1
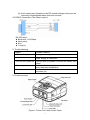
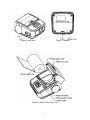
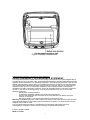
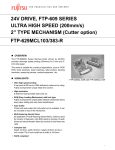
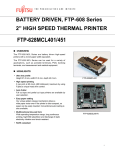
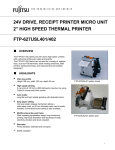
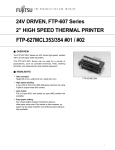
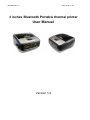
User Manual V1.0
Date: 2010.01.10
3 inches Bluetooth Portable thermal printer
User Manual
Version 1.0
1. Packing contents
1.1
3” Bluetooth thermal printer x 1 (include one battery)
1.2
Portable black cloth bag x 1
1.3
Battery charger x 1
1.4
User manual x 1
1.5
CD-ROM x 1
1.6
Car charger (Option)
1.7
RS-232 cable (Option)
(1.1)
(1.2)
(1.3)
(1.5)
(1.4)
Warning!
Please read the warning before you use the printer.
2. Warning
2.1 Never place the printer to any wet surface or avoid contact with liquids
2.2 Do not drop and do anything harsh that will damage the printer.
2.3 If damage occurs, please consult for repair and never make any changes or
modifications to the product by yourself.
2.4 Take note that the battery is limited to 2 years of use only.
2.5 Charge fully the battery before putting it to first use.
2.6 This printer has been built with low-power radio frequency electric signals so
it should not make any communication interference to other outside devices.
If any interference occurs, please suspend operation and try to position the
printer where it will not create interference.
3. Product specifications
Printing Method
Dot Structure
Dot pitch (Horizontal)
Thermal-line dot method
576 dots/line
0.125 mm (8 dots/mm) dot density
2
Dot pitch (Vertical)
Effective Printing area
Number of Columns
Paper width
Paper thickness
Printing Speed
Character type
Character, dimensions
(WxH), number of columns
Interface
Dimensions
Weight
Life
Operating Environment
Detection
Recommended thermal
sensitive paper
RAM
0.125 mm (8 dots/mm) line feed pitch
72mm
ANK 48 columns/line (maximum 12x24 dot font)
80mm
60 to 100 um: some paper in this range may not be used because of
paper characteristics
Maximum 80mm/sec (640 dot line/sec)
Alphanumeric, kana: 159 types
International characters: 195 types
JIS Kanji (Kanji CG loaded board: about 6800types
12x24 dots, (1.5x3.0mm), 48 columns:ANK
24x24 dots, (3.0x3.0mm), 24 columns: ANK
8x16 dots, (1.0x2.0mm), 72 columns:ANK
16x16 dots (2.0x2.0mm), 36 columns: ANK
Conforms to RS232C / Centronics/USB
112 x 116.5 x 59.5mm (WxLxH)
470g (with battery)
Head
Pulse resistance: 50 million pulses/dot (under our
standard conditions);
Abrasion resistance: paper travelling distance
50km (print ratio: 12.5% or less)
Cutter
500,000 cuts
Operating
0°C to 50°C
temperature*
Operating humidity 20 to 85% RH (no condensation)
Storage
~20 to 60°C (paper not included)
temperature
Storage humidity
5 to 95% RH ( no condensation)
Head temperature
Detected by thermistor
detection
Paper out/mark
Detected by photo-interrupter
detection
Platen release
Detected by sliding switch
High Sensitive Paper TF50KS-E4 (Nippon paper)
Standard paper: TF60KS-E (Nippon paper),
FTP-020PU001 (58mm), PD105R (Oji Paper), FTP-020P0701 (58mm)
Long Life Paper PD160R-N (Oji Paper)
AFB-235 (Mitsubishi Paper), TP50KJ-R (Nippon Paper), HA220AA
(Nippon Paper)
Medium Life Paper TF60KS-F1, FTP-020P0102 (58mm), PD17OR (Oji
Paper), P220VBB-1Mitsubishi Paper)
256K (MAX:4M flash&SRAM)
Remark: All contents are subject to change without notice.
3. Operation Guide
3.1. Loading Paper Roll and Placing the Battery
(1) Open the top cover then lift up the paper compartment.
(2) Place the paper roll in the compartment and make sure it is aligned to fit
inside.
(3) Pull the leading edge of the paper roll straight to pass over the paper
cutter. Close the top cover.
(4) Place the battery according to the + & - markings.
(5) Push the battery rightward to the end.
(6) Close the battery cover and tighten screw to lock it.
3
3.2. Starting to Print
(1) Press and hold down the power button. Wait for the green PWR/CHR
LED indicator to light then let go.
(2) When the BT LED light is flashing, there is still no Bluetooth device
connected to the printer yet.
(3) To let the paper come out, just press the paper feed key.
(4) Seeing the "L. BATT" or "ERROR" light means that a problem has been
encountered. Note the error message, investigate the cause and
troubleshoot accordingly.
(5) To shut the device off, press and hold down the power button. Wait for
the PWR / CHR light to turn off then let go.
3.3 Battery
*Using the battery charging cradle:
(1)Plugged the Battery Charging Cradle to the power socket. Note that the
indicator lights is green.
(2)Insert the battery to the cradle. It must be in correct position for the
charging to start and proceed. Red indicator light implies that battery is
being charged.
(3)A continuous green light means the battery is fully charged and ready to
go.
* Using the car charging cable: (Option)
(4)The car charging cable allows connection between the printer and the car
cigarette lighter socket.
(5)While charging, the PWR/CHR light becomes red. The printer is fully
charged when the red light disappears.
3.4 Printing Procedure
(1) Turn the power on.
(2) Using your device's software, establish a bluetooth connection betweem
the printer and the device.
(3) Enter authentication code of the printer which is "0000"
(4) When a successful connection has been established, the BT light will
light steadily.
(5) Using your device software, send the information to the printer.
(6) A flashing blue light implies occurrence of disconnection. When this
happens, re-establish connection and try printing again.
(7) The printer can be connected to a computer or other device using the
RS232 cable provided that the DIP switch is adjusted (see Chapter III).
When the connection is set up in this manner, there is no need
to establish Bluetooth connection to enable printing.
4. Setup and Maintenance
4.1 The DIP Switch
(1) Definition and Function
Code
ON
1
Reserved
2
Reserved
3
Software Upgrade
4
RS232 Connector
4
OFF
Reserved
Reserved
Normal
Bluetooth Connector
(2) Avoid making any alteration to the DIP switch settings unless you are
extremely knowledgeable about this kind of switch.
4.2 RS232 Connection (The cable is option)
RS-232 setup:
z Baud rate: 115,200bps
z None parity
z 8 bit
z 1 stop bit
5. Trouble shooting
Problem
Possible Reasons
1. Can not turn power on Battery is in wrong direction
Power Supply is insufficient
2. Can not turn power off Control Panel is disabled. Remove the battery then
reload.
3. Can not print
No bluetooth connection between the printer and
device has been established
No information from the device was sent to
the printer yet
6. Product pictures
Figure 1: Printer Front and Control Panel
5
Figure 2: Left Side
Figure 3: Bottom
Figure 4: Inside of the Flip cover
6
Figure 5: Battery Compartment
Federal Communications Commission (FCC) Statement
RADIO FREQUENCY INTERFERENCE STATEMENT
This equipment has been tested and found to comply with the limits for a Class B digital device,
pursuant to Part 15 of the FCC rules. These limits are designed to provide reasonable protection
against harmful interference in a residential installation. This equipment generates, uses and can
radiate radio frequency energy and if not installed and used in accordance with the instructions,
may cause harmful interference to radio communications. However, there is no guarantee that
interference will not occur in a particular installation. If this equipment does cause harmful
interference to radio or television reception, which can be determined by turning the equipment
off and on, the user is encouraged to try correcting the interference by one or more of the
following measures:
- Reorient the receiving antenna.
- Increase the separation between the equipment and receiver.
- Connect the equipment into and outlet on a circuit different from that to which the
receiver is connected.
- Consult the dealer or an experienced radio/TV technician for help.
Warning : A shielded-type power cord is required in order to meet FCC emission limits and also
to prevent interference to the nearby radio and television reception. It is essential that only the
supplied power cord be used.
You are cautioned that changes or modifications not expressly approved by the party
responsible for compliance could void your authority to operate the equipment.
CE, FCC, RoHS certified
Made in Taiwan
7