1
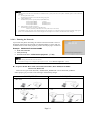
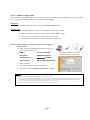
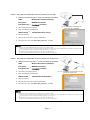
LiveViewer Application User’s Manual Hitachi Digital Products China Co., Ltd. NOTE • • The manufacturer assumes no responsibility for any errors that may appear in this manual. The reproduction, transfer or copy of all or any part of this document is not permitted without express written consent. Trademark acknowledgment • • Windows is a registered trademark of Microsoft Corporation. All other trademarks are the properties of their respective owners Caution The Software is being delivered to you "AS IS" and Hitachi makes no warranty as to its use or performance. HITACHI AND ITS SUPPLIERS, INCLUDING BUT NOT LIMITED TO HITACHI, LTD., DO NOT AND CANNOT WARRANT THE PERFORMANCE OR RESULTS YOU MAY OBTAIN BY USING THE SOFTWARE. EXCEPT TO THE EXTENT PROHIBITED BY LAW IN YOUR JURISDICTION, HITACHI AND ITS SUPPLIERS MAKE NO WARRANTIES CONDITIONS, REPRESENTATIONS, OR TERMS (EXPRESS OR IMPLIED WHETHER BY STATUTE, COMMON LAW, CUSTOM, USAGE OR OTHERWISE) AS TO ANY MATTER IN CONNECTION WITH THE SOFTWARE, INCLUDING WITHOUT LIMITATION NONINFRINGEMENT OF THIRD PARTY RIGHTS, MERCHANTABILITY, INTEGRATION, SATISFACTORY QUALITY, OR FITNESS FOR ANY PARTICULAR PURPOSE. You agree that the Software will not be shipped, transferred or exported into any country or used in any manner prohibited by the United States Export Administration Act or any other applicable export laws, restrictions or regulations (collectively the "Export Laws"). In addition, if the Software is identified as export controlled items under the Export Laws, you represent and warrant that you are not a citizen, or otherwise located within, an embargoed nation (including without limitation Iran, Iraq, Syria, Sudan, Libya, Cuba, North Korea, and Serbia) and that you are not otherwise prohibited under the Export Laws from receiving the Software. All rights to Use the Software are granted on condition that such rights are forfeited if you fail to comply with the terms of this Agreement. Page 1 Contents 1 Compatibility ...................................................................................................................................... 3 1.1 Minimum Computer hardware and software requirements .......................................................... 3 1.2 Software versions.......................................................................................................................... 3 1.3 Updating the "LiveViewer" .......................................................................................................... 4 2 Starting with LiveViewer.................................................................................................................... 5 2.1 Install LiveViewer ........................................................................................................................ 5 2.2 Connect to the network ................................................................................................................. 8 2.2.1 Launch LiveViewer ............................................................................................................... 8 2.2.2 Select network adaptor........................................................................................................... 8 2.2.3 Configure network parameters............................................................................................... 9 2.2.4 Passcode............................................................................................................................... 11 2.2.5 Configure Manually option.................................................................................................. 18 2.3 Select the projector ..................................................................................................................... 22 2.3.1 Connection and transmission ............................................................................................... 22 2.3.2 Connection error .................................................................................................................. 23 2.4 Starting the Network Presentation .............................................................................................. 24 2.4.1 Setting the Live Mode (for Projector models HCP-8000X,HCP-8050X) .......................... 24 2.4.2 Display Mode....................................................................................................................... 25 2.4.3 Presenter mode..................................................................................................................... 25 2.4.4 Display User Name .............................................................................................................. 25 3 Start “LiveViewer” ........................................................................................................................... 26 3.1 Main menus and operating buttons ............................................................................................. 26 3.1.1 Menu Type ........................................................................................................................... 26 3.1.2 Menu button ......................................................................................................................... 26 3.1.3 Status.................................................................................................................................... 27 3.1.4 Multi PC display mode ........................................................................................................ 28 3.1.5 Optional settings .................................................................................................................. 29 3.2 Profile data .................................................................................................................................. 33 3.2.1 Profile data outline............................................................................................................... 33 3.2.2 Create Profile data................................................................................................................ 33 3.2.3 Edit Profile ........................................................................................................................... 34 3.2.4 My Connection..................................................................................................................... 34 Appendix.................................................................................................................................................. 35 Page 2 1 Compatibility 1.1 Minimum Computer hardware and software requirements Windows XP Windows Vista *1 OS *1 ( Service Pack 1 or higher ) Windows 7 Display Available Hard Disk Space Web browser CD-ROM drive Wireless Home Edition / Professional Home Basic / Home Premium / Business / Enterprise / Ultimate Starter / Home Basic / Home Premium / Professional / Enterprise / Ultimate VGA 640x480 or higher 65,536 simultaneous colors or higher 100MB or higher Internet Explorer® (6.0 or higher) IEEE802.11b/g/n 1.2 Software versions The “LiveViewer” software needs to be installed on all the computers (that is going to be connected to the projector through the network). The correct software version depends upon the projector model that you have. If the version is not matched with the projector, the software may not work properly. LiveViewer Version HCP-8000X HCP-8050X 3.xx *1 4.1x *1 4.2x *1 4.3x ✓ ✓ ✓ ✓*2 Model name HCP-3230X HCP-4020X HCP-4060X HCP-5000X HCP-A85W HCP-A81 HCP-A82 HCP-A101 ✓ ✓ ✓ “x” in the version means 0 or greater. *1 Only Windows 32bit version. *2 Windows 64bit version cannot operate correctly. Page 3 HCP-270X HCP-325X HCP-360X HCP-4030X HCP-300WX HCP-U27P HCP-U32P ✓ NOTE • • • • • Improper OS version or driver software for Network Adaptor on your computer may prevent images from being transmitted correctly. It is highly recommended that you check for OS and driver updates. Depending on the type of wireless network device and computer you are using, the projector may not be able to communicate properly with your computer, even if the computer you are using is equipped with built-in wireless LAN functionality. If communication problems occur, please use a Wi-Fi certified wireless network device. In case you use LiveViewer in Windows Vista, Aero Glass cannot be used while the computer image is displayed to the projector. When installing LiveViewer in Windows Vista, the UAC (User Account Control) warning message is displayed. Your computer needs to meet the minimum hardware requirement of your OS. NOTE Projector Models HCP-8000X, HCP-8050X: • Set your computer’s resolution to XGA or less. Refer to the user manual for your computer or Windows. • In some cases, your computer screen may not display correctly on the projector. If the computer’s resolution is larger than 1024x768, the projector will only display the 1024x768 portion of the image. • The Screen Image of Slide Show in Windows Vista cannot be sent to the projector. • Please uninstall LiveViewer first when you update Operating System. Then install LiveViewer again. Projector Models HCP-3230X, HCP-4020X, HCP-4060X, HCP-5000X, HCP-A85W, HCP-A81, HCP-A82, HCP-A101, HCP270X, HCP-325X, HCP-360X, HCP-4030X, HCP-300WX, HCP-U27P, HCP-U32P: • Set your computer’s resolution to XGA or less. Refer to the user manual for your computer or Windows. If it is larger than XGA, the transmission speed will be reduced. • If you use a screen resolution greater than XGA, the projector will shrink it to XGA on screen. • The network communication control is disabled while the projector is in standby mode if the STANDBY MODE item is set to SAVING. Please connect the network communication to the projector after setting the STANDBY MODE to NORMAL. • You can get the latest version of the "LiveViewer" and the latest information for this product from our website. • Depending on the specification of your computer, the computer may slow down due to high CPU usage when the "LiveViewer" is running. • The "LiveViewer" does not work on Windows Vista that is not updated to Service Pack 1 or later. Please install the latest Service Pack on your Windows Vista. 1.3 Updating the "LiveViewer" Please check and get the latest version from the Hitachi Web site. http://www.hitachi-dm.cn Some functions explained in this manual require the "LiveViewer" Version 4.3x. (“x” in the version means 0 or greater.) Page 4 2 Starting with LiveViewer This section explains the process of using the LiveViewer. The outline of the process is as follows: STEP 1. STEP 2. Install the LiveViewer application ( 5) Connect to the network ( 8) The Quick Connection feature prepares some options for connecting to your network projector. You can select one that meets your requirements. ¾ Passcode connection o Profile data connection o History record connection o My Connection ¾ Manual connection STEP 3. Select the projector ( 22) In some cases, there are several projectors connected to the same network. Before you send your image, confirm that the right projector is selected. STEP 4. Start Network Presentation ( 24) The LiveViewer main menu will be on screen. Now, you can send your images to the projector through the network. Fig. 2.a LiveViewer Main menu 2.1 Install LiveViewer In order to use the LiveViewer, you first need to install the enclosed software, “LiveViewer”, onto all computers that you want to connect to your network projector. 1. Turn on the computer 2. Shut down all other applications 3. Insert the accompanying CD-ROM into the computer’s CD-ROM drive NOTE • After sequence 3, the User Account Control (UAC) dialog will appear (if you are using Windows Vista or Windows 7). Please click [Allow] to continue installation. Page 5 4. After a moment, the Choose Setup Language dialog will appear as shown on the right. Select what you like to use in the list, and press [OK]. NOTE • • If the Welcome to LiveViewer Setup dialog doesn't appear, proceed as follows: (1) Click on the [Start] button in the toolbar and select “Run”. (2) Enter E:\software\setup.exe and then press [OK]. If your CD-ROM drive is not drive E on your computer, you will need to replace E with the correct drive letter assigned to your CD-ROM drive. If the software has been previously installed, Un-installation will be done. Click the [Cancel] button, the un-installation will be canceled. If you uninstalled the software by miss-operation, please re-install the software from the first steps. 5. After a moment, the Welcome to LiveViewer Setup dialog will appear as shown on the right. Press [Next]. 6. The License Agreement dialog appears. If you accept it, select "I accept the terms of the license agreement" and press [Next]. 7. The Choose Destination Location dialog appears. Press [Next]. NOTE • A ‘C: \Program Files\Projector Tools\LiveViewer’ folder will be created and the program will be installed into that folder. If you wish to install to a different folder, click [Browse] and select another folder. Page 6 8. Confirm the program folder name. If "Projector Tools" is okay, press [Next] to continue. If not, enter the desired folder name and then press [Next]. NOTE • After sequence 8, the Windows Security dialog will appear if you are using Windows Vista or Windows 7. Please click the [Install this driver software anyway] and continue installation. 9. The Hardware Installation dialog appears. Press Continue. 10. After a moment, installation will complete and the Setup Complete dialog will appear as shown on the right. Click [Finish]. This completes the software installation. You will then be prompted to restart your computer. ✓ To confirm that the software as been properly installed, press the [Start] button on the toolbar, select All Programs and then select the Projector Tools folder. ✓ LiveViewer will appear in that folder if the installation was successful. Page 7 2.2 Connect to the network LiveViewer provides several options for connecting to your network projector. You can choose one that best meets your system and user needs. The descriptions here are based on the case that Windows 7 is installed in your computer. NOTE • • • Up to 50 computers can be simultaneously connected to the projector through a network. It might deteriorate picture quality or audio output is interrupted due to low data transfer speed caused by low communication band between computer and projector when multiple computers are communicating with projector. It might deteriorate picture quality or audio output is interrupted due to low data transfer speed if another computer is connected to projector by LiveViewer while USB displaying. 2.2.1 Launch LiveViewer To Start the LiveViewer software on your computer, take one of the following actions: ¾ Double click the “LiveViewer“ icon on the Desktop in your computer ¾ Select “START” Æ “All Programs” Æ “Projector Tools” Æ LiveViewer Then, proceed to the “2.2.2 Select network adaptor”. ( 8) 2.2.2 Select network adaptor After starting “LiveViewer”, the “Select the Network Connection” screen comes up. Select the network connection that you would like to use. There are 3 options in the menu. ¾ Wireless LAN ¾ Wired LAN ¾ My Connection If you select either the wireless LAN or wired LAN, please proceed to “2.2.2.1 Selecting either Wireless or Wired LAN”. ( 9) If you select the My Connection, jump to “2.2.2.2 Selecting the My Connection”. ( 9) NOTE • This dialog will not be displayed if the computer has just one network adapter and no My Connection is registered. Proceed to item "2.2.3 Configure network parameters". ( 9) Page 8 2.2.2.1 Selecting either Wireless or Wired LAN If you select either Wireless LAN or Wired LAN, a list of the network adaptors is shown in the menu. Select the network adapter that you intend to use, and click [NEXT]. Then, proceed to “2.2.3 Configure network parameters”. ( 9) NOTE • • • • • If you select Wireless LAN, the Wireless LAN adaptors of your computer are shown in the list. If the Wired LAN is selected, the Wired LAN adaptors of your computer are shown. It is required that you enable your network adaptor. If you click [Exit], you will be returned to the previous screen, at this point select another network adaptor. If no more adaptors are present on your computer, “LiveViewer” will be closed. 2.2.2.2 Selecting the My Connection 9 Select “My Connection” and click [Connect]. If you select My Connection, the computer is connected to the projector through the network by using profile data that is pre-assigned to My Connection. When you select the My Connection, the computer immediately starts the connection to the projector. Proceed to the item “2.3 Select the projector”. ( 22) NOTE • • If DHCP is set to ‘ON’ in the projector, the network connection between the projector and computer may not be established since IP address can vary. If you would like to use My Connection, it is recommended that you set DHCP to ‘OFF’ in the projector. If no profile data is assigned to My Connection, it cannot be used. 2.2.3 Configure network parameters There are several options to configure network parameters on your computer. ¾ Enter Passcode ¾ Configure manually ¾ Select from List Select the method that best meets your requirements. 2.2.3.1 Enter Passcode If you want to use the Passcode for connecting to your network projector, select “Enter Passcode” and click [NEXT]. The Passcode is displayed by the projector on screen. Simply input the Passcode into LiveViewer to connect the network projector. Proceed to the “2.3 Select the projector”. ( 22) Page 9 2.2.3.2 Configure manually Select “Configure Manually” and click [NEXT]. There are 3 options for the manual connection method. ¾ Profile Proceed to the item “2.2.5.1 Profile connection”. ( 18) If you select the [Profile], a list of stored profile data is shown. Select one of them to connect the network projector. ¾ History Proceed to the item “2.2.5.2 History connection”. (18) After connecting to the network projector, LiveViewer stores the configuration information under ‘History’. If you would like to use the same connection again, select it from the [History]. ¾ Configure Network Setting Manually Proceed to the item “2.2.5.3 Configure Network Setting Manually”. (19) If you need to make the setting manually, click the [Configure Network Settings Manually]. 2.2.3.3 Select From List Before selecting this item, your computer and network projectors need to be connected to the same network. If the connection is already established, choose [Select From List] A list of the projectors connected to the network will appear. Select which projector you would like to send your images to. Proceed to the “2.3 Select the projector”. ( 22) Page 10 2.2.4 Passcode The unique Passcode system brings you a very quick and simple method for connecting to your network projector. The Passcode is a code that contains the network settings of the projector. When you input the Passcode in the LiveViewer software on your computer, the network settings of the projector and computer are matched and the connection will be established immediately. The section is intended to explain how to use the Passcode. 2.2.4.1 Getting the Passcode The Passcode is 12-digit code consisting of alphanumeric characters (“1-9” and “A-Z”). The Passcode is displayed on the projector screen. Example: Passcode 1234-5678-9ABC Projector Models:, HCP-8000X, HCP-8050X There are two methods to get the Passcode from the projector ¾ Method 1 ✓ Turn on the projector, and make sure that the projector image is displayed on screen. ✓ Press the MENU button on the remote control or the ▲/▼/◄/► buttons on the projector to show the on screen menu. ✓ Use the ▲/▼ cursor buttons to select the Advanced Menu, and use the ► cursor button to enter. ✓ Use the ▲/▼ cursor buttons to select MIU, and use the ► cursor button to enter. ✓ Use the ▲/▼ cursor buttons to select LIVE MODE, and push the ► cursor button. ✓ The Passcode will appear on the screen. ¾ Method 2 ✓ Turn on the projector, and make sure that the projector image is displayed on screen. ✓ Press the MENU button on the remote control or the ▲/▼/◄/► buttons on the projector to show the on screen menu. ✓ Use the ▲/▼ cursor buttons to select the Advanced Menu, and use the ► cursor button to enter. ✓ Use the ▲/▼ cursor buttons to select MIU, and use the ► cursor button to enter. ✓ Use the ▲/▼ cursor buttons to select the INFORMATION, and use the ► cursor button to display the INFORMATION. ✓ The Passcode appears at the top right corner in the INFORMATION window. NOTE • ✓ ✓ ✓ ✓ ✓ ✓ To obtain the settings of the network projector, please use the following procedure. Turn on the projector, and make sure that the projector image is displayed on screen. Press the MENU button on the remote control or the ▲/▼/◄/► buttons on the projector to show the menu on screen. Use the ▲/▼ cursor buttons to select the Advanced Menu, and use the ► cursor button to enter. Use the ▲/▼ cursor buttons to select the MIU, and use the ► cursor button to enter. Use the ▲/▼ cursor buttons to select the INFORMATION, and push the ► cursor button. The setting will be displayed in the MIU-INFORMATION box. Page 11 NOTE • The Passcode system does not work under the conditions below. If your system meets one of these conditions, please set the connection manually. 1) An encryption code is used The Passcode system does not work when using encryption. 2) Unique SSID is used. The Passcode system accepts the factory default SSID only. Factory default SSID 1 wireless Factory default SSID 2: WLANProjector1 Factory default SSID 3: WLANProjector2 Factory default SSID 4: WLANProjector3 3) Subnet mask is not Class A or B or C. The Passcode system accepts Class A, B and C only. Class A:(255.0.0.0), Class B:(255.255.0.0), Class C:(255.255.255.0) Use Method 2, when using the projector in LIVE MODE or PC-LESS Presentation mode, or when the MIU is not selected as the input signal. If there is no communication between the network projector and computer in 5 minutes, the Passcode will be changed. • • Projector Models: HCP-3230X, HCP-4020X,HCP-4060X, HCP-5000X, HCP-A85W, HCP-A81, HCP-A82, HCP-A101 There are two methods to get the Passcode from the projector ¾ Method 1 ✓ Turn on the projector, and make sure that the projector image is displayed on screen. ✓ Press the COMPUTER button on the remote control or the INPUT button on the projector to select the LAN as input port. ✓ If there is no signal on the LAN port, you can find the Passcode on screen. ¾ Method 2 ✓ Turn on the projector, and make sure that the projector image is displayed on screen. ✓ Press the MENU button on the remote control or the ▲/▼/◄/► buttons on the projector to show the on screen menu. ✓ Use the ▲/▼ cursor buttons to select the Advanced Menu..., and use the ► cursor button to enter. ✓ Use the ▲/▼ cursor buttons to select NETWORK, and use the ► cursor button to enter. ✓ Use the ▲/▼ cursor buttons to select the INFORMATION, and use the ► cursor button to display the INFORMATION. ✓ The Passcode appears at the top in the INFORMATION window. NOTE • ✓ ✓ ✓ ✓ ✓ ✓ To obtain the settings of the network projector, please use the following procedure. Turn on the projector, and make sure that the projector image is displayed on screen. Press the MENU button on the remote control or the ▲/▼/◄/► buttons on the projector to show the menu on screen. Use the ▲/▼ cursor buttons to select the Advanced Menu, and use the ► cursor button to enter. Use the ▲/▼ cursor buttons to select the NETWORK, and use the ► cursor button to enter. Use the ▲/▼ cursor buttons to select the INFORMATION, and push the ► cursor button. The setting will be displayed in the INFORMATION box. Page 12 NOTE • The Passcode system does not work under the conditions below. If your system meets one of these conditions, please set the connection manually. 1) An encryption code is used The Passcode system does not work when using encryption. 2) Unique SSID is used. The Passcode system accepts the factory default SSID only. Factory default SSID 1 wireless Factory default SSID 2: WLANProjector1 Factory default SSID 3: WLANProjector2 Factory default SSID 4: WLANProjector3 3) Subnet mask is not Class A or B or C. The Passcode system accepts Class A, B and C only. Class A:(255.0.0.0), Class B:(255.255.0.0), Class C:(255.255.255.0) Use Method 2, when you project your computer image by the "LiveViewer", or when the LAN port is not selected as the input signal. If there is no communication between the network projector and computer in 5 minutes, the Passcode will be changed. • • Projector Models: HCP-270X , HCP-325X, HCP-360X , HCP-4030X, HCP-300WX, HCP-U27P, HCP-U32P There are two methods to get the Passcode from the projector ¾ Method 1 ✓ Turn on the projector, and make sure that the projector image is displayed on screen. ✓ Press the COMPUTER button on the remote control or the INPUT button on the projector to select the LAN as input port. ✓ If there is no signal on the LAN port, you can find the Passcode on screen. ¾ Method 2 ✓ Turn on the projector, and make sure that the projector image is displayed on screen. ✓ Press the MENU button on the remote control or the ▲/▼/◄/► buttons on the projector to show the on screen menu. ✓ Use the ▲/▼ cursor buttons to select the Advanced Menu..., and use the ► cursor button to enter. ✓ Use the ▲/▼ cursor buttons to select NETWORK, and use the ► cursor button to enter. ✓ Use the ▲/▼ cursor buttons to select the WIRELESS INFORMATION or WIRED INFORMATION depending on the type of connection you use, and use the ► cursor button to display the INFORMATION. ✓ The Passcode appears at the top in the INFORMATION window. NOTE • To obtain the settings of the network projector, please use the following procedure. Turn on the projector, and make sure that the projector image is displayed on screen. Press the MENU button on the remote control or the ▲/▼/◄/► buttons on the projector to show the menu on screen. Use the ▲/▼ cursor buttons to select the Advanced Menu, and use the ► cursor button to enter. Use the ▲/▼ cursor buttons to select the NETWORK, and use the ► cursor button to enter. Use the ▲/▼ cursor buttons to select the WIRELESS INFORMATION or WIRED INFORMATION depending on the type of connection you use, and push the ► cursor button. ✓ The setting will be displayed in the INFORMATION box. ✓ ✓ ✓ ✓ ✓ Page 13 NOTE • • • The Passcode system does not work under the conditions below. If your system meets one of these conditions, please set the connection manually. 1) An encryption code is used The Passcode system does not work when using encryption. 2) Unique SSID is used. The Passcode system accepts the factory default SSID only. Factory default SSID 1 wireless Factory default SSID 2: WLANProjector1 Factory default SSID 3: WLANProjector2 Factory default SSID 4: WLANProjector3 3) Subnet mask is not Class A or B or C. The Passcode system accepts Class A, B and C only. Class A:(255.0.0.0), Class B:(255.255.0.0), Class C:(255.255.255.0) Use Method 2, when you project your computer image by the "LiveViewer", or when the LAN port is not selected as the input signal. If there is no communication between the network projector and computer in 5 minutes, the Passcode will be changed. 2.2.4.2 Entering the Passcode If you select the [Enter Passcode], the “Please enter the Passcode” screen is displayed. Please enter the Passcode (12-digits divided by 3 boxes) that can be found on the screen of the projector you are currently trying to connect to. Example: PASSCODE 1234-5678-9ABC ✓ Enter the Passcode ✓ Click [Connect] ✓ Proceed to the item “2.3 Select the projector”. ( 22) NOTE • • When entering, the Passcode is not case sensitive. If the manual setting screen is displayed, please follow the item ”2.2.4.3 Manual Configuration”. ( 15) Projector Models: HCP-270X , HCP-325X, HCP-360X , HCP-4030X, HCP-300WX HCP-U27P, HCP-U32P There are two types of the Passcode, “PASSCODE_WIRELESS” and “PASSCODE_WIRED”. Select proper type you want to use referring to the following images. PASSCODE_WIRELESS PASSCODE_WIRED a) Direct connection between the projector and computer (AdHoc mode) a) The projector connected to computer by the wired LAN b) The projector connected to an access point by the wireless LAN (Infrastructure mode) b) The projector connected to an access point by the wired LAN Page 14 2.2.4.3 Manual Configuration After you input the Passcode(14), you are required to input the network setting manually if you use any encryption code or your unique SSID or Subnet mask except Class A/B/C(14). Wired LAN If you use the wired LAN, proceed to the item "2.2.4.7 Wired LAN" (17). Wireless LAN The required information depends on how you connect the projector and computer. ¾ Direct connection between the projector and computer (AdHoc mode). ¾ The projector connected to an access point by a LAN cable. ¾ The projector connected to an access point by the wireless LAN. 2.2.4.4 Direct connection between the projector and computer (AdHoc mode) ✓ Enter the following information (matching what is set in the network projector. *1) SSID *2: wireless (example) Encryption: WEP64bit (example) Encryption key *3: 4 Subnet mask * : Fig. 2.b Direct connection between the projector and computer (AdHoc mode) ********** (example) 255.255.255.128 (example) ✓ Click [Connect] ✓ The wireless connection will be established. ✓ Proceed to the item “2.3 Select the projector”. ( 22) NOTE • • • *1 To find the network setting on the projector, refer to NOTE. ( 13) *2 If you do not use the factory default SSID, you will need to input your SSID manually or by selecting from the list of detected SSID’s. *3 If you are using encryption, you need to input the encryption key. Contact your network administrator to find the encryption key • *4 that is set in the projector. The encryption key is always shown as “**********”. If you use Subnet mask address other than Class A/B/C, you will need to input it. Page 15 2.2.4.5 The projector connected to an access point by a LAN cable ✓ Settings of the access point*1. Enter the following information. SSID: WirelessAccessPoint (example) Encryption: WEP64bit (example) Encryption key *2: ********** (example) Fig. 2.c The projector connected to an access point by a LAN cable ✓ The setting from the projector *3 ✓ Enter the following information. Subnet mask *4: 255.255.255.128 (example) ✓ Click [Connect]. ✓ The wireless connection will be established. ✓ Proceed to the item “2.3 Select the projector”. ( 22) NOTE • • • • *1 Contact your network administrator for the proper access point settings. If you are using encryption, you need to input the encryption key Contact your network administrator to find the encryption key that is set in the projector. The encryption key is always shown as “**********”. *3 To find the network setting on the projector, refer to the NOTE. ( 13) *4 If you use Subnet mask address other than Class A/B/C, you will need to input it. *2 2.2.4.6 The projector connected to an access point by the wireless LAN ✓ Settings of the access point *1. Enter the following information. SSID: WirelessAccessPoint (example) Encryption: WEP64bit (example) Encryption key *2: ********** (example) ✓ The setting from the projector *3 Fig. 2.d: The projector connected to an access point by the wireless LAN ✓ Enter the following information. Subnet mask *4: 255.255.255.128 (example) ✓ Click [Connect] ✓ The wireless connection will be established. ✓ Proceed to the item “2.3 Select the projector”. ( 22) NOTE 1 • • * Contact your network administrator for the proper access point settings. 2 * If you are using encryption, you need to input the encryption key. Contact your network administrator to find the encryption key that is • • *3 set in the projector. The encryption key is always shown as “**********”. To find the network setting on the projector, refer to the NOTE. ( 13) *4 If you use Subnet mask address other than Class A/B/C, you will need to input it. Page 16 2.2.4.7 Wired LAN ✓ Enter the following information for the projector. Subnet mask *1: 255.255.255.128 (example) ✓ Click [Connect] ✓ The network connection will be established. ✓ Proceed to the item “2.3 Select the projector”. ( 22) NOTE • *1 In case the case you use the Subnet mask other than Class A/B/C, the above screen is displayed. Please input the Subnet mask address. Page 17 2.2.5 Configure Manually option There are 3 options for configuring manually. ¾ Profile connection ¾ History connection ¾ Configure Network Setting Manually 2.2.5.1 Profile connection Select Profile data for connecting to the network projector. It is required to store profile data in advance. ✓ Select the [Profile] and a ‘Profile’ listed in the window ✓ Click [Connect] ✓ Proceed to the item “2.3 Select the projector”. ( 22) NOTE • • To check the settings of a Profile data, follow the process below. ✓ Choose a profile data that you want to check. ✓ Move the mouse cursor to the Profile and click the right button on the mouse to display a pop-up menu. ✓ Select “Property” in the pop-up menu, and click the left button on the mouse. ✓ The configuration information of the selected Profile is shown. If DHCP is set on in the projector, the network connection between the projector and computer may not be established since the IP address may vary. If you like to use the Profile or History connection, set DHCP to OFF in the projector. 2.2.5.2 History connection Select History data to connect to the network projector. It is required to store the History data in advance. ✓ ✓ ✓ ✓ Select the [History] and a ‘Profile’ listed in the window Click [Connect] Proceed to the item “2.3 Select the projector”. ( 22) If you want to copy a history record to a profile data, select one of the history records and click the [Register to profile]. The profile data cannot be erased automatically. NOTE • • • The number of the history record is maximum 10 for each network adapter. When the 11th data is stored, the oldest record among the 10 will be overwritten. The date & time information in each history record is renewed when the network is connected by using the history record. If the DHCP is set on in the projector, the network connection between the projector and computer may not be established since IP address may be varied. Page 18 2.2.5.3 Configure Network Setting Manually All setting for the network connection between the projector and computer is input manually. ✓ Select the [Configure Network Settings Manually] The information to be input for a manual configuration will vary, depending on how you want to connect the projector and computer. Wired LAN If you use the wired LAN, proceed to the item "2.2.5.7 Wired LAN" (21). Wireless LAN The required information depends on how you connect the projector and computer. ¾ Direct connection between the projector and computer (AdHoc mode). ¾ The projector connected to an access point by a LAN cable. ¾ The projector connected to an access point by the wireless LAN. 2.2.5.4 Direct connection between the projector and computer (AdHoc mode) ✓ Enter the following information (matching what is set in the network projector. *1) SSID: wireless (example) Encryption: Fig. 2.e Direct connection between the projector and computer (AdHoc mode) WEP64bit (example) 2 Encryption key * : ********** (example) Mode: AD-HOC ✓ Click [Next] ✓ Enter the following information that is set in the projector. *1 IP address: 192.168.1.10(example) Subnet mask: 255.255.255.0(example) ✓ Click [Connect] ✓ The wireless connection will be established. ✓ Proceed to the item “2.3 Select the projector”. ( 22) NOTE • • 1 * To find the network setting on the projector, refer to NOTE. ( 13) 2 * If you are using encryption, you need to input the encryption key. Contact your network administrator to find the encryption key that is set in the projector. The encryption key is always shown as “**********”. Page 19 2.2.5.5 The projector connected to an access point by a LAN cable ✓ Settings of the access point *1. Enter the following information. SSID: WirelessAccessPoint (example) Encryption: WEP64bit (example) *2 Encryption key : ********** (example) Mode: INFRASTRUCTURE ✓ Click [Next]. ✓ Enter the following information *3. IP address: 192.168.1.10 (example) Subnet mask: 255.255.255.0 (example) ✓ Click [Connect]. ✓ The wireless connection will be established. ✓ Proceed to the item “2.3 Select the projector”. ( 22) NOTE • • • *1 Contact your network administrator for the proper access point settings. If you are using encryption, you need to input the encryption key. Contact your network administrator to find the encryption key that is set in the projector. The encryption key is always shown as “**********”. *3 To find the network setting on the projector, refer to the NOTE. ( 13) *2 Page 20 Fig. 2.f The projector connected to an access point by a LAN cable 2.2.5.6 The projector connected to an access point by the wireless LAN ✓ The setting on the access point *1. Enter the following information. SSID: WirelessAccessPoint (example) Encryption: WEP64bit (example) *2 Encryption key : ********** (example) Mode: INFRASTRUCTURE ✓ Click [Next] Fig. 2.g The projector connected to an access point by the wireless LAN ✓ Enter the following information that set in the projector *3 IP address: 192.168.1.10(example) Subnet mask: 255.255.255.0(example) ✓ Click [Connect] ✓ The wireless connection will be established. ✓ Proceed to the item “2.3 Select the projector”. ( 22) NOTE • • • *1 Contact your network administrator for the proper access point settings. If you are using encryption, you need to input the encryption key. Contact your network administrator to find the encryption key that is set in the projector. The encryption key is always shown as “**********”. *3 To find the network setting on the projector, refer to the NOTE. ( 13) *2 2.2.5.7 Wired LAN ✓ Enter the following information for the projector. *1 IP address: 192.168.1.10(example) Subnet mask: 255.255.255.128 (example) ✓ Click [Connect] ✓ The network connection will be established. ✓ Proceed to the item “2.3 Select the projector”. ( 22) NOTE • 1 * To find the network setting on the projector, refer to NOTE. ( 13) Page 21 2.3 Select the projector If the resolution of your computer is set higher than XGA (1024x768), your screen resolution may need to be reconfigured (and the screen above will be displayed), when Projector Model is HCP-8000X, HCP-8050X. ✓ To change the resolution, click [Yes]. ¾ If you click [Yes], the resolution on your computer is switched to XGA (1024x768). ¾ If you click [No], the resolution is not changed. NOTE • • • • • When the resolution of your computer is changed, the arrangement of icons on the Desktop screen may be changed. If the resolution is changed, it will revert back to the original resolution when the “LiveViewer“ is closed. If the resolution is not changed, the projector will display XGA (1024x768) portion from top left corner of your computer screen. Refer to the user manual for your computer or Windows on how to change the resolution of your computer. If you checked “Not displaying image resolution dialog” option, this dialog will not show up at next time. If you would like to change the setting, click Option icon on the “LiveViewer” main menu and uncheck “Not displaying image resolution dialog" option. 2.3.1 Connection and transmission When the network connection is established, the “Connection to Projector successful” screen is displayed. Make sure that the correct projector that you want to send your image to is selected, by checking the projector name and IP address as shown in the screen. To send images to the projector, click [Yes]. The transmission will be started. In order to display the transmitted images to the projector, it is first required that you: Projector Models: HCP-8000X, HCP-8050X ✓ Set the input of the projector to MIU ✓ Select Live Mode in the MIU menu of the projector Projector Models: HCP-3230X, HCP-4020X, HCP-4060X, HCP-5000X, HCP-A85W, HCP-A81, HCP-A82, HCP-A101, HCP-270X , HCP-325X, HCP-360X , HCP-4030X, HCP-300WX, HCP-U27P, HCP-U32P ✓ Select the LAN port as input source on the projector Refer to the item “3 Start “LiveViewer”” ( 26). If you select [No], then the LiveViewer main menu is displayed in Stand-by mode. (Stand-by mode is the condition when the wired or wireless connection is established, or button on the but the images are not transmitted.) The transmission can be started by clicking the LiveViewer main menu. Page 22 2.3.2 Connection error When connection to the projector can not be established, an error message, “Network Connection not established”, will be displayed. on the main Click [OK], to display the LiveViewer main menu. Click menu to go back to the item “2.2.2 Select network adaptor”. ( 8) NOTE • If you selected My Connection, check the network setting in the projector, and retry the connection from the item “2.2 Connect to the network”. ( 8) Page 23 2.4 Starting the Network Presentation This chapter explains the Network Presentation feature with which you can project computer images transmitted through a network. The “LiveViewer” allows you to project images from one or multiple computers by connecting the projector to an existing network without using computer cables. This Network Presentation feature helps you to smoothly make your presentations and conduct conferences. Projector Models: HCP-8000X, HCP-8050X Live Mode ( 2.4.1 Setting the Live Mode) can display your computer’s image on screen in real time through either a wired or wireless LAN connection. So, a signal cable connection is not required. Projector Models: HCP-3230X, HCP-4020X, HCP-4060X, HCP-5000X, HCP-A85W, HCP-A81, HCP-A82, HCP-A101, HCP-270X , HCP-325X, HCP-360X , HCP-4030X, HCP-300WX, HCP-U27P, HCP-U32P To start the Network Presentation, select the LAN port as the input source on the projector and click the Starting Capture button on the “LiveViewer”. 2.4.1 Setting the Live Mode (for Projector models HCP-8000X, HCP-8050X) This section is intended to explain how to switch to Live Mode in the MIU menu of the projector, either by using the remote control or web browser software. From Web Remote Control on a web browser: ✓ Click the [LIVE MODE] button From the OSD menu, by using the remote control or keypad of the projector: ✓ Turn on the projector, and make sure that the projector image is displayed on screen. ✓ Press the MENU button on the remote control or the ▲/▼/◄/► buttons on the projector to show the menu on screen. ✓ Use the ▲/▼ cursor buttons to select the Advanced Menu, and use the ► cursor button or ENTER button to enter the item. ✓ Use the ▲/▼ cursor buttons to select MIU, and use the ► cursor button or ENTER button. ✓ Use the ▲/▼ cursor buttons to select the LIVE MODE, and push the ► cursor button or ENTER button. From My Button function: ✓ Turn on the projector, and make sure that the projector image is displayed on screen. ✓ Press the MENU button on the remote control or the ▲/▼/◄/► buttons on the projector to show the menu on screen. ✓ Use the ▲/▼ cursor buttons to select the Advanced Menu, and use the ► cursor button or ENTER button to enter the item. ✓ Use the ▲/▼ cursor buttons to select the OPTION, and use the ► cursor button or ENTER button. ✓ Use the ▲/▼ cursor buttons to select the MY BUTTON Menu, and use the ► cursor button or ENTER button to enter the item. ✓ Choose 1 or 2 on the MY BUTTON menu using the ◄/► cursor buttons. Then using the ▲/▼ buttons sets LIVE MODE function to the button. Page 24 2.4.2 Display Mode In the “LiveViewer”, there are two display modes, Single PC mode and Multi PC mode. ¾ Single PC mode The projector displays images sent by one computer. Also audio can be sent by one computer. ( 31) ¾ Multi PC mode The Multi PC mode can connect the projector with up to 50 computers, allowing the projector to displays images of up to 4 computers of those connected computers at the same time. NOTE • • • • Audio cannot be sent in the Multi PC mode. When multiple computers are connected to one projector, it might decrease data transfer performance. When motion picture is displayed in the projector, it is not recommended to connect more than 5 computers with the projector. When multiple computers are connected to one projector, it is recommended to discuss with network administrator to establish suitable connection environment with less load given to network as little as possible. • It might deteriorate picture quality or audio output is interrupted due to low data transfer speed caused by low communication band between computer and projector when multiple computers are communicating with projector. • It might deteriorate picture quality or audio output is interrupted due to low data transfer speed if another computer is connected to projector by LiveViewer while USB displaying. 2.4.3 Presenter mode In the Single PC mode, the projector can be occupied by one computer and can block access from any other computers (if Presenter mode is set to ON in LiveViewer). While making your presentation, you don’t need to worry that the image on screen will be unexpectedly switched to an image sent by another computer. Presenter mode can be set to ON in the Option menu in the LiveViewer Main menu. 2.4.4 Display User Name A User Name can be set in LiveViewer, which will be displayed on screen while presenting. This makes it easy to keep track of whose image is currently displayed on screen. Page 25 3 Start “LiveViewer” Once you have established a connection between your network projector and computer, the LiveViewer main menu will be shown on the computer screen. From the main menu you can configure settings and operate the functions needed to send images to the projector in the Live mode. 3.1 Main menus and operating buttons 3.1.1 Menu Type LiveViewer has 2 types has an Easy and Advanced menus, When LiveViewer is started, the last used type will be shown. When the network connection is not established, the Advanced menu will be shown. 10) Status Display 9) 4) 1) 3) 2) Switch to Easy menu Switch to Advanced menu 5) 6) 7) 8) Indicator 9) Fig. 3.a LiveViewer 4 Main Menu (Easy Menu / Advanced Menu) 3.1.2 Menu button 1) Start Capture button The transmission to the network projector is started and images will be displayed in Live mode. The initial Display mode is Single PC mode. After that, the last Displayed mode will be applied. 2) Stop Capture button The transmitted image is stopped. NOTE • Images may not be displayed on screen, if the Start/Stop buttons are clicked repeatedly. 3) Hold button The image on screen is temporally frozen. The last image before the button is clicked remains on screen. This allows you to change the image data on your computer without showing it on the projector’s screen. 4) Display mode button (28) It allows you to switch between Single PC mode and Multi PC mode. 5) Connect button The screen to select the connection mode is displayed. Go to the item "2.2.3 Configure network parameters"( 9) Page 26 6) Option button The option screen is displayed. 7) Web control button Starts the Web browser on your computer and displays Web control screen to control one projector and change various settings for the projector. 8) Information button The version of the LiveViewer is displayed. 9) Close button The network is disconnected and LiveViewer is closed. 10) Minimize button Connected Disconnected Not connected Hold The main menu is closed, and LiveViewer icon is displayed on the task tray in your computer. Double-click the icon in the task try to re-launch the main menu. Fig. 3.b Task tray Icon 3.1.3 Status 3.1.3.1 Indicator The indicator shows the following status. Indicator Status Note Not connected The network connection to the projector is not established yet. Hold Connected Disconnected The network connection is established, but the image transmission is on hold. The network connection is established and the images on the computer are being sent to the projector. The indicator is blinks while the connection is in progress. The network connection to the projector is disconnected. Page 27 3.1.3.2 Status Display in Multi PC mode An icon is displayed at the right end of the Display mode buttons, when the Multi PC mode is selected. One of the following icons are designed to inform you how many and which of the quarter screens are in use. Status Status icon No computer is on screen One computer is on screen. Two computers are on screen. Three computers are on screen. Four computers are on screen. NOTE • • The status display is refreshed in every 3 seconds. If status cannot be gotten from the projector, it will not be displayed. 3.1.4 Multi PC display mode LiveViewer has both Single PC mode and Multi PC display modes. These modes can be switched from the main menu. 1) 2) 3) 4) 5) ✓ Click the button on the main menu. The buttons below are displayed. ✓ Select from 1) to 5) buttons, and click it. 1) Single PC mode: Your image is displayed full screen. 2) - 5) Multi PC mode: Your image is displayed on a quarter screen as identified by the icon ✓ The projector screen is switched to the mode selected above, and your computer image will be displayed on the screen. ✓ The icon on the main menu is replaced by the icon you selected. NOTE • • • Image transmission is stopped when: ¾ you click the Single PC mode button while the projector is in the Single PC mode or ¾ you click one of the Multi PC mode buttons while the projector is in the Multi PC mode When Multi PC mode is selected, the projector screen is automatically divided to 4 zones. If the quarter screen that displays images sent from another computer is selected, that computer network projector connection is disconnected. (for Projector models CP-X268A, CP-X608, CPX2, CP-X308, CP-X417, CP-X807, CPX4, CP-X809) Page 28 3.1.5 Optional settings Projector Models: HCP-8000X, HCP-8050X Clicking the Option button displays the option menu on screen. 1) 2) 3) 5) 6) 4) Fig. 3.c Option Menu 1) Not displaying image resolution confirmation dialog. If checked – The confirmation dialog for screen resolution reconfiguration ( 22) is not displayed. If unchecked – the dialog is always displayed (Default behavior). 2) Not displaying confirmation dialog for adding Network settings. If checked – The confirmation dialog for adding a network configuration ( 36) is not displayed when you connect the computer to the projector. If unchecked – The dialog is always displayed (Default behavior). 3) Optimize Performance LiveViewer captures computer screen in JPEG mode and send the JPEG data to the projector. LiveViewer has two options that have different compression rate of JPEG data. Transmission speed: Speed takes priority over Image quality. JPEG compression rate is higher. The displayed image on the projector is rewritten quicker because the transferred data is more compressed, but the image quality is lessened. Image Quality: Image quality takes priority over Speed. JPEG compression rate is lower. The displayed image on the projector is rewritten slower because the transferred data is larger, but the image quality is better. 4) Cursor Emulation If the mouse cursor (pointer) on your computer screen is not displayed on the projector screen, check the Cursor Emulation box. “LiveViewer” helps you to find the cursor on the screen. 5) Presenter Mode In Single PC mode, the projector can be occupied by one computer and can block access from any other computers, if the Presenter mode is set to ‘On’ in “LiveViewer” While making your presentation, you don’t need to worry that the image on screen will be unexpectedly switched to an image sent by another computer. If you want to use Presenter Mode, put a check mark in the check box. Page 29 NOTE • • • When Multi PC mode is selected, the setting for the Presenter mode is invalid. When switching from Multi PC mode to Single PC mode, Presenter mode setting of the computer is valid. The default setting is ‘ON’. 6) Display User Name A user name (up to 20 letters) can be input by using alphanumeric characters. The user name can be displayed on the projector screen, so it’s easy to tell whose image is currently on the screen. If the check box is not selected, the information is not sent to the projector. Projector Models: HCP-3230X, HCP-4020X, HCP-4060X, HCP-5000X, HCP-A85W, HCP-A81, HCP-A82, HCP-A101 Clicking the Option button displays the option menu on screen. 1) 2) 3) 4) 5) Fig. 3.d Option Menu 1) Not displaying confirmation dialog for adding Network settings. If checked – The confirmation dialog for adding a network configuration ( 36) is not displayed when you connect the computer to the projector. If unchecked – The dialog is always displayed (Default behavior). 2) Optimize Performance LiveViewer captures computer screen in JPEG mode and send the JPEG data to the projector. LiveViewer has two options that have different compression rate of JPEG data. Transmission speed: Speed takes priority over Image quality. JPEG compression rate is higher. The displayed image on the projector is rewritten quicker because the transferred data is more compressed, but the image quality is lessened. Image Quality: Image quality takes priority over Speed. JPEG compression rate is lower. The displayed image on the projector is rewritten slower because the transferred data is larger, but the image quality is better. 3) Presenter Mode In Single PC mode, the projector can be occupied by one computer and can block access from any other computers, if the Presenter mode is set to ‘On’ in “LiveViewer” While making your presentation, you don’t need to worry that the image on screen will be unexpectedly switched to an image sent by another computer. If you want to use Presenter Mode, put a check mark in the check box. Page 30 NOTE • • • When Multi PC mode is selected, the setting for the Presenter mode is invalid. When switching from Multi PC mode to Single PC mode, Presenter mode setting of the computer is valid. The default setting is ‘ON’. 4) Display User Name A user name (up to 20 letters) can be input by using alphanumeric characters. The user name can be displayed on the projector screen, so it’s easy to tell whose image is currently on the screen. If the check box is not selected, the information is not sent to the projector. 5) Display LiveViewer If you want to display LiveViewer application window to the screen, please check the box. NOTE • • Please check this box when you use Starboard Software with iPJ-AW250N. The annotation layer may not display on the projector image when this option is OFF. This function is available on Ver.4.22 or later. Projector Models: HCP-270X, HCP-325X, HCP-360X, HCP-4030X, HCP-300WX, HCP-U27P, HCP-U32P Clicking the Option button displays the option menu on screen. 1) 2) 3) 4) 5) 6) Fig. 3.e Option Menu 1) Not displaying confirmation dialog for adding Network settings. If checked – The confirmation dialog for adding a network configuration ( 36) is not displayed when you connect the computer to the projector. If unchecked – The dialog is always displayed (Default behavior). 2) Optimize Performance LiveViewer captures computer screen in JPEG mode and send the JPEG data to the projector. LiveViewer has two options that have different compression rate of JPEG data. Transmission speed: Speed takes priority over Image quality. JPEG compression rate is higher. The displayed image on the projector is rewritten quicker because the transferred data is more compressed, but the image quality is lessened. Image Quality: Image quality takes priority over Speed. JPEG compression rate is lower. The displayed image on the projector is rewritten slower because the transferred data is larger, but the image quality is better. 3) Sound Audio transmission can be selected valid(ON) or invalid(OFF). The default setting is ON. Page 31 4) Presenter Mode In Single PC mode, the projector can be occupied by one computer and can block access from any other computers, if the Presenter mode is set to ‘On’ in “LiveViewer” While making your presentation, you don’t need to worry that the image on screen will be unexpectedly switched to an image sent by another computer. If you want to use Presenter Mode, put a check mark in the check box. NOTE • • • When Multi PC mode is selected, the setting for the Presenter mode is invalid. When switching from Multi PC mode to Single PC mode, Presenter mode setting of the computer is valid. The default setting is ‘ON’. 5) Display User Name A user name (up to 20 letters) can be input by using alphanumeric characters. The user name can be displayed on the projector screen, so it’s easy to tell whose image is currently on the screen. If the check box is not selected, the information is not sent to the projector. 6) Display LiveViewer If you want to display LiveViewer application window to the screen, please check the box. Page 32 3.2 Profile data 3.2.1 Profile data outline Settings to connect the network projector and computer can be stored as ‘Profile’ data. Once the data is stored, all you need to do is to select the ‘Profile’ to connect to the network projector. This is recommended when the same network connection is used often. 3.2.2 Create Profile data Profile data is made from the Manual Configuration screen. Up to 10 sets of Profile data can be stored for each network adaptor. ✓ Select [Profile] and click [New]. ✓ “Create new profile” will appear. If you have already made 10 sets of Profile data, you cannot make a new one, until you have deleted previously stored profile data. Input all the required information for your network connection. If you want to clear the information you have already input, click [Clear]. ✓ Click [OK], to save. If you don’t want to save, click [Cancel]. ✓ Once you click [OK], the new Profile data is shown in the Profile list,. Profile data can be stored after making a network projector connection. Check the “Register this setting to My Connection” and click [Yes]. The data will be stored and shown in the Profile list. NOTE • • • • When you make new Profile data, it is strongly recommended to check that the new Profile works properly by testing the connection. If you change the wireless network adaptor, make a new Profile for the adaptor. If 10 Profiles already exist, the box cannot be checked The profile name for the stored data is assigned by the LiveViewer automatically. The name will be shown in the Profile list. Page 33 3.2.3 Edit Profile If necessary, the profile data can be edited on the Manual Configuration screen. ✓ Select [Profile], and select one of the profiles listed in the window. ✓ Click [Edit]. ✓ The “Edit profile” screen will come up. ✓ Edit the information as required. If you want to clear all information in the window, click [Clear]. ✓ After the editing is completed, Click [OK]. If you don’t want to store it, click [Cancel]. ✓ If you click the [OK], the edited profile data is stored and shown in the profile list.. NOTE • When you edit a profile data, it is strongly recommended to check that the edited data can work properly by testing the connection. 3.2.4 My Connection Often used profile data can be registered as ‘My Connection’ profile data. Once the data is registered, all you need to do is to select My Connection to connect to the network projector. ✓ Click [My Connection]. ✓ The “Add My Connection” screen will appear. The currently selected profile data is shown with a check mark in the list. ✓ Select one of the profiles listed in the window and put a mark in the check box. ✓ Click [OK], then the window is closed. If you don’t want to select a new one, click the [Cancel]. NOTE • In the list, all profile data is shown no matter which network adaptor is selected. You can register a profile data that is not for currently selected network adaptor as My Connection profile data. Page 34 Appendix A Messages Message 1: A network connection was not established. This screen is displayed in the case that the projector is not connected with a LAN cable to your computer (when wired LAN is selected). Be sure that the projector is connected with a LAN cable to your computer. Click [OK], and you will be returned to the previous screen (select the network connection mode). Message 2: The number of computer connection exceeds the limit. The Projector has already reached the maximum number of Network Connections. The projector can connect up to 50 computers at the same time. ✓ Click [OK], the LiveViewer main menu is displayed. Please retry after disconnecting one of the connected computers. Message 3: A network connection could not be established. Windows prevented network configuration changes. ✓ You may be logged into Windows under User authority. ✓ Click [OK] to return to the previous screen. ✓ Consult with your network administrator to log in under Administrator authority. ✓ Once you have logged in with Administrator authority, please return to “2 Starting with LiveViewer”( 5) Page 35 Message 4: Are you sure you want to connect the selected projector? This message appears when the wireless adaptor you selected is already in use (with another network connection). ✓ To connect, click [Yes]. Proceed to the item “2.3 Select the projector”. ( 22) ✓ Click [No] to return to the previous screen. Message 5: Incorrect Passcode. An incorrect Passcode was input. ✓ Click [Back] to return to the “Enter Passcode” screen. ✓ Check the Passcode on the projector screen and enter the code again. Message 6: Do you want to apply suggested network settings as follows? This dialog will be displayed when you need to change a Network configuration on your computer in order to connect to the projector. ✓ Confirm with your network administrator if the Network configuration on the dialog is OK, and then click [Yes]. ✓ If you do not want to apply the Network configuration on the dialog, click [No]. ✓ If you want to add the Network configuration manually, click [Change]. A new dialog will be display to add a Network configuration as shown on the right hand side. Please enter IP address and subnet mask of your computer, then click [OK]. NOTE • If you checked “Not displaying confirmation dialog for adding Network settings” option, this dialog will not show up at next time. If you would like to change the setting, click Option icon on the “LiveViewer” main menu and uncheck “Not displaying confirmation dialog for adding Network settings" option. Page 36 Message 7: An IP Address overlaps with the IP Address of the projector you are trying to connect to. This message appears when the IP address on your computer is the same as that of the projector. Since different IP address is required, click [Back] and enter proper IP address. Message 8: Incorrect IP Address. This message appears when an incorrect IP address on your computer is set. ✓ Click [OK] and enter proper IP address. Message 9: A Network Configuration Conflict exists. This message appears when the network connection mode you set in the computer does not match with the mode of the network projector. ✓ Please verify your network configuration settings on the projector and computer. ✓ Click [Exit], then the LiveViewer main menu is displayed. ✓ Click on the main menu to go back to “2.2.2 Select network adaptor”. ( 8) Message 10: The projector is currently in use (Presenting) by another user. The projector you want to display to is occupied by another computer in the Presenter mode. ✓ Click [OK], then the LiveViewer main menu is displayed in stand-by mode. ✓ Once the Presenter has finished, retry to send your images. Page 37 Message 11: A Slideshow is currently running on the projector that you are trying to display to. The projector you want to send your images to is in the Slideshow mode (PC-LESS Presentation mode). ✓ Click [Yes], then the projector is switched from the Slideshow mode to the Live mode. ✓ Click [No], then the projector remains in the Slideshow mode, and the LiveViewer main menu is displayed (Stand-by mode) on your computer. Message 12: Are you sure you want to switch to Live mode? (for Projector models HCP-8000X, HCP-8050X) ✓ Click [Yes], and the projector is switched to Live mode. ✓ Click [No], and the projector will remain as is, the LiveViewer main menu is displayed in the Stand-by mode on your computer. Message 13: Are you sure you want to change the input channel of the Projector to 'MIU'? (for Projector models HCP-8000X, HCP-8050X) The projector is not set to the MIU as an input signal. ✓ Click [Yes], and the projector is switched to the MIU. ✓ Click [No], and the projector will remain as is, the LiveViewer main menu is displayed in the Stand-by mode on your computer. Message 14: Are you sure you want to change the input channel of the Projector to 'LAN'? (for Projector models HCP-3230X, HCP-4020X, HCP-4060X, HCP-5000X, HCP-A85W, HCP-A81, HCP-A82, HCP-A101, HCP-270X, HCP-325X, HCP-360X, HCP-4030X, HCP-300WX, HCP-U27P, HCP-U32P) The projector is not set to the LAN as an input signal. ✓ Click [Yes], and the projector is switched to the LAN. ✓ Click [No], and the projector will remain as is, the LiveViewer main menu is displayed in the Stand-by mode on your computer. Page 38 Message 15: Are you sure that you want to turn on the network adapter? The screen is displayed in the case that the selected network adapter is invalid. ✓ To turn it on, click [Yes]. Proceed to the item “2.3 Select the projector”. ( 22) ✓ Not to turn it on, click [No]. The screen is back to the previous one to select another network adapter. Page 39 B Trouble Shooting(for Projector models HCP-8000X, HCP-8050X) Problem No image The network projector that you want to connect to is not in the list of available projectors Likely Cause Things to Check Reference Page Number The projector is not turned on. Is the projector's lamp on? - The projector's input source isn't switched to MIU. Is the projector switched to MIU? - Check both the computer and projector's network settings. If you The computer change the projector's settings, turn off and/or projector's the projector's AC power and then turn it network settings are on again. If you simply put the projector not configured in STANDBY power mode and then turn correctly. it on again, the new settings might not take effect. Weak radio signal Live Mode Wireless / Wired Firewall software other than Windows® Firewall is installed in your computer. Bring the computer and projector closer together Radio waves won't go through concrete and metal (steel doors, etc.) Refer to the firewall software manual and take one of the following actions: - Exclude the “LiveViewer” from blocking item list - - - Disable the firewall software while using the “LiveViewer” The computer and/or projector's Check the network configurations of the network settings are computer and projector. not configured correctly. Cannot communicate 11 - The Projector is not set to Live Mode Check the mode in the projector’s MIU Menu to make sure that it is in the correct mode. 24 Cannot communicate due to configure wireless / encryption settings If there is a wireless configuration utility loaded on your computer, check the configuration settings of it. Please refer the manual of your configuration utility. - Configuration network settings of LiveViewer may not be set correctly. Be sure that the configuration settings of LiveViewer are correct for usage with your computer or wireless adapter. - Page 40 Problem The projected image is rather slow compared to that of the computer Likely Cause Things to Check Reference Page Number Wireless network utility software may block the Windows Zero configuration process. Use network utilities that may come with your computer or wireless LAN card to establish wireless network connection. For detail, refer to the manual of the computer or the card. - The projector isn't capable of relaying dynamic images such as PowerPoint® animation at full speed. Switching the priority to ‘Transmission Speed’ under the options menu may help to improve speed. 29 The compression rate being used for transferring the images is too low. Switching the priority to ‘Transmission Speed’ under the options menu may help to improve speed. 29 Live Mode Wireless / Wired No Image LiveViewer cannot send computer Using Photo Gallery screen data while using Windows Vista Slideshow in Photo Gallery Slideshow. Please close Windows Vista. Photo Gallery Slideshow before using LiveViewer. Images contain lots of interference. The compression rate being used for transferring the images is too high. Try setting the priority to Image Quality in the LiveViewer Option menu. You may experience a drop in speed. 29 Two cursors appear Cursor of the computer and cursor of the projector are displayed in succession. Turn off the cursor Emulation in the LiveViewer Option Menu. 29 No cursor appears Some computers may not display the cursor in when using LiveViewer 3. Turn on the Cursor Emulation in the LiveViewer Option menu. 29 No transparency or translucency effects (Glass) Using LiveViewer with Windows Aero mode. LiveViewer does not support these features of Windows Vista Aero. - Page 41 Network connection between the computer and projector is disconnected when computer display resolution is changed during Network Presentation. After you updated Operating System, the software performance becomes slower. The capture driver may have been disabled due to updating process. Please re-connect using “Connect button” after changing computer display resolution, or change display resolution before connecting with the “LiveViewer”. 26 Please uninstall LiveViewer. Then, install LiveViewer again. - Page 42 C Trouble Shooting(for Projector models HCP-3230X, HCP-4020X, HCP-4060X, HCP-5000X, HCP-A85W, HCP-A81, HCP-A82, HCP-A101, HCP-270X, HCP325X, HCP-360X, HCP-4030X, HCP-300WX, HCP-U27P, HCP-U32P) Problem No image The projector that you want to connect to is nowhere to be found on the list of available projectors Connection to the Network Cannot communicate Likely Cause Things to Check Reference Page Number The projector is not turned on. Is the projector's lamp on? - The projector's input source isn't switched to LAN. Is the projector switched to LAN? - Check both the computer and projector's network settings. If you The computer change the projector's settings, turn off and/or projector's the projector's AC power and then turn it network settings are on again. If you simply put the projector not configured in STANDBY power mode and then turn correctly. it on again, the new settings might not take effect. Firewall software other than Windows® Firewall is installed in your computer. Refer to the firewall software manual and take one of the following actions: - Exclude the “LiveViewer” from blocking item list 12, 13 - - Disable the firewall software while using the “LiveViewer” The computer and/or projector's Check the network configurations of the network settings are computer and projector. not configured correctly. - The Projector input port isn't switched to LAN. Check the projector's input port setting. 12, 13 An access point is used, and your computer is connected to the access point via wireless LAN. Use network utilities that may come with your computer or wireless LAN card to establish wireless network connection. For detail, refer to the manual of the computer or the card. - Page 43 Problem The projected image is rather slow compared to that of the computer Likely Cause Things to Check Reference Page Number Using the Multi PC mode. Use the Single PC mode 25 The projector isn't capable of relaying dynamic images such as PowerPoint® animation at full speed. Switching the priority to ‘Transmission Speed’ under the options menu may help to improve speed. 30, 31 The compression rate being used for transferring the images is too low. Switching the priority to ‘Transmission Speed’ under the options menu may help to improve speed. LiveViewer cannot send computer Using Photo Gallery screen data while using Windows Vista Slideshow in Photo Gallery Slideshow. Please close Windows Vista. Photo Gallery Slideshow before using LiveViewer. 30, 31 - Network Presentation Poor communication between computer and Projector. Click the “Stop Capture” button from the LiveViewer main menu to disconnect the computer and projector. Next, click the “Start Capture” button in the main menu to re-connect the computer and projector. If the projector still does not show any image (black screen), exit from LiveViewer and try again. 26 Can't display the movies correctly. In some combinations of computer's video card and application software, there is a possibility that true image - especially movies played by media player cannot be transferred to the projector with the LiveViewer”. If there is a video acceleration level adjustment function in your application, please try to adjust it. Refer your application manual in detail. - Images contain lots of interference. The compression rate being used for transferring the images is too high. Try setting the priority to Image Quality in the LiveViewer Option menu. You may experience a drop in speed. 30, 31 No Image Page 44 Likely Cause Things to Check Reference Page Number No transparency or translucency effects (Glass) Using LiveViewer with Windows Aero mode. LiveViewer does not support these features of Windows Vista Aero. - No Audio Audio mode is off. Using the Multi PC mode. Select Sound “On”. Select Single PC mode. Using NOT available models Check model name. HCP-270X, HCP325X, HCP-360X, HCP-4030X, HCP300WX, HCP-U27P, HCP-U32P are available for audio transmission. Mute or low volume is selected on the projector. Check the audio settings on the projector. Mute or low volume is selected on your computer. Check the audio settings on your computer. Poor communication between computer and Projector. Select “OFF” from “Sound” in the option menu of LiveViewer. Then select “ON” for “Sound”. Problem Network Presentation If the projector still does not produce any sound, exit from LiveViewer and try again. If audio output cannot be obtained even though above countermeasures are applied, install “LiveViewer” again. Sound interruption It was connected or disconnected computer while using LiveViewer with peripheral equipment by HDMI cable. The computer is connected or disconnected with peripheral equipment by HDMI cable while using LiveViewer. Sound interruption may occur if the computer you are using changes the audio configuration upon connecting or disconnecting HDMI cable. Please restart LiveViewer. Page 45 26, 31 - - - 31 5 8 Problem Likely Cause Things to Check Insufficient communication band makes data transfer speed lower. Sound interruption may occur when if the communication band between the computers and the projector is insufficient, like in a condition of multiple computers communicating with the projector, Sound interruption Reference Page Number - Please check your network connection. USB equipment (USB storage device, USB wireless adapter and so on) is connected to USBA terminal in projector. Network Presentation In about 30 seconds after USB device is connected to projector, firmware in projector transacts driver embedding. Since sound interruption might occure in 30 seconds, wait for a while. In addition, when USB wireless adapter is used, SSID search is executed repeatedly until wireless communication is done after driver is embedded. While this transaction, since sound interruption might occur, check following items in "WIRELESS SETUP" of projector menu and confirm proper wireless connection is established. Please disconnect USB wireless adapter when connected - Access Point or computer is not working, invalid wireless setting or wireless LAN is not used. Refer to projector user manual for "WIRELESS SETUP" details. "WIRELESS SETUP" confirmation items - MODE - ENCRYPTION - SSID Even though the issue is not resolved, reconnect LiveViewer. Noise comes from speaker in projector even though computer does not output sound. Mute function in audio playback software like Windows Media Player is used. 31 USB equipment (USB storage device, USB wireless adapter and so on) is connected to USBA terminal in projector. When computer does not output audio, making LiveViewer "Sound" "Off" decreases sound noise. Page 46 31 Problem Network Presentation Noise comes from speaker in projector even though computer does not output sound. Others - Information from the projector to computer is not correct or completed - The projector does not respond - Image on screen is frozen. Likely Cause Things to Check Iris is activated. When computer does not output audio, making LiveViewer "Sound" "Off" decreases sound noise. When active iris is not used, set "ACTIVE IRIS" "OFF" using projector menu. Reference Page Number 31 Refer to projector user manual for the detail explanation of "ACTIVE IRIS". Communication between the projector and computer is not working well. NETWORK Projector functions not working well. Select the “Stop Capture” button from the main menu of LiveViewer to disconnect the computer & projector. Then select the “Start Capture” button from the main menu of LiveViewer to reconnect the computer and projector. If the projector image is still frozen, exit from LiveViewer and try again. Try “NETWORK RESTART” in SERVICE menu under the NETWORK menu. Page 47 26