1
USER MANUAL
English
First of all,thank you for your choice on the handheld laser
distance meter.
Please carefully read the safety instructions and the user
manual before using this product,otherwise it may result in
hazardous laser radiation and electric shock.The person
responsible for the equipment must ensure that all users
understand these directions and adhere to them.
Safety Instructions
1.This product is a classⅡlaser product. Please DO NOT
stare into beam at any time when operating this product!
2.Please DO NOT Looking directly into the beam with optical
aids (e.g.binoculars,telescopes)!
3.Please DO NOT remove any safety labels this product!
Equipment Performance
1.Measuring range is from 0.05 to 50m;
2. Calculation function:
a. Area b.Volume c.Height (Pythagorean theorem)
d. Addition and subtraction
3.Storage and recall of measurement results
4.Metric and British unit system
5.LCD with background light
6.Automatically switch off
4
Technical Parameters:
Technical Specifications
Measuring accuracy typically
(m d Stand deviation)
Range
Laser type
Distance in m
±2mm
0.05~50m(A-7)/100m(A-11)
635nm,<1mW,classs2
laser spot in mm
10,50m, 6,30mm
Measurements per battery set
Distance unit
up to 5000
0.000m,0’
00”,ft,in
Operating Temperature
Storage Temperature
0~+40℃
-20~+70℃
Minimum and maximum measurements
Continuous measurement
Addition/subtraction
Area/volume/pythagorean measurements
Spray proof/dust protected
Batteries
Weight with batteries
Dimensions
IP54
AAA×1.5V
215g
126×50×28mm
Prohibited Use
1. Opening of the equipment by using tools (screwdrivers,etc.),
as far as not specifically permitted for certain cases
2. Aiming directly into the sun
3. Using outside the stated limits
4. Immersing the equipment in water
5. Cleaning the lens using alcohol or any other organic solvent
6. Wiping the lens directly with fingers or other rough surfaces
7. Powering the equipment beyond the rated DC voltage
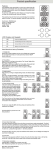
LCD Icon indication
keypad functions
1 LASER "ON"
12 POWER ON/ MEASURING - KEY
2 REFERENCE
3 LEVEL INDICATION *
13 AREA/VOLUME/PYTHAGORAS
- KEY
4 HISTORICAL READINGS
14 PLUS[+] - KEY
5 AREA/VOLUME/PYTHAGORAS
15 BACK LlGHT/UNIT- KEY
6 SIGNAL POWER INDICATION
16 REFERENCE - KEY
7 BATIERY STATUS
17 MINUS[-] - KEY
18 CLEAR/OFF - KEY
8 REPARING
9 CONTINUOUS MEASREMENT
10 CURRENT READING
11 UNIT
LCD and keypad description
6
1
7
8
2
9
3
4
10
5
11
12
13
16
14
17
18
15
figure
Start-up
1. Battery Installation
a. According to figures,remove battery compartment lid with
specified battery key;
b. Insert batteries with correct polarity according to battery lid
indications;
C.Close the battery compartment lid and skew tight with the
battery compartment key;
*Caution:
figure
1. Please do not mix new and old batteries,Use alkaline batteries
or rechargeable batteries only
2. Please replace batteries when the symbol flashes permanently
in the display
3. Please remove the batteries before any long period of non-use
4. Flat batteries must not be disposed of with household waste.
Care for the environment and take them to the collection points
provided in accordance with national or local regulations
Equipment operation
Switch on and off
Long-time press
button to switch on the
equipment with default reference setting of
single measurement mode,rear reference
and metric unit system; At the same time
battery state and laser reflection
signal intensity indication as shown as
figure C;
figure
Clear Button
Pressing
lines;
button to clear the last command or displayed data by
Change Measurement Reference
Default setting of measurement is rear edge when switching
on .Pressing this button will change the measurement reference;
Display Background Light
Default setting of LCD background is switching off. Pressing
the button will switch on or off LCD background light;
Unit Conversion
figure
Default setting of measurement unit is
metric unit. Long-time pressing
button
will convert metric unit British unit from ft,
in to ’ ” and so on as shown in figure D.
figure
Measurement
Signal-mode Measurement
When equipment is switched on,pressing
button to activate
the laser and aiming the laser onto target and pressing
button gain to trigger single-mode measurement,the result is
displayed immediately as shown in figure E.
figure
Continuous-mode Measurement
When equipment is switched on,long-time pressing
button
trigger continuous-mode measurement with
symbol flashing
MIN: MINIMUM VALUE
MAX:MAXIMUM VALUE
Current measurement value is displayed in LCD bottom line as
shown in figure F .
figure
Functions
Area,Volume,Indirect Measurement (Pythagorean Theorem)
figure
Press
button to change measurement functions,respectively,as
shown in figure G;select corresponding function and begin the
measurement;
Measurement Functions
Single-mode Measurement
Area Measurement
Volume Measurement
Height Measurement 1
Height Measurement 2
Lcons
Measurement Sequence
Addition and Subtraction Functions
+ The next measurement is added to the
previous one
- The next measurement is subtracted
from the previous one,as shown in
figure H
figure
Storage and recall of measurement results
The equipment will automatically store
the last 50 measurement results at
reverse time. On standby state,shown
in figure I,pressing + or - buttons will
recall historical measurement results
with the first reading as record No.1 and
so on. When 50 records are full,the
equipment will directly delete the first
reading and store the current reading
figure
Appendix
Message Code
Message Code
Cause
Battery too low
101
Remedy
Change batteries
104
Calculation error
Repeat procedure
152
Temperature too high
Cool down equipment
153
Temperature too low
Warm up equipment
Out of range
Please measure target within
distance of 0.05 to 50m
155
Received signal too weak
Use target plant
156
Received signal too strong
Use target plant
157
Wrong measurement or
background brightness
too high
Darken target or
change target
160
Shake too much
Stabilize equipment and
repreat measurement
154
Important Icons
lcons
Content
Flashing
Description
Continuous measurement
More singal power bar indicates stronger
Received singal
reflection singal with faster measurement
Power indicator
speed and higher accuracy
More battery bar indicates more battery
Batter indicator energy;Flash of this icon means batteries
run out
Data storage
Hardware error
Measurement results are stored at
reverse time
Switch on/off the equipment several times.
if the symbol still appears,then your
instrument is defective.please call your
dealer for assistance
Warranty
We guarantees TWO-year warranty .
All illustrations, and technical specifications may be subject to
change whitout prior notice.
Technical parameters of the product abide by the
(GB/T 14267-2009) of the P.R.C.National Standard.



![j:j_"Xt$l"j:]:":,lg]:"r/Human Resources have been duty - e](http://vs1.manualzilla.com/store/data/005657435_1-26d97049bf04f0fd92265d73e45a9ab3-150x150.png)