1
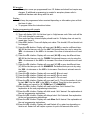
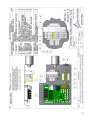
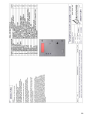
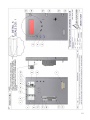
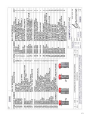
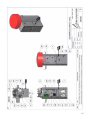
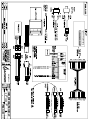
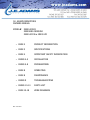
J.E. ADAMS INDUSTRIES
OWNERS MANUAL
MODEL#
29000-29003
29000UNI-29003UNI
29000-2M thru 29003-2M
o PAGE 2
PRODUCT INFORMATION
o PAGE 3
SPECIFICATIONS
o PAGE 4
IMPORTANT SAFETY INFORMATION
o PAGES 4-5
INSTALLATION
o PAGES 5-8
PROGRAMMING
o PAGE 8
OPERATING
o PAGE 8
MAINTENANCE
o PAGES 9
TROUBLESHOOTING
o PAGES 10-14
PARTS LIST
o PAGE 15-18
WIRE DIAGRAMS
REV. 5-20-2010
PRODUCT INFORMATION
Please take a moment to fill out the information below in order to aid us with
any future sales or service inquiries. Model number and serial number
information can be found on the serial tag located inside the control box and/or
on the lower exterior of the can. Key number can be found on the tag that
comes attached to the keys. There may be more than one key number
depending on unit.
Please keep this information with your records.
MODEL#:_________________________________________
SERIAL#:_________________________________________
KEY NUMBER(S):_________________________________
DATE PURCHASED:_______________________________
DISTRIBUTOR:___________________________________
J.E. Adams Industries
1025 63rd Ave. S.W.
Cedar Rapids, IA 52404
1-800-553-8861
www.jeadams.com
2
SPECIFICATIONS:
Unit specifications: (29000-29003, 29000UNI-29003UNI)
Voltage:
120VAC, 60Hz
Amperage:
(1)30 amp service is required for this unit
Weight:
260 lbs with pallet attached
Vac specifications: (29000-29003, 29000UNI-29003UNI)
Motors:
(3) 120VAC Vacuum motor
Fuses:
(3) 10 amp inline fuses
Shampoo specifications: (29000-29003, 29000UNI-29003UNI)
Compressor:
(1) Thomas 120VAC, 1/12th hp compressor
Peristaltic pump:
(2) Thomas peristaltic pumps, 12VDC
Unit specifications: (29000-2M thru 29003-2M)
Voltage:
120v, 60Hz
Amperage:
(1)20 amp service is required for this unit
Weight:
260 lbs with pallet attached
Vac specifications: (29000-2M thru 29003-2M)
Motors:
(2) 120VAC Vacuum motor
Fuses:
(2) 10 amp inline fuses
Shampoo specifications: (29000-2M thru 29003-2M)
Compressor:
(1) Thomas 120v, 1/12th hp compressor
Peristaltic pump:
(2) Thomas peristaltic pumps, 12VDC
NOTE: “UNIT INTENDED FOR COMMECIAL USE ONLY”
Installation of 29000UNI, 29001UNI, 29002UNI and 29003UNI units are to be
installed only be a qualified Unitec represented distributor or installer. Failure to
do so may result in improper installation and may not be configured properly.
3
IMPORTANT SAFETY INSTRUCTIONS
When using an electrical appliance, basic precautions should always be followed, including
the following:
READ ALL INSTRUCTIONS BEFORE USING (THIS APPLIANCE)
WARNING – To reduce the risk of fire, electric shock, or
injury:
•
•
•
•
•
•
•
•
Do not use on wet surfaces.
Use only as described in manual. Use only manufactures recommended attachments.
Do not allow to be used as a toy. Close attention is necessary when used by or near
children.
Do not put any object into openings. Do not use with any opening blocked; keep free
of dust, lint, hair and anything that may reduce air flow.
Keep hair, loose clothing, fingers, and all parts of body away from openings and
moving parts.
Do not use to pick up flammable or combustible liquids, such as gasoline, or use in
areas where they may be present.
“Do not pick up anything that is burning or smoking, such as cigarettes, matches, or
hot ashes.”
“DO not use without dust bag and/or filters in place.”
SAVE THESE INSTRUCTIONS
Installation Instructions:
•
•
•
•
•
Determine location to mount unit (“DANGER” “THIS EQUIPMENT
INCORPORATES PARTS SUCH AS SWITCHES, MOTORS, OR THE LIKE
THAT TEND TO PRODUCE ARCS OR SPARKS THAT CAN CAUSE AN
EXPLOSION. WHEN LOCATED IN GASOLINE-DISPENSING AND SERVICE
STATIONS INSTALL AND USE AT LEAST 20 FEET (6 M) HORIZONTALLY
FROM THE EXTERIOR ENCLOSURE OF ANY DISPENSING PUMP AND AT
LEAST 18 INCHES (450 MM) ABOVE A DRIVEWAY OR GROUND LEVEL.”
Run 30 amp service to that location (NOTE UNIT HAS WIRE PROVIDED
UNDERNEATH TO CONNECT INCOMING POWER SUPPLY)
Grounding Instructions: This appliance must be connected to a grounded
metal, permanent wiring system; or an equipment-grounding conductor must be
run with the circuit conductors and connected to the equipment-grounding
terminal or lead on the appliance.
Mount unit to location and use fig. 1 for mount pattern
If unit is vault ready configuration see fig. 1 for mounting and fig. 2 for vault tube
location.
4
FIG. 1
10.42
11.125
11.375
Ø0.80
4 PL
11.125
Ø15.75
5.2
Ø0.7500
OPTIONAL
MOUNT HOLE
12.90
7.13
FRONT OF UNIT
FIG. 2 (VAULT TUBE LOCATION)
TOP VIEW
1.54
28.125
Ø15.75
4.17
Ø1.63
8.73
VAULT
TUBE
3.16
31.9
•
•
Once unit has been installed use 5871B8 cap plugs supplied with unit to seal holes
in canister bottom located in lower cleanout door. Then connect to power, insert
shampoo and spot formula into bottom door and attach lids to appropriate bottles.
Turn unit on and move to program instructions
Programming Instructions:
Coin acceptor:
• No programming to acceptor needed if unit was purchased with the standard
Imomex Z32 electronic acceptor (8149-92 our part number) is pre-programmed to
accept US quarters, .984 tokens, US $1 coin and 1.073 token. Acceptor is preprogrammed before it is sent to J.E. Adams.
• If different acceptor was purchased, see additional literature sent along with unit
for programming info.
5
Bill acceptor:
• Bill acceptor comes pre programmed from J.E. Adams and should not require any
changes. If additional programming is needed to acceptors please refer to
additional literature sent along with this unit.
Display:
• Unit may be programmed when received depending on information given at that
the time of order.
• To program follow the instructions below.
Display programming with remote:
1) Press the red power button.
2) Timer will display 0000. At this time type in 4 digit access code. Note code will be
1234 until changed by customer.
3) Once code has been entered display should read ok. If display does not read ok,
repeat step 1 and 2.
4) Press CH + button. Timer will display coin value. This should $.25 and should not
be changed.
5) Press the CH +button. Display will now read (A: 30) or may be a different time.
(A) Will be the time per coin for the VAC. Set desired time per coin by using the
VOL – to decrease or the VOL + to increase. Once time is entered move to next
step.
6) Press the CH + button. Display will now read (B: 30) or may be different time.
(B) Will be the time per coin for TURBO. Set desired time per coin by using the
VOL – to decrease or the VOL + to increase. Once time is entered move to next
step.
7) Press the CH + button. Display will now read (C: 30) or may be different time.
(C) Will be the time per coin for SHAMPOO. Set desired time per coin by using
the VOL – to decrease or the VOL + to increase. Once time is entered move to
next step.
8) Press the CH + button. Display will now read D. D is not used.
9) Press the CH + button. Display will now read E. E is not used.
10)Press the CH + button. Display will now read F. F is not used.
11)Press the CH + button. Display will now read (on A). This is the number of coins
to start VAC. Use the VOL – and VOL + to adjust. Once this is done press the
CH+ button and repeat for (B) TURBO and (C) SHAMPOO.
12)Press the CH + button. Display will read bonus time. Set if desired. See
explanation at the end programming instructions.
13)Press the CH + button. Display will debit mode. Set if desired. See explanation at
the end programming instructions.
14)Press the CH + button. Display will delayed start. Set if desired. See explanation
at the end programming instructions.
15)Press the CH + button. Display will read HLxx. Set if desired. See explanation at
the end programming instructions.
16)Press the CH + button. Display will read Restart off or restart on depending on
what is set. Restart off will require a person to put in full amount after unit is
6
turned off to reactivate. Restart on allows for additional coins to be put in the
machine to keep unit running. To set use VOL – or VOL + to change.
17)Press the CH + button. Display will now read STD or USER or MIX. To make a
custom message use VOL + button to scroll to USER. At this point press and hold
CH + button until original message appears. At this time you may change the
message simply by using the VOL – or VOL + buttons to change letters. Once
message has been entered you must put the symbol / at the end of
message. This will tell display that this is the end of the message.
18)Press the CH + button now 5 more times to exit programming.
19)Unit should now be programmed.
Program definitions:
• Bonus time settings:
¾ Amount of time set in bonus time is added to regular time per
coin/pulse(e.g. if you want to give 45 seconds for bonus time and
your regular time per coin is 30 seconds, you would set bonus time
at 00:15)
¾ Bonus is disabled by setting bonus time to 00:00.
¾ If bonus time is set to less than one minute, bonus time is added
when bonus coin is reached and every coin after that until time
expires.
¾ If bonus time is set at 1:00 or more, bonus will be a “one time”
bonus. Bonus time will only be added for bonus coin or multiplies of
bonus coin (e.g. 16th coin, 32nd coin, etc). Any other coin will on
receive regular time per coin.
¾ If bonus time is set to 99:00, when bonus coin is deposited, timer
will show “-on-“ and timer will continue to run until coin switch wire
is shorted to ground by a loop detector or other switch closure for
a minimum of two seconds.
•
Debit and credit mode:
¾ Debit mode: As coins are deposited display shows “$1.75 MORE,
$1.50 MORE, $1.25 MORE” etc. until start price is reaches. Once
start price is reached display switches to time accumulating until no
more coins have been deposited.
¾ Credit mode: As coins are deposited display shows money
accumulating ($.25, $.50, $.75 etc). If timer is also set to delayed
start mode timer will continue to show money accumulating until
no more coins have been deposited. If timer is set to instant start,
as soon as start price is reached, timer will change to time counting
down.
¾ Both mode: As coins are deposited display shows money
accumulating ($.25, $.50, $.75 etc). If start price is not reached,
after 5 seconds timer will alternate between “add $x.xx more” and
amount of money already deposited.
7
Display programming with push button:
• Unit can be programmed using buttons that are located inside display. One is
labeled S2, which is used to change from item to item. One is labeled S1
which is used to set desired value. If you hold down S1 this will cause numbers
to decrease. If you repeatedly push S1 numbers will increase.
• When programming with buttons use same instructions as remote except for
the following. Where it says to press CH + use S2 and where it says to use
VOL + or – use S1.
Operating Instructions:
•
•
•
•
•
Select desired function.
Insert coins or bills to start desired function.
If shampoo/spot is selected, it is recommended that you vacuum before
applying formula.
If other function is selected other than original selected item unit will
recalculate timer based on the amount of money it takes to start the specific
function.
Once service is used, hang up hose.
Operating Instructions 29000UNI-29003UNI:
•
•
•
•
•
Select desired function.
Insert coins or bills or swipe credit card to start desired function. When credit card
is selected swipe card and wait for activation.
If shampoo/spot is selected, it is recommended that you vacuum before applying
formula.
If other function is selected other than original selected item unit will recalculate
timer based on the amount of money it takes to start the specific function.
Once service is used, hang up hose.
Changing fluids:
•
Disconnect power. Unscrew cap from empty bottle. Remove empty bottle.
Insert new bottle into unit. Insert line into bottle and screw cap onto bottle.
Reconnect power
Maintenance:
•
Filter bags should be taken out weekly and shaken out. Also it might be a good
idea to keep a new set of bags on hand so that once a month or longer you can
take original bags out and wash them.
• Check vac hose for cracks on a weekly basis.
• Check shampoo and spot formula bottles to assure that they are full.
• Clean canister with a stainless steel cleaner as needed.
• Check motor brushes approx. every 3 months for excessive wear. Motor brushes
should be changed if they are shorter than ¼”. Please disconnect power
•
•
before doing this.
Check all shampoo lines and assembly for any signs of wear.
All servicing of machine should be conducted by an authorized service
representative.
8
Troubleshooting:DISCONNECT POWER BEFORE SERVICING
Problem
Possible cause
Solution
Unit is not powered
Breaker inside unit is not in the on
position
Flip breaker on
Display is not powering
Breaker inside unit is not in the on
position
Flip breaker on
Check transformer inside main power
box in unit. Is there 24VAC at output
terminal?
Replace transformer (8131-2)
Coin acceptor putting out continuous
pulse
Press mode button on display. If
fail does not go away replace coin
acceptor.
(8149-92)
Reprogram display. If fail goes
away and then comes back, replace
battery in display.
Display reads "fail"
Program in display may be lost
Unit keeps blowing my
breaker from my
incoming power source
Fuses for vac motors
keep blowing.
Unit has lost suction
Unit has shut down
For no apparent reason
Inadequate wire size supplied to
machine
Call electrician and install proper
wire size for 30amp service versus
length or run.
Wrong size breaker
Install correct breaker( only use
wire size that is adequate to handle
30 amp breaker)
Inadequate wire size supplied to
machine
Call electrician and install proper
wire size for 30amp service versus
length or run.
Motor brushes may be bad or too short
Replace motor brushes (8055BR)
Vac hose clogged
Clean out debris from vac hose
Filter bags need cleaned
Clean out filter bags or replace
(8076)
Vac hose is damaged
Replace vac hose (2036)
Cleanout door gaskets torn or worn
Replace gaskets (8159)
This unit has a reset thermal limiter in
the compressor. Unit may have shut
down due to excessive heat
Turn off power to the machine and
wait for a period of 5 minutes.
Reapply power and activate
machine.
9
10
11
12
13
14