1
Java Object Oriented Neural Engine
GUI Editor User Guide
Joone Editor User Guide
Contents
1
INTRODUCTION..................................................................................................... 6
1.1
2
INTENDED AUDIENCE ........................................................................................... 6
DOWNLOAD AND INSTALLATION ................................................................... 7
2.1
JAVA .................................................................................................................... 7
2.2
JOONE FILES ......................................................................................................... 7
2.3
OTHER FILES ........................................................................................................ 7
2.3.1
Note ............................................................................................................. 7
2.4
RUNNING THE JOONE EDITOR ............................................................................... 7
3
MENU......................................................................................................................... 8
3.1
FILE ...................................................................................................................... 8
3.1.1
New.............................................................................................................. 8
3.1.2
Open ............................................................................................................ 8
3.1.3
Save ............................................................................................................. 8
3.1.4
Save As ........................................................................................................ 8
3.1.5
Export Neural Net ....................................................................................... 8
3.1.6
Print............................................................................................................. 8
3.1.7
Exit .............................................................................................................. 8
3.2
EDIT ..................................................................................................................... 8
3.2.1
Cut ............................................................................................................... 9
3.2.2
Copy ............................................................................................................ 9
3.2.3
Paste ............................................................................................................ 9
3.2.4
Duplicate ..................................................................................................... 9
3.2.5
Delete .......................................................................................................... 9
3.2.6
Group .......................................................................................................... 9
3.2.7
Ungroup ...................................................................................................... 9
3.2.8
Sent to Back................................................................................................. 9
3.2.9
Bring to Front.............................................................................................. 9
3.3
ALIGN .................................................................................................................. 9
3.3.1
Toggle Snap to Grid .................................................................................... 9
3.3.2
Left............................................................................................................. 10
3.3.3
Center ........................................................................................................ 10
3.3.4
Right .......................................................................................................... 10
3.3.5
Top............................................................................................................. 10
3.3.6
Middle........................................................................................................ 10
3.3.7
Bottom ....................................................................................................... 10
3.4
ATTRIBUTES ....................................................................................................... 10
3.4.1
Figure Attributes:...................................................................................... 10
3.4.2
Text Attributes ........................................................................................... 10
3.5
CONTROL ........................................................................................................... 11
3.5.1
Control Panel ............................................................................................ 11
3.5.2
Add Noise .................................................................................................. 12
3.5.3
Randomize ................................................................................................. 12
2
Joone Editor User Guide
3.5.4
Reset Input Streams ................................................................................... 13
3.5.5
Macro Editor ............................................................................................. 13
3.6
LOOK’N’FEEL..................................................................................................... 17
3.6.1
Metal.......................................................................................................... 17
3.6.2
CDE/Motif ................................................................................................. 17
3.6.3
Windows .................................................................................................... 17
3.7
HELP .................................................................................................................. 17
3.7.1
About Joone............................................................................................... 17
3.7.2
Help Contents............................................................................................ 17
4
TOOLBAR............................................................................................................... 18
4.1
SELECTION TOOL ............................................................................................... 18
4.2
LABEL AND CONNECTED LABEL......................................................................... 18
4.3
DRAWING TOOLS ............................................................................................... 18
4.4
INPUT LAYERS .................................................................................................... 18
4.5
LAYERS .............................................................................................................. 18
4.6
OUTPUT LAYERS ................................................................................................ 19
4.7
CHARTING COMPONENT ..................................................................................... 19
4.8
SYNAPSES........................................................................................................... 20
4.8.1
The Pop-Up Menu for all Connection Types ............................................ 22
4.9
PLUGINS ............................................................................................................. 22
5
LAYERS................................................................................................................... 23
5.1
PROCESSING LAYERS ......................................................................................... 23
5.1.1
Linear ........................................................................................................ 23
5.1.2
Sigmoid...................................................................................................... 23
5.1.3
Tanh........................................................................................................... 23
5.1.4
Logarithmic ............................................................................................... 23
5.1.5
Context ...................................................................................................... 24
5.1.6
Nested ANN ............................................................................................... 24
5.1.7
Delay ......................................................................................................... 24
5.2
I/O LAYERS ........................................................................................................ 26
5.2.1
File Input ................................................................................................... 26
5.2.2
URL Input.................................................................................................. 26
5.2.3
Excel Input................................................................................................. 26
5.2.4
Switch Input............................................................................................... 26
5.2.5
Learning Switch......................................................................................... 27
5.2.6
File Output ................................................................................................ 28
5.2.7
Excel Output.............................................................................................. 28
5.2.8
Switch Output ............................................................................................ 28
5.2.9
Teacher...................................................................................................... 28
6
PLUGINS ................................................................................................................. 30
6.1
PRE-PROCESSING PLUGINS ................................................................................. 30
6.2
MONITOR PLUGINS ............................................................................................. 31
6.2.1
The Annealing Concept ............................................................................. 32
3
Joone Editor User Guide
7
BASIC TUTORIAL ................................................................................................ 32
8
AN ADVANCED EXAMPLE: THE XOR PROBLEM ...................................... 34
8.1
9
TESTING THE TRAINED NET ............................................................................... 37
THE XML PARAMETER FILE ........................................................................... 38
9.1
9.2
9.3
9.4
10
THE <BUTTONS> … </BUTTONS> SECTION ....................................................... 38
THE <OPTIONS> … </OPTIONS> SECTION .......................................................... 39
SEPARATORS ...................................................................................................... 39
TEMPORARILY REMOVING ITEMS ....................................................................... 40
ONLINE RESOURCES...................................................................................... 41
10.1
10.2
10.3
10.4
10.5
10.6
10.7
11
JOONE................................................................................................................. 41
ARTIFICIAL NEURAL NETWORKS TECHNOLOGY................................................. 41
JAVA .................................................................................................................. 41
JAXP ................................................................................................................. 41
JHOTDRAW ........................................................................................................ 41
SOURCE FORGE .................................................................................................. 41
SUN MICROSYSTEMS .......................................................................................... 41
GLOSSARY......................................................................................................... 42
11.1
11.2
11.3
11.4
11.5
11.6
11.7
11.8
11.9
11.10
11.11
11.12
ANN / NN........................................................................................................... 42
CLASSPATH ........................................................................................................ 42
GUI.................................................................................................................... 42
JAR FILE ............................................................................................................. 42
JAXP ................................................................................................................. 42
LAYER ................................................................................................................ 42
NEURON ............................................................................................................. 42
NEURAL NETWORK ............................................................................................ 42
PE ...................................................................................................................... 42
SWING ............................................................................................................ 42
XML .............................................................................................................. 43
ZIP FILE .......................................................................................................... 43
4
Joone Editor User Guide
Revision
Revision
Date
Author
0.1.0
October 12, 2001
Harry Glasgow
0.1.5
October 15, 2001
Paolo Marrone
0.1.6
October 21, 2001
Paolo Marrone
0.2.0
November 6, 2001
Paolo Marrone
0.5.7
January 8, 2002
Paolo Marrone
0.5.8
January 13, 2002
Paolo Marrone
0.5.9
January 22, 2002
Harry Glasgow
0.6
February 12, 2002
Harry Glasgow
April 9, 2002
Paolo Marrone
May 15, 2002
Paolo Marrone
0.6.5
0.6.6
0.7.0
September
2002
02,
Harry Glasgow
Comments
•
Pre-release draft
•
Added a parameter file on the command line to reflect the
last change of the editor package
•
•
Added the description of the XML parameter file
Added the description of the Teacher component and of
the Control Panel
Added the advanced example based on the XOR problem
Added page numbers
Added the Export Neural Net menu item
Added the <option> section of the XML parameter file
Added the drawing tool buttons
Added the official URL of Joone (www.joone.org)
Added plugin sections
•
•
•
•
•
•
•
•
•
•
•
•
•
•
•
•
•
Added the use of the Monitor plugins
Added the ‘Add Noise’ and ‘reset Input Streams’ menu
items
Added the new layers (XL I/O, nested ANN, Switch I/O)
Updated the list of libraries needed to run the editor
Enhanced the explanation of the Delay Layer
Added the Help Contents menu item
Added the Learning Switch component and the validation
parameter in the Control Panel
Added the use of the Scripting Plugin
Added details of new sections for the two-part menu, the
Macro Editor pane and the charting module.
Added the description of the Context and Logarithmic
layers
5
Joone Editor User Guide
1
Introduction
The Java Object Oriented Neural Engine (Joone) is a system of Java modules that provide
a framework for developing, teaching and testing neural networks.
Joone comprises two elements, a core engine and a GUI editor. The core engine is used
by the editor to process neural networks. This guide focuses chiefly upon the editor
component.
1.1
Intended Audience
This document is intended for non-programmers, persons interested in developing neural
networks with the Joone editor.
6
Joone Editor User Guide
2
Download and Installation
2.1
Java
To run Joone, Java 2 (release 1.2 or above) needs to be installed on your computer. This
is available from Sun Microsystems at http://java.sun.com/j2se/. Installation of Java falls
outside the scope of this document but is relatively straightforward.
2.2
Joone Files
The compiled Joone project files are available from Source Forge at http://
sourceforge.net/projects/joone/. The Joone engine and editor zip files are available from
the project’s Summary page. Both these files are required to run the Joone editor and
should be included in your computer’s Java Classpath.
2.3
Other Files
The Joone editor makes use of the following libraries:
• jhotdraw.jar from JhotDraw 5.2, a Java based drawing package
• xalan.jar and crimson.jar from JAXP, the Java XML processing package
• jh.jar from JavaHelp 1.1 or above
• poi-hssf.jar, poi-poifs.jar, poi-util.jar and hssf-serializer.jar from Jakarta HSSF
project, the library to read/write Excel files
• bsh-core.jar from BeanShell (www.beanshell.org), a Java scripting engine
The joone-ext.zip package contains a version of the above libraries.
2.3.1 Note
•
•
2.4
JoonEdit does not work with the new JhotDraw 5.3, only the 5.2 version. A new
version of JoonEdit will soon be released that works with JhotDraw 5.3.
Sun Microsystems has released Java Standard Edition 1.4, which includes JAXP,
so it may not be necessary to include this separately for Java editions 1.4 and
above.
Running the Joone Editor
To run the Joone editor, put all the above packages on the classpath, then JoonEdit class
should be invoked with the following command:
java org.joone.edit.JoonEdit <parameters.xml>
where <parameters.xml> is the optional XML parameters file with the complete path (see
/org/joone/data/layers.xml for an example). If the parameter is not specified, the editor
will use a default set of parameters in the joone-edit.jar file
On a Windows platform, Click Start then Run and type in the above command, then click
OK. Alternatively you can use the RunEditor.bat contained in the executable distribution
package.
7
Joone Editor User Guide
3
Menu
The menu of the Joone editor accesses standard operations.
3.1
File
Projects built with the Joone editor can be saved and reopened at a later date. Projects are
saved as serialized files with the file extension of ‘ser’. Only one project can be edited at
a time. Joone will prompt to save an edited project prior to closing, or opening a new
project.
3.1.1 New
Creates a new Joone project. Any existing project changes are lost.
3.1.2 Open
Opens an existing Joone project. This will replace any existing project.
3.1.3 Save
Allows the current Joone project to be saved as a serializable file.
3.1.4 Save As
Allows a Joone project to be saved as a serializable file with a different name or path.
3.1.5 Export Neural Net
Allows the exporting of a neural net in a serialized form (.snet). This is provided for use
in the distributed environment (or for other future uses).
3.1.6 Print
Prints a graphical representation of the current project.
3.1.7 Exit
Exits the Joone editor.
3.2
Edit
Joone allows various editing and positional actions to be performed on a component. Edit
options may not be available if the required number of components is not selected. Copy
8
Joone Editor User Guide
and paste operations are only available with drawing tools and not with Joone
components.
3.2.1 Cut
Deletes a selected component from the screen but keeps it in memory for Paste
operations.
3.2.2 Copy
Copies a selected component from the screen to memory.
3.2.3 Paste
Copies a selected component from memory to the screen.
3.2.4 Duplicate
Duplicates a selected component.
3.2.5 Delete
Deletes a selected component from the screen.
3.2.6 Group
This menu item groups a number of components together so that they can be manipulated
as a single component.
3.2.7 Ungroup
This ungroups a previously grouped set of components.
3.2.8 Sent to Back
Positions a selected component so that other components that overlap it are drawn over
this one.
3.2.9 Bring to Front
Positions a selected component so that this component is drawn over other components
that it overlaps.
3.3
Align
Several components can be selected concurrently by either clicking on each required
component while holding down the Shift key, or by dragging a rectangle around a group
of components. Once a number of components are selected, alignment menu options can
be applied to align the controls relative to each other.
3.3.1 Toggle Snap to Grid
Turns on/off the alignment of the components on a fixed grid facilitating the arrangement
of the objects on the drawing area.
9
Joone Editor User Guide
3.3.2 Left
Aligns selected components vertically along their left hand edge.
3.3.3 Center
Aligns selected components vertically along their center line.
3.3.4 Right
Aligns selected components vertically along their right hand edge.
3.3.5 Top
Aligns selected components horizontally along their top edge.
3.3.6 Middle
Aligns selected components horizontally along their middle.
3.3.7 Bottom
Aligns selected components horizontally along their bottom edge.
3.4
Attributes
The attributes of the drawing tools (see below) can be modified with the following
commands. The following attributes can be changed:
3.4.1 Figure Attributes:
•
•
•
Fill Color
Pen Color
Line’s Arrows
3.4.2 Text Attributes
•
•
•
•
Font
Font Size
Font Style
Text Color
These commands do not affect the attributes of the neural network components (layers
and connections).
10
Joone Editor User Guide
3.5
Control
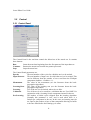
3.5.1 Control Panel
The Control Panel is the tool that controls the behaviour of the neural net. It contains
three buttons:
Run:
Continue:
Stop:
Starts the neural net beginning from the first pattern of the input data set.
Restarts the neural net from the last pattern processed.
Stops the neural net.
The Control Panel parameters are:
Epochs:
The total number of the cycles for which the net is to be trained.
Input Patterns: The total number of input rows for which the net is to be trained. This
can be different from the number of rows read from the FileInput
component (lastRow – firstRow + 1).
Momentum:
The value of the momentum (see the literature about the backpropagation algorithm).
Learning Rate: The value of the learning rate (see the literature about the backpropagation algorithm).
Learning:
True if the net is to be trained, otherwise set false.
Validation:
True if the net is to be tested on a validation data set. Used ONLY in
conjunction with a Learning Switch component inserted in the net.
Pre-Learning:
The number of initial cycles skipped from the learning algorithm.
Normally this parameter is zero, and is used when there is a
DelayLayer component in the net. In this case pre-learning must be
set equal to the number of taps of that component allowing its buffer
to become filled before the learning cycle starts.
11
Joone Editor User Guide
To better explain the use of the Pre-Learning parameter, it serves to avoid making
changes to the values of biases and synapses in the presence of a delayed layer. This is
because if these values are altered from the first cycle of the learning process, this would
adjust them using a wrong input pattern, obtained before the full input ‘temporal window’
is presented to the network. For instance, if an input pattern is composed of one column
as follows:
0.2
0.5
0.1
....
and an input delay layer with taps = 3 is present, then when the network might only have
read the first two input values (0.2 and 0.5), and the output of this first layer would be:
Delay Layer
0
-1
0
-1
0.2
-1
0.5
… 0.1 0.5 0.2
In this case the network would learn the wrong {0, 0, 0.2, 0.5} pattern.
Thus the Pre-Learning parameter must be set equal to the taps parameter so that the
network starts to learn only when all the ‘taps’ values have been read.
3.5.2 Add Noise
This adds a random noise component to the net and is useful for allowing the net to exit
from a local minimum. At the end of a round of training, adding noise may ‘jolt’ the
netork out of a local minimum so that further training produces a better network.
3.5.3 Randomize
This reset the weights of a neural network, initializing it to a random state.
12
Joone Editor User Guide
3.5.4 Reset Input Streams
This command resets all the buffered input streams in input and teacher layers, permitting
the reloading of their buffers with the input data. This is useful after the contents of some
files have changed and it is necessary to reload the data.
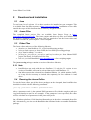
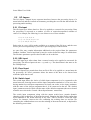
3.5.5 Macro Editor
A powerful scripting management engine is provided in the Joone Editor. Before
describing this feature, it is important to understand the concepts underlying the scripting
engine.
There are two types of script in Joone:
Event-driven scripts
User-driven scripts
These are executed when a neural network’s event is raised.
These are executed manually by the user.
Both of the above type of scripts are contained within the neural network, and are
serialized, stored and transported along with the neural network that contains them (in the
same way that macros defined in a MS Word of Excel document are). In this manner
the defined scripts can be executed even when the net is running on remote machines
outside the GUI editor.
It is possible to load, edit, save and run any script (in this document also referred to as
Macro) using a user friendly graphical interface. The Macro Editor can be opened with
the Control Macro Editor menu item. A window will be shown, as depicted in the
following figure:
13
Joone Editor User Guide
In the Macro Editor, the user can define both of the two script types. On the left side of
the editor there is the list of the available scripts for the neural network. For a new
network, the list already contains the definitions of all the available event-driven scripts.
To edit a script, the user simply clicks on the desired script on the list and inserts the code
in the text area on the right.
The text area has some useful features to help with the writing of the BeanShell code:
• Coloured code based on the Java syntax (comments, keywords, literals, etc.)
• Highlighting of matching opening/closing brackets and parenthesise.
• Highlighting of the current edited row of code.
• Different colours used to emphasize unclosed strings.
Note in the above figure the bold Java keywords “new” and “for”, the small box
indicating the corresponding open bracket matching the one near to the cursor, the greyed
row indicating the current edited row, and the red colour used to indicate an unterminated
string.
The event-driven scripts can not be renamed nor deleted from the list. If the user does not
want to define an event-driven script, s/he can just remove or comment the corresponding
code in the text area.
The user-driven scripts can be added, renamed or deleted by choosing the corresponding
menu item in the ‘Macro’ menu.
3.5.5.1 The Macro Editor Menu
Here are details of all the menu items of the Macro Editor frame.
File
Import Macro
Save Macro as…
The content of a text file can be imported into the text area
of the selected script. The old text will be replaced.
The content of the selected script can be exported into a
text file.
14
Joone Editor User Guide
Close
Closes the Macro Editor window.
Cut
Copies the selected text into the clipboard and delete it
from the text area (you can also use Ctrl-X).
Copies the selected text into the clipboard (you can also use
Ctrl-C).
Pastes the content of the clipboard into the text area starting
at the cursor position (you can also use Ctrl-V).
Selects all the content of the text area.
Edit
Copy
Paste
Select All
Macro
Enable Scripting
Add
Remove
Rename
Run
Set Rate…
If checked, this enables the execution of the event-driven
scripts for the edited neural network. If not checked, all the
events of the net will be ignored.
Adds a new user-driven script (the user cannot insert new
event-driven scripts).
Removes the selected user-driven script. Disabled for
event-driven scripts.
Permits renaming of the selected user-driven script.
Disabled for event-driven scripts.
Runs the selected script.
Sets the execution rate (the number of free training cycles
between two execution calls) for cyclic event-driven scripts.
The cyclic event-driven scripts are the ‘cycleTerminated’
and the ‘errorChanged’ scripts.
Warning: The default value of rate for a new network is 1
(one), but it is recommended tat the value be set to between
10 and 100 (or even more) to ensure that there is sufficient
processing time available for the running of neural
network.
15
Joone Editor User Guide
3.5.5.2 Macro Scripting Features
The following section describes some characteristics of the scripting feature added to
Joone’s engine.
How to use internal Joone objects
To obtain a reference to the internal neural network’s objects use:
• jNet to access to the edited org.joone.net.NeuralNet object
• jMon to access to the contained org.joone.engine.Monitor object
For example:
• jNet.getLayers().size() returns the number of the layers contained in the
neural network.
• jMon.getGlobalError()
returns the last RMSE value from the net.
A list of the callable public methods for the above two objects is available in the project’s
javadoc html files. To use the objects from the Joone libraries, it is not necessary to
import the corresponding package. The following packages are imported automatically
for you by the script’s engine:
org.joone.engine.*
org.joone.engine.learning.*;
org.joone.edit.*
org.joone.util.*
org.joone.net.*
org.joone.io.*
org.joone.script.*;
For instance, to create a new sigmoid layer, simply write:
newLayer = new SigmoidLayer();
How to call another script from within a macro
Within a macro it is possible to call another script contained in the neural network (both
user and event-driven scripts).
To do this, use the following code:
name = “NameOfTheMacroToCall”;
macro = jNet.getMacroPlugin().getMacroManager().getMacro(name);
eval(macro);
The scope of the script’s variables
All the scripts defined in a neural network (both user and event-driven scripts) share the
same namespace and actual-values storage. Thus a global variable declared and initialised
in script_A can be accessed in script_B.
For example:
1. Add a macro named ‘macro1’ and insert into it the code: myVariable = 5;
16
Joone Editor User Guide
2. Add a macro named ‘macro2’ and insert into it the code: print(“The value is:
“+ myVariable);
Run first the macro1 and then the macro2; you will see into the standard output console
the result: “The value is: 5”
For further details about scope and the use of variables, see the BeanShell manual.
3.6
Look’n’Feel
The default ‘look and feel’ of the Joone editor is Metal. Currently there is no way to
make another style the default.
3.6.1 Metal
Selecting this menu option displays the editor in the Metal GUI style.
3.6.2 CDE/Motif
Selecting this menu option displays the editor in the CDE/Motif GUI style.
3.6.3 Windows
Selecting this menu option displays the editor in the Windows GUI style.
3.7
Help
3.7.1 About Joone
This option displays the Joone Editor About screen. The current version of the Editor and
of the Engine being used is also displayed. Version numbers are of the form ‘majorrelease.minor-release.build’, i.e. 1.2.5. If an older, incompatible engine version is
detected, a warning will be displayed in the About screen, as backward compatibility is
not guaranteed between editor and engine versions.
3.7.2 Help Contents
This option displays the on line help of the editor.
17
Joone Editor User Guide
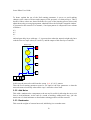
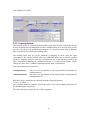
4
Toolbar
The tool bar buttons are divided into two palettes. One contains all the drawing buttons,
while the other contains all the construction components, as shown in the following
figure:
The content of the drawing palette is determined by the Joone application while the
component panel is configurable by modifying the layers.xml file. Please note that not all
of the following components may appear by default in the Joone Editor application due to
limited space on the tool bars. See the chapter on the XML parameter file for details on
how to alter the items that appear in the toolbar.
4.1
Selection Tool
The Selection Tool allows Layers to be selected and dragged around the screen. It is also
use to create links between Layers.
4.2
Label and Connected Label
The Label tool allows text comments to be placed on the screen.
The Connected Label tool allows the addition of text to each drawing tool. The attached
text will follow the figure’s movements.
4.3
Drawing Tools
These tools permit the addition of several figures to the drawing panel of the GUI editor.
They will be saved along with the neural network (Save menu item) and then restored on
the drawing panel (Open menu item).
4.4
Input Layers
The New File Input Layer, New URL Layer, New Excel Input Layer, the Switch Input
Layer and the Learning Switch tools allow new input layers to be added to the screen.
4.5
Layers
The New Linear Layer, New Sigmoid Layer, New Tanh Layer, New Logarithmic Layer,
New Context Layer, New Nested ANN Layer and New Delay Layer tools allow new
processing layers to be added to the screen.
18
Joone Editor User Guide
4.6
Output Layers
The New Switch Output Layer, New File Output Layer, New Excel Output Layer and
New Teacher Layer tools allow new output layers to be added to the screen.
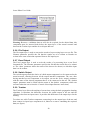
4.7
Charting Component
This component belongs to the output components family, so it can be used anywhere
that makes sense to insert an output component. For instance, it can be attached to the
output of a Layer, or to the output of a Teacher component.
The charting component has the following properties:
maxXaxis:
maxYaxis:
name:
resizable:
show:
title:
serie:
The maximum value of the X axis. Set this value to the maximum number
of the samples required to visualise in the chart.
The maximum value of the Y axis. Set this value to maximum value you
expect to display in the chart.
The name of the chart component.
If true, the window containing the chart will be resizable. The resizing of
the window will be rescale the entire chart, adapting itself to the new size
of the frame.
Used to show or hide the window containing the chart.
The text shown in the title bar of the window containing the chart.
Indicates what series (column) in a multicolumn output data is to be
displayed
All the above properties are updateable at any time, including during the running of the
network making it possible to show the chart at several sizes or resolutions. This is an
example of the use of the charting component:
19
Joone Editor User Guide
In the above example, the charting component is attached to the output of a teacher
component to capture and display the RMSE values during the training phase. The
maxXaxis property is set to the number of the training epochs, while the maxYaxis is set
to the max value we want to show in the chart.
The user can change either of these values at any time to show a zoomed view of the
chart.
4.8
Synapses
These components allow the user to choose the type of synapse that connects two layers.
In the toolbar there are three buttons as above, representing respectively a Full Synapse, a
Direct Synapse and a Delayed Synapse. More type will be added to future versions of
Joone.
20
Joone Editor User Guide
•
•
•
A Full Synapse will connect every output connection of one layer to this input of
every neuron in another layer.
A Direct Synapse will connect each output connection of one layer to exactly one
neuron in the other layer. The number of outputs of the first layer must match the
number of neurons in the second layer, or an exception will be generated when the net
is started.
A Delayed Synapse behaves as a full Synapse where each connection is implemented
with a FIRFilter object. In this connection is implemented the temporal
backpropagation algorithm by Eric A. Wan, as in 'Time Series Prediction by Using a
Connectionist Network with Internal Delay Lines' in Time Series Prediction.
Forecasting the Future and Understanding the Past, by A.Weigend and
N.Gershenfeld. Addison-Wesley, 1994.
To use these components, the firstly selects the tool button corresponding to the synapse
required, then drags a line from one layer to another in the drawing area. The new
inserted synapse will be shown with an arrow containing a small box at its centre, as in
the following figure:
The box contains a label indicating the type and state of the synapse. The available types
are shown the following table:
F = Full Synapse
D = Direct Synapse
-1 = Delayed Synapse
If the little box is greyed, then the synapse is disabled, indicating that this branch of the
net is interrupted. To disable a synapse, right-click it and set the ‘Enabled’ property in the
property panel to false. This feature is very useful in the designing of a neural network to
try several architectures on the fly.
The neural network contained in the file org/joone/samples/synapses/synapses.ser
contains an example using synapses currently available in JoonEdit.
Warning:
• Use the above tool buttons ONLY to connect two layers and NOT to connect any
other component such as input or output components, plugins, etc. Doing
otherwise will cause an exception.
• The basic method to connect two layers is to simply drag an arrow from the right
handle of a layer to the other, which default to a Full Synapse.
21
Joone Editor User Guide
•
Neural networks saved with a previous version of JoonEdit will continue to work
but the synapses will be shown unlabelled. This should not create confusion
because in previous releases of the Joone editor only full synapses was created.
Popup menu will work on older versions.
4.8.1 The Pop-Up Menu for all Connection Types
Right-clicking on any connection displays a pop-up menu as per other components.
The menu contains two items:
Properties
Delete
NB
•
•
4.9
To show the property panel for the synapse selected.
To delete the connection.
The Properties item is not shown if the line selected does not contain a synapse,
for instance the arrow connecting an input component to a layer.
The Delete item is included with all pop-up menus.
Plugins
The New Center Zero Layer, New Normalize Layer and the New Turning Point Layer
tools, as well as Linear, Dynamic Annealing Monitor allow new plugin layers to be added
to the screen.
22
Joone Editor User Guide
5
Layers
There are numerous layer types available in the Joone editor.
5.1
Processing Layers
These layers contain processing neurons. They consist of a number of neurons as set by
the layer’s row parameter. The differences between layer types are described in this
section.
5.1.1 Linear
The output of a linear layer neuron is the sum of the input values, scaled by the beta
parameter. No transfer function is applied to limit the output value, the layer weights are
always unity and are not altered during the learning phase.
5.1.2 Sigmoid
The output of a sigmoid layer neuron is the sum of the weighted input values, applied to a
sigmoid function. This function is expressed mathematically as:
y = 1 / (1 + e-x)
This has the effect of smoothly limiting the output within the range 0 and 1.
5.1.3 Tanh
The tanh layer is similar to the sigmoid layer except that the applied function is a
hyperbolic tangent function. This function is expressed as:
y = (ex – e-x)/(ex + e-x)
This has the effect of smoothly limiting the output within the range –1 and 1.
During training, the weights of the Sigmoid and Tanh layers are adjusted to match teacher
layer data to the network output.
5.1.4 Logarithmic
The logarithmic layer is similar to the sigmoid layer except that the applied function is a
logarithmic function. This function is expressed as:
y = log(1 + x)
y = log(1 – x)
if x >= 0
if x < 0
This layer is useful to avoid to saturate the input of the layer in presence of input values
near the extreme points 0 and 1.
23
Joone Editor User Guide
5.1.5 Context
The context layer is similar to the linear layer except that it has an auto-recurrent
connection between its output and input, like depicted in the following figure:
w
x
PE
y
Its activation function is expressed as:
y = b * (x + y(t-1) * w)
where :
b = the beta parameter (inherited from the linear layer)
w = the fixed weight of the recurrent connection (not learned)
The w parameter is named ‘timeConstant’ in the property panel because it backpropagates the past output signals and, as its value is less than one, the contribute of the
past signals decays slowly toward zero at each cycle.
In this manner the context layer has a own ‘memory’ embedded mechanism.
This layer is used in recurrent neural networks like the Jordan-Elman NNs.
5.1.6 Nested ANN
The nested neural network layer permits an entire neural network to be added to the
network being edited. Using this component, it is possible to build modular neural
networks, constituted of several pre-built neural networks, allowing complex, compound
‘organisms’ to be created. The parameter ‘Nested ANN’ must be filled with the name of a
serialized neural network (saved with the File->Export neural net menu item).
Note: A neural network to be used in a nested ANN component, must be composed
solely of processing elements and not file I/O and/or Teacher layers.
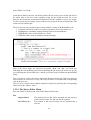
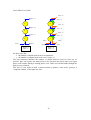
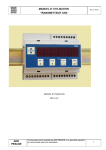
5.1.7 Delay
The delay layer applies the sum of the input values to a delay line, so that the output of
each neuron is delayed a number of iterations specified by the taps parameter.
To understand the meaning of the taps parameter, the following picture that contains two
different delay layers, one with 1 rows and 3 taps, and another with 2 rows and 3 taps:
24
Joone Editor User Guide
X2(t - 3)
X1(t - 3)
X1(t - 3)
-1
-1
-1
X2(t - 2)
X1(t - 2)
-1
-1
X1(t - 2)
-1
X2(t - 1)
X1(t - 1)
-1
-1
-1
X2(t)
X1(t)
X1(t - 1)
X2(t)
X1(t)
X1(t)
Rows = 1
Taps = 3
X1(t)
Rows = 2
Taps = 3
the delay layer has:
• the number of inputs equal to the rows parameter
• the number of outputs equal to the rows * (taps + 1)
The taps parameter indicates the number of output delayed cycles for each row of
neurons, plus one because the delayed layer also presents the actual input sum signal
Xn(t) to the output. During a training phase, error values are fed backwards through the
delay layer as required.
This layer is very useful to train a neural network to predict a time-series, giving it a
‘temporal window’ of the input raw data.
25
Joone Editor User Guide
5.2
I/O Layers
The I/O (Input / Output) layers represent interfaces between the processing layers of a
neural network and the external environment, providing the net with the data needed for
processing and/or training.
5.2.1 File Input
The file input layer allows data in a file to be applied to a network for processing. Data
for processing is expected as a number of rows of semicolon-separated columns of
values. For example, the following is a set of three rows of four columns:
0.2;0.5;0.6;0.4
0.3;-0.35;0.23;0.29
0.7;0.99;0.56;0.4
Each value in a row will be made available as an output of the file layer, and the rows
will be processed sequentially by successive processing steps of the network.
As some files may contain information additional to the required data, the parameters
firstRow, lastRow, firstCol and lastCol may be used to define the range of useable data.
The filename parameter specifies the file that is to be read from.
5.2.2 URL Input
The URL input layer allows data from a remote location to be applied to a network for
processing. The allowed protocols are http and ftp. The data format is the same as for
the FileInput layer.
5.2.3 Excel Input
The Excel Input layer permits data from an Excel file to be applied to a neural network
for processing. Its ‘sheet’ parameter allows the name of the sheet to be chosen from
which the input data is read.
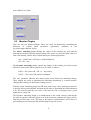
5.2.4 Switch Input
The switch input allows the choice of which input component is to be connected to the
neural network, choosing between all the input components attached to it. The user, after
having attached several input components to its input, can set the ‘active input’ parameter
with the name of the chosen component that is to be connected to the net. The ‘default
input’ parameter must be filled with the name of the default component (the one activated
when the user selects the ‘Control->Reset Input Streams’ menu item).
The switch input component, along with the output switch layer, permits dynamic
changing of the architecture of the neural network, changing the input and/or output data
layers attached to the neural network at any time. This is useful to switch the input
source, for instance, between the file containing the training data set and the file
containing the validation data set to test the training of the neural network, as depicted in
the following screen shot:
26
Joone Editor User Guide
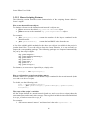
5.2.5 Learning Switch
The learning switch is a special implementation of the Switch Input component and can
be used to attach both a training data set and a validation data set to the neural net. In this
way the user can test the generalization property of a neural network using a different
data set to the one used during the training phase.
The training input data set can be attached by dragging an arrow from the input
component to the learning switch, while the validation input data set can be attached
simply by dragging an arrow from the red square on top of the learning switch to the
input component containing the validation data set. To switch between them, simply
change the value of the 'validation' parameter shown in the Control Panel.
This component has two properties:
trainingPatterns:
validationPatterns:
Must be set to the number of the input patterns constituting the
training data set.
Must be set to the number of the input patterns constituting the
validation data set.
Both these above parameters are obtained from the following formula
lastRow - firstRow + 1
where the last/firstRow variables contain the values of the corresponding parameters of
the attached input components.
The following figure depicts the use of this component:
27
Joone Editor User Guide
Warning: Because a validation data set will also be required for the desired data, this
component must be inserted both before the input layer of the neural network and
between the Teacher layer and the desired input data sets.
5.2.6 File Output
The file output layer is used to convert the results of a processing layer to a text file. The
filename parameter specifies the file that the results are to be written to. Results are
written in the same semicolon-separated form as file input layers.
5.2.7 Excel Output
The Excel output layer is used to write the results of a processing layer to an Excel
formatted file. The filename parameter specifies the file that the results are to be written
to. The ‘sheet’ parameter allows the name of the sheet to be chosen, to which the input
data is to be written.
5.2.8 Switch Output
The switch output permits the choice of which output component is to be connected to the
neural network, choosing between all the output attached components. The user, after
having attached several components to its output, can set the ‘active output’ parameter
with the name of the chosen component that is to be connected to the net. The ‘default
output’ parameter must be filled with the name of the default component (which one
activated when the user selects the ‘Control->Reset Input Streams’ menu item).
5.2.9 Teacher
The Teacher layer allows the training of a neural net, using the back-propagation learning
algorithm. It calculates the difference between the actual output of the net and the
expected value from an input source. It provides this difference to the output layer for the
training.
To train a net, add a Teacher component, connecting it to the output layer of the net, and
then connect an input layer component to it, linked to a source containing the expected
data (see figure).
28
Joone Editor User Guide
29
Joone Editor User Guide
6
Plugins
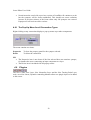
There are three types of pre-processing plugins for the input data, and two monitor
plugins. A connection to a plugin can be added by dragging an arrow from the magenta
square handle on the bottom side of an input layer, as depicted in the following figure:
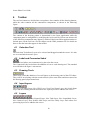
6.1
Pre-Processing Plugins
There are three pre-processing plugins implemented, but others can be implemented by
extending the org.joone.util.ConverterPlugIn class:
Centre on Zero
Normalizer
Turning Points Extractor
This plugin centres the entire data set around the zero axis
by subtracting the average value.
This plugin can normalize an input data stream within a
range determined by its min and max parameters.
This plugin extracts the turning points of a time series,
generating a useful input signal for a neural net,
emphasising the relative max and min of a time series
(very useful to extract buy and sell instants for stock
forecasting). Its minChangePercentage parameter indicates
what the minimum change around a turning point should
be to consider it a real change of direction of the time
series. Setting this parameter to a relative high value helps
to reject the noise of the input data.
Every plugin has a common parameter named serie. This indicates what series (column)
in a multicolumn input data is to be affected (0 = all series).
A plugin can be attached to an input layer, or to another plugin so that pre-processing
modules can be cascaded.
If both centre on zero and normalize processing is required for an input stream, the
centre on zero plugin can be connected to a file input layer, and then a normalizer plugin
attached to this, as shown in the following figure:
30
Joone Editor User Guide
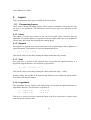
6.2
Monitor Plugins
There are also two Monitor Plugins. These are useful for dynamically controlling the
behaviour of control panel parameters (parameters contained in the
org.joone.engine.Monitor object).
The Linear Annealing plugin changes the values of the learning rate (LR) and the
momentum parameters linearly during training. The values vary from an initial value to a
final value linearly, and the step is determined by the following formulas:
step = (FinalValue - InitValue) / numberOfEpochs
LR = LR – step
The Dynamic Annealing plugin controls the change of the learning rate based on the
difference between the last two global error (E) values as follows:
If E(t) > E(t-1) then LR = LR * (1 - step/100%).
If E(t) <= E(t-1) then LR remains unchanged.
The ‘rate’ parameter indicates how many epochs occur between an annealing change.
These plugins are useful to implement the annealing (hardening) of a neural network,
changing the learning rate during the training process.
With the Linear Annealing plugin, the LR starts with a large value, allowing the network
to quickly find a good minimum, and then the LR reduces permitting the found minimum
to be fine tuned toward the best value, with little the risk of escaping from a good
minimum by a large LR.
The Dynamic Annealing plugin is an enhancement to the Linear concept, reducing the
LR only as required, when the global error of the neural net augments are larger (worse)
than the previous step’s error. This may at first appear counter-intuitive, but it allows a
good minimum to be found quickly and then helps to prevent its loss.
31
Joone Editor User Guide
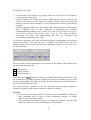
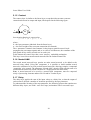
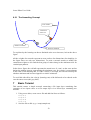
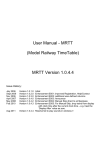
6.2.1 The Annealing Concept
Error surface
Actual error
of the NN
Relative minimum
Absolute minimum
To explain why the learning rate has to diminish as the error increases, look at the above
figure:
All the weights of a network represent an error surface of n-dimensions (for simplicity, in
the figure there are only two dimensions). To train a network means to modify the
connection weights so as to find the best group of values that give the minimum error for
certain input patterns.
In the above figure, the red ball represents the actual error. It ‘runs’ on the error surface
during the training process, approaching the minimum error. Its velocity is proportionate
to the value of the learning rate, so if this velocity is too high, the ball can overstep the
absolute minimum and become trapped in a relative minimum.
To avoid this side effect, the velocity (learning rate) of the ball needs to be reduced as the
error becomes worse (the grey ball).
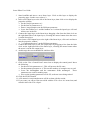
7
Basic Tutorial
This tutorial creates a simple network connecting a file input layer containing four
examples of two input values to a file output layer via a linear layer containing two
neurons.
1. Using a text editor, create a new file and add four lines as follows:
0.2;0.3
0.4;0.5
0.6;0.8
0.9;1.0
2. Save the file to disk (e.g. c:\temp\sample.txt).
32
Joone Editor User Guide
3. Start JoonEdit and insert a new linear layer. Click on this layer to display the
properties page. Set the rows value to 2.
4. Insert a File Input layer to the left of the linear layer, then click on it to display the
properties window:
• Set the firstCol parameter to 1.
• Set the lastCol parameter to 2.
• Enter c:\temp\sample.txt in the fileName parameter.
• Leave the firstRow as 1 and the lastRow as 0 so that the input layer will read
all the rows in the file.
5. Connect the input layer to the linear layer dragging a line from the little circle on
the right hand side of the input layer, releasing the mouse button when the arrow
is on the linear layer.
6. Now insert a File Output layer to the right of the linear layer, click on it and insert
into the properties window:
• ”c:\temp\sampleout.txt” on the fileName parameter.
7. Connect the linear layer to the file output layer by dragging a line from the little
circle on the right hand side of the linear layer, releasing the mouse button when
the arrow is on the file output layer.
8. At this stage the screen should look similar to this:
9. Click on the ‘Net->Control Panel’ menu item to display the control panel. Insert
the following:
• Set the totCicles parameter to 1. This will process the file once.
• Set the patterns parameter to 4. This sets the number of example rows to read.
• Leave the learningRate and the momentum fields unchanged. These
parameters are used for training a net.
• Also set the learning parameter to FALSE, as the net is not being trained.
10. Click the START button
11. A file named c:\temp\sampleout.txt will be written with the results.
12. If you want, you can save the net to disk with the ‘File->Save As’ menu item, and
reload it later with ‘File->Open’.
33
Joone Editor User Guide
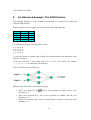
8
An Advanced Example: The XOR Problem
This example illustrates a more complete construction of a neural net to teach the
classical XOR problem.
In this example, the net is required to learn the following XOR truth table:
Input 1
0
0
1
1
Input 2
0
1
0
1
Output
0
1
1
0
So, we must create a file containing these values:
0.0;0.0;0.0
0.0;1.0;1.0
1.0;0.0;1.0
1.0;1.0;0.0
A semicolon needs to separate each column. The decimal point is not mandatory if the
numbers are integer.
Create this file with a text editor and save it on the file system (for instance
c:\joone\xor.txt in a Windows environment).
Now we'll build a neural net like this:
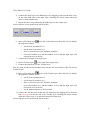
Run the editor, and execute these following steps:
1. Add a new sigmoid layer
parameter to 2
and set its layerName to 'Input' and the rows
2. Add a new sigmoid layer, and set its layerName to 'Hidden' and the rows
parameter to 3
3. Add a new sigmoid layer, and set its layerName to 'Output', leaving the rows
parameter as 1
34
Joone Editor User Guide
4. Connect the input layer to the hidden layer by dragging a line from the little circle
on the right hand side of the input layer, releasing the mouse button when the
arrow is on the hidden layer
5. Repeat the above step connecting the hidden layer to the output layer
At this stage the screen should look similar to this:
6. Insert a File Input layer
the properties window:
to the left of the input layer, then click on it to display
o
Set the firstCol parameter to 1
o
Set the lastCol parameter to 2
o
Enter c:\joone\xor.txt in the fileName parameter
o
Leave the firstRow as 1 and the lastRow as 0 so that the input layer will
read all the rows in the file
7. Connect the File Input to the input layer
8. Insert a Teacher layer
to the right of the output layer
9. Connect the output layer to the Teacher layer
Now we must provide the desired data to the teacher (the last column of the file xor.txt)
to train the net:
10. Insert a File Input layer
the properties window:
above of the Teacher layer, then click on it to display
o
Set the firstCol parameter to 3
o
Set the lastCol parameter to 3
o
Enter c:\joone\xor.txt in the fileName parameter
o
Leave the firstRow as 1 and the lastRow as 0 so that the input layer will
read all the rows in the file
o
Set the name parameter to 'Desired data'
11. Connect the Teacher layer to that last File Input layer by dragging a line from the
little red square on the top side of the Teacher layer, releasing the mouse button
when the yellow arrow is on the last inserted File Input layer
At this stage the screen should look similar to this:
35
Joone Editor User Guide
12. Click on the ‘Net->Control Panel’ menu item to display the control panel. Insert
the following:
o
Set the totCicles parameter to 10,000. This will process the file 10,000
times
o
Set the patterns parameter to 4. This sets the number of example rows to
read.
o
Set the learningRate parameter to 0.8 and the momentum parameter to 0.3
o
Set the learning parameter to TRUE, as the net must be trained.
o
Set the validation parameter to FALSE, as the net is not being tested
13. Click the START button, and you'll see the training process starting.
The Control Panel shows the cycles remaining and the current error of the net.
At the end of the last cycle, the error should be very small (less than 0.1), otherwise click
on the Net->Randomize menu item (to add a little ‘noise’ to the weights of the net) and
click the START button again. If required, you can save the net with the 'File->Save
As…' menu item, so you can reuse the net later by loading it from the file system.
36
Joone Editor User Guide
8.1
Testing the Trained Net
To test the trained net:
14. Add an Output File layer on the right of the output layer, click on it and insert into
the properties window:
o
”c:\temp\xorout.txt” on the fileName parameter
15. Connect the output layer of the net to the File Output layer.
16. Select the line that connects the output layer to the Teacher layer and click on the
Edit->Delete to disconnect the Teacher from the neural net.
17. On the Control Panel change the following:
o
Set the totCicles parameter to 1. This will process the input file once.
o
Set the learning parameter to FALSE, as the net is not being trained.
18. Click on the START button.
19. Open the xorout.txt file with an editor, and you'll see a result like this (the
values can change from one run to another, depending on the initial random
values of the weights):
0.02592995527027603
0.9664584492704527
0.9648193164739925
0.03994103766843536
This result shows that the neural net has learned the XOR problem, providing the correct
results:
•
a value near zero when the input columns are equal to 0;0 and 1;1
•
a value near one when the input columns are equal to 0;1 and 1;0
37
Joone Editor User Guide
9
The XML Parameter File
This section explains how to modify the tool palette to personalize and extend the editor
with new components.
The following sections are provided in the layers.xml file, provided with the editor
package. By default he Joone Editor will look for the file org/joone/data/layers.xml as the
parameter file, but this behaviour can be overridden by specifying the parameter file as a
parameter to the run command:
java org.joone.edit.JoonEdit /some_path/your_parameter_file.xml
The layers.xml file provided with Joone includes all the available component types in the
Joone project although some of the less-used ones are commented out.
9.1
The <buttons> … </buttons> Section
This section contains all the buttons that are present in the toolbar.
<layer type="…" class="…” image="…" />
This section describes a layer. Its parameters are:
type:
class:
image:
The name of the layer that will be shown when the mouse passes over it.
The name of the class (complete with the package ‘xxx.yyy.zzz.classname’). The
class must extend the org.joone.engine.Layer class and must be in the JVM
classpath.
The name of the image of the toolbar button. The name of the file should be:
“org.joone.images.” + image_name + “.gif”, so the searched file name will be:
/org/joone/images/image_name.gif (only gif images are allowed in the actual
version of the editor).
<input_layer type="…" class="…" image="…" />
This section describes an input layer. All parameters are the same as above. The input
layer class must extend the org.joone.io.StreamInputSynapse and must be in the
classpath.
<input_switch type="…" class="…" image="…" />
This section describes an input switch layer. All parameters are the same as above. The
input switch layer class must extend the org.joone.engine.InputSwitchSynapse and
must be in the classpath.
<learning_switch type="…" class="…" image="…" />
This section describes a learning switch layer.
All parameters are the same as above. The learning switch layer class must extend the
org.joone.engine.learning.LearningSwitch and must be in the classpath.
<output_layer type="…" class="…" image="…" />
38
Joone Editor User Guide
This section describes an output layer. All parameters are the same as above. The output
layer class must extend the org.joone.io.StreamOutputSynapse and must be in the
classpath.
<output_switch type="…" class="…" image="…" />
This section describes an output switch layer. All parameters are the same as above. The
output switch layer class must extend the org.joone.engine.OutputSwitchSynapse
and must be in the classpath.
< teacher_layer type="…" class="…" image="…" />
This section describes a teacher layer. All parameters are the same as above. The teacher
layer class must extend the org.joone.engine.learning.TeachingSynapse and must
be in the classpath.
<input_plugin type="…" class="…" image="…" />
This section describes an input plugin for the data pre-processing. All parameters are the
same
as
above.
The
input
plugin
class
must
extend
the
org.joone.util.ConverterPlugin class and must be in the classpath.
<monitor_plugin type="…" class="…" image="…" />
This section describes a monitor plugin to control the behaviour of the training process.
All parameters are the same as above. The monitor plugin class must extend the
org.joone.util.MonitorPlugin class and must be in the classpath.
<synapse type="…" class="…" label="…" image="…" />
This section describes a synapse to connect two layers together. This tag has the same
properties as the other components, plus a ‘label’ property to set the label shown in the
little box. The label is not mandatory but its use is recommended to visually distinguish
various types of synapse displayed in the drawing area. If no label is specified, the
synapses will be drawn as an arrow. The synapse component must extend the
org.joone.engine.Synapse class.
9.2
The <options> … </options> Section
This section contains all the parameters that control the behaviour of the GUI editor.
Currently it contains the following tags:
<refreshing_rate value="nnn" />
This parameter controls the refreshing rate of the fields shown in the control panel during
the training. To speed up the training process, set this value to a high value (100 or more).
9.3
Separators
Small spaces can be inserted between toolbar buttons by inserting separator tags at the
required position in the layers file thus:
<separator/>
39
Joone Editor User Guide
9.4
Temporarily Removing Items
Any item can be temporarily removed from the toolbar by enclosing the item in comment
tags <!-- and -->. For example, to temporarily remove a separator from the toolbar, edit
the separator tag…
<separator/>
…to…
<!--<separator/>-->
…or alternatively…
<!--<separator/-->
40
Joone Editor User Guide
10
Online Resources
10.1 Joone
Home page: http://www.joone.org/
Summary page: http://sourceforge.net/projects/joone/
10.2 Artificial Neural Networks Technology
http://www.dacs.dtic.mil/techs/neural/neural_ToC.html
10.3 Java
http://java.sun.com/
10.4 JAXP
http://java.sun.com/xml
10.5 JHotDraw
http://sourceforge.net/projects/jhotdraw/
10.6 Source Forge
http://www.sourceforge.net
10.7 Sun Microsystems
http://www.sun.com/
41
Joone Editor User Guide
11
Glossary
11.1 Ann / NN
Artificial Neural Network. Synonymous throughout this document with the term neural
network, an interconnected network of simulated neurons.
11.2 Classpath
The environment variable listing the files and directories that Java will search for runtime classes. On a Windows system, this variable is available by right-clicking the My
Computer icon on the desktop, selecting the Advanced tab of properties, selecting
Environment Variables. A semicolon should separate different entries in the Classpath.
11.3 GUI
Graphical User Interface.
11.4 Jar File
Similar to a Zip file.
11.5 JAXP
Java API for XML Parsing. Java’s set of packages for processing XML files.
11.6 Layer
A collection of neurons that make up a Neural Network. The output of each neuron in a
layer is linked to the input of every neuron in connected layers.
11.7 Neuron
An independent processing unit, similar to a neuron in the brain. A neuron accepts inputs
from the outputs of other neurons and produces a result from these.
11.8 Neural Network
Computer models based on the neural structure of the brain that are able to learn from
experience.
11.9 PE
Processing Element, i.e. a node (the neuron) constituting a layer.
11.10 Swing
Java’s GUI component set. The Joone editor uses these components as the graphical
framework of the GUI.
42
Joone Editor User Guide
11.11 XML
Extensible Markup Language. The Joone editor uses this language to process some
parameter files.
11.12 Zip File
A compressed set of files. Java is able to read zipped files at run time, allowing Java
programs to be deployed as a small number of files.
43
This document was created with Win2PDF available at http://www.daneprairie.com.
The unregistered version of Win2PDF is for evaluation or non-commercial use only.