1
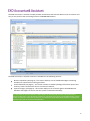
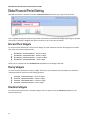
This material is copyright. It is intended only for MYOB Enterprise Solutions Business Partners and their customers. No
part of it may be reproduced in any way without the prior permission of MYOB.
MYOB has carefully prepared this material but excludes (to the extent allowed by legislation) any direct or indirect
liability arising from errors or omissions or from its use. Any case studies (including the application of particular accounting
standards or legislation) are representative examples only, and will not directly apply to the user’s own circumstances. They
are not a substitute for professional advice. Users must check that third party materials, for example from the IRD and the
ATO, are current at the time they are used.
MYOB is an internationally registered trademark of MYOB Technology Pty Ltd. The use of this trademark and MYOB’s other
trademarks is prohibited without prior consent. Other products mentioned may be service marks, trademarks or registered
trademarks of their respective owners.
EXO Accountant’s Assistant ________________________________________________ 1
Global Financial Period Setting .....................................................................................................2
Licensing ........................................................................................................................................3
Business Checklists ______________________________________________________ 4
Financial Review ________________________________________________________ 5
Systems Integrity ________________________________________________________ 6
Ledger Reconciliation ....................................................................................................................6
Data Verification ________________________________________________________ 7
Tax Reports ____________________________________________________________ 9
Tax Returns....................................................................................................................................9
Tax by Rate Type Report ...............................................................................................................9
Tax Rate Exceptions ......................................................................................................................9
General Ledger Reports __________________________________________________ 10
General Ledger Report Writer.....................................................................................................10
Using the GL Report Writer .........................................................................................................11
Index ________________________________________________________________ 23
iii
The EXO Accountant’s Assistant module provides accountants and external advisors with an intuitive and
easy-to-use portal to the accounting functions of MYOB EXO Business.
The EXO Accountant’s Assistant interface is divided into the following sections:
Business Checklists (see page 4) - this section displays a set of dashboard widgets containing
checklists for important accounting processes.
Financial Review (see page 5) - this section contains a standard package of financial reports that
show key metrics for business owners and external advisors.
Systems Integrity (see page 6) - this section displays a set of checks against the EXO Business
database and ledgers to ensure that the system is balanced and healthy.
An “Overview for External Advisors” White Paper can be accessed from the EXO Accountant’s
Assistant Help menu. This document provides an overview of key areas of the EXO Business system,
so that accountants and externals advisors can familiarise themselves with the basic concepts and
functions they will encounter in EXO Business.
1
EXO Business Accountant’s Assistant User Guide
The EXO Accountant’s Assistant includes a Financial Period combo box at the top of the interface:
This is a global setting that specifies the period to be used by all Dashboard widgets appearing on the EXO
Accountant’s Assistant. Widgets and reports must be set up to use this parameter.
To use the Financial Period in a Grid or Pivot widget, the SQL statement used by the widget must contain
one of the Current Period parameters:
@CURRENT_GLPERIODSEQNO – General Ledger
@CURRENT_CRPERIODSEQNO – Debtors Ledger
@CURRENT_DRPERIODSEQNO – Creditors Ledger
@CURRENT_STKPERIODSEQNO – Stock Ledger
These can be entered from the Parameter list dropdown on the widget’s SQL tab.
To use the Financial Period in a Clarity widget, the Clarity report displayed by the widget must be have a
runtime parameter with one of the following names:
CURRENT_GLPERIODSEQNO – General Ledger
CURRENT_DRPERIODSEQNO – Debtors Ledger
CURRENT_CRPERIODSEQNO – Creditors Ledger
CURRENT_STKPERIODSEQNO – Stock Ledger
To use the Financial Period in a Checklist widget, select an option from the Context dropdown on the
Checklist Setup tab.
2
EXO Accountant’s Assistant
The EXO Accountant’s Assistant module can be run by a single user without the need for an additional
licence; licences must be purchased to allow more than one user to access it.
The following restrictions apply when accessing the EXO Business system from the EXO Accountant’s
Assistant:
Full access is available to key functions relating to the General Ledger.
Restricted access to the Debtors and Creditors screens is available; basic details of Debtor and
Creditor accounts can be edited, but no transactions can be generated for them.
Read-only access to Stock item records is available.
3
The Business Checklists section of the EXO Accountant’s Assistant displays a set of checklist widgets for
important accounting processes.
By default, checklists for the following processes are displayed:
End of Period
End of Year
Tax Return
Each checklist represents the best practices recommended by MYOB for those processes. These checklists
are all context-sensitive to the period selected from the Financial Period control (see page 1).
4
The Financial Review section of the EXO Accountant’s Assistant contains a standard package of financial
reports that show key metrics for business owners and external advisors.
Reporting functions on this tab include:
GL Trial Balance
General Ledger Graph
Export to Accountants Office
On upgrading to EXO Business 8.5 or later, all General Ledger reports (see page 20) that are set up in the
system are added as nodes to the checklist on this tab. In a new installation of EXO Business 8.5 or later,
the default General Ledger reports are added.
5
The Systems Integrity tab displays a set of checks against the EXO Business database and ledgers to ensure
that the system is balanced and healthy. The following utilities are displayed by default:
Ledger Reconciliation (see below)
Data Verification (see page 7)
Tax Exceptions (see page 9)
The Ledger Reconciliation utility provides an overview of the status of each ledger:
Sub-ledgers that are green are in balance with the related control account; red sub-ledgers are not. The
status of each sub-ledger is determined using the reconciliation reports (GL Payables Reconciliation, GL
Receivables Reconciliation and Inventory Value Reconciliation).
Each area of the report can be clicked on to drill to more information:
Clicking on a total for a control account opens the General Ledger Account Details window,
displaying the relevant control account (Stock, Debtors or Creditors).
Clicking on the variance amount for a sub-ledger icon and the General Ledger icon opens the
relevant Reconciliation Exceptions report.
Clicking on the total for a sub-ledger opens the relevant Reconciliation report.
6
MYOB EXO Business includes a utility that performs various tests on the transactions in the EXO Business
database to highlight any errors and suggest what may be causing them. After running a Database Update
operation, a prompt appears asking if you want to verify the data:
At other times, the data verification utility can be accessed from the EXO Business Configurator at Utilities
> Others > EXO Config Verification.
Note: The Data Verification utility can be added to drop down menus, so that it can be accessed
from other modules.
7
EXO Business Accountant’s Assistant User Guide
The following options are available:
Field
Description
Verify Debtors
Verify Creditors
Verify General
Ledger
Verify Current
Invoices
Verify Allocations
Verify Misc
Functions
Stock
These options determine which aspects of the EXO Business system will be
checked by the data verification process.
Fix Current Aged
Balances
If this option is ticked, any imbalances in the current aged balances that
are detected by the data verification process will be automatically
corrected.
Only List Errors
If this option is ticked, then the output results will only show the results of
tests that return errors - any tests that pass will not be listed.
Source Ledgers
Period Range
Select the range of periods whose data you want to verify.
Click OK to run the data verification process. The results of the process are displayed in the lower section;
click Save to save the results to a text file or Print to print them out.
8
The main Tax Return functions under Tax Reports on the Reports menu are used to generate the tax return
(specific to the country), and are complimented with Tax By Rate Type and Tax Rate Exceptions reports. You
can also use the Tax Rate Exception Report menu item to highlight invoices where the tax rate is not
relevant to the transaction type.
The following Tax Return reports are available:
New Zealand GST Return
BAS Tax Return
Singapore GST Return
VAT Return
Each report is accompanied by an Edit Return option, which lets you select and edit previous returns.
Reports > Tax Reports > Tax Report by Rate Type
The Tax by Rate Type report can be used to create "manual" tax returns, or to allow auditing of data. Two
reports exist: a tax rate report for payment transactions and a tax rate report for invoice transactions.
Note: The Clarity report for payment transactions is TAXByRateType_Payment.CLR, and invoice
transactions is TAXByRateType.CLR.
A Tax Rate Exceptions report can be run to help identify incorrect coding, or invalid codes. This report is
available from the Tax Return reports by selecting Utilities > Tax Rate Exceptions. (You can also add the
report to the main EXO Business menu for direct access.)
This report can help identify tax rates set up or used on the incorrect ledger if changes are made to the tax
rate settings.
9
MYOB EXO Business provides you with the ability to generate a variety of reports such as the GL Graph, GL
Trial Balance and GL Transaction Batch Listing. You need reports as a reference for yourself as well as to
provide your financiers and government authorities with the financial performance and position of your
organization.
The GL Report Writer enables you to report on transactions that have been posted to the General Ledger. It
is period-driven in the same way as the transactions in the General Ledger being reported on.
The Report Writer is set up in a tabulated format with rows and columns. The rows determine the content
by General Ledger account or group of accounts. The columns determine the periods or budget. The report
is written in a sequential order both in terms of the rows and the columns. You need to define the
sequence of actions to take place, dependent on the numbering of the rows and columns. It is
recommended that the first draft of the report has the rows and columns numbered in a way (say
increments of 10) that allow you to insert rows or columns at a later date.
Reports > General Ledger Reports > Setup GL Reports
The following report is a sample of how you can use the features available in the EXO Business Setup GL
Reports (see page 11) utility to specify settings (see page 11) and options in rows and columns (see page
14) to create a clear and well-presented report.
10
General Ledger Reports
Reports > General Ledger Reports > Setup GL Reports
When using Setup GL Reports the user is presented with a search window. The first time the window is
displayed, no reports are listed as none have yet been set up. In the example below, a few reports have
been defined.
The following options are available:
To create a new report, click the New button. The Details tab (see page 11) containing the Settings
and Rows And Columns sub-tabs is displayed.
To create a copy of an existing report, select the report name, then click the
button. A copy of
the report is added to the list of existing reports. The user can change the name of the copy by
overtyping the default name.
To delete a report from the list, select the report and click the
button or press the DELETE key.
Once reports have been set up, the search window displays a list of these reports. The user can double-click
a report name for details.
11
EXO Business Accountant’s Assistant User Guide
Reports > General Ledger Reports > Setup GL Reports > [New]
The Settings sub-tab on the Details tab allows the user to specify the settings for the report. Initially, the
page contains default settings which provide the basic settings that the report requires. If the defaults are
being used, the user can move to the Rows and Columns sub-tab.
Click the Test Layout button for a preview of the layout.
Field Descriptions
12
Item
Description
Report No
The system generated number assigned to the report.
Report Name
Enter a descriptive name of the report here.
Secondary Heading
Provides a detailed heading and is in addition to the report name.
General Ledger Reports
Period End Descriptor
Used either for the period ended (used for Statements of Financial
Performance) or as a (used for Statements of Financial Position).
There are a number of display options for each; select the
appropriate option from the list.
Report Units
This is used as a divisor to change the units which the report will use.
For example, selecting 1000 means the report is printed in
thousands (000’s).
Decimal Places
Determines the number of decimal places shown on the report.
Show Commas
Determines if a comma separates the units of the report at each 000
break.
Short Periods in Header
Uses a shorter form of the period name (for example, Jan instead of
January).
Show Variance as %
Shows the budget variance between actual and budget instead of a $
value.
Period Year in Header
Puts the period year in the header where period has been selected
as a column.
Suppress Zeros
A default setting which can be overwritten when actually running the
report to determine if the report shows a row when all columns in
that row equal 0.
Period No in Header
Puts the period number in the header where period has been
selected as a column.
List Sub Accounts
A default setting which can be overwritten when actually running the
report to determine if the report shows sub accounts, where they
exist.
Repeat Header
Determines if the report header should be repeated where the
report continues over more than 1 page.
Use Clarity Formatting
Tick this option if a Clarity formatting template (CLF) is to be used.
Deliver to Excel
Tick this option if the generated report is to be exported to an Excel
compliant format.
Period in same Financial
Year
This option only applies to the "P&L Report - All Branches" Report
Type. If this option is ticked, then at run time fields set to rolling 12
months are limited to reporting the financial year only. Fields not set
to rolling 12 months are not affected by this option.
Page No Location
Determines the position on the page for the page number to appear.
There is also an option not to display a page number.
Page Orientation
Selects the page as either portrait or landscape. The selection here
will be determined by the number of columns the user would like to
display, the font, font size and report units.
Page Break
Varies depending on page orientation, font and font size selections.
This could require trial and error to find what best suits the user’s
report.
Font Name
The font to be used when printing the report.
Size
The size of the font to be used when printing the report.
13
EXO Business Accountant’s Assistant User Guide
Report Table Name
Enter a name for the report table in this field. This is essentially the
file name storing the report settings.
Report Code
Enter a short, descriptive code for the report. Reports are ordered by
their Report Code on the Run GL Reports window (see page 20).
Validate at Runtime
If this option is ticked, EXO Business checks the Chart of Accounts
when the report is run or previewed. If the Chart of Accounts has
changed since the report was last edited, warnings to check the
report setup appear at the end of the report and in the Warning(s)
pane on the right of this tab.
Reports > General Ledger Reports > Setup GL Reports > [New] > (Rows and Columns)
The report is made up of rows and columns. As a general rule, the rows are used for a subject while the
columns refer to the period to be reported on.
Use the
and
buttons to re-order report rows. Alternatively, you can edit the rows’ sequence
numbers on the Report Row Record window (see page 15).
A preview of the report is displayed in a pane on the right of the window. Click the Preview button (
)
to refresh the preview (the preview is also refreshed when the Save button is clicked). By default, the
preview displays no data, allowing it to display and refresh faster. To display real data on the preview, click
the Preview with Data button (
14
).
General Ledger Reports
Report Row Record
Right-clicking on a Report Rows field grid displays the following shortcut menu:
New Row: Displays a blank Report Row Record window.
Edit Row: Displays the Report Row Record window populated with the information related to the
selected row.
Delete Row: Deletes the selected row from the report.
When either the new or edit row option is selected the Report Row Record window (see page 15) opens.
Report Column Setup
Right-clicking on a Report Columns field in the grid displays the following shortcut menu:
New Column: Displays a blank Report Column Record window.
Edit Column: Displays the Report Column Record window populated with the information related
to the selected row.
Delete Column: Deletes the selected column from the report.
When either the new or edit row option is selected the Report Column Setup window (see page 18) opens.
15
EXO Business Accountant’s Assistant User Guide
GL Report Rows are added and edited by right-clicking on a row on the Rows and Columns sub-tab of the
Setup GL Reports window (see page 14):
Field Descriptions
Item
Description
Report
The name of the selected report. This is displayed by default.
Sequence
Enter a number here to set or change the sequence that the row
performs its defined action.
Note: You can also use the
and
buttons on the Setup GL
Reports window (see page 14) to re-order report rows, which
changes their sequence numbers.
16
Action type
Determines the function that the row performs. The table below (see
page 17) lists and describes each function.
Caption
The description that appears in the row of the report.
GL Account range
The GL Account range to be reported on.
To
The GL Account range to be reported on.
Normally
debit/credit
Determines what sign (+ve or –ve) to be applied to the number being
printed.
Branch
Determines if the row is to be branch specific. If branches are being used
in columns this should be set to Acc.
General Ledger Reports
SQL filter
Used as the where clause in a SQL statement.
Note: By default, this filter does not apply to the Budget column (if
one exists). To make the SQL filter apply to the Budget column, enter
/B= followed by the SQL statement to be run against the GLBUDGETS
table, e.g. GLTRANS.BRANCHNO = 1 /B= GLBUDGETS.BRANCHNO = 1
Reset after print
Used with Sub Total, Total and Grand Total lines to reset the accumulator
after printing.
Action types
The following types are available from the Action type dropdown:
Item
Description
01
Main
Heading
The heading text for the report, which is displayed in bold.
02
Sub Heading
Subheading text is displayed in bold and underlined.
03
Narrative
Narrative lines are plain text with no emphasis.
04
Page Break
This will force a page break at this row. This overrules any page length
setting made on the Settings page.
05
Single
Account
Group
Allows the user to specify a GL account to be printed in the report.
06
Single
Account
Group
Conditional
on Value
Same as single account group but it allows user to specify Normally
Debit/credit (Normally Debit/credit combo box on the screen is enabled)
as an extra criteria
07
Sequential
Range of
Account
Groups
If selected this shows information of GL accounts that falls in between
the specified GL account group range.
08
Single
General
Ledger
Account
If selected this shows information of a single GL account
09
Single
General
Ledger
Account
Conditional
on Value
If selected this shows information of a GL single account but it allows
user to specify Normally Debit/credit (Normally Debit/credit drop-down
list on the screen is enabled) as an extra criteria.
10
Sequential
Range of
Accounts
If selected this shows information for a range of GL account.
17
EXO Business Accountant’s Assistant User Guide
18
11
Profit and
Loss Account
Range Total
function
Allows the user to print a total similar to a P&L Range Value but which
gets added as a P&L Total.
12
P&L Subtotal
Prints the total of the list above it. If the previous subtotal has not been
reset then the subtotal also includes any prior subtotals.
13
P&L Total
Prints the subtotals above the total. If the previous total has not been
reset then the total also includes any prior totals.
14
P&L Grand
Total
Prints the totals above the grand total. If the previous grand total has
not been reset then the grand total also includes any prior grand totals.
15
Bal Sheet
Range Tot
The same as the P&L Range Total except that it is used for a Statement
of Financial Position.
16
Bal Sheet
SubTotal
The same as the P&L Subtotal except that it is used for a Statement of
Financial Position.
17
Bal Sheet
Total
The same as the P&L Total except that it is used for a Statement of
Financial Position.
18
Bal Sheet
Grand Total
The same as the P&L Grand Total except that it is used for a Statement
of Financial Position.
19
P&L Ledger
Total
Used in the Statement of Financial Position to provide the user with the
sum of the current year’s Statement of Financial Performance. In a
technical sense it is the total of the GLTRANS where the GLACCS section
= 0 for the current financial year.
20
P&L Range
Value
Allows the user to combine GL accounts based on a SQL Filter.
21
Bal Sheet
Range Val
The same as the P&L Range Value except that it is used for a Statement
of Financial Position.
22
Opening
Stock
Used in conjunction with periodic closing stock.
23
Closing Stock
Used in conjunction with periodic closing stock.
General Ledger Reports
GL Report Rows are added and edited by right-clicking on a column on the Rows and Columns sub-tab of
the Setup GL Reports window (see page 14):
Field Descriptions
Item
Description
Report
The name of the selected report. This is displayed by default.
Heading
The heading for the column. If using <Period>, the period name appears
in place of <Period>.
Type
Determines the function that the column performs. The following list
describes each function.
GL Code - Lists in the column the GL Code, where applicable.
Data Field - Lists the name of the account or the description used (if
any) in the Report Row Record.
Period - Allows the user to define the period to be printed.
PD Range - Allows the user to define a period range, e.g. three
months for a quarter.
Moving frame of periods - Allows the user to define a period range
(represented by the frame length value) and this period range is
relative to the period for which the report is run.
This Year - Prints the Year to Date value for the current financial
year.
Last Year - Prints the Year to Date value for the last financial year.
Last Year End - Prints the year end value for the last financial year.
19
EXO Business Accountant’s Assistant User Guide
Budget - Prints the budget value for the current financial year.
YTD Budget - Prints the budget value for the current financial year
to date.
Percentage - Allows the user to select a column to report on the
percentage of a row.
20
Field Name
This becomes active if the DataField option is selected in the Type field.
Allows the user to select directly from the GLACCS table.
Period No
Determines the period to be reported on.
Current Period = 0.
From Period
Use in conjunction with PD RANGE. Period No becomes the start period
and From Period is the end Period No.
Include rolling 12
months
The system accommodates reporting on either a financial year or rolling
year (rolling 12 months) and the choice can be made at run time. This is
achieved without having to modify the report after each period roll.
For each column in the report you wish to optionally report on a rolling 12
month basis. For required columns, tick Include Rolling 12 Months so that
this field will be either rolling 12 months or financial year only dependant
on run time selection. If not ticked, then the field will always report
financial year only.
Order periods from
oldest to newest
This option applies to columns where the Type is set to "Moving frame of
periods", or where the Type is set to "Period" and the Include rolling 12
months option is ticked. It affects the ordering of columns: when ticked,
columns are ordered from oldest to newest, e.g. July 2011, August 2011
... June 2012; when unticked, columns are ordered from newest to oldest,
e.g. June 2012, May 2012 ... July 2011.
Branch
Used to set a specific branch in a column. If using branches in the column
the user should have branches in rows set to All.
Sequence
Enter a number here to set or change the sequence that the row
performs its defined action.
Alignment
Sets the option for printing alignment to the right or the left of the
column.
Width
Determines the column width.
% Row Seq
When using percentage, the Row Seq and Col Seq provide the coordinates
for the figure to be used as 100%
% Col Seq
When using percentage, the Row Seq and Col Seq provide the coordinates
for the figure to be used as 100%
General Ledger Reports
To run a predefined report (see page 11), select General Ledger Reports > Run GL Reports from the
Reports menu.
Item
Description
Report
Select the report to run. Reports are listed with their Report Code and
Report Name, as set up on the Settings tab of the Setup GL Reports
window (see page 11).
Period
The period selection box determines where the report starts with respect
to a period = 0 selection. For example, if the period selected in the period
list is period 2, the report adds 2 periods to each column where it has a
period determined (0 will become 2, 1 will become 3, and so on).
Frame Starts
At run time you can specify the starting period for the moving frame using
the Frame Starts entry. This will be greyed when there are no moving
frame fields.
Budget 1 and 2
If the GL report being run has budgeting columns, the Budget list turns
active and allows the user to select the budget to be reported against.
Branch no(s)
Use the branches either as defined or manually check the branch
numbers from the window opened through the ellipsis [...] button.
Include periods in
same financial year
only
This checkbox is only available if the "P&L Report - All Branches" Report
Type is selected. If this option is ticked, then at run time fields set to
rolling 12 months are limited to reporting the financial year only. Fields
not set to rolling 12 months are not affected by this option.
21
EXO Business Accountant’s Assistant User Guide
Suppress accounts
with zero values
This setting determines if the report shows a row when all columns in that
row equal 0. The default value is determined by the Suppress Zeros check
box on the Setup GL Reports window (see page 11).
List sub accounts
This setting determines if the report shows sub accounts, where they
exist. The default value is determined by the List Sub Accounts check box
on the Setup GL Reports window (see page 11).
Use Clarity
formatting
template
Tick this option if a Clarity formatting template (CLF) is to be used.
Deliver to Excel
Tick this option if the generated report is to be exported to an Excel
compliant format.
Analysis codes
If GL Analysis Codes have been set up, codes can be specified here.
Once all settings are configured, click the
button to generate the report.
Saving GL Report Writer Settings
The settings on the Run GL Report window can be saved to a file, so that they can be re-used at a later
time. Click the Save or Save As buttons ( or ) to save the settings as a file with the extension .GLR.
To load settings from a .GLR file, click the
button and browse to select the file.
A .GLR file can also be specified as a parameter when adding the Run GL Reports menu item:
Specifying a .GLR file means that when the menu item is selected, a GL report will be automatically
generated using the settings in the .GLR file (the Run GL Report window does not appear). It is possible to
set up multiple GL Report menu items, each with different settings, so that a variety of GL Reports can be
generated quickly.
Note: By default, .GLR files are saved in the directory specified by the Directory location for standard
Clarity forms profile setting (several example .GLR files are installed in this directory). When running
a GL Report from a menu item as illustrated above, the .GLR file is assumed to be in this directory.
Setting the Default Report
When adding the Run GL Reports menu item, it is possible to specify which report should be selected by
default when the Run GL Reports window opens. Enter the parameter REPORTID=x into the Parameters
field, where x is the Report No of the default report.
22
rows and columns ...................................... 14
settings ....................................................... 12
C
Clarity Reports
General Ledger................................................10
G
General Ledger Reports .................................. 10
settings............................................................12
GL Report Writer ............................................ 10
running ............................................................21
setting up ........................................................11
R
Reports
General Ledger ............................................... 10
T
taxation
Tax Return reports ........................................... 9
23