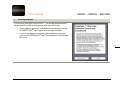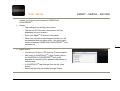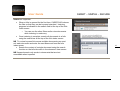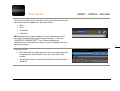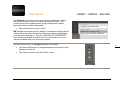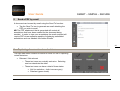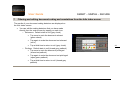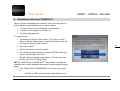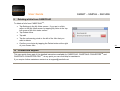
1
SMART – SIMPLE – SECURE TM CASEFOLIO User Guide 7867221/3 User Guide SMART – SIMPLE – SECURE Contents Introduction 3 This user guide covers the iOS iPad app CASEFOLIOTM What else do I need to know? 3 3 1 Getting started 4 2 Search, sort and filter 9 3 Display and navigate the documents 12 4 Annotations 16 5 Send a PDF by email 20 6 Capturing document review decisions 20 7 Filtering and editing document coding and annotations from the folio index screen 22 8 Exporting a folio from CASEFOLIO 24 9 Deleting a folio from CASEFOLIO 26 10 Contact and support 26 7867221/3 2 User Guide SMART – SIMPLE – SECURE Introduction This user guide covers the iOS iPad app CASEFOLIOTM CASEFOLIOTM is a smart, simple and secure iPad App that has been built from the ground up for one purpose: To capture your decisions about documents you review. To this end CASEFOLIOTM supports document tagging and annotations for workflows ranging from small document sets to large-scale document exports from leading litigation review platforms. What else do I need to know? A separate user guide covers CASEFOLIO CONVERTERTM and CASEFOLIO CONVERTER PROTM , the PC companion software applications used to prepare and import your documents and metadata into CASEFOLIOTM and to convert them to a number of formats following your review. 3 7867221/3 User Guide SMART – SIMPLE – SECURE Getting started 1 The first time you open CASEFOLIOTM you will be presented with the terms and conditions that govern your use of the app: • If you agree to the terms and conditions governing your use of CASEFOLIOTM tap ‘I agree’ and the app will open • If you do not agree to the terms and conditions governing your use of CASEFOLIOTM tap ‘Quit application’ and the app will close 4 7867221/3 User Guide SMART – SIMPLE – SECURE Each set of documents that is imported into CASEFOLIOTM appears in a separate folio • A sample folio named ‘Enron Sample Set’ is pre-installed that you can use to evaluate the full feature set of CASEFOLIOTM • Swipe left and right to navigate between available folios 5 Brand CASEFOLIOTM in your firm or company’s style by adding a name and selecting a colour scheme: • Select Settings in the top right corner • Select Change Theme 7867221/3 User Guide SMART – SIMPLE – SECURE Personalise your details: • type in your firm or company details • select your colour scheme • tap Save and then Done 6 Add documents to CASEFOLIOTM • Additional folios can be created using CASEFOLIO CONVERTERTM or CASEFOLIO CONVERTER PROTM (available at casefolio.net) • Folios are imported to CASEFOLIOTM and exported from CASEFOLIOTM using the iTunesTM import/export function • The import/export function is unlocked by means of an inapp purchase using your AppleTM ID. This purchase also 7867221/3 User Guide SMART – SIMPLE – SECURE entitles you to a one year license of CASEFOLIO CONVERTERTM • Unlock: o Tap settings from the My folios screen o Tap the red $17.99 button (this amount will vary depending on your location) o Enter your AppleTM ID account information o When you unlock the import/export function you will be presented with a coupon code. Use this coupon code to download CASEFOLIO CONVERTERTM from casefolio.net 7 • Import a folio: o Connect your iPad to a PC that has iTunes installed o Add a folio to CASEFOLIOTM using iTunes (refer to the CASEFOLIO CONVERTERTM user guide available at casefolio.net for detailed instructions on this process) o In CASEFOLIOTM tap Settings from the My folios screen o Select the folio that you added through iTunes 7867221/3 User Guide • SMART – SIMPLE – SECURE Import a secured folio: o Documents in a folio can optionally be secured as part of the CASEFOLIO CONVERTERTM process. o Secured folios are imported in the same manner as unsecured folios. However, if a folio is secured you will be required to provide the folio password before CASEFOLIOTM will import the document set o The password for the included Secure Sample set is password • Import a single PDF o PDF documents can be imported to CASEFOLIOTM using the iOS ‘open in’ function: 7867221/3 Open the PDF that you want to import Tap the Open in icon. The location of this icon will vary depending on the app that you are in Select CASEFOLIO You will be prompted to select an existing folio or to create a new folio 8 User Guide 2 The PDF document will appear in the folio you have chosen Tap the User files tab in the folio index screen to view only those documents that been imported in this manner SMART – SIMPLE – SECURE Search, sort and filter View your documents: • Tap on a folio to open it. The folio index screen displays your index of documents • Swipe up and down to browse through the folio index 7867221/3 9 User Guide SMART – SIMPLE – SECURE Search for keywords: • When a folio is opened for the first time, CASEFOLIO indexes the files so that they can be keyword searched. Indexing progress is indicated in the search field at the top of the folio index screen o You can use the other filters and/or view documents while indexing is under way • Once indexing is complete, search all documents in a folio using the search bar at the top of the folio index screen NB To review keyword hits across multiple documents you must exit each document and enter the next document from the folio index screen • Search the content of a single document using the search function on the left side menu in the document view screen NB Keyword search only works in documents that are text searchable when imported 7867221/3 10 User Guide SMART – SIMPLE – SECURE There are four filters in the top right corner of the folio index screen. Use these buttons to filter your document list by: • Date • Type • Custodian • Collection NB Metadata will only be available if it is included as part of the folio import package that your document belongs to. See the CASEFOLIO CONVERTERTM User Guides (available at casefolio.net) for information on how to include metadata with your document imports Clear your filters: • Each filter that has been applied to refine your document set is displayed as a blue button at the top of the folio index screen. • Tap any blue button to remove that filter from the document result set 7867221/3 11 User Guide SMART – SIMPLE – SECURE Sort your results by: • Document ID • Date • Title NB The Date sort option will only be available if date metadata is included as part of the folio import package that your document belongs to. See the CASEFOLIO CONVERTERTM User Guides (available at casefolio.net) for information on how to include metadata with your document import 3 Display and navigate the documents 12 Display the document: • Tap a document in the folio index screen to view it • Swipe up and down to browse pages in a document • Pinch to zoom in and out • Use the handle grips to slide the side menus out of view and back into view 7867221/3 User Guide SMART – SIMPLE – SECURE Use the left side menu to navigate between documents: • Tap Close to return to the folio index screen • Tap Next and Previous to navigate between documents in the document result set Use Search in the left menu bar to search or navigate within a document: • Search the document content for keywords • Navigate between pages • Navigate to bookmarks NB keywords will only be found in a document if it is text searchable 7867221/3 13 User Guide SMART – SIMPLE – SECURE When a keyword search is performed, the number of keyword hits in the document are indicated on a search navigation toolbar that appears in the top left corner of the screen: • Use the arrows on this toolbar to navigate between keyword hits in a document • Each keyword hit will be outlined by a yellow box Use the Details icon on the left menu to view a document’s metadata NB Metadata will only be available if it is included as part of the folio import package that your document belongs to. See the CASEFOLIO CONVERTERTM User Guides (available at casefolio.net) for information on how to include metadata with your document imports 7867221/3 14 User Guide SMART – SIMPLE – SECURE Use Related in the left menu to view the host, attachment, and/or sibling documents (if any) of the document being viewed. The current document is displayed with a grey background; related documents have a white background: • Tap a related document to view it NB Related documents will only display if metadata containing these relationships were imported as part of the folio import package that your document belongs to. See the CASEFOLIO CONVERTERTM User Guides (available at casefolio.net) for information on how to include metadata with your document imports Use the left side menu to navigate between documents: • Tap Next and Previous to navigate between documents in the document result set • Tap Close to return to the folio index screen 7867221/3 15 User Guide 4 SMART – SIMPLE – SECURE Annotations Use Annotations in the left menu to add a: • Note (text annotation) • Highlight • Ink (handwritten annotation) • Bookmark • Sound clip (voice annotation) 16 Add a Note: • A Note is a text annotation that can be added to any part of a document • Tap the Note button and then tap the screen where you want your Note to appear • Enter the text for your note and tap Done in the context menu that has appeared in the top right corner • This toolbar can also be used to: o Colour code a Note o Edit or delete an existing Note (tap an existing Note to 7867221/3 User Guide SMART – SIMPLE – SECURE enable the context menu) Add a Highlight: • Tap the Highlight button and then drag your finger over the text that you want to highlight. Use the context menu in the upper right corner to select the highlighting colour and to edit or delete the highlights 17 Add an Ink annotation: • An Ink annotation is a free hand drawing that can be added on top of any part of a document o Tap the Ink button and then use your finger or a stylus to draw and write on the document. Use the context menu in the upper right corner to select the ink colour and line thickness and to edit or delete the ink annotation 7867221/3 User Guide SMART – SIMPLE – SECURE Add a Bookmark: • Tap the Bookmark button and then tap the screen where you want your Bookmark to appear • The Bookmark text has a default value that is DocID and page number of the document it is being created in. You can amend or replace this text if desired. Once you are satisfied with the text of your Bookmark, tap Done in the context menu that has appeared in the top right corner • This toolbar can also be used to: o Colour code a Bookmark o Edit or delete an existing Bookmark (tap an existing Bookmark to enable the context menu) Add a Sound clip: • A Sound clip is an audio annotation that can be inserted at any part of a document • Tap the Sound clip button and then tap the screen where you want the Sound clip to appear • The Sound clip control menu will appear at the top of screen and will begin recording • Speak in a normal tone of voice and use the pause button to control your recording 7867221/3 18 User Guide • Tap Stop when you have completed your recording. Each Sound clip is limited to a maximum of two minutes • Tap the blue audio icon at the base of the Sound clip annotation to activate the context menu SMART – SIMPLE – SECURE If a document has annotations, the Annotations icon is highlighted: • Tap the Annotations icon to display a list of the annotations within the document • Tap a specific annotation or bookmark to navigate to its location in the document 7867221/3 19 User Guide 5 SMART – SIMPLE – SECURE Send a PDF by email A document can be sent by email using the Send To function: • Tap the Send To icon to generate an email attaching the PDF you wish to email NB The PDF attachment that is generated will contain all annotations that have been created for the document being emailed. In order to view your annotations the email recipient will require PDF viewer software capable of displaying embedded annotations such as Adobe’s free Adobe Reader 20 6 Capturing document review decisions The right side menu contains a number of icons for use in capturing review decisions: • Relevant / Not relevant o These two icons are mutually exclusive. Selecting one icon deselects the other o These two icons can have a total of three states: 7867221/3 Null (no selection – both icons are grey) Relevant (green check) User Guide • SMART – SIMPLE – SECURE Not relevant (red x) Privileged / Not privileged o These two icons are mutually exclusive. Selecting one icon deselects the other o These two icons can have a total of three states: Null (no selection – both icons are grey) Privileged (closed red padlock) Not privileged (open green padlock) 21 • Confidential o This icon has two states: • Confidential (red key) Null (grey key) Favourite o This icon has two states: 7867221/3 Favourite (yellow star) Null (grey star) User Guide 7 SMART – SIMPLE – SECURE Filtering and editing document coding and annotations from the folio index screen The results of your document coding decisions are displayed on the folio index screen. • You can edit the coding decisions that you have made directly from the main screen by tapping on each icon: o Relevance: Default state is null (grey check) Tap once to code the document relevant (green check) Tap again to code the document not relevant (red x) Tap a third time to return to null (grey check) o Privilege: Default state is null (closed grey padlock) 7867221/3 Tap once to code the document privileged (closed red padlock) Tap again to code the document not privileged (open green padlock) Tap a third time to return to null (closed grey padlock) 22 User Guide SMART – SIMPLE – SECURE Documents containing annotations that you have created are identified on the folio index screen. • If a document has annotations, the Annotations icon is highlighted orange • Tap the Annotations icon to display a list of the annotations within the document • Tap a specific annotation or bookmark to navigate to its location in the document • Tap the annotation icon on the document page to activate the context menu and then edit the annotation as required 23 Certain documents can be quickly viewed using the filters on the left: • Favourites • Relevant • Privileged • Confidential • User files (PDF files imported directly from email or the internet by the user. For more information see ‘Adding documents’ above 7867221/3 User Guide 8 SMART – SIMPLE – SECURE Exporting a folio from CASEFOLIO When you have completed your review of a folio you may want to export the folio and metadata that you have created: • for import into your firm’s litigation review platform • to produce to the parties in a matter, or • for some other purpose To export a folio: • Tap Settings in the My folios screen. If you are in a folio, return to the My folios screen by tapping My folios in the top left corner of the folio index screen • Tap ‘Export folios’ • Tap the folio that you want to export • You will be prompted whether to include PDF files with your export. Select either Yes or No • The folio export package is generated. You can now copy this file onto your PC using iTunes NB The CASEFOLIO CONVERTERTM User Guides, available at Casefolio.net, contain detailed instructions for performing the steps below • Use CASEFOLIO CONVERTERTM to convert your export to: o A folder of PDFs and html report that contains your 7867221/3 24 User Guide SMART – SIMPLE – SECURE coding decisions and basic document metadata fields o A folder of PDFs and CSV file that contains your coding decisions and all document metadata fields • Use CASEFOLIO CONVERTER PROTM to convert your export to: o An export.mdb load file suitable for import directly into: FTI’s RingtailTM eDiscoveryTools’ ReviewerTM o A relativity.dat load file suitable for import directly into kCura’s RelativityTM o A delimited_data.csv load file suitable for import directly into AccessData’s SummationTM Visit casefolio.net for more information on CASEFOLIO CONVERTERTM and CASEFOLIO CONVERTER PROTM 7867221/3 25 User Guide 9 SMART – SIMPLE – SECURE Deleting a folio from CASEFOLIO To delete a folio from CASEFOLIOTM: • Tap Settings in the My folios screen. If you are in a folio, return to the My folios screen by tapping My folios in the top left corner of the folio index screen • Tap Delete folios • Tap edit • Tap the red warning circle to the left of the folio that you want to delete • Confirm your choice by tapping the Delete button at the right of your chosen folio 10 Contact and support This user guide forms part of the detailed instructions available for CASEFOLIO, CASEFOLIO CONVERTERTM and CASEFOLIO CONVERTER PROTM, at any point you can click Help for assistance. If you require further assistance contact us at [email protected] 7867221/3 26