1
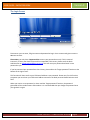
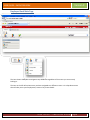
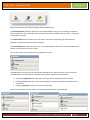
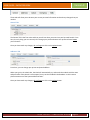
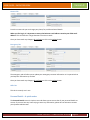
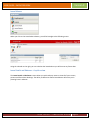
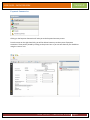
Version 9 USER GUIDE – EMPLOYEE KIOSK EMPLOYEE KIOSK USER GUIDE USER GUIDE – EMPLOYEE KIOSK Page 1 Version 9 USER GUIDE – EMPLOYEE KIOSK Contents Introduction .................................................................................................................................................. 3 Logging into the Employee Kiosk from FESA ................................................................................................ 4 Logging into the Employee Kiosk from outside of FESA ............................................................................... 5 The Login Screen ........................................................................................................................................... 6 Forgot Your Password? ............................................................................................................................. 7 Employee Kiosk Main Page ........................................................................................................................... 8 Personal Details .......................................................................................................................................... 10 Tabs and buttons of the Personal Details Screen ................................................................................... 11 General Tab ......................................................................................................................................... 12 Addresses Tab ..................................................................................................................................... 12 Contact Tab ......................................................................................................................................... 13 Emergency Tab .................................................................................................................................... 13 Skills Tab .............................................................................................................................................. 13 Personal Details – A quick review ........................................................................................................... 13 Leave Details and Leave Balance ................................................................................................................ 14 Leave Details ........................................................................................................................................... 14 Leave Balance .......................................................................................................................................... 15 Leave Details and Balances – A quick review .......................................................................................... 15 Payslip and Payment Summaries Details .................................................................................................... 16 Paylsip ..................................................................................................................................................... 16 Payment Summaries ............................................................................................................................... 17 Employee History ........................................................................................................................................ 18 Employee History Screen ........................................................................................................................ 18 Additional Information................................................................................................................................ 20 Browsers ................................................................................................................................................. 20 Kiosk Security .......................................................................................................................................... 20 Confidentiality ......................................................................................................................................... 20 Sign Off .................................................................................................................................................... 20 Contacts .................................................................................................................................................. 20 USER GUIDE – EMPLOYEE KIOSK Page 2 Version 9 USER GUIDE – EMPLOYEE KIOSK Introduction Welcome to FESA Employee Kiosk! If you are a new user, or have not used the Kiosk for From the Kiosk you will be able to: Update your personal information (eg. new address, new mobile number, etc.), which will automatically update into the HR system; View your employment history to see what positions you have worked in, including your salary history; View your leave history, including leave taken and future periods of leave. View your Leave Balance to see how many hours of Annual Leave, Personal Leave and Long Service Leave that you have available. You can also calculate how much leave you will have in the future, View and print payslips for the last 3 years; and View your end of year Payment Summaries. This guide will take you through the functionality of this new Kiosk, and allow both new and current users to use this program to its fullest. Should you have any difficulties with the Kiosk please do not hesitate to contact the Employee Kiosk Administrator at; Email: [email protected] Phone: 9323 9417 USER GUIDE – EMPLOYEE KIOSK Page 3 Version 9 USER GUIDE – EMPLOYEE KIOSK Logging into the Employee Kiosk from FESA The Employee Kiosk button is located within the Application Links area of the FESA intranet. Clicking on this will take you to the Kiosk front page. This page will be continuously updated to provide you with the latest news, upgrades, downtime etc. of the Kiosk. This guide is also available to download from this page. Click on the Login button to commence your Kiosk session. USER GUIDE – EMPLOYEE KIOSK Page 4 Version 9 USER GUIDE – EMPLOYEE KIOSK Logging into the Employee Kiosk from outside of FESA To access the Employee Kiosk from outside of FESA you will need to go to the main FESA Website at www.fesa.wa.gov.au. The link to the Employee Kiosk will be found under the “Our People” section. This will take you to the Employee Kiosk webpage, which is identical in design to the internal page. Alternatively, you can go to https://employeekiosk.fesa.wa.gov.au. Please be aware that you will have to type in https:// or you will not be taken to the web page and will receive a “page not found error”. Once you have arrived at the Employee Kiosk webpage, click on the Login button to commence your Kiosk session. USER GUIDE – EMPLOYEE KIOSK Page 5 Version 9 USER GUIDE – EMPLOYEE KIOSK The Login Screen Please enter your surname, full given name and password to begin. Your surname and given name are not case sensitive. Please Note, you only have 3 opportunities to enter your password correctly. If this is entered incorrectly 3 times your Kiosk account will be suspended. If this occurs, please email the Kiosk Administrator on [email protected] who will reset your password and email a new password to you. If you have entered your password less than 3 times, please utilize the “forgot password” function at the bottom of the login screen. This function will then email to your FESA email address a new password. Please note, for this function to operate you must have your FESA email address entered in the Kiosk personal details business email field. When you receive a new password, or have used the ‘forgot password’ function, the password generated will be random letters and numbers. It is recommended that you change this password once you sign back in again. USER GUIDE – EMPLOYEE KIOSK Page 6 Version 9 USER GUIDE – EMPLOYEE KIOSK Forgot Your Password? If you have forgotten your password and have attempted to log in less than 3 times, you can click on the “forgot password” link in the bottom right hand corner. You will be presented with this screen. Enter in your surname and your date of birth in the format shown below. Once you have entered your information, and it is correct, the Date of Birth Bar will be highlighted green, as in the example below. Then click on the submit button in the top left hand side. Shortly after you have clicked submit, and as long as your FESA business email address is entered into the Kiosk, you should receive an email supplying you with a new password. USER GUIDE – EMPLOYEE KIOSK Page 7 Version 9 USER GUIDE – EMPLOYEE KIOSK Employee Kiosk Main Page The icons shown allow you to navigate to any Kiosk area regardless of the screen you are currently looking at. The Icon on the left will activate once you have navigated to a different screen. It is a drop down menu that will take you to your Employment, Leave or Pay screen details. USER GUIDE – EMPLOYEE KIOSK Page 8 Version 9 USER GUIDE – EMPLOYEE KIOSK These are the primary icons that will display the Kiosk information. The Personal Details button will take you to your personal details. Here, you can change your address, phone numbers etc. This information will then be automatically uploaded to the HR system – saving you a call or email to Payroll. The Leave Details button will take you to your leave screen which will display your leave balances, bookings, any future leave details and leave history. The View Payslip button will take you to your current payslip details. From here, you will be able to view and print all payslips from the last 3 years. You can also access your information via the applications menu. The applications menu has several more options available to you. While some are similar to the ones mentioned above, the information provided in these options is generally more detailed. Clicking on employment will allow you to view your entire employment history at FESA. Clicking on leave allows you to view any pending leave, as well as check all leave balances and leave history. Clicking on payslip will take you to your current payslip. Below is a break down of all the options. These will be explained later in greater depth. USER GUIDE – EMPLOYEE KIOSK Page 9 Version 9 USER GUIDE – EMPLOYEE KIOSK Personal Details The personal details screen is accessed by clicking on the above button. From here, you can change your address details, contact details, emergency contact details as well as changing your password. The skills tab is not currently in use in this version. When you change information here, it will be updated into the HR system automatically. USER GUIDE – EMPLOYEE KIOSK Page 10 Version 9 USER GUIDE – EMPLOYEE KIOSK Tabs and buttons of the Personal Details Screen Refresh – this button will revert back to your last update. This feature is useful if you’ve made several mistakes and haven’t updated yet. Update – this will save any changes you have made to your personal details. After you have updated, the information will flow into the HR system. You may move your way through all the tabs and then save, however it is better to save as you go. Upon pressing the update button, you will be shown the following message; Change Password – this will take you to the change password screen. You must always change your password from the default password. A preferred password will have combination of lowercase, uppercase, numbers and at least one alternate key. USER GUIDE – EMPLOYEE KIOSK Page 11 Version 9 USER GUIDE – EMPLOYEE KIOSK These tabs will allow you to browse your current personal information and make any changes that you need to. General Tab The General Tab is the first active tab that you will see when you enter into your Personal Details. From here, the only thing you can currently do is change your preferred name. Your preferred name is not your nickname. Once you have made any changes, do not forget to click on the update button. Addresses Tab From here, you can change your private and postal address. When you type in the suburb bar, the Kiosk will automatically try and match that suburb with the state and post code. If the suburb is not accepted, it may not be included in the database. In this instance please contact one of the Systems Administrators. Once you have made any changes, do not forget to click on the update button. USER GUIDE – EMPLOYEE KIOSK Page 12 USER GUIDE – EMPLOYEE KIOSK Version 9 Contact Tab From the contact tab you can change your phone, fax, mobile and email details. When you first log in, it is important to ensure the business email address contains your FESA email address. This will allow the “Forgot Password” function to work. Once you have made any changes, do not forget to click on the update button. Emergency Tab The emergency tab will allow you to update your emergency contacts information. It is imperative that you keep this information up‐to‐date. Once you have made any changes, do not forget to click on the update button. Skills Tab This tab is currently not in use. Personal Details – A quick review The Personal Details screen is simple to use and allows you to ensure that all your personal details are current. If you ever have any issues trying to enter any information, please do not hesitate to contact your Systems Administrator. U S E R G U I D E – E M P L O Y E E K I O S K Page 13 Version 9 USER GUIDE – EMPLOYEE KIOSK Leave Details and Leave Balance Leave Details Clicking on the leave details in either of the above screens will take you to a screen where you can view all of your leave details. This screen displays your leave balances as at the current pay period, any current bookings and your leave history. USER GUIDE – EMPLOYEE KIOSK Page 14 Version 9 USER GUIDE – EMPLOYEE KIOSK Leave Balance When you click on the Leave Balance button, you will be brought to the following screen. Using the calendar to the right, you can calculate the leave balance you will have at any future date. Leave Details and Balances – A quick review The Leave Details and Balances screens allow you quick and easy access to view all of your current, present and future leave bookings. The ability to determine future leave balance will assist you in planning leave in advance. USER GUIDE – EMPLOYEE KIOSK Page 15 Version 9 USER GUIDE – EMPLOYEE KIOSK Payslip and Payment Summaries Details Paylsip When you click on the Payslip button, your payslip for the current pay period will be displayed. Alternatively, you can simply click on the View Payslips button on the main page. From the menu to the right of the payslip, you can browse through the year and month to find a particular payslip that can then be displayed and printed by clicking the printer icon. USER GUIDE – EMPLOYEE KIOSK Page 16 Version 9 USER GUIDE – EMPLOYEE KIOSK Payment Summaries Clicking on the Payment Summaries will take you to the Payment Summary screen. From the menu on the right hand side, you will be able to browse up to three years of payment summaries. These can be printed by clicking on the printer icon or you can save them to your hard drive using the ‘save as’ icon. USER GUIDE – EMPLOYEE KIOSK Page 17 Version 9 USER GUIDE – EMPLOYEE KIOSK Employee History Employee History Screen By clicking on the Employee History button, you will be brought to the employee history screen which will display both your salary and position history within FESA. USER GUIDE – EMPLOYEE KIOSK Page 18 Version 9 USER GUIDE – EMPLOYEE KIOSK Salary History provides a breakdown of your pay history, showing the effective date, position, salary, hourly rate, class and level for each salary change. By dragging your mouse over any of your current or previous positions in the positions field, the position number will be displayed. This is useful if you are trying to find a JDF for your position, or filling out a form that requires you to enter your position number. Employee History Screen – A quick review The employee history screen provides you quick access to view your entire employment history within FESA. You can check your salary levels, position numbers and cost centres. USER GUIDE – EMPLOYEE KIOSK Page 19 Version 9 USER GUIDE – EMPLOYEE KIOSK Additional Information Browsers If you are using a browser that is not on the list below, you may experience some problems while using the Employee Kiosk. It is recommended that you download one of the following browsers to use the Employee Kiosk. The Employee Kiosk has been tested on and works with the following browsers; Mozilla Firefox (v3.5.3) Internet Explorer (v7.0) Chrome (v2.0) Safari (v4.0.3) Kiosk Security FESA ICT recommends the following measures to protect your home computer against viruses, malware, worms and other vulnerabilities: Keep up‐to‐date on security patches and fixes for your operating system. The easiest way to do this is to set your system to receive automatic security updates issued by Microsoft. If your system does not allow automatic updates, we recommend that you manually install the Microsoft security patch through Microsoft Update, Install anti‐virus and anti‐spyware software and keep them up‐to‐date; and Enable a firewall which will help block attacks before they can get into your computer. Confidentiality By using this program, you acknowledge that: The logon ID assigned to me is my responsibility, and I am accountable for its use. I will not, lend nor share my password with anyone. I acknowledge that my password security is my responsibility. Sign Off Please ensure that you sign off the Kiosk rather than just closing the web browser. If you do not sign off, you will not be able to sign back in immediately as your Kiosk session is still active. Contacts If you have any problems or questions, please contact the administrator on; [email protected] USER GUIDE – EMPLOYEE KIOSK Page 20