1
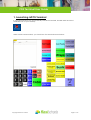
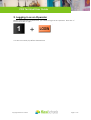
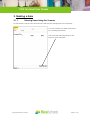
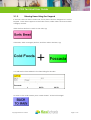
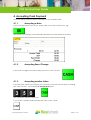
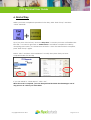
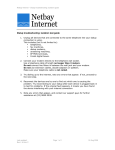
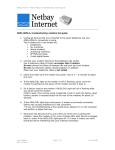
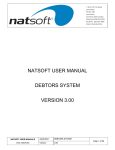
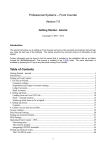
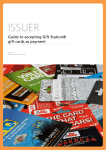
POS Terminal User Guide
Point-of-Sale
Terminal
User Guide
Contents
1.
Launching inPOS Terminal .......................................................................................................... 2
2.
Logging in as an Operator ......................................................................................................... 3
3.
Making a Sale ............................................................................................................................... 4
4.
3.1.1.
Entering Items Using the Scanner..........................................................................4
3.1.2.
Entering Items Using the Keypad ..........................................................................5
3.1.3.
Entering Items That Don’t Have a Button or Barcode ......................................6
3.1.4.
Voiding Items (Removing from the Sale).............................................................6
Accepting Cash Payment ......................................................................................................... 7
4.1.1.
Accepting a Note....................................................................................................7
4.1.2.
Accepting Exact Change ......................................................................................7
4.1.3.
Accepting another Value ......................................................................................7
4.1.4.
Accepting EFTPOS or Cheque ..............................................................................8
5.
Using Layby ................................................................................................................................... 9
6.
End of Day ................................................................................................................................... 10
Copyright flexischools 2013
Page 1 of 10
POS Terminal User Guide
1. Launching inPOS Terminal
If your terminal does not automatically start inPOS terminal, double click the inPOS
terminal icon on your desktop
When inPOS has launched, you should see the terminal screen below:
Copyright flexischools 2013
Page 2 of 10
POS Terminal User Guide
2. Logging in as an Operator
Before performing any transactions, you need to log in as an operator. Press the “1”
button and click “Login”:
+
You are now ready to perform transactions
Copyright flexischools 2013
Page 3 of 10
POS Terminal User Guide
3. Making a Sale
3.1.1.
Entering Items Using the Scanner
To sell an item, simply scan the barcode and the item will appear in the items list:
You can continue to add more items,
by scanning each item.
The total sale value appears at the
bottom of the items list.
Copyright flexischools 2013
Page 4 of 10
POS Terminal User Guide
3.1.2.
Entering Items Using the Keypad
If the item does not have a barcode, it may have a button assigned to it on the
keypad. Some items appear on the main screen, while others are shown within
category screens.
Click the item button to add it to the sale, eg:
Otherwise, click a category button, and then select the item, eg:
+
You will see the item added to the item listing for the sale:
To return to the main screen, press “Main Screen” in the bottom right
Copyright flexischools 2013
Page 5 of 10
POS Terminal User Guide
3.1.3.
Entering Items That Don’t Have a Button or Barcode
If the item does not have a barcode or a button, it must be entered as “Open Food”.
Enter the value of the item and then press “Open Food”. For example, to enter a
$2.50 item, press:
+
Tip: If you can’t see the “Open Food” button, you might need to press “Main Screen”
first
Tip: If you make a mistake when entering the value, press the “Clear” button.
You will see the item appear in the item list:
3.1.4.
Voiding Items (Removing from the Sale)
If you accidentally add an item to the sale, you can remove it by clicking the item on
the list, and then
clicking void:
+
The item is then removed from the sale.
Copyright flexischools 2013
Page 6 of 10
POS Terminal User Guide
4. Accepting Cash Payment
Once the sale is entered, ask the customer for the total sale value.
4.1.1.
Accepting a Note
If the customer hands over a note, simply click one of the note buttons, eg:
The amount of change is automatically calculated and the drawer is opened:
4.1.2.
Accepting Exact Change
If the exact change is provided, simply press the “Cash” button:
4.1.3.
Accepting another Value
If another cash value is provided by the customer, enter the amount prior to clicking
the “cash” button. For example, to accept $3.50, press:
The transaction will be completed.
If you make a mistake while entering the value, press “Clear”
Copyright flexischools 2013
Page 7 of 10
POS Terminal User Guide
4.1.4.
Accepting EFTPOS or Cheque
To accept EFTPOS or Cheque, press the relevant button:
You can also part pay by EFTPOS or Cheque by entering
the amount, as you did above with the Cash button.
Copyright flexischools 2013
Page 8 of 10
POS Terminal User Guide
5. Using Layby
The layby function uses the
following buttons.
Once the sale items are entered you have two options, accept a deposit and place
the items on layby. Or just put the items on layby. To put the items on layby hit the
"Create Layby" button. You will be presented with the following screen, enter a
description for the layby (the customer's name & phone number (please note there is
a 16 character limit, Jane0400000000 is sufficient)). This helps to quickly identify the
correct layby for future reference. Once you have entered the description click the
“OK” button.
Since the sale has not been finalised the layby will not print a receipt. To print a
receipt click the “Print Layby Receipt” button. Once you have finished with the layby
click the “Close Layby” button to close it. When the customer returns to pay off the
sale, to select the layby click the “Layby List” button, this will bring up a list of all the
current layby sales. Select the correct one and click “Open Order”. You may then
finish the sale as per normal.
Copyright flexischools 2013
Page 9 of 10
POS Terminal User Guide
6. End of Day
When you have completed operation for the day, click “End of Day” and then
“Close Terminal”:
+
Tip: If you press “End of Day” and see “Entry Error”, it means you have not finalised the
last sale. You need to go back to “Main Screen” and either complete the sale by
accepting some cash, or void the items in the list. Once the transaction is complete,
press “End of Day” again.
Select “Print” and then “Print and Reset” to notify the system that you have
completed sales for the day
If you are asked to “Clear Report”, click “Yes”.
When the reset is complete, you can then perform the inPOS Stock Manager end of
day process to collect your sales data.
Copyright flexischools 2013
Page 10 of 10