1
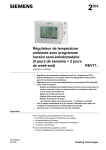
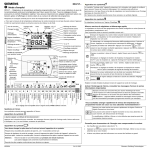
REV17 User Guide
SIEMENS BUILDING TECHNOLOGIES
6
7
8
9
10
11
12
13
14
15
16
Temperature
Comfort phase 1
End
Comfort phase 1
Start time
Comfort phase 2
Temperature
Comfort phase 2
End
Comfort phase 2
Start time
Comfort phase 3
Temperature
Comfort phase 3
End
Comfort phase 3
Saving temp.
time program
Start
Absence
Temperature
Absence
17
18
Temperature
remote control
5
End
Absence
4
Start time
Comfort phase 1
Time setting
3
1, 2 or 3
Comfort phases
2
Date Day / Month
/ Year
1
Weekdays 1-5
Weekend 6-7
RUN
Slider positions
Slider Positions
If the selected operating mode does not support the setting, the time display shows PASS.
STEP
Programming
Symbol
Initial Start Up - Enabling Battery Power:
Remove the controller from the mounting base and pull out the black insulating tape tab from the battery compartment: The controller
turns on automatically. Re-insert the controller in the mounting base.
1
Language Selection:
After startup, a welcome message appears for approx 2 minutes. Press a button to interrupt the message. Language selection starts
with “ENGLISH“ (factory setting). Press
your language choice.
2
or
until your desired language appears. Press
or move the slider to accept
Hint: if you choose the incorrect language, an Expert Level Reset will need to be performed. This is achieved by:
Pressing simultaneously the DIP switch reset button (on the back of the unit under the dip switch cover) and the
and
for 5 seconds: After this reset, all factory settings will be reloaded. This applies to both the slider settings and the
settings made on the expert level.
Setting Time:
3
Move the Slider to position 1 (time setting): Press
or
to set the time.
or
to set the date. (Note: the day of the week is automatically chosen)
Setting Date:
4
Slider in position 2 (date: day/month/year): Press
Weekday (1-5) and Weekend (6-7) Blocks:
Slider in position 3 (Monday- Friday weekdays
5
or
, Saturday and Sunday weekend
blocks in the top right hand corner. Press the
or
): You will notice the flashing
to toggle between both blocks.
Comfort Phases:
6
Slider in position 4 (there are 3 comfort phases): Press
or
to set the comfort phases you desire.
Setting Time in Comfort Phase 1:
Slider in position 5 (start time comfort phase 1): Press
7
or
to set the start time.
Hint: you will notice the flashing time cursor on the 24 hour time bar (at the bottom of the screen) corresponding with the
entered time, moves as you adjust the time with the
or
buttons
Setting Temperature in Comfort Phase 1:
8
or
Slider in position 6 (temperature comfort phase 1): Press
to set the temperature.
Setting Time to End Comfort Phase 1:
9
Slider in position 7 (end time comfort phase 1): Press
,
,
or
to set the end time.
Setting Time and Temperature for Comfort Phase 2 and 3:
Slider positions 8…10 (comfort phase 2) and slider positions 11…13
(comfort phase 3): Same procedure as above for comfort phase 1.
10
,
,
Setting Energy Saving Temperature from Monday to Sunday:
Slider in position 14 (energy saving temperature in time switch programs Automatic and Exception day): Press
or
to set the
temperature. Note: The energy saving temperature is valid Monday through Sunday. It does not depend on operating mode "Continuous
11
energy saving".
Hint:
12
RUN
REV17 User Guide
If you do not want your heating to come on at night (or anytime it is controlling to the
Complete Programming
setpoint) then set this value low e.g. 3.0°C
Move the slider to RUN position and close the cover.
Room temperature controller REV17
Page 1 of 2
Operating Mode Selection
There are five operating modes as described in the table below.
Operating mode symbol descriptions
Automatic weekly mode with maximum three heating phases per day. (typical
setting during winter)
Exception day with maximum three heating phases. Enables you to program
Automatic switching sequences different to usual automatic program. Ideal for
long weekends.
Continuous comfort mode (heater will maintain set point continuously until
removed) e.g. heater will be on 24/7
Continuous energy saving mode (Night time set point).
Continuous Frost protection mode/OFF Mode (continuous frost protection, can
be set between 8°C and 3°C, if room temperature drops below this set value the
or
buttons and wait until it stops
heater will turn on). To set this use the
flashing
Select operating mode
Press the operating mode button
to scroll down and back up to the top in order to select one of 5 modes.
Operating modes with time program
The controller offers both time programs Automatic
and Exception day
.
Do you feel too warm / too cold ?
Press
or
to set the temperature. The setting is temporary and active only until the next time the controller
activates a change.
Note:
To set your own programs, see: "Enter customized temperatures and switching
times".
Continuous operating modes
The controller offers continuous operating modes "Continuous comfort mode“
"Continuous energy saving mode“
and frost protection mode
,
.
Do you feel too warm / too cold ?
Press
or
to set a continuous temperature.
Enter holidays or absence
You can enter start, temperature and end of your holidays. The controller switches to the set holiday temperature at
the start of the holidays and back to the preset operating mode at the end of the holidays.
During holiday mode, symbol
flashes and the end of the holidays is displayed.
Proceed as follows:
Slider in position 15 (start of absence): Press
or
to set the starting date of the holidays.
Slider in position 16 (temperature during absence): Press
the holidays.
Slider in position 17 (end of absence): Press
RUN
Move the slider back to RUN. Symbol
To quit holiday mode prematurely, press
or
or
to set the temperature effective during
to set the end date of the holidays.
appears to the left of symbol
,
,
,
.
or move the slider.
How can I tell if my heater should be running?
When the REV Controller requires the heater to be heating you should see the
screen.
REV17 User Guide
Room temperature controller REV17
symbol on the right side of the
Page 2 of 2