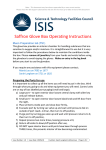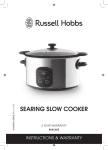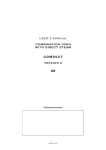
1
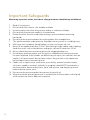
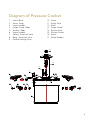
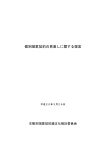
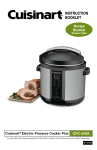
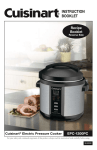
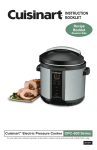
User Guide
Important information on how to use and care
for your SCANPAN Pressure Cooker
The SCANPAN pressure cooker lets you prepare fresh, flavoursome and
elegant food in a fraction of the time of traditional cooking methods. We
pride ourselves on its quality, ease of use and safety. Start learning now and
you’ll soon be cooking quick, tasty and nutritious meat stews, ragouts, pasta
sauces, soups, stocks, grains and dried beans like a professional.
CONTENTS
Important Safeguards 3
Diagram of Pressure Cooker 4
Safety 5
Instructions for Use 6
To Open and Close Pressure Cooker 6
Operating Instructions 7
First Use 8
Cooking 9
Reducing the Pressure 10
Cooking Times 11
Care of Product 12
Valves 13
Silicone Gasket Maintenance 14
Trouble Shooting 15
Recipes 16
Important Safeguards
When using a pressure cooker, these basic safety precautions should always be followed:
1.
2.
3.
4.
5.
6.
7.
8.
9.
10.
11.
12.
13.
14.
3
Read all instructions.
Do not touch hot surfaces. Use handles or knobs.
Increase supervision when the pressure cooker is used near children.
Do not place the pressure cooker in a heated oven.
Extreme caution must be used when moving a pressure cooker containing
hot liquids.
Do not use the pressure cooker for anything other than intended use.
This appliance cooks under pressure. Improper use may result in a scalding injury.
Make sure unit is properly closed before use (see instructions for use).
Never fill the cooker more than 2/3 full. See markings inside cooker and if cooking
foods that swell, such as dried beans and grains, do not fill more than 1⁄2 full.
Always check the pressure release devices for clogging before use.
Do not open pressure cooker until the unit has cooled and all internal pressure
has been released. If the handles are difficult to push apart, this indicates that the
cooker is still pressurized - do not force it open. Any pressure in the cooker can
be hazardous (see instructions for use).
Foods such as apple sauce, cranberries, pearl barley, oatmeal or other cereals,
split peas, noodles, macaroni, rhubarb, or spaghetti should NOT be cooked in a
pressure cooker, because they foam, froth, and splatter, and clog the pressure
release device (steam vent).
Do not use the pressure cooker for pressure frying with oil.
When the normal operating pressure is reached, turn the heat down so the liquid,
which creates the steam, does not evaporate.
Diagram of Pressure Cooker
1.
2.
3.
4.
5.
6.
7.
8.
9.
Utensil Base
Screw - Body
Lower Handles
Finger Guard - Body
Bracket - Body
Upper Handles
Spring - Auto Lock Valve
Body - Auto Lock Valve
Double Locking Valves
10.
11.
12.
13.
14.
15.
16.
17.
Cover
Safety Valve
Knob
Finger Guard
Release Valve
Silicone Gasket
Screw
Safety Window
12
13
14
11
9
6
15 16
10
8
7
17
2
3
4
5
1
4
Safety
The SCANPAN pressure cooker has four safety systems to ensure perfectly safe cooking.
1. D
ouble Locking Valves - First Safe Guard
These valves are in the side handles and
prevent the buildup of pressure if the cover is
not properly closed. If the pressure cooker
cover is properly closed, this safety lock
prevents the opening of the cooker once the
inside pressure reaches above 5KPa.
2. Release Valve - Second Safe Guard
The release valve is the knob on top of the
cover, which raises and lowers depending on
the cooking pressure. It contains a precision
spring which keeps a working pressure for the
pressure cooker. It has two pressures
indicated by two red lines, the first line
indicates a low cooking pressure and the
second line indicates a high cooking
pressure. This valve also prevents an
excessive build-up of pressure.
3. Safety Valve - Third Safe Guard
This safety valve on the cover releases
pressure, should the release valve fail.
4. Safety Window - Fourth Safe Guard
Safety window on the rim of the cover
releases pressure in the pressure cooker if the
other safety valves fail. The silicone gasket
itself will push through the safety window to
release pressure to ensure perfectly safe
cooking, while the cover will stay on the
pressure cooker without rupturing.
5
Instructions for Use
Important - read these instructions carefully and ensure you complete the “First Use”
instructions by bringing the cooker to pressure with just water, so that you can
experience the process and also to get to know the different parts. Unlike a normal
covered pot, where steam gathers from the boiling liquid, steam escapes and the
temperature remains steady; a pressure cooker lid is locked onto the pot, and the
silicone gasket ensures that the steam is trapped in the pot. The pressure builds up
and the temperature rises above boiling point. Safety valves in the cover of the
pressure cooker release the steam to maintain a safe level of pressure. The steam and
pressure MUST BE RELEASED before the cover is opened.
To open and close the pressure cooker
Before closing the cooker please check safety and operating valves (2, 3 & 4) making
sure that the openings of all the valves are clear. Place the cover on the utensil base as
shown. Line up the positioning circle (stamped on top of the cover) with the center of
one of the base handles. Push down and turn the cover in a clockwise direction until
the cover handles lines up with the base handles. To open the cover, turn the top
handle counter-clockwise relative to the base handle. Lift off the cover.
6
Operating Instructions
Your SCANPAN pressure cooker is compatible with all stove tops, including electric,
gas, ceramic, and induction. When cooking on a stovetop, always select a burner
closest to the utensil’s diameter. When cooking with gas, never allow the flame to
come up around the sides of the pressure cooker. Do not leave the pressure cooker
unattended when heating. On induction hobs do not overheat.
7
First Use
Before using your pressure cooker for the first time, wash all parts thoroughly in ½ cup
vinegar and hot, soapy water, rinse and dry.
Dry the silicone gasket well and replace it in the cover. Fill the pressure cooker with 2
cups of water and lock the cover in place.
Place on stove top at medium to high heat and bring to pressure. As the water begins
to heat, the air in the pressure cooker will escape through the pressure release valve
causing the knob to rise, rising to show the first red ring on the valve stem. At this
stage lower the heat to maintain this pressure, cook the water for a further ten minutes
at this pressure. Remove the pressure cooker from the heat source. Before opening,
take note that the pressure cooker cover can only be opened when the steam &
pressure has been released. ALWAYS DEPRESSURIZE THE PRESSURE COOKER
BEFORE ATTEMPTING TO OPEN. Always open the cover away from you to allow
steam to escape. To check that the pressure has released, confirm that the release
valve knob has completely lowered to the top of the pressure cooker cover.
You can use one of the below methods.
Method 1:
Slow pressure release – Remove the pressure cooker from the heat source and allow it
to cool.
Method 2:
Normal pressure release – Use your finger or wooden spoon handle to push down
lightly on the knob. Hold it down until no more steam comes out.
(Steam will escape
from below knob)
Method 3:
Fast pressure release – Lean the pressure cooker over the sink and run warm water
around the outer edge ONLY of the cover. Note: Only wet the outer edge to prevent
water from being drawn into the pressure cooker!
8
Cooking
Never fill the cooker more than 2⁄3 full. See markings inside cooker and if cooking
foods that swell, such as dried beans and grains, do not fill more than 1⁄2 full. Wipe
the rim of cooker clean of any spills before attaching the cover, as food can prevent
sealing. Check that the silicone gasket is clean and dry.
Always use an accurate timer. Never use the pressure cooker without at least 2 cups of
liquid before bringing to pressure. Add food and liquid to utensil. Cover and begin
cooking over medium-high to high heat. Preheating is not necessary.
As the food begins to heat, air in the pressure cooker will escape through the pressure
release valve causing the valve cap to rise which will close the pressure release valve.
Continue to cook until the first red ring becomes visible on the valve stem. At this
point, lower the temperature if level 1 is the recommended cooking level for the food
you are cooking. If the recommended cooking level is level 2, allow the food to continue
to cook over medium-high to high heat until the second red ring becomes visible on the
valve stem.
•
•
L
evel 1 is reached when the first red ring is visible
on the valve stem. Level 1 cooks foods gently at a
low cooking pressure.
evel 2 is reached when the 2nd red ring becomes
L
visible on the valve stem. Level 2 cooks at a high
cooking pressure
Once the desired cooking level is reached, lower the heat in order to maintain the
desired cooking level. You may need to adjust the heat during cooking to maintain the
desired cooking level.
A gentle hissing sound of escaping steam means that the heat is too high. Turn the
heat down and/or remove the pressure cooker from the heat source for a short time
until the second ring is just visible.
As a safety measure, the above mentioned capacities should always be maintained.
Avoid total evaporation of the liquid. When the cooking time is finished, turn off the
heat and reduce the pressure in the pressure cooker.
9
Reducing the Pressure
IMPORTANT SAFEGUARD—Do not open the pressure cooker until the unit has
cooled and all internal pressure has been released. If the handles are difficult to push
apart, this indicates that the cooker is still pressurized - do not force it open. Any
pressure in the cooker can be hazardous.
The pressure cooker can only be opened when the normal operating pressure has
been released. Always depressurize the utensil before attempting to remove the
cover. Always open the cover away from you to allow steam to escape.
After the food has been cooked for the recommended time, turn off the heat and
remove the pressure cooker from the heat source. Be sure to place it on a
heatproof surface.
Release the pressure using one of the following methods:
•
•
•
S
low pressure release – Remove the pressure cooker from the heat source and
allow it to cool.
N
ormal pressure release – Use your finger or a wooden spoon to push down lightly
on the knob. Hold it down until no more steam comes out.
F
ast pressure release – Lean the pressure cooker over the sink and run warm water
around the outer edge ONLY of the cover. Note: Only wet the outer edge to
prevent water from being drawn into the pressure cooker.
10
Cooking Times
High
Low
Pressure Pressure
20
12
16
15
20
14
20
15
20
10
30
25
40
24
32
30
40
28
40
30
40
20
60
50
15
25
15
28
25
25
15
30
50
30
56
50
50
30
4
6
10
10
6
7
8
3
7
8
8
12
20
20
12
14
16
6
14
16
High
Low
Pressure Pressure
8
6
9
7
8
7
9
8
5
27
6
20
8
25
28
6
18
9
7
5
25
10
5
7
16
12
18
14
16
14
18
16
10
54
12
40
16
50
56
12
36
18
14
10
50
20
10
14
4
2
5
5
5
7
6
8
4
10
10
10
14
12
5
12
45
10
10
15
10
11
15
15
10
24
90
20
20
30
20
22
30
30
The cooking times indicated
should be taken as a guide.
Do not hesitate to adapt them
to your personal tastes, your
cooking style or to the type of
ingredients you use.
Dried vegetables such as lentils,
chick peas, beans, etc. should
be left to soak in water before
cooking. It is not necessary to
thaw frozen vegetables or small
fish. For large fish or frozen
meat, increase the cooking time
slightly. Clean fish thoroughly,
sprinkle with a little lemon juice
and salt just after cooking.
Brown meat well, even a little
more than usual, since steam
cooking will cause a slight
loss of colour. Cooking times
depend on the thickness and
quality of the meat.
Level 1 (when the first red ring
is visible on the valve stem) LOW PRESSURE is suitable
for more delicate foods,
poaching fruit, steaming fish
and some vegetable cooking.
Level 2 (when the second red ring is visible on the valve stem) - HIGH PRESSURE is
suitable for dense, solid foods, ie. casseroles, pot roast, dried beans etc.
The times stated here are only a guide and may vary depending on the season, the
quality, variety and size of the food. When the valve stem has risen to the indicated
level 1 or level 2 the cooking time starts.
11
Care of Product
•
•
•
•
•
A
fter each use, wash the cooker with hot water and a normal washing-up liquid using
a sponge or cloth.
D
o not use abrasive cleaners or scouring pads which may dull the high polish finish
of the product.
D
ry the cooker thoroughly after washing. Never clean the cover or silicone gasket
in the dishwasher.
T
o keep your pressure cooker in a shiny condition, it is highly recommended to use
the SCANPAN stainless steel and copper cleaner.
After use do not store the cooker with the cover closed.
*Storage example
12
Valves
The valve stem rises and lowers to show you the cooking level in your pressure cooker
and it is also an important safety device. Every time before using your pressure cooker,
check the valve stem to make sure it is working properly.
•
•
•
•
Be sure the knob is screwed tightly on the valve stem.
Gently pull up on the knob.
The
valve stem should move freely up and down.
If it does not, do not use the pressure cooker (see
trouble shooting).
B
efore each use check that the steam outlet is not
obstructed by food particles or any other material.
Should the safety release valve not operate during cooking
•
Remove
the cooker from the heat source, cool down and open (following
opening instructions).
•
C
heck inside the cover that there are no food particles in the valve.
•
I f food particles have passed through the release valve, you will need to disassemble
and clean it (see valve maintenance and cleaning).
•
A
fter cleaning the valve, replace, close cooker and restart cooking.
•
If the release valve fails to operate a second time, stop cooking.
Valve Maintenance and Cleaning
In normal use, the pressure release valve is self-cleaning. If, however, you can see food
particles around the release valve outlet, you will need to disassemble and clean it as
follows:
1. Invert the cover. Hold the knob with one hand and
1 Knob
unscrew the screw attached to the valve stem by
2 Finger guard
turning it in a counter-clockwise direction with a
spanner until the knob comes off the valve stem.
2. Remove the valve cover, pull out the valve stem, and
3 Valve body
clean the parts in warm soapy water. Remove any
4 Spring
food particles from inside the pressure release valve.
3. Reassemble the cover. Re-insert the valve stem and
5 Valve Stem
replace the valve cover. Re-attach the knob to the
valve stem by tightening the screw in a clockwise
6 Nut
direction. Be sure the knob is securely fastened to the
valve stem. Note: It is normal for there to be a gap
between the valve cover and the utensil cover to
allow steam to escape.
13
Silicone Gasket Maintenance
•
•
•
•
•
•
W
e recommend that the silicone gasket be replaced at least once every 12
months, depending on the frequency of use.
A
fter each use, remove the silicone gasket from the cover and wash it by hand in
warm, soapy water. Never wash the silicone gasket in a dishwasher!
I f food sticks to the silicone gasket, do not scrub with abrasives or attempt to
scrape the food off using any tools or even fingernails as this could tear the
material. Instead soak the silicone gasket in warm, soapy water until the food
loosens easily. After cleaning, allow the silicone gasket to air dry.
B
efore each use, and before storing the silicone gasket in the cover, apply a thin
coating of cooking oil to the top and bottom of the rubber surface with your thumb
and finger.
T
o store, place the silicone gasket in the cover and place the cover upside-down on
the utensil so undue stress is not placed on the silicone gasket.
B
efore cooking, be sure the silicone gasket is not twisted but is seated evenly in
the groove around the entire circumference of the cover. Never use force if the
cover is difficult to slide closed on the cooker. Instead, remove the cover, take out
the silicone gasket, and re-lubricate it with cooking oil. Reinsert the silicone gasket
in the cover and try again.
*To replace silicone gasket in lid: Ensure silicone gasket
locks underneath the two clips on the inside of cover.
14
Trouble Shooting
If you have any questions or are unsure how to operate your SCANPAN pressure cooker,
contact your service centre.
1. If the pressure cooker does not seal properly:
•
Check that the silicone gasket is properly inserted in the cover.
• Lubricate the silicone gasket lightly with cooking oil or moisten with a little water.
•
If the cover still will not seal, you may need to replace the gasket.
2. If effort is required to open or close the cover even after the silicone gasket has
been lubricated with cooking oil, then the cover or the utensil base may have been
damaged. DO NOT ATTEMPT TO USE THE PRESSURE COOKER.
3. If the safety valve (secondary release valve) releases steam while cooking, the main
pressure release valve may not be functioning properly. Please do not use it again.
Then let it cool down and contact the SCANPAN service centre.
4. If the valve stem will not move freely, disassemble and clean the pressure release
valve (see valve maintenance).
ENQUIRY
Pressure could not be
built up inside utensil.
There is leakage
through gasket.
CAUSE
The cover is not properly closed.
Silicone gasket is not properly fitted inside
the cover.
Recheck the silicone gasket location.
The release value is not properly assembled.
Recheck the release valve
Silicone gasket is not properly fitted inside
the cover.
Follow the instruction of opening & closing the
cover.
Silicone gasket is ageing.
Replace a new gasket.
There is leakage
through gasket.
Inside pressure is too high.
Remove the pressure cooker from the heating
source or reduce heat
Pressure indicator fails
Pressure could not be built up inside utensil.
Please refer to the “cooking” section of the user
guide and bringing the pressure cooker to
pressure.
Release valve does not work normally.
Please contact service centre
The cover can not be
opened after cooling.
There is water on the O-ring of Double
locking valve.
Gently touch the top of valve insert.
Pressure indicator is
unstable.
The heating source is unstable.
Check the heating source.
There is pressure
released through the
safety valve.
Spring release valve is blocked.
Please contact service centre
The cooker boils dry.
There is leakage through gasket.
Turn the heat down and remove the pressure
cooker from heating source immediately.
Check the silicone gasket is fitted properly, and
in good working order.
Check there is enough liquid added to the
cooker before cooking. Check the heating is not
too high.
The heating is too strong. Cooking time is too
long.
There is not enough liquid added to the
cooker (should be at least 2 cups of liquid).
15
HELP/ADVICE
Follow the instruction of opening & closing the
cover.
Recipes
•
Vegetable Medley with Olive Tapenade
•
Prawn & Saffron Risotto
•
Steamed Chicken & Bok Choy in Lemon Soy Broth
•
Vanilla Poached Fruit in Riesling
•
Rich Meat Sauce with Garlic Mash
16
Vegetable Medley with Olive Tapenade
Ingredients
Tapenade:
20 pitted green olives,
1 clove garlic
Small handful of coriander leaves
1 small chilli
Soup:
6 cloves garlic - crushed
3 tsp cumin
4 Tbs chopped coriander leaves & stalks
4 Tbs olive oil
½ tsp cinnamon
4 zucchini - cut into chunks
2 onions - finely chopped
2 handfuls spinach - chopped
4 large tomatoes peeled & chopped
3 Tbs chopped parsley
1 litre chicken stock
5cm piece of ginger - peeled and chopped
Freshly ground salt & pepper to taste
Method
Tapenade: Pound together with mortar and pestle or blend in a food processor to
form a smooth paste.
Soup: Heat SCANPAN pressure cooker - without cover - on a medium heat, add oil
and cook ginger, garlic, coriander, cumin, cinnamon, onions and zucchini. Cook gently
until the onions are soft - do not brown. Stir in the chopped tomatoes and chicken
stock. Close and lock the lid, bring to HIGH PRESSURE (cooking level 2 - when the
second ring is visible on the valve stem, refer to cooking section in the instruction
manual) over a high heat. Turn heat down and cook for 4 minutes, remove from heat
and allow pressure to release. Open the cover and add spinach and parsley, stir well.
Replace the cover leaving to stand - not on heat - for five minutes. Serve in soup bowls
topped with a spoonful of the olive tapenade with fresh crusty bread.
17
Prawn & Saffron Risotto
Ingredients
4 Tbs butter
¼ tsp saffron threads
½ cup/1 dl dry white wine
1 medium onion - chopped
2 cloves garlic - crushed
3½ cups/8 dl fish stock
250g prawns - fresh or frozen - peeled
2 Tbs fresh chopped parsley
1½ cups/3.5 dl of rice for risotto arborio, carnaroli or vialone nano
1 large ripe tomato - seeded and cut
into thin slices
Method
Heat the SCANPAN pressure cooker - without lid - on a medium heat, melt 2 Tbs butter,
add the prawns and cook for about 2 minutes. Transfer the prawns to a plate and set
aside. Stir the saffron into the wine and set aside. Add the 2 remaining tablespoons of
butter to the SCANPAN pressure cooker and heat over a medium heat, add the onion
and garlic and cook for 1 to 2 minutes. Add the rice and stir to coat with the butter - do
not brown - add the saffron and wine and cook until the liquid has almost evaporated.
Stir in the stock and season with salt and pepper. Close and lock the cover, bring to
HIGH PRESSURE (cooking level 2 - when the second ring is visible on the valve stem,
refer to cooking section in the instruction manual) over a high heat. Turn heat down and
cook for 5 minutes, remove from heat and allow pressure to release. Open the cover and
stir in prawns, tomato and parsley. Garnish with whole prawns.
18
Steamed Chicken & Bok Choy in
Lemon Soy Broth
Ingredients
2 cups/5 dl chicken stock
4 Tbs lemon juice
Snow peas
2 spring onions - thinly sliced
150ml sake
Zest of 1 lemon
10 skinless, boneless chicken thighs
4 Tbs low salt soy sauce
3 baby bok choy - cut lengthwise into
4 pieces
1 carrot - sliced into long thin ribbons
Method
Marinate chicken in sake for at least one hour. Place trivet and steamer basket in
SCANPAN pressure cooker and pour in the chicken stock. Place the chicken thighs in
the steamer basket. Close and lock the cover, bring to LOW PRESSURE (cooking level
1 - when the first ring is visible on the valve stem, refer to cooking section in the
instruction manual) over a high heat. Turn heat down and cook for 6 minutes, remove
from heat and allow pressure to release. Open cover and add all vegetables - except
spring onions - close and lock the cover, bring back to LOW PRESSURE and cook for 2
minutes, remove from heat and allow pressure to release. Open cover and remove
chicken and vegetables and the steamer basket. Place SCANPAN pressure cooker –
without cover - back on the heat and bring to the boil to allow stock to reduce approx 5 minutes, remove from the heat and add soy sauce and lemon juice. Slice
chicken thighs into four and place in a wide bowl, add vegetable mix, pour over broth
and sprinkle with spring onions and lemon zest.
19
Vanilla Poached Fruit in Riesling
Ingredients
1 cup/2.5 dl castor sugar
6 firm peaches (or apricots, nectarines etc) - peeled
1 vanilla bean - split lengthwise
1½ cups/3.5 dl riesling
Method
Place sugar, wine and vanilla bean in SCANPAN pressure cooker - without cover - on a
medium heat and allow syrup to simmer for 3 to 5 minutes. Remove from heat and
add fruit. Close and lock the cover, heat SCANPAN pressure cooker to LOW
PRESSURE (cooking level 1 - when the first ring is visible on the valve stem, refer to
cooking section in the instruction manual) over high heat, turn heat down and cook for
5 minutes. Remove from heat and allow pressure to release. Transfer fruit to a dish,
return SCANPAN pressure cooker - without cover - to heat and boil to reduce syrup to
a thick consistency. Pour over the fruit and serve with good vanilla ice cream.
20
Rich Meat Sauce with Garlic Mash
Ingredients
2 Tbs olive oil
1 onion - finely chopped
1 carrot - finely sliced
2 sticks celery - sliced
2 cloves garlic - crushed
50g bacon - chopped
500g lean minced beef
½ cup/1 dl red wine
1 cup/2.5 dl beef stock
3 Tbs tomato paste
200g chicken livers - cleaned of fat &
sinew, cut in half
Salt & freshly ground pepper to taste
Method
Heat the SCANPAN pressure cooker - without cover - on a medium heat, add oil,
onion, carrot, celery, garlic and bacon. Fry gently until onion is soft. Turn heat up and
add chicken livers and minced beef. Fry until livers are browned and the minced beef
is crumbly. Stir in the wine and allow to bubble for one minute. Remove from the heat
and add the stock and tomato paste, mix well. Close and lock the cover, heat
SCANPAN pressure cooker to HIGH PRESSURE (cooking level 2 - when the second
ring is visible on the valve stem, refer to cooking section in the instruction manual)
over high heat, turn heat down and cook for 8 minutes. Remove from heat and allow
pressure to release. Remove cover and season with salt and freshly ground black
pepper to taste. This can be thickened if required. Note - this is excellent when
combined with garlic mashed potatoes.
21
22
www.scanpan.dk | www.scanpan.com.au | www.scanpan.co.nz
23