1
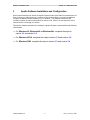
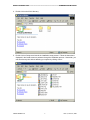
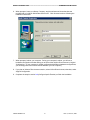
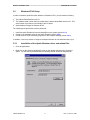
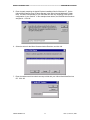
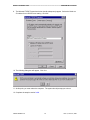
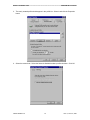
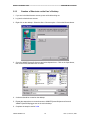
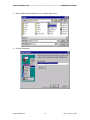
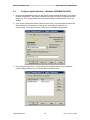
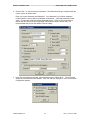
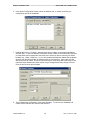
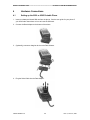
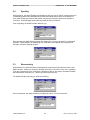
DIRECT INTERNET DATA User’s Guide Iridium Satellite LLC Rev. 2; June 15, 2001 DIRECT INTERNET DATA ------------------------------------------------------------------------------------- TABLE OF CONTENTS 1 Direct Internet Data Overview................................................................................................... 3 2 Hardware/Software Requirements............................................................................................ 4 3 Apollo Software Installation and Configuration ......................................................................... 5 3.1 WINDOWS 95/98/ME SETUP .................................................................................................. 6 3.2 WINDOWS NT4.0 SETUP ....................................................................................................... 9 3.2.1 Installation of the Apollo Emulator driver and related files ....................................... 9 3.2.2 Creation of a Separate Hardware Profile for the Apollo Emulator.......................... 14 3.2.3 Creation of Shortcuts on the User’s Desktop ......................................................... 19 3.2.4 Adding the Apollo Emulator to the Startup Menu ................................................... 20 3.3 WINDOWS 2000 SETUP ...................................................................................................... 24 3.4 CONFIGURE APOLLO EMULATOR – WINDOWS 95/98/ME/NT4.0/2000................................... 26 4 Hardware Connections............................................................................................................ 29 4.1 SETTING UP THE 9500 OR 9505 PORTABLE PHONE .............................................................. 29 4.2 SETTING UP THE 9570 PORTABLE DOCK .............................................................................. 31 4.3 SETTING UP THE 9520 MOBILE PHONE ................................................................................ 32 5 Connecting to the Internet....................................................................................................... 33 5.1 5.2 5.3 5.4 LOGGING ON ...................................................................................................................... 34 SPOOFING .......................................................................................................................... 36 RECONNECTING .................................................................................................................. 36 LOGGING OFF ..................................................................................................................... 37 Iridium Satellite LLC 2 Rev. 2; June 15, 2001 DIRECT INTERNET DATA ------------------------------------------------------------------------------------------------------- OVERVIEW 1 Direct Internet Data Overview Direct Internet Data Service provides enhanced Internet connectivity through dedicated servers at the Iridium gateway, allowing you to execute accelerated file transfers and to more efficiently browse the Internet and exchange email. Using this service, you connect directly to the Internet, using your Iridium phone as a data modem. In essence, your Iridium phone appears as an external modem to your computer. Direct Internet Data Service offers faster connection times, improved throughput, and Smart ConnectTM features. Smart ConnectTM assists you in managing your airtime by seamlessly connecting and disconnecting you through the Iridium system when no data is being transferred. This feature, called “spoofing”, will reduce airtime charges, improve the phone’s battery life, and allow you to seamlessly reconnect to the Iridium system if your connection is dropped. Airtime charges accumulate only while the call is connected. Improved effective data throughput is achieved through the use of user-transparent data compression. The channel rate is still 2.4 Kbps, but up to 10 Kbps effective throughput can be achieved depending on content (graphics and images will result in lower effective throughput). Before using Direct Internet Data, you will need to install the client software (provided on the Iridium World Data Services CD) on your computer. How it Works To access Direct Internet Services, you will need a computer and data capable Iridium phone. You will connect the computer to the handset via a serial cable and data connector. (If you are using a 9570 Portable Dock, you will only require the serial cable. If you are using a 9520 Mobile Phone, you will not require any additional hardware). This service utilizes dedicated servers at the Iridium gateways, which provide high-speed connectivity to the Internet and optimized serverto-handset communications. By initiating a connection through the client software, your handset will dial and initiate a connection with the Iridium gateway through the Iridium satellite constellation. This connection setup is similar to how a voice call is established, except a data connection is requested and the switch will route the call to the Direct Internet server. Once connected to the Direct Internet server and a session has been established, you will be seamlessly connected to the Internet, as if you were on a LAN. You can then check your email and browse the Internet just like you would via Dial-Up Data Service, except that now you have the advantages offered by the Direct Internet Data Service. Figure 1 illustrates how a Direct Internet data call is routed. Internet Iridium Gateway Figure 1. Iridium Direct Internet Data Connectivity Iridium Satellite LLC 3 Rev. 2; June 15, 2001 DIRECT INTERNET DATA ------------------------------------------------------ HARDWARE/SOFTWARE REQUIREMENTS 2 Hardware/Software Requirements To use Iridium Direct Internet Data Service, you will need the following: A Windows-based PC, with: • • • Windows 95, 98, Me, NT4.0 (Service Pack 4 or later) or 2000 CD-ROM drive Serial port A SIM Card that is provisioned for data (note that this SIM can also be used for voice calls). An Iridium Phone (A Motorola 9500 or 9505 Portable Phone, or a 9520 Mobile Phone) with a data-capable internal software version. Check the software version in the phone by pressing *#91# on the keypad. • • • Motorola 9500 Phone must have software version INC0620 or later Motorola 9505 Phone must have software version LAC109G or later Motorola 9520 Phone must have software version RAC0620 or later Hardware and Software, depending on the type of phone you are using, according to the table below: Type of Iridium Phone used for data calls 9500 or 9505 9500 or 9505 Phone, with 9520 Mobile Phone a 9570 Portable Dock* Phone Hardware and Software Data Kit (shown below), which includes: • Data Adapter • Serial Cable (9-Pin, M/F) • Stand • Iridium World Data Services CD Iridium World Data Services CD (Available in the Data Kit. Also sold separately) Serial Cable (9-Pin, M/F) (Not sold as a standalone item by Iridium. This item is widely available at retail stores) * The 9570 Portable Dock requires an adapter (sold separately) for use with the 9505 Portable Phone. Data Kit Components: Iridium Satellite LLC 4 Rev. 2; June 15, 2001 DIRECT INTERNET DATA -----------------------------------------------------------------------------SETUP & CONFIGURATION 3 Apollo Software Installation and Configuration Direct Internet Data Service utilizes the Apollo Emulator product from Brand Communications Ltd. Prior to using your Iridium phone as a modem for Direct Internet Data, you must first install and configure the Apollo Emulator software on your computer. This software emulates a LAN connection (hence the name of the product) so that your PC “thinks” it is connected to a LAN or Internet service even though it is remote. This section contains instructions for installing the Apollo Emulator in selected Microsoft Windows environments. ⇒ For Windows 95, Windows 98 or Windows Me, complete the steps in section 3.1 and section 3.4 ⇒ For Windows NT4.0, complete the steps in section 3.2 and section 3.4 ⇒ For Windows 2000, complete the steps in section 3.3 and section 3.4 Iridium Satellite LLC 5 Rev. 2; June 15, 2001 DIRECT INTERNET DATA -----------------------------------------------------------------------------WINDOWS 95/98/Me SETUP 3.1 Windows 95/98/Me Setup In order to install the Apollo Emulator software in Windows 95, Windows 98 or Windows Me, you will need the following: The Iridium World Data Services CD The software serial number that is provided with the Iridium World Data Services CD. This serial number is printed on the outside of the CD jacket The Apollo Emulator will create a new hardware profile on your computer during the installation. This hardware profile will be called "Iridium Direct-Internet.” Hardware profiles are used to ensure that there are no conflicts between various devices such as LAN cards, such that each device is only enabled within its own hardware profile. In this way, the Apollo Emulator hardware profile enables the Apollo Emulator software but disables all other LAN cards. Similarly, in non-Apollo Emulator profiles the Apollo Emulator software is disabled while the other appropriate devices are enabled. This should not concern you; indeed it is the safest way of installing new devices. If you already use hardware profiles, the new one will appear in the boot-up list. If you do not already use hardware profiles, you will see a new screen each time your computer boots up. Windows 95 Note: TCP/IP needs to be installed in order for the Apollo Emulator to work. Most times, the Apollo Emulator will do this for you, but it may have problems in early versions of Windows 95. In this case, it will warn you that TCP/IP installation must be done manually. TCP/IP can be installed manually by selecting Start > Settings > Control Panel. In the Control Panel window, double click on Network, and then click Add. Select Protocol, and click Add. Select Microsoft and TCP/IP. Use the default settings, and reboot the computer when requested. 1. Close all applications. 2. Insert the Iridium World Data Services CD into your CD drive, and browse to the Direct Internet directory on the CD. 3. Double click on the Windows9598Me directory. Iridium Satellite LLC 6 Rev. 2; June 15, 2001 DIRECT INTERNET DATA -----------------------------------------------------------------------------WINDOWS 95/98/Me SETUP 4. Double click on the Disk1 directory. 5. Double click on Setup.exe to launch the installation setup process. Follow the instructions displayed in the install screens to advance through the installation process. Henceforth, you can cancel at any time without affecting your system by clicking Cancel. Iridium Satellite LLC 7 Rev. 2; June 15, 2001 DIRECT INTERNET DATA -----------------------------------------------------------------------------WINDOWS 95/98/Me SETUP 6. When prompted, enter your Name, Company, and the software serial number that was provided with your Iridium World Data Services CD. Click Next and continue following the installation instructions. 7. When prompted, reboot your computer. During your computer’s reboot, you will see a hardware configuration window asking you to select either Iridium Direct-Internet or Original Configuration. (If your computer is already configured with different hardware configurations, you will simply see Iridium Direct-Internet added to your list of options.) 8. If you plan to initiate a Direct-Internet session, select Iridium Direct-Internet; otherwise, select Original Configuration. 9. Complete the steps in section 3.4 (Configure Apollo Emulator) to finish the installation. Iridium Satellite LLC 8 Rev. 2; June 15, 2001 DIRECT INTERNET DATA --------------------------------------------------------------------------------- WINDOWS NT4.0 SETUP 3.2 Windows NT4.0 Setup In order to install the Apollo Emulator software in Windows NT4.0, you will need the following: The Iridium World Data Services CD The software serial number that is provided with the Iridium World Data Services CD. This serial number is provided on the outside of the CD jacket Administrator privileges for Windows NT4.0 The following three procedures must be performed: 1. Install the Apollo Emulator driver and related files on the system (section 3.2.1) 2. Create a new hardware profile for the Apollo Emulator (section 3.2.2) 3. Create shortcuts to the necessary programs on the computer desktop (section 3.2.3) In addition, a user may choose to configure the Apollo Emulator to auto-start when they log in. 3.2.1 Installation of the Apollo Emulator driver and related files 1. Close all applications. 2. Right click on the Network Neighborhood icon on the desktop and select the Properties option. You will then be presented with the following window. Select the Adapters tab. Iridium Satellite LLC 9 Rev. 2; June 15, 2001 DIRECT INTERNET DATA --------------------------------------------------------------------------------- WINDOWS NT4.0 SETUP 3. Click Add… 4. When prompted for the desired adapter, click on Have Disk… Iridium Satellite LLC 10 Rev. 2; June 15, 2001 DIRECT INTERNET DATA --------------------------------------------------------------------------------- WINDOWS NT4.0 SETUP 5. Enter the path containing the Apollo Emulator installation files for Windows NT. On the Iridium World Data Services CD these files are in the \Direct Internet\WindowsNT folder. Note: The letter corresponding to your CD-ROM drive will vary according to the specific configuration of your machine. In the example shown below, the CD-ROM drive has been assigned d:. Click OK. 6. Select the driver for the Brand Communications Emulator, and click OK. 7. Enter the software serial number that was provided with your Iridium World Data Services CD. Click OK. Iridium Satellite LLC 11 Rev. 2; June 15, 2001 DIRECT INTERNET DATA --------------------------------------------------------------------------------- WINDOWS NT4.0 SETUP 8. Click Close to close the Network Properties window. Iridium Satellite LLC 12 Rev. 2; June 15, 2001 DIRECT INTERNET DATA --------------------------------------------------------------------------------- WINDOWS NT4.0 SETUP 9. The Microsoft TCP/IP Properties window should subsequently appear. Select the Obtain an IP address from a DHCP server setting. Click OK. 10. The following dialog box will appear. Click Yes. 11. At this point, you must reboot the computer. The system should prompt you to do so. 12. Complete the steps in section 3.2.2. Iridium Satellite LLC 13 Rev. 2; June 15, 2001 DIRECT INTERNET DATA --------------------------------------------------------------------------------- WINDOWS NT4.0 SETUP 3.2.2 Creation of a Separate Hardware Profile for the Apollo Emulator 1. Open the Control Panel by selecting Start > Settings > Control Panel. Then, double click on the System icon. Click on the Hardware Profiles tab. Select the active hardware configuration (designated by Current). Click Copy… l 2. Enter a name for the new profile. Click OK. Iridium Satellite LLC 14 Rev. 2; June 15, 2001 DIRECT INTERNET DATA --------------------------------------------------------------------------------- WINDOWS NT4.0 SETUP 3. The newly created profile should appear in the profile list. Select it and click the Properties button. 4. Select the network tab. Select the Network-disabled hardware profile checkbox. Click OK. Iridium Satellite LLC 15 Rev. 2; June 15, 2001 DIRECT INTERNET DATA --------------------------------------------------------------------------------- WINDOWS NT4.0 SETUP 5. Reboot the computer. During the reboot, you will be prompted to select the hardware configuration to use. Choose the New configuration that was just created. 6. Once the computer has rebooted, open the Control Panel by clicking Start > Settings > Control Panel. Then, Double Click on the Devices icon. Scroll down and select Brand Communications Emulator NDI. Click HW Profiles… 7. Select the new configuration (Iridium Direct-Internet in this example) and click Enable. Iridium Satellite LLC 16 Rev. 2; June 15, 2001 DIRECT INTERNET DATA --------------------------------------------------------------------------------- WINDOWS NT4.0 SETUP 8. The configuration should now be enabled. 9. Highlight the Original Configuration and click Disable. The status of that configuration should now be shown as Disabled. Click OK. 10. The Devices window should be redisplayed. Click Close. Iridium Satellite LLC 17 Rev. 2; June 15, 2001 DIRECT INTERNET DATA --------------------------------------------------------------------------------- WINDOWS NT4.0 SETUP 11. Reboot the computer. 12. During the reboot, a menu will appear. Select the Iridium Direct-Internet profile in the boot-up menu. 13. Complete the steps in section 3.2.3. Iridium Satellite LLC 18 Rev. 2; June 15, 2001 DIRECT INTERNET DATA --------------------------------------------------------------------------------- WINDOWS NT4.0 SETUP 3.2.3 Creation of Shortcuts on the User’s Desktop 1. If you are in the Administrator account, press ctrl-alt-del and log out. 2. Log into the desired user account. 3. Right click on the desktop. Select the New > Shortcut option. Click on the Browse button. 3. Go to the \WINNT\System32 directory and select Apemctrl.exe. Click on the Open button, then click on Next, and then click on Finish. 4. A shortcut should be created on the desktop. 5. Repeat the steps above to create shortcuts to \WINNT\System32\Apemconf.exe and \WINNT\System32\Aplogger.exe on the user’s desktop. 6. Complete the steps in section 3.2.4. Iridium Satellite LLC 19 Rev. 2; June 15, 2001 DIRECT INTERNET DATA --------------------------------------------------------------------------------- WINDOWS NT4.0 SETUP 3.2.4 Adding the Apollo Emulator to the Startup Menu 1. Select Start > Settings > Taskbar. Select the Start Menu Programs tab. Click the Add button. 2. Click the Browse button. Iridium Satellite LLC 20 Rev. 2; June 15, 2001 DIRECT INTERNET DATA --------------------------------------------------------------------------------- WINDOWS NT4.0 SETUP 3. Select \WINNT\System32\Apemctrl.exe. Click the Open button. 4. Click the Next button. Iridium Satellite LLC 21 Rev. 2; June 15, 2001 DIRECT INTERNET DATA --------------------------------------------------------------------------------- WINDOWS NT4.0 SETUP 5. Select the Startup program folder. Click Next >. 6. Enter a name for the shortcut. Click Finish. Iridium Satellite LLC 22 Rev. 2; June 15, 2001 DIRECT INTERNET DATA --------------------------------------------------------------------------------- WINDOWS NT4.0 SETUP Note: After adding the Apollo Emulator to the Startup Menu, when the user selects any hardware configuration where the Apollo client is disabled, the following warning may appear. If this occurs, click the OK button. No adverse affects should be observed hereafter. 7. Complete the steps in section 3.4 (Configure Apollo Emulator ) to finish the installation. Iridium Satellite LLC 23 Rev. 2; June 15, 2001 DIRECT INTERNET DATA ----------------------------------------------------------------------------------- WINDOWS 2000 SETUP 3.3 Windows 2000 Setup In order to install the Apollo Emulator software in Windows 2000, you will need the following: The Iridium Data Services CD The software serial number that is provided with the Iridium World Data Services CD. This serial number is provided on the outside of the CD jacket Administrator privileges for Windows 2000 1. Close all applications. 2. Insert the Iridium World Data Services CD into your CD drive, and browse to the Direct Internet directory on the CD. 3. Double click on the Windows2000 directory. Iridium Satellite LLC 24 Rev. 2; June 15, 2001 DIRECT INTERNET DATA ----------------------------------------------------------------------------------- WINDOWS 2000 SETUP 4. Double click on Setup.exe to launch the installation setup process. Follow the instructions displayed in the install screens to advance through the installation process. Henceforth, you can cancel at any time without affecting your system clicking Cancel. 5. When prompted, enter the software serial number that was provided with your Iridium World Data Services CD. Click Next and continue following the installation instructions. 6. Complete the steps in section 3.4 (Configure Apollo Emulator ) to finish the installation. Iridium Satellite LLC 25 Rev. 2; June 15, 2001 DIRECT INTERNET DATA ------------------------------------------------------------------ CONFIGURE APOLLO EMULATOR 3.4 Configure Apollo Emulator – Windows 95/98/Me/NT4.0/2000 1. As part of the installation process, you will need to change selected information in the Apollo Emulator configuration. As part of the installation process, the Apollo Configuration window will pop up. If not, simply double click on the Apollo Emulator Config shortcut icon on your desktop. 2. In the Apollo Configuration window, select the Current tab. All of these fields except for the Email: field will be pre-configured. Entering your email address is optional, but recommended. It will only be used to contact you for troubleshooting purposes. 3. Next, select the Services tab. This should be pre-configured with the correct telephone number (008816000021) for you to access Direct Internet services. Iridium Satellite LLC 26 Rev. 2; June 15, 2001 DIRECT INTERNET DATA ------------------------------------------------------------------ CONFIGURE APOLLO EMULATOR 4. Click on Edit… to view the Service Parameters. The fields should be pre-configured with the correct values, as shown below. Enter your correct Username and Password. Your Username is your Iridium telephone number (8816 31x xxxxx) and your password is “password” – (note that password is lower case). You can also modify the timeout parameters in the “Timeouts” box to lengthen or shorten the time before you spoof (spoofing is described in detail in section 5.2). It is recommended that you use the default Timeouts initially. 5. In the Service Parameters window, select Advanced next to “Block All IP”. The IP Protocol window should match the below window. Click OK, and then OK again to return to the Apollo Configuration window. Iridium Satellite LLC 27 Rev. 2; June 15, 2001 DIRECT INTERNET DATA ------------------------------------------------------------------ CONFIGURE APOLLO EMULATOR 6. In the Apollo Configuration window, select the Modems tab. A modem should be preconfigured as part of the installation. 7. Highlight the Iridium V110 9600 – Motorola 95xx Series modem (if not already highlighted), and click Edit… to open the Modem Parameters window. Make sure the selection in the Data port drop-down box corresponds to the serial port to which you plan to connect your Iridium handset (e.g., COM1, COM2, etc.). If you have installed the Motorola Satellite Series Modem driver for use with Dial-up Data, do not select this as your Data port. Also, make sure the Baud Rate is set at 19200. Do not be concerned if your Setup string and Reset string do not match the below window since these values are pre-configured and may change over time. Click OK and close all open windows. 8. This completes the configuration of the Apollo Emulator. To connect your hardware and initiate a Direct-Internet call, continue with section 4. Iridium Satellite LLC 28 Rev. 2; June 15, 2001 DIRECT INTERNET DATA ------------------------------------------------------------ 9500/9505 PORTABLE PHONE SETUP 4 Hardware Connections 4.1 Setting up the 9500 or 9505 Portable Phone 1. Insert your data-provisioned SIM card into the phone. See the user guide for your phone if you need further instructions on how to insert the SIM card. 2. Connect the Data Adapter to the bottom of the phone. 3. (Optionally) connect a charging device to the Data Adapter. 4. Plug the Serial Cable into the Data Adapter. Iridium Satellite LLC 29 Rev. 2; June 15, 2001 DIRECT INTERNET DATA ------------------------------------------------------------ 9500/9505 PORTABLE PHONE SETUP 5. Plug the Serial Cable into the serial port on your computer. 6. Rotate and extend the phone’s antenna. Place the phone into the stand, or otherwise position the phone so that the antenna is vertical and has a clear view of the sky. 7. Continue with section 5. Iridium Satellite LLC 30 Rev. 2; June 15, 2001 DIRECT INTERNET DATA ----------------------------------------------------------------------- 9570 PORTABLE DOCK SETUP 4.2 Setting up the 9570 Portable Dock 1. Insert your data-provisioned SIM card into the phone or the dock. See the user guide for your Portable Phone or Portable Dock if you need further instructions on how to insert the SIM card. 2. Insert the 9500 Portable Phone into the Portable Dock (or insert a 9505 Portable Phone, with optional dock adapter). 3. Plug the Serial Cable into the back of the Portable Dock. 4. Plug the Serial Cable into the serial port on your computer. 5. Connect an external antenna to the Portable Dock, and orient the antenna so that it has a clear view of the sky. 6. Continue with section 5. Iridium Satellite LLC 31 Rev. 2; June 15, 2001 DIRECT INTERNET DATA -------------------------------------------------------------------------- 9520 MOBILE PHONE SETUP 4.3 Setting up the 9520 Mobile Phone 1. Insert your data-provisioned SIM card into the Mobile Phone. See the user guide for your phone if you need further instructions on how to insert the SIM card. 2. The wiring harness for the 9520 Mobile Phone contains a built-in Serial Cable. Plug the Serial Cable into the serial port on your computer. 3. Verify that an external antenna is connected to the Mobile Phone, and orient the antenna so that it has a clear view of the sky. 4. Continue with section 5. Iridium Satellite LLC 32 Rev. 2; June 15, 2001 DIRECT INTERNET DATA -------------------------------------------------------------------CONNECTING TO THE INTERNET 5 Connecting to the Internet The following are tips for the successful operation of the Apollo Emulator in order to access Iridium Direct Internet services. Please read these tips before using the Apollo Emulator for the first time. 1. For the Apollo Emulator to work, you always need to select the Apollo Emulator hardware profile at boot-up of the PC (unless you are running Windows 2000). In any other hardware profile, the Apollo Emulator is disabled. If you boot into the wrong configuration, the Apollo Emulator software will be disabled, and you will not be able to access Iridium’s Direct Internet Services. 2. Windows 2000 does not require different hardware configurations while using the Apollo Emulator to access Direct Internet Services. However, you should not be attached to a LAN while using the Apollo Emulator with Windows 2000. Prior to accessing Direct Internet services with Windows 2000, you should either: • Disconnect the Ethernet cable from your NIC card, or… • Disable the NIC card. To do this, click on Start > Settings > Network And Dialup Connections. Right-click Local Area Connection and then left-click Disable. Note that prior to reconnecting to a LAN, you will need to re-enable this. 3. While your computer is in the Apollo Emulator hardware profile, you cannot put your computer into the Suspend/Hibernate mode. (Normally, this is only an issue if you are using a laptop.) In fact, you are strongly encouraged to modify your power settings on your computer to disable the power saving options to avoid entering the Suspend/Hibernate mode (e.g., by closing the lid of your laptop). The Suspend/Hibernate modes cause problems since these will disable your serial port, to which the Apollo Emulator is communicating. To modify your power management settings, open your Control Panel by selecting Start > Settings > Control Panel. In the Control Panel window, double click on Power Options (or variation thereof), and change your settings to disable the Suspend/Hibernate mode. 4. You should always log out of your Direct Internet session before shutting down your computer. If you fail to log off, (e.g., your battery loses its charge), it is not a problem. The server may reject your initial subsequent log in attempt, because it thinks you are already logged in. If this happens, simply log in a second time, which will then succeed. 5. Within the Configuration window, you cannot change any of the settings or parameters (e.g., spoofing timeouts) until you have logged out of your current session. 6. If you select Auto-Logon after reboot, your computer will attempt to automatically dial and log you into a new session every time you boot your computer in the Apollo Emulator hardware profile. Therefore, you will need to ensure that your Iridium handset is connected and registered at this time. 7. You cannot normally swap handsets midway through a session (e.g., while you are spoofed), as the change may cause the server to bar the session for authentication reasons. If you need to change handsets, log out first. Then, swap handsets, and log back in. 8. Familiarize yourself with which COM port your communications device uses, and ensure that you select the correct one within the Configuration window. No other application (e.g., DialUp Networking) can use the COM port that the Apollo Emulator is using while the Apollo Iridium Satellite LLC 33 Rev. 2; June 15, 2001 DIRECT INTERNET DATA -------------------------------------------------------------------CONNECTING TO THE INTERNET Emulator is transferring data or in spoofed mode. To release the COM port for other applications, either log off or re-boot in a different hardware profile. 9. Please remember that your Iridium data connection is not as fast as the landline connections to which you may be accustomed. Sending and receiving data will take much longer and response times will be slower. The Apollo Emulator’s compression and call recovery features will help in improving your performance Note: See the Application Notes document for instructions on how to optimize some common software applications for use with Iridium data services. 5.1 Logging On You must first log onto the Direct Internet server in order to access the Direct-Internet services. 1. Connect your computer and Iridium phone as described in section 4. 2. Orient the phone’s antenna with a clear view of the sky. 3. If your computer is off, turn it on and wait for it to boot up. 4. Turn on your Iridium phone and wait for it to register with the satellite network. 5. Double click on the Apollo Emulator icon in your task bar, which is the networking icon with an “X” to denote “Logged Out.” Windows 2000 Note: If you are using Direct Internet for the first time in Windows 2000, you must doubleclick the “Apollo Controller” icon on your desktop. This will load the Apollo Emulator icon into your task bar. Apollo Emulator The Apollo Controller window opens up. If you are not in the correct hardware configuration, the Apollo Controller will indicate that the Apollo Emulator is disabled. You will need to reboot into the proper hardware configuration. Iridium Satellite LLC 34 Rev. 2; June 15, 2001 DIRECT INTERNET DATA -------------------------------------------------------------------CONNECTING TO THE INTERNET 6. Click on the telephone icon to initiate a connection. The software will initialize the Iridium handset and begin dialing. 7. Once connected, the server will authenticate you. 8. After successful authentication, you will be logged onto the server and have a direct connection to the Internet. While logged in, the networking icon in the taskbar will appear with red and green flashing screens to indicate transmit and receive traffic flow. Iridium Satellite LLC 35 Rev. 2; June 15, 2001 DIRECT INTERNET DATA -------------------------------------------------------------------CONNECTING TO THE INTERNET 5.2 Spoofing While logged in, the Apollo Emulator will intelligently drop your call (or “Spoof”) whenever there is no data being passed, and transparently reconnect the call whenever there is new data to be sent, without losing your session and without you having to manually reconnect or log back in every time. Airtime charges accumulate only while the call is connected. Prior to spoofing, the Apollo Emulator will warn you: Once spoofed, the Apollo Emulator status will change from “You are connected” to “Connection Spoofed.” While spoofed, the networking icon in the task bar will appear with a lightning bolt through it to denote “Spoofed Session.” 5.3 Reconnecting While spoofed, the Apollo Emulator will transparently reconnect the call whenever there is new data to be sent - without you having to manually reconnect or log back in every time. In addition, if you are connected and your connection is dropped or fails for any reason, the Apollo Emulator will transparently reconnect you – without any intervention from you. The Apollo Emulator will notify you while reconnecting: Once reconnected, the Apollo Emulator will update its state to “You are connected.” Iridium Satellite LLC 36 Rev. 2; June 15, 2001 DIRECT INTERNET DATA -------------------------------------------------------------------CONNECTING TO THE INTERNET 5.4 Logging Off When are ready to end your Direct-Internet session, select the connection (“hand”) icon to log off of the Direct-Internet server. Once logged off, you will have to log in again in order to access the Direct-Internet services. If you are spoofed and select the connection icon to log off, the Apollo Emulator will transparently reconnect you in order to log off. Iridium Satellite LLC 37 Rev. 2; June 15, 2001 DIRECT INTERNET DATA -------------------------------------------------------------------------------------- TRADEMARK NOTICE Trademark Notice Iridium and the Iridium logo are registered trademarks and/or service marks of Iridium Satellite LLC. Windows, Windows 95, Windows 98, Windows Me, Windows NT, Windows 2000, Dial-Up Networking, Outlook, Outlook Express and Internet Explorer are registered trademarks of Microsoft Corporation. Netscape, Netscape Navigator and Netscape Messenger are registered trademarks of Netscape Communications Corporation. Apollo Emulator and Smart Connect are registered trademarks of Brand Communications Ltd. Motorola and Satellite Series are registered trademarks of Motorola, Inc. Iridium Satellite LLC 38 Rev. 2; June 15, 2001