1
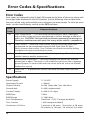
User Guide
© 2014 Hickok Inc. All rights reserved.
All rights reserved.
No part of this manual may be reproduced or transmitted in any form or by any means, electronic or
mechanical, without written permission from Hickok.
Hickok assumes no responsibility for use of this equipment by untrained or unauthorized persons.
Printed in the United States of America.
Safety Information
Before using this equipment, carefully read, understand and follow instructions and safety messages
on equipment and in this guide.
This guide cannot anticipate or provide advice and cautions for all situations encountered by
technicians. With this in mind, always follow and refer to the manuals provided by the manufacturer
of the vehicle or equipment being tested or used for all information and testing procedures whenever
diagnosing, repairing or operating such vehicle or equipment.
Failure to follow the instructions, cautions and warnings provided here as well as those provided by the
vehicle and equipment manufacturers can result in fire, explosion, bodily injury and property damage.
In addition to the information listed below, additional warnings and cautions are listed throughout the
guide. Please read them carefully.
Fuel vapors are toxic and explosive, which can cause severe injury or death.
• Use proper ventilation to avoid breathing fuel vapors.
•
Minimize contact with the skin with the use of gloves (such as nitrile gloves) when there is
possibility of getting methanol fuel on your hands.
•
If the skin is directly exposed, wash the area immediately and change any clothes that have
become wet with fuel.
•
Always wear approved safety glasses when testing. Should fuel get into eyes, flush eyes
immediately with water and consult your physician.
Vehicles emit flammable vapors which can ignite.
• Keep flames, sparks, cigarettes and other ignition sources away from the vehicle at all times.
•
In case of fire, never use water to fight flames caused by methanol or methanol blended gasoline.
This will cause the flames to spread instead of extinguishing them.
•
Use a dry chemical extinguisher to fight flames (preferably one marked ABC, though BC is
acceptable). A foam extinguisher is acceptable only if it is ARF grade, which is resistant to alcohol.
Before beginning any tests, make sure the test environment is safe and the vehicle meets these conditions:
• Test area should be well ventilated.
•
Vehicle should be in park.
•
Wheels should be blocked.
•
Engine should be at normal operating temperature.
•
Vehicle should have normal exhaust flow.
•
Keep all tester cables clear of exhaust manifolds and radiator fan blades.
•
Use caution when testing on a vehicle while the engine is running (surfaces may become hot,
electric cooling fans may turn on unexpectedly, etc.)
2
Contents
Overview.......................................................................................... 4
PWM Power Pro Components........................................................................................ 4
Using the Controls and Connections.......................................................................... 5
Using the PWM Power Pro.............................................................. 6
Two Wire Testing & Hookup Procedure...................................................................... 6
One Wire Hookup Testing & Hookup Procedure..................................................... 7
Fuse Box Testing & Hookup Procedure....................................................................... 8
Total Circuit Demand Testing & Hookup Procedure.............................................. 9
Error Codes & Specifications......................................................... 10
Error Codes.........................................................................................................................10
Specifications.....................................................................................................................10
Contact Information...................................................................... 11
Warranty......................................................................................... 12
3
Overview
PWM Power Pro Components
2 – 3 ft 40A Test Leads
Tester
2 Removable
Power Clips
2 – Alligator Clips
Banana Jacks
Power Cable
2 – Female Spade
Terminal Probes
1 – Male Spade
Terminal Probes
Tester – Used along with the supplied adapters, connects to the suspect
component (stand alone or on vehicle) providing power and measuring current
draw. The tester controls the selected Duty Cycle/PWM to the component while
monitoring current usage.
Power Cable with Banana jacks – When used along with the Removable Power
Clips, connects to the vehicle’s battery to supply power to the tester. Banana
jacks also allow you to use an alternate power source. Note: Once it is connected to
power, the tester turns on automatically and performs a self test (the LED Readout and
the Error LED briefly turn on). If the PWM Power Pro does not perform a self test, check
the battery voltage and/or polarity of the power cable hookup to the vehicle battery.
40A Test Leads – 1 red and 1 black. Use along with one of the supplied flex probe
adapters or clips to connect the tester to the component you are testing.
Flex Probe Adapters and Clips – 2 female spade terminal probes, 1 male spade
terminal probes, and 2 alligator clips are included. The probes are used along with
the leads to connect to the component you are testing.
Optional 77202 Spade Flex Probe Kit and 77203 Round Flex Probe Kit (not
shown)– Both kits contain an assortment of terminal probes to provide for a
larger coverage of connectors.
4
Overview
Using the Controls and Connections
Heat Sink
Output Jack
LED Readout
Ground Jack
Error LED
PWM Control Knob
Load Polarity
Output Switch
CAUTION! The Heat Sink can become
extremely hot during use. Therefore,
avoid contact with your skin or any of
the vehicle’s components.
Output Jack – Connect the red test lead here. Outputs power or ground to drive
the components that already have one side tied to the vehicle wiring.
LED Readout—Displays the average current (amperage) the component is using
at any duty cycle. Also, when there is an error, it displays a two digit error code
(see the rear panel of the tester for a listing of error codes or refer to the Error Code
section in this guide for details.
Load Polarity Output Switch – Sets the drive polarity of the output jack and
enables the PWM control knob.
Heat Sink – Used to dissipate heat generated during testing.
Ground Jack– Connect the black test lead here. Supplies ground for components
that need a two wire hookup.
Error LED– Lights to indicate an error and that the output jack has been disabled. Also, the LED readout displays the error code. See the rear panel of the tester for a
listing of error codes or refer to the Error Code section in this guide for details.
PWM Control Knob– Sets the duty cycle of the supply delivered to the output
jack for variable load current.
5
Using the PWM Power Pro
Two Wire Testing & Hookup Procedure
Use this procedure for any
of the following conditions:
• Bench testing
• Component is still
connected to the vehicle
but is disconnected from
the vehicle’s harness.
Procedure
1. Set the Output Polarity
Switch to the OFF
position and the PWM
Control Knob to OFF.
Tester
Red Test Lead
OUTPUT
Black Test
Lead
+
–
Component
Vehicle Harness
IMPORTANT! The tester GROUND JACK
is not protected. If connected to the
battery’s positive ( + ) terminal, it will
fail and become inoperable (see Error
Code 04).
2. Connect the tester’s
power cable to the battery. The tester will power up and perform a self
test. Once the test is completed, the LED Readout displays a zero. Note:
If the unit becomes unresponsive, remove and reconnect the power cable
connections to the battery.
3. Select the probes (or clips) that most closely mates to the components and
then connect to the test leads.
4. Plug the red test lead into the output jack and the black test lead into the
ground jack. IMPORTANT! To avoid possible damage, do not let the tips of the
leads touch once they are connected to the tester.
5. Disconnect the component from the circuit and connect the positive ( + )
and negative ( – ) leads to the component per the vehicle’s shop manual.
6. Set the Output Polarity Switch to + and rotate the PWM Control knob to
increase (or decrease) the amount (%) desired to test the component. The
amount of current the component is drawing is displayed in the LED Readout.
• For best duty cycle control on smaller loads (<2A), connect one side of the
component to power and the other side to the output jack. Set the lead
polarity to (–) minus.
• For reversing motors such as power windows and locks, reverse the test
leads to drive the motor in the opposite direction.
7. Make note of the results and refer to the specifications listed in the vehicle’s
shop manual to determine the course of action needed for repairs.
6
Using the Power Pro
One Wire Hookup Testing & Hookup Procedure
Use this procedure for
in-circuit testing a
component connected to
a harness.
Tester
OUTPUT
Test Lead
Vehicle
Harness
Component
Procedure
1. Set the Output Polarity Switch to the OFF position and the PWM Control
Knob to OFF.
2. Connect the tester’s power cable to the battery. The tester will power
up and perform a self test. Once the test is completed, the LED Readout
displays a zero. Note: If the unit becomes unresponsive, remove and reconnect
the power cable connections to the battery.
3. Select the probe that most closely mates to the component’s harness and
connect it to a test lead.
4. Plug the test lead into the output jack.
5. Connect the output lead to the component by back probing the drive side
of the component per the vehicle’s shop manual.
6. Set the Output Polarity Switch to + or – based on the component’s circuit
operation per the vehicle’s shop manual and rotate the PWM Control knob
to increase (or decrease) the amount (%) desired to test the component.
The amount of current the component is drawing is displayed in the LED
Readout.
7. Make note of the results and refer to the specifications listed in the vehicle’s
shop manual to determine the course of action needed for repairs.
7
Using the Power Pro
Fuse Box Testing & Hookup Procedure
Use this procedure for
fuse box / relay testing.
Test Lead
OUTPUT
Fuse / Relay
Box
Component
Tester
Procedure
1. Set the Output Polarity Switch to the OFF position and the PWM Control
Knob to OFF.
2. Connect the tester’s power cable to the battery. The tester will power
up and perform a self test. Once the test is completed, the LED Readout
displays a zero.
3. Connect the male spade terminal to a test lead.
4. Plug the test lead into the output jack.
5. Remove the fuse (or relay) and connect the output lead to the component
side of the fuse or relay per the vehicle’s shop manual.
6. Set the Output Polarity Switch to + and rotate the PWM Control knob to
increase (or decrease) the amount (%) desired to test the component. The
amount of current the component is drawing is displayed in the LED Readout.
7. Make note of the results and refer to the specifications listed in the vehicle’s
shop manual to determine the course of action needed for repairs.
8
Using the Power Pro
This procedure uses the same hookup as the Fuse Box Testing Procedure
Total Circuit Demand Testing & Hookup Procedure
1. Set the Output Polarity Switch to the OFF position and the PWM Control
Knob to OFF.
2. Connect the tester’s power cable to the battery. The tester will power
up and perform a self test. Once the test is completed, the LED Readout
displays a zero.
3. Connect the male spade terminal to a test lead.
4. Plug the test lead into the output jack.
5. Remove the fuse (or relay) and set the Output Polarity Switch to + and
rotate the PWM Control knob to 100%.
6. Probe the component side of the suspect circuit fuse or relay with all of
the component(s) turned on (or off, as desired). Determine the demand by
reading the amps displayed in the LED Readout
7. Make note of the results and refer to the specifications listed in the vehicle’s
shop manual to determine the course of action needed for repairs.
9
Error Codes & Specifications
Error Codes
Error codes are indicated by the lit Red LED located on the front of the tester along with
a two digit code displayed in the LED Readout. Use the following chart to determine
the cause of the error code and the course of action you need to take. To clear an error
code, set the Load Polarity switch to the OFF position.
Error
Code
Required Action
01
Over Temperature — Turn the tester off and allow to cool. Prolonged
high current usage can cause overheating as well as damage to the load
under test. CAUTION! The Heat Sink can become extremely hot during use.
Therefore, avoid contact with your skin or any of the vehicle’s components.
02
Over Current — Excessive current draw may be caused by high startup demand on the component being tested. Start from 0% and
slowly increase the current. Over Current can also be caused by failing
component or excessive testing run time.
03
Low Battery — The tester detected low battery voltage. Check the
vehicle’s battery and/or connections.
04
Ground Jack Inoperable — The tester detected (at power up) that the
ground jack is open. The tester is still usable but you must run a separate
ground jumper. To correct the error the tester must be sent in to Hickok /
Waekon for service
05
Timed Out — To protect the vehicle, the Auto-off time varies with the
current.
Specifications
Power Supply
11–18 VDC
Operating Current
< 100mA
Output Current
0–40A (high side / low side drive
Ground Jack
0–40A (unprotected)
Current Display
0–40A (0.1A steps)
PWM Rate 15kHz
PWM Range
0–100% duty
Over Temperature
Heat Sink > 120° F (output disabled)
Over Current > 40A (output disabled)
Continuous On Time
2 minutes @ 40 amps, 10 minutes @ 20 amps,
25 minutes @ 10 amps, 30 minutes @ 5 amps
10
Warranty
Subject to the conditions that follow and are noted below, this product is warranted to be free from
defects in material and workmanship, under proper use and in accordance with the manufacturer’s written
recommendation and specifications, for a period designated below on all products:
•
This product carries a one year limited warranty.
The manufacturer’s obligation under this warranty is limited to unaltered products returned to the
manufacturer by the initial end user of the new products. Therefore, this warranty does not cover any
products resold by the end user to third parties, nor any reconditioned products sold as such, by the
manufacturer. The sole remedy for any such defect shall be the repair, or replacement, of the product at
the sole discretion of the manufacturer. This warranty does not cover expendable parts, such as batteries,
nor does it cover shipping or handling. In addition, manufacturer is not liable for any loss or damage to
product during shipping.
In the event it is determined that the product has been tampered with, or altered in any way, this warranty
is void and all claims against the product will not be honored. All warranty claims must be submitted as
outlined by the manufacturer and shall be processed in accordance with the manufacturer’s established
warranty claim procedures. These procedures include provisions that proof of purchase must be established
(by either warranty card from the seller or by point of purchase receipt) and that the manufacturer will
make every attempt to return ship the product within one business day from receipt of the returned
product, freight prepaid.
In addition, all maintenance procedures, as outlined by the product manuals, should be followed for the
warranty to be kept in force. Should the product not be used in accordance with procedures as specified,
or if the product otherwise fails outside of the warranty, the manufacturer reserves the right to make such
judgment and the party returning the product will be notified that written notification will be necessary
to repair the product at a cost which the manufacturer deems as reasonable. The product will then be
shipped back to the customer, COD; or as the manufacturer deems appropriate.
This is the only authorized manufacturer’s warranty and is in lieu of all other expressed, or implied,
warranties or representations, including but not limited to any implied warranties of merchantability or
fitness or any other obligations on the part of the manufacturer. In no event will the manufacturer be
liable for business interruptions, loss of profit, personal injury, costs of delays, or any special, indirect,
incidental or consequential damages, costs or losses.
061014