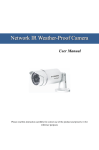
1
OBIS Safety and Emissions Analyzer System Operating Instructions Pennsylvania Table of Contents Using This Manual. . . . . . . . . . . . . . . . . . . . . . . . . . . . . . . . . . . . . . . . . . . . . . . . . . . . . . . . . . . . . . . . . . . v Safety Information . . . . . . . . . . . . . . . . . . . . . . . . . . . . . . . . . . . . . . . . . . . . . . . . . . . . . . . . . . . . . . . . . . . . I Introduction and Equipment Overview . . . . . . . . . . . . . . . . . . . . . . . . . . . . . . . . . . . . . . . . . . . . . . . . .1-1 Clean Air and Vehicle Emissions . . . . . . . . . . . . . . . . . . . . . . . . . . . . . . . . . . . . . . . . . . . . . . . . .1-1 Engine Combustion . . . . . . . . . . . . . . . . . . . . . . . . . . . . . . . . . . . . . . . . . . . . . . . . . . . . . . . .1-2 Pollutants . . . . . . . . . . . . . . . . . . . . . . . . . . . . . . . . . . . . . . . . . . . . . . . . . . . . . . . . . . . . . . . .1-2 Acronyms and Terms . . . . . . . . . . . . . . . . . . . . . . . . . . . . . . . . . . . . . . . . . . . . . . . . . . . . . . . . . .1-3 Equipment Overview . . . . . . . . . . . . . . . . . . . . . . . . . . . . . . . . . . . . . . . . . . . . . . . . . . . . . . . . . .1-4 Analyzer Front . . . . . . . . . . . . . . . . . . . . . . . . . . . . . . . . . . . . . . . . . . . . . . . . . . . . . . . . . . . .1-4 Analyzer Back . . . . . . . . . . . . . . . . . . . . . . . . . . . . . . . . . . . . . . . . . . . . . . . . . . . . . . . . . . . .1-6 User PC Function. . . . . . . . . . . . . . . . . . . . . . . . . . . . . . . . . . . . . . . . . . . . . . . . . . . . . . . . . .1-8 Bar Code Scanner . . . . . . . . . . . . . . . . . . . . . . . . . . . . . . . . . . . . . . . . . . . . . . . . . . . . . . . . .1-9 Remote Control . . . . . . . . . . . . . . . . . . . . . . . . . . . . . . . . . . . . . . . . . . . . . . . . . . . . . . . . . . .1-9 Gas Cap Tester . . . . . . . . . . . . . . . . . . . . . . . . . . . . . . . . . . . . . . . . . . . . . . . . . . . . . . . . . . .1-9 System Security . . . . . . . . . . . . . . . . . . . . . . . . . . . . . . . . . . . . . . . . . . . . . . . . . . . . . . . . . . . . .1-10 Using the Keyboard . . . . . . . . . . . . . . . . . . . . . . . . . . . . . . . . . . . . . . . . . . . . . . . . . . . . . . . . . .1-10 Function Keys . . . . . . . . . . . . . . . . . . . . . . . . . . . . . . . . . . . . . . . . . . . . . . . . . . . . . . . . . . .1-10 Data Entry Keys . . . . . . . . . . . . . . . . . . . . . . . . . . . . . . . . . . . . . . . . . . . . . . . . . . . . . . . . . .1-11 Calculator and Movement Control Keys. . . . . . . . . . . . . . . . . . . . . . . . . . . . . . . . . . . . . . . .1-11 Using the Remote Control Keypad . . . . . . . . . . . . . . . . . . . . . . . . . . . . . . . . . . . . . . . . . . . . . . .1-12 General Vehicle Inspection. . . . . . . . . . . . . . . . . . . . . . . . . . . . . . . . . . . . . . . . . . . . . . . . . . . . .1-14 Accessing and Aborting Tests . . . . . . . . . . . . . . . . . . . . . . . . . . . . . . . . . . . . . . . . . . . . . . .1-14 Using the Bar Code Scanner . . . . . . . . . . . . . . . . . . . . . . . . . . . . . . . . . . . . . . . . . . . . . . . .1-16 Software Overview . . . . . . . . . . . . . . . . . . . . . . . . . . . . . . . . . . . . . . . . . . . . . . . . . . . . . . . . . . .1-18 Powering Up the Analyzer . . . . . . . . . . . . . . . . . . . . . . . . . . . . . . . . . . . . . . . . . . . . . . . . . .1-18 Inspection Mode. . . . . . . . . . . . . . . . . . . . . . . . . . . . . . . . . . . . . . . . . . . . . . . . . . . . . . . . . .1-18 PC Mode . . . . . . . . . . . . . . . . . . . . . . . . . . . . . . . . . . . . . . . . . . . . . . . . . . . . . . . . . . . . . . .1-19 System Security . . . . . . . . . . . . . . . . . . . . . . . . . . . . . . . . . . . . . . . . . . . . . . . . . . . . . . . . . .1-19 Monitor Screens . . . . . . . . . . . . . . . . . . . . . . . . . . . . . . . . . . . . . . . . . . . . . . . . . . . . . . . . . .1-20 Main Menu . . . . . . . . . . . . . . . . . . . . . . . . . . . . . . . . . . . . . . . . . . . . . . . . . . . . . . . . . . . . . .1-23 Software Flowchart . . . . . . . . . . . . . . . . . . . . . . . . . . . . . . . . . . . . . . . . . . . . . . . . . . . . . . .1-25 Vehicle Emissions Inspection . . . . . . . . . . . . . . . . . . . . . . . . . . . . . . . . . . . . . . . . . . . . . . . . . . . . . . . .2-1 Test Types . . . . . . . . . . . . . . . . . . . . . . . . . . . . . . . . . . . . . . . . . . . . . . . . . . . . . . . . . . . . . . . . . .2-1 Vehicle Data Entry . . . . . . . . . . . . . . . . . . . . . . . . . . . . . . . . . . . . . . . . . . . . . . . . . . . . . . . . . . . .2-2 Vehicle Found on the VID . . . . . . . . . . . . . . . . . . . . . . . . . . . . . . . . . . . . . . . . . . . . . . . . . . .2-6 Vehicle Not Found on the VID . . . . . . . . . . . . . . . . . . . . . . . . . . . . . . . . . . . . . . . . . . . . . . .2-10 Fuel Cap Test . . . . . . . . . . . . . . . . . . . . . . . . . . . . . . . . . . . . . . . . . . . . . . . . . . . . . . . . . . . . . . .2-12 OBD Test . . . . . . . . . . . . . . . . . . . . . . . . . . . . . . . . . . . . . . . . . . . . . . . . . . . . . . . . . . . . . . . . . .2-16 After Repairs Tests. . . . . . . . . . . . . . . . . . . . . . . . . . . . . . . . . . . . . . . . . . . . . . . . . . . . . . . . . . .2-23 Equipment Maintenance Menu. . . . . . . . . . . . . . . . . . . . . . . . . . . . . . . . . . . . . . . . . . . . . . . . . . . . . . . .3-1 Status Screen . . . . . . . . . . . . . . . . . . . . . . . . . . . . . . . . . . . . . . . . . . . . . . . . . . . . . . . . . . . . . . . .3-2 Fuel Cap Pressure Test Calibration . . . . . . . . . . . . . . . . . . . . . . . . . . . . . . . . . . . . . . . . . . . . . . .3-3 Sticker Maintenance . . . . . . . . . . . . . . . . . . . . . . . . . . . . . . . . . . . . . . . . . . . . . . . . . . . . . . . . . . . . . . . .4-1 Issue Waiver Sticker . . . . . . . . . . . . . . . . . . . . . . . . . . . . . . . . . . . . . . . . . . . . . . . . . . . . . . . . . . .4-2 This Year’s Mileage Less Than 5000 . . . . . . . . . . . . . . . . . . . . . . . . . . . . . . . . . . . . . . . . . . . . . .4-6 New Vehicle Exemption . . . . . . . . . . . . . . . . . . . . . . . . . . . . . . . . . . . . . . . . . . . . . . . . . . . . . . . .4-8 Sticker Replacement . . . . . . . . . . . . . . . . . . . . . . . . . . . . . . . . . . . . . . . . . . . . . . . . . . . . . . . . . .4-8 Voided or Damaged Sticker . . . . . . . . . . . . . . . . . . . . . . . . . . . . . . . . . . . . . . . . . . . . . . . . . . . . .4-8 Missing or Stolen Sticker . . . . . . . . . . . . . . . . . . . . . . . . . . . . . . . . . . . . . . . . . . . . . . . . . . . . . . .4-8 Issue Diagnostic Exemption . . . . . . . . . . . . . . . . . . . . . . . . . . . . . . . . . . . . . . . . . . . . . . . . . . . . .4-9 Diagnostic Functions . . . . . . . . . . . . . . . . . . . . . . . . . . . . . . . . . . . . . . . . . . . . . . . . . . . . . . . . . . . . . . .5-1 Snap-Link . . . . . . . . . . . . . . . . . . . . . . . . . . . . . . . . . . . . . . . . . . . . . . . . . . . . . . . . . . . . . . . . . . .5-1 1 Table of Contents OBDII Test . . . . . . . . . . . . . . . . . . . . . . . . . . . . . . . . . . . . . . . . . . . . . . . . . . . . . . . . . . . . . . . . . 5-2 Barcode Reader Test . . . . . . . . . . . . . . . . . . . . . . . . . . . . . . . . . . . . . . . . . . . . . . . . . . . . . . . . . 5-4 Gas Cap Integrity Test . . . . . . . . . . . . . . . . . . . . . . . . . . . . . . . . . . . . . . . . . . . . . . . . . . . . . . . . 5-5 Station Menu . . . . . . . . . . . . . . . . . . . . . . . . . . . . . . . . . . . . . . . . . . . . . . . . . . . . . . . . . . . . . . . . . . . . . 6-1 Print Sticker Used Report . . . . . . . . . . . . . . . . . . . . . . . . . . . . . . . . . . . . . . . . . . . . . . . . . . . . . . 6-2 Network Communications Diagnostics . . . . . . . . . . . . . . . . . . . . . . . . . . . . . . . . . . . . . . . . . . . . 6-3 Modem Diagnostics . . . . . . . . . . . . . . . . . . . . . . . . . . . . . . . . . . . . . . . . . . . . . . . . . . . . . . . 6-4 Dial Tone Check . . . . . . . . . . . . . . . . . . . . . . . . . . . . . . . . . . . . . . . . . . . . . . . . . . . . . . . . . . 6-4 Network Diagnostics. . . . . . . . . . . . . . . . . . . . . . . . . . . . . . . . . . . . . . . . . . . . . . . . . . . . . . . 6-5 Troubleshooting Communication Problems . . . . . . . . . . . . . . . . . . . . . . . . . . . . . . . . . . . . . 6-6 Data File Refresh . . . . . . . . . . . . . . . . . . . . . . . . . . . . . . . . . . . . . . . . . . . . . . . . . . . . . . . . . . . . 6-7 Previous Vehicle Inspection History . . . . . . . . . . . . . . . . . . . . . . . . . . . . . . . . . . . . . . . . . . . . . . 6-8 Print Communication Log . . . . . . . . . . . . . . . . . . . . . . . . . . . . . . . . . . . . . . . . . . . . . . . . . . . . . . 6-9 Test Record Search and Retrieval . . . . . . . . . . . . . . . . . . . . . . . . . . . . . . . . . . . . . . . . . . . . . . 6-10 Request Lockout Status . . . . . . . . . . . . . . . . . . . . . . . . . . . . . . . . . . . . . . . . . . . . . . . . . . . . . . 6-11 Emergency Software Update . . . . . . . . . . . . . . . . . . . . . . . . . . . . . . . . . . . . . . . . . . . . . . . . . . 6-13 Remote Software Update . . . . . . . . . . . . . . . . . . . . . . . . . . . . . . . . . . . . . . . . . . . . . . . . . . . . . 6-14 Other Functions . . . . . . . . . . . . . . . . . . . . . . . . . . . . . . . . . . . . . . . . . . . . . . . . . . . . . . . . . . . . . . . . . . . 7-1 VIR Reprint / Record Search - Retrieval . . . . . . . . . . . . . . . . . . . . . . . . . . . . . . . . . . . . . . . . . . . 7-1 Training Mode . . . . . . . . . . . . . . . . . . . . . . . . . . . . . . . . . . . . . . . . . . . . . . . . . . . . . . . . . . . . . . . 7-3 Print Rejection From Testing Forms . . . . . . . . . . . . . . . . . . . . . . . . . . . . . . . . . . . . . . . . . . . . . . 7-4 General Maintenance . . . . . . . . . . . . . . . . . . . . . . . . . . . . . . . . . . . . . . . . . . . . . . . . . . . . . . . . . . . . . . . 8-1 General Routine Maintenance . . . . . . . . . . . . . . . . . . . . . . . . . . . . . . . . . . . . . . . . . . . . . . . . . . 8-1 Printer Operation and Maintenance . . . . . . . . . . . . . . . . . . . . . . . . . . . . . . . . . . . . . . . . . . . . . . 8-1 Maintaining the Bar Code Scanner . . . . . . . . . . . . . . . . . . . . . . . . . . . . . . . . . . . . . . . . . . . . . . . 8-2 Cleaning the Scanning Window . . . . . . . . . . . . . . . . . . . . . . . . . . . . . . . . . . . . . . . . . . . . . . 8-2 Checking the Scanner Case . . . . . . . . . . . . . . . . . . . . . . . . . . . . . . . . . . . . . . . . . . . . . . . . . 8-2 Connection Panels . . . . . . . . . . . . . . . . . . . . . . . . . . . . . . . . . . . . . . . . . . . . . . . . . . . . . . . . . . . 8-3 Analyzer Back Panel . . . . . . . . . . . . . . . . . . . . . . . . . . . . . . . . . . . . . . . . . . . . . . . . . . . . . . 8-3 Interface Box . . . . . . . . . . . . . . . . . . . . . . . . . . . . . . . . . . . . . . . . . . . . . . . . . . . . . . . . . . . . 8-4 Accessories and Options . . . . . . . . . . . . . . . . . . . . . . . . . . . . . . . . . . . . . . . . . . . . . . . . . . . . . . 8-5 Standard Accessories. . . . . . . . . . . . . . . . . . . . . . . . . . . . . . . . . . . . . . . . . . . . . . . . . . . . . . 8-5 Options . . . . . . . . . . . . . . . . . . . . . . . . . . . . . . . . . . . . . . . . . . . . . . . . . . . . . . . . . . . . . . . . . 8-5 Appendix A: OBD II Connections . . . . . . . . . . . . . . . . . . . . . . . . . . . . . . . . . . . . . . . . . . . . . . . . . . . . . A-1 Key Terms. . . . . . . . . . . . . . . . . . . . . . . . . . . . . . . . . . . . . . . . . . . . . . . . . . . . . . . . . . . . . . . . . . A-1 OBD II and What it Means . . . . . . . . . . . . . . . . . . . . . . . . . . . . . . . . . . . . . . . . . . . . . . . . . . . . . A-4 The Data Link Connector (DLC) . . . . . . . . . . . . . . . . . . . . . . . . . . . . . . . . . . . . . . . . . . . . . . . . . A-5 OBD II. . . . . . . . . . . . . . . . . . . . . . . . . . . . . . . . . . . . . . . . . . . . . . . . . . . . . . . . . . . . . . . . . . A-6 OBD II Drive Cycles/Readiness Monitors . . . . . . . . . . . . . . . . . . . . . . . . . . . . . . . . . . . . . . . A-6 OBD II Monitors . . . . . . . . . . . . . . . . . . . . . . . . . . . . . . . . . . . . . . . . . . . . . . . . . . . . . . . . . . A-7 Future OBD II . . . . . . . . . . . . . . . . . . . . . . . . . . . . . . . . . . . . . . . . . . . . . . . . . . . . . . . . . . . . A-8 Powertrain System Diagnostic Trouble Codes . . . . . . . . . . . . . . . . . . . . . . . . . . . . . . . . . . . A-8 Standardized Fault Code Format . . . . . . . . . . . . . . . . . . . . . . . . . . . . . . . . . . . . . . . . . . . . . A-9 Codes Only—OBD II Diagnostic Trouble Codes . . . . . . . . . . . . . . . . . . . . . . . . . . . . . . . . . A-9 DTC Naming Guidelines for Signals from Components . . . . . . . . . . . . . . . . . . . . . . . . . . . A-11 Communication Problems . . . . . . . . . . . . . . . . . . . . . . . . . . . . . . . . . . . . . . . . . . . . . . . . . A-12 OBD System Testing. . . . . . . . . . . . . . . . . . . . . . . . . . . . . . . . . . . . . . . . . . . . . . . . . . . . . . . . . A-14 The Malfunction Indicator Lamp . . . . . . . . . . . . . . . . . . . . . . . . . . . . . . . . . . . . . . . . . . . . . A-17 OBDII Connections . . . . . . . . . . . . . . . . . . . . . . . . . . . . . . . . . . . . . . . . . . . . . . . . . . . . . . . . . . A-18 OBD II Connections Table . . . . . . . . . . . . . . . . . . . . . . . . . . . . . . . . . . . . . . . . . . . . . . . . . . . . A-19 2002 . . . . . . . . . . . . . . . . . . . . . . . . . . . . . . . . . . . . . . . . . . . . . . . . . . . . . . . . . . . . . . . . . . A-19 2001 . . . . . . . . . . . . . . . . . . . . . . . . . . . . . . . . . . . . . . . . . . . . . . . . . . . . . . . . . . . . . . . . . . A-29 2000 . . . . . . . . . . . . . . . . . . . . . . . . . . . . . . . . . . . . . . . . . . . . . . . . . . . . . . . . . . . . . . . . . . A-38 1999 . . . . . . . . . . . . . . . . . . . . . . . . . . . . . . . . . . . . . . . . . . . . . . . . . . . . . . . . . . . . . . . . . . A-45 1998 . . . . . . . . . . . . . . . . . . . . . . . . . . . . . . . . . . . . . . . . . . . . . . . . . . . . . . . . . . . . . . . . . . A-53 1997 . . . . . . . . . . . . . . . . . . . . . . . . . . . . . . . . . . . . . . . . . . . . . . . . . . . . . . . . . . . . . . . . . . A-59 1996 . . . . . . . . . . . . . . . . . . . . . . . . . . . . . . . . . . . . . . . . . . . . . . . . . . . . . . . . . . . . . . . . . . A-66 2 Using This Manual This manual contains instructions for set-up and use of the vehicle emissions inspection/maintenance (I/M) analyzer. It contains a table of contents to make information easy to find. Using I/M Software This documentation assumes that the I/M software is properly installed and operating on a host compatible with the software. The instructions assume that the operator has a basic understanding of personal computer (PC) operation. For PCrelated questions refer to the manuals accompanying the host computer. The computer supplied with the analyzer is not equipped with virus protection software. It is strongly recommended that you purchase and install virus protection software on the computer hard drive. ✓ You will be billed for all computer virus service calls. The computer supplied with the analyzer has no surge protection or battery backup. It is strongly recommended that you purchase and install a surge protector or universal power supply (UPS) battery backup with surge protection, to avoid damage from power fluctuations and improper shutdowns. This documentation is designed for use in conjunction with the online software HELP built into the analyzer. Press F1 on the keyboard to display HELP messages on the analyzer screen. Warranty Service Repair and service must be performed according to your warranty/ service agreement. Refer to the warranty statement, a separate document provided with the analyzer, for exact coverage and details. Call EquiServ at 1-800-225-5786 for analyzer repair service. iii Using this Manual Conventions This section lists the various types of information used in this manual. Check Note A check note provides additional information about the subject in the preceding paragraph. Example: ✓ You will be billed for all computer virus service calls. Testing Tips Testing tips provide information that applies to a specific test. Each testing tip is introduced by this icon for easy identification. Example: Read and follow all Safety Messages in this manual. Chapter References Additional information in text is referenced by chapter section and page number. Example: See Using I/M Software on page i-iii. Equipment Damage The possibility of damage to vehicle or equipment is introduced by a signal word indicating this condition. Example: To prevent hard drive corruption, always power-down the analyzer computer by turning off the main power switch, located on the back of the analyzer, when an analyzer system menu is displayed. Safety Messages Safety messages are provided to help prevent personal injury and equipment damage. All safety messages are introduced by a signal word indicating the hazard level. The types of safety messages are: Indicates an imminently hazardous situation which, if not avoided, will result in death or serious injury to the operator or to bystanders. Indicates a potential hazard which, if not avoided, could result in death or serious injury to the operator or to bystanders. iv Using this Manual Indicates a potential hazard which, if not avoided, may result in minor or moderate injury to the operator or to bystanders. The three-part message panel, used with safety messages, uses Three different type styles further define the potential hazard: • Normal type states the hazard, • Bold type states how to avoid the hazard, and • Italic type states the possible consequences of not avoiding the hazard. Some safety messages contain visual symbols with signal words. Example: Risk of burns. Do not remove radiator cap unless engine is cold. Pressurized engine coolant may be hot. Hot engine coolant can cause serious burns. v Using this Manual Trademark Acknowledgements Snap-on®, Snap-Link® and ShopKey® are registered trademarks of Snap-on Technologies, Inc. MCITM is a trademark of MCI Communications Corporation. MS-DOSTM is a trademark of Microsoft Corporation. Pentium® is a registered trademark of Intel Corporation. DELLTM is a trademark of Dell Computer Corporation. Windows® is a registered trademark of Microsoft Corporation. Snap-on Diagnostics, A Division of IDSC Holdings Inc., Lincolnshire IL. EquiServ, A Division of IDSC Holdings Inc., Conway, AR. Copyright Information Pennsylvania OBIS Safety and Emissions Analyzer System Operating Instructions ©2003, Snap-on Diagnostics The information, specifications and illustrations in this documentation are based on the latest information available at the time of printing. Snap-on reserves the right to make changes at any time without notice. vi Safety Information For your safety, read this manual thoroughly before operating the Analyzer System. The Analyzer System is intended for use by properly trained, skilled professional automotive technicians. The safety messages presented in this section and throughout this manual are reminders to the operator to exercise extreme care when using this test instrument. There are many variations in procedures, techniques, tools and parts for servicing vehicles, as well as in the skill of the individual doing the work. Because of the vast number of test applications and variations in the products that can be tested with this instrument, the manufacturer cannot possibly anticipate or provide advice or safety messages to cover every situation. It is the automotive technician's responsibility to be knowledgeable of the system that is to be tested. It is essential to use proper service methods and test procedures and to perform tests in an appropriate and acceptable manner that does not endanger your safety, the safety of others in the work area or the equipment or vehicle being tested. It is assumed that, before using this tool, the operator has a thorough understanding of vehicle systems. Understanding the principles and operating theories of vehicle systems is necessary for competent, safe and accurate use. Before using the Analyzer System, always refer to and follow the safety messages and applicable test procedures provided by the manufacturer of the equipment or vehicle being tested. I Safety Information Read All Instructions Read all instructions and safety messages in this manual. All safety messages in this section contain a signal word, a three-part message, and, in some instances, a symbol/pictorial. The signal word indicates the level of hazard in a situation. Danger indicates an imminently hazardous situation which, if not avoided, will result in death or serious injury to the operator or bystanders. Warning indicates a potentially hazardous situation which, if not avoided, could result in death or serious injury to the operator or bystanders. Caution indicates a potentially hazardous situation which, if not avoided, may result in moderate or minor injury to the operator or bystanders. Important indicates the possibility of damage to vehicle or equipment. Some safety messages contain visual symbols with signal words. For example: Risk of burns. Do not remove radiator cap unless engine is cold. Pressurized engine coolant may be hot. Hot engine coolant can cause serious burns. An icon, when present, gives a graphical description of the potential hazard. Safety messages in this section contain three different type styles. • Normal type states the hazard. • Bold type states how to avoid the hazard. • Italic type states the possible consequences of not avoiding the hazard. II Safety Information Important Safety Instructions Risk of electric shock. • Connect power cord to properly grounded outlet. Do not remove or bypass the grounding pin. • Do not touch ignition coils, coil terminals and spark plugs while operating. Ignition coils, coil terminals and spark plugs emit high voltage. • Use extreme care when working around spark plugs, spark plug wires and coil terminals while engine is running. • Do not use any test lead, pickup or adaptor, other than those intended for use with this product. Electric shock can cause serious injury. Risk of poisoning. • Use this equipment in locations with mechanical ventilation providing at least four air changes per hour. Engine exhaust contains carbon monoxide gas, a colorless, odorless lethal gas. • Route exhaust outside while testing with engine running. Poisoning can result in death or serious injury. Risk of explosion. • Wear safety goggles and protective clothing, user and bystander. • Use this equipment in locations with mechanical ventilation providing at least four air changes per hour. • Do not smoke, strike a match, place metal tools on battery or cause a spark in the vicinity of the battery. Battery gases can ignite. • Avoid making accidental connection between battery terminals through tools, jumper leads, etc. • Properly secure calibration gas bottle to prevent damage. Damaged gas bottles can explode. Explosion can cause death or serious injury. III Safety Information Risk of fire. • Wear safety goggles and protective clothing, user and bystander. • Do not position head directly over or in front of the carburetor or throttle body. Do not pour gasoline down the carburetor or throttle body when cranking or running the engine, when working with fuel delivery systems or any open fuel line. Engine backfire can occur when the air cleaner is out of normal position. • Do not use carburetor sprays or fuel injector cleaning solvents when performing diagnostic testing. • Keep a dry chemical (Class B) fire extinguisher rated for gasoline, chemical and electrical fires in the work area. Fire can cause death or serious injury. Risk of fire. • Be aware that many systems maintain residual pressure in the line after the engine is turned off. • Wipe up fuel spills immediately. • Turn vehicle off before connecting or disconnecting equipment. • Keep shop rags, towels, paper, oils, fuel, plastics and other combustible materials clear of vehicle exhaust and evacuation hoses. • Keep a dry chemical (Class B) fire extinguisher rated for gasoline, chemical and electrical fires in the work area. Flames can cause serious injury. Risk of expelling fuel, oil vapors, hot steam, hot toxic exhaust gases and other debris. • Wear safety goggles and protective clothing, user and bystander. • Engine systems can malfunction expelling fuel, oil vapors, hot steam, hot toxic exhaust gases and other debris. Fuel, oil vapors, hot steam, hot toxic exhaust gases, and other debris can cause serious injury. Risk of burns. Do not remove radiator cap unless engine is cold. Pressurized engine coolant may be hot. Hot engine coolant can cause serious burns. IV Safety Information Risk of burns. • Do not touch hot exhaust systems, manifolds, engines, radiators, sample probe, etc. • Wear gloves when handling hot engine components, such as PCV and EGR valve. • Wear gloves when handling hot exhaust sample probe. Hot components can cause burns. The engine compartment contains electrical connections and hot or moving parts. • Do not place test equipment or tools on fenders or other places in the engine compartment. • Keep yourself, test leads, clothing and other objects clear of electrical connections and hot or moving engine parts. • Keep hands, feet, clothing and test equipment away from moving parts. • Barriers are recommended to help identify danger zones in test area. Contact with electrical connections and hot or moving parts can cause injury. SAVE THESE INSTRUCTIONS V Safety Information VI 1 Introduction and Equipment Overview Clean Air and Vehicle Emissions The government recognized vehicle emissions as a source of air pollution when it passed the Air Act. While the Act did not establish vehicle emissions standards, it did authorize the government to contribute to local air pollution control efforts. However, amendments to the Act required that manufacturers equip all cars and light trucks with emissions pollutant controls. Subsequent research produced technologies to develop more effective control methods. Prior to the Air Act, the effects of automobile emissions on air quality were not well understood. Smog was thought to be a mixture of smoke and fog—the two words that “smog” comes from. Soon, more comprehensive studies showed that over 40% of all air-born emissions were by-products of automobile exhaust. Smog was found to be the result of a chemical reaction that occurs in sunlight between hydrocarbons (HC) and oxides of nitrogen (NO2). Once the government understood the contribution of vehicle emissions to air pollution, it formulated legislation to control it. Figure 1-1: Controlling Vehicle Emissions Pollutants Leads to Cleaner Air 1-1 Introduction and Equipment Overview Engine Combustion Understanding how vehicles produce pollutive emissions requires an understanding of engine combustion. The regulated pollutants carbon monoxide, hydrocarbons, and oxides of nitrogen are byproducts of the fuel burning process. The internal combustion engine combines gasoline fuel (hydrocarbons), air (oxygen), and fire (ignition) in a combustion chamber to produce energy to drive the wheels of a car. Effective control of each component maximizes the power and efficiency of the engine. A carburetor or fuel injector determines the air/fuel mixture; precisely timed spark firing synchronizes piston action; and the amount of compression determines the power of combustion explosion. If all these components worked perfectly, complete combustion would take place. During complete combustion, no excess fuel goes unburned, and all available oxygen burns. However, in the real world many factors create conditions which are unfavorable for complete combustion. Contributing factors include degraded engine and cylinder conditions, impure fuel, the natural impurities in the air, and imprecise combustion timing. Consequently, we must monitor vehicle emissions pollutants in order to limit their contribution to air pollution. Pollutants Some by-products of internal combustion engines have all been recognized as hazardous in high concentrations. These pollutants alter the composition of the air we breath, which is usually 78% nitrogen, 20.8% oxygen, and 1% trace elements. Carbon Monoxide (CO) A major component of polluted air is carbon monoxide (CO). CO is a colorless, odorless gas which, when concentrated, is toxic. Any fueled engine properly adjusted and in good operating condition produces relatively low CO readings. Excessive CO develops when the combustion chamber is receiving a large volume of fuel and a proportionately small amount of air. By weight, carbon monoxide accounts for about 47% of air pollution produced by vehicle emissions. Oxides of Nitrogen (NO2) Another pollutant comes in the form of oxides of nitrogen (NO2). Oxides of nitrogen consist of nitrogen combined with varying amounts of oxygen. NO2 is produced by heat and pressure during the combustion process and is a main component in photochemical smog, described earlier. Hydrocarbons (HC) Of greater concern today, however, is unburned gasoline which is composed of hydrocarbons (HC). When combustion is incomplete due to a lack of oxygen, insufficient temperatures, or any of a number of other problems, a certain amount of raw fuel remains unburned. Even a tuned engine, in good mechanical and electrical condition, emits some HC. Excessive HC in non-catalytic reactor vehicles is the result of incomplete combustion because of mechanical, electrical, or carburetor defects. 1-2 Introduction and Equipment Overview HC consists of carbon and hydrogen atoms in various combinations and, like NO2, is a major component in the formation of photochemical smog. Carbon Dioxide (CO2) Carbon dioxide (CO2) is also a by-product of combustion and is non-toxic at low levels (we exhale CO2 when we breathe). It is the result of one carbon molecule joining with two oxygen molecules in the combustion chamber and is sent out through the exhaust with HC, CO, and O2. Controlling Vehicular Emissions Pollutants To meet federal standards for vehicle emissions, manufacturers developed various emission controls. Since these controls were developed to quickly respond to Clean Air Act mandates, they were developed within a few years of each other. Manufacturers considered overall vehicle operation as well as individual control systems, which were tailored not only to control specific pollutants but to interact with the other systems as well. Vehicle emissions controls can be classified into two categories: those that prevent the formation of pollutants (pre-combustion) and those that reduce or control emissions levels (post-combustion). It take less effort and is less expensive to prevent the production of pollutive emissions than to destroy the pollutants after formation. Therefore, pre-combustion control is by far the most effective and widely used of the two types of emissions control systems. Excessive emission of HC, CO, and NO2 have been identified as a probable cause of numerous health problems. In addition, excessive NO2 contributes extensively to excessive smog production, which causes respiratory problems in much of the general population. Studies show that controlling vehicle emissions is among the most effective methods for improving air quality. Vehicles that emit “clean” emissions improve their fuel economy and vehicle performance as well as the environment. Acronyms and Terms BMV DLC DTC KOEO KOER MIL OBD PCM SAE TIN TSB VIN VIR Bureau of Motor Vehicles Data Link Connector Diagnostic Trouble Codes Key On Engine Off Key On Engine Running Malfunction Indicator Light Onboard Diagnostic Powertrain Control Module Society of Automotive Engineers Transaction Identification Number Technical Service Bulletins Vehicle Identification Number Vehicle Inspection Report 1-3 Introduction and Equipment Overview Equipment Overview The equipment consists of the analyzer that contains a PC, a bar code reader, a remote control and a gas cap tester. For more details about each component, see: • Analyzer Front, page 1-4 • Analyzer Back, page 1-6 • User PC Function, page 1-8 • Bar Code Scanner, page 1-9 • Remote Control, page 1-9 • Gas Cap Tester, page 1-9 Analyzer Front Most of the I/M analyzer operating controls are available from the front of the unit. This section describes the items labeled on the analyzer front view shown in Figure 1-2. A B C H D G E F Figure 1-2: Analyzer, Front View A Monitor Specifications and Contrast Controls The monitor offers a high-resolution color VGA monitor display. Use the contrast controls, located below the monitor screen, to adjust the monitor to shop lighting conditions. Layout, Prompts, HELP Messages Interaction with the I/M analyzer computer occurs through the monitor. For more information, refer to Monitor Screens, page 1-20. 1-4 Introduction and Equipment Overview B Report Printer A non-secured printer using 8-1/2” x 11” one-part paper produces the vehicle report, and can also produce a hard copy of test results compiled during tune-up emissions analysis, weekly gas calibration, etc. May also be used to print most monitor screen displays (press the PRINT SCRN key). Always verify that the report printer is ON and has paper before printing. For additional information about printer operation, refer to the user’s manual included with the printer. C Mouse and Keyboard The mouse is located inside a drawer on the front of the analyzer. Use the mouse to select buttons and make selections from dropdown lists for I/M functions on the monitor screen. The keyboard is located inside a drawer on the front of the analyzer. Use the keyboard to select I/M functions that display on the monitor screen, advance through test sequences, and enter data into onscreen fields. D Locked Equipment Compartment The locked equipment compartment houses the computer. This compartment is locked, but may be opened by the equipment owner to install software on the PC. — For PC information, reference the literature package provided with the PC. E Gas Cap Tester Used when performing Gas Cap Tests, as part of the inspection process. A box with adaptors for testing is also provided. See Figure 1-1. F Storage Cabinet This cabinet is for storage of additional portable equipment or other necessary items. G Bar Code Scanner Used for quick data entry of information in bar code form. H Remote Control Used to make menu selections and operate most analyzer functions. Items Not Shown Computer Components The following items are located on the computer inside the locked equipment compartment. DVD-ROM Drive Analyzers are equipped with a digital video drive (DVD), which is located near the top of the PC tower. Floppy Disk Drive This disk drive is referred to a drive "A:/". Can be used to load program and diagnostic software on the computer. PC Power/Reset Switch This switch is located above the DELL logo. Press to clear the monitor and reboot (restart) the computer, if necessary. For information about orderly power-downs, refer to Powering Up the Analyzer, page 1-18. — Do not use this switch to turn off the PC. Flip-Up Cover One additional USB port and a headphone jack are located under this cover on the lower portion of the PC tower. Interface Box The interface box is located behind the left front door. No user action is required for proper analyzer operation. See Connection Panels, page 8-3 for a description of the interface box. 1-5 Introduction and Equipment Overview Analyzer Back Some analyzer controls, auxiliary assemblies, and connections are located on the back of the unit. This section describes the items labeled on the analyzer rear view, shown in Figure 1-3. C B A D L E K F J I G H Figure 1-3: Analyzer, Rear View Report Printer See Analyzer Front, page 1-4. B ID Plate Contains the following: • Model number, • Serial number, • Voltage requirements, and • Patent information/listings. C Warning Label Contains critical safety messages. D Monitor See Analyzer Front, page 1-4. E Connection Panel Provides connections for options. See Analyzer Connection Panel, page 1-7. F Bar Code Scanner Used for quick data entry of information in bar code form. G OBD II Interface OBD II cable and adaptor. H Telephone Cord Accommodates off-site modem communication. — Be sure the cord is securely plugged into a telephone wall outlet when in use. I Gas Cap Tester Waekon gas cap tester. A 1-6 Introduction and Equipment Overview J Ventilation Grate / Access Panel When access panel is removed, rear PC connectors are exposed. — Service must open with a special key. K The main power switch, located on the right rear of the unit, Main Power Switch completely shuts off power to the analyzer. Press the rocker switch to the left or right to turn the analyzer on or off. L Power Cord Connects analyzer to main power source. Analyzer Connection Panel ✓ Figure 6-2: Connection Panel, Back of Analyzer Ports used depend on State requirements and optional equipment added to the analyzer. Some options may not be available for specific analyzer systems. Ports and Connections COM A Not used COM B Not used COM C (CPC Connector) Gas cap tester (not used) COM D Not used COM E (DB-25 Connector) Snap-Link Cable COM F Not used COM G Not used COM H (DB-25 Connector) Bar code scanner COM I (DB-9 Connector) Spare, Comm One Serial COM J Not used COM K Not used COM L (DB-9 Connector) OBD II cable 1-7 Introduction and Equipment Overview User PC Function The analyzer is designed to provide full access to all standard PC capabilities running on Windows 2000. Two modes of operation are possible: • Inspection Mode • PC Mode Inspection Mode Use this mode to perform state inspections after a valid authorization access code is entered. The inspection mode is secure. You can neither access nor change the operating program and stored data. The computer is equipped with "logical" security and code encryption, which prevent unauthorized access. Attempting to "crack" the system renders the unit non-operational and you will be charged for any service call required to return the analyzer to service. The state is also notified of the attempt to tamper. PC Mode Use this mode to operate the analyzer like a standard PC with Windows. ✓ Different access codes are required than for Inspection Mode. All Windows 2000 compatible programs can be loaded and run on the PC, including ShopKey shop-management and vehicle repair software programs available from your Snap-on representative. The analyzer is equipped with a DELL computer that has the following minimum specifications: • 2.00 GHz or faster processor • 128 MB RAM • 40 GB hard drive • 56 K modem • 16x DVD drive • 3.5" floppy drive • Spare USB port (on front of PC, behind lower cover) • Spare RS232 communication port (back of the analyzer) If you are unfamiliar with PC hardware or Windows software, it is strongly recommended that you obtain instructional materials before attempting to use the PC functions. The analyzer system warranty does not cover the installation, training, technical assistance or repair of any software on the PC side of the analyzer. All software you install or devices you connect to your system are solely your own responsibility. If a virus infects your computer, it is your own responsibility. We strongly recommend that you purchase and install virus protection software, such as Norton AntiVirus. All service calls necessary as a result of user-installed software, hardware or the occurrence of a virus will be billed to you. Service personnel will return the unit to its original configuration and provide suggestions to prevent additional problems. EquiServ does not service or repair items that are not provided by Snap-on. 1-8 Introduction and Equipment Overview Bar Code Scanner The bar code scanner, located on the side of the unit, eliminates certain keyboard entries by entering a complete field of data into the analyzer through a simple scan. The hand-held scanner reads bar codes and symbols in hard-to-reach places (such as labels on engines, hoods, government-provided access cards, and vehicle information documents). Remote Control Use the remote control to operate the analyzer from around the vehicle or when testing requires controlling the analyzer apart from the keyboard. Gas Cap Tester The Waekon gas cap tester is used with the analyzer for gas cap testing. See the manual that accompanies the tester for specifications and detailed operation information. Waekon Figure 1-1: Waekon Gas Cap Tester 1-9 Introduction and Equipment Overview System Security The analyzer can detect computer and data storage tampering. The tamper condition is identified by the program and recorded on the hard drive. Only state or service personnel can remove the tamper condition and return the analyzer to operation. Attempting to access secured areas will invoke an analyzer lockout. • The analyzer will not perform I/M emission inspections if it is locked out. • Only service personnel can unlock the analyzer, and you will be billed for the service call. Using the Keyboard This section describes the function of several types of keys on the analyzer keyboard: Data Entry Keys, Tab Key, Enter Key and Movement Control Keys. Also available for remote analyzer operation is the Remote Control Keypad. See Remote Control, page 1-9. Function Keys The software operates with a standard keyboard and keyboard functions for PC/Windows. ESC/ABORT Abort a vehicle inspection or backs out of the current menu/function. When ESC is pressed during the inspection, the question DO YOU WANT TO ABORT THE TEST? displays. — Select YES to abort the test. — Select NO or press ESC a second time to return to the inspection. During inspections, programming returns to the Main Menu. F1/HELP Press to display on-screen HELP information. HELP contains additional test instructions or explanations when available. There are two types of HELP: — System-wide HELP provides general information about the currently displayed function. — Vehicle inspection HELP provides detailed input information about entries that must be completed by the operator. F2/CLEAR Press to clear data from a data entry field. F9/BACKUP Press to move backwards in a procedure sequence. F10/CONTINUE Press to move forward in a procedure sequence. F11/PRINT SCREEN This function is available to produce a hard copy of the current screen, except during vehicle emissions testing. — Scroll lock and pause break keys are not applicable. F12/STATUS 1-10 Display system faults or warnings currently present when STATION LOCKOUT, SYSTEMS FAULT PRESENT or SYSTEM WARNING PRESENT appear in the lower right of the screen. Introduction and Equipment Overview Data Entry Keys 1 through 9 Enter numbers. Aa through Zz Enter letters. Punctuation Enter punctuation or symbols. BACKSPACE Delete a previous entry. CAPS LOCK Enter capital letters. All letters are capitals until CAPS LOCK is pressed a second time. ENTER Confirm an action and store information in memory. SHIFT Invoke a key's second character or function. SPACE BAR Add a space character. — The CTRL and ALT keys are not applicable Delete Clear all contents in a data entry field Calculator and Movement Control Keys Calculator Keys Calculator keys are numbered keys that are arranged as if on a calculator and perform the same function when NUM LOCK is pressed. Movement Control Keys TAB Move the cursor to the next field in the screen. Store information from the previous field into memory. SHIFT + TAB Move the cursor to the previous field in the screen. Store information from the field just exited into memory. PAGE UP Return to a previous page. PAGE DOWN Advance to the next page. DELETE Delete current characters. Down-Arrow Reveal drop-down menu, then move down in the list Up-Arrow Move up in a list 1-11 Introduction and Equipment Overview Using the Remote Control Keypad Use the remote control keypad as a keyboard when providing computer input from a remote location. Figure 1-2: Remote Control Keypad 1-12 A – Remote Control Unit Use the keys on this unit, to access, navigate, or exit the I/M software from a remote location. B – Setup Not used for I/M testing. C – Eng Data Not used for I/M testing. D – Tools Not used for I/M testing. E – HELP Not used for I/M testing. F – Menu/ESC Not used for I/M testing. G – Freeze Not used for I/M testing. H – Back Not used for I/M testing. I – Up Arrow Press to move cursor toward top of screen. J – CONT Not used for I/M testing. K – Right Arrow Press to move cursor toward right side of screen. L – Yes Not used for I/M testing. M – Down Arrow Press to move cursor toward bottom of screen. N – NO Not used for I/M testing. Introduction and Equipment Overview O – Enter Press to complete data entry. P – Left Arrow Press to move cursor toward left side of screen. Function/Numeric Q– Keys Press these keys to select various functions. F1/HELP to display on-screen HELP information. F10/CONTINUE to move forward in a procedure sequence. F12/SYSTEM FAULTS to display system faults R – Clear Not used for I/M testing. S – Opt 1 This key is reserved for future use. T – Opt 2 This key is reserved for future use. U – Print Not used for I/M testing. V – Shift Not used for I/M testing. 1-13 Introduction and Equipment Overview General Vehicle Inspection The inspection process, prompts, and screen procedures are determined by State regulations. You must know and understand your State regulations to properly use the analyzer software. Accessing and Aborting Tests Entering Access Codes Figure 1-3: Inspector Logon Prompt Screen Access to certain menu items, including an Emissions Inspection Test, requires two codes: • Inspector access code, and • Inspector PIN number. 1. Scan Inspector license number. — Press TAB to move from field to field. — Press SHIFT+TAB to move to the previous field. 2. Enter access code. — Select F10 to Continue. ✓ Logon may be unsuccessful for any of the following reasons: — Inspector license number was not found on file. — Inspector license is not valid to conduct emissions tests. — Inspector access code is incorrect. — Inspector license has expired. — Inspector license has been suspended or revoked. The bar code scanner must be used to scan access codes from badges. Manual entry is not allowed. If the technician license or station license have expired, the analyzer does not allow access to the emissions inspection function. 1-14 Introduction and Equipment Overview Aborting an Inspection Figure 1-4: “Would you like to abort?” Prompt Screen This section describes the procedure for aborting an inspection. If entry into the inspection functions is attempted while certain faults exist, the program aborts. Press F12 STATUS to view a list of faults. ✓ Warnings that do not affect vehicle inspection may be present during testing. These warnings concern conditions that should be addressed, but that do not affect testing. 1. Press ESC at any time to abort a test and return to the Main Menu. The analyzer displays a prompt to verify the abort, as shown in Figure 1-4. — Select NO or press ESC a second time to return to the place in the test from which the abort was attempted. — Select YES to abort the test. ✓ After selecting YES, in some applications an Abort Code may be required indicating the reason the test was ended. In this case, the analyzer displays a list of Abort Codes. Highlight the correct code and press Enter. 1-15 Introduction and Equipment Overview Using the Bar Code Scanner The analyzer is equipped with a bar code scanner that is used to simplify the entry of frequently used information, including: • Vehicle Identification Numbers (VINs), • Vehicle sticker information, and • Other bar coded information. Figure 1-5: Example 1-D and 2-D Bar Codes Figure 1-5 shows a typical bar code symbol. By arranging the bars and spaces contained in a bar code in a certain order, it is possible to represent, or "encode" letters, words, and numbers. Bar codes contain a blank area on their left and right sides. This blank area is called a "quiet zone" and it tells the scanner where the bar code begins and ends. It is important to include these blank areas when running the scanner over the bar code. Scanning Technique Test the Scanner Aim the scanner away from you and press the trigger. When you press the trigger, the scanning beam is energized for approximately 3.5 seconds (default). Scan 1. Make sure the symbol you want to scan is within the proper scanning range. 2. Aim and press the trigger. — The scan beam and red SCAN LED light for about 3.5 seconds, or until a successful "read" or decode is achieved. 3. The scanner has read the symbol successfully when: — You hear a "beep," and — The green DECODE LED lights. This LED stays green until the next trigger pull, or until power is removed from the scanner. Before attempting a scan, make sure the bar code is of good quality and that the bar code scanner's scanning window is clean. Dirt and specks can cause inaccurate scans, as can wrinkled or smudged bar codes. 1-16 Introduction and Equipment Overview Scanning Tips Hold the Scanner at an Angle Do not hold the scanner directly over the bar code. In this position, light can bounce back into the scanner's exit window and prevent a successful "read" or decode. Scan the Entire Symbol • Your scan beam must cross every bar and space on the symbol. • The larger the symbol, the farther away you should hold the scanner. • Hold the scanner closer for symbols with bars that are close together. • A short high-tone “beep” indicates a good decode. Figure 1-6: Right and Wrong Ways to Scan a Bar Code Storing the Scanner When not in use, store the scanner in the small holster on the side of the analyzer. 1-17 Introduction and Equipment Overview Software Overview The analyzer software leads the operator step-by-step through test functions. All analyzer functions display on the monitor and are controlled by the keyboard and the mouse. A remote control is available for use with the OBIS program. The basic operation of the analyzer is menu-driven. See Main Menu, page 1-23. Relevant information displays concisely using the full capacity of the primary screen, specific HELP screens, and operator prompts. See: • Powering Up the Analyzer, page 1-18 • Inspection Mode, page 1-18 — Access, page 1-18 • PC Mode, page 1-19 — Access, page 1-19 — Exit, page 1-19 • System Security, page 1-19 • Monitor Screens, page 1-20 — Menus, page 1-20 — Prompts, page 1-21 — Data Entry Screens, page 1-21 — HELP Screens, page 1-22 • Main Menu, page 1-23 • Software Flowchart, page 1-25 Powering Up the Analyzer 1. Turn ON the main power switch located on the back of the analyzer. — The Windows Password Access Screen displays. ✓ The telephone cord must be connected at all times to the appropriate telephone connection at your site, using the phone cable provided with the analyzer. 2. Enter the required operating mode. — Inspection, for emissions testing, or — PC, for normal PC use without emissions testing. Inspection Mode Access 1. Power up the analyzer. 2. Type "obis" in the Windows User Name field and select OK. — The system launches the OBIS inspection software. ✓ No password is required. System Faults or Warnings in the OBIS Inspection Program The System Status Screen lists any fault(s) detected during power-up system checks. These faults display in the lower right section of the screen. 1-18 Introduction and Equipment Overview Exit 1. Select the End button on the bottom of the Inspection screen and follow the prompts. 2. To completely shut down the system, select "Shut down" from the Windows drop down menu. 3. When the monitor screen is blank, turn OFF the main power switch located on the back of the analyzer. PC Mode Use the analyzer in a normal PC and function as normal PCcompatible system. The user must exit the OBD II software to enter PC mode. To place the analyzer into PC Mode: 1. Go the Main Menu. 2. Select End Shutdown/PC Option. ✓ For additional information refer to User PC Function, page 1-8. Access 1. Power up the analyzer. 2. Type "PC" in the Windows User Name field and select OK. — The system launches the Windows PC software without emissions testing. ✓ No password is required. System Security The analyzer can detect tampering. The tamper condition is identified by the program and recorded on the hard drive. Only State or service personnel can remove the tamper condition and return the analyzer to operation. • • • • Never attempt to modify I/M test data. Never attempt to access the I/M operating program. Never open the PC case. Always power down properly. 1-19 Introduction and Equipment Overview Monitor Screens The information needed to operate the analyzer appears on the monitor display screens. There are several different types of screens that display on the monitor: • Menus • Prompts • Data Entry Screens Menus Menu Selections Shortcut Buttons Online Help Title Bar Navigation Buttons System Status Figure 1-7: Example Analyzer Menu Screen Menu screens are divided into the major areas, described in this section. See Figure 1-7. Menu Selections Use to select a function. Title Bar The area contains the menu name, test name or current function. On-line HELP Area On-line HELP for the current screen function displays in the top right-hand portion of the screen. System Status Area The current status of the system—including any current error messages—displays in the bottom right-hand portion of the screen. Navigation Buttons Shortcut Buttons 1-20 The Previous and Next buttons to navigate through screens as well as the End button used to exit the analyzer program and operate in PC mode are in the bottom of the screen. These buttons are "quick clicks" to four commonly used functions: • Main Menu, • Missing or Voided Certificates, • Calibration, and • Vehicle Diagnostics. Introduction and Equipment Overview Prompts Figure 1-8: Example Prompt Screen Prompt screens require an answer to a question or to confirm an action. See Figure 1-8. — Select the buttons to respond or press Enter to execute the active button. Data Entry Screens Data Entry Fields Instruction Bar Figure 1-9: Example Data Entry Screen Data entry screens require information to be entered into fields. See Figure 1-9. — To move forward in a procedure sequence, select Continue with the mouse or press F10 on the keyboard. — To abort a procedure, select Abort or press ESC on the keyboard. 1-21 Introduction and Equipment Overview HELP Screens When additional instructions or explanations of test functions are available, the HELP key is highlighted. Figure 1-10: Example HELP Screen There are two types of HELP. • System-wide HELP provides general messages based on the major function currently in use, such as Calibration or Main Menu. See Figure 1-10. • Emissions Test HELP provides detailed information for most data entry inputs required by the operator. 1-22 Introduction and Equipment Overview Main Menu Figure 1-11: Main Menu Select an inspection type or menu to be accessed from the analyzer Main Menu. See Figure 1-11. 1 Vehicle Emissions Inspection Menu • Use to perform the emissions test on vehicles. ✓ The word "emissions" is used in this manual to refer to an OBD II Test. The State refers to OBD II testing as "emissions" testing. 2 Diagnostic Functions • Use to access various diagnostics tests including: — Snap-Link feature for a screen that allows you to connect a Snap-on scanner to the PC. — OBD II Test to diagnose vehicle emissions problems. — Barcode Reader Test verifies that the — Gas Cap Integrity Test ✓ ✓ The scanner must be a Snap-on scanner. Follow the instructions in the Snap-Link manual for operation of the software. 1-23 Introduction and Equipment Overview 3 Station Menu • Print Sticker Used Report — Use to display and print a report of stickers used at the station) • Network Communication Diagnostics — Modem Diagnostics — Dial Tone Check — Network Diagnostics • Data File Refresh — File transfer and screen prompts during data file refresh. • Previous Vehicle Inspection History — After gathering some vehicle information VIID access will be attempted and, if successful, the equipment will request the production of a report. • Print Communications Log — Print to the VIR printer a text listing of all communications session logs recorded by the equipment for a minimum of the past 100 communication sessions. • Test Record Search and Retrieve — Display of inspection records, the search and retrieval of previous test records. • Request Lockout Status — Upon selection, VIID access will be attempted and, if successful, the VIID will return the revised lockout status even though the lockout might not have been removed. • Emergency Software Update — Used with software disk to update analyzer. • Remote Software Update — Used to access Snap-on Remote Update Server. 4 State Menu • Used by the State auditor to verify that the analyzer is functioning properly. — DO NOT attempt to access this menu or a Lockout could occur. 5 Manufacturer’s Technician Menu • Used by analyzer service technicians only. — DO NOT attempt to access this menu or a Lockout could occur. — Resuming analyzer operations after a lockout requires a service visit. Do not attempt to access Manufacturer’s Technician Menu. 1-24 Introduction and Equipment Overview Software Flowchart Figure 1-12: Software Flowchart 1-25 Introduction and Equipment Overview 1-26 Vehicle Emissions Inspection 2 This chapter contains information about the inspection process using the Vehicle Emissions Inspection Menu including: • Test Types, page 2-1 • Vehicle Data Entry, page 2-2 • Fuel Cap Test, page 2-12 • OBD Test, page 2-16 • After Repairs Tests, page 2-23 Test Types Determine the type of test to perform on a vehicle by identifying the county in which the vehicle is registered. The following overview of counties identifies test type for those specific counties: • • • • >1996 OBD /Gas Cap 1975–1995 Gas Cap & Visual • • • • Berks Cumberland Dauphin Lancaster Lebanon Lehigh Northhampton York GasCap & Visual • • • • • • • • Blair Cambria Centre Erie Lackawanna Luzerne Lycoming Mercer 1996 & Newer - Added OBD • Pittsburgh/Philadelphia 2-1 Vehicle Emissions Inspection Vehicle Data Entry Figure 2-1: Main Menu 1. Select Vehicle Emissions Inspection from the Main Menu. Figure 2-2: Inspector Logon 2. Scan Inspector license number. — Press TAB to move from field to field. — Press SHIFT+TAB to move to the previous field. ✓ ✓ ✓ License number and access code may also be entered manually. License number consists of two (2) alpha characters followed by six (6) numbers. Access code consists of five (5) numbers. 3. Enter access code. — Select F10 to Continue. ✓ 2-2 Logon may be unsuccessful for any of the following reasons: Vehicle Emissions Inspection — The Inspector license number was not found on file. — The Inspector license is not valid to conduct emissions tests. — Inspector access code is incorrect. — Inspector license has expired. — Inspector license has been suspended or revoked. Figure 2-3: Vehicle Identification 4. Ask the customer for BMV Registration Credential or previous VIR. ✓ Use the barcode for faster testing. 5. Select the Test Type: — Initial, or — After Repairs Press Tab or Enter. 6. Scan the barcode on the BMV Registration Credential, the VIR, the VIN on the vehicle or enter VIN Number and press Tab or Enter. — If the VIN is entered manually, a second entry is required. — If the VIN entered has more than 17 characters you are asked to check the VIN number and re-enter manually. ✓ Scanning is the fastest and preferred method for data entry. 7. Enter Title Number and press Tab or Enter. ✓ Title Number must be between 5 and 10 characters long. 8. Enter License Plate Number and select F10 to Continue. 2-3 Vehicle Emissions Inspection Figure 2-4: Verify Vehicle Information 9. A review screen displays. Verify that the information is correct and select: Yes, if vehicle information is correct — The analyzer contacts the VID for a vehicle match. See Figure 2-5. No, if vehicle information is incorrect. — The Vehicle Identification screen displays. Correct information and select F10 to Continue. Figure 2-5: VID Contact 10. The analyzer contacts the VID. Select F10 to Continue. ✓ 2-4 If the VID cannot be contacted, an error message displays. Vehicle Emissions Inspection Figure 2-6: No Vehicle Match, Check Entries ✓ ✓ Figure 2-7: Verify Vehicle Information If no vehicle match is found on the VID, the message in Figure 2-7 displays. Select Continue (F10) to proceed. If the analyzer cannot contact the VID after two attempts the following message displays and emissions testing continues: CANNOT ACCESS NETWORK. PROCEED WITH THE EMISSIONS TEST. ✓ There is a limit to the number of test that may be performed without connecting to the VID. When that limit is reached the following message displays: COMMUNICATION SECURITY VIOLATION. TOO MANY EMISSIONS TESTS WITHOUT COMMUNICATING TO THE VID. THE INSPECTION CANNOT PROCEED, CONTACT PENNDOT SUPPORT. ✓ If no vehicle matching the VIN, Title Number and License Plate is found on the VID, the message in Figure 2-6 displays. Check the data entered, make the necessary changes and press F10 to CONTINUE. 2-5 Vehicle Emissions Inspection Vehicle Found on the VID ✓ Figure 2-8: VID Contact If a previous initial inspection is on file for the vehicle you are asked if you want to qualify the inspection as an After Repairs Inspection. Select: — Yes, to change to After Repairs Inspection, or — No, to continue with an Initial Inspection, Figure 2-9: Vehicle Found, Confirmation 11. If the vehicle is found on the VID, the Vehicle Confirmation screen displays completed with all information available from the VID. — Confirm that all information is correct and select Yes (F10) to Continue. — Select No (Esc) if the vehicle information is incorrect. 2-6 Vehicle Emissions Inspection Figure 2-10: Vehicle Data 12. Verify that the information in the Vehicle Data screen is correct. — If necessary, enter the necessary vehicle information changes using the keyboard and dropdown menus. See Figure 2-10. 13. Enter the Vehicle Model Year and press Enter. ✓ The Vehicle Year and County selection determine the test type performed. — Visual — Visual and OBD — Other 14. Press Enter to accept the Vehicle Make retrieved from the VID. — If the Vehicle Make is incorrect, select the drop down and choose the Vehicle Make from the display list. Press Enter to Continue. ✓ If the vehicle is not on the list, select "Other" from the end of the list. 15. Press Enter to accept the Vehicle Model retrieved from the VID. — If the Vehicle Model is incorrect, select the drop down and choose the Vehicle Model from the display list. Press Enter to Continue. ✓ The analyzer contains a lookup table for various vehicle makes and models. This list may not apply to "newer" vehicles. — To access the list, type the first few letters of the make or model or press Enter. Use the arrow keys to move through the list that displays. Either select the model from the list or type in the model name. 2-7 Vehicle Emissions Inspection Figure 2-11: Vehicle Model and Body Type List 16. Enter the Vehicle Body Style and press Enter. Options are: — 1 = Sedan — 2 = Station Wagon — 3 = Pickup — 4 = Sport/Utility Vehicle — 5 = Minivan — 6 = Full-Size Van 17. If requested, enter the Gross Vehicle Weight and press Enter. ✓ ✓ No test is performed if the GVW entered is less than 2,500 lbs or greater than 9,000 lbs. GVWR does not display if sedan or station wagon are selected. If GVWR entered is: — Greater than 8,500 lbs and the model year is 1996 or newer, the analyzer conducts an OBD II Test. — Less than or equal to 6,500 lbs and the model year is 1996 or newer, the analyzer performs an OBD II Test. — GVW for passenger cars must be no less that 1,700 lbs and no greater that 6,000 lbs. 18. Select the County in which the vehicle resides. To display the County in the entry field: — Type the first letter of the county in the County field, or — Scroll the list and select the county. ✓ The State has varying test requirements that include Visual Inspection only, TSI/OBD, ASM/OBD and OBD only. Another analyzer is required to perform TSI and ASM Tests. 19. Select Fuel Type and press Enter. Options are: — G = Gasoline — B = Bi-Fueled (Dual-Fueled) If the vehicle is dual fueled, the following message displays: YOU HAVE INDICATED THAT THIS VEHICLE IS DUAL FUELED. PLEASE CONFIRM THAT THE VEHICLE IS OPERATING ON GASOLINE FOR THE TEST BY SELECTING "YES" Select Yes and press Enter. 2-8 Vehicle Emissions Inspection — D = Diesel (Not applicable) If the vehicle is diesel fueled, the following message displays: YOU HAVE INDICATED THAT THIS VEHICLE IS DIESEL FUELED. PLEASE CONFIRM THAT THE VEHICLE IS OPERATING ON DIESEL BY SELECTING "YES" Select Yes, press Enter and the test ends. Vehicles fueled by diesel do not require testing. 20. Enter the Odometer Reading and select Continue (F10). ✓ Do not enter tenths of miles or decimal points. 21. If the system found a match, the Vehicle Confirmation Screen displays asking if it is the correct vehicle. Select: — Yes (F10) to CONTINUE, or — No (Esc) if the vehicle is incorrect and manually enter the vehicle information. ✓ Figure 2-12: Vehicle Data Confirmation If the vehicle VIN, Title Number and License Plate is found on the VID, the screen in Figure 2-12 displays. 22. After all data is entered and validated, a review screen displays. See Figure 2-12. Review the information and if correct, select: — ACCEPT to Continue, or — EDIT to BACK-UP and make corrections. 2-9 Vehicle Emissions Inspection Vehicle Not Found on the VID Vehicle information must be entered before performing a test If no vehicle match is found on the VID. ✓ See Vehicle Found on the VID, page 2-6 for additional data entry instructions. Figure 2-13: Vehicle Data 1. Enter the necessary vehicle information using the keyboard and dropdown menus. See Figure 2-13. Select Continue (F10) to proceed. Figure 2-14: Vehicle Data 2. As information is entered, new information may display on the screen for completion (i.e., Vehicle Body Style) as shown in Figure 2-14. ✓ ✓ 2-10 Trucks require weight entry. Press the first letter of the Make and Model to find a match. Vehicle Emissions Inspection ✓ Selecting a Fuel Type other than gasoline automatically aborts the test. Figure 2-15: Vehicle Data Confirmation 3. A verification screen displays. Review all information to be sure it is correct. — If correct, select ACCEPT to Continue. — If not correct, select EDIT to return to the Vehicle Data screen (Figure 2-14). 4. Gas Cap Test begins. See Fuel Cap Test, page 2-12. 2-11 Vehicle Emissions Inspection Fuel Cap Test A Fuel Cap Pressure Test Calibration must be performed within 72 hours of Vehicle Emissions Inspection testing. See Gas Cap Integrity Test, page 5-5 for testing procedure. 1. Depending on the County of Registration (see page 2-1), you may be required to perform a Visual Inspection with the Gas Cap Test. — The Vehicle Year also determines the test type. Figure 2-16: Tamper Inspection Systems 2. When the screen shown in Figure 2-16 displays, answer each question with one of the following: — P = Pass — F = Fail — N = Not Applicable Figure 2-17: Fuel Cap Present? 3. Select Yes and press Enter if the fuel cap is present. — If the cap is not present, the test fails. ✓ 2-12 It is suggested that if the fuel cap is missing, a new cap is installed prior to testing. Vehicle Emissions Inspection Figure 2-18: Fuel Cap Accessible? 4. Select Yes to proceed if the fuel cap is accessible. — If the cap is not accessible, the vehicle fails the test. ✓ Gas caps must be tested. Figure 2-19: Fuel Cap Removable? 5. Select Yes to proceed if the fuel cap can be removed. — If the cap can not be removed, the vehicle fails the test. Figure 2-20: Fuel Cap Fit Standard Adapter? 6. Select Yes to proceed if the fuel cap fits a standard adapter. — If the cap does not fit a standard adapter, the Gas Cap Test is skipped. 2-13 Vehicle Emissions Inspection Figure 2-21: Turn Ignition Key OFF 7. Be sure the ignition key is in the off position and select Continue (F10) or Enter to proceed. Figure 2-22: New Fuel Cap Prior to Test? 8. Determine if a new fuel cap was installed immediately prior to the start of the test and select Yes or No. — If the fuel cap was replaced due to a customer request and the cap fails the test, there is another opportunity to test the cap before declaring the test Failed. Figure 2-23: Remove Fuel Cap 9. Select a fuel cap adapter, if required, and connect to the fuel cap. — Connect the fuel cap and adapter to the fuel cap pressure tester. — Select Continue to proceed with the Fuel Cap Test. The following messages display and the Gas Cap Test automatically proceeds: ✓ 2-14 INITIALIZING GAS CAP TESTER. READY TO TEST. Use the remote to continue if at the rear of the vehicle. Vehicle Emissions Inspection 10. The following message displays: GAS CAP TEST IN PROGRESS... 11. The gas cap tester beeps when testing is complete and one of the following messages display: TEST COMPLETE - PASSED! TEST COMPLETE - FAILED! Figure 2-24: Return Fuel Cap Adapter 12. Remove fuel cap adapter and return the fuel cap to the vehicle. — Select Continue to proceed. Figure 2-25: More than One Fuel Tank/Fuel Cap? 13. Select No to proceed if the vehicle does not have more than one fuel tank/cap. ✓ If Yes is selected, both caps must be tested and the Gas Cap Test is repeats for the second cap. 2-15 Vehicle Emissions Inspection Figure 2-26: Did Customer Request Fuel Cap Replacement? 14. If the fuel cap fails the test, you are asked if the customer requested that the fuel cap be replaced. Select Yes or No. — If No is selected, the vehicle fails the test. ✓ If one cap in a multiple set fails, all fuel caps fail. — If a cap is replaced prior to during testing, information entered for that cap remains in the system when additional fuel caps are tested during the inspection. OBD Test After the Gas Cap Test, the OBDII Test follows. ✓ ✓ 2-16 This section includes detailed OBDII Test instructions. For introductory OBDII information see: — Key Terms, page A-1, — The Data Link Connector (DLC), page A-5, — OBD System Testing, page A-14, — OBDII Connections, page A-18. This test is only performed if the vehicle model year is 1996 and newer and is registered in an OBD county. — If the vehicle type is "T" (Truck) and the GVWR is equal to or greater than 8501 lbs and less than 9000 lbs, the program prints a Rejection From Inspection Form containing the vehicle information. Vehicle Emissions Inspection Figure 2-27: MIL Bulb Check 1. Locate the MIL light and observe carefully. See The Malfunction Indicator Lamp, page A-17. Turn the key on and check the light. Did the MIL turn on? Select: — Yes, came on. — No, did not come on. ` Figure 2-28: MIL Bulb Check 2. Start the engine and allow to idle. Wait approximately 10–12 seconds. Verify the MIL light goes out. — No indicates the light turned off. 2-17 Vehicle Emissions Inspection Figure 2-29: OBDII Connection 3. OBD Hookup information displays. See Figure 2-29. Follow the screen prompts. — Be sure the ignition key is off. — Locate the vehicle’s OBD diagnostic link connector (DLC). — Attach the analyzer OBD lead to the vehicle connector. — Leave the key off for 15 seconds with connector attached. ✓ ✓ ✓ 2-18 Never connect to the vehicle until instructed to do so. Press F1 to see a diagram of common connection locations and press Esc to exit, or see Figure A-10, page A-18. Select Continue (F10) when ready to proceed. Follow the procedure in OBD Testing Begins, page 2-19. If the OBD lead cannot be connected to the vehicle, select Connection Not Possible (F6) and follow the procedure in OBD Connection Problem, page 2-19. Vehicle Emissions Inspection OBD Connection Problem Figure 2-30: OBD Connection Problem A reason must be identified if the vehicle can not be connected for testing. Use the screen shown in Figure 2-30 to select the reason for the vehicle cannot be connected. ✓ ✓ If the Connection Problem screen was accessed in error, select "Return to previous screen" and continue testing. OBD must be tested. The vehicle fails the test when any of the choices on the Connection Problem screen are selected. OBD Testing Begins ✓ Once started, the OBD Test can not be aborted. Figure 2-31: Communication Countdown 4. A countdown screen displays while the analyzer checks communication with the vehicle. 2-19 Vehicle Emissions Inspection Figure 2-32: Start Engine 5. Start the engine and allow it to idle. Press Continue (F10) to proceed. Figure 2-33: Idle Countdown 6. A countdown screen displays while the analyzer collects OBDII emission data. 7. Wait while the following message displays: COLLECTING DATA PLEASE WAIT 2-20 Vehicle Emissions Inspection Figure 2-34: OBDII Comm Problem 8. If communication can not be established during data collection, the screen in Figure 2-34 displays. — Recheck connections, select Retry and repeat the procedure. — Select Continue with No OBD to end the test if communication remains unsuccessful. Figure 2-35: Test Results 9. When the test is complete a report displays showing the results of the test. See Figure 2-35. 2-21 Vehicle Emissions Inspection Figure 2-36: Test Fee Entry 10. At the end of the OBD Test, the Test Fee Entry screen shown in Figure 2-36 displays. — Enter the test fee, in dollars and cents (example: 21.00), the motorist is being charged. 11. Next, one of two possibilities occurs: — The analyzer contacts the VID and transmits test results to the host, or — You are prompted to enter a sticker/decal number for passing vehicles. Figure 2-37: Sticker/Decal Number 12. If the vehicle passed the test, enter the next sticker number. — Enter the sticker number expiration date if different from the default date that displays, or if instructed to correct the date. 13. The analyzer contacts the VID. 2-22 Vehicle Emissions Inspection Figure 2-38: Number of VIRS to Print 14. After contacting the VID, select the number of Vehicle Inspection Reports (VIR) to print and press F10 to print the reports. ✓ Make sure the printer is ready to print. After Repairs Tests After repairs inspections are required for vehicles that failed their initial inspection and have returned after obtaining vehicle repairs. The emissions test part of the inspection procedure is identical to an initial inspection. If a vehicle passes an after repairs inspection, the operator must enter information about the vehicle's repairs. This occurs after the emissions test and before entering the sticker number. The procedure below provides details. 1. The inspector enters their access codes to initiate an inspection. — Indicate the test type on the screen that displays. 2. Enter vehicle data as detailed in the previous section. 3. Perform the emissions tests as detailed in Fuel Cap Test, page 2-12 and OBD Test, page 2-16. 4. After the emissions test is complete the following question displays: Figure 2-39: Receipts or Emissions Repair Data Form DOES CUSTOMER HAVE AN EMISSIONS REPAIR DATA FORM FORM A CERTIFIED EMISSIONS REPAIR FACILITY (CERF)? — Obtain a CERF form from the customer and select YES to continue. 2-23 Vehicle Emissions Inspection 5. Next, you are asked if repairs were made at this station. Select Yes (Y) or No (N). — Obtain and use the receipts from the customer to enter the date the repair work was performed on the vehicle. 6. If not repaired at this station you are asked if customer repaired the vehicle. Figure 2-40: Repair Data Entry 7. Use the customer provided information to enter the following data when requested: — Repair facility number — Inspector number — Work order number — Repair date — Parts cost — Labor cost 2-24 Vehicle Emissions Inspection Figure 2-41: Repair Data Entry Categories 8. Select from the repair categories provided in the vehicle repair categories list. — Press enter to select a category. Select "S" if the vehicle was serviced for this repair; — Select "R" if the technician only recommended the repair. — Select END to exit the vehicle repair categories list. 9. The following question displays: DOES CUSTOMER HAVE ADDITIONAL REPAIR DATA FORMS? ✓ If the answer is Yes, repeat steps 5–8. 2-25 Vehicle Emissions Inspection Figure 2-42: Test Fee Entry 10. Enter the amount charged for the inspection fee. — The analyzer contacts the VID and transmits test results to the host, or — You are prompted to enter a sticker/decal number for passing vehicles. Figure 2-43: Sticker/Decal Number 11. If the vehicle passed the test, enter the next sticker number. — Enter the sticker number expiration date if different from the default date that displays. 2-26 Equipment Maintenance Menu 3 This chapter contains procedures for the Equipment Maintenance Menu including: — Status Screen, page 3-2 — Fuel Cap Pressure Test Calibration, page 3-3 Figure 3-1: Equipment Maintenance Menu 1. Select Equipment Maintenance from the Vehicle Emissions Inspection Menu. 3-1 Equipment Maintenance Menu Status Screen Figure 3-2: Status Screen The Status Screen provides general analyzer system information including: • Station Information • Testing Activity Information • Lockout Status ✓ To perform emissions testing, all status readings must be clear. To access the Status Screen: 1. Select Vehicle Emissions Inspection Menu, Equipment Maintenance Menu, Status Screen. — Select Close (Esc) to return to the Equipment Maintenance Menu. 3-2 Equipment Maintenance Menu Fuel Cap Pressure Test Calibration ✓ A Fuel Cap Pressure Test Calibration must be performed within 72 hours of Vehicle Emissions Inspection testing. 1. Select Fuel Cap Pressure Test Calibration from the Equipment Maintenance Menu. See Figure 3-1. The Fuel Cap Pressure Test calibration procedure begins. 2. Enter your inspector ID prior to starting the calibration procedure. ✓ This is the same information required to perform an inspection. Figure 3-3: Gas Cap Calibration Check, PASS 3. Using the calibrator connected to the gas cap tester, place the valve on top to point to the green cap and select Continue. Figure 3-4: Gas Cap Calibration Check, FAIL 3-3 Equipment Maintenance Menu 4. Using the calibrator connected to the gas cap tester, place the valve on top to point to the red cap and select Continue. Figure 3-5: 5. A Passed or Failed screen displays at the end of the procedure. ✓ ✓ 3-4 If the gas cap fails, repeat the procedure again paying close attention to the instructions. The gas cap calibration must PASS to perform inspections. 4 Sticker Maintenance This chapter contains procedures for Sticker Maintenance including: • Issue Waiver Sticker, page 4-2 • This Year’s Mileage Less Than 5000, page 4-6 • New Vehicle Exemption, page 4-8 • Sticker Replacement, page 4-8 • Voided or Damaged Sticker, page 4-8 • Missing or Stolen Sticker, page 4-8 • Issue Diagnostic Exemption, page 4-9 Use Sticker Maintenance to replace lost stickers and issue stickers under special circumstances. ✓ Procedures are specified by the State. Review State regulations for eligibility requirements or contact the State. Figure 4-1: Sticker Maintenance Menu 1. To access, select Main Menu > Emissions Inspection > Sticker Maintenance Menu. 2. Enter license number and access code. — A license number and access code must be entered for each item on this menu. 3. For waivers, minimum mileage, new exemption, and sticker replacement, provide the following data. — VIN (twice) — Vehicle license plate number (twice) — Title number This data entry procedure is identical to the data entry for an emissions test. 4-1 Sticker Maintenance Issue Waiver Sticker 1. Select Issue Waiver Sticker from the Sticker Maintenance Menu. See Figure 4-1. Figure 4-2: Vehicle Identification 2. Perform one of the following: — Scan the barcode on the BMV Registration Credential or VIR, — Enter the VIN, Title Number and License Plate using the keyboard. 3. Confirm that entries are correct or edit. 4-2 Sticker Maintenance Figure 4-3: Vehicle Data 4. Enter the Vehicle Model Year, County and GVWR. Figure 4-4: Odometer Reading 5. Enter the number of miles on the odometer. — Do not enter fractions or tenths of a mile. ✓ Waivers are issued only by State regulation and may be denied. Contact the State for help. 4-3 Sticker Maintenance Figure 4-5: Request for Diagnostic Waiver — If the Waiver Request is valid, the question shown in Figure 4-5 displays. Figure 4-6: Repairs Performed? 6. Answer the question regarding repairs. — If Yes is entered, information regarding the repair is requested as in a reinspection procedure. 4-4 Sticker Maintenance Figure 4-7: Contacting the VID 7. The analyzer contacts the VID to verify a previous reinspection was done. ✓ The VID determines if a waiver is issued. 8. If a waiver is approved, the analyzer prompts you for the sticker number. — Enter the sticker number, which the analyzer stores for transmission to the host computer. 4-5 Sticker Maintenance This Year’s Mileage Less Than 5000 1. Select This Year's Mileage Less Than 5000 from the Sticker Maintenance Menu. See Figure 4-1. Figure 4-8: Vehicle Identification 2. Perform one of the following: — Scan the barcode on the BMV Registration Credential or VIR, — Enter the VIN, Title Number and License Plate using the keyboard. 3. Confirm that entries are correct or edit. 4-6 Sticker Maintenance Figure 4-9: Odometer Reading 4. Enter the number of miles on the odometer. Figure 4-10: Vehicle Eligible? 5. Analyzer asks if vehicle is eligible for an exemption. Select: — YES if the odometer reads less than 5000 miles. — NO if the odometer reads more than 5000 miles. 6. If Yes is selected, enter sticker number and expiration date. 7. The data is saved to the analyzer record and a report is printed. 4-7 Sticker Maintenance New Vehicle Exemption ✓ Use the same general procedure as previously described for the following two items. 1. Select New Vehicle Exemption from the Sticker Maintenance Menu. 2. Analyzer asks if vehicle is eligible for an exemption. Select: — Yes, if the vehicle has never been registered in Pennsylvania and the odometer reads less than 5000 miles. — Otherwise, select NO. 3. If approved, enter sticker number and expiration date. 4. The data is saved to the analyzer record and a report is printed. Sticker Replacement 1. Select Sticker Replacement from the Sticker Maintenance Menu. 2. Select Yes to verify that the sticker is present for replacement. — Select NO if the sticker is not present for replacement. 3. If approved, enter sticker number and expiration date. 4. The data is saved to the analyzer record and a report is printed. Voided or Damaged Sticker ✓ Vehicle information is not required for the following two items. 1. Select Record a Voided or Damaged Sticker from the Sticker Maintenance Menu. 2. Enter the number of the sticker in question. Missing or Stolen Sticker 1. Select Record a Missing or Stolen Sticker from the Sticker Maintenance Menu. 2. Enter the number of the sticker in question. 4-8 Sticker Maintenance Issue Diagnostic Exemption 1. Select Issue Diagnostic Exemption. 2. Enter the VIN, Title Number and License Plate using the keyboard. Figure 4-11: Diagnostic Exemption 3. Select Yes and the analyzer contacts the VID to verify that the exemption is allowed. See Figure 4-11. 4. If the data entered cannot be found on the VID you can try again or contact the state. 4-9 Sticker Maintenance 4-10 5 Diagnostic Functions Use the Diagnostic Functions Menu to perform vehicle diagnostic tests and gather information about system testing devices. Options include: • Snap-Link, page 5-1 • OBDII Test, page 5-2 • Barcode Reader Test, page 5-4 • Gas Cap Integrity Test, page 5-5 Figure 5-1: Diagnostic Functions Snap-Link Select Snap-Link from the Diagnostic Functions Menu for a screen that allows you to connect a Snap-on scanner to the PC and display, analyze and print live vehicle data. ✓ ✓ The scanner must be a Snap-on scanner. Follow the instructions in the Snap-Link manual for operation of the software. 5-1 Diagnostic Functions OBDII Test Use to perform of OBD II Tests and diagnose vehicle emissions problems. OBDII data gathered from the test includes: • Module Information • Monitor • Key Information • DTC Information ✓ This can be used to pre-test OBD II vehicles. The OBD II Communications Test provides a fast and easy method to "pretest" OBD-equipped vehicles or as a quick diagnostic tool. Snap-Link and your Snap-on scanner can be used for in-depth diagnostics. To perform the OBD II Test: 1. Select OBDII Test from the Diagnostics Function Menu. Figure 5-2: OBDII Key in DLC 2. Plug the OBDII key into the vehicle’s DLC, start the engine and let it idle. Select Continue. ✓ You cannot escape until the OBD times out. — If communication is successful, the following message displays with progressing status information: INITIALIZING OBDII 5-2 Diagnostic Functions Figure 5-3: OBDII Test Screen 3. After communication is established, the OBDII Test Screen displays with the data collected. — Select Close or press Esc to return to the Diagnostic Functions Menu. 5-3 Diagnostic Functions Barcode Reader Test Use this feature to verify that the barcode reader is functioning properly. Figure 5-4: Barcode Reader Test 1. Select Barcode Reader Test from the Diagnostics Function Menu. — The Barcode Reader Test screen displays. 2. Scan a barcode. See Using the Bar Code Scanner, page 1-16. — If successful, the barcode value displays in the Data Window verifying that the barcode reader is functioning properly. — Select Close or press Esc to return to the Diagnostic Functions Menu. 5-4 Diagnostic Functions Gas Cap Integrity Test Use this feature to determine if a gas cap is functioning properly. ✓ Place cap being tested on correct adapter before selecting the Gas Cap Integrity Test. 1. Select Gas Cap Integrity Test from the Diagnostics Function Menu. Figure 5-5: Initializing Gas Cap Tester — The Initializing Gas Cap Tester screen displays. 2. The test is performed and results provided. Figure 5-6: Test Complete 3. The Gas Cap Test Complete Screen displays with the Passed or Failed results of the test. — Select Continue (F10) to return to the Diagnostic Functions Menu. 5-5 Diagnostic Functions 5-6 6 Station Menu The Station Menu allows the station owner to perform a number of special actions. Each menu item is described in this section. To access the Station Menu, select Station Menu from the Main Menu. ✓ Figure 6-1: Station Menu Access to the Station Menu is protected by a unique password. The default password for a new analyzer is “Station.” Figure 6-2: Manager Logon If you change the password and forget the new code, it cannot be reset. A paid service call to reload the code is required. 6-1 Station Menu Print Sticker Used Report Use Print Sticker Used Report to print a report of all stickers issued at the station for the past 31 days or less. Figure 6-3: Sticker Used Report Search Criteria 1. Select Print Sticker Used Report from the Station Menu. 2. Select dates in the Begin Test Date and the End Test Date fields and select Continue (F10). ✓ Use the calendar provided on the dropdown or enter the month and/or day using the up and down arrow keys. The dates selected must be with 31 days of the current date. 3. Select Yes to verify the report request and is report prints. 6-2 Station Menu Network Communications Diagnostics Figure 6-4: Network Communications Diagnostics Use the Network Communications Diagnostics to diagnose communication problems with the host computer. See Figure 6-4. ✓ The analyzer can pass all of the Network Diagnostics tests and still not be able to communicate with the host computer for actual emission testing. 6-3 Station Menu Modem Diagnostics Use the Modem Diagnostics feature to test the analyzer modem. ✓ The modem is a device that allows data to be sent back and forth between the analyzer and the host computer using telephone lines. — The Dialtone Test verifies the phone connection between the analyzer and the telephone wall jack. 1. From the Station Menu > Network Communications Diagnostics, select Modem Diagnostics. — The modem is OK if the following message displays: MODEM DIAGNOSTICS PASSED — Call Service to repair the analyzer if the following message displays: MODEM DIAGNOSTICS FAILED. CALL SERVICE. Dial Tone Check The Dial Tone Check verifies that there is a phone connection between the analyzer and the telephone wall jack. 1. From the Station Menu > Network Communications Diagnostics, select Dial Tone Check. — The analyzer attempts to detect a dial tone. 2. Dial tone detected: DIAL TONE DETECTED - PASSED Dial tone NOT detected: NO DIAL TONE DETECTED - FAILED. CHECK TO SEE THAT PHONE CORD IS CONNECTED. POSSIBLE FAULTS CAN BE CHECKED USING A STANDARD PHONE AT BOTH THE EQUIPMENT END OF PHONE CABLE OR AT THE WALL PLUG FOR PHONE. IF NO DIAL TONE ON PHONE CABLE - CONTACT PHONE COMPANY. IF DIAL TONE DETECTED USING PHONE THE FAULT IS IN EQUIPMENT CALL SERVICE. ✓ Plug a standard telephone into the wall jack used by the analyzer and attempt to make a call. If you can call out successfully using the telephone, call EquiServ to repair the analyzer. Do not contact the telephone company; the telephone line is fine. If you cannot place a call, contact the phone company, as the analyzer is fine. 6-4 Station Menu Network Diagnostics 1. From the Station Menu > Network Communications Diagnostics, select Network Diagnostics. — The analyzer attempts to contact the host computer. 2. Review the status message. — If data on the analyzer and the host match, the following message displays: NETWORK COMMUNICATIONS PASSED — If data on the analyzer and the host do not match, the following message displays: NETWORK COMMUNICATIONS FAILED — If the analyzer and the host cannot communicate the following message displays: CANNOT ACCESS NETWORK. CALL TECHNICAL SUPPORT ✓ For additional information refer to Troubleshooting Communication Problems, page 6-6. 6-5 Station Menu Troubleshooting Communication Problems If you experience communication problems, perform the following diagnostics using the “Network Diagnostics” function. This is the most comprehensive test and provides the most information rapidly. Following is a list of error messages that may occur and possible corrective actions. FAILED AUTOMATIC NUMBER IDENTIFICATION (ANI) CHECK Call MCI help desk and verify the analyzer phone number is correct. GENERAL EXCEPTION Call MCI help desk. INVALID SERVER RESPONSE Call MCI help desk. INVALID STATION OR ANALYZER ID Call MCI help desk and verify your Station Number or analyzer number are correct. The Station Number can be found on the Status page. NO DIAL TONE Check the phone line to the analyzer, using a telephone for testing. If OK, perform Modem Check. LINE BUSY Try again, then check phone number, or call MCI help desk. NO ANSWER Try again, then check phone number, or call MCI help desk. TRY AGAIN or INVALID TOKEN Call MCI help desk. 6-6 Station Menu Data File Refresh Figure 6-5: Data File Refresh 1. Select Main Menu > Station Menu > Data File Refresh to place a call to the host computer and update all data on the analyzer. — The Network Access screen displays when the call is placed. See Figure 6-5. The updating process works as follows: — A call is placed to the host computer. — Data is refreshed by the host. — Updated inspector and certificate information displays. 2. When the successful update is complete, the following message displays: THE INSPECTOR LICENSE NUMBERS AND ACCESS CODES HAVE BEEN UPDATED BY THE VIID. IN CASE THERE ARE PROBLEMS CONTACT PENNDOT OR MCI. — If the analyzer does not communicate with the host, the following message displays: CANNOT ACCESS NETWORK 3. The screen displays a list of current station and inspector information. — Press F3 to print this report for your file and Exit. ✓ ✓ To view data prior to printing and exiting the screen, follow the prompts on the bottom of the screen if more than one page is available. If the procedure fails, "wait" a few minutes and try again. 6-7 Station Menu Previous Vehicle Inspection History Use Previous Vehicle Inspection History to obtain a report listing previous emissions inspections, waivers, exemptions and emissions related repairs on the host for a vehicle. ✓ The station is charged for this report and you are asked to verfiy that you want to proceed. Figure 6-6: Network Communications Diagnostics 1. Select Main Menu > Station Menu > Previous Inspection History Report to place a call to the host and retrieve data for a specific vehicle. — When selected, the following displays: A Previous Inspection History Report for a Vehicle Has Been Started. This report will list previous emissions inspections, waivers, exemptions and emissions related repairs on file in the central host computer for this vehicle. There will be a charge to the station equivalent to an emissions inspection communications charge for this report. You may exit at any time prior to final placing of the call to the main host computer. Do you wish to proceed? Yes or No 2. Select Yes or No. 3. Scan or manually enter the VIN from the BMV Registration Credential. All other information is optional. — Before sending the request to the host, the following message displays: Is this vehicle information correct? — If No is selected, correct the VIN number and proceed. — If Yes is selected, the analyzer contacts he VID. 4. Data, if available, displays on the screen and a report prints. — Press F3 for an additional copy of the report. — Press F10 to end. 6-8 Station Menu Print Communication Log Use the Print Communications Log feature to view an on-screen record of all communications between the analyzer and the host computer that occurred in the last 14 days. The analyzer offers the option to select a particular communications event for printing. Figure 6-7: Print Communications Log 1. To access, select Main Menu > Station Menu > Print Communications Log. ✓ This report contains no information useful to the user. — Select this function only when advised by the Communication Help Desk. 6-9 Station Menu Test Record Search and Retrieval Figure 6-8: Test Record Search Use Test Record Search and Retrieval to display a list of all inspections for a VIN performed at the station during the past 30 days. 1. To access, select Main Menu > Station Menu > Test Record Search and Retrieval. — The Search Criteria screen displays. See Figure 6-8. 2. Enter the VIN number and the Title Number, Test Date and/or Sticker Number. — A report displays on the screen or can be printed. Test record information includes date, begin time, VIN, vehicle license, year, make, model and Inspector ID. ✓ ✓ ✓ Press F10 to search for a specific record. Press F9 to see all stored reports. The more data entered, the faster the search. 3. Use the arrow keys to scroll the list and select a single vehicle inspection record for display. 4. Once a record is located, review the complete vehicle inspection record and print an individual record using the VIR printer. ✓ Both the on-screen and printed report are the same. — To print from the view screen press F3. — To close, press Esc until the Main Menu displays. 6-10 Station Menu Request Lockout Status Use the Request Lockout Status to clear lockouts set by the host computer once the cause of the lockout has been resolved. When this function is selected, the analyzer places a call to the host computer and the lockout status is updated. ✓ Remember that a lockout can be set or cleared by the host computer. Figure 6-9: Request Lockout Status 1. To access, select Main Menu > Station Menu > Request Lockout Status. — If the host computer has a lockout set, only the host computer can clear it. 2. The analyzer communicates with the host and updates the lockout status. 6-11 Station Menu Figure 6-10: Request Lockout Status, Report 3. An on-screen report displays for review. See Figure 6-10. ✓ ✓ ✓ The report shows your allowed "No Contact Limit." The status must show "Clear" for all items to perform tests. If the analyzer is locked out, contact the MCI Help Desk to have the problem corrected or to discuss the problem. 4. Select Esc to Exit. 6-12 Station Menu Emergency Software Update Figure 6-11: Emergency Software Update Use the Emergency Software Update function, when required, to download changes and updates to analyzer software. 1. Insert the Update CD into the CD drive of the PC. See Analyzer Front, page 1-4 for CD locations. 2. Select Software Update from the Station Menu. The screen in Figure 6-11 displays. Follow the on-screen instructions until the update is complete. 3. Select F10 to update with a CD. 6-13 Station Menu Remote Software Update Remote Software Updates are available two ways: • Manual (user invoked) and • Automatic (analyzer invoked) After a predetermined number of days, the analyzer checks the Snap-on host for software updates each time the analyzer is started. It is recommended that all available updates are performed. ✓ If a software update is available and not installed, you are offered the update each time the analyzer starts until installation is completed. If mandatory State software updates are not performed, a State-mandated lockout may occur. Manual 1. Select Main Menu > Station Menu > Remote Software Update. — The analyzer communicates with the Snap-on host and checks for software updates. 2. If an update is available, select Yes to install. — The update is performed without user intervention and the analyzer restarts the OBIS program. Automatic If a software update is available, you have the option of installing the update. • Select Yes to install. — The update is performed without user intervention and the analyzer restarts the OBIS program. • Select No and the update is not installed. ✓ 6-14 If a software update is available and not installed, you are offered the update each time the analyzer starts until installation is completed. 7 Other Functions Topics in this section include: • VIR Reprint / Record Search - Retrieval, page 7-1 • Training Mode, page 7-3 • Print Rejection From Testing Forms, page 7-4 VIR Reprint / Record Search - Retrieval ✓ ✓ ✓ A replacement VIR can be printed from the selected test record. A replacement VIR is labeled "DUPLICATE" If no data is available to print on the VIR, "Data not available" displays in the missing data field. When the VIR is reprinted, the Vehicle Emissions Inspection Menu displays. Use VIR Reprint / Record Search - Retrieval, allows to search for and reprint a Vehicle Inspection Report. No test is performed—the analyzer simply prints another copy of the results of the vehicle’s last inspection test. Figure 7-1: Vehicle Emissions Inspection Menu 1. Select Test Record Search & Retrieval from the Vehicle Emissions Inspection Menu. 7-1 Other Functions Figure 7-2: VIR Reprint Search Criteria 2. Enter the required vehicle data in the Search Criteria Screen that displays and select Search (F10). — Press F9 to view all tests stored. ✓ ✓ Entry in all fields is not required but, the more information provides a faster the search. All test records stored on the analyzer are searched. Figure 7-3: Test Record Selection 3. Use the arrow key to select a record from the Test Record Selection screen that displays. Select: — Continue (F10) to review and print the record, — Back (Esc) twice to exit, once to return to Search. 7-2 Other Functions Training Mode Use the Technician Training function to simulate actual inspections. The major difference between training and inspection modes is that in training mode, no certificate is issued, no calls are made to the host computer, and lockouts do not apply. The training test sequence matches an actual inspection or reinspection with the following exceptions: • No access code is required, • No certificate is issued. ✓ The analyzer must be completely functional to perform a Training Test. 1. Select Training Mode from the Vehicle Emissions Inspection Menu. ✓ If faults exist in the analyzer, system faults or warnings currently present when appear in the lower right of the screen. — In some cases, a training test cannot be performed if certain information (such as Station Information) is missing. 2. The test procedure is identical to an actual vehicle emissions inspection. See detailed procedures: — Vehicle Data Entry, page 2-2 — Fuel Cap Test, page 2-12 — OBD Test, page 2-16 — After Repairs Tests, page 2-23 — Visual Inspection 3. When the Training Mode inspection is complete, the analyzer prints a training VIR and returns to the Vehicle Emissions Inspection Menu. 7-3 Other Functions Print Rejection From Testing Forms Figure 7-4: VIR Reprint Preview 1. Select Print Rejection From Testing Forms from the Vehicle Emissions Inspection Menu. 2. Enter the required number of forms to print and select OK (F10). ✓ 7-4 This form is completed by hand. 8 General Maintenance This chapter contains maintenance-related subjects, including: • General Routine Maintenance, page 8-1, • Printer Operation and Maintenance, page 8-1, • Maintaining the Bar Code Scanner, page 8-2, • Connection Panels, page 8-3, and • Accessories and Options, page 8-5. An operator should perform the analyzer maintenance and service procedures in this section on a regular or as-needed basis. All other service must be performed by an authorized service representative. General Routine Maintenance Weekly Clean the monitor screen with glass cleaner, inspect all cables and replace if damaged. Every 60 to 90 Days Lubricate the cabinet casters with a light viscosity machine oil every 60 to 90 days. Periodically • Clean the test leads and power cord periodically with waterless hand cleaner and wipe dry. • The analyzer has a painted stain-resistant finish. Clean the painted and plated surfaces with spray cleaner. Wipe down the cabinet periodically with a damp cloth. Printer Operation and Maintenance For information regarding printer operation and maintenance, refer to the user manual provided with the printer. Do not change any of the default printer settings. Doing so may result in improperly printed inspection reports. 8-1 General Maintenance Maintaining the Bar Code Scanner The bar code scanner requires minimum care. Although specific maintenance is not required, the following periodic checks help to keep the scanner in optimum condition. Cleaning the Scanning Window Why The bar code scanner uses an optical system protected by a window at the scanning end. It is important to keep this window clean, because if it becomes dirty, scratched, or smudged, the optics behind the window do not work properly. When The scanning window must be kept clean to assure that the unit scans successfully on the first attempt. The scanning window should be cleaned anytime scanning performance begins to degrade or when the window is visibly dirty. How If the scanning window becomes dirty, clean it by wiping a soft cloth or facial tissue dampened with water or a mild detergent and water solution. If you use a detergent solution for cleaning, follow with a rinse step so no residues are left on the window. ✓ ✓ Use the same method to clean the scanner body. Do not submerge the scanner in water, as it is not watertight. Do not use abrasive wipes or materials to clean the scanning window. Never use solvents such as alcohol or acetone on the scanning window, as they can damage the window finish. Checking the Scanner Case Check the scanner case periodically for signs of damage. A damaged case can lead to movement of the internal components, which can cause malfunctions. 8-2 General Maintenance Connection Panels Analyzer Back Panel Figure 8-1: Connection Panel, Back of Analyzer ✓ Ports used depend on state requirements and optional equipment added to the analyzer. Some options may not be available for specific analyzer systems. Ports and Connections COM A Not used COM B Not used COM C (CPC Connector) Gas cap tester COM D Not used COM E (DB-25 Connector) Snap-Link Cable COM F Not used COM G Not used COM H (DB-25 Connector) Bar code scanner COM I (DB-9 Connector) Spare, Comm One Serial COM J Not used COM K Not used COM L (DB-9 Connector) OBD II cable 8-3 General Maintenance Interface Box The interface box is located behind the left front door of the analyzer. Figure 8-2: Connection Panel (Back of Analyzer) Buttons, Connectors and Components A– Power Button Always on, powers interface box only — Do not turn off. B– Security Switch Connector Not used, allows security switches to be added, if necessary C– USB to Computer Connector Connects interface box to PC. — Never unplug while PC is on. 8-4 D– Remote Control Sensor Connector The remote control sensor, located in the keyboard drawer, is connected to the interface box with this connector. E– Power Cord Connector 115V power into interface box. F– Voltage Selection Switch Preset to 115V. G– Spare 115V Outlet 115V power outlet, not used — Do not plug any device into this outlet H– Cooling Fan Interface box power supply cooling fan. — Do not block this fan. General Maintenance Accessories and Options Standard Accessories Item Part Number Remote control 7009E9321-30 OBDII adapator EAE0032L51A OBDII interface cable 6-04122A 6-04222A Barcode scanner EEEH102A Snap-Link package EESP304A Waekon gas cap tester EAA0145C20A Gas cap tester communication cable EAW0166L03A Operator’s manual ZEEEA136A Options Contact your Snap-on Sales Representative for complete details and information 8-5 General Maintenance 8-6 A Appendix A: OBD II Connections To meet OBD II requirements, most 1996 and newer vehicles are equipped with two testing modes: • Generic OBD II, and • Enhanced OBD II. This manual provides information on the Generic OBD II mode only. Key Terms Refer to the following list of terms and descriptions when using the OBD II information in this manual. Baud Rate The speed a controller transfers and receives data, measured in bits per second (bps). Closed Loop A state in which the engine controller controls and adjusts the air/ fuel mixture based on input from the upstream oxygen sensor. The oxygen sensor must reach approximately 600° F before the engine runs in closed loop. Comprehensive Components Any component, other than a major monitor (i.e. fuel trim, catalyst, evaporative system, exhaust gas re-circulation (EGR), secondary air (AIR), oxygen sensor(s) (O 2S), oxygen sensor heater (HO 2S), misfire, that has any effect on vehicle emissions. Conflict (or Disablement) Condition that interferes with proper execution of a specific monitor. Diagnostic Executive or Management System Powertrain control module (PCM) software responsible for performing testing of powertrain components and systems, recording testing results, and controlling the illumination of the lamps. Diagnostic Link Connector or Data Link Connector (DLC) Connector where diagnostic scan tools interface with the vehicle’s onboard computer. Under On-Board Diagnostics, second generation (OBD II), the DLC is a standardized 16-cavity connector and has a standardized location. Diagnostic Trouble Codes (DTC) A-1 Appendix A Codes associated with engine controller fault messages identifying emission control components that are malfunctioning and that can be retrieved using a diagnostic scan tool. Drive Cycle Series of operating conditions that can operate all of the OBD monitors during a single driving event. Enabling Conditions or Criteria Exact engine operating conditions required for a diagnostic test to run. Federal Test Procedure (FTP) A transient-speed mass emissions test conducted on a loaded dynamometer. This is the test which, by law, car manufacturers use to certify that new vehicles are in compliance for hydrocarbon, carbon monoxide, and oxides of nitrogen emissions and must be passed before that model may be sold in the United States. Fuel trim or metering An engine control module (ECM) function that controls and adjusts the fuel delivery during closed-loop operation to bring the air/fuel mix to as close to the optimum ratio or (stoichiometry) as possible. Functionality Associated with comprehensive component testing in which outputs from the engine controller are verified by monitoring specific input signals from other components for expected change. Good Trip Trip counters in which various monitors pass testing under predetermined conditions. The fulfillment of specific test parameters during a drive cycle. Good trips are counted for MIL extinguishing and DTC erasure. Heated Oxygen Sensor (HO2S) Oxygen sensor that is heated electrically as well as by engine exhaust so that it warms to normal operating temperature more quickly. International Organization for Standardization (ISO) Worldwide federation of national standards bodies from some 130 countries, one from each country. ISO’s work results in international agreements that are published as international standards. ISO 9141 ISO recommended data communication network protocol or standard. In Use Deterioration (IUD) IUD is the effect of time and use on vehicle performance and emission systems. Malfunction Inability of an emissions-related component or system to remain within design specifications. Malfunction also refers to the deterioration of any of the components or systems to a degree that would likely cause the emissions of an average vehicle to exceed the emissions standards by 1.5% times. A-2 Appendix A Maturing Code (or Pending Code) With certain DTC the PCM sets a temporary code that indicates a monitor has failed at least one time. The MIL remains off unless the problem occurs a specific number of times. Then the temporary code matured into a hard code and the PCM turned on the MIL. Open Loop State in which the air/fuel mixture is being controlled by the engine computer according to a standard program and essentially ignores the oxygen sensor signal. Normally encountered during the first few minutes of operation after a cold start. Powertrain Control Module Onboard control module that monitors engine functions or both engine and transmission/transaxle functions. PCM Power Down PCM power down is done by removing ignition voltage from the PCM for at least 10 seconds, typically by turning the ignition switch to the LOCK position. On some newer vehicles with electronic transmission gear selector indicators, the PCM stays powered up in the ignition key off position. A power down event allows the PCM to update certain memories and to complete DTC trips. Pending Conditions The PCM may delay running a monitor if an unresolved malfunction has occurred in a related system. The pending conditions are used to prevent a monitor from failing incorrectly. Rationality Term associated with comprehensive component testing in which signal inputs from various components are compared to verify that conditions agree. Readiness Status After a vehicle is repaired or if the battery or PCM has been disconnected, the Readiness Status for each non-continuous diagnostic monitor must be reset. This means that the vehicle must be operated through a complete drive cycle. Society of Automotive Engineers (SAE) Professional organization of automotive engineers and designers that establishes standards and conducts testing for many automotive-related functions within the automotive industry. Short Term Adaptive The short-term compensation made by the engine controller to vary injector pulse width. Based on oxygen sensor inputs, the PCM changes injector pulse width by a percentage to maintain minimal emissions output. Stoichiometric Term most often used to describe the ideal air/fuel mixture entering the intake. The point at which the production of emissions is at a minimum and catalyst conversion of emissions is most efficient. The stoichiometric air/fuel ratio is 14.7 to 1 measured in parts by weight. A-3 Appendix A Task Manager PCM software designed to manage, regulate and perform various monitor testing. Trip A key cycle (key ON, run, key OFF/power down) where the enable criteria for a particular diagnostic are met and the diagnostic test runs. Warm-up Cycle A warm-up cycle is achieved when the engine coolant temperature rises at least 40° F (22.2° C) above engine start-up and achieves a minimum temperature of 160° F (71.1° C). OBD II and What it Means “OBD” stands for "onboard diagnostics." OBD II is a system developed by the Society of Automotive Engineers (SAE) to standardize automotive electronic diagnosis so technicians could use the same tools and analyzers to test any make and model without special adapters. SAE established guidelines that include: • A universal diagnostic test connector, called the data link connector or DLC, with dedicated pin assignments. • A standardized location for the DLC, visible under the driver’s side dash. • A standardized list of diagnostic trouble codes (DTC’s) used by all manufacturers. • The ability of the vehicle system to record a snapshot of operating conditions when a fault occurs that effect vehicle emissions. • A glossary of standard terms, acronyms, and definitions used in system components. In addition, SAE publishes a standard communications protocol for establishing hardware, software, and circuit parameters ofOBD II systems. Unfortunately, vehicle manufacturers have different interpretations of the standard communications protocol. As a result, the generic OBD II communications scheme used varies, depending on the vehicle. SAE publishes recommendations, not laws, but the Environmental Protection Agency (EPA) and the California Air Resources Board (CARB) made many of SAE’s recommendations legal requirements that car makers were required to phase in over a three-year period. • Beginning in 1994, vehicles with a new engine management computer—about 10% of each manufacturers fleet— were supposed to comply with OBD II standards. • For 1995, OBD II systems were to appear on about 40% of the new vehicles sold. — Some of the 1994–1995 OBD II systems were not fully compliant, so the government granted waivers to give manufacturers time to fine-tune their systems. • Beginning with the 1996 model year, all new vehicles sold in the U.S.A must be fully OBD II compliant. A-4 Appendix A The Data Link Connector (DLC) Figure A-3: DLC Configuration and Pin Assignments The DLC is a 16-pin connector. The female half is on the vehicle, and the male end in on the analyzer data cable adapter. Pins are arranged in two rows of eight, numbered one to eight and nine to sixteen. See Figure A-3. Figure A-4: Connect to the DLC While Sitting in Driver’s Seat Seven of the 16-pin positions have mandatory assignments, while vehicle manufacturers can use the remaining nine pins at their discretion. The connector is D-shaped and keyed so the two halves mate only one way. You should be able to connect to the DLC while sitting in the driver’s seat as illustrated in Figure A-4. The DLC cannot be hidden behind panels and must be accessible without the use of tools. Although out of the normal line of sight, the DLC should be clearly visible to a technician when crouching. A-5 Appendix A This was the way it was supposed to be done! Information on locating the DLC is in OBDII Connections‚ page A-18 of this manual. The numerous locations of the DLC can be located by vehicle type. Updates to this information are available from many after-market suppliers including: Aftermarket Research Institute, Inc. P.O. Box 648 Southeastern, PA 19399 The DLC is designed for analyzer access only. You cannot jumper any of the terminals to display codes on the instrument cluster warning lamp or malfunction indicator lamp (MIL). The MIL only alerts the driver and the technician that a code has been set. Figure A-5: OBD II Test Adapter The 16-pin OBD II adapter shown in Figure A-5 connects the analyzer to the DLC. The adapter attaches to the end of the analyzer data cable and is held in place by captive screws. OBD II The Powertrain Control Module (PCM) in OBD II vehicles monitors the function and operating efficiency of various emission-related circuits and components. When a monitored circuit or component is not operating properly, a diagnostic trouble code (DTC) is set. OBD II Drive Cycles/Readiness Monitors Each monitor requires that a certain sequence of events occur before monitoring their assign circuit. This is referred to as a drive cycle. The events required to activate each monitor vary, depending on the circuit and components. When a Readiness Monitor parameter reads READY, the required sequence of events has completed and the monitor is ready to report problems and set Diagnostic Trouble Codes (DTC). When a Readiness Monitor reads NOT DONE, the required sequence of events has not completed and the monitor is therefore not ready to report the vehicles problems or set Diagnostic Trouble Codes. When a readiness monitor reads N/A, the vehicle is not equipped for that monitor. The paragraphs that follow give a brief description of each monitor. A-6 Appendix A OBD II Monitors Misfire Monitor (MISFIRE) Monitors engine misfire and designates by DTC the specific cylinder in which a misfire occurs. Misfire is a lack of combustion due to an absence of spark, poor fuel metering, poor compression, or any other cause. Typically, inputs from the Engine Coolant (ECT), Mass Air Flow (MAF), and Crankshaft Position (CKP) sensors are required to enable the monitor. Comprehensive Component Monitor (COMPONENTS) Determines when a malfunction occurs in any PCM input or output circuit that is not exclusively monitored by another monitor system. A malfunction can be a short, an open, or an out-of-range value. The monitor is enabled shortly after the engine is started. However, some individual components may not be available for monitoring. Secondary Air System Monitor (AIR) Monitors the function of the secondary air system, and test the ability of the air system to inject air into the exhaust. This monitor relies on the O 2 sensor feedback to determine the presence of air flow. Inputs from the ECT, Intake Air Temperature (IAT), and CKP sensor, and the O 2 sensor monitor are required to enable the AIR monitor. Oxygen Sensor Monitors (O 2 SENSOR & O 2 HEATER) Monitors the O 2 sensor switching frequency for degradation, and the heater circuit for proper operation (when equipped). Exhaust Gas Recirculation System Monitor (EGR SYS) Tests the integrity and flow characteristics of the EGR system. This monitor is enabled during EGR system operation, after certain base engine and operating conditions are satisfied. Inputs from the ECT, IAT, Throttle Position (TP) and CKP sensors are required to enable the EGR monitor. Fuel System Monitor (FUEL SYS) Monitors the adaptive fuel control system and determines when a learned value exceeds a specified threshold. Inputs from the ECT, IAT, and MAF or Manifold Absolute Pressure (MAP) sensors are required to enable this monitor. Catalyst Efficiency Monitor (CAT) Determines when the catalytic converter has fallen below a minimum level of effectiveness. Inputs from the ECT, IAT, and TP sensors are required to enable this monitor. Some vehicles may also require CKP and Vehicle Speed Sensor (VSS) inputs. When this monitor is READY, it relies mainly on inputs from the oxygen sensors. Evaporative Emission System Monitor (EVAP SYS) Checks the function of EVAP components and the ability to flow fuel vapor (hydrocarbons) to the engine. The sequence-of-events required to enable this monitor vary, depending on the Evaporative Emissions (EVAP) system components. Heated Catalyst Monitor No description available. A/C Refrigerant Monitor No description available. A-7 Appendix A Future OBD II • Vehicles with electrical systems greater than 12V in the future, such as 42V, will probably use a different OBD II connector because of system voltage. • In the next couple of years another communication protocol called Controlled Area Network (CAN) will begin to appear on vehicles. Powertrain System Diagnostic Trouble Codes Following are the recommended industry common trouble codes for the Powertrain Control System. These include systems that might be integrated into an electronic control module and used to control engine functions such as fuel, spark, idle speed, and vehicle speed (cruise control) as well transmission control. The fact that a code is recommended as a common industry code does not imply that it is a required code (legislated), an emission related code, or that it indicates a fault that causes the malfunction indicator light to illuminate. Refer to DTC Naming Guidelines for Signals from Components‚ page A-11. A-8 Appendix A Standardized Fault Code Format Figure A-6: SAE Fault Code Format Example Codes Only—OBD II Diagnostic Trouble Codes Diagnostic Trouble Codes (DTC) are reported in a five-character alphanumeric format. First Character The first character is a letter that defines the system where a code was set. Four letters are currently assigned: P—Powertrain B—Body C—Chassis U—Undefined Second Character The second character is: 0—SAE defined (generic) code 1—Manufacturer-defined (enhanced) code 2—With “B” or “C”, reserved for manufacturers 3—With “B” or “C”, reserved for SAE ✓ The meaning of 2 or 3 varies according to the system character (P, B, C, or U). See First Character‚ page A-9. Third Character The third DTC character indicates the system where the fault occurred: 1—fuel or air metering problem 2—fuel or air metering problem 3—ignition malfunction or engine misfire 4—auxiliary emission control system problem 5—vehicle or idle speed control system problem 6—computer or output circuit fault 7—transmission control problem 8—transmission control problem A-9 Appendix A Final Characters The final characters in the DTC reveal the conditions that triggered the code. Different sensors, actuators and circuits are assigned blocks of numbers. • The lowest number in the block indicates a general malfunction. This is the generic DTC. • Higher numbers in the block—called enhanced codes—provide more specific information, such as low or high voltage, slow response, or an out-of-range signal. Both the Federal Clean Air Act and California OBD legislation require uniformity among manufacture’s fault code numeric format and messages associated with these codes. This format is defined in SAE J2012. The Diagnostic Trouble Codes (DTC) consists of the alphanumeric designators followed by three digits: P0 P0 P1 P2 P3 P3 B0 B0 B1 B2 B3 C0 C0 C1 C2 C3 U0 U0 U1 U2 U3 A-10 P3 Powertrain related codes Powertrain codes controlled by SAE Powertrain codes controlled by the manufacturer Powertrain codes controlled by SAE Powertrain codes controlled by manufacturer (P3000– P3399) Powertrain codes controlled by SAE (P3400–3999) B3 Body related codes Body codes controlled by SAE Body codes controlled by the manufacturer Body codes controlled by the manufacturer Body codes reserved C3 Chassis related codes Body codes controlled by SAE Body codes controlled by the manufacturer Body codes controlled by the manufacturer Body codes reserved U3 Network related codes Network codes controlled by SAE Network codes controlled by the manufacturer Network codes controlled by the manufacturer Network codes reserved Appendix A DTC Naming Guidelines for Signals from Components Component/System SAE J1930 Acronym SAE J1930 Air Conditioning Modifier(1) Noun Name A/C Clutch Status N/A Air Conditioning A/C Clutch Relay Crankshaft Position CKP DI Low resolution Distributor Ignition DI HIgh resolution Engine Coolant ECT Sensor Engine Speed RPM Input Evaporative Emissions EVAP Canister Purge Valve Evaporative Emissions EVAP Purge Exhaust Gas Recirculation EGR Solenoid FC Relay 1 Fan Control FC Voltage Sensor Distributor Ignition* Fan Control Parameter(1) Voltage Solenoid Relay 2 Heated Oxygen Sensor HO2S In acronym Heated Oxygen Sensor HO2S In acronym Heater Voltage Heated Oxygen Sensor HO2S Heated Oxygen Sensor HO2S Voltage Idle Air Control IAC Valve Idle Air Control IAC Valve Ignition Control IC N/A Voltage Ignition Control IC N/A Voltage Injector N/A Intake Air Temperature IAT Knock Sensor KS In acronym Knock Sensor KS Module Malfunction Indicator Lamp MIL in acronym Manifold Absolute Pressure MAP Sensor Voltage Mass Air Flow MAF Sensor Frequency Mass Air Flow MAF Sensor Secondary Air Injection AIR Solenoid Temperature Voltage Sensor Voltage Voltage Throttle Position TP Sensor Throttle Position TP Sensor Torque Converter Clutch TCC Solenoid Vehicle Speed Sensor VSS In acronym Vehicle Speed Sensor * VSS In acronym Stuck on 1. * Intermittent If used. NOTE: Service Information uses Component/System SAE J1930 or Acronym SAE J1930, Modifier(1), Noun Name, Parameter(1) A-11 Appendix A Communication Problems Some OBD II equipped vehicles have problems communicating with the analyzer. A PCM may fail to communicate with the analyzer. If a problem exists with the wiring or other circuit parts on the vehicle, the analyzer may not be able to communicate with the PCM. The vehicle’s failure to perform a test also can be a symptom for diagnosing a driveability problem. Check Analyzer Operation If the analyzer works properly on other vehicles then the problem is probably in the vehicle, not the analyzer. PIN NO 1 2 3 4 5 6 7 8 9 10 11 12 13 14 15 16 ASSIGNMENTS Manufacturer’s Discretion BUS + Line, SAE J1850 Manufacturer’s Discretion Chassis Ground Signal Ground Manufacturer’s Discretion K Line, ISO 9141 Manufacturer’s Discretion Manufacturer’s Discretion BUS – Line, SAE J1850 Manufacturer’s Discretion Manufacturer’s Discretion Manufacturer’s Discretion Manufacturer’s Discretion L Line, ISO 9141 Vehicle Battery Positive Figure A-7: 16-pin DLC Connector Pinout Testing the Diagnostic Connector —16-pin DLC Unfortunately, vehicle manufacturers have different interpretations of OBD II requirements. This makes it difficult to define a specific approach to DLC problem diagnosis. In the Figure A-7 you can see that: • Some manufacturers use the SAE J1850 BUS+ line but not the BUS-, while others use the ISO 9141 K LINE, but not the L LINE. • Ford has used the 3 lines, the J1850 lines for powertrain tests, and the ISO 9141 line for the non-powertrain tests (ABS and GEM). • There have also been cars with no ground at pin 4. • In addition, a pin location that is stuffed, doesn’t necessarily mean that it is stuffed based on the OBD II requirements. Use the Ground Test‚ page A-13 and Battery Voltage Test‚ page A-13 at the diagnostic center to help determine the reason the vehicle does not perform the diagnostic tests. Use a highimpedance digital voltmeter. A-12 Appendix A Ground Test This test measures the voltage drop across the ground side of the diagnostic connector. An ideal system ground should have a voltage drop of 0.1 volt or less. 1. Connect the voltmeter positive (+) lead to the ground terminal in the diagnostic connector. 2. Connect the negative (–) lead directly to the battery negative (–) terminal. ✓ Do not connect the voltmeter negative lead to an engine or chassis ground To check for an open circuit at the diagnostic connector ground terminal connect the voltmeter positive (+) lead to the battery positive and the negative lead to the connector ground terminal. You should read battery voltage. If the meter reads zero, the ground terminal is open. Battery Voltage Test This tests the battery voltage supply to the computer. 1. Connect the voltmeter positive (+) lead to the battery voltage terminal at the diagnostic connector. 2. Connect the negative (–) lead to the battery ground terminal. You should ready battery voltage. A-13 Appendix A OBD System Testing For most emission control systems and components, OBD II requires that malfunctions are identified before a problem becomes serious enough to cause vehicle emissions to exceed Federal Test Procedure (FTP) standards by more than 50%. Instead of monitoring emissions directly, the OBD II system looks for emission problems by monitoring virtually every component and system that can increase emissions. OBD II monitoring includes systems and components that cannot be checked during conventional tailpipe I/M testing such as cold start emissions reduction devices and evaporative systems. Diagnostic Fault Testing In contrast, the OBD II system does not measure emissions but uses monitors and/or complex statistical methods to predict when the emissions exceed limits. Figure A-8: Pass/Fail Requirements Limits are usually 150% of the certification standard that applies to the vehicle. Additionally, the rule requires monitoring specific components for faults even if faults do not cause emissions to increase 150%. When emission and/or component malfunction is detected, the MIL must illuminate and a fault code must be stored that indicates the likely area of malfunction. A-14 Appendix A Drive Cycles To predict if emission limits are exceeded or components are faulty, the PCM must test and/or monitor components for proper operation. Sometimes these component tests are complex and require the vehicle be operated in certain driving modes or conditions to complete. • Drive Cycle — Requires an engine startup and shut down. • Warm-Up Cycle — Requires engine operation that ensures the coolant temperature rises to a minimum of 40°F from engine startup and reaches a minimum of 160°F. • A Trip means vehicle operation (following an engine-off period) of duration and driving mode such that all components and systems are monitored at least once by the diagnostic system. This is subject to the limitation that the trip monitoring conditions must all be encountered at least once during he first engine start portion of the applicable FTP cycle. While there have been efforts to develop a “generic” drive cycle, this does not currently seem possible due to significant design differences between manufacturers. Component Monitoring When fuel level is low, manufacturers are allowed to disable monitoring systems affected by running out of fuel (e.g., misfire detection). However, these component monitoring systems can only be disabled if the fuel level is below 15% of nominal tank capacity. Misfire Monitoring The diagnostic system must monitor and report engine misfire and identify the specific cylinder experiencing the misfire. If more than one cylinder is misfiring, a separate code must indicate that multiple cylinders are misfiring. Manufacturers must phase in expanded misfire monitoring conditions beginning with the late 1997 model year based on the following schedule. • Equal or exceed 50% for MY 1997 through MY 1999; • Equal or exceed 75% for MY 2000; • Equal or exceed 90% for MY 2001; and • 100% implementation for MY 2002. Evaporative System Monitoring The diagnostic system must be able to verify air flow from the evaporative system. The diagnostic system also monitors the evaporative system for loss of hydrocarbon vapor in the atmosphere by performing a pressure or vacuum check of the complete system. Implementation of this requirement is mandatory only for MY 1996 or later vehicles. Beginning with MY 2000, manufacturers must phase in diagnostic strategies to detect system leaks greater than or equal in magnitude to a leak caused by a 0.020 diameter orifice. A-15 Appendix A Secondary Air System Monitor The diagnostic system must be able to indicate secondary air delivery system malfunction when the flow rate falls below a point when the vehicle would exceed 1.5 times any of the applicable FTP emission records. Air Conditioning Refrigerant Monitoring If the vehicle uses a refrigerant that could harm the stratospheric ozone layer or are reactive in forming atmospheric ozone, the diagnostic system must monitor for loss of the refrigerant. Fuel System Monitoring Manufacturers must continuously monitor the fuel system such that a vehicle’s emissions would not exceed 1.5 times any the applicable Federal Test Procedure (FTP) standards. Oxygen Sensor Monitoring The diagnostic system must monitor the output voltage, response rate, and any other parameter which can affect emissions of all primary (fuel control) oxygen sensors for malfunction. It must also monitor the all secondary oxygen sensors (fuel trim control or monitoring device) for proper output voltage and response rate. Exhaust Gas Recirculation System Monitoring The EGR system must be monitored for both low and high flow rate malfunctions. Positive Crankcase Ventilation (PCV) System Monitoring Beginning with the MY 2002, manufacturers must phase-in diagnostic strategies to monitor the PCV system for system integrity. The following phase-in schedule applies: • Equal or exceed 30% for MY 2002; • Equal or exceed 60% for MY 2003; and • 100% implementation for MY 2004. Thermostat Monitoring Beginning with the MY 2000, manufacturers must phase-in diagnostic strategies to monitor the thermostat for proper operation. The following phase-in schedule applies: • Equal or exceed 30% for MY 2000; • Equal or exceed 60% for MY 2001; and • 100% implementation for MY 2002. Comprehensive Component Monitoring The diagnostic system must monitor any electronic powertrain component/system not otherwise described above which either provides input to (directly or indirectly), or receives commands from the onboard computer and which: • Can affect emissions during any reasonable in-use driving condition, or; • Is used as part of the diagnostic strategy for any other monitored system or component. A-16 Appendix A The Malfunction Indicator Lamp ISO Symbol Figure A-9: Malfunction Indicator Lamps All 1996 and subsequent model-year passenger car, light-duty trucks, and medium-duty vehicles must be equipped with a malfunction indicator light (MIL) located on the instrument panel that informs the vehicle operator of a malfunction of a powertrain component which affects emissions and provides input to, or receive output from, the onboard computer(s) or of the malfunction of the computer(s) itself. The MIL must illuminate in the engine-run key position before engine cranking to indicate that the MIL is functional. The MIL must display one of the following phrases: CHECK ENGINE SERVICE ENGINE SOON SERVICE POWERTRAIN SOON Alternatively, the ISO engine symbol shown in Figure A-9 may be substituted. ✓ The MIL must blink during misfire conditions. Extinguishing the MIL For misfire or fuel system malfunctions, the MIL may be extinguished if the fault does not recur when monitored during three subsequent sequential driving cycles with conditions similar to those under which the malfunction was first determined. For all other faults, the MIL may be extinguished after three subsequent sequential driving cycles during which the monitor functions and the fault does not reoccur. The diagnostic system may erase a fault code after 40 warm-up cycles if the fault has not re-registered except as noted above. Readiness Codes Readiness codes are used to indicate if the system has run all monitors available. If all monitors have been run and no faults were found then the assumption is made that the vehicle is “clean.” A-17 Appendix A OBDII Connections The location of the OBD II (On-Board Diagnostics) connection on a vehicle depends on make, model, and year. Following the diagram is a list of connector locations with reference to the grid. Use the SAE Standardized Link to connect to the vehicle’s onboard diagnostics port in order to interrogate and retrieve fault codes. The information provided in this chapter was current at the time of printing. However, you are responsible for current applications. For the most up-to-date information, contact the: ✓ Aftermarket Research Institute, Inc. P.O. Box 648 Southeastern, PA 19399 For additional information, see The Data Link Connector (DLC)‚ page A-5. Figure A-10: Map of OBD II Tachometer Connector Locations ✓ A-18 This information is for reference only and may not be current for all states. Appendix A OBD II Connections Table 2002 Manufacturer Year Model Acura 2002 3.2 CL, 3.2 TL Location Cover Comments 8 No above shifter 3.5 RL 8 Yes front of shifter; remove ashtray MDX SUV 3 No under dash at right; connector faces down NSX 7 No under passenger dash RSX 3 No (See Figure A-10) Aston Martin 2002 DB7 & Vanquish 3 Yes left side of center console Audi 2002 A4 1.8T & Quattro, A4 2.8 & Quattro, A4 Avant & 2.8 wagon, A6 &Quattro, A8 3.7 & 4.2 2 No lower dash, left of steering column NOTE: From 1998 to 2002 all Audi DLC’s are located at 2, uncovered, including S4 Quattro and TT Coupe and Roadster Bentley 2002 All models 2 No Engine codes A, B, C, D & E: DLC in lower fascia compartment; remove plastic cover panel; Engine code F, DLC is just above parking brake pedal BMW 2002 3-Series, 5-Series, X-5 SUV 2 Yes lower dash next to kick panel; pull cover down 7-Series 2‘ Yes lower A pillar; pull 1st cover off, then 2nd down X-5 SUV models 8 Yes lower A pillar; pull 1st cover off, then 2nd cover Z-(all models) 7 Yes passenger side dash; next to console Z8-series 2 Yes lower dash; over clutch & brake pedals; pull cover down Mini Cooper & Cooper S 1 Yes lower dash; over clutch & brake pedals; pull cover down A-19 Appendix A Manufacturer Year Buick 2002 Cadillac Chevrolet Cars Chevrolet Cars Chevrolet Trucks & SUVs 2002 2002 2002 2002 NOTE: A-20 Model Location (See Figure A-10) Cover Comments All Century 1 No right of accelerator pedal LeSabre 2 No lower edge dash; right of parking brake release Park Avenue 2 No lower edge dash; between steering column & park brake Regal 3 No lower edge dash; right of steering column next to console Rendezvous SUV 1 No left of steering column Catera 2 No Deville & Concours 2 No Eldorado 1 No Escalade SUV & EXT 2 No bottom left corner of dash; above park brake Seville 2 No lower edge dash; right of steering column & hood release Camaro, Malibu 3 No Cavalier, Corvette, Metro 1 No Impala, Lumina Sedan & Monte Carlo 3 No lower edge dash; right of steering column Prizm 1 No lower edge dash; right of parking brake pedal Venture van 1 No lower edge dash; left of steering column Astro van 1 No Avalanche 2 No bottom left corner of dash; above parking brake Blazer & S-10 Trucks, & C/ K Trucks 2 No Blazer & S-series; lower edge dash; right of parking brake Chevy Van & Express, Express van, Suburban; Tahoe 2 No lower edge dash; right of parking brake Silverado 2 No lower edge dash; above parking brake Tracker SUV (also as a Geo) 3 No lower edge dash; right of parking brake pedal Trailblazer 3 No lower edge dash; reach back lower edge dash; above park brake pedal Many Chevrolet trucks come with a pull-off cover. This cover is not attached. It may be missing on some vehicles if discarded. Appendix A Location Manufacturer Year Model Chrysler 2002 Concorde, LHS, 300M 1 No below lower instrument panel cover, near steering column; connector slants down Neon 2 No below lower instrument panel cover, near steering column Prowler 2 No below lower instrument panel cover, near cowl PT Cruiser 1 No below steering column, under instrument panel Sebring Sedan 3 No underneath instrument panel; near steering column; connector slants down Town & Country Van 2 No below lower steering column cover; near park brake release cable handle Daewoo Dodge Ferrari (See Figure A-10) Cover Comments NOTE: On 1998 and later Chrysler vehicles, the DLC is located at 3, lower dash, between parking brake and brake pedal. 2002 Lanos 6 No Leganza 3 No Nubira 2 Yes behind fuse panel cover, on kick panel Caravan & Grand Caravan 2 No lower edge of dash, above parking brake pedal Dakota Truck & Durango 1 No below steering column opening cover, near hood release cable handle Intrepid 1 No below lower instrument panel cover, near steering column Neon, Stratus 3 No lower edge dash surround; right of steering column Ram Van & Wagon 1 No lower edge dash; above brake pedal Ram 1500 Truck 1 No below steering column opening, near hood release cable handle Ram 2500 & 3500 Truck 6 No underneath instrument panel, below ashtray Viper 2 No underneath instrument panel, near clutch pedal All models 3 No up high, under dash; may be close to steering column 2002 2002 A-21 Appendix A Manufacturer Year Ford Cars & SUVs 2002 Ford Trucks GMC Trucks 2002 2002 NOTE: A-22 Model Location (See Figure A-10) Cover Comments Crown Victoria, Excursion SUV, Thunderbird, Windstar 3 No Escape SUV 2 No Escort & Escort ZX2 2 No Expedition SUV 3 Yes lower edge dash; above accelerator pedal; has removable plastic cover Explorer SUV 1 No lower edge dash; above accelerator pedal; has removable plastic cover Focus 2 Yes see in dash; left of hood release; behind unmarked pull-down door Mustang 3 No rear of lower dash; next to trans. tunnel; faces left Taurus 1 No lower edge dash; left of steering column All Econoline Vans & Club Wagon 3 Yes lower edge dash; below steering column Explorer SportTrac 2 Yes lower edge dash; left of steering column, cap snaps out All F Series Trucks 3 No Ranger 2 No left of hood release Denali 2 No lower edge of dash; above parking brake Envoy 3 No lower right edge of dash; reach back; next to console Safari Van, Savana Van 2 No lower edge dash; below parking brake release Sierra, Suburban, Yukon 2 No lower edge dash; above parking brake Sonoma 2 No lower edge dash; right of parking brake lower edge dash; right of hood release Many GMC trucks come with a pull-off cover. This cover is not attached. It may be missing on some vehicles if discarded. Appendix A Location Manufacturer Year Model Honda 2002 Accord 2 No above hood release; connector faces down Civic 3 No lower right edge dash; behind console trim (See Figure A-10) Cover Comments CR-V SUV 7 No right of console Insight Hybrid 8 No right side edge of console; near floor Odyssey Van 3 No far right edge of dash; next to console; faces down S-2000 Roadster 7 No under passenger dash; next to console Hummer 2002 All models 2 No Some vehicles may have a connector cover Hyundai 2002 Accent 2 No rear of lower edge dash; right of hood release Elantra 2 No Sonata 3 No rear lower edge dash; next to console Tiburon 1 No lower edge dash; right of steering column Santa Fe SUV 2 Yes located in fuse box panel XG-350 3 No I-30 * 2 No connector located near fuse box cover; connector faces down I-35 2 No connector faces down Q-45 * 2 No OBD II connector faces down QX-4 SUV 2 No located by fuse box cover; connector faces down Infiniti Isuzu Jaguar 2002 NOTE: Vehicles with an * have two types of connectors: 1)Nissan-dedicated connector which works only with a Nissan scan tool or Nissan-dedicated laptop PC. 2)Standard 16-pin OBD II connector which may be used with any generic scan tool. 2002 Axiom, Rodeo, Rodeo Sport 2 No under dash at left; connector faces down Trooper 2 Yes behind unmarked panel over hood release S-Type Sedan, All XJ Sedans, Van den Plas 3 No X-Type AWD Sedan, All XK Sports 2 No 2002 A-23 Appendix A Location Manufacturer Year Model Jeep 2002 Grand Cherokee 2 No Below steering wheel opening cover, near hood release cable handle Liberty 3 No Below knee blocker cover near center console Wrangler 2 No Below instrument panel, left of brake panel Optima 3 No under dash next to console; connector faces down Rio 3 No under dash next to console; connector faces down Sedona Van 1 No connector faces down Spectra 3 No Sportage SUV 3 No All Models 3 No Diablo 3 No find next to left side of console under dash Discover & Discovery II 3 No lower right corner dash; next to console Freelander 6 No left side of console, facing left Range Rover 7 No lower left passenger dash; next to console ES-300 1 Yes bottom edge of dash; left of steering column GS-300 & 430 1 No lower edge dash; next to steering column IS-300 & SportCross 2 Yes lower left edge of dash; next to kick panel Kia Lamborghini Land Rover Lexus A-24 2002 2002 2002 2002 (See Figure A-10) Cover Comments LS-430 2 Yes LX-470 SUV 2 Yes lower edge dash; next to console RX-300 1 Yes lower edge dash; next to steering column SC-430 2 Yes lower left side of dash Appendix A Location Manufacturer Year Model Lincoln 2002 Blackwood Sport Luxury Truck 3 No Continental 3 No LS-6 & LS-8 3 No lower edge dash; in line with ignition switch Navigator SUV 3 No lower right edge of dash; above accelerator pedal Town Car 3 No lower edge dash; right of steering column see NOTE No connector may be in one of two places Lotus (See Figure A-10) Cover Comments 2002 Esprit NOTE: Location 9: passenger-side footwell, under dash; DLC is a non-fixed position at the end of a wiring pigtail; may be found in the engine compartment or in the tailgate area; in this location the connector is located immediately forward of the battery on side of the fuse/ relay center Maserati 2002 Spyder 1 No right of steering column; angled down Mazda 2002 All Mazda B-series pickup trucks 1 No listing includes 2000, 2300, 2500, 3000 & 4000 All Protege models & Protege 5 2 No rear left edge dash; next to hood release; DLC faces down Tribute SUV 2 No rear edge dash; right of hood release A-25 Appendix A Location Manufacturer Year Model Mercedes Benz 2002 C Class 3 Yes bottom of dash to right of red brake release lever CL Class 2 Yes lower left corner of dash; near park brake pedal; hinged cover door opens to right CLK Class 3 Yes bottom of dash next to right kick panel E Class 2 Yes bottom of dash; adjacent to floorboard G-500 (Gelandewagen) 2 Yes lower left corner of dash; adjacent to floorboard M Class 2 Yes rear edge of lower dash; right of park brake pedal S Class 2 Yes lower left corner of dash; near park brake pedal SL Class 3 Yes lower right corner of dash; next to foot vent in right kick panel SLK Class 2 Yes lower left corner of dash; behind red hood release lever; near floorboard far left of dash; rear of lower edge Mercury (See Figure A-10) Cover NOTE: All late-model Mercedes Benz covers are hinged 2002 Cougar 2 No Grand Marquis 3 No Mountaineer SUV 1 No Sable 2 No Villager Van 2 No Comments lower edge dash next to steering column on left MINI by BMW 2002 Mini Cooper & Cooper S 1 Yes Mitsubishi 2002 Diamante 1 No Eclipse & Spyder 3 No lower right edge dash; next to kick panel Galant 3 No bottom right corner of dash; next to kick panel Mirage Coupe 3 No Montero SUV 3 No Montero Sport 2 No Plus 8 9 No Morgan A-26 2002 lower dash over clutch & brake pedals; pull cover down lower edge dash at far right; connector faces down below & behind lower left edge of passenger side dash Appendix A Location Manufacturer Year Model Nissan 2002 All passenger car models 2 No Frontier Truck, X-Terra SUV 2 No Pathfinder SUV 2 No lower edge dash; right of hood release Quest Van 2 No lower edge dash; left of steering column Alero 2 No lower left edge dash; between steering column & hood release Aurora 1 No Bravada 3 No lower edge dash; between steering column & console Oldsmobile 2002 (See Figure A-10) Cover Comments some DLC locations may be to rear, under dash. On Altimas DLC is angled down at far left Panoz 2002 Esperante 3 Pontiac 2002 Aztek 1 No lower edge dash; right of park brake release Bonneville 2 No lower left corner of dash; above park brake pedal Firebird 3 No behind plastic panel at lower right corner of dash Grand AM 1 No lower edge of dash; above parking brake pedal Montana Van 1 No lower edge of dash; left of steering column Sunfire 1 No on bracket at lower edge of dash; above foot rest Vibe 2 No lower left side of dash; above foot rest All 911 models, Carrera, Carrera 4, Carrera 4S, Turbo, GT2 2 No Boxster, Boxster S 2 No Porsche 2002 Roll Royce 2002 Silver Seraph, Silver Spur 1 No Saab 2002 9-3 1 Yes 9-5 3 Yes lower edge dash; right of steering column; plastic cover A-27 Appendix A Manufacturer Year Saturn 2002 Subaru 2002 Model Location (See Figure A-10) Cover Comments All S Series, All L Series 2 No All L Series 2 No bottom edge of dash; right of hood release Forester, Impreza, WRZ 2 Yes lower left dash; pull-down door Legacy, Brighton, Outback 2 No left side of steering column No lower edge dash; right of steering column; near center console Suzuki 2002 Vitara, Grand Vitara XL-7 3 Toyota 2002 Avalon, RAV 4 SUV 1 No Camry 2 Yes Celica 2 Yes Corolla 2 No Echo 2 Yes Highlander SUV 2 Yes lower edge dash; in cavity next to park brake Matrix 2 No bottom edge of dash; above foot rest MR-2 Spyder 1 No left of steering column Prius Hybrid 3 No RAV-4 SUV 1 No Sequoia SUV 3 No lower edge dash; mounted on a bracket; above accelerator pedal Solara (Camry) 1 No lower edge dash; below steering column Tacoma Truck, Tundra Truck 3 No lower edge dash; next to console; connector faces down 4-Runner SUV 3 No Cabrio, Golf, Jetta; New Beetle 2 No Toyota Volkswagen Volvo A-28 2002 2002 2002 lower left side of dash lower left side of dash under dash at left side Eurovan 3 No Passat 4 No under dash at left side New Beetle 2 No under dash at left side C 70 8 Yes in center console compartment under cover marked OBD S-40 6 No S-60 2 Yes S 80 2 No bottom left corner of dash; behind swing-down door Appendix A 2001 Location Manufacturer Year Model Acura 2001 2.5 TL, 3.2 TL 9 No next to seat heater switch; below radio 3.2 CL, 3.2 TL 8 No above shifter 3.5 RL 8 Yes front of shifter; behind ashtray Integra, 2.2 CL, 2.3 CL, 3.0 CL 8 No passenger side of console MDX SUV 3 No under dash at right; connector face down NSX 7 No under passenger dash (See Figure A-10) Cover Comments Aston Martin 2001 DB7 & Vanquish 3 Yes left side of center console Audi 2001 A4 1.8T & Quattro, A4 2.8 & Quattro, A4 Avant & 2.8 wagon, A6 &Quattro, A8 3.7 & 4.2, Cabriolet 2 No lower dash, left of steering column NOTE: From 1998 to 2002 all Audi DLC’s are located at 2, uncovered, including S4 Quattro and TT Coupe and Roadster Bentley 2001 All models 2 No Engine codes A, B, C, D & E: DLC in lower fascia compartment; remove plastic cover panel; Engine code F, DLC is just above parking brake pedal BMW 2001 3-Series, 5-Series, X-5 SUV 2 Yes lower dash next to kick panel; pull cover down 7-Series 6 Yes below radio & A/C controls; pull 1st cover off, then 2nd cover Z8-series 2 Yes lower dash; next to kick panel, pull cover down A-29 Appendix A Location Manufacturer Year Model Buick 2001 All Century 1 No at right of accelerator pedal LeSabre 2 No lower edge dash; right of parking brake release Park Avenue 2 No lower edge dash; between steering column & park brake Regal 3 No lower edge dash; right of steering column; next to console Catera 2 No Deville & Concours 2 No Eldorado 1 No Escalade SUV 2 No lower edge dash; left of steering column; above park brake Seville 2 No lower edge dash; right of steering column & hood release Camaro, Malibu 3 No Cavalier, Corvette, Metro 1 No Impala, Lumina Sedan & Monte Carlo 3 No lower edge dash; right of steering column Prizm 1 No lower edge dash; right of parking brake pedal Venture van 1 No lower edge dash; left of steering column Cadillac Chevrolet Cars Chevrolet Trucks & SUVs 2001 2001 2001 NOTE: A-30 (See Figure A-10) Cover Comments lower edge dash; above park brake pedal (cap) Astro van 1 No Blazer & S-10 Trucks, & C/ K Trucks 2 No Blazer & S-series; lower edge dash; right of parking brake Chevy Van & Express, Express van, Suburban; Tahoe 2 No lower edge dash; right of parking brake Silverado 2 No lower edge dash; above parking brake Tracker SUV (also as a Geo) 3 No lower edge dash; right of parking brake pedal Many Chevrolet trucks come with a pull-off cover. This cover is not attached. It may be missing on some vehicles if discarded. Appendix A Location Manufacturer Year Model Chrysler 2001 Concorde, LHS, 300M 1 No below lower instrument panel cover, near steering column; connector slants down Neon 2 No below lower instrument panel cover, near steering column Prowler 2 No below lower instrument panel cover, near cowl PT Cruiser 1 No below steering column, under instrument panel Sebring Convertible 2 No lower edge dash; over hood release; by kick panel; connector slants down Sebring Sedan 3 No underneath instrument panel; near steering column; connector slants down Town & Country Van 2 No below lower steering column cover; near park brake release cable handle Daewoo Dodge (See Figure A-10) Cover Comments NOTE: On 1998 and later Chrysler vehicles, the DLC is located at 3, lower dash, between parking brake and brake pedal. 2001 Lanos 6 No Leganza 3 No Nubira 2 Yes behind fuse panel cover, on kick panel Caravan & Grand Caravan 2 No lower edge of dash, above parking brake pedal Dakota Truck & Durango SUV 1 No below steering column opening cover; near hood release cable handle Intrepid 1 No below lower instrument panel cover; near steering column Neon, Stratus 3 No lower edge dash surround; right of steering column Ram Van & Wagon 1 No lower edge dash; above brake pedal Ram 2500 & 3500 Truck 6 No underneath instrument panel, below ashtray Viper 2 No underneath instrument panel; near clutch pedal 2001 A-31 Appendix A Manufacturer Year Model Ferrari 2001 All models Ford Cars & SUVs 2001 Ford Trucks Geo GMC Trucks 2001 2001 2001 NOTE: A-32 Location (See Figure A-10) 3 Cover No Comments up high, under dash; may be close to steering column Crown Victoria, Windstar 3 No Escape SUV 2 No Escort & Escort ZX2 2 No Excursion SUV 3 No Expedition SUV 3 Yes lower edge dash; above accelerator pedal; has removable plastic cover Explorer SUV 2 Yes lower edge dash; left of steering column Focus 2 Yes below dash; L of hood release; behind unmarked pull-down door Mustang 3 No rear of lower dash; next to transmission tunnel; faces left Taurus 2 No lower edge dash; left of steering column All Econoline Vans & Club Wagon 3 Yes lower edge dash; below steering column Explorer SportTrac 2 Yes lower edge dash; left of steering column, cap snaps out All F Series Trucks 3 No Ranger 1 No lower edge dash; right of hood release lower edge dash; left of hood release Prizm 1 No Tracker SUV 3 No Denali, Denali XL, Envoy, Rally, Vandura, Savana Van 1 No Safari Van 2 No lower edge dash; below parking brake release Sierra, Suburban, Yukon 2 No lower edge dash; above parking brake Sonoma 2 No lower edge dash; right of parking brake Many GMC trucks come with a pull-off cover. This cover is not attached. It may be missing on some vehicles if discarded. Appendix A Location Manufacturer Year Model Honda 2001 Accord 2 No above hood release; connector faces down Civic 3 No lower right edge dash; behind console trim CR-V SUV 7 No right of console Insight Hybrid 8 No right side edge of console; near floor Odyssey Van 3 No far right edge of dash; next to console; faces down S-2000 Roadster 7 No under passenger dash; next to console (See Figure A-10) Cover Comments Hummer 2001 All models 2 No Some vehicles may have a connector cover Hyundai 2001 Accent 2 No rear of lower edge dash; right of hood release Elantra 2 No Sonata 3 No rear lower edge dash; next to console Tiburon 1 No lower edge dash; right of steering column Santa Fe SUV 2 Yes located in fuse box panel XG-300 3 No I-30 * 2 No connector located near fuse box cover; connector faces down G-20 2 No connector faces down Q-45 * 2 No OBD II connector faces down QX-4 SUV 2 No located by fuse box cover; connector faces down Infiniti Isuzu 2001 NOTE: Vehicles with an * have two types of connectors: 1)Nissan-dedicated connector which works only with a Nissan scan tool or Nissan-dedicated laptop PC. 2)Standard 16-pin OBD II connector which may be used with any generic scan tool. 2001 Rodeo, Rodeo Sport 2 No under dash at left; connector faces down Trooper 2 Yes behind unmarked panel over hood release VehiCross SUV 2 No behind unmarked panel over hood release A-33 Appendix A Location Manufacturer Year Model Jaguar 2001 S-Type Sedan, All XJ Sedans, Van den Plas, XJ-8, XJR, Super V8, XJ Sport, Van den Plas 3 No All XK Sports Cars 2 No Cherokee 2 No rear of lower left edge dash Grand Cherokee 2 No below steering wheel opening cover; near hood release cable handle Wrangler 2 No below instrument panel; left of brake panel All Vehicles 3 No lower dash above accelerator pedal Optima 2 No under dash by steering column Sportage SUV 3 No All Models 3 No Diablo 3 No find next to left side of console under dash Discover & Discovery II 3 No lower right corner dash; next to console Range Rover 7 No lower left passenger dash; next to console ES-300 2 Yes remove fuse box cover; plug is above fuse panel GS-300 & 430 1 No lower edge dash; next to steering column IS-300 & SportCross 2 Yes lower left edge of dash; next to kick panel LS-430 2 Yes LX-470 SUV 2 Yes lower edge dash; next to console RX-300 1 Yes lower edge dash; next to steering column Jeep Kia Lamborghini Land Rover Lexus A-34 2001 2001 2001 2001 2001 (See Figure A-10) Cover Comments Appendix A Location Manufacturer Year Model Lincoln 2001 Continental 3 No LS-6 & LS-8 3 No lower edge dash; in line with ignition switch Navigator SUV 3 No lower right edge of dash Town Car 3 No lower edge dash; right of steering column (See Figure A-10) Cover Comments Lotus 2001 Esprit 7 No above passenger dash Mazda 2001 All Mazda B-series pickup trucks 1 No listing includes 2000, 2300, 2500, 3000 & 4000 626 2 No Millenia 3 No lower right corner dash; next to tunnel MPV Van 2 No behind lower edge dash; to right of hood release MX-5 (Miata) 2 Yes behind fuse box panel Protege 2 No rear left edge dash; next to hood release Tribute SUV 2 No rear edge dash; right of hood release C Class & CLK 3 Yes All other models 2 Yes Cougar 2 No Mazda Mercedes -Benz Mercury Mitsubishi 2001 2001 2001 2001 Grand Marquis 3 No Mountaineer SUV 2 Yes Sable 2 No Diamante 1 No Eclipse 3 No Galant, Montero Sport 3 No Mirage 2 No Montero SUV 3 No far left of dash; rear of lower edge lower right edge dash; next to kick panel lower edge dash at far right; connector faces down A-35 Appendix A Location Manufacturer Year Model Nissan 2001 All passenger car models, Frontier Truck, X-Terra SUV, 200-SX & SE 2 No Pathfinder SUV 2 No lower edge dash; right of hood release Quest Van 2 No lower edge dash; left of steering column Alero 2 No lower left edge dash; between steering column & hood release Aurora 1 No Bravada 2 No lower right edge dash; right of parking brake pedal Intrigue 3 No lower edge dash; right of steering column; plastic cover Silhouette Van 1 No lower edge dash; left of steering column Oldsmobile 2001 (See Figure A-10) Cover Comments Plymouth 2001 Breeze, Neon, Prowler, Voyager 2 No lower left of dash; over hood release; next to kick panel Pontiac 2001 Aztek, Montana Van 1 No lower edge dash; left of steering column Bonneville, Sunfire, Grand Am 1 No Firebird, Grand Prix 3 No All 911 models, Carrera & Turbo 6 Yes Boxter, Boxter S 2 No Porsche 2001 Roll Royce 2001 All models 2 No Saab 2001 9-3 1 Yes 9-5 3 Yes lower edge dash; right of steering column; plastic cover Saturn 2001 All S Series, All L Series 2 No Subaru 2001 Forester, Impreza & WRZ 2 Yes lower left dash; pull-down door Legacy, Brighton & Outback 2 No lower dash; below hood release; hinged cover A-36 Appendix A Location Manufacturer Year Model Suzuki 2001 Vitara, Grand Vitara 3 No Toyota 2001 Avalon, RAV 4 SUV 1 No Camry, Solara 1 No Celica 2 Yes Volkswagen Volvo 2001 2001 (See Figure A-10) Cover Comments lower edge dash; new right console kick panel lower edge dash; below steering column Corolla, Echo 2 No Land Cruiser 2 No behind fuse box cover MR-2 Spyder 1 No left of steering column Prius Hybrid, T-100 Truck, 4-Runner SUV 3 No Sequoia SUV 3 No lower edge dash; above accelerator pedal Sienna Van 3 No lower edge dash; mounted on a bracket; above accelerator pedal Tacoma Truck, Tundra Truck 3 No lower edge dash; next to console; connector faces down Cabrio, Golf, Jetta; New Beetle 2 No under dash at left side Eurovan, Passat 3 No GTI 6 No remove ashtray; sliding cover; next to ashtray C-70, V-90 8 Yes in center console compartment under cover marked DLC S-40, V-40 6 No S-80, V-70 2 No A-37 Appendix A 2000 Location Manufacturer Year Model Audi 2000 A4 1.8T & Quattro, A4 2.8 & Quattro, A4 Avant & 2.8 wagon, A6 &Quattro, A8 3.7 & 4.2, Cabriolet NOTE: From 1998 to 2002 all Audi DLC’s are located at 2, uncovered, including S4 Quattro and TT Coupe and Roadster Bentley 2000 All models 2 No engine codes A, B, C, D & E: DLC in lower fascia compartment; remove plastic cover panel; Engine code F, DLC is just above parking brake pedal BMW 2000 3-Series 2 Yes lower dash next to kick panel; pull cover down 5-Series, 8-Series 2 Yes lower dash next to kick panel; pull 1st cover off, then 2nd down 7-Series 6 Yes below radio and A/C controls; pull 1st cover off, then 2nd down Z-(All models) 7 Yes passenger side, next to console Z-8 2 Yes lower dash; over clutch & brake pedals; pull cover down Buick Cadillac A-38 2000 2000 (See Figure A-10) 2 Cover No Comments lower dash, left of steering column All Century 1 No at right of accelerator pedal LeSabre 2 No lower edge dash; right of parking brake release Park Avenue 2 No lower edge dash; between steering column & park brake Regal 3 No lower edge dash; right of steering column; next to console Catera 2 No Deville & Concours 2 No Eldorado 1 No Escalade SUV & EXT 2 No bottom left corner of dash; above parking brake Seville 2 No lower edge dash; right of steering column & hood release lower edge dash; above park brake pedal (cap) Appendix A Location Manufacturer Year Model Chevrolet Cars 2000 Camaro, Malibu 3 No Cavalier, Corvette, Metro 1 No Impala, Lumina Sedan & Monte Carlo 3 No lower edge dash; right of steering column Prizm 1 No lower edge dash; right of parking brake pedal Venture Van 1 No lower edge dash; left of steering column Astro van 1 No Blazer & S-10 Trucks, & C/ K Trucks 2 No Blazer & S-Series; lower edge dash; right of parking brake Chevy Van & Express, Express Van, Suburban; Tahoe 2 No lower edge dash; right of parking brake Silverado 2 No lower edge dash; above parking brake Tracker SUV (also as a Geo) 3 No lower edge dash; right of parking brake pedal Chevrolet Trucks & SUVs Chrysler Daewoo 2000 (See Figure A-10) Cover Comments NOTE: Many Chevrolet trucks come with a pull-off cover. This cover is not attached. It may be missing on some vehicles if discarded. 2000 Cirrus, Concorde, LHS 3 No Sebring Convertible 2 No lower edge dash; over hood release; by kick panel; connector slants down Town & Country Van 2 No below lower steering column cover; near park brake release cable handle NOTE: On 1998 and later Chrysler vehicles, the DLC is located at 3, lower dash, between parking brake and brake pedal. 2000 Lanos 6 No Leganza 3 No Nubira 2 Yes behind fuse panel cover, on kick panel A-39 Appendix A Location Manufacturer Year Model Dodge 2000 Avenger 3 No lower right dash; next to console Caravan & Grand Caravan 2 No lower edge of dash, above parking brake pedal Dakota Truck & Durango SUV 2 No lower edge dash; left of hood release Neon, Stratus, Viper 2 No under left side dash; pver hood rise; by kick panel Ram Van & Wagon 1 No lower edge dash; above brake pedal Ram 2500 & 3500 Truck 6 No underneath instrument panel, below ashtray All models 3 No up high, under dash; may be close to steering column Contour 2 No Crown Victoria, Windstar 3 No Escort & Escort ZX2 2 No Excursion SUV 3 No Expedition SUV 3 Yes lower edge dash; above accelerator pedal; has removable plastic cover Explorer SUV 2 Yes lower edge dash; left of steering column Focus 2 Yes below dash; L of hood release; behind unmarked pull-down door Mustang 3 No rear of lower dash; next to transmission tunnel; faces left Taurus 2 No lower edge dash; left of steering column All Econoline Vans & Club Wagon 3 Yes lower edge dash; below steering column All F Series Trucks 3 No Ranger 1 No Prizm 1 No Tracker SUV 3 No Ferrari 2000 Ford Cars & SUVs 2000 Ford Trucks Geo A-40 2000 2000 (See Figure A-10) Cover Comments lower edge dash; left of hood release Appendix A Location Manufacturer Year Model GMC Trucks 2000 Denali, Denali XL, Envoy, Rally, Vandura, Savana Van 1 No Safari Van 2 No lower edge dash; below parking brake release Sierra, Suburban, Yukon 2 No lower edge dash; above parking brake Sonoma 2 No lower edge dash; right of parking brake Honda (See Figure A-10) Cover Comments NOTE: Many GMC trucks come with a pull-off cover. This cover is not attached. It may be missing on some vehicles if discarded. 2000 Accord 2 No above hood release; connector faces down Civic 2 No OBD II connector faces down CR-V SUV 7 No right of console Odyssey Van 3 No far right edge of dash; next to console; faces down S-2000 Roadster 7 No under passenger dash; next to console Hummer 2000 All models 2 No Some vehicles may have a connector cover Hyundai 2000 Accent 2 No rear of lower edge dash; right of hood release Elantra 2 No Sonata 3 No rear lower edge dash; next to console Tiburon 1 No lower edge dash; right of steering column G-20 2 No connector faces down I-30, Q-45 * 2 No OBD II connector faces down QX-4 SUV 2 No located by fuse box cover; connector faces down Infiniti 2000 NOTE: Vehicles with an * have two types of connectors: 1)Nissan-dedicated connector which works only with a Nissan scan tool or Nissan-dedicated laptop PC. 2)Standard 16-pin OBD II connector which may be used with any generic scan tool. A-41 Appendix A Location Manufacturer Year Model Isuzu 2000 Amigo, Rodeo 2 No under dash at left; connector faces down Hombre Truck 2 No lower edge dash; right of parking brake Trooper, VehiCross 2 Yes behind unmarked panel over hood release XJ-8, XJR, Super V8, XJ Sport, Van den Plas 3 No All XK SPorts Cars 2 No Jaguar Jeep Kia 2000 2000 2000 (See Figure A-10) Cover Comments Cherokee 2 No rear of lower left edge dash Grand Cherokee, Wrangler 2 No rear of lower left edge dash All Vehicles 3 No lower dash above accelerator pedal Sportage SUV 3 No Lamborghini 2000 Diablo 3 No find next to left side under dash Land Rover 2000 Discover & Discovery II 3 No lower right corner dash; next to console Range Rover 7 No lower left passenger dash; next to console ES-300 2 Yes remove fuse box cover; plug is above fuse panel GS-300 & 400 1 No lower edge dash; next to steering column LS-400 2 Yes above parking brake LX-470 SUV 2 Yes lower edge dash; next to console RX-300 1 Yes lower edge dash; next to steering column SC-300, SC-400 2 Yes lower left side of dash above passenger dash Lexus 2000 Lotus 2000 Esprit 9 No Mazda 2000 Millenia 3 No MX-6,MVP,Protege,626 2 No S430,S500 2 Yes All Other Vehicles 1 No Mercedes -Benz A-42 2000 Appendix A Location Manufacturer Year Model Mitsubishi 2000 Mirage, Eclipse, Galant, Avenger, Sebring 3 No Montero 2 No Montero Sp, Nativa, Diamante 1 No (See Figure A-10) Cover Nissan 2000 All Vehicles 2 No Porsche 2000 All Vehicles 2 No Rover 2000 Discovery Series II 3 No Range Rover 9 No 9-3 1 Yes 9-5 3 Yes Saab 2000 Subaru 2000 Imperza, Legacy, Forester 1 Yes Suzuki 2000 Swift,Geo metro, Esteem 1 No Vitara, GM Traker, Grand Vitara 1 No 4-Runner 2WD, 4WD 3 No Avalon 1 No Solara (Camry) 1 No Camry, ES 300 3 No Celica 2 Yes Corolla, Prizm 2 No Toyota Volvo 2000 2000 GS 300, GS 400 3 No Land Cruiser, LX 470 3 No LS 400 2 Yes New Hybrid 7 No New Small 2 Yes RAV 4 3 No RX 300 2 Yes SC 300, SC 400 2 Yes Sienna 3 Yes Tacoma 2WD, 4WD 3 No Tundra 2WD, 4WD 3 No C-70, S-70, V-70 8 Yes S-40, V-40 6 Yes S-80 2 Yes Comments under passenger dash A-43 Appendix A Manufacturer Year Model Volkswagen 2000 New Beetle, Passat, Golf, Jetta A-44 Location (See Figure A-10) 2 Cover No Comments Appendix A 1999 Location Manufacturer Year Model Audi 1999 A4 1.8T & Quattro, A4 2.8 & Quattro, A4 Avant & 2.8 wagon, A6 &Quattro, A8 3.7 & 4.2, Cabriolet NOTE: From 1998 to 2002 all Audi DLC’s are located at 2, uncovered, including S4 Quattro and TT Coupe and Roadster Bentley 1999 All models 2 No Engine codes A, B, C, D & E: DLC in lower fascia compartment; remove plastic cover panel; Engine code F, DLC is just above parking brake pedal BMW 1999 3-Series, 5-Series, 8Series 2 Yes lower dash next to kick panel; pull 1st cover off, then 2nd down 7-Series 6 Yes below radio and A/C controls; pull 1st cover off, then 2nd down Z-(All models) 7 Yes passenger side, next to console All Century 1 No at right of accelerator pedal LeSabre 2 No lower edge dash; right of parking brake release Park Avenue 2 No lower edge dash; between steering column & park brake Regal 3 No lower edge dash; right of steering column; next to console Rivera 1 No Catera 2 No Deville & Concours 1 No Eldorado 1 No Escalade SUV & EXT 2 No bottom left corner of dash; above parking brake Seville 2 No lower edge dash; right of steering column & hood release Buick Cadillac 1999 1999 (See Figure A-10) 2 Cover No Comments lower dash, left of steering column A-45 Appendix A Manufacturer Year Chevrolet Cars 1999 Chevrolet Trucks & SUVs 1999 NOTE: Chrysler Daewoo A-46 1999 Model Location (See Figure A-10) Cover Comments Camaro, Malibu 3 No Cavalier, Corvette, Metro 1 No Lumina Sedan & Monte Carlo 3 No lower edge dash; right of steering column Prizm 1 No lower edge dash; right of parking brake pedal Venture Van 1 No lower edge dash; left of steering column Astro van 1 No Blazer & S-10 Trucks, & C/ K Trucks 2 No Blazer & S-Series; lower edge dash; right of parking brake Chevy Van & Express, Express Van, Suburban; Tahoe 2 No lower edge dash; right of parking brake Silverado 2 No lower edge dash; above parking brake Tracker SUV (also as a Geo) 3 No lower edge dash; right of parking brake pedal Many Chevrolet trucks come with a pull-off cover. This cover is not attached. It may be missing on some vehicles if discarded. Cirrus, Concorde, LHS 3 No Town & Country Van 2 No below lower steering column cover; near park brake release cable handle NOTE: On 1998 and later Chrysler vehicles, the DLC is located at 3, lower dash, between parking brake and brake pedal. 1999 Lanos 6 No Leganza 3 No Nubira 2 Yes behind fuse panel cover, on kick panel Appendix A Location Manufacturer Year Model Dodge 1999 Avenger 3 No lower right dash; next to console Caravan & Grand Caravan 2 No lower edge of dash, above parking brake pedal Dakota Truck & Durango SUV 2 No lower edge dash; left of hood release Intrepid 2 No lower edge dash; between parking brake & pedal Neon, Stratus, Viper 2 No under left side dash; pver hood rise; by kick panel Ram Van & Wagon 1 No lower edge dash; above brake pedal Stealth 3 No lower right edge of dash; nest to console up high, under dash; may be close to steering column (See Figure A-10) Cover Comments Ferrari 1999 All models 3 No Ford Cars & SUVs 1999 Contour 2 No Crown Victoria, Windstar 3 No Escort & Escort ZX2 2 No Expedition SUV 3 Yes lower edge dash; above accelerator pedal; has removable plastic cover Explorer SUV 2 Yes lower edge dash; left of steering column Focus 2 Yes below dash; L of hood release; behind unmarked pull-down door Mustang 3 No rear of lower dash; next to transmission tunnel; faces left Taurus 2 No lower edge dash; left of steering column Windstar 1 No bottom edge dash; right of steering wheel All Econoline Vans & Club Wagon 3 Yes lower edge dash; below steering column All F Series Trucks 3 No Ranger 1 No Prizm 1 No Tracker SUV 3 No Ford Trucks Geo 1999 1999 lower edge dash; left of hood release A-47 Appendix A Location Manufacturer Year Model GMC Trucks 1999 Denali, Denali XL, Envoy, Rally, Vandura, Savana Van 1 No Safari Van 2 No lower edge dash; below parking brake release Sierra, Suburban, Yukon 2 No lower edge dash; above parking brake Sonoma 2 No lower edge dash; right of parking brake Honda (See Figure A-10) Cover Comments NOTE: Many GMC trucks come with a pull-off cover. This cover is not attached. It may be missing on some vehicles if discarded. 1999 Accord 2 No above hood release; connector faces down Civic 2 No OBD II connector faces down CR-V SUV 7 No right of console Del Sol 7 No under passenger side dash Odyssey Van 3 No far right edge of dash; next to console; faces down Hummer 1999 All models 2 No Some vehicles may have a connector cover Hyundai 1999 Accent 6 No in coin box Elantra 2 No Sonata 3 No rear lower edge dash; next to console Tiburon 1 No lower edge dash; right of steering column Amigo, Rodeo 2 No under dash at left; connector faces down Hombre Truck 2 No lower edge dash; right of parking brake Oasis Van 7 No under passenger dash; next to console Trooper 2 Yes behind unmarked panel over hood release VehiCross SUV 2 No behind unmarked panel over hood release Isuzu A-48 1999 Appendix A Location Manufacturer Year Model Infiniti 1999 I-30* 2 No OBD II connector faces down; below fuse box Q-45 * 2 No OBD II connector faces down QX-4 SUV 2 No located by fuse box cover; connector faces down Jaguar Jeep Kia (See Figure A-10) Cover Comments NOTE: Vehicles with an * have two types of connectors: 1)Nissan-dedicated connector which works only with a Nissan scan tool or Nissan-dedicated laptop PC. 2)Standard 16-pin OBD II connector which may be used with any generic scan tool. 1999 XJ-8, XJR, Super V8, XJ Sport, Van den Plas 3 No All XK Sports Cars 2 No Cherokee 2 No rear of lower left edge dash Grand Cherokee, Wrangler 2 No rear of lower left edge dash All Vehicles 3 No lower dash above accelerator pedal Sportage SUV 3 No 1999 1999 Lamborghini 1999 All Models 3 No Land Rover 1999 Discover & Discovery II 3 No lower right corner dash; next to console Range Rover 7 No lower left passenger dash; next to console ES-300 2 Yes remove fuse box cover; plug is above fuse panel GS-300 & 400 1 No lower edge dash; next to steering column LS-400 2 Yes above parking brake LX-470 SUV 2 Yes lower edge dash; next to console RX-300 1 Yes lower edge dash; next to steering column SC-300, SC-400 2 Yes lower left side of dash Esprit 9 No Above Passenger Dash Lexus Lotus 1999 1999 A-49 Appendix A Location Manufacturer Year Model Mazda 1999 MX-5 (Miata),MX6,Protege,626 2 No MVP 1 No (See Figure A-10) Cover Comments Mercedes Benz 1999 All Vehicles 2 Yes Mitsubishi 1999 3000GT 3 No Diamante 2 No Eclipse & Spyder 3 No lower right edge; next to kick panel Galant 3 No bottom right corner of dash; next to kick panel Mirage 2 No Montero SUV 2 No Montero Sport 3 No Nissan 1999 All models 2 No Oldsmobile 1999 Alero 2 No Aurora, L S S & Olds 88 1 No Bravada 2 No Cutlass, Cutlass Supreme 3 No Intrigue 3 No lower edge dash; right of steering column; plastic cover Silhouette Van 1 No lower edge dash; left of steering column lower left edge dash; between steering column & hood release lower right edge dash; right of parking brake pedal Panoz 1999 Roadster 3 Plymouth 1999 Breeze, Prowler, Voyager 2 No Neon 2 No lower left of dash; over hood release; next to kick panel Voyager 2 No lower edge of dash; above parking brake pedal A-50 Appendix A Manufacturer Year Pontiac 1999 Model Location (See Figure A-10) Cover Comments Bonneville 1 No Firebird 3 No Grand AM, Montana Van 1 No lower edge of dash; left of steering column Sunfire 1 No on bracket at lower edge of dash; above foot rest Vibe 2 No lower left side of dash; above foot rest Porsche 1999 All Vehicles 2 No Rolls Royce 1999 All models 2 No Rover 1999 911 models 3 No Range Rover 9 No under passenger dash 9-3 1 Yes lower edge dash; right steering column; plastic cover 9-5 3 Yes Saab 1999 Saturn 1999 All S Series 2 No Subaru 1999 Forester 1 Yes left side of steering column; pull-down cover Impreza 1 Yes left side of steering column Legacy, Brighton, Outback 2 Yes left side of steering column Legacy Postal Vehicles (RHD) 2 Esteem 31 No X-90 3 No Swift 3 No lower dash; right of steering column Vitara, Grand Vitara XL-7 3 No lower edge dash, right of steering column, near center console Suzuki 1999 on driving (right) side of instrument panel layout lower dash; right of steering column A-51 Appendix A Location Manufacturer Year Model Toyota 1999 4-Runner SUV 3 No Avalon 2 Yes bottom left edge of dash; behind fuse block cover Camry, Solara (Camry) 1 No lower edge dash; below steering column Celica 3 Yes Corolla 1 No Land Cruiser, Paseo 2 Yes VOLVO Volkswagen A-52 1999 1999 (See Figure A-10) Cover Prizm 1 No RAV-4 SUV 3 No Sienna Van 3 No Supra 2 Yes Tacoma Truck 3 No T-100 Truck 3 No S-80 2 Yes All Other Vehicles 9 Yes EuroVan 4 Yes Golf,Jetta 7 No New Golf, New Jetta,New Bettle, Passat, Cabrio 2 No Comments behind fuse box cover behind lower edge dash hand brake area Appendix A 1998 Location Manufacturer Year Model Audi 1998 A4 1.8T & Quattro, A4 2.8 & Quattro, A4 Avant & 2.8 wagon, A6 &Quattro, A8 3.7 & 4.2, Cabriolet NOTE: From 1998 to 2002 all Audi DLC’s are located at 2, uncovered, including S4 Quattro and TT Coupe and Roadster Bentley 1998 All models 9 Yes bottom passenger side dash or in glove box BMW 1998 3-Series, 5-Series, 8Series 2 Yes lower dash next to kick panel; pull 1st cover off, then 2nd down 7-Series 6 Yes below radio and A/C controls; pull 1st cover off, then 2nd down Z-(All models) 7 Yes passenger side, next to console All Century 1 No at right of accelerator pedal LeSabre 2 No lower edge dash; right of parking brake release Park Avenue 2 No lower edge dash; between steering column & park brake Regal 3 No lower edge dash; right of steering column; next to console Rivera, Skylark 1 No Catera 2 No Deville & Concours 1 No Eldorado 1 No Seville 2 No Camaro, Malibu 3 No Cavalier, Corvette 1 No Lumina Sedan & Monte Carlo 3 No lower edge dash; right of steering column Venture Van 1 No lower edge dash; left of steering column Buick Cadillac Chevrolet Cars 1998 1998 1998 (See Figure A-10) 2 Cover No Comments lower dash, left of steering column lower edge dash; right of steering column & hood release A-53 Appendix A Manufacturer Year Chevrolet Trucks & SUVs 1998 Chrysler Dodge Ferrari A-54 Model Location (See Figure A-10) Cover Comments Astro van 1 No Blazer & S-10 Trucks, & C/ K Trucks 2 No Blazer & S-Series; lower edge dash; right of parking brake Chevy Van & Express, Express Van, Suburban; Tahoe 2 No lower edge dash; right of parking brake Silverado 2 No lower edge dash; above parking brake Tracker SUV (also as a Geo) 3 No lower edge dash; right of parking brake pedal NOTE: Many Chevrolet trucks come with a pull-off cover. This cover is not attached. It may be missing on some vehicles if discarded. 1998 Cirrus, Concorde, LHS 3 No Town & Country Van 2 No below lower steering column cover; near park brake release cable handle NOTE: On 1998 and later Chrysler vehicles, the DLC is located at 3, lower dash, between parking brake and brake pedal. 1998 Avenger 3 No lower right dash; next to console Caravan & Grand Caravan 2 No lower edge of dash, above parking brake pedal Dakota Truck & Durango SUV 2 No lower edge dash; left of hood release Intrepid 2 No lower edge dash; between parking brake & pedal Neon, Stratus, Viper 2 No under left side dash; pver hood rise; by kick panel Ram Van & Wagon 1 No lower edge dash; above brake pedal Stealth 3 No lower right edge of dash; nest to console All models 3 No up high, under dash; may be close to steering column 1998 Appendix A Manufacturer Year Ford Cars & SUVs 1998 Ford Trucks Geo GMC Trucks Honda 1998 1998 1998 Model Location (See Figure A-10) Cover Comments Contour 2 No Crown Victoria 3 No Escort & Escort ZX2 2 No Expedition SUV 3 Yes lower edge dash; above accelerator pedal; has removable plastic cover Explorer SUV 2 Yes lower edge dash; left of steering column Mustang 3 No rear of lower dash; next to transmission tunnel; faces left Taurus 2 No lower edge dash; left of steering column Windstar 1 No bottom edge dash; right of steering column All Econoline Vans & Club Wagon 3 Yes lower edge dash; below steering column All F Series Trucks 3 No Ranger 1 No Metro, Prizm 1 No Tracker SUV 3 No Denali, Denali XL, Envoy, Rally, Vandura, Savana Van 1 No Safari Van 2 No lower edge dash; below parking brake release Sierra, Suburban, Yukon 2 No lower edge dash; above parking brake Jimmy, Sonoma 2 No lower edge dash; right of parking brake lower edge dash; left of hood release NOTE: Many GMC trucks come with a pull-off cover. This cover is not attached. It may be missing on some vehicles if discarded. 1998 Accord 6 No behind ashtray; left of lighter Civic 2 No OBD II connector faces down CR-V SUV 7 No right of console Del Sol 7 No under passenger side dash Odyssey Van 7 No under passenger dash; next to console Prelude 7 No under passenger dash; remove trim panel A-55 Appendix A Manufacturer Year Model Hummer 1998 All models Hyundai 1998 Infiniti Isuzu Jaguar Jeep Kia Lamborghini A-56 1998 Location (See Figure A-10) 2 Cover Comments No Some vehicles may have a connector cover in coin box Accent 6 No Elantra 2 No Sonata 3 No rear lower edge dash; next to console Tiburon 1 No lower edge dash; right of steering column I-30* 2 No OBD II connector faces down; below fuse box Q-45 * 2 No OBD II connector faces down QX-4 SUV 2 No located by fuse box cover; connector faces down NOTE: Vehicles with an * have two types of connectors: 1)Nissan-dedicated connector which works only with a Nissan scan tool or Nissan-dedicated laptop PC. 2)Standard 16-pin OBD II connector which may be used with any generic scan tool. 1998 Amigo, Rodeo 2 No under dash at left; connector faces down Hombre Truck 2 No lower edge dash; right of parking brake Oasis Van 7 No under passenger dash; next to console Trooper 2 Yes lower edge dash; right of parking brake XJ-8, XJR, Super V8, XJ Sport, Van den Plas 3 No All XK Sports Cars 2 No Cherokee 2 No rear of lower left edge dash Grand Cherokee, Wrangler 2 No rear of lower left edge dash All Vehicles 3 No lower dash above accelerator pedal Sportage SUV 3 No All Models 3 No 1998 1998 1998 1998 Appendix A Location Manufacturer Year Model Land Rover 1998 Discover & Discovery II 3 No lower right corner dash; next to console Range Rover 7 No lower left passenger dash; next to console ES-300 2 Yes remove fuse box cover; plug is above fuse panel GS-300 & 400 1 No lower edge dash; next to steering column LS-400 2 Yes above parking brake LX-470 SUV 2 Yes lower edge dash; next to console RX-300 1 Yes lower edge dash; next to steering column SC-300, SC-400 2 Yes lower left side of dash Above Passenger Dash Lexus 1998 (See Figure A-10) Cover Lotus 1998 Esprit 9 No Mazda 1998 Millenia 3 No Protege,626 2 No Mercedes -Benz 1998 All Vehicles 2 Yes Mitsubishi 1998 3000GT, Stealth 3 No Avenger, Sebring 3 No Diamante 2 No Eclipse 3 No Nissan Porsche 1998 1998 Expo, Summit Wagon 2 No Galant 3 No Mirage 2 No Montero 2 No Montero Sp, Nativa 3 No Infiniti (All Vehicles) 2 No Nissan (All Vehicles) 2 No 911 models 6 Yes Boxster 2 No Rolls Royce 1998 Silver Spur, Park Ward 9 No Rover 1998 Discovery 3 No Range Rover 9 No Comments under passenger dash under passenger dash A-57 Appendix A Location Manufacturer Year Model Saab 1998 900, 9000 1 Yes Subaru 1998 Legacy,Impreza,Forester 2 Yes Suzuki 1998 Esteem 1 No Side Kick 1 No Side Kick Sport 1 No Swift, GM metro 1 No X-90 1 No 4Runner (2/4 WD) 3 No Avalon 2 Yes Camry 3 No Celica 3 Yes Corolla 1 No ES 300 3 No Toyota Volvo Volkswagen A-58 1998 1998 1998 (See Figure A-10) Cover GS 300/400 3 No Land Cruiser 3 No LS400 2 Yes LX 470 3 No Paseo 2 Yes Prizm 1 No RAV4 (2/4 WD) 3 No SC 300/400 2 Yes Sienna 3 No Supra 2 Yes T100 (2/4 WD) 3 No Tacoma (2/4 WD) 3 No Tercel 2 Yes S80 2 Yes All Other Vehicles 9 Yes EuroVan, Passat 4 No Golf, Jetta, Cabrio 7 Yes New Beetle 2 No Comments behind fuse cover behind fuse cover behind fuse cover hand brake area Appendix A 1997 Location Manufacturer Year Model Audi 1997 A4 1.8 & Quattro, A4 2.8 & Quattro, A4 Avant & 2,8 wagon, A6 & Quattro A8 3.7 & 4.2 2 No lower dash, left of steering column Cabriolet 2 No lower dash left of steering column (See Figure A-10) Cover Comments Bentley 1997 All models 9 Yes bottom passenger side dash or in glove box BMW 1997 3-Series, 5-Series, 8Series 2 Yes lower dash next to kick panel; pull 1st cover off, then 2nd down 7-Series 6 Yes below radio and A/C controls; pull 1st cover off, then 2nd down Z-(All models) 7 Yes passenger side, next to console All Century 1 No at right of accelerator pedal LeSabre 2 No lower edge dash; right of parking brake release Park Avenue 2 No lower edge dash; between steering column & park brake Regal 3 No lower edge dash; right of steering column; next to console Rivera, Skylark 1 No Catera 2 No Deville & Concours, Eldorado 1 No Fleetwood 3 No Seville 2 No Camaro, Caprice, Impala SS 3 No Cavalier, Corvette 1 No Lumina Sedan & Monte Carlo 3 No lower edge dash; right of steering column Venture Van 1 No lower edge dash; left of steering column Buick Cadillac Chevrolet Cars 1997 1997 1997 lower edge dash; right of steering column & hood release A-59 Appendix A Location Manufacturer Year Model Chevrolet Trucks & SUVs 1997 Astro van 1 No Blazer & S-10 Trucks, & C/ K Trucks 2 No Blazer & S-Series; lower edge dash; right of parking brake Chevy Van & Express, Express Van, Suburban; Tahoe 2 No lower edge dash; right of parking brake Silverado 2 No lower edge dash; above parking brake Tracker SUV (also as a Geo) 3 No lower edge dash; right of parking brake pedal NOTE: Chrysler Dodge 1997 1997 Ferrari A-60 1997 1997 Cover Comments Many Chevrolet trucks come with a pull-off cover. This cover is not attached. It may be missing on some vehicles if discarded. Cirrus, Concorde, LHS 3 No Town & Country Van 2 No below lower steering column cover; near park brake release cable handle Avenger 3 No lower right dash; next to console Caravan & Grand Caravan 2 No lower edge of dash, above parking brake pedal 2/5 No left of connector location area Dakota Truck & Durango SUV 2 No lower edge dash; left of hood release Intrepid 2 No lower edge dash; between parking brake & pedal Neon, Stratus, Viper 2 No under left side dash; pver hood rise; by kick panel Ram Van & Wagon 1 No lower edge dash; above brake pedal Stealth 3 No lower right edge of dash; nest to console Summit Sedan 2 No Summit Wagon 2/5 No left of location area Vision 1 No lower center dash; left of steering column All models 3 No up high, under dash; may be close to steering column Colt Vista Wagon Eagle (See Figure A-10) Appendix A Manufacturer Year Ford Cars & SUVs 1997 Ford Trucks Geo GMC Trucks 1997 1997 1997 NOTE: Model Location (See Figure A-10) Cover Comments Aerostar Van 3 Yes Aspire, Probe 3 No Contour 2 No Crown Victoria 3 No Escort & Escort ZX2 2 No Expedition SUV 3 Yes lower edge dash; above accelerator pedal; has removable plastic cover Explorer SUV 2 Yes lower edge dash; left of steering column Mustang 3 No rear of lower dash; next to transmission tunnel; faces left Taurus 2 No lower edge dash; left of steering column Thunderbird 7 Yes Windstar 1 No bottom edge dash; right of steering column All Econoline Vans & Club Wagon 3 Yes lower edge dash; below steering column All F Series Trucks 3 No Ranger 1 No Metro, Prizm 1 No Tracker SUV 3 No Denali, Denali XL, Envoy, Rally, Vandura, Savana Van 1 No Safari Van 2 No lower edge dash; below parking brake release Sierra, Suburban, Yukon 2 No lower edge dash; above parking brake Jimmy, Sonoma 2 No lower edge dash; right of parking brake lower edge dash; left of hood release Many GMC trucks come with a pull-off cover. This cover is not attached. It may be missing on some vehicles if discarded. A-61 Appendix A Location Manufacturer Year Model Honda 1997 Accord 6 No behind ashtray; left of lighter Civic, Passport SUV 2 No OBD II connector faces down CR-V SUV 7 No right of console Del Sol 7 No under passenger side dash Odyssey Van 7 No under passenger dash; next to console Prelude 7 No under passenger dash; remove trim panel (See Figure A-10) Cover Comments Hummer 1997 All models 2 No Some vehicles may have a connector cover Hyundai 1997 Accent 6 No in coin box Elantra 2 No Sonata 3 No rear lower edge dash; next to console Tiburon 1 No lower edge dash; right of steering column I-30* 2 No OBD II connector faces down; below fuse box J-30* 1 No OBD II connector concealed high up under dash; reach up to access Q-45 * 2 No OBD II connector faces down Infiniti Isuzu Jaguar A-62 1997 NOTE: Vehicles with an * have two types of connectors: 1)Nissan-dedicated connector which works only with a Nissan scan tool or Nissan-dedicated laptop PC. 2)Standard 16-pin OBD II connector which may be used with any generic scan tool. 1997 Hombre Truck 2 No lower edge of dash; right of parking brake Oasis Van 7 No under passenger dash; next to console Rodeo 2 No under dash at left; connector faces down Trooper 2 Yes behind unmarked panel over hood release XJ-8, XJR, Super V8, XJ Sport, Van den Plas 3 No All XK Sports Cars 2 No 1997 Appendix A Location Manufacturer Year Model Jeep 1997 Cherokee 2 No rear of lower left edge dash Grand Cherokee, Wrangler 2 No rear of lower left edge dash All Vehicles 3 No lower dash above accelerator pedal Sportage SUV 3 No Kia 1997 (See Figure A-10) Cover Comments Lamborghini 1997 All Models 3 No Land Rover 1997 Defender 90 8 Yes remove fuse box cover; plug is above fuse panel Discover & Discovery II 3 No lower right corner dash; next to console Range Rover 7 No lower left passenger dash; next to console ES-300 2 Yes remove fuse box cover; plug is above fuse panel GS-300 & 400 1 No lower edge dash; next to steering column LS-400 2 Yes above parking brake LX-450 SUV 2 Yes lower right edge dash; next to console SC-300, SC-400 2 Yes lower left side of dash above passenger dash Lexus 1997 Lotus 1997 Esprit 9 No Mazda 1997 MVP 1 No MX-5 (Miata),MX6,626,Millenia 3 No Protege 2 No Mercedes Benz 1997 All Vehicles 2 Yes Mitsubishi 1997 3000GT, Stealth 3 No Avenger, Sebring 3 No Diamante 2 No Eclipse 3 No Expo, Summit Wagon 2 No Galant 3 No Mirage 2 No Montero 2 No Montero Sp, Nativa 3 No A-63 Appendix A Location Manufacturer Year Model Nissan 1997 Infiniti (All) 2 No Nissan (All) 2 No 911 models 6 Yes Boxster 2 No Porsche 1997 (See Figure A-10) Cover Comments Rolls Royce 1997 Silver Spur, Silver Dawn, Park Ward, Limousine 9 No under passenger dash Rover 1997 Defender 6 Yes under parcel tray Discovery 3 No Range Rover 9 No 900, 9000 1 Yes Saab 1997 Subaru 1997 Suzuki A-64 1997 Legacy, Impreza, Forester 2 Yes SVX 3 Yes Esteem 1 No Side Kick 1 No Side Kick Sport 1 No Swift, GM metro 1 No X-90 1 No under passenger dash Appendix A Location Manufacturer Year Model Toyota 1997 4Runner (2/4 WD) 3 No Avalon 2 Yes Camry 3 No Celica 3 Yes Volvo Volkswagen 1997 1997 (See Figure A-10) Cover Comments behind fuse cover Corolla 1 No ES 300 3 No GS 300 1 No Land Cruiser 2 Yes LS4,00 2 Yes LX 450 2 Yes behind fuse cover Paseo 2 Yes behind fuse cover Previa (2/4 WD) 6 Yes top instrmt panel Prizm 1 No RAV4 (2/4 WD) 3 No SC 300/400 2 Yes Supra 2 Yes T100 (2/4 WD) 3 No Tacoma (2/4 WD) 3 No Tercel 2 Yes S80 2 Yes All Other Vehicles 9 Yes Euro Van, Passat 4 Yes Golf, Jetta, Cabrio 7 Yes behind fuse cover behind fuse cover hand brake area A-65 Appendix A 1996 Location Manufacturer Year Model Audi 1996 A4, Cabriolet, Quattro, Wagon 8 Yes remove rear ashtray center console; behind sliding cover Cabriolet, A6 9 Yes rear ashtray (See Figure A-10) Cover Comments Aston Martin 1996 DB7 Coupe 9 Yes right side of center console Bentley 1996 All models 9 Yes bottom passenger side dash or in glove box BMW 1996 3-Series, 5-Series, 8Series 2 Yes lower dash nest to kick panel, pull 1st cover off, then 2nd cover 7-series 6 Yes below radio & A/C controls, pull 1st cover off, then 2nd cover Z-3 (all models) 6 Yes Center console below heater controls All Century 1 No at right of accelerator pedal LeSabre 2 No lower edge dash; right of parking brake release Park Avenue 2 No lower edge dash; between steering column & park brake Regal 3 No lower edge dash; right of steering column; next to console Rivera, Skylark 1 No Roadmaster 3 No Catera 2 No Deville & Concours, Eldorado 1 No Fleetwood 3 No Seville 2 No Buick Cadillac A-66 1996 1996 lower edge dash; right of steering column & hood release Appendix A Manufacturer Year Chevrolet Cars 1996 Chevrolet Trucks & SUVs Chrysler Dodge 1996 Model Location (See Figure A-10) Cover Comments Baretta, Corsica 2 No Camaro, Caprice, Impala SS 3 No Cavalier, Corvette 1 No Lumina Sedan & Monte Carlo 3 No Astro van 1 No Blazer & S-10 Trucks, & C/ K Trucks 2 No Blazer & S-Series; lower edge dash; right of parking brake Express Van, Suburban; Tahoe 2 No lower edge dash; right of parking brake Silverado 2 No lower edge dash; above parking brake Tracker SUV (also as a Geo) 3 No lower edge dash; right of parking brake pedal lower edge dash; right of steering column NOTE: Many Chevrolet trucks come with a pull-off cover. This cover is not attached. It may be missing on some vehicles if discarded. 1996 Cirrus, Concorde, LHS, New Yorker 3 No Town & Country Van 2 No below lower steering column cover; near park brake release cable handle Avenger 3 No lower right dash; next to console Caravan & Grand Caravan 2 No lower edge of dash, above parking brake pedal 2/5 No left of connector location area Dakota Truck & Durango SUV 2 No lower edge dash; left of hood release Intrepid 2 No lower edge dash; between parking brake & pedal Ram Van & Wagon 1 No lower edge dash; above brake pedal Spirit 2 No Stealth 3 No 1996 Colt Vista Wagon lower right edge of dash; nest to console A-67 Appendix A Manufacturer Year Eagle 1996 Ferrari 1996 Ford Cars & SUVs 1996 Ford Trucks Geo GMC Trucks 1996 1996 1996 NOTE: A-68 Model Location (See Figure A-10) Cover Comments Summit Sedan 2 No Summit Wagon 2/5 No left of location area Vision 1 No lower center dash; left of steering column All models 3 No up high, under dash; may be close to steering column Aerostar Van 3 Yes Aspire, Probe 3 No Contour 2 No Crown Victoria 3 No Escort & Escort ZX2 2 No Explorer SUV 2 Yes lower edge dash; left of steering column Mustang 3 No rear of lower dash; next to transmission tunnel; faces left Taurus 2 No lower edge dash; left of steering column Thunderbird 7 Yes Windstar 1 No Bronco 7 Yes All Econoline Vans & Club Wagon 3 Yes All F Series Trucks 3 No Ranger 1 No bottom edge dash; right of steering column lower edge dash; below steering column lower edge dash; left of hood release Metro, Prizm 1 No Tracker SUV 3 No Denali, Denali XL, Envoy, Rally, Vandura, Savana Van 1 No GMC G-Series Van 3 No Safari Van 2 No lower edge dash; below parking brake release Sierra, Suburban, Yukon 2 No lower edge dash; above parking brake Jimmy, Sonoma 2 No lower edge dash; right of parking brake Many GMC trucks come with a pull-off cover. This cover is not attached. It may be missing on some vehicles if discarded. Appendix A Manufacturer Year Model Hummer 1996 All models Hyundai 1996 Infiniti Isuzu Jaguar Jeep Kia Lamborghini 1996 Location (See Figure A-10) 2 Cover Comments No Some vehicles may have a connector cover in coin box Accent 6 No Elantra 2 No Sonata 3 No rear lower edge dash; next to console G-20* 2 No This vehicle has only a Nissan dedicated connector behind fuse block lid I-30* 2 No OBD II connector faces down, below fuse box J-30* 1 No OBD II connector concealed high up under dash; reach up to access Q-45 * 2 No OBD II connector faces down NOTE: Vehicles with an * have two types of connectors: 1)Nissan-dedicated connector which works only with a Nissan scan tool or Nissan-dedicated laptop PC. 2)Standard 16-pin OBD II connector which may be used with any generic scan tool. 1996 Hombre Truck 2 No lower edge dash; right of parking brake Oasis Van 7 No under passenger dash; next to console Rodeo 2 No under dash at left; connector faces down Trooper 2 Yes behind unmarked panel over hood release XJ-8, XJR, Super V8, XJ Sport, Van den Plas 3 No XJS 2 No Cherokee 2 No rear of lower left edge dash Grand Cherokee, Wrangler 2 No rear of lower left edge dash All Vehicles 3 No lower dash above accelerator pedal Sportage SUV 3 No All Models 3 No 1996 1996 1996 1996 A-69 Appendix A Location Manufacturer Year Model Land Rover 1996 Discover & Discovery II 3 No lower right corner dash; next to console Range Rover 7 No lower left passenger dash; next to console ES-300 2 Yes remove fuse box cover; plug is above fuse panel GS-300 & 400 1 No lower edge dash; next to steering column LS-400 2 Yes above parking brake LX-450 SUV 2 Yes lower right edge dash; next to fuse box panel RX-300 1 Yes lower edge dash; next to steering column SC-300, SC-400 2 Yes lower left side of dash MVP 1 No MX-5 (Miata),MX-3,MX-6, 626, Millenia 3 No Protege 2 No Lexus Mazda 1996 1996 (See Figure A-10) Cover Mercedes Benz 1996 All Vehicles 2 Yes Mitsubishi 1996 3000GT, Stealth 3 No Avenger, Sebring 3 No Diamante 2 No Eclipse 3 No Expo, Summit Wagon 2 No Galant 3 No Mirage 2 No Montero 2 No Montero Sp, Nativa 3 No Truck(2WD) 2 No Nissan 1996 Infiniti (All) 2 No Nissan (All) 2 No Porsche 1996 All Vehicles 6 Yes Rolls Royce 1996 Silver Spur, Silver Dawn, Park Ward, Limousine 9 Yes A-70 Comments under passenger dash Appendix A Manufacturer Year Rover 1996 Model Location (See Figure A-10) Cover Discovery 3 No Range Rover 9 No Saab 1996 900, 9000 1 Yes Subaru 1996 Legacy, Impreza, Forester 2 Yes SVX 3 Yes 1 No Comments under passenger dash Suzuki 1996 Esteem, Side Kick, Side Kick Sport, Swift, GM metro, X-90 Toyota 1996 4-Runner (2/4 WD) 3 No Avalon 2 Yes behind fuse cover Camry 2 Yes behind coin box Celica 3 Yes Corolla 2 No ES 300 3 Yes GS 300 1 No Land Cruiser 2 Yes LS400 2 Yes Paseo 2 Yes behind fuse cover Previa (2/4 WD) 6 Yes top instrumt panel Prizm 1 No RAV4 (2/4 WD) 3 No SC 300/400 2 Yes Supra 2 Yes T100 (2/4 WD) 3 No Tacoma (2/4 WD) 3 No Tercel 2 Yes S80 2 Yes All Other Vehicles 9 Yes Cabrio, Golf, Jetta 7 Yes Euro Van, Passat 4 Yes Volvo Volkswagen 1999 1996 behind fuse cover behind fuse cover hand brake area A-71 Appendix A A-72 ZEEEA136A Rev B ©2003 Snap-on Tools Company Printed in U.S.A. (12/03)


![VERUS PRO User Manual [3980kb PDF File] - Snap](http://vs1.manualzilla.com/store/data/005690474_1-9ff68923f14d7698ce72469cabae3990-150x150.png)