1
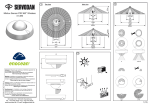
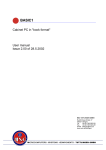
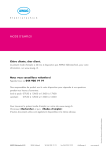
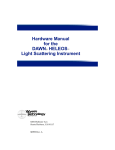
User guide
360° presence detector,
1-10 V, 41-351
GB
Off delay:
Cut-off time before the presence detector switches off the light.
Set using Time potentiometer or Time 1 on IR Remote.
Orientation lighting:
When there is insufficient daylight and the off delay runs out, the
lighting is dimmed to the “Level 2” setting, and after the time set
with “Time 2”, the lighting switches off completely. Unless the
PIR has registered activity.
Technical data
Input:
Supply voltage......................................230 V AC 50 Hz +/- 10%
Power consumption (standby)..............0.2 W (without light fittings).
øL1 ........................................................L
øN .........................................................N
Operation
The 360° 1-10 V presence detector consists of an integral
unit featuring control of 1 × 1-10 V output, PIR, light sensor
and built-in IR receiver. All external units such as pushbutton
power switches and light fittings are connected directly to the
presence detector which is fitted directly to the ceiling.
The presence detector can be installed and operated using
the factory settings. However, for optimal light regulation, it is
recommended that you adjust the presence detector settings
to the conditions of the premises (light requirements).
This is done via the IR Remote, model 41-922 (accessory).
Installation
Installation:
The 360° 1-10 V presence detector is designed for direct ceiling
installation.
1. The base is fitted to the ceiling and connected as shown in
connection diagram Fig.4.
2. Push the detector component into the terminal block in the
base and fit the securing screw (Combislot).
3. Set and test the 360° 1-10 V presence detector as shown in Fig. 5.
4. Fit the detector cover.
Pushbutton:
øL1 ........................................................
ø ........................................................
Output:
Relay.....................................................NO, μ 10 A
Load:
Incandescent lamps .........................2300 W
Fluorescent tubes, not compensated ..1200 VA
Halogen incandescent lamps ...........2300 W
Energy-saving bulbs .........................58 x (18 W)
Max. compensation capacity ..............140 μF
Max. starting peak ...............................165 A/20 m sec.
Performance:
Ch 1 ......................................................1-10 V/max. 10 mA
Time range ...........................................1–60 mins
Setpoint ...............................................50 – 1500 lux
Orientation lighting level .......................5–100%
Orientation lighting Time ......................0–60 mins, infinite
Enclosure class ....................................IP 20
Insulation class .....................................CL. I
Ambient temp. ......................................-5°C to +50°C
Approval:
CE in accordance with .........................EN 60669-2-1
Accessories
See connection diagram, Fig. 7.
1-10 V output and pushbutton must be installed as a highvoltage installation.
Glossary
App. Man:
Application manual, manual on and off via pushbutton switch,
automatic off via presence detector, or light level.
App. Auto:
Application automatic, automatic on and off via presence
detector, light level dependent.
Setpoint:
Desired light level (lux) at table height.
Set using Lux potentiometer or Set 1 on IR Remote.
IR Remote.............................................Model 41-922
IR User Remote ....................................Model 77-921
GB
Settings
Factory settings:
Application ................................App. Man
Setpoint .....................................300 lux
Setpoint hysteresis ....................50%
Orientation lighting level ............5%
Orientation lighting time ............1 min.
Off delay (Time) .........................10 mins
LED ...........................................On
Setting of Lux and Time ............Via IR Remote
LED indicators:
Red LED flashes when activity is detected by the presence detector.
Green LED flashes when the pushbutton power switch or the IR
Remote is activated.
Blue LED is lit when test mode is selected.
Blue LED flashes when setting the setpoint, indicating overillumination.
Manual dimming using the pushbutton:
When the dim function has been activated, the lighting must be
switched off so that it can be switched on, and thus function with
daylight control (according to built-in light sensor).
Function App. Man
Function App. Auto
You must use an IR Remote (accessory) to select App. Auto.
Function description:
Ceiling lighting
When a presence detector registers activity and light is required,
the lighting comes on automatically.
As long as the presence detector registers activity, the lighting
will be daylight-controlled according to the preset parameters.
As daylight increases, lighting in the room starts to dim until
the preset minimum light level is achieved. If there is sufficient
incident daylight, the lighting switches off.
The light switches off automatically after a preset period, when
the presence detector does not register activity within the
detection area.
Manual switching off of lighting
If a pushbutton is used, a short press will switch off the light.
After a blackout period of approx. 10 secs the PIR is ready again
for auto switch on.
Dimming of lighting
A long press of the pushbutton enables the lighting to be
adjusted up/down.
Manual override using IR Remote.
Manual, Factory settings
Function description:
Ceiling lighting
Daylight control is switched on and off via the pushbutton.
The light can be switched on when light is needed according to
the preset parameter.
As long as the presence detector registers activity, the lighting
will be adjusted according to the preset parameters.
As daylight increases, lighting in the room starts to dim until the
preset minimum light level is achieved.
If there is sufficient incident daylight, the lighting switches off.
The light switches off automatically after a preset period, when
the presence detector does not register activity within the
detection area.
Dimming of lighting
A long press of the pushbutton enables the lighting to be
adjusted up/down.
Manual override using IR Remote.
Remote control
Setting/Functions via the IR Remote (accessory):
The IR Remote provides options for manual on/off and dim, for
selecting another application, carrying out a test and also other
parameters.
On and Off:
The lighting is manually switched on and off at the same time
regardless of light level.
Dim up and Dim down:
The lighting is manually adjusted at the same time.
Automatic:
Control functions according to the application selected.
Test:
Walk test, testing detection area by activating built-in presence
detector; the light sensor does not work.
Automatically reverts to operating mode after 5 minutes.
GB
Parameters:
Select between Man and Auto applications.
Reset parameters to factory settings.
Setting desired light level via Set 1 (50–1500 lux in steps of 50
lux).
Setting of off delay via Time 1 (1–60 mins in steps of 1 min. and
10 mins)
Switch off LED indication LED On/Off.
For further information about the IR Remote see the installation
and user manual for IR Remote model 41-922.
If the 360° 1-10 V presence detector is in “edit mode” (unlock),
then the IR buttons On and Off do not work.
Operation & maintenance
Contact a qualified electrician in the event of a fault or
breakdown.
59
127
2,5 m
Fig. 1
D
A
7m2
B
19m2
C
110m2
D
300m2
0,8 m
A B C
ø2
7m2
ø3,4
9m2
ø8
50m2
ø13,5
140m2
ø3
ø5
ø 12
ø 20
Fig. 2
Fig. 3
105 mm
60 mm
45°
Fig. 4
Fig. 5
41-351 Sensor 360° 1-10 V
ON
OFF
1-10 V
L1’
L1
1 2 3 4
-
+
N
Factory settings
12 34
LUX
TIME
Lux + Time via potmeter.
Lux + Time IR via IR remote
L1
1
15min
N
Min. sensitivity
Low sensitivity
Elect. ballast
Light Dimmer
Min
LUX
Max
1min
N
TIME
30min
High sensitivity
Max. sensitivity
L
3 4
DC
-
+
Fig. 7
Fig. 6
41-922
Lock/
unlock
App.
Auto
App.
Man
LED
On/Off
Lock/
unlock
App.
Auto
App.
Man
LED
On/Off
Test
On
Off
Reset
Test
On
Off
Reset
Dim
down
Dim
up
Time 1
-1
Time 1
+1
Fact. 2
-5
Fact. 2
+5
Time 1
-10
Time 1
+10
Tilbehør
Accessory
Zubehör
Accessoire
1-10 V
Time 2
+1
Time 2
-10
Time 2
+10
Learn
in
Clear
Fade
-
Fade
+
Level 1
-
Level 1
+
Level 2
-
Level 2
+
L
L
L
Zone 1
Time 2
-1
Zone 1
Time
Pushbutton
Set 1
+50
Zone 1
Set 1
-50
Dim
down
L
L
L
L
L
Zone 1
Zone 1
L
Zone 1
Automatic
Zone 1
Automatic
Zone 1
Dim
up
Zone 1
77-921
Advarsel: Indbygning og montering af elektriske apparater må kun foretages af aut. elinstallatør. Ved fejl eller driftforstyrelser kontakt den aut. elinstallatør.
! Ret til ændringer forbeholdes !
Warning: Installation and assembly of electrical equipment must be carried out by qualified electricians. Contact a qualified electrician in the event of fault or breakdown. !
Reserving the right to make changes !
Achtung: Einbau und Montage elektrischer Geräte dürfen nur durch Elektrofachkräfte erfolgen. Wenden Sie sich bei Störungen bzw. Ausfall an einen Elektrofachkraft. !
Änderungen vorbehalten !
Avertissement: L’installation et le montage d’appareils électriques doivent exclusivement être exécutés par un électricien agréé. En cas de défaut ou de perturbation du
fonctionnement, contacter un installateur électricien agréé. ! Sous réserve de modifications !