Transcript
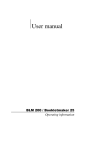
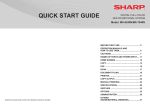
OPERATING INSTRUCTIONS
FINISHING- AUTOMATIC STAPLING
MAGAZINE SORT &
SADDLE-STITCHING
MODE (BOOKLET MODE)
1. Place paper in the cassette(s). When using this
mode in bypass copying, be sure to specify the
paper size.
1. Place paper in the cassette(s).
2. Place the original(s).
2. Set the paper size.
3. Press the NON-SORT, NON-STAPLE key.
3. Place the original(s).
4. Press the FRONT STAPLE or
When placing them in the reversing automatic
DOUBLE STAPLE
document feeder (optional), set them by referring
or REAR STAPLE key.
to the order of pages in the illustrations below.
5. Press the START key.
When placing them on the glass, place the first
page of the originals first if MAGAZINE SORT or
1-SIDED ORIGINALS TO 2-SIDED COPIES
CHANGING TONER CARTRIDGE
2.
1.
5. Press the
1 > 1 SIMPLEX
3.
6. Press the START key.
5. Press the START key.
4.
5. Pull out the seal in the direction of the
arrow.
6. Insert the new toner cartridge straight until
5.
or
Select other copy modes as required.
Select other copy modes as required.
4.
MAGAZINE SORT
SADDLE-STITICH key.
key.
4. Shake the new toner cartridge well to
CHECKING THE METER READING
3. On the basic screen, press the
4. Press the 1 > 2 DUPLEX key or 2 > 2 DUPLEX
supporting it.
7. Close the front cover straight until it stops.
4.Press the NON-SORT, NON-STAPLE key.
2. Place the original(s)
than halfway, pull it straight out while
it stops.
then 8-5, (6-7).
the paper size.
pull out the colour toner cartridge to be
loosen the toner inside.
them in the order of pages 12-1, (2-11), 10-3, (4-9),
specify
2. Put your fingers in the groove and slowly
3. When the cartridge is pulled out more
selected. If SADDLE-STITCH is selected, set
When using this mode in bypass copying be sure to
1. Open the front cover.
replaced.
MAGAZINE SORT & SADDLE-STITCH is
1. Place paper in the cassette(s)
6.
BLACK & WHITE/COLOUR COPY MODE SELECTION
SCAN TO FILE OR USB
1. Place the original(s). For instructions about placing
This function allows you to select the Full Colour
the originals, see Operator’s Manuals for Basic
mode, the Black mode and the Auto Colour mode.
Function.
1. Press the FULL COLOUR , BLACK or
2. Press the SCAN button on the control panel to
enter the scan menu.
The basic scan menu is displayed.
3. Press the SCAN TO FILE OR USB button.
1. Press the User Functions (123) key.
The SCAN TO FILE OR USB screen is displayed.
2. Press the Print Out Total Counter Icon.
*4. If you want to store the scanned data in the USB
3. Collect the printed counter report from the exit tray.
media, connect the USB media to the equipment, press
the MFP LOCAL
button to release and then press
AUTO COLOUR button.
-
FULL COLOUR
: Regardless of colour, all
originals are colour copied.
- BLACK : Regardless of colour, all originals are
copied in black & white (default setting).
-
AUTO COLOUR
: The type of original is
automatically distinguished. Coloured originals are
colour-copied and black & white originals are
copied in black & white.
the
USB MEDIA button. Button is selected (displayed as
reversed button).
5. Press the ENTER button. The screen returns to the
basic scan menu. Press the SCAN! button.
*TIP: If the USB media is not connected to the
For Toshiba Service and Supplies call:
equipment, the USB MEDIA button cannot be selected.
TIP When using the “AUTO COLOUR” mode, pay attention to the following
points.
- In the “AUTO COLOUR” mode, if the colour area is too small, the colours
are close to black or they are too light, colour originals may be copied in
black & white. In this case, select the “FULL COLOUR” mode. Yellowish
originals or originals with a coloured background may be automatically
copied in colour even though they are black & white. To be sure to make the
copies in the desired mode, select “FULL COLOUR” or “BLACK”.