1
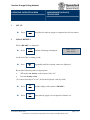
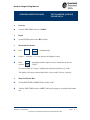
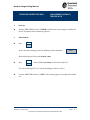
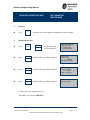
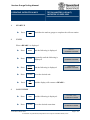
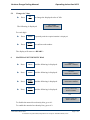
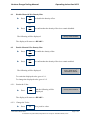
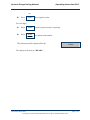
Nuclear Gauge Testing Manual Section 4 Operating Instructions Testing - Asphalt THIS PAGE IS INTENTIONALLY BLANK Nuclear Gauge Testing Manual OPERATING INSTRUCTION N301 1 SET UP 2 TEST PARAMETERS (ASPHALT) TROXLER 3440 Press ON and allow the nuclear gauge to complete the self-test routine. UNITS When <READY> is displayed: Press Press SHIFT X SPECIAL and the following is displayed: 9 Press Press YES EXIT SPECIAL repeatedly until the following is displayed: and the following is displayed: 9 Press DEPTH and the following is displayed: SPECIAL FUNCTION YES - Next menu 1 - STAT TEST 2 - DRIFT TEST YES – Next menu 9 – SET UNITS 10 – BAND RATE 11 – COMM PROTOCOL UNITS in XXX Press 1 – PCF 2 – METRIC ENTER – No change UNITS IN METRIC 2 The display will return to <READY>. Issue Date: March 2013 © The State of Queensland, Department of Transport and Main Roads, 2013 Page 1 of 9 Nuclear Gauge Testing Manual 3 Operating Instruction N301 COUNT TIME Press Press TIME - DEPTH and the following is displayed: and the following will be displayed: 2 TIME: XX 1 – 15 sec 2 – 1 min 3 – 4 min -COUNT TIME1 min The display will return to <READY>. 4 ASPHALT MODE Press Press SHIFT X MODE and the following is displayed: 8 Press DEPTH and the following is displayed: ASPHALT: XXXX Select: 1 – % MA 2 – 100% - % MA and the following is displayed: ASPHALT: % MA Do you want to enable % voids also? 2 Press COUNT 1 Press YES EXIT MODE: XXXX Select: 1 – SOIL 2 – ASPHALT (CE to exit) and the following is displayed: ASPHALT: % MA % VOIDS and the following is displayed: ASPHALT: % MA OR NO/CE C/CE Issue Date: March 2013 © The State of Queensland, Department of Transport and Main Roads, 2013 Page 2 of 9 Nuclear Gauge Testing Manual Operating Instruction N301 The display will return to <READY>. Press Press SHIFT X MODE and the following is displayed: 8 Press DEPTH and the following is displayed: ASPHALT: XXXX Select: 1 – % MA 2 – 100% - % MA and the following is displayed: ASPHALT: 100% MA Do you want to enable % voids? 2 Press DEPTH 2 Press YES EXIT MODE: XXXX Select: 1 – SOIL 2 – ASPHALT (CE to exit) and the following is displayed: ASPHALT: 100% MA % VOIDS and the following is displayed: ASPHALT: 100% MA OR NO/CE C/CE The display will return to <READY>. Issue Date: March 2013 © The State of Queensland, Department of Transport and Main Roads, 2013 Page 3 of 9 Nuclear Gauge Testing Manual 5 Operating Instruction N301 MAXIMUM DENSITY Press PROCTOR/ MARSHALL and the following is displayed: + MA = XXXX kg/m3 PR = XXXX VD = XXXX Want to change? To retain value, go to 5.1. To change value, go to 5.2. 5.1 Retain the Value Press NO/CE C/CE to retain the displayed value of MA. The display will return to <READY>. Go to 6. 5.2 Change the Value Press YES to change the displayed value of MA. EXIT And the following will be displayed: Press COUNT and the following is displayed: 1 Select: 1 – MA 2 – PR 3 – Voidless Select source of Marshall value: 1 – Stored Value 2 – New Value To enter a new value, go to 5.3. To select a stored value, go to 5.4. Issue Date: March 2013 © The State of Queensland, Department of Transport and Main Roads, 2013 Page 4 of 9 Nuclear Gauge Testing Manual 5.3 Operating Instruction N301 Enter a New Value DEPTH Press and the following is displayed: 2 Marshall: XXXX kg/m3 Press ENTER when completed Use the numbered keys to enter the required value to the nearest 1kg/m3. Press START/ ENTER and the following is displayed: = MA = XXXX kg/m3 Do you want to save this value for later use? If the value is not to be saved: NO/CE Press C/CE and the display will return to <READY>. Go to 6. To save the displayed value: YES Select Marshall Memory Cell: 1:XX2:XX 3:XX4:XX Press Press the numbered key (1, 2, 3 or 4) to select a memory cell in which to store the value. EXIT and the following is displayed: And the following will be displayed: Marshall XXXX kg/m3 ENABLED! stored in cell X The display will return to <READY>. Go to 6. Issue Date: March 2013 © The State of Queensland, Department of Transport and Main Roads, 2013 Page 5 of 9 Nuclear Gauge Testing Manual 5.4 Operating Instruction N301 Select a Stored Value Press COUNTS and the following is displayed: 1 Select desired Marshall: 1:XX2:XX 3:XX4:XX Press the numbered key (1, 2, 3 or 4) to select the required value: And the following will be displayed: Marshall XXXX kg/m3 ENABLED! The display will return to <READY>. 6 VOIDLESS DENSITY Press PROCTOR/ MARSHALL and the following is displayed: + Press Press YES EXIT CALC 3 and the following is displayed: and the following is displayed: MA = XXXX kg/m3 PR = XXXX VD = XXXX Want to change? SELECT: 1 – MA 2 – PR 3 - VOIDLESS Voidless Density XXXX kg/m3 Press enter when complete Use the numbered keys to enter the required value to the nearest 1kg/m3. Press START/ Issue Date: March 2013 © The State of Queensland, Department of Transport and Main Roads, 2013 Page 6 of 9 Nuclear Gauge Testing Manual Operating Instruction N301 ENTER = And the display will return to <READY>. 7 MATERIAL WET DENSITY BIAS Press OFFSET -OFFSET- Select: 1 – Dens. –ZZZ2 – Moist –ZZZ3 – Trench –ZZZ- and following is displayed: MR Press COUNTS 1 The following will be displayed: Density Offset DISABLED Do you want to ENABLE? OR Density Offset ENABLED Do you want to DISABLE? To disable the material wet density bias, go to 7.1. To enable the material wet density bias, go to 7.2. 7.1 Disable Material Wet Density Bias Press NO/CE C/CE to confirm that the density offset is to remain disabled And the following will be displayed briefly: YES OR EXIT to disable the density offset. Density Offset DISABLED The display will return to <READY>. Issue Date: March 2013 © The State of Queensland, Department of Transport and Main Roads, 2013 Page 7 of 9 Nuclear Gauge Testing Manual 7.2 Operating Instruction N301 Enable Material Wet Density Bias Press YES EXIT to enable the density offset NO/CE OR C/CE to confirm that the density offset is to remain enabled. -Wet DensityOffset XXXX kg/m3 Want to change? The following will be displayed: To retain the value, go to 7.2.1. To change the value, go to 7.2.2. 7.2.1 Retain the Value Press NO/CE C/CE to retain the displayed value of Wet Density Offset. Density Offset ENABLED! The following will be displayed briefly: The display will return to <READY>. 7.2.2 Change the Value Press Press YES EXIT COUNT 1 and the following is displayed: OR DEPTH 2 and the following is displayed: - WD Offset Select: + or 1=+ 2=- WD Offset Press enter when completed Issue Date: March 2013 © The State of Queensland, Department of Transport and Main Roads, 2013 Page 8 of 9 Nuclear Gauge Testing Manual Operating Instruction N301 Use the numbered keys to enter the required value to the nearest 1kg/m3. Press START/ ENTER = The following will be displayed: Density Offset ENABLED! The display will return to <READY>. Issue Date: March 2013 © The State of Queensland, Department of Transport and Main Roads, 2013 Page 9 of 9 THIS PAGE IS INTENTIONALLY BLANK Nuclear Gauge Testing Manual OPERATING INSTRUCTION N302 1 SET UP 2 MEASUREMENT (ASPHALT) TROXLER 3440 Press ON and allow the nuclear gauge to complete the self-test routine. MEASUREMENT When <READY> is displayed: Press START/ ENTER = The following will be displayed: Depth: 0 mm MA: XXX kg/m3 Time: XX sec. OR (asphalt density bias disabled) Depth: 0 mm MA: XXX kg/m3 (WD Offset) Time: XX sec. (asphalt density bias enabled) At the end of the counting period, the following will be displayed: % MA = XX.X % WD = XXXX kg/m3 M = X.X % M = X.X % VOIDS = XXX % (asphalt density bias disabled) OR % MA = XX.X % WD = XXXX kg/m3 (WD Offset) ENTER – More Info (asphalt density bias enabled) Issue Date: March 2013 © The State of Queensland, Department of Transport and Main Roads, 2013 Page 1 of 2 Nuclear Gauge Testing Manual Operating Instruction N302 If more information is required: Press START/ ENTER = M = XX And following will be displayed: %M = XX %VOIDS = XX Record WD as the wet density. SHIFT Press COUNTS 1 X And following will be displayed: Dens ct. = XXXX Moist ct. = XX SHIFT/RECALL to see Readings Record Dens Ct as the density count. Press NO/CE and the display will return to <READY>. C/CE Press OFF if the nuclear gauge is not required for further use. Issue Date: March 2013 © The State of Queensland, Department of Transport and Main Roads, 2013 Page 2 of 2 Nuclear Gauge Testing Manual OPERATING INSTRUCTION N303 1 SET UP 2 TEST PARAMETERS (ASPHALT) TROXLER 3430 ON YES Press and allow the nuclear gauge to complete the self-test routine. UNITS When <READY> is displayed 3 Press SPECIAL and the following is displayed: - RECALL ( or ENTER) Press repeatedly until the following is displayed: - SET UNITS ( or ENTER) Press START ENTER and the following is displayed: - UNITS ( or ENTER) Press Press ON YES and the display will return to <READY>. to set the desired unit COUNT TIME Press TIME and the following is displayed: Press to set the desired count time TIME: X min ( or ENTER) Issue Date: March 2013 © The State of Queensland, Department of Transport and Main Roads, 2013 Page 1 of 6 Nuclear Gauge Testing Manual 4 5 Press ON YES Operating Instruction N303 and the display will return to <READY>. DEPTH Press Press Press ON YES DEPTH and the following is displayed: Depth: XX mm ( or change) repeatedly until the required test depth is displayed: and the display will return to <READY>. ASPHALT MODE AND MAXIMUM DENSITY Press MA PR and the following is displayed: ZZ: XXXX () Change ZZ value? Press until “MA” is displayed. MA: XXXX () Change MA value? To retain the displayed value go to 5.1 To change the displayed value go to 5.2. 5.1 Retain the value Press OFF NO to retain the displayed value. The display will return to <READY>. Go to 6. Issue Date: March 2013 © The State of Queensland, Department of Transport and Main Roads, 2013 Page 2 of 6 Nuclear Gauge Testing Manual 5.2 Operating Instruction N303 Change the value Press ON YES to change the display value of MA The following will be displayed: MA: XXXX ( or ENTER) For each digit: Press Press START ENTER repeatedly until the required number is displayed. to confirm each number. The display will return to <READY>. 6 ASPHALT DENSITY BIAS Press SPECIAL and the following is displayed: - RECALL ( or ENTER) Press repeatedly until the following is displayed: - OFFSET ( or ENTER) Press START ENTER and the following is displayed: Offset: Density ( or enter) Press START ENTER Issue Date: March 2013 © The State of Queensland, Department of Transport and Main Roads, 2013 Page 3 of 6 Nuclear Gauge Testing Manual Operating Instruction N303 The following will be displayed: Dens. Offset OFF Want to enable? OR Dens. Offset ON Want to disable? To disable the asphalt density bias, go to 6.1. To enable the asphalt density bias, go to 6.2. 6.1 Disable Asphalt Density Bias Press OFF NO to confirm that the density offset is to remain disabled OR ON YES The following will be displayed briefly: to disable the density offset. Dens Offset OFF The display will return to <READY>. Go to 7. 6.2 Enable Asphalt Density Bias Press ON YES to disable the density offset. And the following will be displayed: OR OFF NO to confirm that the density offset is to remain disabled. D Off = XXXX kg/ m ( or ENTER) 3 To retain the display go to 6.2.1. To change the display go to 6.2.2. Issue Date: March 2013 © The State of Queensland, Department of Transport and Main Roads, 2013 Page 4 of 6 Nuclear Gauge Testing Manual 6.2.1 Operating Instruction N303 Retain the Value Press START ENTER The following will be displayed: Dens. Offset ON The display will return to <READY>. Go to 7. 6.2.2 Change the Value Press to enter a positive asphalt density bias until the required number is displayed. OR to enter a negative asphalt density bias. For each digit: Press Press START ENTER to confirm each number. The following will be displayed briefly: Dens. Offset ON The display will return to <READY>. 7 ASPHALT VOIDLESS DENSITY Press SPECIAL and the following is displayed: - RECALL ( or ENTER) Press repeatedly until the following is displayed: - VOIDLESS DENS ( or ENTER) Issue Date: March 2013 © The State of Queensland, Department of Transport and Main Roads, 2013 Page 5 of 6 Nuclear Gauge Testing Manual Press START ENTER Operating Instruction N303 and the following is displayed: VD = XXXX ( or enter) For each digit: Press Press START ENTER until the required number is displayed. to confirm each number. The display will return to <READY>. Issue Date: March 2013 © The State of Queensland, Department of Transport and Main Roads, 2013 Page 6 of 6 Nuclear Gauge Testing Manual OPERATING INSTRUCTION N304 1 SET UP 2 MEASUREMENT (ASPHALT) TROXLER 3430 Press ON YES and allow the nuclear gauge to complete the self-test routine. MEASUREMENT When <READY> is displayed Press START ENTER and the following is displayed: Depth: XX mm Time: XX sec At the end of the counting period: Press repeatedly until the required values are displayed. Record the following values as appropriate: WD as the wet density to the nearest 0.001 t/m3. D as the density count. (To convert from kg/m3 to t/m3, divide the displayed value by 1000.) Press ON YES and the display will return to <READY>. Press OFF NO if the nuclear gauge is not required for further use. Issue Date: March 2013 © The State of Queensland, Department of Transport and Main Roads, 2013 Page 1 of 1 THIS PAGE IS INTENTIONALLY BLANK Nuclear Gauge Testing Manual OPERATING INSTRUCTION N305 1. TEST PARAMETERS (ASPHALT) TROXLER 3411B Start-up Turn the PWR/TIME switch to “NORM”. 2. Depth Set the DEPTH switch to the “BS” position. 3. Maximum Wet Density SET Press SHIFT M simultaneously. Set the +/- switch to – (i.e. set to decrease the displayed value). Hold or press SET M repeatedly until the required value is obtained to the nearest 1 kg/m3. (To convert from t/m3 to kg/m3, multiply the maximum dry density by 1000.) The display will return to normal mode after a few seconds if no key is pressed. 4. Material Moisture Bias Set the MOISTURE CORRECTION switches to “0”. Turn the PWR/TIME switch to “OFF” if the nuclear gauge is not required for further use. Issue Date: October 2003 © The State of Queensland, Department of Main Roads, 2003 Page 1 of 1 THIS PAGE IS INTENTIONALLY BLANK Nuclear Gauge Testing Manual OPERATING INSTRUCTION N306 MEASUREMENT (ASPHALT) TROXLER 3411B 1. Start-up X Turn the PWR/TIME switch to “NORM” and allow the nuclear gauge to stabilise for at least 20 minutes before commencing the test. 2. Measurement X Press STD MEA At the end of the counting period, the following will be displayed: XXXX Record the displayed value as the density count. %MAR X Press WD and record the wet density to the nearest 0.001 t/m3. (To convert from kg/m3 to t/m3, divide the displayed value by 1000.) X Turn the PWR/TIME switch to “OFF” if the nuclear gauge is not required for further use. Issue Date: October 2003 © The State of Queensland, Department of Main Roads, 2003 Page 1 of 1 THIS PAGE IS INTENTIONALLY BLANK Nuclear Gauge Testing Manual OPERATING INSTRUCTION N307 1. Start-up ON Press 2. TEST PARAMETERS TROXLER 4640B and allow the nuclear gauge to complete the self-test routine. Measurement Units Press SHIFT SPECIAL 9 x and the following will be displayed: and the following will be displayed: Units in ZZZ Press: 1 - US 2 - METRIC ENTER - no change and the following will be displayed: Density in kg/m3 Select: 1 - kg/m3 2 - g/cm3 Enter - no change STATUS Press Press 7 OFFSET 2 OFFSET Press 2 SPECIAL FUNCTION YES - next menu 1 - Surface Voids 2 - Recover Erase and the following will be displayed: UNITS - METRIC Density in g/cm3 (Units of g/cm3 are equivalent to t/m3.) The display will return to <READY>. Issue Date: October 2003 © The State of Queensland, Department of Main Roads, 2003 Page 1 of 7 Nuclear Gauge Testing Manual 3. Operating Instruction N307 Count Time Press TIME -Count TimeXX min. Do you want to change? and the following will be displayed: - Sel: Press YES and the following will be displayed: EXIT OFFSET Press and the following will be displayed: 2 1- 0.5 min. 2- 1 min. 3- 2 min. 4- 3 min. -Count Time1 minutes! The display will return to <READY>. 4. Layer Thickness Press THICK and the following will be displayed: MR Layer Thickness: X.XX cm. Input and Press ENTER Use the numbered keys to enter the layer thickness to the nearest 0.1 cm (The minimum value that can be set is 2.54 cm). Press START/ ENTER = and the following will be displayed briefly: Layer Thickness: X.XX cm. The display will return to <READY>. Issue Date: October 2003 © The State of Queensland, Department of Main Roads, 2003 Page 2 of 7 Nuclear Gauge Testing Manual 5. Operating Instruction N307 Marshall and Maximum (Voidless) Density Press MA/ VOIDLESS and the following will be displayed: MA: X.XXX g/cm3 VD: X.XXX g/cm3 Do you want to change? If MA and VD values of "0.000 g/cm3" are displayed: Press NO/CE C/CE If values other than "0.000 g/cm3" are displayed: Press YES and the following will be displayed: MARSHALL X.XXX g/cm3 Input and Press ENTER and the following will be displayed: VOIDLESS DENSITY X.XXX g/cm3 Input and Press ENTER EXIT RECALL Press Press 0 START/ ENTER = RECALL Press Press 0 START/ ENTER and the display will return to <READY>. = Issue Date: October 2003 © The State of Queensland, Department of Main Roads, 2003 Page 3 of 7 Nuclear Gauge Testing Manual 6. Operating Instruction N307 Asphalt Density Bias Press OFFSET SHIFT x The following will be displayed: 2 Offset: DISABLED XX g/cm3 1 - Enable/Change 2 - Disable OR Offset: ENABLED XX g/cm3 1 - Enable/Change 2 - Disable To disable the asphalt density bias, go to Step 6.1. To enable the asphalt density bias, go to Step 6.2. 6.1 Disable Asphalt Density Bias Offset DISABLED! Press OFFSET 2 and the following will be displayed briefly: The display will return to <READY>. 6.2 Enable Asphalt Density Bias SP. CAL. Press 1 and the following will be displayed: Offset: ENABLED XX g/cm3 Want to change offset value? To retain the displayed value, go to Step 6.2.1. To change the displayed value, go to Step 6.2.2. Issue Date: October 2003 © The State of Queensland, Department of Main Roads, 2003 Page 4 of 7 Nuclear Gauge Testing Manual Operating Instruction N307 6.2.1 Retain the Value Press NO/CE C/CE The display will return to <READY>. 6.2.2 Change the Value Press YES and the following will be displayed: EXIT Select source of Offset 1 - keyboard 2 - stored value To enter a new value, go to Step 6.2.2.1. To select a stored value, go to Step 6.2.2.2. 6.2.2.1 Enter a New Value SP. CAL. Press Press and the following will be displayed: 1 SP. CAL. 1 to enter a positive bias The following will be displayed: OR Offset value: ---- g/cm3 Select 1=+ 2=- to enter a negative bias. OFFSET 2 Offset value: x ---- g/cm3 Input and press ENTER Use the numbered keys to enter the asphalt density bias to the nearest 0.001 g/cm3. Issue Date: October 2003 © The State of Queensland, Department of Main Roads, 2003 Page 5 of 7 Nuclear Gauge Testing Manual Press START/ ENTER Operating Instruction N307 and the following will be displayed: = Offset: ENABLED XXXXg/cm3 Do you want to save this value? Note: It is not necessary to save the displayed value to enable it. If the value is not to be saved: Press NO/CE and the display will return to <READY>. C/CE To save the displayed value: Press YES and the following will be displayed: EXIT Enter permanent Memory location to save Offset: (1 – 12)? - - Use the numbered keys to enter the memory location. Note: Record the memory location and bias to facilitate subsequent retrieval of saved values. Press START/ ENTER = and the following will be displayed briefly: Offset: ENABLED x XX g/cm3 Saved in memory location X The display will return to <READY>. 6.2.2.2 Select a Stored Value Press OFFSET 2 Issue Date: October 2003 and the following will be displayed: Offset: # X XX g/cm3 1 – to select 2 – for next © The State of Queensland, Department of Main Roads, 2003 Page 6 of 7 Nuclear Gauge Testing Manual Operating Instruction N307 OFFSET Press repeatedly until the required memory location and value is displayed. 2 SP. CAL. Press and the following will be displayed briefly: 1 Offset: ENABLED XX g/cm3 The display will return to <READY>. Press OFF Issue Date: October 2003 if the nuclear gauge is not required for further use. © The State of Queensland, Department of Main Roads, 2003 Page 7 of 7 THIS PAGE IS INTENTIONALLY BLANK Nuclear Gauge Testing Manual OPERATING INSTRUCTION N308 1. Start-up X Press 2. Measurement ON MEASUREMENT (ASPHALT) TROXLER 4640B and allow the nuclear gauge to complete the self-test routine. When <READY> is displayed: X Press START/ ENTER = MA: Thick: Avg: Time: The following will be displayed: XXXX g/cm3 XX.XX cm XX OR XX secs OR (asphalt density bias disabled) At the end of the counting period, the following will be displayed: MA: Thick: Avg: Time: XXXX g/cm3 XX.XX cm XX, Offset XX secs. (asphalt density bias enabled) Dens: XXXX kg/m3 %MA: XX.XX% 100-%MA: XXX.XX% %VOID: X.XX% Record Dens as the wet density to the nearest 0.001 t/m3. X Press RECALL SHIFT x 0 and the following will be displayed: Dens: %MA: %VOID: Cnts XXX.X kg/m3 XX.XX% X.XX% XXXX XXXX Record Cnts as the density count values for System 1 and System 2. Issue Date: October 2003 © The State of Queensland, Department of Main Roads, 2003 Page 1 of 2 Nuclear Gauge Testing Manual X Press NO/CE Operating Instruction N308 and the display will return to <READY>. C/CE X Press OFF Issue Date: October 2003 if the nuclear gauge is not required for further use. © The State of Queensland, Department of Main Roads, 2003 Page 2 of 2 Nuclear Gauge Testing Manual OPERATING INSTRUCTION N309 1. TEST PARAMETERS (ASPHALT) CPN MC3 Measurement Units Pre- March 1998 Nuclear Gauge: X Press UNIT STEP 1 X Press UNIT 1 AC simultaneously until the density and moisture display is obtained. until "gcc" is displayed. AC Post-March 1998 Nuclear Gauge: X Press UNIT STEP 1 X Press X Press X Press X Press ENTER simultaneously. AC until "gcc" is displayed. STEP ENTER until "Density" is displayed. CLEAR Issue Date: October 2003 © The State of Queensland, Department of Main Roads, 2003 Page 1 of 3 Nuclear Gauge Testing Manual 2. Count Time X Press Operating Instruction N309 TIME UNIT TIME TIME 0 1 0 0 BS X Press 3. Maximum Density X Press X Press AC BS BS ENTER %COMP • until "Md" is displayed. MAX and use the numbered keys to enter "0.0" 4 A X Press 4. Asphalt Density Bias X Press ENTER D BIAS 5 B To enter a positive bias: X Press ID + Issue Date: October 2003 and use the numbered keys to enter the asphalt density bias to the nearest 0.001 t/m3. © The State of Queensland, Department of Main Roads, 2003 Page 2 of 3 Nuclear Gauge Testing Manual X Press Operating Instruction N309 ENTER To enter a negative bias: X Press ID - X Press and use the numbered keys to enter the asphalt density bias to the nearest 0.001 t/m3. ENTER Issue Date: October 2003 © The State of Queensland, Department of Main Roads, 2003 Page 3 of 3 THIS PAGE IS INTENTIONALLY BLANK Nuclear Gauge Testing Manual OPERATING INSTRUCTION N310 1. Measurement X Press MEASUREMENT (ASPHALT) CPN MC3 START At the end of the counting period, the following will be displayed: RXXX DaXX gcc Dn Pr % Md Bi XXX XXX ETOX:XX h2o XXXX XXXX XXXX wet XXXX XXXX XXX XXXX T0X:XX dry XXXX XXXX XXXX XXXX XXX Record Dn wet as the wet density to the nearest 0.001 t/m3. Pre-March 1988 Nuclear Gauge: X Press STEP UNIT 1 simultaneously. AC Record Ct wet as the density count. X Press STEP UNIT 1 Issue Date: October 2003 simultaneously to return to the density display. AC © The State of Queensland, Department of Main Roads, 2003 Page 1 of 2 Nuclear Gauge Testing Manual Operating Instruction N310 Post-March 1988 Nuclear Gauge: X Press X Press X Press X Press STEP UNIT 1 simultaneously. AC STEP repeatedly until "Counts" is displayed. ENTER CLEAR Record Ct wet as the density count. X Press X Press X Press X Press STEP UNIT 1 simultaneously to return to the density display. AC STEP ENTER repeatedly until "Density" is displayed. CLEAR Issue Date: October 2003 © The State of Queensland, Department of Main Roads, 2003 Page 2 of 2 Nuclear Gauge Testing Manual OPERATING INSTRUCTION N311 TEST PARAMETERS (ASPHALT) CPN MC1DR; MC1DR-P * The MC1DR has no keypad facility to set parameters 1. Asphalt Mode X Press X Press X Press X Press X Press MAX ENTER STEP ▼ repeatedly until the following is displayed: Marshall Test? MAX ENTER STEP ▼ repeatedly until a value less than "1.000 g/cm3" is displayed (a value of "0.0 g/cm3" is preferred). START EXIT Issue Date: October 2003 © The State of Queensland, Department of Main Roads, 2003 Page 1 of 1 THIS PAGE IS INTENTIONALLY BLANK Nuclear Gauge Testing Manual OPERATING INSTRUCTION N312 1. Measurement X Press MEASUREMENT (ASPHALT) CPN MC1DR; MC1DR-P START At the end of the counting period, the following will be displayed: MC-1DR Wet Den Moi Den X.XX X.XX MC-1DR-P TotDen TotWater X.XX X.XX Record Wet Den or TotDen as the wet density to the nearest 0.001 t/m³. X Press STEP repeatedly until the following is displayed: Dcount Mcount XXXXX XXXX Record Dcount as the density count. After 30 seconds, the display will turn off. X Press STEP to restore the display. Issue Date: October 2003 © The State of Queensland, Department of Main Roads, 2003 Page 1 of 1 THIS PAGE IS INTENTIONALLY BLANK Nuclear Gauge Testing Manual OPERATING INSTRUCTION N313 1. Start-up X Press PWR TEST PARAMETERS (ASPHALT) HUMBOLDT 5001EZ and allow the nuclear gauge to complete the initialising routine. The following will be displayed: *DATA XX/XX/XX *SETUP XX:XX:XX *ENGINEERING DEPTH=SAF *SET UP 2 *SET MEASUREMENT MODES *SET TRNCH COR. *SET TARGETS X Press 2. Measurement Units X Press F1 and the following will be displayed: X Press F3 repeatedly until “SI” flashes. X Press MAIN MENU and the display will return to the main menu. F2 Issue Date: October 2003 and the following will be displayed: *SET DATE *SET TIME *UNITS = PCF/SI © The State of Queensland, Department of Main Roads, 2003 Page 1 of 3 Nuclear Gauge Testing Manual 3. Count Time X Press F2 F2 The following will be displayed: X Press 4. Asphalt Mode X Press 5. Depth X F1 Operating Instruction N313 MEAS STD TYPE DEPTH =FAST/NORM/SLOW =4MIN/16MIN =ASPH/SOIL/THIN =AUTO/MANUAL repeatedly until “NORM” flashes. F3 repeatedly until “ASPH” flashes. Press F4 repeatedly until “AUTO” flashes. X Press MAIN MENU and the display will return to the main menu. 6. Maximum Density MAXD = X Press MAX “D” Issue Date: October 2003 and the following will be displayed: XXXX *INCREASE *DECREASE © The State of Queensland, Department of Main Roads, 2003 Page 2 of 3 Nuclear Gauge Testing Manual Operating Instruction N313 X Press F4 to decrease the displayed value until a value of 900 kg/m3 is obtained. X Press MAIN MENU and the display will return to the main menu. 7. Asphalt Density Bias There is no facility to set an asphalt density bias using the keypad. 8. Material Moisture Bias X Press F2 and the following will be displayed: *SET UP 2 *SET MEASURE MODES *SET TRENCH COR. *SET TARGETS X Press F4 and the following will be displayed: MAXD = XXXX KVAL = X.XXX *INCREASE *DECREASE X Press F2 repeatedly until the KVAL value flashes. X Press F4 repeatedly until a displayed value of “0.0” is obtained. X Press MAIN MENU and the display will return to the main menu. X Press PWR if the nuclear gauge is not required for further use. Issue Date: October 2003 © The State of Queensland, Department of Main Roads, 2003 LWD= XXXX SPG=X.XXX Page 3 of 3 THIS PAGE IS INTENTIONALLY BLANK Nuclear Gauge Testing Manual OPERATING INSTRUCTION N314 1. Start-up X Press 2. Measurement X Press PWR MEAS MEASUREMENT (ASPHALT) HUMBOLDT 5001EZ and allow the nuclear gauge to complete the initialising routine. and the following will be displayed: At the end of the counting period, the following will be displayed: TAKING MEASUREMENT TIME REMAINING X:XX DC = X MC = X DEPTH=BAC MEASURE ASPH RESULTS WD = XXXX.X% %MA = XXX.X AC = X.X MAXD = XXXX *NEXTM DEPTH=BAC Record WD as the wet density to the nearest 0.001 t/m3. (To convert from kg/m3 to t/m3, divide the displayed value by 1000.) X Press F4 and the following will be displayed: DC = XXXX.X MC = XX.X VR = XX.XX *LAST DS = XXXX.X MS = XXX.X %AV = X.XX MDEPTH=BAC Record DC as the density count. X Press X Press MAIN MENU PWR and the display will return to the main menu. if the nuclear gauge is not required for further use. Issue Date: October 2003 © The State of Queensland, Department of Main Roads, 2003 Page 1 of 1 THIS PAGE IS INTENTIONALLY BLANK Nuclear Gauge Testing Manual OPERATING INSTRUCTION N315 1. Start-up X Press ON X Press CLEAR TEST PARAMETERS (ASPHALT) HUMBOLDT 5001C and allow the nuclear gauge to complete the initialising routine. SHIFT ENTER simultaneously until the following is displayed: SAF 0:0 2. Asphalt Mode X Press X Press 3. Maximum Density X Press 1 S/A repeatedly until “ASPH” is displayed. CLEAR ENTER LWR D MAX D and the following will be displayed: dE XXXX.X If a value of “0.0” is displayed: X Press CLEAR to retain the displayed value. ENTER Issue Date: October 2003 © The State of Queensland, Department of Main Roads, 2003 Page 1 of 2 Nuclear Gauge Testing Manual Operating Instruction N315 If a value other than “0.0” is displayed: X Press and hold X Press SHIFT CLEAR and use the numbered keys to enter a value of “0.0”. SAF repeatedly until the following is displayed: ENTER 0.0 4. Asphalt Density Bias There is no facility to enter an asphalt density bias using the keypad. X Press OFF Issue Date: October 2003 if the nuclear gauge is not required for further use. © The State of Queensland, Department of Main Roads, 2003 Page 2 of 2 Nuclear Gauge Testing Manual OPERATING INSTRUCTION N316 1. Start-up X Press 2. Measurement ON MEASUREMENT (ASPHALT) HUMBOLDT 5001C and allow the nuclear gauge to complete the initialising routine. XXX X Press CLEAR SHIFT ENTER simultaneously until the following is displayed: C:XXX TRENCH X Press NORM 0:0 and the following will be displayed: At the end of the counting period, the following will be displayed: 1.00 XXX XXXX Record the displayed value as the wet density to the nearest 0.001 t/m3. (To convert from kg/m3 to t/m3, divide the displayed value by 1000.) X Press 7 and record the displayed value as the density count. DC X Press CLEAR SHIFT ENTER X Press OFF simultaneously until the following is displayed: XXX 0:0 if the nuclear gauge is not required for further use. Issue Date: October 2003 © The State of Queensland, Department of Main Roads, 2003 Page 1 of 1 THIS PAGE IS INTENTIONALLY BLANK Nuclear Gauge Testing Manual OPERATING INSTRUCTION N317 1. Start-up X Press 2. Depth X Press 3. Maximum Density X Press and allow the nuclear gauge to complete the initialising routine. ON UP TEST PARAMETERS (ASPHALT) HUMBOLDT 5001P OR DOWN repeatedly until the required measurement depth is displayed. SET RD D If a value of “0.0” is displayed: SET X Press SHIFT RD D to retain the displayed value. If a value other than "0.0" is displayed: X Press and hold SHIFT X Press SHIFT and use the numbered keys to enter a value of "0.0". SET Issue Date: October 2003 RD D to retain the displayed value. © The State of Queensland, Department of Main Roads, 2003 Page 1 of 2 Nuclear Gauge Testing Manual 4. Operating Instruction N317 Asphalt Density Bias There is no facility to enter the asphalt density bias using the keypad. 5. Material Moisture Bias X Press SET RD K If a value of "0.0" is displayed: X Press SET SHIFT to retain the displayed value. RD K If a value other than "0.0" is displayed: X Press and hold SHIFT X Press SHIFT X Press OFF and use the numbered keys to enter a value of "0.0". SET Issue Date: October 2003 RD K to store the value. if the nuclear gauge is not required for further use. © The State of Queensland, Department of Main Roads, 2003 Page 2 of 2 Nuclear Gauge Testing Manual OPERATING INSTRUCTION N318 1. Start-up X Press 2. Measurement X Press ON NORM MEASUREMENT (ASPHALT) HUMBOLDT 5001P and allow the nuclear gauge to stabilise for at least ten minutes before commencing the test. C:XXX and the following will be displayed: XXXX.X XXX At the end of the counting period, the following will be displayed: XXXX.X Record the displayed value as the density count. X Press 0 WD and record the displayed value as the wet density to the nearest 0.01 t/m3. (To convert from kg/m3 to t/m3, divide the displayed value by 1000.) X Press OFF if the nuclear gauge is not required for further use. Issue Date: October 2003 © The State of Queensland, Department of Main Roads, 2003 Page 1 of 1 THIS PAGE IS INTENTIONALLY BLANK Nuclear Gauge Testing Manual OPERATING INSTRUCTION N319 1 START UP 2 TEST PARAMETERS (ASPHALT) INSTROTEK XPLORER 3500 ON YES Press and allow the nuclear gauge to complete the self-test routine. UNITS When <READY> is displayed 3 Press MENU and the following is displayed: - RECALL UP/DOWN or ENTER Press DOWN repeatedly until the following is displayed: - SET UNITS UP/DOWN or ENTER Press START ENTER and the following is displayed: Units: kg/m3 UP/DOWN or ENTER Press DOWN to set the desired unit. Press ON YES and the display will return to <READY>. and the following is displayed: Cnt Time: X min UP/DOWN or ENTER to set the desired count time. Cnt Time: 1 min UP/DOWN or ENTER COUNT TIME Press TIME Press DOWN Issue Date: March 2013 © The State of Queensland, Department of Transport and Main Roads, 2013 Page 1 of 5 Nuclear Gauge Testing Manual 4 5 Press ON YES Operating Instruction N319 and the display will return to <READY>. DEPTH DEPTH: XX mm UP/DOWN or ENTER Press DEPTH the following is displayed: Press DOWN repeatedly until the required test depth is displayed. Press ON YES and the display will return to <READY>. ASPHALT MODE AND MAXIMUM DENSITY Press MA PR and the following is displayed: ENTER selects PR DOWN selects MA Press DOWN and the following is displayed: MA: XXXXX Change value? To retain the displayed value, go to 5.1. To change the displayed value, go to 5.2. 5.1 Retain Value Press OFF NO to retain the displayed value. The display will return to <READY>. Go to 6. Issue Date: March 2013 © The State of Queensland, Department of Transport and Main Roads, 2013 Page 2 of 5 Nuclear Gauge Testing Manual 5.2 Operating Instruction N319 Change the Value Press ON YES to change the displayed value of MA. The following is displayed: MA: XXXXX UP/DOWN or ENTER For each digit: Press DOWN repeatedly until the required number is displayed. Press START ENTER to confirm each number. The display will return to <READY>. 6 MATERIAL WET DENSITY BIAS Press MENU and the following is displayed: - RECALL UP/DOWN or ENTER Press DOWN and the following is displayed: - OFFSET UP/DOWN or ENTER Press START ENTER and the following is displayed: Offset: Density UP/DOWN or ENTER Press START ENTER and the following is displayed: Density Offset OFF Want to enable? OR Density Offset ON Want to disable? To disable the material wet density bias, go to 6.1. To enable the material wet density bias, got to 6.2. Issue Date: March 2013 © The State of Queensland, Department of Transport and Main Roads, 2013 Page 3 of 5 Nuclear Gauge Testing Manual 6.1 Operating Instruction N319 Disable Material Wet Density Bias ON YES Press to disable the density offset. OR OFF NO Press to confirm that the density offset is to remain disabled. The following will be displayed: Density Offset Disabled The display will return to <READY>. 6.2 Enable Material Wet Density Bias ON YES Press to enable the density offset. OR Press OFF NO to confirm that the density offset is to remain enabled. The following will be displayed: 3 D Off = XXXX kg/ m UP/DOWN or ENTER To retain the displayed value, go to 6.2.1. To change the displayed value, go to 6.2.2. 6.2.1 Retain the Value ON YES Press and the following will be displayed: Density Offset Enabled The display will return to <READY>. 6.2.2 Change the Value Press UP for a positive value. Issue Date: March 2013 © The State of Queensland, Department of Transport and Main Roads, 2013 Page 4 of 5 Nuclear Gauge Testing Manual Operating Instruction N319 OR Press DOWN for a negative value. For each digit: Press DOWN until the required number is displayed. Press START ENTER to confirm each number. The following will be displayed briefly: Density Offset Enabled The display will return to <READY>. Issue Date: March 2013 © The State of Queensland, Department of Transport and Main Roads, 2013 Page 5 of 5 THIS PAGE IS INTENTIONALLY BLANK Nuclear Gauge Testing Manual OPERATING INSTRUCTION N320 1 START UP 2 MEASUREMENT (ASPHALT) INSTROTEK XPLORER 3500 Press ON YES and allow the nuclear gauge to complete the self-test routine. MEASUREMENT When <READY> is displayed Press START ENTER and the following is displayed: Time = XX sec Depth: XX mm At the end of the counting period: Press DOWN repeatedly until the required values are displayed. Record the following values as appropriate: WD as the wet density to the nearest 0.001 t/m3. D Count as the density count. (To convert from kg/m3 to t/m3, divide the displayed value by 1000.) Press ON YES and the display will return to <READY>. Press OFF NO if the nuclear gauge is not required for further use. Issue Date: March 2013 © The State of Queensland, Department of Transport and Main Roads, 2013 Page 1 of 1 THIS PAGE IS INTENTIONALLY BLANK Nuclear Gauge Testing Manual OPERATING INSTRUCTION N321 1 START UP 2 TEST PARAMATERS (ASPHALT) TROXLER 3440P Turn the power switch on and allow the nuclear gauge to complete the self-test routine. MEASUREMENT UNITS When <READY> is displayed Press SETUP Press 2 The following will be displayed: Press - Units 1. pcf 2. kg/m3 3. g/cm3 2 The following will be briefly displayed: Metric Units Kg/m3 ENABLED The display will return to <SETUP>. 3 COUNT TIME Press SETUP Issue Date: March 2013 © The State of Queensland, Department of Transport and Main Roads, 2013 Page 1 of 8 Nuclear Gauge Testing Manual Press 1 Press 2 Operating Instruction N321 TIME: XX 1 - 15 sec 2 - 1 min 3 - 4 min and the following is displayed: The following will be briefly displayed: COUNT TIME 1 min The display will return to <READY>. 4 ASPHALT MODE Press MODE The following will be displayed: Press MODE: XXXX Select: 1 - ASPHALT 2 - SOIL Press # to Select 1 The following will be displayed briefly: Asphalt Mode ENABLED The display will return to <READY>. Issue Date: March 2013 © The State of Queensland, Department of Transport and Main Roads, 2013 Page 2 of 8 Nuclear Gauge Testing Manual 5 Operating Instruction N321 MATERIAL WET DENSITY BIAS Press OFFSET Press 1 the following is displayed: -OFFSET1 - Dens. -OFF2 - Moist -OFF3 - Trench -OFF- The following will be displayed: Density Offset xx kg/m3 1. Enable 2. Disable 3. Change Offset To disable the material wet density bias, go to Step 6.1. To enable the material wet density bias, go to Step 6.2. To change the material wet density bias, go to Step 6.3. 5.1 Disable Material Wet Density Bias Press 2 The following will be displayed briefly: Density Offset DISABLED The display will return to <READY>. Go to 7. 5.2 Enable Material Wet Density Bias Press 1 Issue Date: March 2013 © The State of Queensland, Department of Transport and Main Roads, 2013 Page 3 of 8 Nuclear Gauge Testing Manual The following will be displayed: 5.3 Operating Instruction N321 Density Offset ENABLED Change Material Wet Density Bias Press 3 the following is displayed: Density Offset xx kg/m3 Select (+/-) Input and <ENTER> Use the numbered keys to enter the required value to the nearest 1 kg/m3. (To convert from t/m3 to kg/m3, multiply the material wet density bias by 1000.) Press ENTER START The following will be displayed briefly: Density Offset ENABLED The display will return to <READY>. 6 MATERIAL MOISTURE BIAS Press OFFSET Press 2 the following is displayed: -OFFSET--Select: 1 - Dens. -OFF2 - Moist. -OFF3 - Trench -OFF- The following will be displayed: Issue Date: March 2013 © The State of Queensland, Department of Transport and Main Roads, 2013 Page 4 of 8 Nuclear Gauge Testing Manual Operating Instruction N321 Moisture Offset 1. xxxx 2. xxxx 3. xxxx 4. xxxx 5. New 6. Disable 6.1 Disable Material Moisture Bias Press 6 Moisture Offset DISABLED The following will be displayed: The display will return to <READY>. Go to Step 8. 6.2 Enable the Material Moisture Bias 6.3 Press the number corresponding to any of the stored values. Change a Material Moisture Bias Value Press 5 the following is displayed: Select Offset Source 1. Manual Entry 2. Gauge Derived For manual entry: Press 1 the following is displayed: True Moisture % x.xx Press <ENTER> Use the numbered keys to enter the average oven dry moisture content to the nearest 0.01%. Press ENTER START the following is displayed: Gauge Moisture % 0.00% Press <ENTER> Issue Date: March 2013 © The State of Queensland, Department of Transport and Main Roads, 2013 Page 5 of 8 Nuclear Gauge Testing Manual Operating Instruction N321 Use the numbered keys to enter the average standard blocks moisture content to the nearest 0.01%. Press ENTER START the following is displayed: K = xxxx Do you want to save this value for later use ? To save the displayed value: Press YES the following is displayed: 1. 3. Select Memory Cell 2. 4. Press # to Select Press a numbered key (1, 2, 3 or 4) to select a memory location in which to save the value. The following will be displayed briefly: K x.xx ENABLED If the value is not to be displayed: Press NO The display will return to <READY>. For gauge derived: Press 2 the following is displayed: True Moisture % x.xx Press <ENTER> Use the numbered keys to enter the true moisture content to the nearest 0.01%. Press ENTER START the following is displayed: Place gauge on soil, Lower rod and Press any key Place the gauge on the measurement site and press any key. Issue Date: March 2013 © The State of Queensland, Department of Transport and Main Roads, 2013 Page 6 of 8 Nuclear Gauge Testing Manual Operating Instruction N321 At the completion of the counting period the following will be displayed: K: ##.## Save This Value for Later Use ? To save the value: Press YES To enable the value without storing: 7 Press NO TRENCH OFFSET Press OFFSET Press 3 the following is displayed: -OFFSET1 - Dens. -OFF2 - Moist. -OFF3 - Trench -OFF- the following is displayed: Trench Offset M: 0 D: 0 1. Enable 2. Disable 3. Change Offset To enable the trench offset: Press 1 The following is displayed: Trench Offset ENABLED To disable the trench offset: Issue Date: March 2013 © The State of Queensland, Department of Transport and Main Roads, 2013 Page 7 of 8 Nuclear Gauge Testing Manual Press Operating Instruction N321 2 The following is displayed: Trench Offset DISABLED To change the trench offset: Press 3 The following is displayed: Press Place Gauge in trench on Std. Block in SAFE Pos. Press <START> ENTER START At the end of the counting period the display will return to <READY>. Turn the power switch off if the nuclear gauge is not required for further use. Issue Date: March 2013 © The State of Queensland, Department of Transport and Main Roads, 2013 Page 8 of 8 Nuclear Gauge Testing Manual OPERATING INSTRUCTION N322 1 START UP 2 MEASUREMENT (ASPHALT) TROXLER 3440P Turn the power switch on and allow the nuclear gauge to complete the self-test routine. MEASUREMENT When <READY> is displayed Press ENTER START the following is displayed: Depth: XX mm PR: XXXX kg/m3 Time: XX sec. In the manual depth mode the gauge will prompt for the source rod depth. In automatic mode the gauge software reads the depth strip on the source rod to determine the depth. At the end of the counting period, the following will be displayed: WD = xxxx M= x %M = X.X Record WD as the wet density: Press ESC Press RECALL Press The following will be displayed: DC = xxxx MC = xx Issue Date: March 2013 © The State of Queensland, Department of Transport and Main Roads, 2013 Page 1 of 2 Nuclear Gauge Testing Manual Operating Instruction N322 Record the following values as appropriate: DC as the density count. MC as the moisture count. Press Turn the power switch off if the nuclear gauge is not required for further use. ESC and the display will return to <READY>. Issue Date: March 2013 © The State of Queensland, Department of Transport and Main Roads, 2013 Page 2 of 2 Nuclear Gauge Testing Manual OPERATING INSTRUCTION N323 1 START UP 2 TEST PARAMATERS (ASPHALT) TROXLER 3430P Turn the power switch on and allow the nuclear gauge to complete the self-test routine. MEASUREMENT UNITS When <READY> is displayed Press SETUP Press 2 The following will be displayed: Press - Units 1. pcf 2. kg/m3 3. g/cm3 2 The following will be briefly displayed: Metric Units Kg/m3 ENABLED The display will return to <SETUP>. 3 COUNT TIME Press SETUP Issue Date: March 2013 © The State of Queensland, Department of Transport and Main Roads, 2013 Page 1 of 8 Nuclear Gauge Testing Manual Press 1 Press 2 Operating Instruction N323 TIME: XX 1 - 15 sec 2 - 1 min 3 - 4 min and the following is displayed: The following will be briefly displayed: COUNT TIME 1 min The display will return to <READY>. 4 ASPHALT MODE Press MODE The following will be displayed: Press MODE: XXXX Select: 1 - ASPHALT 2 - SOIL Press # to Select 1 The following will be displayed briefly: Asphalt Mode ENABLED The display will return to <READY>. Issue Date: March 2013 © The State of Queensland, Department of Transport and Main Roads, 2013 Page 2 of 8 Nuclear Gauge Testing Manual 5 Operating Instruction N323 MATERIAL WET DENSITY BIAS Press OFFSET Press 1 the following is displayed: -OFFSET1 - Dens. -OFF2 - Moist -OFF3 - Trench -OFF- The following will be displayed: Density Offset xx kg/m3 1. Enable 2. Disable 3. Change Offset To disable the material wet density bias, go to Step 6.1. To enable the material wet density bias, go to Step 6.2. To change the material wet density bias, go to Step 6.3. 5.1 Disable Material Wet Density Bias Press 2 The following will be displayed briefly: Density Offset DISABLED The display will return to <READY>. Go to 7. 5.2 Enable Material Wet Density Bias Press 1 Issue Date: March 2013 © The State of Queensland, Department of Transport and Main Roads, 2013 Page 3 of 8 Nuclear Gauge Testing Manual The following will be displayed: 5.3 Operating Instruction N323 Density Offset ENABLED Change Material Wet Density Bias Press 3 the following is displayed: Density Offset xx kg/m3 Select (+/-) Input and <ENTER> Use the numbered keys to enter the required value to the nearest 1 kg/m3. (To convert from t/m3 to kg/m3, multiply the material wet density bias by 1000.) Press ENTER START The following will be displayed briefly: Density Offset ENABLED The display will return to <READY>. 6 MATERIAL MOISTURE BIAS Press OFFSET Press 2 the following is displayed: -OFFSET--Select: 1 - Dens. -OFF2 - Moist. -OFF3 - Trench -OFF- The following will be displayed: Issue Date: March 2013 © The State of Queensland, Department of Transport and Main Roads, 2013 Page 4 of 8 Nuclear Gauge Testing Manual Operating Instruction N323 Moisture Offset 1. xxxx 2. xxxx 3. xxxx 4. xxxx 5. New 6. Disable 6.1 Disable Material Moisture Bias Press 6 Moisture Offset DISABLED The following will be displayed: The display will return to <READY>. Go to Step 8. 6.2 Enable the Material Moisture Bias 6.3 Press the number corresponding to any of the stored values. Change a Material Moisture Bias Value Press 5 the following is displayed: Select Offset Source 1. Manual Entry 2. Gauge Derived For manual entry: Press 1 the following is displayed: True Moisture % x.xx Press <ENTER> Use the numbered keys to enter the average oven dry moisture content to the nearest 0.01%. Press ENTER START the following is displayed: Gauge Moisture % 0.00% Press <ENTER> Issue Date: March 2013 © The State of Queensland, Department of Transport and Main Roads, 2013 Page 5 of 8 Nuclear Gauge Testing Manual Operating Instruction N323 Use the numbered keys to enter the average standard blocks moisture content to the nearest 0.01%. Press ENTER START the following is displayed: K = xxxx Do you want to save this value for later use ? To save the displayed value: Press YES the following is displayed: 1. 3. Select Memory Cell 2. 4. Press # to Select Press a numbered key (1, 2, 3 or 4) to select a memory location in which to save the value. The following will be displayed briefly: K x.xx ENABLED If the value is not to be displayed: Press NO The display will return to <READY>. For gauge derived: Press 2 the following is displayed: True Moisture % x.xx Press <ENTER> Use the numbered keys to enter the true moisture content to the nearest 0.01%. Press ENTER START the following is displayed: Place gauge on soil, Lower rod and Press any key Place the gauge on the measurement site and press any key. Issue Date: March 2013 © The State of Queensland, Department of Transport and Main Roads, 2013 Page 6 of 8 Nuclear Gauge Testing Manual Operating Instruction N323 At the completion of the counting period the following will be displayed: K: ##.## Save This Value for Later Use ? To save the value: Press YES To enable the value without storing: 7 Press NO TRENCH OFFSET Press OFFSET Press 3 the following is displayed: -OFFSET1 - Dens. -OFF2 - Moist. -OFF3 - Trench -OFF- the following is displayed: Trench Offset M: 0 D: 0 1. Enable 2. Disable 3. Change Offset To enable the trench offset: Press 1 The following is displayed: Trench Offset ENABLED To disable the trench offset: Issue Date: March 2013 © The State of Queensland, Department of Transport and Main Roads, 2013 Page 7 of 8 Nuclear Gauge Testing Manual Press Operating Instruction N323 2 The following is displayed: Trench Offset DISABLED To change the trench offset: Press 3 The following is displayed: Press Place Gauge in trench on Std. Block in SAFE Pos. Press <START> ENTER START At the end of the counting period the display will return to <READY>. Turn the power switch off if the nuclear gauge is not required for further use. Issue Date: March 2013 © The State of Queensland, Department of Transport and Main Roads, 2013 Page 8 of 8 Nuclear Gauge Testing Manual OPERATING INSTRUCTION N324 1 START UP 2 MEASUREMENT (ASPHALT) TROXLER 3430P Turn the power switch on and allow the nuclear gauge to complete the self-test routine. MEASUREMENT When <READY> is displayed Press ENTER START the following is displayed: Depth: XX mm PR: XXXX kg/m3 Time: XX sec. In the manual depth mode the gauge will prompt for the source rod depth. In automatic mode the gauge software reads the depth strip on the source rod to determine the depth. At the end of the counting period, the following will be displayed: WD = xxxx M= x %M = X.X Record WD as the wet density: Press ESC Press RECALL Press The following will be displayed: DC = xxxx MC = xx Issue Date: March 2013 © The State of Queensland, Department of Transport and Main Roads, 2013 Page 1 of 2 Nuclear Gauge Testing Manual Operating Instruction N324 Record the following values as appropriate: DC as the density count. MC as the moisture count. Press Turn the power switch off if the nuclear gauge is not required for further use. ESC and the display will return to <READY>. Issue Date: March 2013 © The State of Queensland, Department of Transport and Main Roads, 2013 Page 2 of 2 Nuclear Gauge Testing Manual OPERATING INSTRUCTION N325 1 SET UP 2 TEST PARAMETERS (ASPHALT) TROXLER 3450 Press ON and allow the nuclear gauge to complete the self-test routine. UNITS When <READY> is displayed: Press Press SPECIAL 4 To access the Gauge Setup menu. 1234- Set Time/Date Print Set-Up Depth Indicator Set Beeper Level ↕ Scroll through the menu using the arrow keys. Press 8 and the following is displayed: Press 2 and the following is displayed: UNITS in XXX 1 – PCF 2 – kg/m3 3 – g/cm3 UNITS IN kg/m3 The display will return to the Gauge Setup menu. Issue Date: March 2013 © The State of Queensland, Department of Transport and Main Roads, 2013 Page 1 of 8 Nuclear Gauge Testing Manual 3 Operating Instruction N325 COUNT TIME Press TIME Press 2 and the following is displayed: COUNT TIME: XX 1 – 15 sec 2 – 1 min 3 – 4 min and the following is displayed: -COUNT TIME60 sec The display will return to <READY>. 4 ASPHALT MODE Press MODE Press 2 and the following is displayed: And the following will be displayed briefly: - MODE – 1 – Soil Mode 2 – Asphalt Mode 3 – Thin Layer Mode Asphalt Mode Enabled The display will return to <READY>. 5 MATERIAL WET DENSITY BIAS Press OFFSET and the following is displayed: OFFSET Select 1 – Wet Density OFF 2 – Moisture OFF 3 – Trench OFF Issue Date: March 2013 © The State of Queensland, Department of Transport and Main Roads, 2013 Page 2 of 8 Nuclear Gauge Testing Manual Operating Instruction N325 1 Press The following will be displayed: Wet Density Offset: xxxx kg/m3 1 – Enable 2 – Disable 3 – Change Offset To disable the material wet density bias: 2 Press and following is displayed: Wet Density Offset DISABLED To enable the material wet density bias: 1 Press and following is displayed: Wet Density Offset ENABLED 5.1.1 Change the Value Press and the following is displayed: 3 Press + ↑ OR - Wet Density Offset xxxx kg/m3 Select (+/-) ↓ Issue Date: March 2013 © The State of Queensland, Department of Transport and Main Roads, 2013 Page 3 of 8 Nuclear Gauge Testing Manual Operating Instruction N325 Use the numbered keys to enter the required value to the nearest 1kg/m3. Press ENTER Density Offset The following will be displayed: ENABLED The display will return to <READY>. 6 MATERIAL MOISTURE BIAS Press OFFSET Press 2 and following is displayed: OFFSET Select: 1 – Wet Density OFF 2 – Moisture OFF 3 – Trench OFF The following will be displayed: Moisture Offset: K = 0.00 1 – Enable 2 – Disable 3 – Change Offset To disable the moisture offset: Press 2 and following is displayed: Moisture Offset DISABLED To enable the moisture offset: Issue Date: March 2013 © The State of Queensland, Department of Transport and Main Roads, 2013 Page 4 of 8 Nuclear Gauge Testing Manual Press 1 Operating Instruction N325 and following is displayed: Moisture Offset ENABLED 6.1.1 Change the Value Press 3 and the following is displayed: Moisture Offset 1 – Stored Offset 2 – Gauge Derived 3 – Keypad Entry To select a stored offset: Moisture Offset Press Use the numbered keys to enter the required value to the nearest 0.01%. 1 and the following is displayed: Select K Value Cell: 1 – 0.00 2 – 0.00 3 – 0.00 4 – 0.00 The display will return to <READY>. 6.1.2 Change to a Gauge-Derived Value To change the moisture bias to a gauge-derived value: Press 3 and the following is displayed: Press 2 and the following is displayed: Press 1 and the following is displayed: Moisture Offset 1 – Stored Offset 2 – Gauge Derived 3 – Keypad Entry Gauge Derived Moisture Offset 1 – Measure Moisture 2 – Input True Moist Place Gauge On Surface To Be Tested Press START For 4 One – Minute Counts Issue Date: March 2013 © The State of Queensland, Department of Transport and Main Roads, 2013 Page 5 of 8 Nuclear Gauge Testing Manual Press Operating Instruction N325 START The gauge displays the progress of the measurements. After each reading the gauge displays the results. To continue to the next measurement: Press START After the last measurement: Press ENTER and the following is displayed: Moisture Offset 1 – Stored Partial Moisture Offset 2 – Input True Moist To enter the true moisture later: Press 1 To overwrite the partial offset: Press YES To use the stored partial offset: Press NO To enter the true moisture now: Press 2 and the following is displayed: Input True Moisture xxxxx % ENTER When Done Issue Date: March 2013 © The State of Queensland, Department of Transport and Main Roads, 2013 Page 6 of 8 Nuclear Gauge Testing Manual 7 Operating Instruction N325 TRENCH OFFSET Press OFFSET and following is displayed: Press 3 and following is displayed: OFFSET Select: 1 – Wet Density OFF 2 – Moisture OFF 3 – Trench OFF Trench: TMO = xxxx TDO = xxxx xxxx 1 – Enable 2 - Disable 3 – Change Offset To disable the trench offset: Press 2 Trench Offset and following is displayed: DISABLED To enable the trench offset: Press 1 Trench Offset and following is displayed: ENABLED To create a new trench offset: Press 3 and following is displayed: Set Rod To STD Pos Press START For 1 Minute STD Count In Trench Position the gauge inside the trench and: Press START The gauge will display the progress of the standard count operation. After the standard count the gauge displays: Issue Date: March 2013 © The State of Queensland, Department of Transport and Main Roads, 2013 Page 7 of 8 Nuclear Gauge Testing Manual Operating Instruction N325 New Trench Offset TMO = xxxx TDO = xxxx xxxx Want To Accept ? To enable the new trench offset: Press YES To create another trench offset: Press NO Issue Date: March 2013 © The State of Queensland, Department of Transport and Main Roads, 2013 Page 8 of 8 Nuclear Gauge Testing Manual OPERATING INSTRUCTION N326 1 SET UP 2 MEASUREMENT (ASPHALT) TROXLER 3450 Press ON and allow the nuclear gauge to complete the self-test routine. MEASUREMENT When <READY> is displayed: Press START In the manual depth mode the gauge will prompt for the source rod depth. In the automatic depth mode the gauge software reads the depth strip on the source rod to determine the source rod depth. At the end of the counting period, the following will be displayed: %MA = xxxx % WD = xxxx kg/m3 %VOIDS = xxxx Record the following values: % MA as the percent Marshall to the nearest 0.1%. WD as the wet density to the nearest 0.001 t/m3. %VOIDS = 100 x 1-WD/VOIDLESS (when enabled). (To convert from kg/m3 to t/m3, divide the displayed value by 1000.) Press ↓ Issue Date: March 2013 © The State of Queensland, Department of Transport and Main Roads, 2013 Page 1 of 2 Nuclear Gauge Testing Manual And the following will be displayed: Operating Instruction N326 DC: - Counts xxxxx xxxx Record the following values as appropriate: DC for system 2 (upper right reading) as the density count. Press Press ESC and the display will return to <READY>. OFF if the nuclear gauge is not required for further use. Issue Date: March 2013 © The State of Queensland, Department of Transport and Main Roads, 2013 Page 2 of 2 Nuclear Gauge Testing Manual OPERATING INSTRUCTION N327 1 SET UP 2 TEST PARAMETERS (ASPHALT) CPN MC1 AND MC3 ELITE Press ON YES and allow the nuclear gauge to complete the self-test routine. UNITS Press Press MENU DOWN the first screen will be: 1. Recall 2. Set depth UP/DOWN for next Select #, ESC exit the following is displayed: 11. Auto scroll 12. Set units UP/DOWN for next Select #, ESC exit (button 1 then 2) 1. PCF 2. kg/m3 3. GCC Select #, ESC exit Press After selecting the unit of measurement the gauge returns to the menu screen 11. Auto scroll 12. Set units UP/DOWN for next Select #, ESC exit Press GAUGE READY COUNT TIME: # min Depth: ### Offset: N <date> <time> 12 ESC returns to ready screen Issue Date: December 2013 © The State of Queensland, Department of Transport and Main Roads, 2014 Page 1 of 3 Nuclear Gauge Testing Manual 3 COUNT TIME Press Press UP and DOWN to set the desired count time. 4 Operating Instruction N327 Press TIME YES and the following is displayed: returns to ready screen Cnt Time: ## min. UP/DOWN TO CHANGE YES to Accept ESC to Exit GAUGE READY COUNT TIME: # min Depth: ### Offset: N <date> <time> DEPTH The Elite gauge is equipped with an automatic non-magnetic depth indicator. The depth is automatically read as you lower the source into the measure position and the appropriate constants are selected to calculate the density. The gauge can be placed into manual depth mode by disabling the Automatic depth mode from the MENU functions. 5 ASPHALT MODE AND MAXIMUM DENSITY Press Press MA PR 2 and the following is displayed: 1. Proctor 2. Max. Dens Select #, ESC exit For Max Dens. MA: #### PCF Change value? Press YES or NO ESC to Exit Issue Date: December 2013 © The State of Queensland, Department of Transport and Main Roads, 2014 Page 2 of 3 Nuclear Gauge Testing Manual Press YES Operating Instruction N327 Enter value for Max Dens: ### PCF ENTER to accept ESC to Exit Use the number buttons to change the value. Once you have entered the PR value the gauge will return to ready screen. Issue Date: December 2013 © The State of Queensland, Department of Transport and Main Roads, 2014 Page 3 of 3 THIS PAGE IS INTENTIONALLY BLANK Nuclear Gauge Testing Manual OPERATING INSTRUCTION N328 1 SET UP 2 MEASUREMENT (ASPHALT) CPN MC1 AND MC3 ELITE Press ON YES and allow the nuclear gauge to complete the self-test routine. MEASUREMENT When the ready screen is displayed: Depth: XX mm Press START ENTER and the following is displayed: Time: XX sec At the end of the counting period the gauge will display: M Count: ### D Count: ### MCR: ### DCR: ### Press UP/DOWN WD: #### kg/m3 %MA: #### %VOIDS: #### Press UP/DOWN Moist: #### kg/m3 DD: #### kg/m3 % Mois: #.# %PR: #.# Press UP/DOWN Issue Date: December 2013 © The State of Queensland, Department of Transport and Main Roads, 2014 Page 1 of 2 Nuclear Gauge Testing Manual Operating Instruction N304 Record the following values: WD as the wet density to the nearest 0.001 t/m3. D Count as the density count. (To convert from kg/m3 to t/m3, divide the displayed value by 1000.) Press ON YES and the display will return to the ready screen Press OFF NO if the nuclear gauge is not required for further use. 3 Issue Date: December 2013 © The State of Queensland, Department of Transport and Main Roads, 2014 Page 2 of 2