1
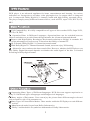
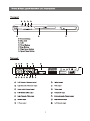
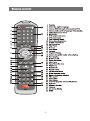
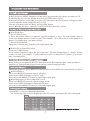
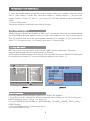
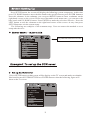
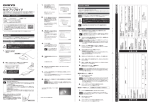
LDVD5.1A
USER'S MANUAL
DVD/DIVX PLAYER
MPEG 4
The important safety instruction shall include where applicable, the following information
and warnings.
1) Read these instructions.
2) Keep these instructions.
3) Heed all warnings.
4) Follow all instructions.
5) Do not use this apparatus near water.
6) Clean only with dry cloth.
7) Do not block any ventilation openings. Install in accordance with the manufacturer's
instructions.
8) Do not install near any heat sources such as radiators, heat registers, stoves, or any other
apparatus (including amplifiers) that produce heat.
9) Do not defeat the safety purpose of the polarized or grounding-type plug. A polarized plug
has two blades with one wider than the other. A grounding type plug has two blades and a third
grounding prong. The wide blade of the third prong are provided for your safety. If the
provided plug does not fit into your outlet, consult an electrician for replacement of the
obsolete outlet.
10) Protect the power cord from being walked on or pinched particularly at plugs,
convenience receptacles, and the point where they exit from the apparatus.
11) Only use attachments/accessories specified by the manufacturer.
12) Use only with the cart, stand, tripod, bracket, or table specified by the manufacturer, or
sold with the apparatus. When a cart is used, use caution when moving the cart/apparatus.
13) Unplug this apparatus during lightning storms or when unused for long period of time.
14) Refer all servicing to qualified service personnel. Servicing is required when the
apparatus has been damaged in any way, such as power-supply cord or plug is damaged, liquid
has been spilled or objects have fallen into the apparatus, the apparatus has been exposed to
rain or moisture, does not operate normally, or has been dropped.
"CAUTION: USE OF ANY CONTROLS, ADJUSTMENTS, OR PROCEDURES OTHER
THAN THOSE SPECIFIED HEREIN MAY RESULT IN HAZARDOUS RADIATION
EXPOSURE.
The lightning flash with arrow head symbol within an equilateral triangle is intented to alert
the user to the presence of uninsured "dangerous voltage" within the products enclosure that
may be of sufficient magnitude to constitute a risk of electric shock to persons.
The exclamation point within an equilateral triangle is intended to alert the user to the
presence of important operating and maintenance (servicing) instructions in the literature
accompanying the appliance.
WARNING:
TO REDUCE THE RISK OF FIRE OR ELECTRIC SHOCK, DO NOT EXPOSE THIS
APPLIANCE TO RAIN OR MOISTURE. DANGEROUS HIGH VOLTAGES ARE
PRESENT INSIDE THE ENCLOSURE. DO NOT OPEN THE CABINET. REFER
SERVICING TO QUALIFIED PERSONNEL ONLY.
CAUTION:
When replace the direct plug in power supply with a separable cord-connected power
supply.The replacement must be exact duplicate or one recommended by the manufacturer.
CAUTION:
TO PREVENT ELECTRIC SHOCK. MATCH WIDE BLADE OF PLUG TO WIDE SLOT.
POWER-CORE PROTECTION
Power-supply cords should be coated so that they are not likely to be walked on or pinched
by items placed upon or against them. Paying particular attention to cords at plugs,
convenience receptacles and the point where they exit from the product.
POWER LINE
An outside antenna system should not be located in the vicinity of overhead power lines or
other electric light or power circuits, or where it can felt into such power lines or circuit.
When installing an outside antenna system, extreme care should be taken to keep from
touching such power lines or from the product.
OVERLOADING
Do not overload the outlets extortion cords or integral convenience receptacles as this can
result in a risk of the electric shock.
SERVICING
Do not attempt to service this product yourself as opening or removing covers, otherwise it
may expose you to dangerous voltage or other hazards. Refer all servicing to qualified
services personnel.
DAMAGE REQUIRING SERVICE
Unplug this product from the wall outlet and refer servicing to qualified service personnel
under the following condition:
a) When the power-supply cord or plug is damaged.
b) If liquid has been spilled or objects have fallen into the produc
c) If the product has been exposed to rain or water.
d) If the product does not operate normality by following the operating instructions. Adjust
only those controls that are covered by the operating instructions as an improper adjustment
of other controls may result in carnage and will often require extensive work by a qualified
technician to restore the product to its normal operation.
e) If the product has been dropped or damaged in any way.
f) When the product exhibits a distinct change, a performance of this indicates a need for
service.
SAFETY CHECK
Upon completion of service or repairs to this product, ask the service technician to perform
safety checks to determines that the product is in proper operating condition.
WALL OR CEILING MOUNTING
The product should not be mounted to a wall or ceiling.
HEAT
The product should be situated away from heat.
READ INSTRUCTIONS
All the safety and operating instructions should be read before the product is operated.
FOLLOW INSTRUCTION
All operating and use instructions should be followed.
CLEANING
Unplug this product from the wall counted before cleaning. The product should be cleaned
only with a potlahing cloth or a soft dry cloth. Never clean with furniture wax, benxns,
insecticides or other volmtie apulds since they may corrode the cabinet.
ATTACHMENTS
Do not use attachments not recommended by the product manufacturer as they may cause
hazards.
WATER AND MOISTURE
Do not use this product near water for example. Near a bathtub, Wash bowl, Kitchen sink or
laundry tub. In a wet basement or near a swimming pool and the like.
ACCESSORIES
Do not place this product on an unstable cart, stand, tripod, bracket or table. The product may
tail, causing serious injury to a child or adult and serious damage to the product. Use only with
a cart, stand, tripod, bracket or table recommended by the manufacturer. A product and cart
combination should be moved with may cause the product and cart combination to overturn.
CART
A product and cart combination should be moved with care. Quick stops, excessive force, and
unravel surfaces may cause the product and cart combination to overturn.
VENTILATION
Slots and openings in the cabinet are provided for ventilation and to ensure operation of the
product and to protect it from overheating. And these openings must not be blocked or covered.
The openings should never be blocked by placing the product a bed, sofa rug or other.
LOCATION
The appliance should be installed in stable location.
NONUSE PERIODES
The power cord of the appliance should be unplugged from the outer when left unused for a
long period of time.
GROUNDING OR POLARIZATION
This product may be equipped with a polarized alternating current line plug ( a plug having
one blade wider than the other) This plug will fit into the power outlet only one way. This is a
safety feature. You are unable to insert the plug should still rail to fit. Contact your electrician
to not detect the safety purpose of the polarized plug.
The DVD player contains laser devices. The top cover of the DVD module acts as a
protective housing. Laser radiation is dangerous when the top cover is removed or opened.
Avoid direct exposure to beam during service or repair.
Please carefully check if all these following attachments are all ready after opening the
gift box. If not, please consult with agency or retailer.
10
1
DVD player is an advanced appliance for home entertainment and learning. Its various
indicators are far superior to any other video playing devices. Its output video is sharp and
real. It can provide Dolby Digital (5.1 channel) sound with high fidelity, surround effect .
The player can play many different formats of discs, such as DVD, super VCD, DVCD, CD,
MP3.
Full Compatibility: It is fully compatible to all types of discs such as DVD, Super VCD,
DVCD, CD, MP3.
Operation Hints in Different Languages: Operation hints can be switched between
Chinese and others so as to facilitate the operation for the clients at home and abroad.
Picture with High Fidelity Resolution: Horizontal resolution as 500 dpi. It can make full
use of the advantages of large screen TV based on the fidelity of normal TV.
Hi-Fi Sound: Dolby Digital 5.1 Channel surround sound.
With Dolby Digital 5.1 Channel Surround Sound, users can enjoy 3D listening.
Subwoofer can even boost the bass sound effect. However, whether the DVD player can
play Dolby Digital Surround depends on whether the audio signal of the disc s recorded
according to Dolby digital format.
Supporting Many Types of Different Languages: DVD discs can support captions in as
many as 32 different types of languages and dialogues in 8 languages.
Many angles of Enjoyment: Users can enjoy the picture from different angles selected
such as zoom in, side view, panorama etc.
Many Types of Picture Ratio Modes: These modes enable the DVD player to suit different
TV screens.
Manufactured under license from Dolby Laboratories.
"Dolby" and the double-D symbol are trademarks of Dolby Laboratories.
2
5
4
7
6
R/L
POWER
Progressive SCAN
DIGITAL
LDVD5.1A
MPEG 4
SURROUND
3
3
4
5
6
7
14
13
12
FL
FR
SUB
10
11
9
C
UL
US
R
LISTED
AUDIO/VIDEO
APPARATUS
Y
Cr
Cb
VIDEO
POWER 90-240V~ 50/60Hz
SL
SR
CEN
5.1CH AUDIO OUTPUT
1
2
3
ML
MR
MIX OUTPUT
4
5
COAXIAL
S-VIDEO
COA/VIDEO OUTPUT
6
FDA/DHHS
MODEL LDVD5.1A
7
LOSS
OPTICAL
C-tick
DIGITAL
AUDIO OUT
25W
N1186
8
1
8
2
9
3
10
4
11
5
12
6
13
7
14
3
CLASS 1 LASER PRODUCT
APPAREIL A LASER DE CLASS 1
PRODUCT TO LASER CLASS 1
~90-240V
50/60Hz
10
4
Once your DVD player is connected with your TV and the power supply plugs of various
devices have been plugged into the power sockets, and the batteries have already been
inserted into the remote control, you are ready to operate the DVD player.
Turn on the power supply to the TV.
1. Press POWER button on DVD player to turn on power.
Wait a moment and switch the TV to the relevant video input mode (VIDEO IN) with the
TV remote control.
2. Press OPEN/CLOSE button on the player or press
button on the remote control to eject
the disc tray.
When the tray is automatically ejected, place the disc in the tray with the label side facing
up (see the following). You can only place one disc each time.
3. Press PLAY button
The player will retract automatically the tray and start reading the disc, recognize the
different format automatically and display the results on the VFD in the front panel of the
player. Then the player starts the playback of the disc content automatically. If content or
menu appears, you can use the UP, DOWN, LEFT, RIGHT buttons on the remote control to
specify the items to be played, then press ENTER button to start the playback or select
directly with numbers.
During playback, press PAUSE
resume play.
button to pause the playback, press
PLAY or PAUSE to
Press MUTE button to turn off the audio output of the player.
Press MUTE button again to turn it on.
During the playback, press VOLUME+ or VOLUME- button to adjust the volume of the
player.
5
1. Press OPEN/CLOSE button,
The playback will end. Wait for the tray to eject and take out the disc.
2. Press OPEN/CLOSE button to close the tray.
3. Press POWER button to turn off the power supply to the player.
Notes:
(1) If the screen is not full or the edges are covered or there is black and white image
during the playback, please make the system setup by selecting the relevant TV signal
format (PAL OR NTSC).
(2) When the
symbol appears on the TV screen, it means the operation made by the
user is not effective or not acceptable by the player.
In the following sections the frequently used operations are introduced according to the
types of functions. Besides the functions and operations of the buttons are introduced in
page 13.
Press MENU or TITLE to call the menu on the DVD and select a certain portion to play. The
detailed operation are as follows:
1. Press MENU button
A menu appears and the select contents
2. Press UP, DOWN, LEFT, RIGHT button
Move the symbol to the specified item or picture with these button.
3. Press ENTER button to select the items at this time the next submenu may appear,
otherwise the
specified contents will be played automatically. For the submenu operation, first select
the contents
with UP, DOWN, LEFT, RIGHT, then press ENTER button.
During the playback, you can press FWD
to realize the fast forward playing. There are
totally five fast speeds. Every press increases the speed by one step. When the fast forward
reaches the maximum speed, press FWD
again to return to normal playback.
During the playback, you can press REV
to realize the fast reverse playing. There are
totally five fast speeds. Every press increases the speed by one step. When the fast reverse
reaches the maximum speed, press REV
again to return to normal playback.
During the playback, you can press SLOW to realize the slow motion playing at different
speeds. There are forward and reverse for which there are three speeds. Pressing it once the
slow motion speed varies and pressing "PLAY/PAUSE" will return to playing.
6
With DVD, press MENU button to call the list of tracks on the disc, then you can press UP,
DOWN button to select the tracks, then press ENTER button to play.
With non DVD discs, when PBC is on, press PLAY button, the list of tracks will appear, then
you can input the track number directly to play.
You can switch the state of PBC by pressing PBC button.
Notes: Whether the above operation is effective differs from disc to disc.
With DVD discs
1. Press TIME button
2. Press the number button to input the specified chapter or time. The time format input is
"hour hour minute minute second second". For example, if you like to move to the point at 38
minute 5 second to play, just input 003805.
3. Press ENTER button.
The player starts to play from the point of the input time.
With VCD (or non DVD ) discs
Press once TIME button
Press number buttons to input the specified time. The time format input is "minute minute
second second". For example, if you would like to move to the point at 5 minute 25 second to
play, just input 0525.
With DVD, you can press SUBTITLE button to select the language types, such as Chinese,
English etc. Each pressing toggles between one caption language codes.
During the playback, press REPEAT continuously to select different repeat contents to play.
With DVD discs
Press once REPEAT button to repeat "Chapter".
Press twice REPEAT button to repeat "Title".
Press three times REPEAT button to cancel the repeat play.
With other types of discs (when PBC is off)
Press once REPEAT button to repeat a single track.
Press twice REPEAT button to repeat the full disc.
Press three times REPEAT button to cancel the repeat play.
1.When PBC is off, press PROGRAM button
The following figure will be displayed on the TV screen, waiting for the user to program.
7
2. Press the number button to input the track or chapter codes. For example, if an user would
like to play chapter 5 on the disc, then play chapter 4 finally chapter 2 , just press the
number buttons "5"and "4" and "2", (you can press "CLEAR" button to cancel the number
input).
3. Press PLAY button
The player will play in the order specified by the user.
When playing VCD/SVCD/CD/MP3, if PBC is off, you can press directly the number button
corresponding to the track number to play it. If the track number is over 10, you need to press
first 10+ button, then press the corresponding number. For example, if you would like to
select "21", first press twice "10+" button, then press "1" button again.
MP3 discs are a new type of disc with a record of MP3 format audio track. The player
supports MP3 and the specific operations are as follows.
Press OPEN/CLOSE button to eject the tray. Place the MP3 disc, press OPEN/CLOSE button
to retract the tray and the TV screen will display the menu.(see picture 1)
Press EQ button to turn on digital equalizer.(VCD/SVCD/CD/MP3 )
1. Press EQ one time, and current 3D surround mode info will show on the TV screen, press
RIGHT button to choose EQ .(see picture 2)
2. Press UP,DOWN button to choose STANDARD CLASSIC ROCK JAZZ POP
USER modes.
3. Press ENTER button to confirm setup above.
4. Press EQ button to exit.
8
Press SETUP button, the screen will display the following system setup menu. At this time
press UP, DOWN button to move the blue band to the specified menu, press ENTER button to
show the submenu. In the submenu, you can press RIGHT button to enter a submenu on the
right hand corner on the screen. Please note that under each menu state, you can move the
blue band with UP, DOWN button. Press ENTER to make the selection effective. Press the
LEFT button to exit the submenu on the right hand corner of the screen. At any time press
SETUP button to exit the system setup.
The following are examples of the common setup. Users are master the method so as to
setup other devices.
The yellow band locates the current item
SYSTEM SETUP
TV SYSTEM
SCREEN SAVER
VIDEO
TV TYPE
PASSWORD
RATING
DEFAULT
EXIT SETUP
1.Press SETUP button so that system will be display on the TV screen and make sure thatthe
.blue band locates SYSTEM SETUP.Press ENTER buton so that the following figure will
show on the Tv screen.
SYSTEM SETUP
TV SYSTEM
SCREEN SAVER
VIDEO
ON
OFF
TV TYPE
PASSWORD
RATING
DEFAULT
EXIT SETUP
9
2. Press RIGHT button to enter the submenu on the right hand corner of the screen. If you
would like to setup the SCR SAVER to be OFF, press the button to locate the blue band on
OFF, then press ENTER button.
3. Press SETUP button to exit the system setup.
Note: When SCR Saver is ON, screen saver picture will appear under non-work condition.
When SCR Saver is OFF, there will be no screen saver function.
1. Press SETUP button so that the system setup menu appears on the TV screen. Press
DOWN button to move the blue band to SPEAKER SETUP and press ENTER button with the
following picture appear on the TV screen.
SPEAKER SETUP
DOWNMIX
SUBWOOFER
BASS MODE
CENTER DELAY
REAR DELAY
LT/RT
STEREO
VSS
5.1CH
EXIT SETUP
2. Press RIGHT button to enter submenu on the right hand corner of the screen. If you would
like to setup the sound mode to be STEREO, first press DOWN button to move the blue band
to locate the STEREO, then press ENTER button.
Set up 5.1 Channel output might need two steps, namely to to turn off MIXED OUTPUT
MODE and turn on each speaker output channel.
10
Step 1: To turn off mixed output mode (if the mode has been turned off, the step can be
ignored). The operations are as follows:
1. Press SETUP button so that the system setup menu appears on the TV screen. Press
DOWN button to move the blue band to SPEAKER SETUP and press ENTER button with the
following pictures apear on the TV screen.
2. Press RIGHT button to enter the submenu on the right hand corner of the screen.
Press DOWN button to move the blue band to locate the 5.1CH, then press ENTER button.
Finally press SETUP button to exit the system setup.
SPEAKER SETUP
LT/RT
STEREO
VSS
5.1CH
DOWNMIX
SUBWOOFER
BASS MODE
CENTER DELAY
REAR DELAY
EXIT SETUP
Step 2: To turn on each various speaker output channel. The operations are as follows:
1. The operation is the same as the procedure 1 of the first step.
2. Press DOWN to locate the blue band on CENTER and the screen changes as follows:
SPEAKER SETUP
DOWNMIX
SUBWOOFER
BASS MODE
OFF
ON
CENTER DELAY
REAR DELAY
EXIT SETUP
11
3. Press RIGHT button to enter the submenu on the right hand corner of the screen.
Make sure the blue locates the ON, then press ENTER button.
4. Press LEFT button to exit the submenu on the right hand corner of the screen.
Press DOWN button to allow the blue band to locate REAR, press RIGHT button to enter the
submenu on the right hand corner of the screen. Make sure the blue locates the ON, then
press ENTER button.
5. Press LEFT button to exit the submenu on the right hand corner of the screen.
Press DOWN button to allow the blue band to locate SUBWOOFER, press RIGHT button to
enter the submenu on the right hand corner of the screen. Make sure the blue locates the ON,
then press ENTER button.
6. Finally press SETUP button to exit the system setup.
DVD discs with genuine copyright, parents are entitled to forbid those contents not suitable
for children. The operations to set up the parental guide are as follows.
1. Press STOP button so that the player is in stop mode.
2. Press SETUP button so that system setup menu displays on the TV screen, hold DOWN
button pressed until the blue band moves to SYSTEM SETUP, then press ENTER button,
press DOWN button until the blue band moves to RATING item with the TV screen displays
as follows:
SYSTEM SETUP
TV SYSTEM
SCREEN SAVER
VIDEO
1
2
3
4
5
6
7
8
TV TYPE
PASSWORD
RATING
DEFAULT
EXIT SETUP
G
PG
PG 13
R
NC-17
ADULT
3. Press RIGHT button to enter the submenu on the right of the screen. If you would like to
change the age control grade to 1, hold UP button pressed until the blue band locates 1 G,
then press ENTER button.
4. Input the password
0000 .
5. Press SETUP to exit the system setup.
12
Listed in this chapter are the functions of the remote control buttons and their methods of
operations so that the user can refer to them for reference. Please refer to the relevant
sections in chapter 4 and 5 for the detailed operations of most buttons.
11.1 PLAY/PAUSE button
When the player is in the state of stop, pause, slow motion, fast forward, fast reverse,
pressing PLAY button can resume the player to normal playback. When the player is in
playback mode (including slow motion play, fast forward, fast reverse), pressing
PLAY/PAUSE button can resume the normal playback.
11.2 PROGRAM button
Depending on the type of disc, pressing PROGRAM button can change the track playing
sequence.
11.3 CLEAR button
When inputting the code for program playback, pressing CLEAR button can cancel the
input number.
11.4 TITLE button
Pressing TITLE button can display the selectable title menu contained in the DVD disc.
In the menu picture, you can move the UP, DOWN, LEFT, RIGHT button to locate the
specific item, then press ENTER button to specify the playing content (it can be submenu, in
this case continue operating with UP, DOWN, LEFT, RIGHT and ENTER buttons.)
11.5 MENU button
When playing a DVD disc, pressing the button can appear the menu contained in the side
(effectiveness depends on the type of disc). When PBC is off, pressing the button in stop
mode can browse the contents of disc.
11.6 PBC button
Pressing the button switches the PBC state, with VCD 2.0 discs, when PBC is off, during
the playback, press PBC to turn on PBC.
11.7 OSD button
Pressing OSD button will display the message about the play.
11.8 FAST FORWARD BUTTON
Pressing the button will play the disc in slow motion without sound. Each press changes
the fast reverse speed until it resumes the normal playback.
11.9 FAST REVERSE button
Pressing the button will play the disc in slow motion without sound. Each press changes
the fast reverse speed until it resumes the normal playback.
11.10 PREVIOUS button (depends on the format of the disc)
When playing a DVD disc, pressing this button can jump back to play the previous
chapter. With SVCD and other types of disc, pressing the button can jump back to play the
previous track.
11.11 NEXT button (effectiveness depends on the type of disc)
During DVD playback, pressing the button can jump to the playback of next chapter. In
stop mode can browse the contents of disc, pressing the button can skip to the next track.
11.12 SLOW MOTION PLAY button
Pressing the button will play the disc in slow motion without sound. Slow motion play
can be performed forward or reverse. Each press changes the slow motion play speed until it
resumes the moral playback.
13
11.13 REPEAT button
When playing a DVD disc, pressing the button once will repeat the current chapter when
it ends; pressing REPEAT a second time will repeat the content under the current title;
pressing REPEAT a third time will cancel the repeat play function.
11.14 ZOOM button
During playback, pressing the button can zoom out the image, pressing it once enlarges
the image by two times, pressing it twice can enlarge the image by four times, pressing it
again can resume the normal playback.
11.15 ANGLE button (effectiveness depends on the type of disc)
When playing DVD discs on which many angles are recorded, pressing ANGLE can
playback from different angles. Each press of the button changes the angle of the scene.
11.16 MUTE button
Pressing the button can turn off the audio output from the analogue channel.
11.17 SETUP button
On pressing the button, the system setup picture will display on the screen and wait for
the user to set parameters not often changed. Users can make the relevant setup according to
the specific needs. Please refer to page 13 or the detailed operation.
11.18 ENTER button
Pressing the button will make the input or selection effective.
11.19 NUMBER button
The number button "0,1...,9" are used to input numbers, such as inputting the track
number of songs, chapter of a DVD disc, time etc.
11.20 TIME button
Pressing the button allows to input the specific time so that the player jumps to the point
to play.
11.21 AUDIO button
When playing a DVD disc recorded with dts and AC-3, pressing this button can select
audio mode(depends on the DVD disc) Or when playing a DVD disc recorded with many
languages,pressing it can select different language.Each press of the button changes one
language.
11.22 VOLUME+ button
Pressing the button can adjust the volume. Each press increases the volume by one unit.
11.23 VOLUME- button
Pressing the button can adjust the volume. Each press decreases the volume by one unit.
11.24 SUBTITLE button (depends on the type of disc)
Pressing the button can select the caption language such as Chinese, English etc. Each
press changes one caption language code.
11.25 STOP button
When playing DVD, pressing the button once means the playback is paused, and pressing
it twice means the playback is completely stopped.
11.26 OPEN/CLOSE button
Pressing this button once ejects the disc tray and pressing a second time close the disc
tray in turn. You can use this button place or remove a disc.
14
Title: The longest section of a picture, a music piece or a movie on a DVD. Each title is
assigned a title number enabling you to locate the l\title you want.
Track: The sections of a picture or a music piece on a VCD or CD, each track is assigned a
track number enabling you to locate the track you want.
Chapter: A complete section of picture or a music piece on DVD that are smaller than a title.
A title is composed of several chapters. Each chapter is assigned a chapter number.
Caption: The language displayed at the bottom of the TV screen, normally the translation or
the dialogue, which are also recorded on the disc.
Angle: Some DVD discs are recorded from different angles so that users can view the some
scene from different angles.
When you encounter the following problems, first try the following measures. If the
problem still exists, please contact the nearest maintenance center or the maintenance
department of the entertainment company for repairs.
No sound
Make sure that the player is connected rightly with other devices such as amplifier of the
TV set.
Make sure that the TV set is in normal operation.
Check if the system setup is correct.
No normal output from channel 5.1
Make sure that the speakers are correctly connected.
Make sure that the audio signals of disc are recorded with Dolby format.
Make sure that speaker (such as central speaker, surround) are set to "ON".
Check that the audio output is set to analogue output.
Check that the KARAOKE is set to "OFF".
The player can not play
Check the disc is correctly placed on the tray (with the label side facing up).
Check if there is only one disc is placed on the tray.
Make sure that the disc is clean.
Remote control does not work
Move away the objects between the remote control and the player.
Point the remote control at the remote sensor window on the player.
Check the energy of the batteries are sufficient.
Image distortion
Check whether the disc is scratched or dirty.
The player is controlled by a micro computer. In case of malfunction, please turn off the
power supply and turn on the player again in 10 seconds. If there is no error display, the
player can be operated normally.
No response from the button
It might be caused by the power instability or other abnormal phenomena. Please turn off
the power supply and turn on the player again in 10 seconds.
15
16
www.legenddigital.com