1
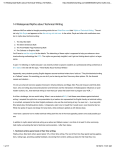
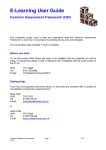
USER MANUAL
Part 8
- End of Year Reports
Software for the benefit of
community group treasurers and
the peak bodies supporting them
PART EIGHT
We lcome to the Part 8 and the e nd the Admin Bandit use r
manual, which is about End of Ye ar Re ports.
This is whe re youʼll le arn how to pre pare financial data for
your annual ge ne ral me e ting, auditor and pe rhaps e ve n to
brie f an incoming tre asure r. Esse ntially, itʼs about closing
the books on the curre nt financial ye ar, so you can start
the ne w one with a cle an slate .
1
CONTENTS
END OF YEAR REPORTS
3
END OF YEAR FINANCIAL REPORTS
3
EPILOGUE
12
INDEX
13
2
End of Year Reports
End of Year Reports
Psst … he re ʼs a se cre t: once upon a time , the e nd of the
financial ye ar use d to be a nightmare for volunte e r
tre asure rs. But thanks to Admin Bandit, itʼs now a bre e ze
— in fact, you can now produce all your annual financial
state me nts in le ss time than it take s to e at a packe t of
chocolate biscuits (hmm … thatʼs a claim we ne e d to te st
in the Admin Bandit office )!
Eve n be tte r, youʼll fly through this final se ction of our use r
manual … be cause youʼve actually cove re d all of your e ndof-financial ye ar tasks, apart from the Re conciliation
Re port, in othe r parts of this use r manual.
END OF YEAR FINANCIAL REPORTS
Start by selecting End of Year Reports in the Reports pull-down menu on
the main menu bar. This takes you to a Select Financial Year screen, where,
as you can probably guess, you need to select the financial year in question
from the pull-down Start Date/End Date box.
Click Cancel if you don’t wish to proceed (this will direct you to the
Transaction List) or Confirm to continue. The latter takes you to an End of
Year Reports List screen, which is divided into two boxes:
3
1. Financial Year
2. Available Reports.
Financial Year
The solution is easy if you accidentally picked the wrong financial year — click
the Change button to return to the Select Financial Year screen.
Available Reports
As you can see in the illustration above, eight reports will generate from the
End of Year Reports List, of which, as we mentioned earlier, the
Reconciliation Report is the only one you haven’t previously learned to
create.
You’ll notice the ticked boxes next to the available reports are inactive. This is
normal, so don’t worry — it simply indicates that reports will be generated.
Now this is where life gets interesting. The illustration below shows what
happens when you try to generate your End of Year Reports without fully
reconciling your accounts first — as the message in red notes, you cannot
produce a Reconciliation Report until all your accounts for the full financial
year are verified. Obviously, you can’t do this until the financial year in
question is over. Hey, we can hardly let you present data to your AGM and
auditor that might contain errors! Besides, it’s not as if you’ll need to generate
End of Year Reports in general until the year has passed and your accounts
are finalised.
4
So, if you get this message and the current financial year is over, you have
two options:
1. Grab your bank statements, reconcile your accounts and come back to
this point later (of course, for the sake of learning, you’re welcome to
keep reading and follow our sample graphics for the rest of this
chapter)
2. Generate all your reports, except the Reconciliation Report, which
you can come back to later.
If you previously ran the End of Year Reports without the Reconciliation
Report, when you next generate the End of Year Reports, you can choose if
you want to generate all the reports again or just the Reconciliation Report
as shown below.
5
My Accounts Are Reconciled But Admin Bandit Says Theyʼre Not!
Check which financial year youʼve selected in the Financial Year box. Chances are,
youʼve got ahead of yourself and accidentally selected the next financial year, rather than
the one just gone.
Okay, click Confirm to generate your reports and go to the End of Year
Report Results screen or Cancel to return to the Select Financial Year
screen.
6
End of Year Report Results
As you can see in our example above, all the reports have generated including
the Reconciliation Report to illustrate some useful points:
1. Note that reports for all your bank accounts are generated; the more
accounts you have, the more reports will be generated
2. You can either individually download reports or create one large
document that contains all reports in one.
3. Any reports you don’t download now will need to be regenerated later
— Admin Bandit will not store them.
The process for downloading reports is the same as previously covered. Click
on any red Download link in the far right column to generate a report. This
takes you to a Report generated screen, where you need to click the red here
link to download your report. This activates a Done screen and a File
Download window, which gives you three options:
1. Open: opens your report in Adobe Reader
2. Save: saves your report to your computer as a PDF file
3. Cancel: terminates your report.
It goes without saying that you need to at least save a copy of your report …
after all, you will need to create copies at some point for your auditor,
committee and annual report.
You’ll be returned to the End of Year Report Results screen when any of the
above three actions are complete — unless you download all reports in a
single document, you’ll need to keep working.
7
Finally, let’s check out the two buttons at the bottom of the screen. Cancel
takes you to the Transaction List, while Select Another Year returns you
to the Select Financial Year screen.
Understanding Your End of Financial Year Reports
As we’ve been through all but one of these reports previously in this chapter,
we’ll only examine the Reconciliation Report, which is a record of how your
accounts have been proved accurate by adding or subtracting where relevant
the following transactions types to or from your account balances:
1. Deposits and other credits to your bank accounts
2. Cheques and other withdrawals from your bank accounts
3. Outstanding receipts (income due but not yet paid)
4. Unpresented cheques (payments made but not yet banked by receiver)
Now, you’ve already learned that reconciling your accounts is anything but
scary, so checking out this report using the key below and the example on the
next couple of pages will be easy.
Your organisation’s name
Name of report
Account/s included
Time period of report
Opening account balance
Cleared transactions
Cleared deposits/credits by: date, number, name and amount
Total cleared deposits/credits
Adjusted bank account balance including deposits/credits
Cleared cheques/withdrawals by: date, number, name and amount
8
Total cleared cheques/withdrawals
Adjusted bank account balance including deposits/credits and
cheques/withdrawals
Uncleared transactions that account for differences between your records
and your bank statement
Outstanding receipts (income still owed) by date, number, name and
amount
Total income owed to you
Bank account balance adjusted (added) to include income owed to you
Unpresented cheques (debts paid that haven’t cleared in receiver’s bank
account) that account for differences between your records and your bank
statement
Total payments owed to others
Bank account balance adjusted (subtracted) to include payments owed by
you
Note advising of difference between your records and your bank statement
of the amount of your petty cash if you haven’t remembered to use the
Repaid Petty Cash field on the Add Deposit screen
9
10
11
Epilogue
Letʼs have a drum roll.
Did you hear it?
Um, perhaps youʼll just have to imagine it. Go on … itʼs worth
it because youʼve just finished working your way through
this user manual!
CONGRATULATIONS
You have mastered Admin Bandit!
If you have any queries and suggestions,
or need further help using this software,
please contact our Support Desk:
H
In the meantime, enjoy your journey
as a volunteer treasurer, and
thank you for giving your time and energy
to make our community a better place.
It is a pleasure for us to be part of what you do … hereʼs to
volunteer treasurers!
12
INDEX
The Admin Bandit use r manual is big … so big, in fact, that
we ʼve divide d it into e ight parts for spe e die r download.
While e ach part has its own conte nts page , the re are time s
whe n youʼll want to know whe re spe cific functions are
cove re d — imme diate ly … without having to sift through a
mountain of page s first.
So he re it is: an inde x to what is include d whe re .
PART 1
INTRODUCTION
4
HOW ADMIN BANDIT WORKS FOR YOU
HOW TO USE THIS MANUAL
HOW TO SET UP ADMIN BANDIT
OPTIONS
4
6
8
13
BANK ACCOUNTS
USER DETAILS
CLIENT DETAILS
13
18
22
PEOPLE
30
ADD GROUP
ADD MEMBER
GROUP LIST
POPULATE GROUPS
MEMBER LIST
MEMBER NOTICES LIST
IMPORT MEMBERS
31
34
38
45
46
54
68
CATEGORIES
77
CATEGORIES
77
13
PART 2
MONEY
3
ADD RECEIPT
ADD PAYMENT
ADD FEE RECEIPT
PRINT RECEIPTS
TRANSACTION LIST
INVOICES OUT LIST
4
10
15
20
25
38
EVENTS
50
ADD EVENT
EVENTS LIST
50
52
DEPOSITS
55
ADD DEPOSIT
DEPOSITS LIST
55
60
PART 3
RECONCILE
3
RECONCILE
3
PART 4
TREASURERʼS REPORT
3
TREASURERʼS REPORT
3
PART 5
MONEY REPORTS
3
TRANSACTION REPORT
CATEGORIES (DETAILED) REPORT
CATEGORIES (SUMMARY) REPORT
BUDGET REPORT
QUARTERLY BAS
EQUIPMENT REPORT
INVOICES OUT (DETAILED) REPORT
INVOICES OUT (SUMMARY) REPORT
4
8
14
17
21
28
32
36
PART 6
MEMBERSHIP REPORTS
3
14
MEMBER DETAILS REPORT
MEMBER FEES REPORT
GROUPS REPORT
4
8
15
PART 7
FUNDRAISING/EVENT REPORTS
FUNDRAISING/EVENT (DETAILED) REPORT
FUNDRAISING/EVENT (SUMMARY) REPORT
3
3
8
PART 8
END OF YEAR REPORTS
3
END OF YEAR REPORTS
3
EPILOGUE
12
INDEX
13
15