1
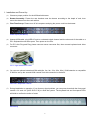
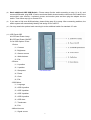
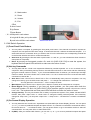
LKD-1516/ 1716 Series
4-in-1 KVM Switch Drawer Setup Manual
1U 15” / 17” LCD Display, Keyboard,
Touch Pad Mouse KVM Rackmount Drawer
And 16 ports KVM switch
User Manual
Industrial Rack Mount LCD KVM Drawer
1
1. Installation and Power-Up
(1) Choose a proper position for the KVM switch drawer.
(2) Drawer Assembly: Fasten the rear brackets onto the drawer according to the depth of rack, then
mount the drawer onto the rack cabinet.
(3) First Time Set-up: Please turn off all computers and plug the power cord into the drawer.
Power Input (AC INPUT)
(4) Unwrap KVM cable, plug HDB-15 end to a selected switch channel and the other end of the cable to a
PC’s keyboard/mouse/video ports. Then power on the PCs.
(5) For PC’s Hot Plug-and Play, please connect mouse connecter first, then connect keyboard and video
connecter.
3-in-1 High-Quarantine Cable
(6) You can use optional extension KVM cable(3m, 6m, 9m, 15m, 20m, 30m), KVM extender or compatible
IP KVM to set up the second KVM console from the connection in the back.
2nd VGA / Keyboard / Mouse
(7) During installation or operation, if you face any signal problem, you can press down both the front-panel
number <G> and <H> [LKD-1516/1716] to reset the system. The keyboard led and front-panel LEDs
will blink to confirm the action of reset.
Switch Key
2
(8) Stack additional OSD KVM Switch : Please setup first-tier switch according to step (1) to (4), and
connect KVM cable, plug HDB-15 end to a selected switch channel and the other end of the cable to the
second-tier’s user console – keyboard, mouse, and monitor ports and then plug the adapter into the
switch. Then follow step (4) to connect PCs.
(9) If you want to link more KVM switches, please follow step (8) to setup. After connecting switches, the
switch system will automatically identify and assign ID for each PC.
(10) You may attach the optional rack mounting kit to the additional switch for standard 19” rack.
(11) LCD Panel OSD
A.LCD Panel Power Lamp
B.LCD Panel Power ON/OFF
C.Call OSD Option / Enter
1.Colour
1
Contrast
2
Brightness
3
Gamma correct
4
White balance
5
Exit
2.Picture
1
H.position
2
V.position
3
Sharpness
4
Phase
5
Clock
6
Exit
LCD Panel OSD
3.OSD Menu
1
Language
2
OSD H.position
3
OSD V.position
4
OSD V.position
5
OSD H.position
6
OSD timer
7
Translucent
8
Exit
4.Miscel laneous
1
Signal source
3
2
Mode select
3
Reset
4
Volume
5
Exit
5.Exit
D.Auto Control
E.Up Button
F.Down Button
12
KVM push in rack cabnet
A.in right & lift side, pull up the white
B.push in the KVM to rack cabnet
White fixed device
2. KVM Switch Operation
(1) Front Panel Push Buttons
A. You may select a computer by pressing the front panel push button. If the channel connected to a power-on
computer, the front panel led will show orange. If shows with blue led, it reflects the selected computer. If a
second-tier switch is connected, when you switch to the PC on the second-tier, the corresponding channel led
on the first-tier will also turn blue to confirm the selection.
B. Auto Scan: By pressing the first-tier switch’s push button <1> and <2>, you can activate Auto Scan function to
scan power-on computers.
C. Reset: By pressing the front-panel number <G> and <H> [LKD-1516/1716] to reset the system, the
keyboard and front panel LEDs will blink to make sure the action of reset.
(2) Hot-key Commands
A. You may start with two <Scroll Lock> keystrokes followed by number keystroke <A> to <H> to switch over 16
computers. After you activating hot-key function, the OSD menu will show on the screen and then followed by
typing the channel number to switch. If you connected additional tier of switches, you should input two-digit
number to switch. Ex: Press <Scroll Lock>+<Scroll Lock>+<1>+<8> to switch to PC No. 8 of second-tier switch
connected on channel No. 1.
B. Auto Scan: Press <Scroll Lock>+<Scroll Lock>+<F4> to automatically scan power-on computers. You may
change scan rate by go to the OSD screen and press < > to change scan interval from 1-255 secs.
a.
You may press two <Scroll Lock> + <Esc> to stop Auto Scan
C. Manual Scan: Press <Scroll Lock>+<Scroll Lock>+<Space> to switch to the next power-on computer.
D. Reset Signal: During operation, if you face any signal problem, you can press down both the
front-panel number <G> and <H> [LKD-1516/1716] to reset the system or press <Scroll Lock>+<Scroll
Lock>+<R>. The keyboard led and front panel LEDs will blink to confirm the action of reset.
E. Change Hot-Key: You may use another set of hotkey to operate this system. First, please activate RESET
function, then press <Caps Lock> or <Scroll Lock> to change the hotkey initial keystroke. If the initial key
changed to “Caps Lock”, you can press <Caps Lock> + <Caps Lock> + <Channel No.> to switch over different
PCs.
(3) On-Screen-Display Operation
A. You may start with two <Scroll Lock> keystrokes to activate OSD (On-Screen-Display) function. You can press
<↑> or <↓> to move to preferred computer and press <Enter>. If a channel is connected to a second-tier switch,
its front will show a “ ” to indicate a switch, you may press <Enter> to go to second-tier switch to select its
connected PCs. You can press <Esc> to leave OSD menu.
B. F1(EDIT): After you activate OSD function, you can use <↑> or <↓> to move to preferred computer and press
4
C.
D.
E.
F.
G.
H.
<F1> to edit, you can use character A~Z, 0~9, ”-”, “ ”, and ”.”. You can use <F5> to clear or <Enter> to go to
next computer. After editing, you can press <F1> to save change.
F2(PSW): After you activate OSD function, you can use <↑> or <↓> to move to preferred computer and press
<F2> to set password. For a password protected computer, it will show a “ ” symbol. When you go to the
computer next time, it will show a small window for you to enter password. If you want to cancel or change the
password, please enter OSD menu and press <F2> in that computer channel. By not entering any character,
you can cancel the password or enter new password to activate password protect.
F3(Scan Set): After you activate OSD function, you can use <↑> or <↓> to move to preferred computer and
press <F3> to set the computer you want to scan. It will show a clock symbol to identify the computer
F4(Auto-Scan): After you activate OSD function, you can press < > to set the scan rate from 1-255 seconds
and press < > to save change. Then press <F4> to activate auto-scan.
Time-Out: The KVM switch allows two-access and only one access can operate in the same time. The period
of time-out is the same as scan rate from 1-255 seconds.
Channel Display: When you switch to different computer, it will show the channel ID and computer name on
the screen and disappeared after 3 seconds.
During operation, if the computer has power-off or added, the status will also change in your next-enter OSD
menu.
3. Remarks
Before operating this 4-in-1 KVM switch drawer, please read operation manual carefully.
Please use high quality 3-in-1 KVM cable for optimum operation.
To prevent potential power damage, please don’t use 2-wire extension cord and ensure AC outlets at PCs and
monitors are on the same phase and have correct grounding.
(4)
Limited Warranty:
A. In no events shall the direct vendor’s liability for direct or indirect, special, incidental or consequential damages,
loss of profit, loss of business, or financial loss which hay be caused by the use of the product exceeds the
price paid for the product.
B. The direct vendor makes no warranty or representation, expressed or implied with respect to the contents or
use of this documentation, and especially disclaims its quality, performance, merchantability, or fitness for any
particular purpose.
C. The direct vendor also reserves the right to revise or update the product or documentation without obligation to
notify any user of such revisions or updates. For further information, please contact your direct vendor.
(1)
(2)
(3)
5