1
SECTION 3: HEAT PUMP TO TANK CONNECTIONS
CONNECTING THE REFRIGERANT LINES TO THE WATER TANK
Step 1. Carefully unwind the copper refrigeration pipes on the heat pump, take care to avoid kinking the pipes. The pipes are
quite hard copper and will kink if care is not taken to carefully mould or form the curve required. If a tight bend to the right is
required in the refrigeration lines, cut back the insulation and use a soft copper tube bender to form the bend. The insulation
must be taped back in place once the bend is made.
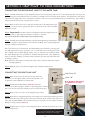
Step 2. Remove the lower cover on the tank, find the two male refrigeration pipe
couplers; you may need to gently pull them out from the tank if you find them
difficult to access.
Step 3. Important! Feed the couplers and refrigerant lines through the holes in
the cover plate to align with the respective couplers on the tank.
You cannot undo the couplers later if you forget this step.
Step 4. Carefully align the male & female couplers before tightening, misalignment
can cause rupture or displacement of the internal “O-Ring” seal, causing refrigerant
leakage & defective performance.
Use some mineral oil on the threads and rubber O-Ring and ensure the coupling nuts
are fully tightened using two spanners, one on each half of the coupling then draw
the coupling halves together tightly; please note you will feel some resistance when
the metal diaphragms are punctured to facilitate refrigerant flow; keep tightening
until you feel the “O-Ring” seal fully seated otherwise gas will leak under the high
operating pressures.
Note: There should be little or no thread showing on the connectors when the couplers
are fully tightened.
Step 5. Refit the lower cover plate and tighten the 4 Stainless Steel screws.
CONNECTING THE HEAT PUMP UNIT
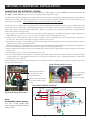
Side Cover “A”
Step 1. Remove the side cover “A” by removing screw “B”.
Pull the cover out slightly at the bottom and push the cover
downwards a few millimetres to release tabs.
Screw “B”
Step 2. Check that the flare fittings (Note A) on the line
connectors are still very tight to ensure no gas leakage here. (If they
are loose, the line may have leaked gas and could need service.)
Step 3. Remove the cover caps on the refrigerant gas valves.
Step 4. Open the two refrigerant gas flow valves at the base of the heat pump using a 5mm
hex key. Turn the large valve approx 6 turns anti clockwise, & the smaller valve approx 2.5
turns anti-clockwise. Note: We recommend using soapy water on the couplers and flare
fittings to check gas leaks. (Note A)
Step 5. Replace the cover caps on the refrigerant valves and refit the plastic side cover to
the Heat Pump unit.
Open the refrigerant gas valves only
once you have checked the connections
are all made correctly and are tight
4
Note (A) Check flare fittings
are tight before opening
valves