1
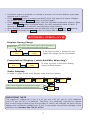
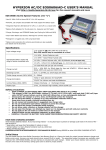
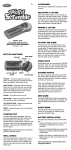
ETHOS
LX41B Pro
opErAting instructions
Please keep for future reference
Thank you for purchasing this Ethos LX41B Pro charger. We are sure you will be pleased with
its performance and features. In order to ensure that you obtain the maximum benefit from
its operation, please read these instructions carefully.
SpEciFicAtions
Input Voltage
11~15V DC
100~240V AC 50~60Hz
Battery Type & Cells
1~4 Lithium-Ion cells (3.6V/cell)
1~4 Lithium-Polymer cells (3.7V/cell)
1~4 LiFePO4 cells (3.3V/cell)
1~12 Nickel-Cadmium cells (Ni-Cd)
1~12 Nickel-Metal Hydride cells (Ni-MH)
Charge Rate
0.1A ~ 4A Adjustable in 100mA steps (Max 40W)
Trickle Charge Rate
0 ~ 100mA (Ni-Cd & Ni-MH Only)
Balancing
Max. Current 120mA
Balancing connector
JST-EH type (4 cell)
Charge Termination
Li-Ion, Li-Po & Li-Fe Constant current/constant voltage
NiCd/NiMH Delta Peak
Delta Peak Sensitivity
Ni-Cd
Ni-MH
8mV/cell
5mV/cell
SpECIAL FEATUrES
• Built-in intelligent balancing circuit is designed to individually balance each cell on
a lithium battery pack within the tolerance of 5mV during charge.
• Balancing plug adaptor boards are supplied to suit FlightPower, Thunder Power
and JST-XH batteries. Optional adaptors for Polyquest & 4/2mm plug car packs are
available.
• 2 line, 8 character, LCD makes the screen clear and legible.
• Monitoring features allow the monitoring of capacity, peak voltage and individual
cell voltages (Lithium only) on the screen during and after charging.
• Various warning messages for incorrect input voltage, wrong connections,
unsuitable battery condition and reverse polarity on output.
1
SAFEty prEcAutions
•DO NOT attempt to charge incompatible types of rechargeable batteries.
This charger is designed to only charge Nickel-Cadmium, Nickel-Metal
Hydride, Lithium-Ion, Lithium-Polymer & LiFePO4 batteries.
•Make sure you place the charger on a firm level surface for charging.
•DO NOT attempt to charge batteries at excessive fast charge currents.
Check with your battery manufacturer for the maximum charge rate
applicable to your battery.
•DO NOT use automotive type battery chargers to power the charger.
•DO NOT leave the charger unattended while charging. Disconnect
the battery and remove input power from charger immediately if the
charger becomes hot. Allow the charger or battery to cool down before
reconnecting.
•DO NOT allow water, moisture or foreign objects into the charger.
•DO NOT place the battery or charger on or near a flammable object
while in use. Keep away from carpets, cluttered workbenches, etc.
•DO NOT cover the air intake holes on the charger as this could cause
the charger to overheat.
•Connect the input leads to the mains or 12V power source first, then
connect the battery.
•DO NOT disassemble the charger.
•This unit is not intended for use by young children or infirm persons
unless they have been adequately supervised by a responsible person to
ensure that they can use it safely.
•Young children should be supervised to ensure that they do not play
with the charger.
•DO NOT attempt to charge whilst the input 12 volt battery is being
charged, as the voltage supplied to the charger may be too high.
•DO NOT attempt to charge non-rechargeable batteries.
2
Lithium Ion/polymEr BAttEry
SAFEty WArnings
Ensure that the charger and battery are placed on a non-flammable
surface whilst charging and ideally charge outdoors wherever possible.
NEVER charge a Lithium ION/Polymer/Fe battery inside a vehicle whatever
the circumstances.
ALWAYS ensure that the charger is correctly set for the battery being
charged, checking both charge rate and cell count (Lithium Only). Be
particularly careful if using a series/parallel battery pack, or if using packs
of different specifications with the same charger.
NEVER charge at a rate higher than that recommended by the cell
manufacturer, this can be very dangerous.
DO NOT leave Lithium ION/Polymer/Fe batteries unattended whilst they
are charging. Monitoring the batteries during charging is very important.
ALWAYS monitor the temperature of the battery being charged every few
minutes. If the battery becomes hot to the touch, disconnect it from the
charger immediately and allow to cool. DO NOT recommence charging
until the battery and charger have been checked for compatibility and the
charger settings have been confirmed as being correct.
In the unlikely event of the Lithium ION/Polymer/Fe battery catching fire
DO NOT use water to attempt to put the fire out, instead use sand or a
fire extinguisher designed for electrical fires.
When used correctly, Lithium ION/Polymer/Fe battery packs are as safe
as any other type of rechargeable battery pack. However they do require
different charge regimes to the longer established Nickel Cadmium and
Nickel Metal Hydride technologies and have the potential of catching
fire if severely mistreated.
If Lithium Polymer battery packs are short-circuited or severely
over-charged elemental Lithium may be deposited internally, and if the
battery pouch is damaged this can escape from inside the battery. If this
occurs a fire may be caused, as elemental Lithium is highly reactive
when exposed to water or moisture, producing flammable hydrogen
gas and corrosive fumes. Elemental Lithium is not produced unless the
battery pack is severely mistreated, so in normal usage there is no
likelihood of explosion or fire.
3
Lithium Ion/polymEr/FE BAttEriEs
Lithium Ion/Polymer battery packs must NEVER be discharged below 3
volts per cell (Li-Fe 2.0V) as this will result in damage to the cells. If the
voltage is allowed to drop below 3 volts per cell the battery voltage may
seem to recover following a charge, but the battery may not then give its
full nominal capacity and a reduction in performance is likely – allowing the
voltage to drop below 3 volts per cell will invalidate all warranty claims.
NEVER charge Lithium Polymer battery packs at greater than 4.2V per
cell, Lithium Ion at 4.1V volts per cell or LiFe at greater than 3.7V per cell
as this will cause irreversible damage to the cells and will invalidate all
warranty claims.
NEVER charge Lithium battery packs above their maximum charge rate.
This can damage the pack and can be dangerous. Generally, Lithium
Polymer packs should not be charged above 1C (1 x Capacity), although
some newer packs do allow charging at 2C.
e.g Li-Po pack of 2500mAh capacity : 1C = 2500mAh = 2.5A max charge current.
DO NOT use discharge rates in excess of those specified with the battery
pack as this will result in a significant drop in voltage under load and will
dramatically reduce the number of charge/discharge cycles the battery
pack will give.
If disposing of Lithium battery packs ensure that the pack is fully
discharged by using a light bulb, electric motor or similar to completely
discharge the pack.
DO NOT allow any Lithium battery pack to short-circuit as this is likely to
result in a minor explosion and consequent fire.
BEFORE charging any Lithium battery packs they should be closely
inspected for any damage, such as punctures in the sleeving or if the
battery has swollen or expanded in size. If any such damage is detected
DO NOT charge, even if the battery otherwise appears to be brand new.
Before commencing charging ALWAYS double check the settings on the
charger to ensure it is set correctly for the battery pack to be charged.
Using the wrong settings is likely to result in damage to the battery pack
being charged and could result in the battery catching fire.
4
Input powEr
12V DC
Connect the 12V input lead to the charger, then red alligator clip to the
positive (+) terminal on the power source and the black alligator clip to
the negative (-) terminal. The charger will display “Input voltage” error
message if the input is below 11V or above 15V. If this happens, please
recheck the input power supply to make sure correct power is present.
OR
100~240V AC
Connect the mains lead to the charger, then connect the AC plug to a
regular AC100~240V wall socket.
NOTE:
If AC power is being used for input power, do
NOT try to connect the 12V DC power as well!
Output BAttEry ConnEctions
Two 4mm banana sockets are located on the right side of the charger.
Connect the battery main power leads to these sockets with the positive
(+) lead connected to the red socket and the negative (-) lead to the
black socket. You may need to purchase an adaptor lead to suit the
specific connector on you battery and make this more convenient. The “No
battery” error message will be displayed if trying to start charging without
connecting a battery to these sockets. The “Open Circuit” error message
will be displayed if a battery becomes disconnected from the charger
while a function is in progress. A “Reverse Polarity” error message will be
displayed if a battery is connected to the charger in reverse.
Note: In order to balance Lithium batteries during charge, please ensure
that both the battery main power leads and the balancing connector from
the battery pack are connected to both 4mm output banana sockets and
balancing port respectively. The balancing port (JST EH type) requires a
short lead (supplied) and an adaptor board to suit other battery balance
connectors. Adaptor boards for Flight Power/Thunder Power and JST-XH
batteries are included. Optional adaptors for Polyquest & 4/2mm plug car
packs are available.
If the main battery power leads ONLY are connected to the output banana
sockets, without connecting the balancing connector to the balancing port
on the charger, the charger will charge or discharge the connected Lithium
pack without balancing it.
5
gEnErAl OpErAtion
• When the charger is first connected to the power source the charger will show the
battery type that was last used.
• If the BATT TYPE button is briefly pressed, the current battery type (NiCd, NiMH,
Li-Ion, Li-Po, Li-Fe ) will flash. By pressing the BATT TYPE button again, the next
battery type will be selected, as shown in the flow-chart below.
NiCd
1.0A
BATT TYPE
NiMH
1.0A
BATT TYPE LiIo
BATT TYPE LiPo
BATT TYPE
1.0A 3CL
1.0A 3CL
LiFe
1.0A
BATT TYPE
3CL
progrAmming
NiCd & NiMH Modes
Li-Ion, Li-Po & Li-Fe Modes
BATT TYPE LiPO
2.0A
ENTER
BATT TYPE NiCd
1.0A
ENTER
INC
NiCd
3.0A
START
INC
LiPO
2.5A
DEC
DEC
3CL
INC
LiPO
2.5A
BATTERY
CHECK....
3CL
DEC
2CL
START
2.98A
8.421V
2 secs
BALANCER
NOT CON.
NiCd CHG
0:04
BALANCER
CON.
BATTERY
CHECK....
2.49A
7.895V
NiMH
3.0A
LiPo
3.0A 2CL
2 secs
LiPo BLC
0:04
Setting Charge Current
Adjust the desired charge current, which ranges from 0.1A to 4.0A
with the INC & DEC buttons. Press the ENTER button to confirm the
setting.
Setting the Number of Lithium Cells
Using the INC and DEC buttons adjust the number of cells to match
the battery being charged and press the ENTER button to confirm the
setting. (Only required for Lithium batteries)
6
• If another button is pressed, or nothing is pressed, the current battery type stops
flashing and is selected.
• If the BATT TYPE button is pressed and briefly held, the input and output voltages
are shown, until the BATT TYPE button is pressed again.
• If the ENTER button is briefly pressed, the first adjustable parameter starts to flash,
then if the ENTER button is pressed again, the next parameter starts to flash. If
nothing is pressed for 5 seconds, the parameter stops flashing.
INC
DEC
• When flashing, the parameters can be adjusted using the and buttons.
START the charge the ENTER button is pressed and briefly held.
• To ‘ ’
ScrEEn DisplAys
Displays During Charge
CHG: Charge
“BLC” will be shown if the balancer cable of the battery is
connected to the balancing port of the charger.
LiPo CHG
0:04
2.49A
7.895V
2 secs
If the Enter button is pressed at any
stage, the charge can be terminated.
Completion Display (with Audible Warning)
LiPo END
42:52
2 secs
0.00A
12.522V
In order to move to the main display,
press the Enter button.
Data Display
In order to move to the main display, press the Enter button.
I = 12.05V
DEC O=12.52V
INC
ChgCAPA
DEC 01205mAh
INC
ChgPEAK
DEC O=12.61V
INC
LCB-[01]
DEC 4.174V
INC
MAX4.18V
DEC MIN4.16V
INC
ENTER
ENTER
“LCB” - Lithium Cell Balancer. Using the ‘INC’ and ‘DEC’
buttons you can view the voltage of individual cells.
DEC LCB-[02]
4.168V
IMPORTANT NOTE
INC
The maximum voltage for Li-Ion is 4.1V per cell, 4.2V per cell for Li-Po batteries
and 3.7V per cell for Li-Fe batteries. Therefore, it is extremely important to choose
the correct Lithium battery type and number of cells to be charged, as each Lithium
battery has a different voltage level. If not, it may cause very serious damage to the
batteries and increase the risk of a fire!
7
Error mEssAgEs
INPUT
VOLTAGE
Input voltage is below 11.0V or exceeds 15V.
NO
BATTERY
Battery is not connected to the charger’s output banana
sockets.
REVERSE
POLARITY
Battery is connected to the output banana sockets in
reverse.
CIRCUIT
PROBLEM
BAT.OPEN
CIRCUIT
A circuit error has been detected during battery checking.
Battery has become disconnected during an operation.
OVER BAT
VOLTAGE
The wrong number of cells has been set while charging
Lithium batteries.
LOW BAT
VOLTAGE
Wrong number of cells has been set, or batteries are over
discharged, while charging Lithium batteries.
HIGH BLC
VOLTAGE
A high voltage cell has been detected during balancing. The
pack may be faulty.
LOW BLC
VOLTAGE
A low voltage cell or short circuit has been detected during
balancing. The pack may be faulty.
DONT CHG
LiXX
There is a lithium battery balancing lead connected to the
charger, but the charger is set to either NiCd or NiMH charge
mode. This helps prevent charging Lithium batteries in the
wrong charge mode.
8
9
www.LogicrC.com
Logic RC Limited
14 Hartham Lane
Hertford
SG14 1QN
United Kingdom
rev. 04/2009