Transcript
Draft051110
cPlease
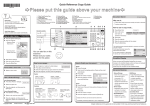
How to install the printer driver...
A Insert the supplied CD-ROM provided with this machine
into the CD-ROM drive.
B Select an interface language, and then click [OK].
C Click [Quick Install].
RPCS printer driver and DeskTopBinderSmartDeviceMonitor for Client are installed.
D Click [I accept the agreement], and then click [Next >].
E Select the machine model you want to use.
F Click [Install].
The printer driver installation starts.
G Click [Finish], and then click [Exit].
Using the HDI driver for AutoCAD...
Why use it?
•
•
Quick Reference Printer Guide
The HDI driver for the AutoCAD 2000 series is provided to
work specifically with the AutoCAD 2000 series of CAD
applications. Also, the HDI driver is specially designed for
use in environments where AutoCAD 2000 applications are
running.
Using the HDI driver reduces print data size, enabling faster
printing.
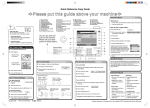
How to prepare for printing...
A On the [Start] menu, point to [Settings], and then click [Printers].
B Select the RPCS printer you want to print from by rightclicking on it.
C Select [Set as Default Printer].
D Select [Printing Preferences...].
E If you get the ‘Configure...’ message, click [OK].
F On the [Change Accessories] tab, select the options that are
installed on the machine, and then click [OK].
G Specify the paper size of the original in the screen that
appears next.
H Click [Add/Change Custom Settings...]. Make your settings
under [Setup], [Edit], [Finishing], and [Misc.].
I Save the custom settings you have made: click [Save as],
enter a name, and then click [OK].
follow these instructions using your PCg
How to print a confidential document...
A Click [File], [Print] and [Properties].
B In [Job Type], select [Locked Print].
C Click [Details].
D Specify [User ID] and [Password].
E Click [OK], and then reconfirm password.
F Perform steps as described in ‘How to print...’ from step 3
onwards.
How to print...
G Go to the machine and then press the {Printer} key.
A Open your document.
B - Click the print icon directly, or
- Click [Print] on the [File] menu.
C Select the printer you want to use in the [Name] or [Select Printer]
list, and then click the [Properties] button or [Print Settings] tab.
D Make the necessary settings, and then click [OK].
E Set a number of copies.
GB GB
I Press [Locked Print Job List].
J Select your document, and then press [Print].
K Enter your password, and then press [OK].
Reconfirm by pressing [Yes].
The Locked Print file is printed, and deleted afterwards.
F Click [OK].
Copyright © 2007
H Press [Print Jobs].
B2866515
How to print documents later (Hold Print)
How to print stored documents on the hard disk (Stored Print)
A
B
C
D
Click [File], [Print] and [Properties].
In [Job Type], select [Hold Print] or [Stored Print].
Click [Details].
Specify [User ID] and [Password] if necessary (for password
protected Stored Print documents).
E Click [OK], and then reconfirm password.
F Perform steps as described in ‘How to print...’ from step 3
onwards.
G Go to the machine, and then press the {Printer} key.
H Press [Print Jobs].
I Press [Hold Print Job List] or [Stored Print Job List].
J Press ID and enter password if necessary (for password
protected Stored Print documents).
K Select your document, and then press [Print].
The Hold Print file is printed, and deleted afterwards.
The Stored Print file is printed.
How to use Web Image Monitor...
A Start your Web browser.
B In your browser's address bar, enter the following:
http://machine's IP address/
C Select one of the following functions:
• Home
• Document Server
• Printer: Print Jobs
• Job
• Configuration
Why use Web Image Monitor?
•
•
To access the machine anywhere via a Web browser.
To provide you with the convenience of managing certain
functions from your computer.
How to use Web Printing Tool...
A Start your Web browser.
B In your browser's address bar, enter the following:
http://machine's IP address/webprint/
C In the menu area to the left, click the menu item corresponding to the function you want to know about.
The page for the selected menu item appears in the work
area to the right.
D Use the displayed page to make settings for printing.
Why use Web Printing Tool?
•
To print GL/2 and TIFF/CALS files, make print settings, and
acquire system logs via a Web browser.
Web Printing Tool requires Java Runtime Environment.
Download it from the following web site: http://www.java.com/
How to monitor your machine in the network...
Use SmartDeviceMonitor, which is automatically installed
with your printer drivers.
A Right-click the green PC icon at the bottom of your screen.
B Click [Property], [Options...], [Network Devices] and press
[Browse...].
C Select your machine, and then click [OK].
D Select a machine in [Printers Folder], and then select [To be
monitored]. Select [Displayed on Task Bar].
If you select this machine from the SmartDeviceMonitor
icon, you can see the [Status], [Configuration] and [Job
History]. Next time you print, you get a message on your pc
in case of any failure.


![quindi fare clic su [OK].](http://vs1.manualzilla.com/store/data/006146641_1-adca829577fffadd0dd4bf009a9cf28a-150x150.png)
