1
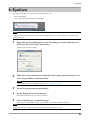
Important
Please read this User’s Manual carefully to
familiarize yourself with safe and effective
usage.
About ScreenManager Pro for LCD.......................... 3
1. Setting Up............................................................... 4
1-1. System Requirements................................................ 4
1-2. Installing the ScreenManager Pro for LCD................ 5
1-3. Setting Icon in the Notification Area........................... 6
1-4. Uninstalling the ScreenManager Pro for LCD........... 7
The latest software and User's Manual
are available for download from our site:
http://www.eizo.com
2. How to Start up/Exit out of the Setting Window...................8
3. Auto FineContrast.................................................. 9
3-1. Auto FineContrast Setting........................................10
3-2. WindowMovie Mode.................................................12
4. Color Adjustment.................................................. 13
5. Screen Adjustment............................................... 17
6. Hot Key................................................................. 18
7. Timer..................................................................... 20
8. Sound................................................................... 22
9. EyeCare................................................................ 23
10. Using the Software with Multi-monitor Setting.................24
11. Troubleshooting.................................................. 25
Glossary.................................................................... 26
No part of this manual may be reproduced, stored in a retrieval system, or transmitted, in any form or by any
means, electronic, mechanical, or otherwise, without the prior written permission of EIZO Corporation.
EIZO Corporation is under no obligation to hold any submitted material or information confidential unless
prior arrangements are made pursuant to EIZO Corporation’s receipt of said information. Although every
effort has been made to ensure that this manual provides up-to-date information, please note that EIZO
monitor specifications are subject to change without notice.
QuickTime is a registered trademark of Apple Inc.
RealPlayer is a registered trademark of RealNetworks, Inc.
Windows, Windows Media and Windows Vista are registered trademarks of Microsoft Corporation in the
United States and/or other countries.
EIZO, EIZO Logo, ColorEdge, ColorNavigator and ScreenManager are registered trademarks of EIZO
Corporation in Japan and other countries.
All other trademarks are the properties of their respective owners.
2
About ScreenManager Pro for LCD
About ScreenManager Pro for LCD
ScreenManager Pro for LCD is the software for adjusting the monitor from the computer using the mouse or
keyboard through the USB interface.
Features
• Auto FineContrast
By registering a FineContrast mode to each application, the monitor automatically switches its FineContrast
mode for each application.
The “WindowMovie” mode, specially provided for this software, is available.
(The FineContrast mode is referred to as the Color mode depending on the type of your monitor.)
• Color Adjustment (Adjustment Data Registration Function)
The ScreenManager Pro for LCD software provides the monitor’s color adjustment function. Adjusted data can
be stored/loaded as registry data of the system.
User color data is also available as a mode for Auto FineContrast function.
• Screen Adjustment
The ScreenManager Pro for LCD software provides the monitor’s screen adjustment functions through the
computer.
• Hot Key Setting
The monitor functions can be assigned to any keys on the keyboard.
• Timer
The software turns on / off the monitor’s power based on the preset timer schedule.
• Sound Control
Volume and balance can be controlled if the monitor employs built-in speakers.
For HD24xxW, the settings such as the volume of external speakers connected to the monitor are adjustable,
and the sound can also be adjusted with the ScreenManager Pro for LCD.
• EyeCare
By using EyeCare function, you can care the health of your eyes.
– EyeCare Reminder
Any pop up messages can be shown periodically.
• Multi-monitor Setting Support
Using the monitor with Multi-monitor setting, the software sets up or adjusts each monitor individually.
3
1. Setting Up
1. Setting Up
1-1. System Requirements
The ScreenManager Pro for LCD software operates under the system shown below.
OS
Microsoft Windows 8.1 (32 bit and 64 bit)
Microsoft Windows 8 (32 bit and 64 bit)
Microsoft Windows 7 Service Pack 1 (32 bit and 64 bit)
Microsoft Windows Vista Service Pack 1 / Service Pack 2 (32 bit and 64 bit)
Microsoft Windows XP Service Pack 3
Computer
Microsoft Windows XP Professional x64 Edition Service Pack 2
Built-in USB
Note
•When multiple monitors are connected, each monitor should display an independent screen. Displaying the
same screen on each monitor or across multiple monitors prevents adjustment using the ScreenManager Pro
for LCD. For details of how to change the settings, see the User’s Manual of the graphics board.
A
B
Independent screen on
each monitor (OK)
4
A
A
Same screen on each
monitor (NG)
A
A screen over the multiple
monitors (NG)
1. Setting Up
1-2. Installing the ScreenManager Pro for LCD
1
Connect the USB cable
Connect the USB upstream port of the monitor to the USB downstream port of the USB compliant PC or
another hub by using the EIZO USB cable.
ex.:
USB Upstream Port
USB Downstream Port
Tips
•Refer to the user’s manual of the monitor for setting up the USB function.
For HD24xxW/FX2431/FX2431TV/ColorEdge CX/CS series monitor
•Connect the USB cable to the USB port (upstream) that fits the PC (PC 1/PC 2) connector. Refer to the
Setup Manual of the monitor, how to connect the USB cable and set up the USB.
•For HD24xxW
Switch the “USB” settings of the monitor to match the PC. For “USB” settings, refer to “2-1. (or 3-1.)
Input Signal Switching” of the user’s manual of the monitor.
•For FX2431/FX2431TV
Switch the “USB Selection” settings of the monitor to “Auto” or to match the PC. For “USB Selection”
settings, refer to “2-1. (or 3-1.) Input (or Broadcast) Signal Switching” of the user’s manual of the
monitor.
•ColorEdge CX/CS series monitor
This function allows the input signal to link the USB upstream port when one monitor is connected to
two PCs. For details, refer to the User’s Manual of the monitor.
2
Insert the “EIZO LCD Utility Disk” CD-ROM to the CD-ROM drive
Menu opens automatically. Click “Software” tab.
Click “ScreenManager Pro for LCD” on the menu.
Tips
• When the menu does not appear automatically, double click “Launcher.exe”.
5
1. Setting Up
3
Install the software
Click “Install” on the menu, then the ScreenManager pro for LCD installer starts up.
Tips
• If your OS is Windows 8.1, Windows 8, Windows 7, or Windows Vista, the “User Account Control”
dialog may appear. *1
Click “Yes” (Windows 8.1, Windows 8, Windows 7) / “Continue” (Windows Vista) to open the menu.
*1: The “User Account Control” dialog does not appear depending on the setting.
Follow the instruction of the menu to install the software.
When the installation completes, the ScreenManager Pro for LCD setting icon appears in the Windows
notification area.
Tips
• Download and install the software from our website according to the following procedure.
1. Extract the downloaded file.
2. Double-click “Setup.exe”.
The setup wizard starts up.
Install the software as prompted by the wizard.
1-3. Setting Icon in the Notification Area
The software has detected the connected monitor. ScreenManager Pro for LCD is active.
Color
Monochrome
The software has not detected the connected monitor. ScreenManager Pro for LCD is not
active. Confirm the USB cable is correctly connected. If the problem persists, turn off the PC
power, then turn it back on.
Tips
•See “10. Using the Software with Multi-monitor Setting” (page 24) when connecting two or more monitors with
the system.
•The software does not detect the monitor automatically when using SX3031W monitor with “Dual Display”
setting. Follow the procedure described in “Manual Setting” (page 24).
6
1. Setting Up
1-4. Uninstalling the ScreenManager Pro for LCD
Windows 8.1 / Windows 8 / Windows 7 / Windows Vista
1
Select “Control Panel” - “Uninstall a Program”
2
Select “ScreenManager Pro for LCD” from the list and click “Uninstall”
Windows XP
1
2
Select “Control Panel” - “Add/ Remove Programs”
Select “ScreenManager Pro for LCD” from the list and click “Remove” to remove
the software
7
2. How to Start up/Exit out of the Setting Window
2. How to Start up/Exit out of the Setting Window
How to Start up
Right-click the ScreenManager Pro for LCD setting icon and select “Setting of ScreenManager Pro for LCD”.
The ScreenManager Pro for LCD setting window appears.
Tips
•The setting window can also be shown by double clicking the ScreenManager Pro for LCD setting icon in the
notification area.
•When the ScreenManager Pro for LCD setting icon is not resident in the notification area, start up the software
by following procedure.
- Windows 8.1:
Click
on the “Start” screen and then click “ScreenManager Pro for LCD Ver. x.x.x” on the “Apps”
screen.
- Windows 8:
Click the tile displayed as “ScreenManager Pro for LCD” in the Start Screen.
- Windows 7, Windows Vista, or Windows XP:
Click “Start” - “All Programs” - “EIZO” - “ScreenManager Pro for LCD” - “ScreenManager Pro for LCD
Ver x.x.x”.
Click to visit our web site.
How to Exit out
Click “Close” on each setting window.
About ScreenManager Pro for LCD
The software version can be checked by clicking “About” through the ScreenManager Pro for LCD icon on the
far left of the title bar.
8
3. Auto FineContrast
3. Auto FineContrast
By registering a FineContrast mode to each application, the monitor automatically switches its FineContrast
mode for each application.
The “WindowMovie” mode, specially provided for this software, is available.
In the “WindowMovie” mode, the brightness of Overlay window area can be controlled separately
(Refer to “3-2. WindowMovie Mode” (page 12)).
Note
•If your OS is Windows 8.1, Windows 8, Windows 7, or Windows Vista, the “WindowMovie” mode is not
available because overlay is not supported.
•The Auto FineContrast function requires the ScreenManager Pro for LCD setting icon is resident in the
notification area.
•The Auto FineContrast function cannot be used when the monitor is being adjusted using ColorNavigator or
ColorNavigator Elements. Use the Auto FineContrast function after the monitor adjustment.
Tips
•The FineContrast mode is referred to as the Color mode depending on the type of your monitor.
Check to activate Auto FineContrast
function.
Register a FineContrast mode to the
application, or delete the registration.
Refer to “If unregistered application starts
up, apply” (page 11).
Refer to “Allow independent mode switching
by screen” (page 11).
Windows XP
Refer to “Set priority for WindowMovie
mode” (page 11).
9
3. Auto FineContrast
3-1. Auto FineContrast Setting
To set the Auto FineCotrast, assign a FineCotrast mode to the application according to the following procedure.
1
Check “Activate Auto FineContrast”
2
Select an application from “Application Selection” pull-down menu
Tips
•Application names that have been active and that have been already registered as FineContrast modes
are displayed in the pull-down menu.
3
Select a FineContrast mode to assign from “FineContrast mode for selected
application” pull-down menu
Tips
•Each FineContrast mode availability depends on the models.
•For details of the FineContrast modes, refer to the user’s manual of the monitor.
•WindowMovie is for ScreenManager Pro for LCD only. When this mode is selected, the brightness of
the parts other than video (overlay window) can be adjusted by clicking “Luminance”. It is suitable for
word processing or reading while playing videos on DVD or TV with high brightness. For the details on
the setting, refer to “3-2. WindowMovie Mode” (page 12). This mode is not available for Windows 8.1,
Windows 8, Windows 7, or Windows Vista.
•User color data which is registered in the “Color Adjustment” tab can be also selected as a mode of
Auto FineContrast function.
4
Click “Register”
5
To register applications continuously, repeat step 2 through step 4
6
Click “Close”
The FineContrast mode is assigned to the application, and the assignation is registered.
Auto FineContrast setting is enabled.
When the registered application became active, the monitor mode is automatically switched to the
FineContrast mode assigned to the selected application.
Note
•No FineContrast modes can be assigned for Windows desktop.
10
3. Auto FineContrast
If unregistered application starts up, apply
Assign a FineContrast mode to the application to which any FineContrast modes are not registered in
“Application Registration”. When the unregistered application became active, the monitor mode is automatically
switched to the FineContrast mode assigned to the selected application. To assign a FineContrast mode to the
application, select a FineContrast mode from the “If unregistered application starts up, apply” pull-down menu.
Allow independent mode switching by screen
This option is available when connecting two or more monitors with the system.
If this option is checked, the FineContrast mode changes for the monitor of application-activated. Other monitor
screen(s) does not change the FineContrast mode. When the application window is shown over several screens,
only the monitor will change its FineContrast mode that contains most of screen area of the application window.
Set priority for WindowMovie mode
Checking this option enables the monitor to remain in “WindowMovie” mode. Even when choosing another
application, the monitor does not change FineContrast mode.
Note
•If your monitor does not support the WindowMovie mode, “Set priority for WindowMovie mode” is not
displayed.
11
3. Auto FineContrast
3-2. WindowMovie Mode
WindowMovie mode is one of the FineContrast modes, which is available only in the ScreenManager Pro for
LCD. The WindowMovie mode can show an overlay window (videos) with higher contrast. This mode is suitable
for watching DVDs and TV. The brightness of area outside overlay window (videos) can be controlled separately
(refer to the following picture). While displaying videos (DVD or TV) brighter, the DTP or e-mail software can
be displayed with normal brightness.
Using Spreadsheet Software while playing DVD with Higher Brightness
1
2
Select the application to play videos from the “Application Selection” pull-down
menu
Select “WindowMovie” mode from the “FineContrast mode for selected
application”
3
“Luminance” is enabled. Click “Luminance” to open the setting window
4
Adjust the parts other than the video window by moving the slide bar
5
Click “OK”
Note
•More than two video applications cannot be displayed with high brightness at the same time.
•WindowMovie mode may not work with some movie file.
•To activate the WindowMovie mode, the graphics board that supports Gamma correction, DirectDraw and
DirectDraw Overlay functions is required. To confirm the graphic board supports these functions, execute the
“WindowMovie check software” of the “EIZO LCD Utility Disk” CD-ROM.
•If your OS is Windows 8.1, Windows 8, Windows 7, or Windows Vista, the “WindowMovie” mode is not
available.
12
4. Color Adjustment
4. Color Adjustment
Color settings of each FineContrast mode can be adjusted and registered independently. Customized adjustment
data of the monitor can be stored in the PC and loaded at any time.
Note
•Color settings cannot be made when the monitor is being adjusted using ColorNavigator or ColorNavigator
Elements. Make color settings after the ColorNavigator or ColorNavigator Elements adjustment.
•If SelfCorrection has been started, the color adjustment function will be disabled. Make color settings after
SelfCorrection is finished.
Tips
•The FineContrast mode is referred to as the Color mode depending on the type of your monitor.
Adjust the color basically
(Refer to “Color” (page 14)).
Adjust the hue and saturation of 6 colors
(Refer to “6 Colors” (page 15)).
Register and read the color adjustment
status to reflect to the monitor.
(Refer to “Register / Delete / Restore the
monitor adjustment data” (page 16)).
1
From “Monitor” pull-down menu select the monitor to adjust when two or more
monitors are connected to the system
Note
•If some monitors are not displayed, perform “Manual Setting” (page 24).
2
Select the FineContrast mode for color adjustment from the “Mode Selection” pulldown menu
Tips
•If CAL mode is selected on a ColorEdge CX/CS series monitor, the CAL mode corresponding to the
input port being used will be selected.
13
4. Color Adjustment
3
Adjust each parameter
Color
As with the monitor, items such as “Brightness” and “Contrast” can be adjusted.
The items that can be adjusted in this window are the same*1 as those that can be adjusted using the
monitor’s color adjustment function. (To check which items can be adjusted using the monitor’s color
adjustment function, refer to the User’s Manual of the monitor.)
*1: Excludes some models. (Some items in this window may not be adjustable or selectable depending on
the monitor model.)
・ For monitors other than HD24xxW/FX2431/FX2431TV
Tips
•“Brightness” may be expressed in the unit of candela (cd/m2) depending on the type of your monitor. If
the entered value cannot be set, the value will appear in magenta.
•Clicking “Reset” returns only the FineContrast mode currently being used to the default settings.
Resetting the Custom/User mode will also return the “6 Colors” values to the default settings.
14
4. Color Adjustment
・ For HD24xxW/FX2431/FX2431TV
Tips
•Clicking “Reset” returns only the currently used Color mode to the default settings.
6 Colors
The hue and saturation of the six colors (red, green, blue, yellow, cyan and magenta) can be adjusted by
using the graphical adjustment patterns.
Adjust the hue and saturation by dragging the six adjustment points.
4
Click “OK”
15
4. Color Adjustment
Register / Delete / Restore the monitor adjustment data
The color adjustment data adjusted in “Color Adjustment” tab can be registered with any name. By reading the
registered data, the adjusted values of each parameter can be reflected to the monitor all at once.
Register
Enter any name in “Adjustment Data Name” text box, and then click “Register”.
Delete
Select the color adjustment data name from “Adjustment Data Name” pull-down menu, and then click “Delete”.
Selected color adjustment data is deleted.
Restore
Select the color adjustment data name from “Adjustment Data Name” pull-down menu, and then click “Restore”.
Selected color adjustment data is reflected to the monitor.
16
5. Screen Adjustment
5. Screen Adjustment
If connecting a computer through analog signal input, you can adjust a screen easily by mouse with displaying
patterns for screen adjustment. Auto Adjustment function automatically adjusts the flicker in screen, display
position, size and resolution. The gray balance will be also adjusted at the same time.
Note
•For some monitor models, resolution may not be adjustable.
•Screen Adjustment is not available for digital signal input, because the screen is displayed properly based on
the setting data of this monitor.
•Screen adjustment is not possible when the monitor is being adjusted using ColorNavigator or ColorNavigator
Elements. Perform screen adjustment after the ColorNavigator or ColorNavigator Elements adjustment.
•If SelfCorrection has been started, the screen adjustment function will be disabled. Perform screen adjustment
after SelfCorrection is finished.
1
From “Monitor” pull-down menu select the monitor to adjust when two or more
monitors are connected to the system
Note
•If some monitors are not displayed, perform “Manual Setting” (page 24).
2
Click “Auto Adjustment”
3
When the screen is not displayed properly, click “Manual Adjustment”
Auto adjustment function starts working.
Adjust manually according to the instructions of the screen.
17
6. Hot Key
6. Hot Key
The monitor functions can be assigned to any keys on the keyboard. Pressing the key on the keyboard performs
the same operation as executing a function.
Note
•Hot key operation is not possible when the monitor is being adjusted using ColorNavigator or ColorNavigator
Elements.
•Hot key operation is not possible while SelfCorrection is running.
•The “USB Power Save” setting will be disabled if the hot key function is used on a monitor equipped with the
“USB Power Save” function.
・For monitors other than HD24xxW/FX2431/FX2431TV
・For HD24xxW/FX2431/FX2431TV
18
6. Hot Key
1
When two or more monitors are connected to the system, select the monitor to set
from “Monitor” pull-down menu
Note
•If some monitors are not displayed, perform “Manual Setting” (page 24).
2
Set hot keys to the monitor
Put the mouse pointer over the item to which set a hot key, and then press any key.
Pressing either “Delete” or “BackSpace” key displays “None” in the box, and resets the hot key.
Tips
•Multiple keys can be set in combination. For example, when press three keys (“Ctrl”, “Shift” and “F2”)
at the same time, “Ctrl + Shift +F2” is displayed.
•The keys assigned to Windows OS such as “Windows logo”, “Delete”, “BackSpace”, “Tab” or “Enter”,
are not available for the hot keys.
•For details of the monitor functions, refer to the user’s manual of the monitor.
3
Click “Close”
The hot key setting is enabled.
Tips
•When two or more monitors are connected to the monitor and the same hot key is set for each monitor, the
setting starts up on each monitor simultaneously by executing the hot key.
Note
•The set keys cannot be used for other application software as long as ScreenManager Pro for LCD is running.
•The mute setting of speaker is not available.
19
7. Timer
7. Timer
With this function, the monitor’s power is automatically turned on or off at the preset time (the monitor power
status is the same as pressing the power button of the monitor directly). This function refers to the system clock
in the OS, making it independent from the monitor or computer’s power saving system. An alarm option which is
activated 5 minutes before turning off the monitor, is available.
Note
•The timer function is not active when the monitor is being adjusted using ColorNavigator or ColorNavigator
Elements.
•The “USB Power Save” setting will be disabled if the timer function is used on a monitor equipped with the
“USB Power Save” function.
Specify the time and select on or off setting
of the power.
Check to alarm 5 minutes before turning off
the monitor. Refer to “How to Set the Alarm”
(page 21).
Click to set the day of the week when the
timer works. Refer to “How to Specify the
Day of the Week for the Timer” (page 21).
Click to hear the set alarm sound.
1
When two or more monitors are connected to the system, select the monitor to set
from “Monitor” pull-down menu
Note
•If some monitors are not displayed, perform “Manual Setting” (page 24).
2
20
Specify the time to turn on or off the monitor
Up to eight schedules can be set.
7. Timer
3
Set the alarm sound and the day of the week for the timer according to your
preference
How to Set the Alarm
1 Check “Activate alarm 5 minutes before turning off the monitor”
2 Click “Alarm sound”
The file select window appears.
3
Select a sound file and click “Open”
The selected sound file is registered as the alarm sound.
Note
•Even if the “Activate alarm 5 minutes before turning off the monitor” is checked, it is necessary to click
the “Alarm sound” to specify the sound file.
How to Specify the Day of the Week for the Timer
1 Click “Day of the week”
The setting window of the day of the week appears.
2
Enable the checkbox of the day of the week that you want the timer to work
3 Click “OK”
4
Click “Close”
The timer is enabled.
21
8. Sound
8. Sound
Volume, treble, bass and/or balance can be controlled for the built-in speaker supported monitor.
Tips
•For HD24xxW, the settings such as the volume of external speakers connected to the monitor are adjustable,
and the sound can also be adjusted with the ScreenManager Pro for LCD.
•Sound settings are not possible while SelfCorrection is running. Make sound settings after SelfCorrection is
finished.
1
When two or more monitors are connected to the system, select the monitor to set
from “Monitor” pull-down menu
Note
•If some monitors are not displayed, perform “Manual Setting” (page 24).
2
Adjust the sound in “Sound Control” according to your preference
Tips
•For some monitor models, some items may not be adjustable.
•Click “Reset” to change the settings back to the default.
Note
•For HD24xxW/FX2431/FX2431TV, the sound does not get back to the default by clicking “Reset”.
22
9. EyeCare
9. EyeCare
By using EyeCare function, you can care the health of your eyes.
・EyeCare Reminder
Any pop up messages can be shown periodically.
Note
•The EyeCare (EyeCare Reminder) requires the ScreenManager Pro for LCD setting icon is resident in the
notification area.
1
Right-click the ScreenManager Pro for LCD setting icon in the notification area,
and select “EyeCare Setting” from the list
EyeCare setting window appears.
2
When two or more monitors are connected to the system, select the monitor to set
from “Target Monitor” pull-down menu
Note
•If some monitors are not displayed, perform “Manual Setting” (page 24).
3
Check “Pop up the message periodically”
4
Set the display interval of the message
The message can be set up to 24 hours by the hour.
5
Click “Edit Message” to edit the message
The message editing window appears. The message can be edited within 255 characters.
Note
•If the target monitor is changed, elapsed time until the message appears is reset.
23
10. Using the Software with Multi-monitor Setting
10. Using the Software with Multi-monitor Setting
ScreenManager Pro for LCD supports the multi-monitor setting and it can control two or more monitors through
the software.
Before you use the application software, confirm none of the following problems exist. If the one of the
following problems remain, perform Manual Setting.
•ScreenManager Pro for LCD setting icon is displayed in monochrome, even though the USB cable has been
connected correctly and the computer has been restarted.
• The connected monitor is not displayed in “Monitor” pull-down menu of the setting window.
• The target monitor cannot be controlled, or the other monitor is controlled instead of target monitor.
Note
•Manual settings are not possible when the monitor is being adjusted using ColorNavigator or ColorNavigator
Elements.
•Manual settings are not possible while SelfCorrection is running.
Tips
•The [Monitor] is shown on the “Color Adjustment”, “Screen Adjustment”, “Hot Key”, “Timer” and “Sound”.
Manual Setting
1
2
24
Right-click the icon in the notification area and select the “Monitor Connection
List” from the list
Click the “Manual setting” and follow the instruction on screen to assign the
monitor to the software
11. Troubleshooting
11. Troubleshooting
Problems
1.The icon is not shown in the notification
area.
Possible cause and remedy
on the “Start” screen and
•If your OS is Windows 8.1, click
then click “ScreenManager Pro for LCD Ver. x.x.x” on the “Apps”
screen.
•If your OS is Windows 8, click the tile displayed as
“ScreenManager Pro for LCD” in the Start Screen.
2.The icon is in monochrome.
•If your OS is Windows 7 or Windows Vista, click “Start” “All Programs” - “EIZO” - “ScreenManager Pro for LCD” “ScreenManager Pro for LCD Ver x.x.x” to start up the software.
•Confirm the USB cable is correctly connected.
•Turn off the PC power, then turn it back on.
3.Auto FineContrast is disabled.
•If the problem persists, follow the procedure described in
“Manual Setting” (page 24).
•The Auto FineContrast function requires the ScreenManager
Pro for LCD setting icon is resident in the notification area.
•Confirm “Activate Auto FineContrast” option in the “Auto
FineContrast” tab is checked.
4.Hot key is disabled.
Timer is disabled.
5.WindowMovie mode does not work.
6.Alarm is not activated (Timer).
7.“WindowMovie” mode is not selected.
8.A function cannot be set or performed.
•Close the setting window. (Closing the setting window enables
the function.)
•Close the setting window. (Closing the setting window enables
the function.)
•WindowMovie mode may not work with some movie file.
•Gamma correction, DirectDraw and DirectDraw Overlay
functions are required for the graphics board to activate the
WindowMovie mode. Run checker application from the menu
window of the CD-ROM to confirm that your graphic board
meets these functions.
•Confirm the “Activate alarm 5 minutes before turning off the
monitor” is checked.
•Click the “Alarm sound” to specify the sound file.
•If your OS is Windows 8.1, Windows 8, Windows 7, or Windows
Vista, the “WindowMovie” mode is not available because
overlay is not supported.
•Set or perform the function of ScreenManager Pro for LCD
after ColorNavigator or ColorNavigator Elements adjustment or
SelfCorrection is finished.
For Multi-monitor Setting only
9.The target monitor cannot be controlled, or
the other monitor is controlled instead of
target monitor.
• USB connected monitor might not related correctly to the
software. Follow the procedure described in “Manual Setting”
(page 24).
25
Glossary
Glossary
ContrastEnhancer
The function to control the brightness of backlight and the gain level as well as correct gamma value according
to the images. So it can produce high-contrast images.
Clipping
The function to show a color gamut of the monitor according to the specification of the configured color gamut
(such as sRGB).
OutlineEnhancer
The function to enhance the color difference between pixels of the image to sharpen the outline of the image and
enrich the texture. It can also blur the outline so that the image looks smooth and soft.
Overlay
Displaying several screens, such as video screens, with overlapped. This function is supported by a graphic
board. The “Software DVD Player” uses this function to display DVD screen. Also other applications, such as
“Windows Media Player”, “QuickTime Player”, “RealPlayer” and TV Play application use this function.
sRGB
sRGB is the international standard for unifying such as color reproduction and color space of computer peripheral
devices (monitor, printer, digital camera, scanner and so on). Set monitor’s FineContrast mode to “sRGB”, the
color temperature of the monitor is fixed to 6500K.
WindowMovie
The mode to brighten the overlay window area when using the video application. It is suitable for using an e-mail
or word processing application as playing videos brightly on DVD or TV program.
26
http://www.eizo.com
Copyright © 2002-2013 EIZO Corporation All rights reserved.
17th Edition-December, 2013
03V22217S1
(U.M-SMPROLCD)