1
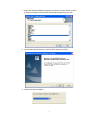
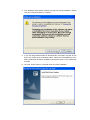
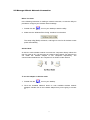
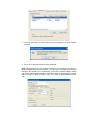
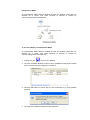
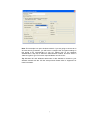
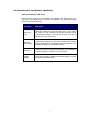
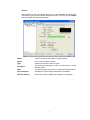
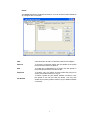
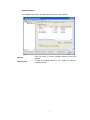
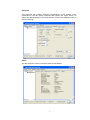
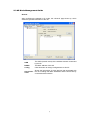
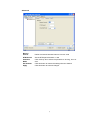
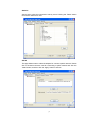
Clipper User Manual High Power Wireless USB Adaptor Version: 1.0 2009. Aug. No part of this publication may be reproduced, transmitted, transcribed, stored in a retrieval system, or translated into any language or computer language, in any form or by any means, electronic, mechanical, magnetic, optical, chemical, manual or otherwise, without the prior written permission of this company. This company makes no representations or warranties, either expressed or implied, with respect to the contents hereof and specifically disclaims any warranties, merchantability or fitness for any particular purpose. Any software described in this manual is sold or licensed "as is". Should the programs prove defective following their purchase, the buyer (and not this company, its distributor, or its dealer) assumes the entire cost of all necessary servicing, repair, and any incidental or consequential damages resulting from any defect in the software. Further, this company reserves the right to revise this publication and to make changes from time to time in the contents hereof without obligation to notify any person of such revision or changes. The software and specifications are subject to change without notice. All right reserved including all brand and product names mentioned in this manual are trademarks and/or registered trademarks of their respective holders. Index 1. Product Information ......................................................................................................................3 1.1 Introduction ................................................................................................................................ 3 1.2 Product Features....................................................................................................................... 3 1.3 System Requirements .............................................................................................................. 3 1.4 Package Contents..................................................................................................................... 4 2. Driver Installation and Configuration .........................................................................................5 2.1 Network Adaptor Installation..................................................................................................... 5 2.2 Manage A Basic Network Connection ..................................................................................... 8 2.2 Introduction to the Wireless LAN Utility.................................................................................. 12 2.3 AP Mode Management Guide................................................................................................ 18 3. Specification ............................................................................................................................... 21 2 1. Product Information 1.1 Introduction The IEEE 802.11b/g wireless USB adaptor enables users to surf the wireless network at 54Mbps in the 2.4GHz radio frequency. This adaptor is also downward compatible to IEEE 802.11b wireless devices at a maximum 11Mbps data rate. Someone may configure this adaptor either with ad-hoc mode to connect with alternative 2.4GHz wireless computers or with infrastructure mode to connect to a wireless AP or router for the internet access. This adaptor includes a convenient utility for scanning available networks and saving preferred networks that users usually connected with. Security encryption is configured via this utility as well. 1.2 Product Features Thank you for purchasing this high-speed wireless network adaptor! This wireless network adaptor supports the IEEE 802.11b/g wireless standards. With easy-to-install USB 2.0 interface - a very common expansion port of computers – plug this wireless network adaptor into any empty USB port of your computer, just that simple! Main features 1. Complies with wireless IEEE 802.11b/g standards 2. High speed transfer rate up to 54Mbps 3. Supports USB 2.0/1.1/1.0 interface 4. Supports 64/128-bit WEP, WPA (TKIP with 802.1x), WPA2 (AES with IEEE 802.1x) for high security level 5. Operating system supports: Windows 98se/ME/2000/XP/Vista/Linux/MacOS *Maximum performance may vary depending on network conditions and environmental factors. 1.3 System Requirements 1. CPU: Pentium III 1G above or similar 2. Memory size: 256MB RAM 3. One CD-ROM drive 4. Hard disk: more than 100MB available space 5. One available USB 2.0 port (USB 1.0 port will largely degrade the performance) 6. Operating system: Windows 98se/ME/2000/XP/Vista/Linux/MacOS 3 1.4 Package Contents 1. Clipper 802.11b/g USB adaptor x 1 2. USB Y-cable x 1 3. CD-ROM x 1 (driver and user manual) 4. Antenna x 1 4 2. Driver Installation and Configuration 2.1 Network Adaptor Installation Please follow these instructions to install your new wireless network card: Insert the USB cable into an empty USB 2.0 port of your computer after the computer is switched on. Never use force to insert the cable. If there is difficulty inserting the cable, flip it over and try again. This autorun wizard can be run in Windows 2000/XP/Vista. The procedures shown are for a Windows XP installation. You can install the Wireless Adapter using the Setup Wizard on the CD-ROM included in the package. The wizard is an easy and quick configuration tool for internet connection with step-by-step process. When you start the Setup Wizard, you will get the following welcome screen. Please choose the language to start the configuration. The wizard will guide you to finish your network connection. We will not provide any instruction for the Setup Wizard here. 5 1. Select the desired installation language in the auto-run menu window, and the programs will appear. Please select the desired language and click ‘OK’. 2. The welcome window pops up. Click the ‘Next’ button to proceed. 3. Please wait while installation. 6 4. The Windows Logo testing warning may pop up during installation. Please click the ‘Continue Anaway’ to continue. 5. If you are using Windows 98se or Windows ME, the system may ask for the driver CD. Please click the Browse button. Select your CD-ROM Drive, then select ‘USB Driver Win98 (or WinME)’ to browse the driver. If not, please skip this step. 6. Click the ‘Finish’ button to complete driver and utility installation. 7 2.2 Manage A Basic Network Connection Before You Start In the following instruction for making a network connection, we use the utility we provided to configure your wireless network settings. 1. Double click the icon on your desktop to start the utility. 2. Make sure the ‘Windows Zero Config’ checkbox is unchecked. The setup utility (RaUI) will launch, and begin to scan for all wireless access points automatically. Ad-Hoc Mode An Ad-Hoc mode wireless network connects two computers directly without the use of a router or AP. It is also know as a peer-to-peer network. For example, we can install this wireless adapter to two computers respectively. The communication between the two computers is an Ad-Hoc mode network. To use this adaptor in Ad-Hoc mode 1. Double click the icon on your desktop. 2. Click the ‘Available Network’ button to scan available wireless network adaptors. Double click on the network adaptor that you are going to connect to. 8 3. Click the OK button to confirm that you are connecting to an open wireless network. 4. Click ‘OK’ to add this network into the profile list. Note: This example is an open wireless network. If you are going to connect to a Wireless adapter with security protection, you will have to configure the encryption settings in this profile to be corresponding to the other wireless adapter. Please click on the “Network Authentication” drop list to select an authentication method, and then select a “Data encryption” type. Fill in each required blanks and click “OK”. 9 Infrastructure Mode An Infrastructure Mode network contains at least one wireless client and one wireless AP or router. This client connects to Internet or intranet by communicating with this wireless AP. To use this adaptor in Infrastructure Mode An Infrastructure Mode network contains at least one wireless client and one wireless AP or router. This client connects to Internet or intranet by communicating with this wireless AP. 1. Double click the icon on your desktop. 2. Click the “Available Network” button to scan available access points. Double click on the AP that you are going to connect to. 3. Click the OK button to confirm that you are connecting to an open wireless network. 4. Click the OK to add this network into the profile list. 10 Note: This example is an open wireless network. If you are going to connect to an AP with security protection, you will have to configure the encryption settings in this profile to be corresponding to your AP. Please click on the “Network Authentication” drop list to select an authentication method, and then select a “Data encryption” type. Fill in each required blanks and click “OK”. Tip: Windows XP and Windows 2000 users is also allowed to connect to your wireless network with the “RT-Set” setup wizard. Please refer to “Appendix” for more information. 11 2.2 Introduction to the Wireless LAN Utility Starting the Wireless LAN Utility Double click the shortcut on your desktop. The Wireless LAN Utility pops up. You may click on the tabs above to configure this adapter. The checkboxes below provide the following functions: Item Name Description Show Tray Icon Check this checkbox to show the utility icon on your system tray, which is in the notification area at the lower-right corner of the windows desktop. You may also uncheck it to remove the utility icon from system tray. Windows Zero Config Uncheck this checkbox to use native Windows XP wireless support (Wireless Zero Configuration Service) instead of using this utility to configure your wireless network. Radio Off Check this checkbox to prevent this adapter form transmitting or receiving signals. Uncheck it to communicate. Disable Adaptor Check this checkbox to disable this wireless adapter. Uncheck it to enable this adapter again. 12 General After starting the utility, the general page pops up This General tab provides the information of your current wireless network connection. You may click the Renew button to refresh those listed information. Status Check if the device associated to target network. Speed The current connection speed. Type Infrastructure mode or Ad-Hoc mode. Encryption The performing encryption mode for connecting to current network profile. SSID The SSID (network name) of the connected wireless network. Signal Strength Indicates the signal strength detected by this adapter. Network Address Shows the current IP addresses settings for this adapter. 13 Profile The Profile tab lists the preferred connections. You can click the buttons beside to do configure each connection. Add Click this button to add a connection profile for this adapter. Remove To remove a connection profile, click this profile on the profile list and click this button to delete it. Edit To modify the configurations for a profile, click this profile on the profile list and click this button to edit. Duplicate To make a copy of a profile, click the profile that going to be copied, and click this button to copy it. Set Default To select a profile as your default wireless connection, click this profile on the list and click this button. You may also double click on each profile to select it as your default wireless connection. 14 Available Network This available tab lists the reachable wireless network of this adaptor. Refresh Click this button to rescan available networks around the adapter. Add to Profile To add an available Network to your profile list, select an available network. 15 Advanced This Advanced tab provides advanced configurations to this adapter. Every modification in this tab will be performed after clicking the ‘Apply’ button. To restore the default settings of the advanced tab, click the ‘Set defaults’ button to perform restoring. Status This tab shows the current connection status of this adaptor. 16 Statistics See this tab to show the transmission activity record. Clicking the “Reset” button recounts the values from zero. 17 2.3 AP Mode Management Guide General After configuring the adapter in AP mode, this “General” page shows up, which shows the general information of this AP. SSID The SSID (network name) of the wireless network constructed by this AP. BSSID The MAC address of this AP Config Click this button to change configurations to this AP Association Table Shows the information of those devices that associated with this AP including their MAC addresses and the time that they connected with this device. 18 Advanced Beacon Interval Define the interval between beacons from 20~1000 DTIM Period Set the DTIM period between 1~255 Preamble Mode Click the drop list to select the preamble to be long, short or auto Set Defaults Click this button to restore the settings above to default Apply Click this button to execute changes. 19 Statistics See this tab to show the transmission activity record. Clicking the “Reset” button recounts the values from zero. Soft AP This page allows users to select the adapter for connect to public network. Please click on the device that are used for connecting to public network and click the “Select” button, and then click the “Apply” button to execute. 20 3. Specification Standards: IEEE 802.11b/g Interface: USB 2.0 (USB 1.1/1.0 Compatible) Frequency Band: 2.4000~2.4835GHz (ISM Band) Data Rate: 11b: 1 / 2 / 5.5 / 11Mbps 11g: 6 / 9 / 12 / 18 / 24 / 36 / 48 / 54 Mbps Securities: WEP 64/128, WPA, WPA2 Antenna: External dipole antenna Driver: Windows 98se/ME/2000/XP/2003/Vista/Linux/MacOS Temperature: 0~70°C Transmit Power: 27dbm @ 11Mbps; 24dbm @ 54Mbps Sensitivity: -92dBm @11Mbps; -76dBm @54Mbps LED Indicator: Link / ACT (Green) 21


![User Manual - [ [ [ ANSEL ] ] ]](http://vs1.manualzilla.com/store/data/005966842_1-ae62d22d0a4b66fbc237bfe063bfcd99-150x150.png)