1
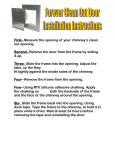
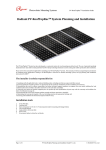
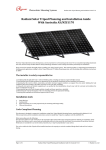
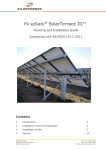
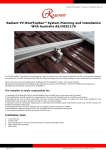
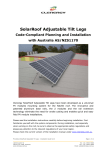
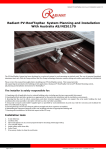
Alu-Pile
Ground System
Installation Manual 2012
Contents
1
Introduction
2-3
2
Planning
3-5
3
System overview
6-7
4
Installation Steps
7-10
5
Warranty
10-11
Page |
1
1. Introduction
1.1 Intended use
● Are intended to be used by individuals with sufficient technical skills for the task.
Knowledge and use of hand tools, measuring devices and values is also required.
● Include various precautions in the forms of Notes, Cautions, and Warnings. These
are to assist in the assembly process and/or to draw attention to the fact that certain
assembly steps may be dangerous could cause serious personal injury and/or damage to
components. Following the step-by-step procedures and these precautions should
minimize the risk of any personal injury or damage to components making the
installation not only safe but an efficient process.
1.2 Service life warranty
Fasten Solar Solar provides a warranty of 10 years for the service life of all materials
used.
1.3 Safety
The following basic safety instructions and warning symbols form an essential part of
this manual and are of fundamental importance when handling this product.
●
●
●
Do not remove or disable any safety devices.
Comply with the relevant safety regulations.
The presence of a second party who can provide help in the event of an
accident is obligatory during the entire installation process.
●
Keep a copy of this installation manual in the immediate vicinity of the system.
1.4 Responsibilities of the owner/operator
The system operator has the following safety-related responsibilities:
●
To ensure that installation of the system is only carried out by individuals with
specialist technical knowledge and basic knowledge of mechanical engineering.
●
●
●
●
To ensure that those commissioned to perform the work can evaluate their
assigned tasks and recognize possible risks.
To ensure that those commissioned to perform the work are familiar with the
system components.
To ensure that the installation manual is available during installation. The
installation manual is an integral part of the product.
Ensure that the installation manual, and in particular the safety instructions, are
red and understood by the relevant personnel before installation.
●
Ensure that the permissible operation conditions are observed. Mounting
systems is not liable for damage occurring when these conditions are not
adhered to.
●
●
Ensure the durability of all connections and the attachment of the system.
Ensure that suitable lifting gear is used for installation.
Page |
2
●
Ensure that only Mounting System components are used when parts need to be
replaced. Otherwise any warranty claim is null and void.
2. Planning
2.1 Installation Location
The Pile-Ground Mounting System is application for the particular location ,such as
non-sandy soil with dense enough. It is recommended to consult with the local
engineer to do it before the beginning of the project.
number
Item of Inspection
Application conditions
No hard thick underground obstacles silty clay and sand soil which
1
Soil Type
is close-grained
2
3
Acidity and
Neutral soil
Alkalinity
PH:6.5~7.2
Soil
Moisture content
Soil moisture less than 30%
2.1 Construction of soil condition to Pile-Ground Mounting System
2.2 Layout Drawing
A general layout drawing is made of every system before delivery. This drawings show
the accordant admeasurements and the position of every components and also the type
of the connectors. Example : when the module size is 1580x808x46mm, the array
configure is 2x9, which placed portrait. The tilt angle is 30deg. The planning drawing
could be as shown as below.
Page |
3
2.3 Grounding Planning
The grounding work has to be carried out by business specializing in grounding. Based
on our design of the units you have to compile grounding plans so that the works flow
smoothly. These plans have to be completed at least a week before the beginning of the
grounding work. These plans have to show the position of the piles and have to
dimension it accordingly. Furthemore, you have to mark the first and the last pile of
Page |
4
every line with a dowel. If a line is longer than 50m there will be markings(dowels)
necessary within the lines.
2.3.1 Tolerance by grounding:
The grounding company should keep the following tolerances to provide a good basis
for the further mounting.
2.3.2
After the grounding the upper parts of the piles have to be coated with zinc dust
primer.
Attention!
Only a special color (Zinc Dust Primer) will give the needed protection and is
accredited according to the standards. Simple zinc color-sprays will not give long-term
protection!
2.4 Installation tools
•
Hydraulic Pile Driver equipment
•
Hexagon Key
•
Electrical drill
•
Adjustable wrench
•
String
•
5 meter tape
Page |
5
3. Overview of system components(one unit)
Overview of system components
1.End
Clamp(8pcs)
5.Support(Pre-as
sembled)(3pcs)
2.Middle Clamp
(32pcs)
3.Heavy-Rail
(8pcs)
4.Clamp
for
Heavy
-Rail (24pcs)
8.Splice for
6.Pile Head (3pcs)
7.C-Pile(3pcs)
Heavy-Rail(4pcs)
Page |
6
9.Barrier
Block(3pcs)
10.Pile brace(3pcs)
4. Installation Steps
Installation instruction in six steps:
1. Install the C-Pile
Before installation, please
prepare the products and
installation
sure
the
tools.
Make
Hydraulic
pile
driver equipment can
be
applied in the construction
work.
Please
confirm
whether the soil conditions
is all right before piling, if
not satisfy please contact
Fasten
Solar
customer
services.
Mark the line of the C-Pile
array. Define the distance
of two Piles,
drive the
piles into the earth with the
help of a string to make
sure all the Piles are in the
same line and height(The
Tolerance for the height:±
10mm).
Note: Please make sure
piles are stable after piling
2. Mount Pile Head
Page |
7
Install the Pile Head and
fix it with Hexagonal Bolt
and Nut.(Recommended
bolt torque 40N·M)
3. Mount Post Brace
Snap the Pile Brace from
one side of Post. Then fold
it and fasten it to pile with
Hexagonal Bolt and Nut.
(Recommended bolt
torque 40 N·M)
4. Install the Support(Pre-assembled)
Connect support with Pile
Head and fasten it with
Hexagonal Bolt and Nut.
(Recommended bolt
torque 40N·M)
Connect support with pile
brace fasten them with
Hexagonal Bolt and Nut.
(Recommended bolt
torque 40N·M)
After installing the
support, adjust the
system to make sure all the
support Beams are in the
same line and height.
Page |
8
5. Install the heavy-rail on the beam
Make sure the distance
between two
Heavy-Rails , and attach
Heavy- Rail to
Beam
with one Clamp for Heavy
-Rail on each side.
(Recommended bolt
torque 18N·M)
Make sure the length of
Heavy-rail is long enough
before connecting it with
Beam.
Splice for Heavy-Rail can
be used to extend the rails.
6.
Mount the panels
Use
End Clamps and
Middle Clamps to fix the
panels. Then fasten them
using Allen key.
(Recommended bolt
torque 18N·M)
Page |
9
The installation of the
structure is finished.
5. Warranty
10 years limited Product Warranty, 25 years long life span.
Fasten Solar Solar Ltd warrants to the original purchaser (“Purchaser”) of
product(s) that it manufactures
(“Product”) at the original
installation site that the Product shall be free from defects in material and workmanship
for a period of ten (10) years, except for the anodized finish, which finish shall be free
from visible peeling, or cracking or chalking under normal atmospheric conditions for
a period of five (5) years, from the earlier of
1) the date when the installation of the Product is completed, or
2) 30 days after the purchase of the Product by the original Purchaser (“Finish
Warranty”).
The Finish Warranty does not apply to any foreign residue deposited on the finish. All
installations in corrosive atmospheric conditions are excluded. The Finish Warranty is
VOID if the practices specified by AAMA 609 & 610-02 – “Cleaning and
Maintenance for Architecturally Finished Aluminum” (www.aamanet.org) is not
followed by Purchaser. This Warranty does not cover any damage to the Product that
occurs during its shipment, storage, or installation.
This Warranty shall be VOID if installation of the Product is not performed in
accordance with Fasten Solar’s written installation instructions, or if the Product has
been modified, repaired, or reworked in a manner not previously authorized by Fasten
Solar IN WRITING, or if the Product is installed in an environment for which it was not
designed. Fasten Solar shall not be liable for consequential, contingent or incidental
damages arising out of the use of the Product by Purchaser under any circumstances.
Page |
10
If within the specified Warranty periods the Product shall be reasonably proven to be
defective, then Fasten Solar shall repair or replace the defective Product, or any part
thereof, in Fasten Solar’s sole discretion. Such repair or replacement shall completely
satisfy and discharge all of Fasten Solar’s liability with respect to this limited
Warranty. Under no circumstances shall Fasten Solar be liable for special, indirect or
consequential damages arising out of or related to use by Purchaser of the Product.
Manufacturers of related items, such as PV modules and flashings, may provide
written warranties of their own. Fasten Solar’s limited Warranty covers only its
Product, and not any related items.
Page |
11