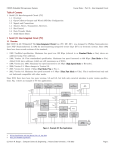
1
Version 2.3 User's Manual Written by: Frank Domina PRINTED MARCH 2, 1997 TABLE OF CONTENTS FEATURES: ..................................................................................................................................................1 FOREWORD: ................................................................................................................................................2 PURPOSE: ....................................................................................................................................................2 THEORY OF OPERATION: ..........................................................................................................................3 BEFORE YOU START:.................................................................................................................................3 GETTING STARTED: ...................................................................................................................................4 EZPACKET'S MAIN SCREEN:.....................................................................................................................5 SESSION W INDOWS:........................................................................................................................................5 STATUS LINES: ................................................................................................................................................5 THE INPUT LINE: ..............................................................................................................................................5 EZPACKET FUNCTIONS: ............................................................................................................................6 PAGE UP / PAGE DOWN / UP / DOWN: SCROLL SESSION'S WINDOW .................................................................6 F1 THROUGH F8: USER DEFINABLE KEYBOARD MACROS .................................................................................6 F9 / SHIFT+F9: SEARCH BACKWARDS ..............................................................................................................6 ALT+F9 / CTRL+F9: SEARCH FORWARDS .........................................................................................................6 F10 / TAB / BACKTAB: SWITCH KEYBOARD'S SESSION...................................................................................6 CTRL+F10: CLEAR SESSION'S SCROLLBACK BUFFER .......................................................................................7 ALT+F10: ZOOM - TOGGLE SESSION W INDOW TO/FROM FULL-SCREEN............................................................7 ALT+A: ABOUT EZPACKET .............................................................................................................................7 ALT+B: SEND BEACON...................................................................................................................................7 ALT+C: CONNECT SESSION ...........................................................................................................................7 ALT+D: DISCONNECT SESSION ......................................................................................................................7 ALT+E: ERASE STATIONS HEARD & NODES HEARD LISTS ...............................................................................8 ALT+F: W RITE SESSION'S CURRENT SCREEN TO FILE ....................................................................................8 ALT+H: HELP ................................................................................................................................................8 ALT+J: STATIONS RECENTLY HEARD ..............................................................................................................9 ALT+L: DOWNLOAD/CAPTURE TO A TEXT FILE (LOG SESSION'S I/O) ...............................................................9 ALT+M: SEND DATAGRAM MESSAGE ..............................................................................................................9 ALT+N: NODES RECENTLY HEARD .................................................................................................................9 ALT+O: CONFIGURATION OPTIONS SCREEN ...................................................................................................9 ALT+P: PAUSE ENTIRE SCREEN .....................................................................................................................9 ALT+R: REMOTE COMMAND HELP ................................................................................................................10 ALT+S: SYSTEM STATUS .............................................................................................................................10 ALT+U: UPLOAD (SEND) A TEXT FILE ...........................................................................................................10 ALT+W: WRITE SESSION'S ENTIRE SCROLL-BACK BUFFER TO A FILE ............................................................10 ALT+X: EXIT EZPACKET...............................................................................................................................10 ALT+Z: RUN DOS SHELL .............................................................................................................................11 CONFIGURING EZPACKET: .....................................................................................................................11 OPTION A: I/O PORTS ...................................................................................................................................11 Sub-Option A: Transmit Port...................................................................................................................12 Sub-Option B: Transmit Bit .....................................................................................................................12 Sub-Option C: PTT Port..........................................................................................................................12 Sub-Option D: PTT Bit ............................................................................................................................12 Sub-Option E: PTT Level ........................................................................................................................12 Sub-Option F: Receive Port ....................................................................................................................12 EZPKTMAN.DOC Copyright © Frank Domina, 1992-1996. Duplication prohibited. i Sub-Option G: Receive Bit ..................................................................................................................... 12 Sub-Option H: Carrier Detect Port.......................................................................................................... 12 Sub-Option I: Carrier Detect Bit.............................................................................................................. 12 Sub-Option J: Carrier Detect Level ........................................................................................................ 12 Sub-Option K: Initialize Port At Startup .................................................................................................. 12 Sub-Option L: Initialize To Value ............................................................................................................ 12 Sub-Option M: Baud Rate ...................................................................................................................... 13 OPTION B: BEACON PATH & MESSAGE ......................................................................................................... 13 Sub-Option 1: Beacon Path.................................................................................................................... 13 Sub-Option 2: Beacon Message............................................................................................................. 13 OPTION C: CONNECTION W ELCOME MESSAGE ............................................................................................. 13 OPTION D: DISPLAY OPTIONS....................................................................................................................... 13 Sub-Option A: Transmit Info ................................................................................................................... 14 Sub-Option B: Receive Header .............................................................................................................. 14 Sub-Option C: Receive Info.................................................................................................................... 14 Sub-Option D: Receive Hex Dump......................................................................................................... 14 Sub-Option E: Highlight .......................................................................................................................... 14 Sub-Option F: Status Line ...................................................................................................................... 15 Sub-Option G: Input Line........................................................................................................................ 15 Sub-Option H: Monitoring Call-sign Filtering .......................................................................................... 15 Sub-Option I: Display Headers on Received Packets ............................................................................ 15 Sub-Option J: Display Packets NOT Addressed to This Station ............................................................ 15 Sub-Option K: Display Received Packets in Hex ................................................................................... 15 Sub-Option L: Display Headers on Received Packets ........................................................................... 15 Sub-Option M: Display Packets NOT Addressed to This Station........................................................... 16 Sub-Option N: Display Received Packets in Hex................................................................................... 16 Sub-Option O: Packet Types To Display................................................................................................. 16 Sub-Sub-Option A: Information............................................................................................................................ 16 Sub-Sub-Option B: Unnumbered Information ...................................................................................................... 16 Sub-Sub-Option C: Receiver Ready .................................................................................................................... 16 Sub-Sub-Option D: Receiver Not Ready.............................................................................................................. 17 Sub-Sub-Option E: Reject.................................................................................................................................... 17 Sub-Sub-Option F: Connect Request .................................................................................................................. 17 Sub-Sub-Option G: Disconnect Request (SABM)................................................................................................ 17 Sub-Sub-Option H: Disconnected Mode.............................................................................................................. 17 Sub-Sub-Option I: Unnumbered Acknowledge .................................................................................................... 17 Sub-Sub-Option J: Frame Reject......................................................................................................................... 17 Sub-Sub-Option K: Unknown Packet................................................................................................................... 17 OPTION E: REMOTE STATION ACCESS .......................................................................................................... 18 Sub-Option 1: Remote Commands Allowed........................................................................................... 18 Sub-Option 1: Drives Remote Stations May Access .............................................................................. 18 OPTION F: FUNCTION KEY DEFINITIONS ........................................................................................................ 19 OPTION G: MONITORING CALL-SIGN FILTERS ................................................................................................. 19 OPTION H: CALL-SIGN ................................................................................................................................. 19 OPTION I: SOUND ......................................................................................................................................... 20 OPTION J: LOG ALL CONNECTS AND DISCONNECTS WITH TIMES TO A FILE ..................................................... 20 OPTION K: ACCEPT MESSAGES W ITH CRC ERRORS .................................................................................... 20 OPTION L: NUMBER OF START FLAGS TRANSMITTED BEFORE DATA IS SENT .................................................. 20 OPTION M: MAXIMUM RETRIES ..................................................................................................................... 20 OPTION N: FRAME ACKNOWLEDGMENT TIME-OUT (SOMETIMES KNOWN AS FRACK)..................................... 20 OPTION O: CHECK DATA-LINK INTERVAL....................................................................................................... 20 OPTION P: BEACON INTERVAL ...................................................................................................................... 21 OPTION Q: INCLUDE RETRY DATA W ITH POLL THRESHOLD (SOMETIMES KNOWN AS PTHRESH) ................... 21 OPTION R: MAXIMUM OUTSTANDING FRAMES BEFORE AND ACK IS EXPECTED .............................................. 21 OPTION S: MAXIMUM PACKET DATA LENGTH................................................................................................. 21 OPTION T: AUTO-W RAP COLUMN W HEN TYPING DATA TO TRANSMIT ............................................................ 21 OPTION U: TX/RX DATA LOG MEMORY BUFFER SIZE (PER SESSION) ............................................................ 22 OPTION V: MAXIMUM NUMBER OF CONCURRENT SESSIONS ........................................................................... 22 ii EZPKTMAN.DOC Copyright © Frank Domina, 1992-1996. Duplication prohibited. OPTION W: DISPLAY CONNECTED INCOMING DATA TO MONITOR WINDOW TOO .................................................22 OPTION X: NEW MAIL INDICATOR ...................................................................................................................22 GLOSSARY.................................................................................................................................................23 EZPKTMAN.DOC Copyright © Frank Domina, 1992-1996. Duplication prohibited. iii Features: 1. 2. 3. 4. 5. 6. 7. 8. 9. 10. 11. 12. 13. 14. 15. 16. 17. 18. 19. 20. 21. 22. 23. 24. 25. 26. 27. 28. 29. Video options include EGA 43 line mode, VGA 50 line mode, current video mode (which allows any non-standard text mode that the user's video card supports), and standard 25 line mode. On-line help for all functions. On-line viewing and changing the configuration. Screen freeze. Up to four (4) simultaneous connections (with separate sessions) in individual windows. Full-screen "zoom" capability to enlarge session windows. Paging forwards and backwards within each window. Window snapshot (writing the current, viewable screen contents or the entire scroll-back buffer to a file). Optional continuous logging of screen output to a file for later viewing or printing. Beaconing (sending station ID w/ short message manually and/or at pre -defined intervals). Upload and Download of ASCII files. Local Mailbox. Separate display of stations and nodes recently heard along with the times they were heard (and the paths to them if in 43+ line mode) with real-time updating. Automatic connection to stations heard by entering a letter for a station in the "heard" list. Abilty to clear the stations heard and nodes heard lists. Display of I/O statistics (CRC errors, framing errors, etc.) with real-time updating. Single keystroke for transmitting a "datagram" (un-numbered) message, both when connected and disconnected. Notification to user if someone attempts to connect while the session is already connected to another station. Allow display of data in both ASCII text and raw packets (hexadecimal) forms. Unique colors for different types of data being displayed. Non-connected session windows can be used to view all miscellaneous traffic while other sessions are connected to stations. Eight (8) user definable function keys (each can "type" up to 76 characters). Shell to DOS prompt (new input will be lost, but current state will be retained). Optional automatic logging of all connections made (only stations, paths to them, and the time of connection will be logged, not the data that was transmitted). Others may repeat through the station to other stations (digipeat). Unattended operations mode. This allows anyone connecting to the station to: a. List directories. b. Read ASCII files that are on disk. c. Get the current time & date. d. Disconnect e. Get a list of last 18 stations heard with their time and their path used. f. Get a list of last 18 nodes heard with their time and their path used. All but the disconnect (bye) command may be disabled, and the disk drives that the remote station has access to can be restricted, both via the on-line configuration. Callsign "include" and "exclude" lists to filter data when monitoring. Optional clearing windows of all scroll-back data (like a DOS CLS per window). Optional filtering of specific packet types when monitoring. EZPKTMAN.DOC Copyright © Frank Domina, 1992-1996. Duplication prohibited. 1 Foreword: EzPacket, written by Frank T. Domina, is based upon Andrew C. Payne's original Poor Man's Packet software. Most of the keystrokes are the same to benefit those that are already familiar with the PMP software. Though nearly the entire program has been written from scratch, the low-level bit I/O routines are almost the same as Mr. Payne's code, as is the NETROM code. I would like to thank Andrew Payne for the model I used for this program and F. Kevin Feeney for designing the PMP modem hardware. Purpose: EzPacket is intended for use by amateur radio operators that are familiar with packet radio procedures. This manual is not intended for those that are completely unfamiliar with packet radio. Basic understanding of packet radio terminology and operating procedures will be necessary for this manual to be completely understood. Hopefully this manual is sufficient documentation to explain EzPacket to those who are new to packet radio, yet have some understanding of what packet radio is about. The hardware that EzPacket is intended to control is a Poor Man's Packet modem (designed by F. Kevin Feeney); however, it can control other hardware that fits into the confines of EzPacket's configurable parameters. Many new features have been added and improvements have been made compared to the original PMP software. This version of EzPacket is not, however, intended to perform all of the functions of a full featured Terminal Node Controller (TNC). Its primary purpose is to provide reliable, easy to use software to run packet over an inexpensive modem, often from a lap-top computer being used in the field. 2 EZPKTMAN.DOC Copyright © Frank Domina, 1992-1996. Duplication prohibited. Theory Of Operation: EzPacket will run on an 8088 (or higher) PC that is 100% IBM compatible. Because of critical timing requirements, it will not run correctly in a Windows 1 enhanced mode DOS window or in an OS/2 2 DOS window. There are five (5) lines supported between the modem and the computer: Ÿ Ÿ Ÿ Ÿ Ÿ RD - Receive Serial Data TD - Transmit Serial Data CD - Carrier Detect PTT - Push To Talk Ground (1200 baud, still in NRZI format) (1200 baud, NRZI encoded) While waiting for the user to press keys on the keyboard, the program is basically in a loop, always checking for CD and to see if anything needs to be transmitted. If a carrier is detected, EzPacket loops , capturing each individual bit of the NRZI receive data stream and places the data into a buffer. This continues until the carrier drops. Any received data that is in the input buffer is then processed. Once all received data has been fully processed, the output queue is checked to see if there is any data that needs transmitting, and if so, it is sent. The program then goes and checks the keyboard to see if anything has been typed, and so on. This is the basic loop that is always being executed. EzPacket follows the specifications of the AX.25 protocol version 2.0. This includes support for digipeaters, information frames (numbered and unnumbered), and supervisory frames. The transmission of data uses a sliding-window protocol with "go back n" NACKing. The size of the window is user configurable between 1 and 7 frames. The length of the data portion of the packet is also user configurable, up to AX.25's limit of 256 bytes. EzPacket only handles ASCII (text) data at this time. The ability for binary data file transfers may be added to EzPacket in the future. For more information regarding the AX.25 protocol, see a manual describing its internals such as ARRL's AX.25 Amateur Packet-Radio Link-Layer Protocol manual (ISBN #0-87259-011-9). Before You Start: Before running EzPacket, there are a few of things you must be aware of. If you are using the PMP modem that was described in 73 Amateur Radio Today, and you have wired the connections to the computer exactly as in the article, this will be simple. If you are using some other configuration, you will need to know what signal lines will be used for CD, PTT, TD, and RD as well as their logical levels. Also, you will need to know what I/O ports on the computer will control/read these signals. (If you will be using LPT1 or LPT2, the ports will be listed below. ) This configuration information is important to have before running the program because the wrong configuration can cause the computer to respond poorly. Please read this section and the Getting Started section before running EzPacket for the first time. 1Windows is a registered trademark of Microsoft Corporation 2OS/2 is a registered trademark of International Business Machine Corporation EZPKTMAN.DOC Copyright © Frank Domina, 1992-1996. Duplication prohibited. 3 When EzPacket is run, it tries to read EZPACKET.CFG from the same drive and directory that EZPACKET.EXE is in. If the configuration file is not found, one will be created and default values wi ll be set for everything that can be defaulted. For now, we will only be concerned with the I/O port configuration The default is PMP on COM1. Below are sample I/O port configurations: PMP PARAMETER Transmit Port Transmit Bit PTT Port PTT Bit PTT on when bit is Receive Port Receive Bit Carrier Detect Port Carrier Detect Bit Carrier Detected when bit is Initialize Port Initialize value NOTE: LPT1 BAYCOM LPT2 COM1 COM2 0x378 0x01 0x378 0x02 LOW 0x379 0x08 0x379 0x80 LOW 0x278 0x01 0x278 0x02 LOW 0x279 0x08 0x279 0x80 LOW 0x3FC 0x01 0x3FC 0x02 HIGH 0x3FE 0x10 0x3FE 0x20 LOW 0x2FC 0x01 0x2FC 0x02 HIGH 0x2FE 0x10 0x2FE 0x20 LOW 0x00 n/a 0x00 n/a 0x3FB 0x40 0x2FB 0x40 HIGH & LOW refer to internal values at the specified port and that LPT ports invert some of the levels externally. The IBM MDA card and some clone computers have LPT1 at 0x3BC and place LPT2 at 0x378 and LPT3 at 0x278. Getting Started: There are three optional run-string arguments that may be passed to EzPacket from the DOS prom pt. If you forget these options, simply run EZPACKET /? and proper usage will be explained. Normally, EzPacket will use video mode that was used the last time EzPacket was run, or the current video mode if it is being run for the first time. If you have a video card that supports a high resolution text mode, such as 132 columns by 60 lines, you can put your card into that mode before starting EzPacket. Otherwise, if you have an EGA, VGA, or higher monitor, the first option tells EzPacket to force the ca rd into 43 (EGA) or 50 (VGA) line mode. This option is /43 or /50. If your video card does not support this mode, nothing will happen if this option is given. If you have run EzPacket previously in the 43/50 line mode and wish to run it in standard 25 line mode, specify /25 on the command line. The second option allows specification of a different configuration file. This is especially useful if several people with different call-signs will be using the program. By default, EzPacket uses EZPACKET.CFG from the same drive and directory that EZPACKET.EXE is in. If you wish to use a different configuration file, you will need to use the /F option. The syntax is /F<configfilename> where configfilename is the name of the configuration file you wish to use (and the path to it). The "<" and the ">" characters should not be included. Example: EZPACKET /Fn9mxi.cfg The third option is /A for auto-startup mode. This option allows EzPacket to start-up without waiting for ENTER to be pressed from the title screen. Do not use this option until EzPacket has been configured properly. Before starting the program, connect your modem to the computer. Once connected, you may start the program, and when the title screen is displayed, press ALT+O to bring up the configuration options screen. If you need to change the default I/O port configuration or need to specify a port to initialize to a certain value, such as turning on COM1's DTR and RTS lines to power your modem, press A to bring up the I/O port sub-menu, change the configuration as needed, then press ESC to return to the main configuration screen. You should now press F to change the call-sign to your call. When done, press ESC to return to the title screen, answering Yes to save the configuration. The rest of the configuration parameters should work for you as defaulted. (For more information on modifying these parameters to suit your specific needs, see the Configuring EzPacket section of this manual.) If you wish to continue with the program at this point, press Enter. If you wish to return to DOS, press ESC. Note: If you have 4 EZPKTMAN.DOC Copyright © Frank Domina, 1992-1996. Duplication prohibited. the Carrier Detect polarity incorrect and EzPacket thinks it sees a constant carrier, there will be about a 3 second delay in response to any keys pressed on the keyboard. EzPacket's Main Screen: EzPacket's main screen is divided up into separate windows for each configured session. Each window has a status line at its bottom, separating it from the other windows. At the very bottom of the screen is the input line. This line is where input is typed for all sessions. Depending on your configuration, the color of this line may change to indicate which session the line is associated with. When typed input is transmitted, it will also appear in that session's window. (For more inf ormation about configuring the number of sessions and the screen's colors, see the Configuring EzPacket section of this manual.) SESSION WINDOWS: There may be up to 4 configured sessions. The first session is session 0. Each configured session has its own window where its traffic is displayed. The type of traffic and the color of each type is configurable. More importantly, each window scrolls independently. This allows you to easily have more than one "conversation" at a time. If you wish to allow viewing of data not addressed to you, that data will be displayed in the window of the highest numbered session that is configured to allow it. This lets you monitor miscellaneous traffic while connected, optionally in a separately scrolling window. You may also configure EzPacket to display data for all connections in the monitor as well as their individual session windows. (For more information about configuring EzPacket to display connection data in the monitor window, see the Configuring EzPacket section of this manual.) STATUS LINES: The status line of the session that the keyboard in associated with will say "Keyboard" on the left side. If a session has logging enabled, "LOG" will appear on its status line. When in scroll -back mode, the direction of additional screen text (up and/or down) will be indicated by arrows on the status line. Your configured call-sign will appear on each status line, with that session's SSID. When connected to a remote station (or attempting a connection), that station and the path to it will also be on the session's status line. To the right of the connection path, when connected, there is room for eight (8) characters that are used to indicate the status of outstanding frames. These characters look somewhat like snow flakes. The position of the snowflakes are determined by the AX.25 frame number of the outstanding frames. After a little experience, this can become a handy indicator of how good a connection is. To the right of the frame indicators is a status indicator for newly received mail. This indicator will show an "M" followed by the number of mail messages received since (a) starting EzPacket or (2) shelling to the DOS prompt from within EzPacket. Finally, on the far right of the status line, TX will appear when EzPacket is transmitting data for that session. CD will appear on all status lines when any data, including noise, is detected such as when the squelch is left open. RX will appear on all status lines whenever a carrier is detected and a valid flag byte has been received, indicating that EzPacket is receiving real data. THE INPUT LINE: This line, at the bottom of the screen, is where all typed input will be displayed. In addition, when you are prompted (such as for a file name or connection path), the prompt will appear on this same line. Other EZPKTMAN.DOC Copyright © Frank Domina, 1992-1996. Duplication prohibited. 5 various warning messages may also appear on the input line. During normal operation, don't forget to look at this line now and then. Besides typing data to send to a remote station, there are many other fu nctions that can be invoked from the main screen. Some are session-specific, while others are not. For details, see the following EzPacket Functions section of this manual. EzPacket Functions: The following functions can be initiated by pressing the associated key, only when the main screen is visible, and only when not being prompted to enter something, such as a connection path or log file name. There is one special key: The ESCape key: Ÿ Pressing ESC from any screen will return you to the previous screen. Ÿ Pressing ESC when typing text to be transmitted will clear all text on the current line. Ÿ Pressing ESC when being prompted to enter anything will cancel the prompt and restore the previous state. It should also be noted that when any string is being prompted for, with the exception of log-file names, the INS, DEL, Left arrow, Right arrow, Backspace, F1, F3, and F5 keys allow editing the previous entry, just as if at a DOS prompt. If you are not familiar with these functions, refer to your DOS user's man ual. PAGE UP / PAGE DOWN / UP / DOWN: SCROLL SESSION'S WINDOW The "page up/down" keys scroll the session's window a page at a time and the "up/down" keys scroll the session's window a line at a time. When the window is not at the bottom, the session's st atus line will indicate the direction in which there is more data to view by displaying arrows. A window will stay scrolled back until it is manually repositioned to the end or until Enter is pressed. This makes it possible to scroll back to reference something that was received and type a response while still viewing it. F1 THROUGH F8: USER DEFINABLE KEYBOARD MACROS See the Configuring EzPacket section for details about configuring these keys. F9 / SHIFT+F9: SEARCH BACKWARDS These keys allow you to search through the scrollback buffer backwards from the current viewed position. F9 is a case-sensitive search; Shift+F9 is a case-insensitive search. ALT+F9 / CTRL+F9: SEARCH FORWARDS These keys allow you to search through the scrollback buffer forwards from the current viewed position. Alt+F9 is a case-sensitive search; Ctrl+F9 is a case-insensitive search. F10 / TAB / BACKTAB: SWITCH KEYBOARD'S SESSION Pressing F10 or TAB will switch the keyboard to the next session's window and show that fact on the status line of the window that the keyboard is now associated with. Pressing BackTAB (Shift+TAB) will switch the keyboard to the previous session's screen. Note that if you have different colors configured for 6 EZPKTMAN.DOC Copyright © Frank Domina, 1992-1996. Duplication prohibited. each session's input line, the input line (always at the bottom of the screen) will change to the color configured for the session that the keyboard is associated with. CTRL+F10: CLEAR SESSION'S SCROLLBACK BUFFER Pressing Ctrl+F10 simultaneously will clear the current session's scrollback buffer (the bu ffer that is displayed in that session's window). You will be prompted on the input line for confirmation before it is cleared. ALT+F10: ZOOM - TOGGLE SESSION WINDOW TO/FROM FULL-SCREEN Pressing Alt+F10 simultaneously toggle the session between windowed and full-screen mode. If the session is currently in scroll-back mode, this will also exit that mode and return the display to the bottom (most recently received data). ALT+A: ABOUT EZPACKET Pressing ALT+A displays a screen that gives a very brief description of EzPacket. It is mainly to satisfy some of the curiosity of first-time users or users that do not have this manual. ALT+B: SEND BEACON Pressing ALT+B will send a beacon following the configured beacon path and containing the configured beacon message. A beacon is an unnumbered message (no response expected), usually containing text. Its purpose is to call CQ or to let others know about your station. The beacon can be configured to be automatically transmitted at a pre-defined interval. Manually initiating a beacon re-starts the countdown for the next automatic beacon. See the Configuring EzPacket section for more about configuring the beacon's parameters. ALT+C: CONNECT SESSION Pressing ALT+C is used to initiate a connection to another station from the session that the keyboard is currently associated with. When ALT+C is pressed, you will be prompted to enter in the station to connect to (and optional path to that station). If connecting directly, simply enter the call -sign of the station that you wish to connect to, including it's SSID if applicable. To digipeat to that station, after entering that stations ID, enter a space, the letter V (or the word VIA), another space, then the stations to digipeat through, in order, separated by spaces or commas. [Example: N9LSH v KC9IL N9CXA] The session's status line will change to show à ? between your call and the remote station's call until the connection is acknowledged by the remote station. Once acknowledged and the connection is established, th e session's status line will change to show ß à between your call and the remote station's call. (If the session is already connected, nothing will happen.) When a session is connected, the status line will show any outstanding (unacknolwdged) frames in the form of snowflake-like symbols. Each snowflake is an outstanding frame. There is space on the status line for eight (8) snowflakes, thus the position of the snowflakes also designates the AX.25 frame numbers. ALT+D: DISCONNECT SESSION Pressing ALT+D will initiate a disconnect for the session that the keyboard is currently associated with, after prompting for user confirmation. If confirmed, that session's status line will change to ß ? between your call and the remote station's call. Normally, you sh ould wait for the remote station to respond and complete the disconnect. If there is some reason that you cannot hear the remote station anymore, you EZPKTMAN.DOC Copyright © Frank Domina, 1992-1996. Duplication prohibited. 7 can force the disconnection by pressing ALT+D a second time. (If the session is not connected, nothing will happen.) ALT+E: ERASE STATIONS HEARD & NODES HEARD LISTS Pressing ALT+E will pop-up a window prompting you to confirm if you wish to clear all of the stations and nodes from their respective "heard lists". Pressing Y will cause both lists to be cleared. Pressing Esc or N will remove the prompt from the screen and leave the lists alone. If both lists are already empty, pressing ALT+E will do nothing. See ALT+J and ALT+N for information about the "stations heard list" and the "nodes heard list", respectively. ALT+F: WRITE SESSION'S CURRENT SCREEN TO FILE Pressing ALT+F will write only the currently viewable portion of the session's scroll-back buffer to a file. You will be prompted to enter the name of the file you wish the text written to. If t he file already exists, you may choose to append to it or over-write it. (See ALT+W for saving the entire scroll-back buffer.) ALT+H: HELP Pressing ALT+H displays the on-line help screen. This screen gives a brief description of what keys will perform what functions. This screen is not intended to replace this manual, but rather serve as a reminder to the user about EzPacket's functions. 8 EZPKTMAN.DOC Copyright © Frank Domina, 1992-1996. Duplication prohibited. ALT+J: STATIONS RECENTLY HEARD Pressing ALT+J allows you to view the last 18 stations that have been heard, sorted with the most recently heard first. If you stay on this screen, the screen will be updated real -time. If your display is in 43 (or more) line mode, the path to each station will also be displayed. You can exit this screen by pressing Esc, or if you wish to connect to a station in the "stations heard list", you can press the letter (A -R) to the left of that station. This will not cause an automatic connection attempt, but it does pre -type the connect string for you. Once you have verified that this is the correct path that you chose, all you have to do is press Enter to initiate the connection attempt. (Since data is still being received while in this screen, it is possible, though very unlikely, that between the time you read the screen and press A -R, the list may be re-sorted, thus causing a different call than the one you selected to be used.) See ALT+N for the "nodes heard" list screen. ALT+L: DOWNLOAD/CAPTURE TO A TEXT FILE (LOG SESSION'S I/O) Pressing ALT+L will cause one of two actions: Ÿ If the session is not currently logging to a file, all subsequently received data for the session to be logged to a file. You will be prompted to enter the name of the file you wish the text written to. If the file already exists, you may choose to append to it or over-write it. Ÿ If the session is currently logging to a file, logging will be turned off. Essentially, ALT+L toggles logging for a session. (See ALT+F and ALT+W for saving already received data.) ALT+M: SEND DATAGRAM MESSAGE Pressing ALT+M will allow you to send a datagram (no-response expected) text message. First you will be prompted for the path for the datagram; then you will be prompted for the message itself. If you press Esc at either of these prompts, the datagram will not be sent. ALT+N: NODES RECENTLY HEARD Pressing ALT+N allows you to view the last 18 nodes that have been heard, sorted with the most recently heard first. If you stay on this screen, the screen will be updated real-time. If your display is in 43 (or more) line mode, the path to each node will also be displayed. You can exit this screen by pressing Esc, or if you wish to connect to a node in the "nodes heard list", you can press the letter (A -R) to the left of that node. This will not cause an automatic connection attempt, but it does pre-type the connect string for you. Once you have verified that this is the correct path that you chose, all you have to do is press Enter to initiate the connection attempt. (Since data is still being received while in this screen, it is possible, though very unlikely, that between the time you read the screen and press A-R, the list may be re-sorted, thus causing a different call than the one you selected to be used.) See ALT+J for the "stations heard" list screen. ALT+O: CONFIGURATION OPTIONS SCREEN See the Configuring EzPacket section for details about the configuration screen. ALT+P: PAUSE ENTIRE SCREEN Pressing ALT+P will cause the entire screen to freeze until another key is pressed. While frozen, data will continue to be received and/or transmitted. Once the screen is unfrozen, that new data will be displayed. EZPKTMAN.DOC Copyright © Frank Domina, 1992-1996. Duplication prohibited. 9 ALT+R: REMOTE COMMAND HELP Pressing ALT+R will display the remote command help screen. This screen gives a brief description of the remote commands that are available within EzPacket. ALT+S: SYSTEM STATUS Pressing ALT+S will display the status screen. This screen contains miscellaneous statistical information that you may find useful. This information includes the number of received frames, CRC errors, framing errors, queue and buffer overflows, frames transmitted, scroll-back buffer usage, and other related statistics. This screen will be updated real-time while it is being viewed. ALT+U: UPLOAD (SEND) A TEXT FILE Pressing ALT+U allows you to transmit the contents of any text file. You will be prompted to enter the name of the file you wish to send. You may include any valid drive and path in the file's name. When the upload completes, the time it took to send and its length will be displayed. (If the session is not connected, nothing will happen when ALT+U is pressed.) ALT+W: WRITE SESSION'S ENTIRE SCROLL-BACK BUFFER TO A FILE Pressing ALT+W will allow you to write the session's entire scroll-back buffer to a file. You will be prompted to enter the name of the file you wish to write the data to. If the file exists, you may choose to append to it or over-write it. The scroll-back buffer does not get cleared by writing it to disk. (See ALT+F for writing only the visible area of the window to a file.) ALT+X: EXIT EZPACKET Pressing ALT+X is the way to exit EzPacket. Note, however, that if you are actively connected to anyone in any session, exiting the program is not allowed. 10 EZPKTMAN.DOC Copyright © Frank Domina, 1992-1996. Duplication prohibited. ALT+Z: RUN DOS SHELL Pressing ALT+X allows you to get to a DOS prompt without exiting EzPacket. Once at the DOS prompt, you must type EXIT to return to EzPacket. Note that if you are actively connected to anyone in any session, shelling to DOS is not allowed. Configuring EzPacket: With the exception of your call-sign and possibly the I/O port configuration, EzPacket should function with the default configuration. If you are interested in "tweaking" EzPacket's configuration to your own preferences and needs, either for aesthetics or performance, on-line configuration is available for many settings. NOTE: If you accidentally configure EzPacket in such a way that does not perform satisfactorily and you cannot remember what you changed, you can easily restore the default configuration by simply deleting the configuration file. To access the on-line Configuration screen, press ALT+O. There will be a list of 22 options on the screen (A through V). To change any of these options, press the corresponding letter. The first seven options (A-G) will display sub-menus. The last 15 options are all set and visible on the main configuration screen. Any time you are entering a numeric value for an option, remember the following: To enter a hexadecimal value, the value must be proceeded with 0x. To enter an octal value, the first digit must be a zero (0). Decimal values entered must not have leading zeros. Each menu option is described below: OPTION A: I/O PORTS When A is pressed, a secondary window will pop-up containing a sub-menu of 12 options (A through L) and the values currently assigned to them. At the bottom of the window is a listing of the serial and parallel I/O ports found in your computer for your reference. After you have made your changes, press Esc to return to the main configuration menu. Sub-options K and L cannot be changed once EzPacket has started. To set these parameters, you must have entered the configuration screen by pressing ALT+O from EzPacket's title screen. NOTE: HIGH & LOW refer to internal values at the specified port and that LPT ports invert some of the bits externally. EZPKTMAN.DOC Copyright © Frank Domina, 1992-1996. Duplication prohibited. 11 Sub-Option A: Transmit Port This parameter sets the output port that will be used to send the transmitted data. The default value is 0x378 (hex) which is the output port for LPT1. Sub-Option B: Transmit Bit This parameter sets the value to be written to the above Transmit Port to transmit a logical 1 bit. The default value is 0x01 which is the least significant bit of the byte (bit #0). Sub-Option C: PTT Port This parameter sets the output port that will be used to key the transmitter. T he default value is 0x378 (hex) which is the output port for LPT1. Sub-Option D: PTT Bit This parameter sets the bit value to be written to the above PTT Port for transmitter keying. The default value is 0x02 which is the second from least significant bi t of the byte (bit #1). Sub-Option E: PTT Level This parameter sets whether the transmitter is keyed when the above PTT Bit is HIGH (1) or LOW (0). The default value is LOW. Sub-Option F: Receive Port This parameter sets the input port that will be used to receive the serial data stream. The default value is 0x379 (hex) which is the input port for LPT1. Sub-Option G: Receive Bit This parameter sets the bit of the above Receive Port that will be looked at to see the incoming serial data stream from the modem's output. The default value is 0x08 which is the most significant bit of the byte's least significant nybble (bit #3). Sub-Option H: Carrier Detect Port This parameter sets the input port that will be looked at to determine when a carrier is presen t. The default value is 0x379 (hex) which is the input port for LPT1. Sub-Option I: Carrier Detect Bit This parameter sets the bit of the above Carrier Detect Port that will be looked at to determine when a carrier is present. The default value is 0x80 which is the most significant bit of the byte e (bit #7). Sub-Option J: Carrier Detect Level This parameter sets whether the a carrier's presence should be determined by the above Carrier Detect Bit being HIGH (1) or LOW (0). The default value is LOW. Sub-Option K: Initialize Port At Startup This parameter is an optional port that you may wish to initialize to some value when the program is started. For instance, if you wanted to power your PMP modem from the DTR and RTS lines on a com port, you could set this parameter to that com port's modem control register's port address. If this value is zero, no startup initialization will be done. The default value is zero (0). Sub-Option L: Initialize To Value This parameter is the value that you want written to the above Initialization Port. The default value is zero (0). (Note: Initializing port 0x3FC to a value of 0x03 will set DTR and CTS high on COM1) 12 EZPKTMAN.DOC Copyright © Frank Domina, 1992-1996. Duplication prohibited. Sub-Option M: Baud Rate This parameter is baud rate (bits per second) that EzPacket will transmit and receive. Choices are 1200 and 300. The default value is 1200. (Note: The standard PMP and Baycom modems will require modification for operation at 300 baud in order to generate the correct mark/space tones.) OPTION B: BEACON PATH & MESSAGE When B is pressed, a secondary window will pop-up containing a sub-menu of 2 options pertaining to what is sent when your beacon is sent. A beacon is an un-numbered message (no response is expected) that is usually addressed to BEACON or to CQ. Beacons are usually send to let other stations know that you exist, and usually will contain a text message stating your QTH. These two sub-options allow you to set your beacon's path and a text message of up to 76 characters. Sub-Option 1: Beacon Path This parameter is a string that contains the address to which the beacon is sent (usually BEACON or CQ) and a optional digipeater path. The form is the same as for a connection path. See the section for ALT+C for the exact format of a path. The default is "BEACON". Sub-Option 2: Beacon Message This parameter is whatever text message you wish to transmit along with your beacon. To remove a message, enter 2 to select this sub option, then press Enter to remove the current message. The default is no message. OPTION C: CONNECTION WELCOME MESSAGE When C is pressed, a secondary window will pop-up containing a sub-menu of 5 options. Each of these options is one line of a welcome message that can be up to five lines long. The welcome message will be sent to anyone that initiates a successful connection to your station. If all five of these lines are blank, the word "Welcome" will be sent. You can select each of these lines separately to edit. Simply press the number (1-5) of the line you wish to modify. To remove the contents of a line, select that line then press Enter and the line will become blank. If there are any blank lines between non-blank lines, those blank lines will be transmitted as containing only Carriage Returns. Any blank lines that have no non -blank lines following them will not be transmitted. The default values are all blank lines. OPTION D: DISPLAY OPTIONS The display options can be set separately for each session. When D is pressed, you will be asked to enter the session number you wish to view/edit (0-3). Once you enter the session's number and press Enter, a secondary window will pop-up containing a sub-menu of 15 options (A-O). The sub-menu is the same for all sessions' configurations: EZPKTMAN.DOC Copyright © Frank Domina, 1992-1996. Duplication prohibited. 13 Sub-Options A-G set the display colors for various types of data. The values for these colors are displayed in hexadecimal for ease of reading them. The high nybble is the background color and the low nybble is the foreground color. Below is a list of values and their corresponding colors. (Note: Bright colors are not allowed for background colors): 0 1 2 3 4 5 6 7 Black Blue Green Cyan Red Magenta Brown (Dark Yellow) White 8 9 A B C D E F Bright Black (Very Dark Gray) Bright Blue Bright Green Bright Cyan Bright Red Bright Magenta Yellow Bright White Sub-Option A: Transmit Info This parameter sets the color for data that is being transmitted. The default is Yellow on Blue. Sub-Option B: Receive Header This parameter sets the color for the header that tells about each received packet's contents. The default is Bright Cyan on Blue. Sub-Option C: Receive Info This parameter sets the color for received text. The default is Bright White on Blue Sub-Option D: Receive Hex Dump This parameter sets the color for received packets that are being dumped in hexadecimal. The default is Bright Green on Blue. Sub-Option E: Highlight This parameter sets the color for highlighted messages. Such messages include connect and disconnect messages, received datagrams, and errors. The default is Bright White on Brown. 14 EZPKTMAN.DOC Copyright © Frank Domina, 1992-1996. Duplication prohibited. Sub-Option F: Status Line This parameter sets the color of the session's status line. This is the line at the bottom of the session's window that shows the connection status, outstanding frames, etc. The default is Black on White. Sub-Option G: Input Line This parameter sets the color that the input line (at the very bottom of the screen) will be when input is being directed to that session. This is also the color of the "Keyboard" message that is displayed on the session's status line. The default foreground color is Bright White and the default background colors are Green, Cyan, Red & Magenta for sessions 0, 1, 2, & 3 respectively. EzPacket allows selective filtering of call-signs when in a window is in monitoring mode. (Monitoring mode is the mode when that window's session is not connected to any station.) There are two lists that can be used to filter incoming data in monitoring mode: an include list and an exclude list. The call -signs contained in those lists are configured from the main options menu because the same lists will be used (if selected) for all sessions. Sub-Option H configures which list, if any, is used: Sub-Option H: Monitoring Call-sign Filtering Pressing H toggles through three filtering choices: No Filtering, Use Exclude List, and Use Include List. No Filtering will let all data be monitored. Use Exclude List will monitor all data except that coming from any of the call-signs that are in the exclude list. Use Include List will monitor only data coming from any of the call-signs in the include list. The default is No Filtering. Sub-options I-K are used to determine the type of received data that is to be displayed in the session's window then the session is connected to another station: Sub-Option I: Display Headers on Received Packets Pressing I will toggle whether or not a header describing each packet received will be displayed when the session is connected to another station. (Note that sub-option I is used as a prequalifier.) The default is NO. Sub-Option J: Display Packets NOT Addressed to This Station Pressing J will toggle whether or not packets that are not specifically addressed to this stations will be displayed when the session is connected to another station. In other words, when the session is connected to someone, do you want to allow display of all traffic heard in this session's window, as opposed to only traffic from the station that you are connected to? (Note that when traffic not addressed to your station is received, it will be displayed in the window of the highest session number that allows it to be displayed.) The default is NO. Sub-Option K: Display Received Packets in Hex Pressing K will toggle whether or not packets received will be displayed also in hexadecimal while still in their raw-received form when the session is connected to another station. (Note that suboption I is used as a pre-qualifier.) Setting this to YES will not prevent messages from being displayed normally. If YES is selected, the packets wi ll first be displayed in hexadecimal, then in their normal, translated ASCII format. The default is NO. Sub-options L-O are used to determine the type of received data that is to be displayed in the session's window then the session is not connected to another station: Sub-Option L: Display Headers on Received Packets Pressing L will toggle whether or not a header describing each packet received will be displayed when the session is not connected to another station. (Note that sub-option L is used as a prequalifier.) The default is YES. EZPKTMAN.DOC Copyright © Frank Domina, 1992-1996. Duplication prohibited. 15 Sub-Option M: Display Packets NOT Addressed to This Station Pressing M will toggle whether or not packets that are not specifically addressed to this stations will be displayed when the session is not connected to another station. In other words, when the session is idle (unconnected), do you want to allow display of all traffic heard in this session's window? (Note that when traffic not addressed to your station is received, it will be displayed in the window of the highest session number that allows it to be displayed.) The default is YES. Sub-Option N: Display Received Packets in Hex Pressing N will toggle whether or not packets received will be displayed also in hexadecimal while still in their raw-received form when the session is not connected to another station. (Note that sub-option L is used as a pre-qualifier.) Setting this to YES will not prevent messages from being displayed normally. The default is NO. Sub-Option O: Packet Types To Display Pressing O will bring up a sub-menu of 11 possible packet types to selectively include or exclude from monitoring (A-K). If all choices are chosen, then this menu item simply displays "ALL" for packet types to display and "NONE" for packet types to not display, otherwi se, each type is shown in the appropriate do/don't display list. The default is to display ALL packet types. When O is pressed to bring up yet another sub-menu, choosing an item from that menu will toggle the listed packet type between YES and NO: Sub-Sub-Option A: Information These packets contain message text/data addressed to a particular call-sign and transmitted within a connected session. Sub-Sub-Option B: Unnumbered Information These packets contain text/data that is addressed, but not associated with a connected session. Examples include IDs, beacon messages, datagrams, etc. Sub-Sub-Option C: Receiver Ready These packets are used within a connected session and are the transmitter's method of telling the receiver that it is okay for the receiver's side to start sending. 16 EZPKTMAN.DOC Copyright © Frank Domina, 1992-1996. Duplication prohibited. Sub-Sub-Option D: Receiver Not Ready These packets are used within a connected session and are the transmitter's method of telling the receiving end to stop transmitting any more packets. Sub-Sub-Option E: Reject These packets are used within a connected session and are how the transmitter tells the receiver that the transmitting end just received a bad packet that needs retransmitting. Sub-Sub-Option F: Connect Request These packets are requests by the transmitter, asking the receiver to establish a connection. Sub-Sub-Option G: Disconnect Request (SABM) These packets are requests by the transmitter, asking the receiver to end a connection. Sub-Sub-Option H: Disconnected Mode These packets are used when the transmitter is not connected to the receiver. There are various uses such as saying "busy - can't connect now" or "bye". Sub-Sub-Option I: Unnumbered Acknowledge These packets have various uses. They are generally used when a connection is not yet established, but an acknowledgment of a received packet needs to be sent. The most common use is probably accepting a connection request from the other side. Sub-Sub-Option J: Frame Reject These packets indicate a serious problem and that the receiving side needs to renegotiate the session's connection. Sub-Sub-Option K: Unknown Packet These are packet types that EzPacket does not recognize. EZPKTMAN.DOC Copyright © Frank Domina, 1992-1996. Duplication prohibited. 17 OPTION E: REMOTE STATION ACCESS When E is pressed, a secondary window will pop-up containing a sub-menu of 2 options pertaining to remote commands: Sub-Option 1: Remote Commands Allowed Pressing 1 will toggle whether or not remote commands (listed below) are allowed. Setting this to YES will allow all remote commands. Setting this to NO will disable all remote commands except \\B and \\BYE. The default is YES. Sub-Option 1: Drives Remote Stations May Access Pressing 2 will pop-up a window for you to enter the drive letters of all drives that you wish to allow remote stations to have access to. Simply type any letters from A to Z, in any order, without any spaces or punctuation. If you have only one floppy drive on your computer, it is strongly recommended that you disable drive B from remote access. This is because DOS will prompt locally to put the B disk in drive A and wait for a key. Obviously, this will cause a problem, especially if your station is unattended. Don't worry about any other non-existent drives in the list. It is only B that DOS does strange things with. If other drives don't exist, or if A is accessed and there is no floppy in it, EzPacket will continue properly and return the error to the remote station. Currently, the only remote commands that access the disk are \\DIR and \\TYPE. The default is all drives except B (ACDEFGHIJKLMNOPQRSTUVWXYZ). Remote commands must be sent on a line of their own. They cannot be embedded within a line of other text that is being sent. Each starts with two (2) back-slashes (\\). Below is a list of available remote commands: 18 \\DIR Transmit a directory listing of your station's disk. allowed, just as if for DOS's DIR command. \\MAIL or \\M Open/close (toggles) the mailbox. When open, data received for the session will be captured to files in the same directory that EzPacket.Exe resides in named EZ_MAIL.??? where ??? is 000 through 999. You must exit EzPacket or go to a DOS shell (ALT+Z) to view these mail files. If new mail has been received since EzPacket has been started or the last time you had gone to a DOS shell, the number of mail messages received will be indicated on each session window's status line. \\TYPE Transmit a file that is on your disk. This is the same as DOS's TYPE command. Note that remote stations can uses this to read the mail files unless you have EzPacket.Exe on a drive that is configured as inaccessible to remote users. \\TIME Transmit your computers current time and date. \\STATIONS or \\J Transmit the "stations heard list". The data transmitted is the same as what is viewable in your Stations Heard Screen, including paths to the stations. (See ALT+J for more details.) \\NODES or \\N Transmit the "nodes heard list". The data transmitted is the same as what is viewable in your Nodes Heard Screen, including paths to the nodes. (See ALT+N for more details.) \\VERSION Transmit the version of EzPacket that you are running. \\BYE or \\B Disconnect from your station. \\HELP or \\? Transmit a brief description of the remote commands that are available. EZPKTMAN.DOC D rives and paths are Copyright © Frank Domina, 1992-1996. Duplication prohibited. OPTION F: FUNCTION KEY DEFINITIONS When F is pressed, a secondary window will pop-up containing a sub-menu of 8 options (1-8), one for each of eight function keys (F1-F8). The current definition of each function key will also be displayed. To edit one of the function keys, press the number of that key. (For example, to edit the definition of f unction key F3, press 3.) Once a number is entered, a third window will pop-up for you to enter the new definition of the function key you selected. A function key's definition is a string of characters, two (2) of which have special meaning. The carat (^) means that the following key is a CONTROL key, and the tilde (~) means that the following key is an ALT key. If you want either of these two keys (^ and ~) to actually be part of the function key's string, place two of them in sequence. Examples: Pressing a function key that has the string ~CN9MXI^M configured, would be the same as typing ALT+c N 9 M X I [Return] on the keyboard. Pressing a function key that has the string ~~CN9MXI^^M configured, would be the same as typing ~ C N 9 M X I ^ on the keyboard. The default function key definitions are all empty (no action is taken if one is pressed). OPTION G: MONITORING CALL-SIGN FILTERS EzPacket allows selective filtering of call-signs when in a window is in monitoring mode. (Monitoring mode is the mode when that window's session is not connected to any station.) There are two lists that can be used to filter incoming data in monitoring mode: an include list and an exclude list. The call -signs contained in these lists will be used for all sessions that have enabled them in that session's display options. If a session's display option is using the Include List, only packets from call -signs that are in the Include List will be monitored. Likewise, if a session's display option is using the Exclude List, packets from all stations except those in the Exclude List will be monitored. Option G configures the contents of these lists Pressing G will pop-up a window containing a sub-menu of call-signs to be used for the include and exclude filters. To enter or change a call-sign in a list, press the menu letter desired and type in the call sign. The callsign may contain an SSID of "-1" through "-15" or an SSID of "-*" to indicate ALL of the SSIDS for that call-sign. To remove a call-sign from a list, press the menu letter desired and delete the call-sign. OPTION H: CALL-SIGN Pressing H will pop-up a window for typing in the call-sign you wish to assign to the station (your call sign). The call sign may optionally be followed by an SSID in the range of 1-15. (Examples: N9MXI or N9MXI5). The specified SSID is used for session zero. Additional sessions increment from session zero's SSID. The default call-sign is NOCALL and should be changed before transmitting with EzPacket. EZPKTMAN.DOC Copyright © Frank Domina, 1992-1996. Duplication prohibited. 19 OPTION I: SOUND Pressing I will toggle through four choices of when sound (beeping) is enabled or not for different modes. EzPacket will beep when connections are made and broken, when a datagram is received, if ASCII bell characters (0x07) are received as text data, and if an error occurs. The four choices are ON (all beeps), OFF (no beeps), User Interfaface (beeps only pertaining to the user interface, including when connections are made from another station), and If In Text (beeps only from ASCII bell characters contained in received or typed data being displayed). The default is ON. OPTION J: LOG ALL CONNECTS AND DISCONNECTS WITH TIMES TO A FILE Pressing J will toggle whether or not a connection log should be made. If connection logging is enabled, the times of all connects and disconnects, the station connected to / disconnected from, and the path to that station will be logged to a file. The log file's name is EZCONLOG.TXT and it will reside in the same location as EZPACKET.EXE. If the file already exists, it will be appended to. The default setting is YES (logging is on). OPTION K: ACCEPT MESSAGES WITH CRC ERRORS Pressing K will toggle whether or not messages received that have CRC errors should be accepted as if there were no errors. If this is option is enabled, you may receive what looks like garbage messages. Before any message with a CRC error is displayed, a highlighted message "CRC ERROR" will be displayed. The default setting is NO (discard messages with CRC errors). OPTION L: NUMBER OF START FLAGS TRANSMITTED BEFORE DATA IS SENT Pressing L will pop-up a window that allows you to enter the number of flag bytes that will be transmitted before actual data is transmitted. This allows someone that has a slow -keying transmitter, such as one with a TX/RX relay, to compensate for the time it takes from the time the PTT is keyed and the time that the transmitter is actually ready to send data. Each flag byte takes about 6.667 milliseconds at 1200 baud (26.667 milliseconds at 300 baud). The accepted range is 2-500 flags. The default value is 50 flags (33.333 milliseconds at 1200 baud). OPTION M: MAXIMUM RETRIES Pressing M will pop-up a window that allows you to enter the maximum number of retries allowed for a single packet before the connection is dropped. The accepted range is 1-500. The default value is 16. OPTION N: FRAME ACKNOWLEDGMENT TIME-OUT (SOMETIMES KNOWN AS FRACK) Pressing N will pop-up a window that allows you to set the maximum amount of time that EzPacket will wait for an acknowledgment for a frame that it transmitted before polling the remote station. The value is specified in seconds. The range is 5-3600. The default value is 8. OPTION O: CHECK DATA-LINK INTERVAL Pressing O will pop-up a window that allows you to set the maximum amount of idle tim e that a connection may have before the remote station is polled. The value is specified in seconds. The range is 5 -3600. The default value is 60. 20 EZPKTMAN.DOC Copyright © Frank Domina, 1992-1996. Duplication prohibited. OPTION P: BEACON INTERVAL Pressing P will pop-up a window that allows you to enter the time interval (in seconds) between automatic beacons. If this value is set to zero, automatic beaconing will be disabled. The range is 0 -65535. The default value is 0. OPTION Q: INCLUDE RETRY DATA WITH POLL THRESHOLD (SOMETIMES KNOWN AS PTHRESH) Pressing Q will pop-up a window that allows you to enter the maximum length of data that should be transmitted along with a poll to the remote station. Setting this value too high increases the amount of data that may be being transmitted redundantly, and since the poll packet is longer, it is more likely to collide with other traffic. This could cause a time-out disconnect. On the other hand, setting this value too low will mean that after many polls of the remote station, your station will still have to transmit the data again, and it may again be a victim of a collision. This could cause an irregularly long response time. Setting this to 0 means that data will never be included with a poll. Setting this to a number higher than your maximum packet data length (option R) means that data will always be included with a poll. Note: If you have a solid connection to the remote station, this value becomes insignificant. The range is 0 -257. The default value is 20. OPTION R: MAXIMUM OUTSTANDING FRAMES BEFORE AND ACK IS EXPECTED Pressing R will pop-up a window that allows you to set the maximum number of frames that may be transmitted before receiving an acknowledgment for the any of those frames. If you have an unreliable connection to the remote station, setting this number low may reduce the number of re-transmitted frames. Because of the way the AX.25 NACKing protocol works, if your station has 7 outstanding frames transmitted and the remote station NACKs the 3rd one, the 3rd through the 7th (5 frames) must be re transmitted. On the other hand, if you transmit 7 frames and the remote station receives all of them without error, it can ACK all 7 frames at once by ACKing the 7th frame. Thus, the better your connection the higher you should set this number, and visa-versa. The range is 1-7. The default is 7. OPTION S: MAXIMUM PACKET DATA LENGTH Pressing S will pop-up a window that allows you to set the maximum amount of data bytes sent in a packet. The higher this number the less transmissions that will have to be made if the connection is a reliable one. However, if the connection is unreliable and requires frequent retries, shortening the length of the packets will improve the odds of getting them through. The range is 1-256. The default value is 256. OPTION T: AUTO-WRAP COLUMN WHEN TYPING DATA TO TRANSMIT Pressing T will pop-up a window that allows you to enter the auto-wrap column number. The auto-wrap feature only applies to data being typed that is to be transmitted to a remote station. If, when you are typing, you pass up the auto-wrap column, as soon as a space is typed, the current line up to that space is transmitted. This allows sort of a word-processor feel. You only have to press [Enter] to send a line that shorter than the auto-wrap column number. To disable auto-wrap, set this value to 0. The range is 0-132. The default value is 70. EZPKTMAN.DOC Copyright © Frank Domina, 1992-1996. Duplication prohibited. 21 OPTION U: TX/RX DATA LOG MEMORY BUFFER SIZE (PER SESSION) Pressing U will pop-up a window that allows you to enter the amount of memory to be allocated for buffering each session's data when the session has logging enabled. (See ALT+L for details on logging). The larger this number, the less often the log data will need to be written to the disk; however, this memory takes away from the memory available for scrolling bac k on the screen. The range is 128-8192. The default value is 2048 (2KB). Note: This option cannot be changed once EzPacket has started. To set this parameter, you must have entered the configuration screen by pressing ALT+O from EzPacket's title screen. OPTION V: MAXIMUM NUMBER OF CONCURRENT SESSIONS Pressing V will pop-up a window that allows you to set the number of concurrent sessions allowed, thus setting the number of windows on the main screen. The range is 1-4. The default is 2. Note: This option cannot be changed once EzPacket has started. To set this parameter, you must have entered the configuration screen by pressing ALT+O from EzPacket's title screen. OPTION W: DISPLAY CONNECTED INCOMING DATA TO MONITOR WINDOW TOO Pressing W will toggle whether or not packets that is being received for a current connection will also be displayed in the monitor window (if a monitor window is present). This allows you to view only valid text in the session's window and everything (including retries, etc.) in the monitor window. The default value is "No." OPTION X: NEW MAIL INDICATOR Pressing X will toggle whether the "new mail" indicator will be steady or flashing. (This indicator appears on each window's status line when mail has been received since EzPacket has been started or you have gone to a DOS shell (ALT-Z command). The default value is "Flashing." 22 EZPKTMAN.DOC Copyright © Frank Domina, 1992-1996. Duplication prohibited. Glossary 43/50 line mode .......................................A video mode that allows display of more than the standard 25 lines of text on the screen at once. EGA video adapters will support 43 lines. VGA video adapters will support 50 lines. ACK .........................................................Acknowledgment. When a frame of data is received by a station, the receiving station usually acknowledges the sending station. In this manual, ACK implies a positive acknowledgment (i.e. the frame was received without error). ARRL .......................................................Amateur Radio Relay League. AX.25 .......................................................The protocol that is used to establish and maintain links between amateur packet radio stations. baud.........................................................The rate at which data is being transmitted. Baud rate is usually equivalent to bits-per-second (bps) as in the case of 1200 baud packet radio; however, be aware that baud and bps are not always equivalent. For instance, 9600 bps telephone modems actually transmit at 2400 baud, with 4 bits per baud. beacon .....................................................A packet radio transmission, usually containing ASCII text, for the purpose of letting others know that the transmitting station is on-the-air and often what its location is. bit .............................................................A single value of either 1 or 0. bps ...........................................................Bits-per-second. The rate at which data is being transmitted. Baud rate is usually equivalent to bps as in the case of 1200 baud packet radio; however, be aware that baud and bps are not always equivalent. For instance, 9600 bps telephone modems actually transmit at 2400 baud, with 4 bits per baud. byte ..........................................................Eight bits. CD............................................................Carrier Detect. This is a connection between the PMP and/or Baycom modem and the PC that lets the PC know when there is a carrier being received. COM ........................................................Short for communications. This how PC serial ports are usually referred to, with COM1 being the first serial port, COM2 being the second, and so forth. (See LPT cor contrast.) connection ...............................................When two stations agree that they are to be "talking" to each other, they establish a connection between them. While a connection is active, each station is monitoring the other's status by polling it periodically and by expecting acknowledgments for each packet that is sent between them. EZPKTMAN.DOC Copyright © Frank Domina, 1992-1996. Duplication prohibited. 23 CRC ........................................................ Cyclical Redundancy Code. This is a method that is used to determine the correctness of data by using a polynomial to derive a nearly unique CRC for each packet. Because data can be distorted when transmitted/received, there needs to be an accurate method of determining if the data was received ok. A 32-bit CRC is appended to each packet. The receiving station uses the same polynomial to calculate the CRC of the received data and compares it to the received CRC. If there is a mismatch, there is an error in the data. The odds of an error being undetected by the CRC-32 algorithm is 0 if there are less than 32 incorrect bits and 1 in 4,294,967,296 if there are 32 or more bits that are incorrect. datagram ................................................. A message that is transmitted to a specific station for which there is no automated acknowledgment expected. EzPacket can send and receive datagrams when connected to a station and when not connected to a station. digipeat.................................................... The process of using a remote station to repeat a transmission. For example, if station A needs to communicate with a too distant station B but is able to communicate with station C which in turn is capable of communicating with station B, then station A can digipeat through station C to station B. When a station that is serving as a digipeater (which EzPacket can do) receives a transmission that needs to be repeated, an entire frame is received and its CRC is validated before it gets re-transmitted to the destination. If there is a CRC error, the received data is completely ignored and the originator is responsible for timing-out and re-transmitting. The digipeat process is automated, thus the digipeater can be unattended. download................................................. A computer term that means "to receive a file". DTR......................................................... Data Terminal Ready. This is a control line on PC COM ports. EGA......................................................... Extended Graphics Array. This is a type of PC video adapter that is capable of more detailed graphics than the original color graphics array (CGA). flag .......................................................... Flag bytes are transmitted at the start and end of frames so that the receiving station can synchronize on the start of a frame and know when the end of frame is reached. The flag byte value is hexadecimal 7E (binary 01111110). The actual transmitted data is guaranteed to never contain the flag value. If multiple flags are received between frames, they will be ignored. In fact, many flags are usually transmitted before a frame to make sure the transmitter and receiver have stabilized before the data is sent. frame ....................................................... A frame is the "chunk" of data that gets transmitted and acknowledged. Because a frame can contain at most 256 bytes of data, long transmissions get automatically broken up into individual frames and pieced back together at the receiving end. Though in computer networks frames are usually smaller chunks of packets which are themselves chunks of larger pieces of data, frames and packets are synonymous in AX.25. 24 EZPKTMAN.DOC Copyright © Frank Domina, 1992-1996. Duplication prohibited. framing error ............................................This is an error that is due to the reception of a frame that did not end on a byte boundary (the number of bits is not evenly divisible by eight). go-back-n.................................................A method of ACK/NACKing in which, when a frame is NACKed, the originator must re-transmit the bad frame and any frames that may have been transmitted since then. I/O ............................................................Abbreviation for input/output. information frame ....................................A frame that contains information that the user is sending. That is, a frame that contains more than the minimum data necessary to communicate between stations and maintain a connection. See supervisory frame for contrast. LPT ..........................................................Common PC abbreviation for Line-Printer. The LPT ports on a PC are parallel ports using voltage levels of 0v and +5v as opposed to COM ports which are serial ports and use voltage levels of -12v and +12v. NACK.......................................................Negative acknowledgment. node.........................................................A special kind of station that is capable of acting as an intelligent repeater. Many commercial TNCs (and EzPacket someday) have the ability to allow stations to connect to them and then in turn let the stations initiate a connection between the node and another station (or another node). This differs from digipeating in that you actually connect to a node and the node maintains a separate connection to the other station/node. When conditions are less than ideal, using a node is preferred to using a digipeater because frame re-transmissions are handled by the node. This can be very significant if you have a long connection chain. Nodes are automated, thus they can be unattended. nybble ......................................................Four bits. One half of a byte. As referred to in this manual, for example, the high nybble of a byte containing the value 3C (hex) is 3 and the low nybble of the same byte is C (hex). packet ......................................................See frame. PTT..........................................................Abbreviation for a radio's push-to-talk button. This is how the modem keys the transmitter. RD............................................................Abbreviation for receive data. RX............................................................Abbreviation for receive. scroll-back buffer .....................................The buffer maintained independently for each session window that allows the user to scroll backwards to view previously received data. session ....................................................The period during which two stations are connected. EzPacket is capable of up to four simultaneous sessions, each in a separate window. (See connection.) EZPKTMAN.DOC Copyright © Frank Domina, 1992-1996. Duplication prohibited. 25 sliding-window ......................................... This is a commonly used protocol that lets stations send multiple frames of data, and receive a single ACK acknowledging more than one frame at a time. This method usually helps to improve throughput. SSID........................................................ A number (0..15) that is appended to a call-sign when transmitted. EzPacket currently uses separate SSIDs for each session, however that will change in the future. A node decrements the SSID (wrapping from 0 to 15) to act as an alias of the station that it is transmitting for. station...................................................... A packet radio station. supervisory frame ................................... Frames that TNCs send back-and-forth to maintain a connection and send acknowledgments. These frames contain no userinitiated data. (See information frame for contrast.) TD ........................................................... Abbreviation for transmit data. Terminal Node Controller........................ A device that connects to an amateur radio and allows the transmission of data, including managing the link protocol on its own. With EzPacket, the computer and the modem together make up the Terminal Node Controller. TNC......................................................... Terminal Node Controller. TX ........................................................... Abbreviation for transmit. un-numbered information frame ............. The same as an information frame, except that the receiver does not ACK/NACK this type of frame. Beacons and datagrams are examples of unnumbered information frames. upload ..................................................... Computer term that means "to transmit a file". VGA......................................................... This is a type of PC video adapter that is capable of more detailed graphics and more colors than EGA. 26 EZPKTMAN.DOC Copyright © Frank Domina, 1992-1996. Duplication prohibited.