1
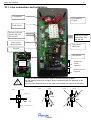
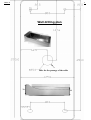
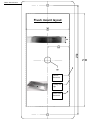
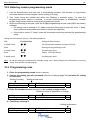
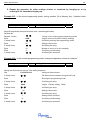
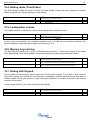
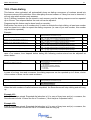
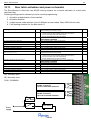
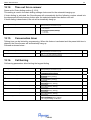
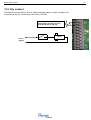
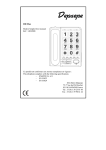
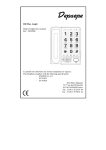
NOTICE D’UTILISATION USER MANUAL Ref: 1969B - 16122010 Cet appareil est destiné à être connecté sur le Réseau Téléphonique Commuté français et sur les installations privées (PBX) de la Communauté Européenne à l’exception des lignes à courant réduit. This product is designed and manufactured in France. It can be connected to the public telephone network as well as behind PABXs. Henri Depaepe SAS 75-77 rue du Pré Brochet 95110 SANNOIS - France Tel : +33 (0)1 30 25 81 60 Fax : +33 (0)1 39 98 61 24 Site Web : www.depaepe.com Notice SecurAccess 3 SUMMARY 10. DESCRIPTION....................................................................................................................................... 29 10.1. 10.2. 11. HOW TO USE IT.................................................................................................................................... 35 11.1. 11.2. 11.3. 11.4. 11.5. 11.6. 12. IDENTIFICATION OF THE DIALING BUTTONS....................................................................................... 35 CALLING ............................................................................................................................................ 35 ANSWERING A CALL .......................................................................................................................... 35 AUTOMATIC LINE DISCONNECTION ................................................................................................... 36 REMOTE DOOR LATCH ACTIVATION .................................................................................................. 36 LOCAL DOOR LATCH ACTIVATION (MODEL WITH KEYPAD) ............................................................... 36 PROGRAMMING................................................................................................................................... 37 12.1. 12.2. 12.3. 12.4. 12.5. 12.6. 12.7. 12.8. 12.9. 12.10. 12.11. 12.12. 12.13. 12.14. 12.15. 12.16. 13. LINE CONNECTION AND INSTALLATION ............................................................................................. 31 MOUNTING LAYOUTS ........................................................................................................................ 32 ENTERING THE LOCAL PROGRAMMING MODE ................................................................................... 37 ENTERING REMOTE PROGRAMMING MODE ....................................................................................... 38 PROGRAMMING RULES ..................................................................................................................... 38 DIALING MODE (TONE/PULSE) ......................................................................................................... 40 LOUDSPEAKER VOLUME.................................................................................................................... 40 MEMORY KEYS STORING .................................................................................................................. 40 DIALING WITH KEYPAD...................................................................................................................... 40 CHAIN DIALING .................................................................................................................................. 41 RINGER ............................................................................................................................................. 42 AUTOMATIC ANSWERING .................................................................................................................. 42 DOOR LATCH ACTIVATION AND POWER SCHEMATIC ......................................................................... 43 TIME OUT FOR NO ANSWER .............................................................................................................. 44 CONVERSATION TIMER ..................................................................................................................... 44 CALL BARRING .................................................................................................................................. 44 CHANGING THE PROGRAMMING ACCESS CODE ................................................................................ 45 RESET ............................................................................................................................................... 45 SPECIAL FEATURES .......................................................................................................................... 46 13.1. 13.2. 13.3. 13.4. 13.5. SHUNT REGULATION ......................................................................................................................... 46 LED LIGHTING.................................................................................................................................... 46 SPEAKER OVERBOOST...................................................................................................................... 46 HEATING RESISTOR .......................................................................................................................... 46 DRY CONTACT................................................................................................................................... 47 14. TABLE FOR PARAMETERS SETTINGS ......................................................................................... 48 15. TEMPLATES FOR FRONT PLATE CUSTOMIZATION................................................................. 50 16. SPECIFICATIONS ................................................................................................................................ 51 17. DECLARATION OF CONFORMITY .................................................................................................. 52 18. WARRANTY AND AFTER SALES SERVICE ................................................................................. 53 Notice SecurAccess 29 10. DESCRIPTION The SecurAccess telephone allows a full handsfree call simply by pressing a button. When the call is terminated, it will automatically hang up. The SecurAccess can also activate: - two doors latches relays remotely or locally when entering a stored code - a dry contact during the conversation for driving an alarm, a camera or any other electrical appliance. The SecurAccess has a built-in speaker overboost feature with 10 dB amplification. This feature requires an optional external power supply complying with CE EN60950-1:2006 BT TRT3 specifications. The SecurAccess complies with IP 65 weather protection specifications. Moreover, a built-in heating resistor, requiring the same as above optional external power supply, provides safe and reliable operations even in very humid environments. Main features: 1. Calling Model with 1 up to 8 programmable off-hook and memory buttons Model with keyboard and 1 up to 4 programmable off-hook and memory buttons. One button can be used to go off-hook and dial with the keypad provided that nothing is stored into its memory. Chain dialing: automatic dialing of a sequence of pre stored numbers (up to 5 numbers – 22 digits max - can be stored in each button) Dialing sequence can be automatically repeated in case of busy line or no answer (up to 9 times) 2. Auto answer An auto answer mode can be activated for calling a party standing close to the SecurAccess or to enter the remote programming mode. The SecurAccess will automatically go off-hook after a pre programmed number of rings : - From 1 up to 9 rings when automatic off-hook selection is activated - After 30 rings otherwise. (see section § 4.9) 3. Automatic line disconnection Automatically when the conversation is over (by busy line tone detection) When a limited timed conversation has been programmed 4. Door latch activation NO/NC driving contacts for a remote and/or local activation of two door latches electrical relays. Selectable activation duration (from 1 up to 9 seconds) Choice of 1 up to 6 four digits codes by door latch. 5. Local or remote programming Local programming requires the use of a keypad and opening the unit if the model has no front panel keypad. Remote programming needs to call the SecurAccess using a DTM (tone) telephone. 6. Dialing Mode Tone (DTMF) or Pulse (66/33 or 60/40 mark break ratio) Notice SecurAccess 7. Conversation timer Choice of unlimited or timed conversation (from 1 up to 9 minutes) 8. Miscellaneous Parameters reset (Back to the factory settings) Hacking and hostile use protection Programming ringer off selection 3 different programmable ringer tunes 4 digits PIN code protection Eeprom memory backup (no need for battery or power supply backup) The unit comes out of factory with the following settings: - Dialing : Tone (DTMF) - Ringer : activated - Ringer melody : #2 - Automatic answer : after 3 rings - Unlimited conversation time - No answer duration when calling : 35 seconds - Chain dialing : not activated - Door latch : not activated - Pin code access to programming : 0000 - No number stored into memory button(s) 30 Notice SecurAccess 31 10.1. Line connection and installation Loudspeaker Programming Keypad RAZ (Reset) Memory/off-hook buttons M1, M3, M5 and M7 Memory/off-hook buttons M2, M4, M6 and M8 Door button Keypad model Line current regulation Keypad Microphone ON Four empty connectors OFF Without line current regulation ON OFF In order to improve the protection against humidity and bad weather: Drill the cable(s) holes with a slightly thinner dimension than the diameter of the cable itself; bend the cable downwards to let the water and humidity run outside of the case. ! Inside With line current regulation Inside Outside Outside Inside Outside Rubber cap Good Bad Cable Housing surface Notice SecurAccess ! 32 Installation, line connection and configuration should be done by qualified personnel. All operations requiring an opening of the unit should be done carefully in order to prevent from potential electric shocks. TRT3 (TNV-3) access : dry contact closed when off-hook. Up to 50 Volts DC/AC 50 Hz 100 mA TRT3 (TNV-3) access : Door latch relay contact 1 : NO/NC and up to 60 VA and 2A maximum TRT3 (TNV-3) access : Door latch relay contact 2 : NO/NC and up to 60 VA and 2A maximum T NC C NO NC C NO TRT3 (TNV-3) access : Telephone line TRT3 (TNV-3) access : Leds access (12-32 Volts DC/AC 50Hz 200 mA TRT3 (TNV-3) access : Heating resistor power (24-37 Volts DC/AC 50Hz 35 mA TRT3 (TNV-3) access : Overboost (12-32 Volts DC/AC 50Hz 100 mA Leds lighting, speaker overboost and the heating resistor will only work with an external power. Power supply specifications are indicated here above. If all of the 3 should be used together, one power supply will be enough provided that it complies with the specifications indicated below and be connected as shown. Alimentation Overboost power BOOST TRT3 (TNV-3) access : Power supply 24 – 32 Volts DC/AC 50 Hz 250 mA Heating resistor Leds power Those ports are designed to be connected on a TRT3 (TNV-3) network in accordance with EN 60950-1 : 2006 specifications. ! Cases come out of factory with pre drilled holes to ensure proper ventilation. Do not fill those holes 10.2. Mounting layouts See following pages Notice SecurAccess 33 Wall drilling plan Hole for the passage of the cable 70 53 Notice SecurAccess 34 Flush mount layout 46 Outside dimension Cutting-out edge Actual case dimension Notice SecurAccess 35 11. HOW TO USE IT 11.1. Identification of the dialing buttons The dialing buttons are always numbered from right to left and top to bottom from M1 to M8 regardless of the number of buttons available. Only models with keyboard have an additional lower button named gate button and allowing opening the door by entering keypad code. 11.2. Calling - By using the off-hook/memory button : -> (Automatic dialing) To go off-hook, simply press any of the off-hook/memory buttons. The unit will automatically turn to “speakerphone” mode and the number stored into its memory if any will be dialed out. If the other party does not answer and if several numbers have been stored into this memory, the unit will automatically dial the following number stored. If chain dialing is activated, the sequence of number will be repeated several times (see “Chain dialing” section § 4.7.). The conversation will be in the “speakerphone” mode. When the call is over, you can hang up the SecurAccess by pressing again the off-hook memory button or, the unit will automatically hang up by detecting busy tone or a reversed polarity. - By using the keypad : -> (manual dialing) only with keypad model To go off-hook, simply press the dedicated button without memory number. The unit will automatically turn to “speakerphone” mode. The keypad will be used to dial the number to call. If the other party does not answer and if several numbers have been stored into this memory, the unit will automatically dial the following number stored. If chain dialing is activated, the sequence of number will be repeated several times (see “Chain dialing” section § 4.7.). The conversation will be in the “speakerphone” mode. When the call is over, you can hang up the SecurAccess by pressing again the off-hook memory button or, the unit will automatically hang up by detecting busy tone or a reversed polarity. 11.3. Answering a call Each time the unit is called; the ringer will be activated except if a no ring setting has been selected. To answer a call, press any of the off-hook buttons or let the unit go automatically off-hook once the number of selected rings before automatic answer has been reached. Once off-hook, the conversation will be held in the “speakerphone” mode. When the call is over, you can hang up the SecurAccess by pressing again an off-hook memory button or, the unit will automatically hang up by detecting busy tone or a reversed polarity. Notice SecurAccess 36 11.4. Automatic line disconnection This may happen during the dialing process or during a conversation in the following cases: 1. 2. 3. 4. 5. 6. When pressing again one of the “off-hook” buttons. No answer duration elapsed. Timed conversation duration elapsed. The other party hangs up and reversed polarity is detected. Busy line tone detection (440 Hz). No speech and no noise on line during 5 minutes. 11.5. Remote door latch activation A party called by the SecurAccess can activate the door latches relays by entering one of the 4 digits stored codes corresponding to the relay on a tone telephone keypad. - If a wrong code is entered, 1 “beep” tone will be emitted, the unit will not hang up waiting for the right code. - If a right code is entered, 2 “beep” tones will be emitted, the door latch will be activated and the unit will hang up. - If the same code is assigned to the two door latches relays, the two relays will be activated according to their respective activation time. This function of dual activation needs an off-hook current > 27mA. If the “fast opening” selection is activated, entering “0#” or “0*” will be enough to activate the door latch 1. Note: the door latch code can be stored in a one touch memory button of the called party. Caution: activation of this code requires a Tone compatible telephone and PABX. 11.6. Local door latch activation (Model with keypad) The keypad on the SecurAccess can be used with the gate button to active a door latch. A door latch can be activated by using the gate button followed by one of the 4 digits stored codes associated to the relay. - If a wrong code is entered, 1 “beep” tone will be emitted, the unit will not hang up waiting for the right code. - If a right code is entered, 2 “beep” tones will be emitted, the door latch will be activated and the unit will hang up. - If the same code is assigned to the two door latches relays, the two relays will be activated according to their respective activation time. Notice SecurAccess 37 12. PROGRAMMING 12.1. Entering the local programming mode 1. 2. 3. 4. 5. Open the unit (only if the model has no front panel keyboard) Connect to the telephone line Reach the front panel or inside programming keypad Press “*” key and, while keeping it depressed, press one of the off-hook memory buttons. Release the off-hook memory button first and the “*” key after : 2 “beep” tones will confirm entering the programming mode. 6. Enter the 4 digits code within 8 seconds : Ö If a wrong code is entered or if it takes more than 8 seconds to enter the code, 1 “beep” tone confirms a wrong code was entered: resume the operation at point 4. Ö If the code is correct, 2 “beep” tones will be emitted confirming entering the programming mode. Keep depressed M1 (off-hook memory button) and * Release M1 Release * Enter 2 “beep” tones 0000 2 “beep” tones: entering the programming mode 4 digits access code (0000: factory settings) confirming entering the programming mode Note: All correct entries are confirmed by a double “beep” tone. Wrong entries are confirmed by a low long “beep” tone and the unit will hang up. Notice SecurAccess 38 12.2. Entering remote programming mode 1. Call the SecurAccess and wait until it automatically answers (the number of rings before automatic answer can be changed, factory setting is 3 rings). 2. Two “beep” tones are emitted and within the following 4 seconds, press * to enter the programming mode (above 4 seconds, a normal communication is established). Another double “beep” tones confirms entering the programming mode. 3. Within the following 8 seconds, enter the 4 digits programming access code (0000 with factory settings): Ö If a wrong code is entered or if it takes more than 8 seconds to enter the code, 1 “beep” tone confirms a wrong code was entered: resume the operation. Ö If the code is correct, 2 “beep” tones will be emitted confirming entering the programming mode. Calling the SecurAccess using a Tone dialing telephone. Dial 0XNNNNNNNN The SecurAccess answers and goes off-hook 2 “beep” tones Enter * Entering the programming mode Confirming the entry 2 “beep” tones Enter Calling the SecurAccess 0000 4 digits (0000 by default) Confirming the entry 2 “beep” tones Note: All correct entries are confirmed by a double “beep” tone. Wrong entries are confirmed by a low long “beep” tone and the unit will hang up. 12.3. Programming rules 1. Enter the programming mode (local or remote) 2. Choose the setting you wish to modify (See list of settings page XX) and enter its setting access code. Setting to modify Setting access code Settings M1 storing for key 1 Code 20 Setting choice Number (22 digits max.) * 9 3. Enter the number to store (memory) or the setting change number. Number to store or parameter to change Settings M1 storing for key 1 Code 20 Setting choice Number (22 digits max.) * 9 4. Confirm by entering *9 Setting confirmation Settings M1 storing for key 1 Code 20 Setting choice Number (22 digits max.) * 9 Notice SecurAccess 39 5. Repeat the operation for other settings choices or terminate by hanging up or by entering 99 for immediate hanging up. Example N°1: In the local programming mode, storing number 18 in Memory key 1 (without chain dialing) Settings M1 storing for key 1 Code 20 Setting choice Number (22 digits max.) Conf. *9 Keep M1 depressed (front panel button) and * (small keypad inside) Release M1 Release * button Enter 2 “beep” tones Enter 2 “beep” tones Enter Enter 0000 2 “beep” tones: entering the programming mode 4 digits access code (0000: factory settings) 20 Confirming entering the programming mode Setting code access 18 *9 Confirming the entry Number to store (18 in this example) Confirming stored setting 2 “beep” tones Confirming the operation Example N°2: In the remote programming mode, change loudspeaker volume to “medium” Settings Loudspeaker volume Code 06 Setting choice Low: 0 – Medium : 1 – High : 2 Conf. *9 Calling the SecurAccess using a Tone dialing telephone. Dial 0XNNNNNNNN The SecurAccess answers and goes off-hook 2 “beep” tones Enter * 0000 4 digits (Factory setting : 0000) Confirming the entry 2 “beep” tones Enter Entering the programming mode Confirming the entry 2 “beep” tones Enter Calling the SecurAccess 06 Setting code access Confirming the entry 2 “beep” tones Enter 1 Setting choice (medium) Enter *9 Confirming stored setting 2 “beep” tones Confirming the operation Notice SecurAccess 40 12.4. Dialing mode (Tone/Pulse) The SecurAccess offers the choice of Tone or Pulse dialing. Check with your operator or installer before using the unit. Factory setting is Tone dialing. Setting to modify Code Dialing mode Pulse dialing mark/break ratio 00 01 Setting choice Factory settings are shown in grey Pulse : 0 – Tone : 1 Pulse 66/33 ms : 0 60/40 ms : 1 Conf *9 *9 12.5. Loudspeaker volume For a better comfort, loudspeaker volume can be adjusted to 3 different levels. Setting to modify Code Loudspeaker volume 06 Setting choice Factory settings are shown in grey Low : 0 – Medium : 1 – High : 2 Conf *9 In very noisy environments, an overboost reception level (+10 dB) can be selected. However, this feature requires an external power supply (see section § 13.3) 12.6. Memory keys storing The SecurAccess comes with 1 up to 8 off-hook/memory buttons. To store the number to be dialed when depressing one of these buttons, enter the programming mode and proceed as follows: Setting to modify Code M1 Key n°1 (mandatory) 20 M1 Key n°2 (mandatory) 25 Setting choice Factory settings are shown in grey Number to store (* # = pause) (22 digits max) Note : no digit entered erases a previous stored number Number to store (* # = pause) (22 digits max) Note : no digit entered erases a previous stored number Conf. *9 *9 12.7. Dialing with Keypad Some models of SecurAccess series come with a front panel keypad. If you wish to dial numbers using this keypad, you should first go off-hook by pressing a selected off-hook button that has no number stored into its own memory. Chain dialing will operate if a number is stored in the second memory of this button. In this sample the key n°4 is used to dial with the keypad. Setting to modify Code M1 Key n°4 M2 Key n°4 35 36 Setting choice Factory settings are shown in grey Keep this memory empty Number to store (* # = pause) (22 digits max) Conf. *9 *9 Notice SecurAccess 41 12.8. Chain dialing This feature, when activated, will automatically keep on dialing a sequence of numbers stored into the same memory/off-hook button if the other party does not answer or if busy line tone is detected, it will only stop when another party answers. Up to 5 different numbers can be stored in each memory and the dialing sequence can be repeated up to 9 times. Time elapsed before the next call can be adjusted. Programming this feature can be done locally or remotely. Each button can store up to 5 numbers but, in order to activate the chain dialing, at least one number must be stored to in order to repeat the dialing sequence (in case of just one number, this number only would be repeated). Example : Setting to modify Code Number 1 Key n°1 (mandatory) 20 Number 2 for chain dialing on key n°1 Number 3 for chain dialing on key n°1 Number 4 for chain dialing on key n°1 Number 5 for chain dialing on key n°1 21 22 23 24 Setting choice Factory settings are shown in grey Number to store (* # = pause) (22 digits max) Note : no digit entered erases a previous stored Number to store (* # = pause) (22 digits max) Note : no digit entered erases a previous stored Number to store (* # = pause) (22 digits max) Note : no digit entered erases a previous stored Number to store (* # = pause) (22 digits max) Note : no digit entered erases a previous stored Number to store (* # = pause) (22 digits max) Note : no digit entered erases a previous stored Conf. *9 number *9 number number number number *9 *9 *9 If a busy tone is detected, the unit will automatically dial the next number stored in the memory. In case of no answer, time elapsed before dialing the following number stored can be adjusted as shown below: Setting to modify Code Elapsed time before next call 08 Setting choice Factory settings are shown in grey 0 : 10 seconds 1 : 20 seconds 2 : 35 seconds (factory setting) 3 : 1 minute 4 : 5 minutes Conf *9 In case of no busy tone and no answer, the dialing sequence can be repeated up to 9 times, choice of the number of times can be made as shown: Setting to modify Code Repeated dial 09 Setting choice Factory settings are shown in grey Enter 0 up to 9 (0 for no repeated dial), note: factory setting = 0 Conf. *9 When the total numbers of calls has been completed, the SecurAccess will stop dialing and will hang up. Example N°1: A list of 5 numbers stored. Repeated dial selection is 9. In case of busy tone and (or) no answer, the SecurAccess will dial 10 times the list of 5 numbers (1 first trial plus 9 repeated trials). Example N°2: A list of 3 numbers stored. Repeated dial selection is 0. In case of busy tone and (or) no answer, the SecurAccess will dial one time the list of 3 numbers and will hang up. Notice SecurAccess 42 12.9. Ringer 3 levels adjustment: off-low-high and 3 melodies selection. Adjust as shown: Setting to modify Code Ringer level 03 Ringer melody 04 12.10. Setting choice Factory settings are shown in grey Low : 0 - High : 1 Conf 0 1 2 3 *9 : : : : ringer off Melody N°1 Melody N°2 Melody N°3 *9 Automatic answering An auto answer mode can be activated for calling a party standing close to the SecurAccess or to enter the remote programming mode. The SecurAccess will automatically go off-hook after a pre programmed number of rings: - From 1 up to 9 rings when automatic off-hook selection is activated After 30 rings otherwise. Setting to modify Code Auto answer 05 Setting choice Factory settings are shown in grey Enter the number of rings before auto answer (0 up to 9) Note: 0 = feature deactivated 3 = factory setting Conf. *9 Notice SecurAccess 12.11. 43 Door latch activation and power schematic The SecurAccess is fitted with two NO/NC driving contacts for a remote activation of a door latch electrical relay. Following settings can be chosen by local or remote programming: 1. Activation or deactivation of door latches 2. Activation duration 3. 4 digits access code selection (up to 6 different access codes, Note: 0000 will not work) 4. Fast opening selection for the door latch n°1 Setting to modify Code Door latch N°1activation 60 Activation duration door latch N°1 61 Setting choice Factory settings are shown in grey 0 : remote and local activated (factory setting) 1 : remote and local deactivated (Door latch not active) 2: remote activated and local deactivated 3: remote deactivated and local activated Enter the number of seconds (from 1 up to 9 seconds). factory setting = 2 seconds Conf. *9 *9 *9 1st access code door latch N°1 62 Enter a 4 digits code, (0000 not allowed) 2nd access code door latch N°1 63 Enter a 4 digits code, (0000 not allowed) *9 3rd access code door latch N°1 64 Enter a 4 digits code, (0000 not allowed) *9 4th access code door latch N°1 65 Enter a 4 digits code, (0000 not allowed) *9 5th access code door latch N°1 66 Enter a 4 digits code, (0000 not allowed) *9 6th access code door latch N°1 Fast opening door latch N°1 with « 0# » or « 0* » Door latch N°1activation 67 68 Enter a 4 digits code, (0000 not allowed) 0 = deactivation (factory setting) - 1 = activation *9 70 *9 Activation duration door latch N°2 71 0 : remote and local activated (factory setting) 1 : remote and local deactivated (Door latch not active) 2: remote activated and local deactivated 3: remote deactivated and local activated Enter the number of seconds (from 1 up to 9 seconds). factory setting = 2 seconds *9 *9 *9 1st access code door latch N°2 72 Enter a 4 digits code, (0000 not allowed) 2nd access code door latch N°2 73 Enter a 4 digits code, (0000 not allowed) *9 3rd access code door latch N°2 74 Enter a 4 digits code, (0000 not allowed) *9 4th access code door latch N°2 75 Enter a 4 digits code, (0000 not allowed) *9 5th access code door latch N°2 76 Enter a 4 digits code, (0000 not allowed) *9 6th access code door latch N°2 77 Enter a 4 digits code, (0000 not allowed) *9 NO: Normally open NC: Normally close COM : COMMON Door latch n°1 NO/NC contact R/T Up to 60 VA and 2A maximum Door latch n°2 NO/NC contact R/T Up to 60 VA and 2A maximum NC or C NO Door latch Power supply NC C NO NC C NO Notice SecurAccess 12.12. 44 Time out for no answer Same as for Chain dialing section (§ 12.8). This setting is used in the chain dialing settings choice and for the automatic hanging up. If chain dialing is activated, the SecurAccess will automatically dial the following number stored into the depressed off-hook/memory button after the selected elapsed time before next call. If chain dialing is deactivated, the unit will automatically hang up. Setting to modify Code Elapsed time before next call 08 12.13. Setting choice Factory settings are shown in grey 0 : 10 seconds 1 : 20 seconds 2 : 35 seconds (factory setting) 3 : 1 minute 4 : 5 minutes Conf. *9 Conversation timer Talking time can be limited by programming. When this feature is activated and the preset talk time is elapsed, the SecurAccess will automatically hang up. Proceed as shown below : Setting to modify Code Talk time duration 07 12.14. Setting choice Factory settings are shown in grey Enter the number of minutes of talk time (from 0 up to 9). Note : 0 = no limit (factory setting) Conf. *9 Call barring Call barring parameters allow limiting the keypad dialing Setting to modify Code Setting choice Factory settings are shown in grey Conf. Call barring activation 80 *9 1er not allowed first digit 81 2nd not allowed first digit 82 1er not allowed first two digits 83 2nd not allowed first two digits 84 3rd not allowed first two digits 85 4th not allowed first two digits 86 Limitation of digits 87 0 : Deactivated (no limit) 1 : Activated (factory setting) Digit not allowed. # if no digit (factory setting) Digit not allowed. # if no digit (factory setting) The two digits not allowed. ## if no digit (factory setting) The two digits not allowed. ## if no digit (factory setting) The two digits not allowed. ## if no digit (factory setting) The two digits not allowed. ## if no digit (factory setting) Maximum digits allowed from 01 to 29 « ## » no limitation (factory setting) « 00 » keypad dialing not allowed *9 *9 *9 *9 *9 *9 *9 Notice SecurAccess 12.15. 45 Changing the programming access code Programming access code setting coming out from factory is : 0000 This code can be modified as indicated below: Setting to modify Code Changing the setting code 90 Setting choice Factory settings are shown in grey Enter the new 4 digits access code twice note : 0000 = factory setting Conf. *9 Your new access code : 12.16. Reset Caution: this operation switches back the unit to all factory settings; it also erases all numbers stored in memories. This operation can be done locally or remotely. Local reset: 1. Open the unit and access to the PCB 2. Connect the unit to a powered telephone line. 3. Depress the RAZ button located on the PCB for at least 4 seconds (see page 5) 4. The unit starts emitting several “beep” tones during the reset 5. When the unit stops emitting “beep” tones, this means the reset is completed, the unit is back to factory settings, including the programming code access (0000). Remote reset: 1. Call the SecurAccess and enter the programming mode (see § 4.2.) 2. Select the reset setting choice code (91) and enter the programming access code and terminate by entering *9. 3. The unit will start emitting “beep” tones during the reset 4. When the unit stops emitting “beep” tones, this means the reset is completed, the unit is back to factory settings, including the programming code access (0000). 5. The unit will automatically hang up. Notice SecurAccess 46 13. Special features 13.1. Shunt regulation The unit is fitted with an automatic gain control system for plain old classical telephone lines. In some cases, with very long lines or poorly powered lines (ATA, Operator modems, etc), the unit may work poorly and it might be useful to shunt this regulation in order to recover more power and ensure good working conditions. See page 31. 13.2. Led lighting The SecurAccess comes with 1 or 2 off-hook buttons and one label display which can be lighted. Buttons and label display backlighting require an external power supply (12 to 32 volts DC or AC 200 mA (TRT3) and the activation of a switch located on the PCB (see diagram below). 13.3. Speaker overboost In very noisy environments, receive sounds from the speaker can be amplified by 9 to 11 dB. This feature requires an external power supply (TRT3 12 to 32 Volts AC or DC and the activation of a switch located on the PCB (see diagram below). 13.4. Heating resistor The unit is fitted with a heating resistor useful for keeping it as dry as possible in very humid or (and) cold conditions as well as with condensation conditions. An external power supply (24 to 37 Volts DC or AC – 35 mA) is needed to turn on the heat from the resistor. See diagram below. ! Speaker overboost, buttons and label display backlight as well as the heating resistor need an external power supply. If all of the 3 should be used together, one power supply will be enough provided that it complies with the specifications indicated below and be connected as shown. Overboost power TRT3 (TNV-3) : Power supply 24-32 Volts DC/AC 50 Hz 250 mA. Heating resistor power Leds power Notice SecurAccess 47 13.5. Dry contact This feature can be used to drive a video recording system, a light, an alarm, etc. It provides a dry NC contact when the unit is off-hook. TRT3 (TNV-3) access : dry contact closed when off-hook. Up to 50 Volts DC/AC 50 Hz 100 mA Video Power supply Notice SecurAccess 48 14. Table for parameters settings Setting to modify Code Setting choice Factory settings are shown in grey Pulse : 0 – Tone : 1 Pulse 66/33 ms : 0 60/40 ms : 1 Low : 0 - High : 1 Conf. Dialing mode Pulse dialing Ringer level 00 01 03 Ringer melody 04 0 1 2 3 *9 Auto answer 05 Enter the number of rings before auto answer (0 up to 9) Note: 0 = feature deactivated 3 = factory setting *9 Loudspeaker volume 06 Low : 0 – Medium : 1 – High : 2 *9 Talk time duration 07 *9 Elapsed time before next call 08 Enter the number of minutes of talk time (from 0 up to 9). Note : 0 = no limit (factory setting) 0 : 10 seconds 1 : 20 seconds 2 : 35 seconds (factory setting) 3 : 1 minute 4 : 5 minutes Repeated dial 09 *9 Number 1 Key n°1 (mandatory) 20 Enter 0 up to 9 (0 for no repeated dial), note: factory setting = 0 Number to store (* # = pause) (22 digits max) Note : no digit entered erases a previous stored number Number to store (* # = pause) (22 digits max) Number to store (* # = pause) (22 digits max) Number to store (* # = pause) (22 digits max) Number to store (* # = pause) (22 digits max) Number to store (* # = pause) (22 digits max) Number to store (* # = pause) (22 digits max) Number to store (* # = pause) (22 digits max) Number to store (* # = pause) (22 digits max) Number to store (* # = pause) (22 digits max) Number to store (* # = pause) (22 digits max) Number to store (* # = pause) (22 digits max) Number to store (* # = pause) (22 digits max) Number to store (* # = pause) (22 digits max) Number to store (* # = pause) (22 digits max) Number to store (* # = pause) (22 digits max) Number to store (* # = pause) (22 digits max) Number to store (* # = pause) (22 digits max) Number to store (* # = pause) (22 digits max) Number to store (* # = pause) (22 digits max) Number to store (* # = pause) (22 digits max) Number to store (* # = pause) (22 digits max) Number to store (* # = pause) (22 digits max) Number to store (* # = pause) (22 digits max) Number to store (* # = pause) (22 digits max) Number to store (* # = pause) (22 digits max) Number to store (* # = pause) (22 digits max) Number to store (* # = pause) (22 digits max) Number to store (* # = pause) (22 digits max) Number to store (* # = pause) (22 digits max) Number to store (* # = pause) (22 digits max) Number to store (* # = pause) (22 digits max) Number to store (* # = pause) (22 digits max) Number to store (* # = pause) (22 digits max) Number to store (* # = pause) (22 digits max) Number to store (* # = pause) (22 digits max) Number to store (* # = pause) (22 digits max) Number to store (* # = pause) (22 digits max) Number to store (* # = pause) (22 digits max) Number to store (* # = pause) (22 digits max) Number Number Number Number Number Number Number Number Number Number Number Number Number Number Number Number Number Number Number Number Number Number Number Number Number Number Number Number Number Number Number Number Number Number Number Number Number Number Number 2 3 4 5 1 2 3 4 5 1 2 3 4 5 1 2 3 4 5 1 2 3 4 5 1 2 3 4 5 1 2 3 4 5 1 2 3 4 5 for chain dialing on key for chain dialing on key for chain dialing on key for chain dialing on key Key n°2 (mandatory) for chain dialing on key for chain dialing on key for chain dialing on key for chain dialing on key Key n°3 (mandatory) for chain dialing on key for chain dialing on key for chain dialing on key for chain dialing on key Key n°4 (mandatory) for chain dialing on key for chain dialing on key for chain dialing on key for chain dialing on key Key n°5 (mandatory) for chain dialing on key for chain dialing on key for chain dialing on key for chain dialing on key Key n°6 (mandatory) for chain dialing on key for chain dialing on key for chain dialing on key for chain dialing on key Key n°7 (mandatory) for chain dialing on key for chain dialing on key for chain dialing on key for chain dialing on key Key n°8 (mandatory) for chain dialing on key for chain dialing on key for chain dialing on key for chain dialing on key n°1 n°1 n°1 n°1 n°2 n°2 n°2 n°2 n°3 n°3 n°3 n°3 n°4 n°4 n°4 n°4 n°5 n°5 n°5 n°5 n°6 n°6 n°6 n°6 n°7 n°7 n°7 n°7 n°8 n°8 n°8 n°8 2 2 2 2 2 2 2 2 2 3 3 3 3 3 3 3 3 3 3 4 4 4 4 4 4 4 4 4 4 5 5 5 5 5 5 5 5 5 5 1 2 3 4 5 6 7 8 9 0 1 2 3 4 5 6 7 8 9 0 1 2 3 4 5 6 7 8 9 0 1 2 3 4 5 6 7 8 9 : : : : ringer off Melody N°1 Melody N°2 Melody N°3 *9 *9 *9 *9 *9 *9 *9 *9 *9 *9 *9 *9 *9 *9 *9 *9 *9 *9 *9 *9 *9 *9 *9 *9 *9 *9 *9 *9 *9 *9 *9 *9 *9 *9 *9 *9 *9 *9 *9 *9 *9 *9 *9 *9 Notice SecurAccess 49 Door latch N°1activation 60 Activation duration door latch N°1 61 0 : remote and local activated (factory setting) 1 : remote and local deactivated (Door latch not active) 2: remote activated and local deactivated 3: remote deactivated and local activated Enter the number of seconds (from 1 up to 9 seconds). factory setting = 2 seconds *9 *9 *9 1st access code door latch N°1 62 Enter a 4 digits code, (0000 not allowed) 2nd access code door latch N°1 63 Enter a 4 digits code, (0000 not allowed) *9 access code door latch N°1 64 Enter a 4 digits code, (0000 not allowed) *9 4th access code door latch N°1 65 Enter a 4 digits code, (0000 not allowed) *9 access code door latch N°1 66 Enter a 4 digits code, (0000 not allowed) *9 6 access code door latch N°1 Fast opening door latch N°1 with « 0# » or « 0* » Door latch N°1activation 67 68 Enter a 4 digits code, (0000 not allowed) 0 = deactivation (factory setting) - 1 = activation *9 70 *9 Activation duration door latch N°2 71 0 : remote and local activated (factory setting) 1 : remote and local deactivated (Door latch not active) 2: remote activated and local deactivated 3: remote deactivated and local activated Enter the number of seconds (from 1 up to 9 seconds). factory setting = 2 seconds *9 3 5 rd th th *9 *9 1st access code door latch N°2 72 Enter a 4 digits code, (0000 not allowed) 2nd access code door latch N°2 73 Enter a 4 digits code, (0000 not allowed) *9 3rd access code door latch N°2 74 Enter a 4 digits code, (0000 not allowed) *9 4th access code door latch N°2 75 Enter a 4 digits code, (0000 not allowed) *9 5th access code door latch N°2 76 Enter a 4 digits code, (0000 not allowed) *9 6th access code door latch N°2 77 Enter a 4 digits code, (0000 not allowed) *9 Call barring activation 80 *9 1er not allowed first digit 81 2nd not allowed first digit 82 1er not allowed first two digits 83 2nd not allowed first two digits 84 3rd not allowed first two digits 85 4th not allowed first two digits 86 Limitation of digits 87 0 : Deactivated (no limit) 1 : Activated (factory setting) Digit not allowed. # if no digit (factory setting) Digit not allowed. # if no digit (factory setting) The two digits not allowed. ## if no digit (factory setting) The two digits not allowed. ## if no digit (factory setting) The two digits not allowed. ## if no digit (factory setting) The two digits not allowed. ## if no digit (factory setting) Maximum digits allowed from 01 to 29 « ## » no limitation (factory setting) « 00 » keypad dialing not allowed Changing the setting code 90 *9 *9 *9 *9 *9 *9 *9 Enter the new 4 digits access code twice note : 0000 = factory setting *9 *9 switches back the unit to all factory settings 91 Four digits access codes Immediate on Hook 99 Close the connection after validation NB : When storing a number in the memory key , combination of key * # inserts a pause (generally used with a PBX). Notice SecurAccess 50 15. Templates for front plate customization Customization: Print your custom made label: Visit our website at www.depaepe.com check for SecurAccess section. Select your appropriate template, fill in with your logos and text and print your own custom face plate. Cut and fold as shown. Installation: Open the SecurAccess case. Disconnect the cable from microphone, keypad and guard button and lift the electronic board to Slip your customized face plate into the slot on the right side of the glass protection. Use the folded part to guide it thoroughly, adjust and cut if necessary. Make sure, if you will use the label backlight, that the buttons connection wires do not dim the led backlight. For model with 1 up to 8 buttons without keypad 75 mm ► F O L D ► 125 mm 141 mm 46 mm H E R E H E R E ► ► 14 mm 7,5 mm F O L D 46,2 mm 7,5 mm Notice SecurAccess 51 For model with 1 up to 4 buttons with keypad 75 mm ► F O L D 49 mm H E R E ► 51,6 mm H E R E ► 46 mm 14 mm 7,5 mm 46,2 mm ► F O L D 7,5 mm 16. Specifications Dimensions : Weather protection : Working temperature range : Door latch relay contact: 295 x 125 mm in the surface mount option complies with IP65 -20° up to 50° (Celsius) up to 60 VA and 2A maximum Power feed behind PABX : Ringing voltage: 25 Volts RMS Off-hook current: 15 mA minimum Dialing mode: Tone or Pulse Notice SecurAccess 52 17. Declaration of conformity This product complies with: European Directive 2002/95/EC on the restriction of the use of certain hazardous substances in electrical and electronic equipment. (RoHS). European Directive 2002/96/EC on waste electrical and electronic equipment. (WEEE). This marking indicates this product should not be disposed of with other household wastes at the end of its working life to prevent possible harm to the environment or human health. Please contact your supplier, your local government office or our commercial department to dispose of it in an approved recycling centre. Notice SecurAccess 53 18. Warranty and after sales service Make sure to use this product in accordance with all operations described in this user manual. Any misuse may be hazardous for this product or for your health. For your security and to avoid damaging the product, we recommend that you read this user manual carefully. In addition : never use this product during thunderstorms this telephone operates in a “hands free” mode, make sure to stay at a reasonable distance from the speaker. Note: Depaepe may void the warranty if no attention has been paid to these points.. Depaepe Telecom warrants that this product will be free from defects in workmanship and materials for a period of one year from the date of purchase. The obligations of Depaepe Telecom, under this warranty shall be limited to the repair or replacement (at our option) during the warranty period, of any part that proves defective in material or workmanship under normal installation, use and service, provided the product is returned to Depaepe Telecom, freight prepaid. Replaced parts may be new parts or include new components. If the unit itself is replaced, it can be exchanged by a repaired second hand unit of the same look and finish (color). Out of warranty policy Depaepe Telecom does not warrant that the SecurAccess will perform perfectly with all the equipments available on the market. The warranty only applies if the product is installed and used as specified in this user manual and in particular with respect to the minimum and maximum electrical voltage and current specifications. This warranty shall be invalid if the product is damaged as a result of misuse, abuse, neglect, accident, exposure to improper electrical voltages or current, repair, alteration or maintenance by any person other than the Depaepe Telecom service facility. Depaepe will not warrant consequences due to “Acts of God” such as weather storms, floods, earthquakes, fires or firestorms or acts of war, riots, etc. Warranty and repair service Phone : +33 (0) 1 30 25 81 74. Products purchased from an installer or from a distributor should be returned to them to be forwarded to us. All products returns should be sent prepaid with a copy of our original delivery note or a copy of the original invoice for tracing purposes at the following address: SAS HENRI DEPAEPE 75/77 Rue du Pré Brochet BP 80107 95112 SANNOIS Cedex (France) Repaired or exchanged units will be shipped back at our own cost. In all other cases a repair cost estimate will be issued and repairs will be completed once accepted.