1
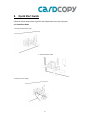
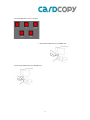
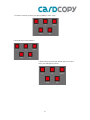
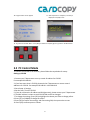
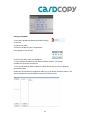
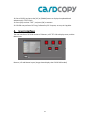
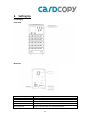
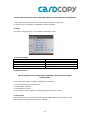
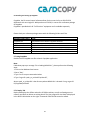
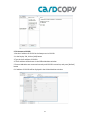
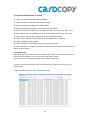
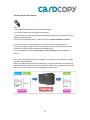
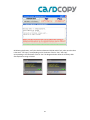
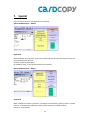
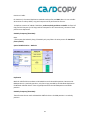
USER MANUAL
FLASH DUPLICATOR
CopyKing II CPY220
1
Table of Contents
1. Introduction
1.1. Welcome
1.2. Package Contents
1.3. Features
Page 4
2. Important Information (Read before Operation)
2.1. Caution
2.2. Operation
Page 5
3. Quick Start Guide
3.1. Standalone Mode
3.2. PC Control Mode
Page 6
Page 9
4. User Interface
4.1. Main Menu
4.2. Progress Status Information
4.3. Button Descriptions
Page 11
5. Setting Up
5.1. Starting Up
5.2. Setup
5.3. Control for Settings
5.4. Update Firmware
5.5. Format HDD
5.6. Installing and Setting up CopyMan
5.7. Using CopyMan
5.7.1 Deploy Tab
5.7.2 Connect to CPY220
5.7.3 Create and Deploy Batch to CPY220
5.7.4 Monitor Tab
5.7.5 Retrieve Logs
5.7.6 Error Code Description
5.8. Removing and Installing I/O Modules
Page 13
Page 12
2
Page 14
Page 14
Page 15
Page 16
Page 17
Page 18
Page 19
6. Functions
6.1. General Guidelines
6.1.1 Control 23
6.1.2 LED Status and Sound Notification
6.2. Function Quick Guide
6.3. FAT Copy & FAT Compare
6.4. Full Copy & Full Compare
6.5. CPRM Copy/Compare
6.6. Clone Copy & Clone Compare
6.7. Erase
6.8. Format
6.9. Burn-In
6.10. SetROnly Permanent
6.11. SetROnly Temporary
6.12. ClearROnly
6.13. Checksum Verify
7. Special
Page 21
Page 22
Page 24
Page 25
Page 26
Page 27
Page 30
Page 28
Page 29
3
1.
Introduction
1.1. Welcome
Thank you for purchasing the Flexmedia Copyking II, CPY220. It allows easy duplication of
data from a Master to 20 Targets, and is designed to accelerate the process of copying
digital contents such as software, video, music, CD-ROM image, DVD+RW image, and other
files, saving you time and floor space. CPY220 also saves more power compared to using
PCs.
CPY220 can be used on its own or with PC central control software. CopyMan, can manage
up to 200 duplicators with a single PC. Jobs can be assigned to CPY220 and log information
can be recorded and managed with CopyMan.
1.2. Package Contents
• 1 CPY220 Duplicator
• 1 AC power cable
• 1 CPY220 User Manual
• 1 CPY220 Software Package (Not with Lite versions)
1.3. Features
• Duplicate up to 20 USB flash drives or SD cards or Micro SD cards simultaneously
• Standalone or PC management with CopyMan, PC central control software
• Copy Speed: up to 20MB/sec
• Standard Functions
– Full Copy/Compare
– FAT Copy/Compare
– Erase/Format/Burn-in/Firmware Upgradeable
• Advanced Function
– Set/Clear Ready Only
– Clone Copy/Compare* (including CD-ROM, DVD+RW, EasySecure copy)
• Optional Function
– CPRM Copy**
• CopyMan – PC Central Control Software
• Removable IO Modules for easy maintenance
* USB controller only
** SD/MSD card only
4
2.
Important Information (Read before Operation)
2.1. Caution
• The warranty may be void if the product is disassembled or modified by a nonauthorized agent, subject to misuse or abuse.
• Use of CopyKing series duplicators, please note that the machines are designed for the
operation of legal duplication. Flexmedia Electronics Corp. assumes no responsibility for
any individual illegal behavior.
2.2. Operation
• It is highly recommended that the CPY220 is powered with an uninterruptible power
supply (UPS) to avoid sudden power failure situations.
• It is highly recommended the same batch of Flash Drives (same controller/flash/flash
capacity) is used for duplication.
• It is OK to connect and disconnect Master or Target drives while the machines power is
on. However, do NOT disconnect or connect the drives while the machine is performing
a function.
• Do not unplug the power while the machine is performing a function.
• Do not remove the removable I/O modules while the machines power is on.
• Operators should always wear anti-static gloves or wristbands to prevent static issue.
Wearing gloves can protect the flash drives from fingerprints. Especially avoid touching
the golden contact points.
• For the real capacity: users may notice that there might be differences in capacity for
individual memory drives (even when they are marked with the same capacity) due to
different controllers and flash used. For example, in the same lot of 1GB USB Flash
Drives, there will be capacities ranging from 984MB to 952MB, even though they are all
marked with 1GB. The capacity and quality of the Flash Drives are maintained by the
Flash Drive vendors.
• The duplication in “Full Copy” will clone totally the same size from Master to Targets,
ex: 952MB Master clone to Targets 982MB real capacity flash drive, all the targets will
change to 952MB which is exactly the same as Master drive.
5
3.
Quick Start Guide
Follow the simple steps below to perform quick duplication and setup Copyman:
3.1 Standalone Mode
1. Connect CPY220 power cable
2. Connect Ethernet cable
3. Switch on power supply
6
4. Press [On/Off] button to turn on CPY220
5. Insert Master USB flash drive (or SD/MSD card)
6. Insert Target USB flash drives (or SD/MSD card)
7
7. To perform “Full Copy” function, press [UP] or [DOWN] to select “Copy”.
8. Press [OK] to go to Copy submenu.
9. Select Full Copy and press [OK]. Window pops up to confirm
action, press [OK] again to continue.
8
10. Progress Status screen appears
11. After duplication is complete, a summary is
displayed. Press [OK] to exit.
12. To go back to the Main Menu: Press [ESC] for Submenu and [ESC] again to go back to the Main Menu.
3.2 PC Control Mode
To connect the CPY220 to the network, please follow the steps below for setup:
Setting up CPY220
1. Contact your IT department to set up a static IP address for CPY220.
For example 192.168.10.1.
2. If you have more than 1 CPY220, please ask the IT department to reserve several
addresses for CPY220. For example 192.168.10.1~192.168.10.10
3. Go to Setup → Settings
4. Set the Date, Time for CPY220.
5. If you do not know the IP address and GW (gate way), please contact your IT department.
6. The MAC address is unique to each CPY220 and cannot be changed.
7. To change the settings, press [OK] to highlight the column you’d like to change yellow.
8. Press [UP] or [DOWN] to change the values.
9. Press [OK] to confirm the settings, and after setting GW, the system asks to reset.
10. Press [OK] to allow system to reboot.
9
Setting up CopyMan
1. Start the CopyMan application by double clicking
on the icon
2. Click on the [Add]
3. Enter the IP address your IT department
has assigned for the CPY220.
4. Click on the [OK] to save the IP address.
5. The IP address will appear in the offline machines column. (see below)
6. Make sure CPY220 is switched on.
7. Click on the [Refresh] button. Make sure both CPY220 and your PC are properly
connected to LAN.
8. Now the CPY220 with the assigned IP address is in the online machines column. This
means CopyMan has successfully detected the CPY220 machine.
10
9. Click on the [Create] button
10. Batch Editor window pops up.
11. Type in the batch name, for example “TEST”
12. Select the Media, for example, “USB”
13. Choose the sequence of jobs to assign in this batch, for example, “Job1: FAT Copy”
“Job2: FAT Compare”
14. Click on the [Save] button to save the batch.
15. Click on the IP address of the CPY220 for the “TEST” to assign on
16. Click on “TEST” under local batch.
17. Click on the [Deploy] button, a pop up window confirms the deployment is ok.
11
18. Go to CPY220, and press the [UP] or [DOWN] button to display the updated batch
submenu with “TEST” batch.
19. Press [OK] to select “TEST”, and press [OK] to execute.
20. CPY220 now performs FAT Copy, followed by FAT Compare, as set up in CopyMan.
4.
User Interface
The user interface of CPY220 consists of 5 buttons, a3.5”TFT LCD to display status, and the
Master port.
Buttons, LCD and Master layout (image shown displays the CPY220 USB model)
12
4.1 Main Menu
4.2 Progress Status Information
4.3 Button Descriptions
Button
ON/OFF
UP/DOWN
ESC
OK
Description
To power on/off the device.
Press the button to power on
Press and hold for one second to power off
To select the operation mode.
Press UP/DOWN to navigate through various functions
To Stop the operation:
Press [ESC] to exit to Main Menu in Submenu
Press [ESC] a window will pop up for confirmation to stop during the operation
To run the selected function
Press [OK] to execute the selected function
13
5.
Setting Up
5.1 Setting up
Front View
Back View
Hardware Components
Description
Fan
RS232 Connector
Power Switch
RJ45 Connector
Fan for cooling purposes
Flexmedia use only
Switch on/off to start up or shut down CPY220
Plug in Ethernet cable for connection with PC
14
*PLEASE LEAVE A SPACE OF AT LEAST 10CM FROM THE BACK OF THE CPY220 TO ALLOW COOLING*
1. At the back of the CPY220, switch the Power Switch red button from [O] to [I]
2. At the front of the CPY220, press [ON/OFF] to switch on CPY220.
5.2 Setup
Go to Setup →Setting for Date, Time, IP address and Gateway setup.
5.3 Control for Settings
Button
Action
OK
UP/DOWN
ESC
Confirm and go to next
Change Settings
Exit Settings and cancels settings
5.4 Update Firmware
DO NOT POWER OFF THE CPY220 DURING A FIRMWARE UPDATE YOU MAY DAMAGE
THE EQUIPMENT
1.
2.
3.
4.
5.
Copy the new firmware (.mtg file) to USB flash drive or SD card.
Insert the flash drive to the master slot.
Select [Update Firmware]
Press OK button execute
The system will start to update, and after updating the machine will reboot.
5.5 Format HDD
Selecting this function, this formats the hard disk drive (HDD) installed inside CPY220. This will
delete all batch and log information stored in the HDD.
15
5.6 Installing and setting up CopyMan
CopyMan, the PC central control software allows for the control of up to 200 CPY220
duplicators with one single PC. With purchase of CPY220, it comes with a software package
of CopyMan.
CopyMan is provided with all “Full Function” equipment and is available separately.
Please check your software package comes with the following Folders and Files:
Filename/Folder Name
Type
CopyMan.exe
CopyMan.ini
DiskChecksum2.exe
MIDAS.DLL
Batch
Database
File;double click to launch CopyMan software
File
File, double click to launch checksum software
File
Folder,records log info of batches recorded from CPY220 HDD
Folder
5.7 Using CopyMan
Double click on CopyMan.exe file to launch CopyMan application.
Note:
If Windows pops up a message “Error loading MIDAS.DLL”, please perform the following
steps:
1. Click on the Windows Start button
2. Go to “Run”
3. Type “cmd” to open command window
4. Type “regsvr32 <path_to_midas.dll>\midas.dll”,
where <path_to_midas.dll> is the directory where MIDAS.DLL is located. For eg: regsvr32
D:\CopyMan\midas.dll
5.7.1 Deploy Tab
Deploy tab displays the offline and online CPY220 machines, as well as allowing users to
create a new Batch or delete an existing batch. The jobs assigned for the Batch is displayed
in the BATCH.INI window on the right. Commands in BATCH.INI cannot be edited.
16
5.7.2 Connect to CPY220
1. Set the IP address of CPY220 in the Setup menu in CPY220.
2. In the Deploy Tab, click on [Add] button
3. Type in the IP address of CPY220
4. The IP address will be shown in the Offline Machines window
5. Ensure LAN cables are connected correctly and CPY220 is turned on, and press [Refresh]
button
6. IP address of CPY220 will be displayed in the Online Machines window.
17
5.7.3 Create and Deploy Batch to CPY220
21. Click on [Create] to open Batch Editor window
22. Type in the name or number of the Batch to assign
23. Select the Media according to the CPY220 model
24. Select the Jobs to be assigned to the Batch on the left column
25. Jobs are executed in sequence in ascending order Job1, then Job2, then Job 3… so on
26. After required Jobs are assigned, click on the [Save] button on the lower left corner
27. Under Deploy Tab, the Batch is displayed in the Local Batch window
28. Click on the IP address of the CPY220 for the required Batch to assign on
29. Click on the Batch to be assigned
30. Click on [Deploy], and a window pops up to confirm its success
31. Press any button on assigned CPY220 to refresh the screen, and the assigned Batch will
appear under the Batch
5.7.4 Monitor Tab
Monitor Tab displays each Batch result according to Batch names. The following information is
displayed: Batch, Machine, Time, Slot, VID, PID, Serial Number, Result.
Log information can be sorted according to Batch, Machine, and Time.
To export to an Excel spreadsheet, click on the Export button, and save the .csv file to the
desired folder.
To clear the Monitor screen, click on the Remove button.
18
Each individual Batch performed is saved in the hard disk drive(HDD) in CPY220. The data
are retrieved from the HDD when the control PC is connected to CPY220. Result displays the
error message if any.
5.7.5 Retrieve Logs
To retrieve the logs from the hard drive in CPY220 when duplicator is connected to control
PC.
1. Make sure CPY220 is connected to CopyMan.
2. Click on the IP of the machine to display the log files.
3. Check the Batch/Folder you would like to retrieve
4. Click on Retrieve Log(s) button to obtain the log.
To retrieve logs from hard drive in CPY220 when operated as stand alone:
5. Make sure CPY220 is connected to CopyMan.
6. Click on the IP of the machine to display the log files.
7. Check the log file of when it is executed. The log name is defined by time as
“YYYYMMDDHHMMSS”
8. Tick the box of the log to retrieve.
9. Click on the Retrieve Log(s) button to obtain the log.
10. Click on “Monitor” tab.
11. The corresponding log file will be displayed in the Monitor page.
12. Check the Result column for the error code description.
19
5.7.6 Error Code Description
00000000 - Success
10000000 - System error
10000100 - USB mount hub failed
10010000 - No disk in slot
10020000 - Disk size does not match
10030000 - Disk write error
10040000 - Disk read error
10050000 - Data compare error
10060000 - Master force stop
10070000 - Disk format error
10080000 - Disk set write protect failed
10090000 - NTFS scan table
100A0000 - Read information page failed
100A0001 - Flash does not match
100A0002 - Write mode3 infoblock failed
100A0003 - Hub removal port device failed
100A0004 - Hub scan port device failed
100A0005 - Restore infoblock failed
100A0006 - Change mode not support PenDrive with
password
5.8 Removing and Installing I/O Modules
1. Switch off power for CPY220
2. Unscrew the 2 screws on the faulty I/O module counter-clockwise
20
3. Remove the I/O Module
4. Unscrew the 3 screws on the I/O module, change the PCB board, and screw the board to the slot.
5. Aim the I/O module socket towards the socket
(view of socket at same eye level)
21
6. Insert the I/O module, make sure the golden finger on the I/O module is inserted into the sockets
7. Secure the I/O module by turning the retaining screws clockwise
22
8. Switch on CPY220, and check if the I/O module is connected properly by checking the LEDs
6.
Functions
6.1 General Guidelines
Note:
• It is recommended to use the same controllers and flash for all functions.
• It is recommended to create a Master from the same batch of USB flash drives.
Available for CPY220USB
Available for CPY220SD
6.1.1 Control
Button
Action
ON/OFF
OK
UP/DOWN
ESC
Power On or Off
Execute selected function
Select function
Exit Settings and cancels settings
23
Available for CPY220MSD
6.1.2 LED Status and Sound Notification
Action
LED Status
Sound
Notification
Power On
Copy/Compare/Erase/Format/
Burn –in/SetROnly/ClearOnly
Error Occurs
Operation complete
successfully
Unable to Detect Device
All Red & Green LEDs of 13 trays blink
Red LED blinks
None
None
Red LED stay lit (without blinking)
Green LED light up
3 short beeps
1 long beep
No blinking for both red & green LEDs
None
6.2 Function Quick Guide
Main Menu
SubMenu
(Display production orders
entered with CopyMan
software)
Batch
FAT Copy
Copy
Full Copy
Clone Copy*
CPRM Copy
FAT Compare
Full Compare
Compare
Clone Compare
24
Function Description
Batch functions provide
adjustable combination
functions, set your frequently
used functions or production
numbers where a maximum
of 10 functions can be
selected
Copy only the sectors with
actual data from the Master
to the Targets. (Only support
FAT file system)
Copy USB/SD flash drives
sector by sector from the
Master to the Targets and
support all file system (FAT,
NTFS, EXT2, EXT3 and so
on)
Copy both the partition
configuration and data of the
Master to the Targets.
Copy CPRM content from
Master to Targets
This function only compares
the actual data between
master and targets sector by
sector, not the entire sector.
This mode compares Master
and Target drives sector by
sector to assure that all the
Target drives have the same
information as the Master
drive.
Compare both the partition
configuration and data of the
CPRM Compare
0x00 or
0xFF
Erase
Format
FAT
1~99
Burn-In
SetROnly Permanent
(CPY220SD/CPY220MSD
only)
SetROnly Temporary
(USB* & SD/MSD)
Advanced
ClearROnly Temporary*
(USB* & SD/MSD)
Settings
Update Firmware
Settings
Format HDD
25
Master to the Targets.
Compare CPRM content of
Master and Targets
Performs complete deletion
of data stored in memory
disc by overwriting specific
data onto each bit of memory
disc. This erase will entirely
overwrite each bit of flash
memory and ensure there is
no way to recover the
original data.
Format the USB/SD flash
drive to FAT32
This mode tests flash drives by
performing a continuous Full
Copy & Full Compare with
adjustable rounds(1~99)
This mode will fix the SD
card in “read only” mark
permanently. This means
there is no way to modify or
erase data contained on the
SD card.
This mode sets the USB or
SD card to be “Read Only”
temporarily. No data can be
written or erased to the USB
drive or SD card.
This mode sets the USB
drive or SD card to
“Rewritable”
*Support only USB drive or
SD card previously “Set
ROnly temporary” with
CPY220.
Set the Date, Time, IP,
Gateway and display MAC
address
Update the new firmware
version to machine via card
Format the Hard Disk Drive
in CPY220. This clears all
log information records
stored in the HDD.
6.3 FAT Copy & FAT Compare
Note:
For FAT Copy and Compare, the data size of Master should always be smaller than real
capacity of Targets.
It is recommended to execute FAT Copy FAT Compare to ensure duplication success.
FAT Copy is used when data size is significantly smaller than real capacity of the USB flash
drive. This function takes less time than Full Copy. FAT Copy only copies the sectors with
actual data from the Master to the Targets (only support FAT file system). For CPY220, with
FAT Copy, as long as the data size of the Master is smaller than the real capacity of Targets,
FAT Copy/Compare can be executed.
6.4 Full Copy & Full Compare
Note:
• For Full Copy and Compare, the real capacity of Targets should always be equal or larger
than the Master.
• It is recommended to execute Full Copy Full Compare to ensure duplication success.
Copy USB/SD flash drives sector by sector from the Master to the Targets and support all file
system (FAT, NTFS, EXT2, EXT3 and so on)
26
6.5 CPRM Copy/Compare
Note:
• CPRM Copy/Compare supports only CPY220SD & CPY220MSD models
It is an optional function, please contact Flexmedia if you are interested in purchasing the
function.
• Please make sure content in the Master is CPRM (SD-Video) content before duplication
• The capacity of the Targets have to be equal to or larger than the Capacity of the Master
• It is recommended to execute CPRM Copy →CPRM Compare to ensure duplication
success.
CPY220 supports CPRM Copy/Compare to duplicate contents encoded with CPRM
specifications, which define a renewable cryptographic method for protecting
entertainment content when recorded on removable and portable physical media including,
but not limited to, DVD media and Flash memory.
Steps for CPRM Copy:
1. Insert the Master with CPRM content into Master slot. If the Master is a microSD card,
please use a microSD to SD card adaptor.
2. Insert Target SD or microSD cards into Target slots.
3. Press [UP/DOWN] to select <Copy>, and press [OK]
4. Press [DOWN] to select <CPRM Copy>, and press [OK]
5. At pop-up window, press [OK] again to execute.
6. CPRM copy executes and finishes.
Steps for CPRM Compare:
1. Press [UP/DOWN] to select <Compare>, and press [OK]
2. Press [DOWN] to select <CPRM Compare>, and press [OK]
3. At pop-up window, press [OK] again to execute.
4. CPRM compare executes and finishes.
27
6.6 Clone Copy & Clone Compare
Note:
• Clone Copy/Compare is part of the advanced package.
• This function works only with approved controllers.
• Please contact your sales representative regarding making Master USB flash drives and
details on changing mode.
• For Clone Copy and Compare, it is required to use the same controllers and flash.
It is recommended to create a Master from the same batch of USB flash drives.
• Clone Copy supports approved USB’s with CD-ROM partition, DVD+RW partition, and
EasySecure solution for specific approved USB flash drives.
• It is recommended to execute Clone Copy → Clone Compare to ensure duplication
success.
Clone Copy copies both the partition configuration and data from the Master to Targets.
Example is illustrated below:
Master is a USB flash drive with CD-ROM partition, Targets are USB flash drives with one
Removable Partition. With Clone Copy executed, all Targets have changed to become the
same as the Master, with its partition configuration and contents.
28
6.7 Erase
Note:
• Erase function does not require a Master
• Data cannot be retrieved by data recovery software after Erase is performed.
This function performs a complete deletion of data stored in a memory disc by overwriting
specific data onto each bit of memory disc. The time taken with Erase is similar to Copy.
Either 0x00 or 0xFF does not affect the Erase time or quality of the flash drive.
After Erase is performed, Format is required on a PC to read/write files on USB flash drive.
Format function on CPY220 can be used as well.
6.8 Format
Note:
• Erase function does not require a Master
• Data might be retrievable using data recovery software only after a format is performed.
Format the USB/SD flash drive to FAT32 or NTFS format. Format takes only seconds
depending on the capacity of the flash drive.
6.9 Burn-In
Note:
• Burn-In function requires a Master
Burn-in tests the quality of flash drives by repeatedly writing and reading the flash drives by
adjustable rounds from 1~99.
29
6.10 SetROnly Permanent
Note:
• SetROnly function does not require a Master
• This function works with SD/Micro SD cards only
• Please make sure desired data exists before performing SetROnly.
The function changes the SD/Micro SD cards to be in “read only” permanently, and no data can
be transferred to the SD/Micro SD cards. Data already existed in the SD/Micro SD cards cannot
be deleted.
6.11 SetROnly Temporary
Note:
• SetROnly function does not require a Master
• This function works with all SD/Micro SD cards.
• This function works only with USB flash drives with approved controllers.
• Please make sure desired data exists before performing SetROnly.
The function changes the flash drives to be in “read only” temporarily, and no data can be
transferred to the flash drives. Data already existing in the flash drives cannot be deleted.
The SetROnly Temp. can be reset back to rewritable (which means data can be transferred
into the flash drive, and existing data can be deleted) with ClearROnly in CPY220.
6.12 ClearROnly
Note:
• ClearROnly function does not require a Master
• This function works with all SD/Micro SD cards.
• This function works only with USB flash drives with approved controllers.
• This function works only with USB flash drives which are SetROnly with CPY220.
30
ClearROnly function resets flash drives with SetROnly performed by CPY220 back to
rewritable, so data can be transferred into the flash drive, and data existed can be deleted.
6.13 Checksum Verify
Note:
• If the checksum is different between copy machine and PC Tool, the data of the source inside
the USB/SD flash drive has differences, please change/check your master USB/SD flash drive or
re-make the content.
This function verifies the accuracy of source in Master drive through the checksum calculation.
Since some flash storage media might not be very stable due to the characteristic of flash drive,
Checksum verify is designed to help users to double confirm the source before performing mass
duplication using CPY220.
It is recommended that the Disk Checksum tool should be run first, and the user should record
the checksum to compare with the copy machine. Every copy and compare process will create a
checksum of source during each cycle of the function operating. For comparison:
The Procedure of Source verification via the Disk Checksum Tool using a PC:
1. Launch DiskChecksum2 (Disk Checksum Calculator 2)
2. Insert the Master drive into the PC.
3. Press “Refresh Disk” to detect the drive at PC, and then press “Calculate Checksum”. It may
take some time to calculate depending on the size of the media.
31
4. Following duplication, verify the checksum between CPY220 and PC Tool, make sure the value
is the same. “FAT Copy” corresponding to FAT checksum of the PC Tool; “Full Copy”
corresponding to Full checksum of the PC Tool. The diagrams below show the summary table
after duplication using a CPY220.
32
7.
Special
In this section, 3 partition configurations are explained.
Special: USB Flash Drive – Mode 3
Duplication
Mode3 USB flash drives perform as common USB flash drives. All copy and compare actions act
as normal duplication perform
SetROnly Temporary/ClearROnly
For SetROnly Temp., it sets the entire partition as read only.
Special: USB Flash Drive – Mode 7
Duplication
Mode 7 USB drive contains 2 partitions, one being the Secure/Public, while the other is a Public
partition. To illustrate the duplication method, the partitions are named as below:
Partition F: Secure/Public
33
Partition G: Public
For Partition F, the normal duplication methods can be performed ONLY when it is set as Public.
As Partition G is always Public, copy and compare can be performed at all times.
To duplicate contents of a Mode 7 USB drive, make sure both partitions are Public. Perform Full
Copy and Full Compare (or FAT Copy and FAT Compare for FAT format drives), contents of both
partitions are duplicated.
SetROnly Temporary/ClearROnly
Note:
• Please note that SetROnly Temp./ClearROnly only sets/clears the write-protect for Partition F
(Secure/Public).
Special: USB Flash Drive – Mode 21
Duplication
Mode 21 USB flash drive emulates a CD-ROM drive and a Rewritable partition. Because a CDROM partition is a read-only partition, only Clone Copy provided by CPY220 allows duplication
for Mode21 USB flash drives. Clone Copy duplicates both the CD-ROM partition and Public
partition.
SetROnly Temporary/ClearROnly
These functions do not work with Mode21 USB flash drives. CD-ROM partition is a read only
partition.
34