1
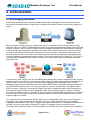
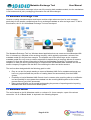
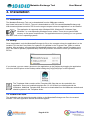
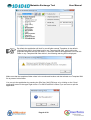
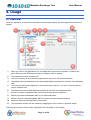
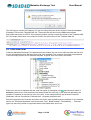
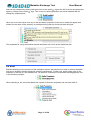
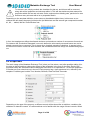
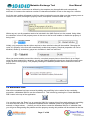
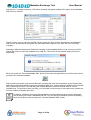
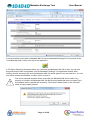
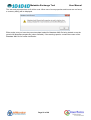
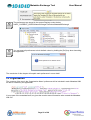
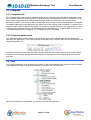
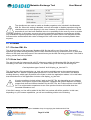
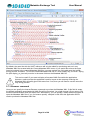
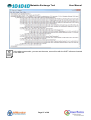
Metadata
Exchange Tool
User Manual
Version 1.1
13-3-2011
IMMOVATOR CROSS MEDIA EXPERTISECENTRUM IS MEDE
GEFINANCIERD MET STEUN VAN HET EUROPEES FONDS VOOR
REGIONALE ONTWIKKELING VAN DE EUROPESE COMMISSIE
Metadata Exchange Tool
User Manual
Table of Contents
1. Glossary of terms ................................................................................................................................... 3
2. Introduction ............................................................................................................................................. 4
2.1 Exchanging Metadata .......................................................................................................................................................... 4
2.2 Metadata Exchange Tool ..................................................................................................................................................... 5
2.3 Metadata Model ................................................................................................................................................................... 5
2.4 Caution ................................................................................................................................................................................. 7
3. Installation .............................................................................................................................................. 8
3.1 Download ............................................................................................................................................................................. 8
3.2 Unzip .................................................................................................................................................................................... 8
3.3 Launch & Quit ...................................................................................................................................................................... 8
3.4 Version ............................................................................................................................................................................... 10
4. Usage ................................................................................................................................................... 12
4.1 Overview ............................................................................................................................................................................ 12
4.2 Templates .......................................................................................................................................................................... 13
4.3 Tree and form .................................................................................................................................................................... 14
4.4 Sets .................................................................................................................................................................................... 15
4.5 Properties ........................................................................................................................................................................... 16
4.6 Metadata XML .................................................................................................................................................................... 17
5. Preferences .......................................................................................................................................... 21
5.1 Overview ............................................................................................................................................................................ 21
5.2 Organization ....................................................................................................................................................................... 22
5.3 Template ............................................................................................................................................................................ 23
5.4 Tree.................................................................................................................................................................................... 23
5.5 Tooltips .............................................................................................................................................................................. 24
5.6 Form................................................................................................................................................................................... 24
5.7 Preview .............................................................................................................................................................................. 25
6. Information ............................................................................................................................................ 28
6.1 Documents ......................................................................................................................................................................... 28
6.2 Organizations ..................................................................................................................................................................... 28
6.3 Credits................................................................................................................................................................................ 28
Page 2 of 28
Metadata Exchange Tool
User Manual
1. Glossary of terms
Form
The right-hand side of the Metadata Exchange Tool window, containing the
controls to edit the various metadata properties.
Metadata
Information describing the video or audio asset. The information is stored in
properties, grouped in sets.
Metadata XML
The metadata formatted as an XML document according to the Metadata XML
Specification.
MXF
Material eXchange Format (MXF) is a container format for professional digital video
and audio media defined by a set of SMPTE standards.
Properties
A field in the metadata, uniquely defined by its Universal Label and having a value
of a certain type.
Sets
A group of zero or more properties and zero or more (sub-) sets.
Template
A data structure describing the allowed sets and properties and their relations and
restrictions, as to be used in the Metadata Exchange Tool.
Template XML
The template information expressed in an XML document according to the
Template XML Specification.
Tree
The left-hand side of the Metadata Exchange Tool window, containing a treeview
with all the sets and containing properties and (sub-)sets.
Universal Label
These are used as a unique identification of metadata sets and properties. They
conists of a 16-byte value, as defined in the SMPTE 298M document.
XML
Extensible Markup Language (XML) is a set of rules for encoding documents in
machine-readable form. It is defined in the XML 1.0 Specification produced by the
W3C, and several other related specifications.
Page 3 of 28
Metadata Exchange Tool
User Manual
2. Introduction
2.1 Exchanging Metadata
In the Dutch broadcast sector companies have replaced the exchanging of video and audio essence
from tape to file based transfer of digital files. Consider the following example of two such companies A
and B:
When company A wants to transfer a video/audio asset to company B this will be by means of using
MXF files, which is a SMPTE-standardized file format for exchanging professional digital video and audio
essence. However, there is also the need to transfer metadata describing this video and audio essence.
In the time tapes were physically transferred, there was often a sticker on the tape or a piece of paper
included in the cassette containing the metadata. But as the transfer of video/audio essence has now
become file-based, there is the need to also exchange the metadata in a digital and standardized way.
Currently metadata is exchanged by paper, phone, e-mail, fax or some Word or Excel file. The 10-10-10
project initiated by iMMovator has set the foundation for a standardized way of exchanging metadata
using XML files.
In most cases, each company has it’s own MAM system based upon a certain metadata model. In many
case this model will (or will be for new systems being setup) be a either based upon the NL Metadata or
ROOS model or will have a structure, with many fields matching the NL Metadata model. The NL
Metadata model was derived with influences from both SMPTE DMS-1 Descriptive Metadata Scheme-1
and the ROOS Metadata model. The sending company A in above example has a metadata model A.
From his system, company A can make an export to the new, standardized XML format. Depending on
how closely his model matches the NL Metadata model, some mapping might be required to achieve
this. Then the XML file is send to company B, who can import it into its MAM system based on metadata
model B. Again, depending on how closely metadata model B matches the NL Metadata model, some
mapping might be required.
The important thing to remember is that the XML file is in a standardized form and can be exported or
imported by any system supporting this standard. Of course, if the overlap of information between
metadata model A and B is not 100%, it might be that some information from company A is transferred in
the XML, but can not be used at company B. Likewise, if company A does not support certain
information that company B does, it can not be present in the XML and will be absent when company B
Page 4 of 28
Metadata Exchange Tool
User Manual
imports it. The information exchange is then not fully covering both metadata models, but the mechanism
is not broken and all joint (overlapping) information can still be exchanged.
2.2 Metadata Exchange Tool
However creating automated export and import modules might take some time for each company,
particularly for the smaller companies that do not exchange metadata as often as larger ones. To aid in
this situation, the 10-10-10 Metadata Exchange Tool was developed.
The Metadata Exchange Tool is a Windows-based application that can create and read Metadata XML
files. It is based on a template of the receiving company, which typically represents a subset of the
metadata model B in the previous example. The template can in fact be as large as the complete
metadata model B or only cover a smaller subset that is desired when a company delivers an asset to
company B. Once the relevant information is filled into the Metadata Exchange Tool based on the
template, an XML file can be generated that is compliant with the Metadata XML standard and can be
send to company B together with the MXF file containing the video-and audio essence.
The tool has been designed with the following goals in mind:
•
•
•
Easy to use tool for people wanting to create a Metadata XML file for metadata exchange and
have not (yet) automated the process of creating these files automatically from their MAM
system.
Possibility to load a Metadata XML file and view it contents at the receiving side as a verification
tool and possibly for copy-paste the metadata into the receiving MAM system as far as that
process has not (yet) been automated.
Debug and verification tool for people implementing the process of exporting and/or importing
Metadata XML files from/into their MAM system.
2.3 Metadata Model
The tool is based on the NL Metadata model or a subset of it. As an example, a part of the subset
named the ‘10-10-10 Basis Model’ is depicted in the following diagram:
Page 5 of 28
Metadata Exchange Tool
User Manual
The model consists of sets (groups) of properties (fields), that are related to each other by the connected
lines. In above example, the ‘Productie Raamwerk’ set has properties like ‘Productie titel’ and ‘SD / HD
vlag’ and links to zero or one ‘Video Parameters’ sets, which has it’s own group of properties. Sets can
be nested within sets without limitations. This model is represented by the Metadata Exchange Tool in
the following way:
At the left hand side, you can see all the sets from the model list, including the properties and sets within
these sets and so on using a treeview. One can add and remove sets and enable or disable properties
by simply using checkboxes. The properties for the selected set are shown in the form at the right hand
Page 6 of 28
Metadata Exchange Tool
User Manual
side. In this form the value for each property can be changed. Once all the sets are added and the
properties have been filled in, all this metadata can be saved to an XML file, which looks something like:
The Metadata XML file contains XML elements for both sets and properties, uniquely identified
by a so-called Universal Label. In addition, each set and property has a human readable name,
which is purely informative and aids with humans examining the XML file. The actual match in
the receiving MAM system during import of the XML should be based solely on these Universal
Labels together with the values for each property. The relation of properties and sets within their
containing parent set is important to make a match. The order of sets and properties within a set is not
relevant. Further details on the format can be found in the Metadata XML Specifications.
This Metadata XML file can then be transferred to the receiving company along with the MXF file
containing the video-and audio essence. This company can then either import the data from this XML file
using an automated process or import the Metadata XML in the Metadata Exchange Tool for easy
inspection, reading or copy-paste into their MAM system.
2.4 Caution
The Metadata Exchange Tool does not by itself define the data of the model for the metadata. Instead,
this is contained in externally supplied Template XML files. Both the Metadata Exchange Tool and the
Template XML files contain a version number.
When using Metadata Exchange Tool with a certain template, always make sure you have
the most recent version of the application and the Template XML file. This will assure that
the receiving company gets the metadata with the correct fields and in the desired format.
Both the Metadata Exchange Tool application and the Template XML files can be
downloaded from the iMMovator website as outlined in the next chapter.
Page 7 of 28
Metadata Exchange Tool
User Manual
3. Installation
3.1 Download
The Metadata Exchange Tool can be downloaded from the iMMovator website
http://www.immovator.nl/101010. The tool is downloaded as a ZIP file named MetadataExchange.zip.
After download please store this ZIP file on the target computer where the application is to be installed.
The application is supported under Windows 2000, Windows XP, Windows Vista,
Windows 7 or a corresponding Windows Server variant. There are no special RAM
memory or disc space requirements. The application does not (natively) run on systems
with Mac, Unix or Linux operating systems.
3.2 Unzip
Once downloaded, unzip the MetadataExchange.zip file on the computer where the application is to be
installed. This can be in any folder, for instance in a subfolder in the ‘Program Files’ folder or another
location. After unzipping, an executable file MetadataExchange.exe, a folder named Templates and a
XLST file used for preview (explained later) should be present in the folder to which you extracted the
ZIP file:
If you desired, you can create a shortcut to the application on the Desktop by dragging the application
icon from within Explorer to the Desktop whilst holding the [Ctrl]+[Shift] keys on the keyboard:
The Templates folder contains all the Template XML files that can be used within the
application. Some pre-installed templates like ’10-10-10 Basis’ are distributed with the
installation. Additional Template XML files can be downloaded from the iMMovator website and
should be placed in the Templates folder.
3.3 Launch & Quit
The application can be started by double-clicking on the MetadataExchange.exe file or the created
shortcut. The main application window should now appear:
Page 8 of 28
Metadata Exchange Tool
User Manual
By default the application will look for a sub-folder named Templates in the default
working folder and in that folder look for any Template XML files, which define the
properties and sets that can be filled in. If for some reason the application can’t find this
folder or any Template XML files within it, the following warning will be displayed:
Make sure that the templates folder exists in the mentioned location and that at least one Template XML
file is present in this folder.
You can quit the application by pressing the [Esc] key, [Alt]+[F4] keys or by clicking on the ‘Close’
application button in the upper right corner. You will be asked to confirm if you are sure to quit the
application.
Page 9 of 28
Metadata Exchange Tool
User Manual
3.4 Version
The version of the Metadata Exchange Tool can be checked by opening the System menu by clicking on
the icon in the left of the title bar and selecting ‘About Metadata Exchange…’.
This will bring up the About dialog, that shows the version information for the Metadata Exchange Tool,
in the example below it is version 1.1.0, Build 10.
The same version can also be obtained without launching the application by right-clicking on the
executable file from Windows Explorer and selecting ‘Properties’.
Page 10 of 28
Metadata Exchange Tool
Page 11 of 28
User Manual
Metadata Exchange Tool
User Manual
4. Usage
4.1 Overview
Once the application is launched as outlined in the preceding chapter, the main application window will
appear.
1
When you click on the application icon, the application system menu appears. It contains the
About dialog and the Preferences dialog for changing various settings.
2
The template selection dropdown list.
3
The tree containing all the sets and properties that are part of the selected template.
4
Checkboxes that can add/remove sets and enable/disable properties for inclusion in the Metadata
XML.
5
The form that shows the properties for the selected set in the tree. The value for each property
can be changed here.
6
Checkboxes that can enable/disable properties for inclusion in the Metadata XML.
7
Button to create the Metadata XML from all sets and the filled in properties.
8
Button to preview the Metadata XML in your Internet Browser
9
Button to load an existing Metadata XML file into the currently selected template.
10
Minimize, maximize and application close button.
11
The application window can be resized by dragging any of the corners or windows edges.
Each part and function will be further explained in the remainder of this chapter.
Page 12 of 28
Metadata Exchange Tool
User Manual
4.2 Templates
The basis of the tool is a template of the metadata model that will be used for filling in the information.
Templates come in the form of Template XML files (not to be confused with Metadata XML files to be
used for exchange) and by default these are stored in a sub-folder named Templates in the default
working folder.
Any additional Template XML files will need to be added to this folder. Upon application start, the
Metadata Exchange Tool will recognize any added templates. The contents and internal details of the
Template XML files are irrelevant to the usage of the Metadata Exchange Tool. A separate Template
XML Specification document is available for those companies wanting to create their own Template XML
files.
The templates define which subset of the NL Metadata model can be filled in by the Metadata Exchange
Tool. Although it is possible and actually has been done to include the complete NL Metadata model into
a template, the overwhelming amount of information might confuse and distract from the purpose of
filling in only those few fields that the receiving side desires. In the absence of a template of the receiving
company, either the 10-10-10 Basis template can be used or some default template as designed by the
sending company. In any case, it depends on the overlap of the used template and the metadata model
of the receiving company how much metadata will actually be exchanged.
After the Metadata Exchange Tool application is launched, the first thing to do is select the template to
be used from the dropdown list in the upper left.
By default, the application will remember the last-selected template when the application is launched.
The names listed in the dropdown menu are not the filenames of the Template XML files in the
Template folder, but instead this name is embedded inside the Template XML file. In many
cases, the Template XML filename and the embedded template name will be (almost) identical
though.
When a template is selected, an error similar to the one below might be displayed. It means
that there are Universal Labels included in the template for either a set or a property that the
Metadata Exchange Tool does not recognise from its internal database.
Page 13 of 28
Metadata Exchange Tool
User Manual
The first thing to check if this happens, is if you are using the most recent version of both the Metadata
Exchange Tool and the Template XML file. These can both be found on the iMMovator website
http://www.immovator.nl/101010. If the problem persists, please contact the creator of the Template XML
file. His contact information can usually be found in the second line of the Template XML file.
4.3 Tree and form
Inside the Metadata Exchange Tool application main window, the tree on the left-hand side and the form
on the right-hand side form the basic tools to fill in all metadata. The contents of the sets and properties
in the tree solely depend on the selected template. A typical view of the tree is as follows:
Each set in the tree is depicted with the small set (stack of rectangles) icon
and have their name in
bold text. Inside a set, all its properties are always listed first in the top, in the order as defined by the
template. Properties do not have an icon in the tree. In the example above, the selected ‘Productie
Raamwerk’ set has 5 properties ‘Publicatie titel’, ‘Origineel gesproken taal’, …
Below the properties, the sub-sets are listed, also in the order as defined by the template. In the example
above, the ‘Productie Raamwerk’ set has sub-sets ‘Taal’, ‘Beeld kwaliteit’, ‘Ondertiteling’, … Sub-sets
again can have any number of properties and/or sets inside them and so on…
Page 14 of 28
Metadata Exchange Tool
User Manual
Sets can be collapsed by clicking with the mouse on the small
sign at the left of the set and expanded
again by clicking on the small
sign. This is only for viewing purposes, the actual metadata will not
change by collapsing sets.
When you move the mouse over any of the sets and/or properties in the tree, a tooltip will appear that
shows you the name of the property, its description along with the Universal Label and type.
The properties for (only) the selected tree will be shown in the form at the right-hand side.
4.4 Sets
Besides showing you the structure of the metadata, the tree also allows you to add or remove metadata
sets and to enable or disable properties using the checkboxes. To add a set, simply either click on the
checkbox or the text of a non-checked set. For instance consider the un-checked ‘Uitzendgegevens’ set
in the following example:
When checking it, the set will be added and expand to show the properties and sub-sets within it:
Page 15 of 28
Metadata Exchange Tool
User Manual
To remove a set, simply uncheck the checkbox for that set. and this set will be removed,
along with all the properties and sub-sets within it. This will also delete any data entered for
properties within this set and sub-sets. So be cautious when deleting sets, particular for sets
that have many sub-sets with a lot or properties filled in.
Depending on the template definition, some sets may be added multiple times. In this case, an unchecked set will always be empty just below the just added set and the sets will get a sequential number
#1, #2, … added, like the ‘Productie deel’ set:
In fact, the template can define the allowed minimum and maximum number of occurrences for each set.
For instance the ‘Production Raamwerk’ root set is defined to exist exactly once and hence can not be
added a second time or removed. This is shown by a checked, grayed out checkbox. In general, when
the minimum number of sets has been reached, the checkboxes for these set(s) are checked and grayed
out.
4.5 Properties
The basic usage of the Metadata Exchange Tool is that you first select a set (after possible adding it) in
the tree on the left and then change the values of the properties in the form on the right. Each of the
properties within the selected set will be displayed in the form on a separate line. To view the properties
of another set, first select that set in the tree. Each property has a type associated to it, defined by the
template. Possible types include Text, Number, Boolean, DateTime and Timecode.
Depending on the type of the property, a different control will be shown like an edit box, combobox list,
checkbox or date-time control. It is assumed that one is familiar with the usage of these controls. When
Page 16 of 28
Metadata Exchange Tool
User Manual
filling in data, certain restrictions as defined by the template may be applicable and automatically
enforced, for instance the maximum number of characters allowed in a text or the range for a number.
As for the tree, tooltips will appear in the form when hovering the mouse either over the property name or
control for the value, showing the property name, description, Universal Label and type.
Within any set, not all properties need to be included in the XML file that is to be created. Using either
the checkbox in front of the property name in the tree or the form will enable or disable the property of
being used.
Initially, only properties that are either required or have a default value will be enabled. Changing the
value of a property in the form will automatically enable that property. Required properties can not be
disabled, shown by a checked, grayed out checkbox in both tree and form.
When you select another set and the value for a required property has not been filled in or an illegal
value has been entered for a property, you will get a dialog stating such and you should first enter some
(legal) value for this property. The property causing the validation problem will be selected in the tree
and the form.
4.6 Metadata XML
After all the metadata has been entered by adding sets and filling in the values for the containing
properties, a Metadata XML file can the created for it. This is done by pressing the ‘Create Metadata
XML’ button in the top of the application.
You can also press the ‘Enter’ key to create the XML file, however this will not work when you are editing
in a multi-line edit control. The complete metadata will be validated (check if all required fields are
entered, no illegal values, …) before you will be able to create the Metadata XML file. If validation fails,
you will get a dialog stating the problem and the property causing this problem will be selected in the tree
Page 17 of 28
Metadata Exchange Tool
User Manual
and the form. If validation passes, a File Save As dialog will appear asking of the name of the Metadata
XML file to be created.
Select a folder, enter a name for the XML file and press the ‘Save’ button. Once saved, the Metadata
XML file can be transferred along with the video-and audio essence in the MXF file to the receiving
company.
Selecting a different template will delete the contents of the metadata filled in so far, hence you will be
offered the choice to save the metadata to an XML file. This choice is also offered when you exit the
application.
When you press the ‘Preview Metadata XML’ button in the top of the application you will be able to see a
preview of the entered metadata.
After pressing this button your Internet Browser will open and show the metadata in a user-friendly way.
Basically what happens is that a temporary Metadata XML file is created with one additional line included
with a reference to a XLST file, that tells your Internet Browser to format the XML data in a more
readable way. For preview to work correctly, you will need a correct setup of the preferences, please see
the next chapter for details about this.
By default, validation of the complete metadata is performed before the preview is displayed,
just as when you create a Metadata XML file. You can skip this validation process by holding
down the [Ctrl] key when pressing the ‘Preview Metadata XML’ button.
Page 18 of 28
Metadata Exchange Tool
User Manual
It is also possible to load back a Metadata XML file into the Metadata Exchange Tool by means of the
‘Load Metadata XML’ button in the top of the application.
A File Open dialog box will appear where you can select the Metadata XML file to load. You can also
drag-and-drop an XML file anywhere onto the Metadata Exchange Tool application window. After
loading, the sets and properties from the Metadata XML file should appear in the tree and form. You can
then either browse the metadata, modify it and/or re-save it.
The current selected template will be used when the Metadata XML file is loaded. Any
property or set within the Metadata XML file that is being loaded that does not match (fit) in
this template will be rejected with a warning. The match is made based on the Universal
Label of each property and set.
Page 19 of 28
Metadata Exchange Tool
User Manual
The sets and properties that do fit will be used. When one of more properties and/or sets are not found,
a summary dialog will be displayed.
Either make sure you have the correct template loaded for Metadata XML file being loaded or use the
generic NL Metadata template file (when available). If the warnings persist, contact the creator of the
Metadata XML file for further clarification.
Page 20 of 28
Metadata Exchange Tool
User Manual
5. Preferences
5.1 Overview
From the System menu, select ‘Preferences…’.
This will open up the Preferences dialog.
Hovering above any of the controls will show a tooltip with a short explanation of that preference.
Page 21 of 28
Metadata Exchange Tool
User Manual
The preferences are stored in the system Registry under the key
‘HKEY_CURRENT_USER\Software\Octagon Solutions\MetadataExchange’
You can reset all preferences to their default values by holding the [Ctrl] key when launching
the application.
The remainder of this chapter will explain each preference in more detail.
5.2 Organization
The contents of the text in the ‘Organization Name’ preference will be included in each Metadata XML
file that is created by the application.
It is not part of the metadata itself, but gives the receiver extra information who created the Metadata
XML file.
Page 22 of 28
Metadata Exchange Tool
User Manual
5.3 Template
5.3.1 Template path
The ‘Template path’ preference is the folder where all the Template XML files that the application uses
will be stored. By default, this preference is empty and when the application starts, it will look for a subfolder called ‘Templates’ in the default working folder. With this preference, one can choose an
alternative location. One reason is that a normal user may not have sufficient permissions to access the
Templates folder next to the application (by default this is the working folder) installed in ‘Program Files’.
Another reason could be that the templates are stored on a central location in the organization for easy
maintenance. Computer names or IP addresses may be included in the ‘Template path’ in the form of
‘\\<ComputerName>\Path\Templates’ or ‘\\<IPAddress>\Path\Templates’.
5.3.2 Default template name
The ‘Default template name’ preference specifies the name of the template that will be loaded after
launching the application. This is the name as embedded in the Template XML files and presented in the
template dropdown list.
It might be the same as the Template XML filename itself, but that doesn’t have to be the case. When
this preference is empty, the last selected template will be used when the application is launched the
next time.
5.4 Tree
The ‘Show properties in tree’ preference will show or hide the properties in the tree at the left-hand side
of the application window. When this checkbox is checked, the tree looks like:
When this preference is unchecked, the same part of the tree looks like:
Page 23 of 28
Metadata Exchange Tool
User Manual
As you can see, it might be easier to view all the sets and their relations, at the cost of not seeing all the
properties in each set at one glance.
5.5 Tooltips
With the preference ‘Show details in tooltips’ the Universal Label (for sets and properties) and the Type
(for properties only) will be hidden from the tooltips. With this preference enabled the tooltips look like:
With the setting disabled, the same tooltip looks like:
Disabling this preference can be useful if these details are not required when filling in the metadata.
However, for debugging issues when creating or loading Metadata XML files, it can be handy to include
the Universal Label and Type information in the tooltips by keeping this preference enabled.
5.6 Form
5.6.1 Font & Line spacing
With the ‘Font’ button a different font can be selected for the form (only), the selected font will not be
applied to the tree. The line spacing can be used to widen the vertical distance between the properties I
the form.
5.6.2 Show property checkboxes in form
With this preference the checkboxes displayed at the left of each property name in the form can be
hidden. This makes the appearance of the dialog less crowded.
Page 24 of 28
Metadata Exchange Tool
User Manual
The checkboxes are used to enable or disable properties to be included in the Metadata
XML file. When this setting is disabled, one can still enable or disable properties using the
checkboxes next to each property in the tree. However, if in addition the preference ‘Show
properties in tree’ has been disabled, there is no possibility for the user any more to enable
or disable properties. In this case, one must rely on the automatic mechanism: properties are initially
only enabled for required properties and properties containing a default value in the template and will
furthermore be enabled when their value is changed. But it will not be able to manually disable them
anymore.
5.7 Preview
5.7.1 Preview XML file
This is the filename of the temporary Metadata XML file that will be used for preview. If no path is
specified, the default working directory will be used. Remember that any referenced XLST or other files
without a URL/path must be present in the same directory as the XML file being previewed. If this field is
empty, preview will not be possible.
5.7.2 Extra line in XML
The extra line with for instance with a XLST reference to add in the Metadata XML file that will allow
formatting of the XML in the Internet Browser. The default setting is to include the following line:
<?xml-stylesheet type="text/xsl" href="display_as_html.xslt"?>
This implies that a file named display_as_html.xslt must be available next to the created temporary
Metadata XML file. Without a specific path specified for ‘Preview XML file’, this will be in the default
working directory, which again by default is the folder in which the application resides. It is in this folder
that the distribution of this application includes a file display_as_html.xslt. *
It is also possible to include a http:// path to the XSLT file, but depending on your Internet
Browser, this might or might not be supported. It appears that Internet Explorer and Safari
support both local and internet locations for the XSLT file, but Firefox requires a local XSLT
file. You might need to experiment to see if the preview function will indeed show the
formatted metadata or not.
If this field is empty, no line will be added in the XML, but preview will still be possible. In this case,
depending on your browser capabilities, you will see something similar to the following:
*
Special thanks to Winfred van Kuijk of AAMedia Group for supplying the distributed XLST file.
Page 25 of 28
Metadata Exchange Tool
User Manual
By default, the extra line with the XLST reference will only be added for previewing and not in any
Metadata XML files created with the ‘Create Metadata XML’ button. If you would like to have the extra
line also included in the created Metadata XML files, you can uncheck the ‘Only add extra line in XML
during preview’ checkbox. To view the created Metadata XML file in a user friendly way, the XLST styling
file (like display_as_html.xslt) must be in the same folder as the Metadata XML file.
This can be useful if you want to display a formatted XML file outside the application.
However, make sure that the application used for import at the company receiving the
Metadata XML will safely ignore this extra line. If not, then you will need to use the extra line
only during preview.
5.7.3 Browser command
Here you can specify the Internet Browser command to preview the Metadata XML. If this field is empty,
the default application associated with XML files will be launched. You might change it if you want to use
another Internet Browser than the default one. Alternatively, you can specify a totally different program to
open the Metadata XML files. If you for instance specify ‘notepad’ in this field, this application will be
used to preview the Metadata XML files:
Page 26 of 28
Metadata Exchange Tool
User Manual
In the above screenshot, you can see the extra, second line with the XLST reference inserted
in the XML file.
Page 27 of 28
Metadata Exchange Tool
User Manual
6. Information
6.1 Documents
NL Metadata model
http://www.immovator.nl/101010-metadata
Metadata XML
10-10-10 Metadata XML Specification, http://www.immovator.nl/101010
Template XML
10-10-10 Template XML Specification, http://www.immovator.nl/101010
NL MXF Exchange
http://www.immovator.nl/101010-aanbeveling
ROOS Metadata model
http://www.mediamanage.nl/project/metadatamodel-roos
SMPTE 380M-2004
Material Exchange Format (MXF) – Descriptive Metadata Scheme-1 (DMS-1)
SMPTE EG42
Material Exchange Format (MXF) – MXF Descriptive Metadata
SMPTE 298M
Universal Labels for Unique Identification of Digital Data
SMPTE RP 210
Metadata Dictionary Registry of Metadata Element Descriptions
6.2 Organizations
10-10-10 Project Initiator
iMMovator Cross Media Network
Freek van ‘t Ooster
Mediapark
Sumatralaan 45
1217 GP Hilversum
Netherlands
+31 (35) 6777507
www.immovator.nl
Metadata XML Specification & Metadata Exchange Tool
Octagon Solutions
Henk Demper
Dr. L.J. Rogierstraat 10
2552 LA Den Haag
Netherlands
+31 (70) 4043495
+31 (6) 26080492
[email protected]
Supported by
Building4Media, www.b4m.com
6.3 Credits
10-10-10 Project Management
Freddy Otten, Otten Media Consultancy
NL Metadata model
Ellen Mulder, Digiframe
ROOS Metadata model
Lucas Vroemen, InCompanyMedia
Sparring partner & XLST file for previewing
Winfred van Kuijk, AAMedia Group
Page 28 of 28