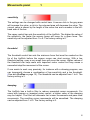
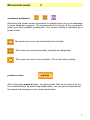
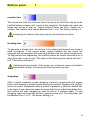
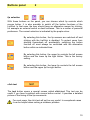
1
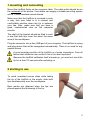
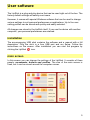
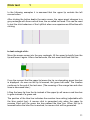
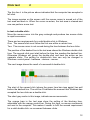
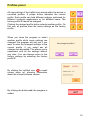
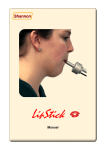
LipStick
User Manual
Contents
Features of the LipStick
2
User Manual
mounting and connecting
starting to use
cursor movements
mouse buttons
cleaning and maintenance
3
3
4
4
4
User software
installation
main screen
5
5
Movements panel
sensitivity
threshold
damping
movement preference
Practice screen
6
6
6
7
8
Buttons panel
reaction time
blocking time
drag delay
lip selection
9
9
9
10
Click test
to test a single click
to test a double-click
to test dragging
11
12
13
Profiles panel
14
Technical details
15
CE declaration of conformity
15
1
The LipStick
The LipStick is an alternative computer mouse for people who cannot use a
standard mouse. All mouse functions can be operated with the mouth. The
screen cursor follows the movements of the mouth; the mouse buttons are
operated with the lips.
Features of the LipStick
• Very sensitive force control. Only small head movements necessary.
• Very accurate at small movements. Pixel by pixel is quite feasible.
• Automatic acceleration for smooth and fast large movements.
• Mouse clicks by raising and lowering lips.
• Free choice of upper- or lower lip for left- or right mouse clicks.
• Mouse dragging easily possible.
• Bite proof mouthpiece of high performance medical grade plastic.
• Robust metal case. Not sensitive to shock or vibration.
• Completely closed construction for optimal hygiene.
• Easily cleaned with any common detergent or disinfectant.
• No parts that can wear or have to be replaced regularly.
• Can be used in any position. Using while lying in bed possible.
• Automatic sensor calibration. No reset button necessary.
• Plug and play for Windows, Apple, Linux and Android.
• With Windows software for individual adjustments.
2
1 mounting and connecting
Mount the LipStick firmly on the computer table. The cable outlet should be on
the underside of the device. Your dealer can supply a suitable mounting system
with a ¼ inch standard camera thread.
Make sure that the LipStick is mounted in such
a way, that your head is in a relaxed and
comfortable position when the tip is between
your lips. Also, make sure that you have a
good, unobstructed view on the computer
monitor.
The shaft of the Lipstick should be tilted in such
a way that both lips cover the about the same
area of the mouthpiece.
Plug the connector into a free USB port of your computer. The LipStick is a plug
and play device that will be recognized automatically. There is no need for any
special drivers.
A good mounting position of the LipStick is of prime importance. From all
factors that influence user comfort, this is the most important!
Because the LipStick calibrates itself at power up, you must not touch the
tip for at least 10 seconds after switching on.
2 starting to use
To avoid unwanted mouse clicks while taking
the tip of the LipStick in the mouth, slide both
lips simultaneously over the mouthpiece.
Best results are obtained when the lips are
placed against the thickening of the tip.
3
3 cursor movements
Keep your lips well closed and gently push the tip in the desired direction. The
screen cursor will move in the corresponding direction. The harder you push,
the faster the cursor will move. Because the LipStick responds to force, tip
movement will be imperceptible. Small head movements are sufficient.
Sometimes, the screen cursor will start moving spontaneously. If you do
not touch the tip for a few seconds, this unwanted movement will stop.
If you do not keep your lips well closed, the screen cursor may stop
moving.
4 mouse buttons
Raising your upper lip and lowering it again will produce a left mouse click. The
lower lip gives a right mouse click. Raising and lowering a lip two times in rapid
succession will generate a double-click.
Dragging with the mouse is possible by keeping the upper lip raised for a
certain minimum time. After the lip is lowered again, the dragging starts. To
stop dragging, raise and lower a lip as with a mouse click.
As long as a lip is raised, screen cursor movements are blocked.
In rare cases, the operation of the buttons and the movements of the
cursor can be disturbed. If the tip is not touched for at least 20 seconds,
the LipStick will reset itself and be fully operational again.
5 cleaning and maintenance
The LipStick is completely closed. There are no hygienic problems with saliva
buildup in the device.
Cleaning is easy. Wiping with a damp cloth, possibly holding a detergent or
disinfectant, is sufficient. The LipStick is compatible with any usual cleaning
agent. You can also use prepacked, alcohol impregnated cleaning pads,
available in pharmacies.
Apart from periodic cleaning, the LipStick is maintenance free. There are no
parts that can wear out or have to be replaced regularly.
4
User software
The LipStick is a plug and play device that can be used right out of the box. The
factory default settings will satisfy most users.
However, it comes with special Windows software that can be used to change
various settings to suit personal preferences or applications. Up to five user
setting profiles can be stored and quickly and easily selected.
All changes are stored in the LipStick itself. If you use the device with another
computer, your personal preferences are retained.
installation
The accompanying USB stick contains the software and a manual with a full
description. Plug the stick in a free USB port and run Setup. Follow the
instructions on the screen. After installation you can start the program by
clicking the LipStick
icon.
main screen
In this screen you can change the settings of the LipStick. It consists of three
panels: movements, buttons and profiles. The size of the main screen is
fixed, but it can be moved around the computer screen.
5
Movements panel
1
sensitivity
The settings can be changed with control bars. A mouse click in the grey area
will increase the value, a click in the coloured area will decrease the value. The
current value is shown by the length of the colour bar and a number in the lefthand side of the bar.
The upper control bar sets the sensitivity of the LipStick. The higher the value of
the sensitivity, the faster the screen cursor will move for a given force. The
sensitivity can be adjusted from 1 to 9. The factory setting is 6.
threshold
The threshold control bar sets the minimum force that must be exerted on the
tip of the LipStick before the screen cursor can start moving. With a low
threshold setting, even a very small force will move the cursor. Higher values of
the threshold can help users with imperfect motor control but may cause a
somewhat step-like movement of the cursor.
If one wants to work very precisely, for instance with a drawing program, one
can temporarily choose a combination of low sensitivity and a low threshold.
(See also Profiles on page 12). The threshold can be adjusted from 1 to 6. The
factory setting is 2.
damping
The LipStick has a built-in filter to reduce unwanted cursor movements. For
users with tremors or impaired motor control, a higher value of the damping
may be helpful. The filter will attenuate fast cursor movements and pass slow
movements. The resulting cursor movements will be smoothed. The damping
can be adjusted from 1 to 5. The factory setting is 2.
6
Movements panel
2
movement preference
Restricting the screen cursor movements to straight lines can be an advantage
in some computer programs. The square buttons at the top of the movements
panel give three possible preferences. The current setting is indicated by a
purple colour.
The cursor can move only horizontally and vertically.
The cursor can move horizontally, vertically and diagonally.
The cursor can move in any direction. This is the factory setting.
practice screen
practice
After clicking the practice button, you get a screen that can be used to try out
the current settings. By performing simple tasks, you can get an impression of
the speed and accuracy of your cursor movements.
7
Practice screen
Start by clicking the red dot. Then move the cursor, as fast as you can, around
the green figure until you reach the dot again, keeping the cursor in the green.
A black line shows the trajectory of the cursor.
As soon as you reach the red dot again, the
time (in seconds) it took to complete the task
appears in the middle. Also shown is the
percentage of time spent in the green.
By clicking one of the three buttons in the
lower right corner, you can choose a different
figure.
The back button returns you to the main
screen.
back
8
Buttons panel
1
reaction time
This control bar sets the minimum time a lip has to be lifted from the tip of the
LipStick before a mouse click is sent to the computer. The higher the value, the
longer the lip has to stay up. Typical reaction times are just a fraction of a
second. The reaction time can be adjusted from 1 to 8. The factory setting is 3.
Increasing the reaction time may reduce unwanted mouse clicks.
blocking time
To generate a double-click, the lip has to be raised and lowered two times in
rapid succession. If the mouse cursor moves between the two clicks, the
computer will not recognize the event as a double-click, but as two single clicks.
To help prevent this happening, the LipStick blocks all cursor movements for a
short time after a mouse click. The value of the blocking time can be set from 1
to 8. The factory setting is 6.
Unintentional movements of the cursor are a frequent cause of problems
with double-clicking. Increasing the blocking time may help.
drag delay
With a normal computer mouse, dragging is done by pressing the left mouse
button and keeping it pressed while moving the mouse. Because the LipStick
blocks all cursor movements while a button is pressed, a different method has
to be used. If one raises the upper lip longer than the so-called drag delay time,
the LipStick will start dragging as soon as the lip is lowered again. To end
dragging, raise and lower the lip like a normal mouse click. The drag delay can
be adjusted from 1 to 12. The factory setting is 4.
9
Buttons panel
2
lip selection
With these buttons on the panel, you can choose which lip controls which
mouse button. It is also possible to switch off the button functions of the
LipStick. In that case, the user should have an alternative means for clicking,
for example an external switch or dwell software. This is a matter of personal
preference. The current selection is indicated by the purple colour.
By selecting this button, the lip sensors are switched off and
clicking with the LipStick is disabled. To protect users from
shutting themselves off accidentally, switching the button
function off must always be confirmed with the alternative
button within an indicated time.
By selecting this button, the upper lip controls the left mouse
button and the lower lip the right button. This is the factory
setting.
By selecting this button, the lower lip controls the left mouse
button and the upper lip the right button.
click test
The test button opens a special screen called click test. This test can be
useful if you have a problem with mouse button control. It provides a detailed
picture of the timing of the lip movements.
For most users, the click test will not be very useful. In exceptional cases
it can be helpful when solving a stubborn problem.
10
Click test
1
In the following examples it is assumed that the upper lip controls the left
mouse button.
After clicking the button test in the main screen, the upper panel changes to a
grey rectangle with three vertical lines, the so-called test area. This can be used
to test the click behaviour of the LipStick when one experiences difficulties with
clicking.
to test a single click:
Move the mouse cursor into the grey rectangle, lift the upper lip briefly from the
tip and lower it again. After a few seconds, the test area could look like this:
From the moment that the upper lip leaves the tip, an elongating green time bar
is displayed. As soon as the lip is lowered, the green bar ends. The timeline
continues to the end of the test area. (The meaning of the orange bar and other
lines is discussed later.)
Lifting the lower lip from the tip instead of the upper lip will cause a red time bar
to grow instead of a green one.
The position of the blue line indicates the reaction time setting (adjustable with
the blue control bar). A mouse click is generated only when the upper lip
remains lifted until the green bar has passed the blue line. When the lip is
lowered before the blue line is reached, no mouse click will be generated.
11
Click test
2
The thin line L in the picture above indicates that the computer has accepted a
left click.
The image remains on the screen until the mouse cursor is moved out of the
test area and back in. When the cursor re-enters, the test area is cleared and
one can perform a new test.
to test a double-click:
Move the mouse cursor into the grey rectangle and produce two mouse clicks
in rapid succession.
There are two requirements for a valid double-click in Windows:
One: The second click must follow the first one within a certain time.
Two: The mouse cursor is not moved during the time between the two clicks.
The position of the dashed line in the test area shows the Windows double-click
time. The second click must start before the time line reaches the dashed line.
Otherwise Windows will ignore the double-click and treat the action as two
separate clicks. The setting for double-click time can only be changed in
Windows: control panel - hardware - devices - mouse.
The next image shows the result of a successful double-click:
The start of the second click (where the green time bar rises again) lies well
before the dashed line. The red line D indicates the moment that Windows has
accepted the two clicks as a double-click.
The short grey marks in this image, indicate mouse movements.
The orange bars in the test area show the setting of the blocking time,
adjustable with the orange control bar. During this time, no mouse movements
are sent to the computer. This makes it easier to fulfil the second requirement
for a valid double-click: no movement between clicks.
12
Click test
3
In the example below, the mouse cursor is moved between the two clicks.
Windows interpreted this as two separate clicks, thus the double-click failed.
Moving between the two clicks is often the cause of difficulties with doubleclicking. Increasing the blocking time or the movement threshold (green control
bar in the main screen) can improve the ease of double-clicking.
to test dragging:
With a standard computer mouse, dragging is performed by pressing the left
mouse button and keeping it pressed while moving the mouse. Because all
movements are blocked while one of the mouse buttons of the LipStick is
active, a different method must be used.
Move the mouse cursor into the grey rectangle and lift the upper lip from the tip.
Wait until the green time bar passes the purple line and lower the lip.
The image below shows that the lip has been lifted long enough to switch to
drag mode. The green time bar reaches past the purple line. The purple time
bar that follows indicates drag mode.
The position of the purple line can be adjusted with the purple control bar.
Lifting the one of the lips for a short time, as in a normal left or right click, ends
dragging.
The button back returns you to the main screen.
13
Profiles panel
All user settings of the LipStick are stored within the device in
so-called profiles. A purple button indicates the current
profile. Each profile can hold different settings, optimised for
different computer applications or for different users. The
factory profile F cannot be changed.
Clicking the desired profile button selects another profile. On
first use, all profiles have the same settings as the factory
profile.
When you close the program or select
another profile while some settings are
changed, the program will ask you if you
want to save the changed settings to the
current profile. If you select no, all
changes are discarded. This allows you to
experiment with all the settings without
any risks. You can always return to the
factory settings by selecting the factory
profile F.
By clicking the LipStick icon
a small
screen pops up, showing information
about the current software version.
By clicking the button exit, the program is
ended.
14
Technical details
Computer connection
USB 1.1 FS (compatible with USB 2 and USB 3)
Composite HID device
Power supply
USB: 5V / 25 mA
Mounting
Standard camera thread (UNC ¼ )
Maximum screw depth 10 mm
Weight
100 grams
Temperature range
Operating temperature between -20°C and +50°C
Lip switches
Capacitive touch. Up/Down differential
Electrically fully isolated
Material mouthpiece
POM: RÖCHLING SUSTARIN C Medical
Material house
Aluminium ST51 anodised
Environmental
IP63. Dust-, rain- and splash proof
CE declaration of conformity
The manufacturer
Shannon Electronics vof
Gebrokenwit 1, 2718 AX Zoetermeer, The Netherlands
declares under exclusive responsibility that the product
Name and type:
Description:
LipStick
Alternative computer mouse for physically handicapped people
has been designed, produced and tested according to the following harmonized standards
for Information Technology Equipment
EN55022:2006
EN55024:1998/2003
Radio Disturbance Characteristics
Immunity Characteristics
and is in compliance with all essential requirements of EMC directive 2004/108/EG.
date:
name:
title:
signature:
August 16, 2013
J. Goezinne
director
Copyright © January 2014 Shannon Electronics, Gebrokenwit 1, 2718 AX Zoetermeer, the Netherlands
www.shannonelectronics.nl
15