1
Shannon
LUCY
Keyboard and mouse
User manual
version 2.0 US
CONTENTS
1.
INTRODUCTION
2
2.
GENERAL OVERVIEW
3
1. Control methods
2. Choice of keyboard overlay
3. Connection with the computer
3
5
6
CONTROL METHODS
7
3.
1. Laser control
2. Control with a mouse or trackball
3. Switch control
7
10
12
MACROS.
14
1. Simple macros
2. Two-step macros
3. Groups of macros
4. Macro overview
14
15
15
16
5.
MOUSE OUTPUT
17
6.
CONTROL FUNCTIONS OVERVIEW
19
1. Special symbols
2. Function keys overview
3. Mouse control functions overview
19
20
26
THE COMPUTER PROGRAM LUCY
27
1. The main window
2. Control functions overview
3. Settings
4. User profiles
5. To close the program
27
28
28
29
30
INSTALLING AND CONNECTING LUCY
31
1. Installation
2. Connection
3. Hardware installation
31
31
32
4.
7.
8.
APPENDIX 1. Key codes
33
1
INTRODUCTION
LUCY enables people who cannot handle an ordinary keyboard to use a personal
computer. There are several control methods, such as laser, mouse, trackball and
switch control. The output to the computer includes all possibilities of the normal
keyboard and the mouse.
Overview
Chapter 2 gives a concise overview of the available control methods and the
recommended keyboard overlay.
Control methods
Chapter 3 addresses one by one the different control methods that can be used with
LUCY. For each control method, the most important functions are discussed.
Macros
Chapter 4 introduces the use of so-called macros. It is possible to store frequently used
words, sentences or control tasks in the memory of LUCY. Such a stored word or
sentence is called a macro. The stored item can be called back with only one or two
selections. Working with macros is simple and can save a lot of time.
Mouse output to computer
Chapter 5 treats all LUCY functions which are related to using the numerical keypad as
a mouse.
Functions and symbols overview
Chapter 6 contains an overview of all special LUCY symbols and all functions which
can be used by means of the symbol fun.
The LUCY program
In chapter 7 the use and advantages of the supplied computer program that can be
used in association with LUCY are discussed.
Installing and connecting LUCY
Chapter 8 gives an overview of the connections on the back of LUCY and describes
the installation procedure. This chapter needs only to be read at first use or when
another overlay number is chosen.
2
2. GENERAL OVERVIEW
2.1 CONTROL METHODS
Direct selection
To be able to select one of the 88 cells on the keyboard overlay a number of control
methods is available. Direct selection with a laser pointer by means of head
movements is the fastest and most comfortable control method. In some cases control
with a mouse or a trackball can be a good alternative.
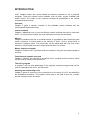
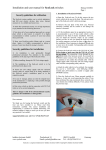
Laser pointer
The laser pointer is a laser light in the shape of a small tube that can
be attached to a headband or to a pair of spectacles. The pointer
throws a clear light spot on the keyboard overlay. Photosensitive
cells in LUCY ensure that the chosen characters are passed on to
the computer. For users who can move their head reasonably well,
laser control is the best control method. The achievable speed is
higher and the use is much less tiring than working with an onscreen system or head stick. The laser pointer can also be used
handheld. In that case the achievable speed will be somewhat lower.
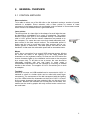
Mouse
LUCY has a connection for a normal USB computer mouse. Moving
the mouse will result in the lighting up of the LEDs behind the
characters on the keyboard overlay. As soon as the LED behind the
chosen character lights up, the character can be sent to the computer
by a mouse click. To be able to use a mouse, the user should be
reasonably proficient with arm and hand. In some cases a
considerable improvement can be reached by mounting a suitable
handle on the mouse. The supplier of LUCY can advise you on such
an adaption.
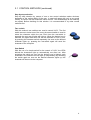
Trackball
Instead of a mouse, an USB trackball can be connected to LUCY. A
trackball is a ball in a holder which can be rolled with small finger
movements. The movements of the ball correspond with the lighting
up of the LEDs behind the characters on the front of LUCY. As soon
as the correct character has been selected, this can be sent to the
computer. Because the trackball has a fixed place on the table, this
method can be used by people with only minimal motor control over
arm and hand.
3
2.1 CONTROL METHODS (continued)
Step by step selection
Step by step selection by means of one or two control switches makes minimum
demands on the motion ability of the user. In nearly all cases with only a very small
motility, a solution can be found with switch control. The disadvantage is the relatively
low speed. Before deciding for this solution it is recommended to try other control
methods first.
Two- switch
With this method, two switches are used to control LUCY. The first
switch serves to select one of the rows; the second switch is used to
select the character within the row. Each time the row-switch is
pressed, the next row of lights will light up. When the desired row is
reached, the lights within this row can be switched on one by one,
by pressing the character switch repeatedly. As soon as the desired
character lights up, pressing the row-switch again will send the
character to the computer.
One-Switch
With the use of a simple switch for the control of LUCY, the LEDs
behind the characters light up automatically row after row. After
activating the switch as soon as the desired row is lighted, each
character in the selected row will light up sequentially. By activating
the switch again as soon as the desired character lights up, this
character will be sent to the computer.
4
2.2 CHOICE OF KEYBOARD OVERLAY
There are two types of keyboard overlay available. Overlay no. 1 is intended for direct
selection with laser pointer, mouse or trackball. Overlay no. 2 is intended for step-bystep selection with one or two switches. Although each overlay can be used with each
control method, deviation from the recommended combinations inevitably results in a
loss of speed and of comfort. The overlays are separately available and can simply be
exchanged.
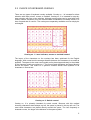
Overlay no. 1. Laser indicator, mouse or trackball control
The layout of the characters on the overlays has been optimised for the English
language. With normal text the average distance between the characters is as small as
possible. The space is the most used symbol and is placed approximately in the middle
of the character matrix on overlay no.1. The 8 most used characters are placed directly
around the space. This matrix of 9 symbols contains almost three quarters of all
characters in normal text.
Overlay no. 2. Switch control
Overlay no. 2 is primarily intended for switch control. Because with this method
choosing characters starts always top left, the space is placed in this top left cell. The
most used characters are placed directly around the space. The less frequently a
character occurs, the larger is the distance to the space symbol.
5
2.3 CONNECTION WITH THE COMPUTER
USB connection
LUCY is linked with the computer by a single USB cable. This cable allows the transfer
of all required signals to the computer for both the LUCY keyboard and mouse output
and also acts as the power supply. If a standard keyboard and mouse are connected
with the same computer, these can be used normally.
LUCY can function in combination with every personal computer without a special
computer program. All important control functions of LUCY can be used.
A disadvantage of the use of LUCY without the special program is the lack of feedback
to the user. Apart from a blinking LED behind the return ↵ symbol there is no indication
whether LUCY works normally or is waiting for input. Therefore with LUCY a special
supportive Windows program is provided.
LUCY program
It is recommended to load the LUCY program automatically after switching on the
computer. In the lower right hand corner of the screen appears an icon as a sign that
the program is active. The program can only be started when LUCY is connected to the
computer. Some properties of the program are:
• As soon as a control function of LUCY becomes active, a small screen appears with
instructions. After the settings have been modified, the screen disappears
automatically.
• Macros are programmable keys on LUCY which can save much time. LUCY itself
can contain only a limited number of macros. With the LUCY program the number of
macros can be extended indefinitely.
• The program contains an overview of all available LUCY control functions with a
short explanation.
• It is possible to recall an overview of all current LUCY settings and to change these
settings as required.
• A user profile contains all settings and macros of a certain user. If several people
use the same LUCY, they can store their profiles in the computer and simply retrieve
them.
6
3. CONTROL METHODS
3.1 LASER CONTROL
Functioning
The laser pointer produces a clear red light spot with which the characters on the front
of LUCY can be selected. After a character is illuminated during a certain time, LUCY
sounds a short beep as a sign that the character has been accepted. The LED behind
the character lights up shortly. The chosen character is now sent to the computer.
Target group
Laser control has been developed initially for people who can only use an ordinary
keyboard using a head stick or a mouth stick. Laser control works a lot faster and is
much less tiring. Also, in comparison with systems with which you control a cursor on a
computer screen with head movements, laser control has advantages. Trying to work
rapidly with such a pointing system, results in flickering and inertia of the cursor.
Working with such a system for a prolonged time inevitably leads to fatigue and even
headache. Laser control is not only much faster but can be used for a longer time
without fatigue complaints.
The installation of the equipment
Main point for the installation of LUCY is a relaxed and comfortable posture for the
user. The height must be such that from a relaxed and comfortable position one looks
at approximately the middle of the overlay. It is recommended to place the computer
monitor just beside LUCY. This facilitates back and forth looking between LUCY and
the monitor.
The correct working distance
The recommended working distance lies between approximately 50 and 70
centimetres. The larger the distance, the smaller the required head movements. At
large distances the head movements become so small, that sufficiently precise aiming
of the laser becomes difficult.
Attaching the laser indicator
The attachment plate of the laser pointer can be attached to a headband or to a leg of
a pair of glasses. For attaching the laser pointer one needs a screwdriver and the
connection is not simply detachable. A little magnet keeps the indicator itself firmly in
place in the ball joint and can be removed very simply. Extra attachment plates, for
example for use with other glasses, are available at your dealer.
Aiming the laser pointer
The laser pointer is provided with a ball joint to enable pointing it in the right direction.
The recommended manner for establishing the right direction is as follows: Look at the
space symbol at the keyboard overlay in a relaxed and comfortable posture. Then aim
the indicator at the space symbol. The locking screw at the side of the attachment plate
should be unfastened. As soon as the correct direction has been found, the screw can
be fastened carefully.
7
3.1 LASER CONTROL (continued)
IMPORTANT CONTROL FUNCTIONS
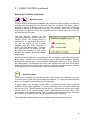
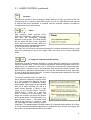
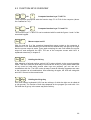
Reaction speed
A certain amount of time passes between the moment the light spot falls on a character
and the beep indicating that the character has been accepted. This delay makes it
possible to take the shortest course to the next character without the intervening
characters reacting to the passing of the spot. This reaction speed can be adjusted
very simply. For optimal comfort it is important that the reaction speed is chosen not
too large and not too small.
The two step-like symbols on the
keyboard overlay are used for setting the
reaction speed. The current setting is
indicated on a small screen as soon as
you aim the pointer at one of these
symbols, and the LUCY program is
active. The LED behind return ↵ will blink
as a sign that LUCY is waiting for input.
By aiming the indicator at one of the
symbols, the reaction speed will change
step-by-step.
As soon as the desired value is reached you can consolidate it by aiming the light spot
at the return ↵ symbol. The correct setting can only be determined in practice because
it varies from case to case. In most cases a suitable start value is 17. If one chooses
the setting higher, the characters will react more rapidly to the light spot and a higher
speed can be reached. However, the chance of errors occurring will increase. Certainly
in the beginning it can be rewarding to experiment with the settings.
rep
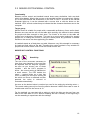
Repeating mode
If you select a character with the laser pointer, it will be sent to the computer only once,
no matter how long the light spot touches the character. To select the same character
twice, you first have to move away from the character.
In some cases is can be helpful to put LUCY in a repeating mode. Then, a selected
character will be typed repeatedly. To set the repeating mode, you have to select the
rep key on LUCY. The LED behind rep will light up. Selecting the rep key once again
returns LUCY to the normal setting. Some experienced users keep their LUCY
permanently in the repeating mode. This is a matter of personal preference. The steplike symbols for establishing the reaction speed are always repeating.
The repeat rate of the characters can be adjusted with Fun Rep. see page 24.
8
3.1 LASER CONTROL (continued)
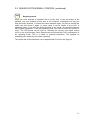
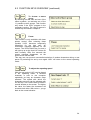
fun
Function
The function symbol is used to change certain settings of LUCY and also to use the
function keys of a computer. After selecting the fun key, the LED behind it will light up
to indicate that more characters or symbols must be selected. Chapter 6 contains a
complete overview of all functions.
fun
p
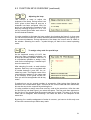
Pause
After selecting these symbols LUCY
becomes temporarily insensitive for the
light spot. An information message
appears on the screen. The LEDs behind
the fun and p will light up as a sign that
LUCY does not work normally. After four
seconds the screen message disappears,
so the entire screen can be read.
This way one can prevent uncontrolled selection of random characters during a rest
pause. By selecting fun and p once again LUCY will return to the normal operating
mode.
fun
d
To suppress unwanted double strikes
Sometimes a double character appears on screen although seemingly the character
was only selected once. There is a simple explanation: when the light spot moves very
rapidly from one character to the next, it sometimes overshoots the target character
slightly before it comes to rest on the character, thus hitting and selecting it twice. This
phenomenon is generally imperceptible to the eye but nevertheless occurs, especially
in case of large and fast movements. To reduce unwanted double strikes you can raise
the so-called double strike pause.
To select a character twice, the light spot
has to leave the character and then return
to it. The minimal time between the first
and the second hit is called the double
strike pause. This pause can be adjusted
with fun d. After selecting fun and d a
small screen appears in which a new
value 1, 2 or 3 can be chosen. The LED
behind return ↵ blinks as a sign that
LUCY is waiting for a new setting. The
larger the number, the longer the double
touch pause will be. To fix the setting, you
have to select return ↵. The most usual
value for the pause is 2. A value of 1 has
the advantage of faster selecting double
characters. The disadvantage is a larger chance of unwanted double strikes. At a value
of 3 one must wait somewhat longer before a character can be chosen once again, but
the chance of unwanted double strikes is smallest.
9
3.2 MOUSE OR TRACKBALL CONTROL
Functionality
Because mouse control and trackball control show many similarities, both are dealt
with in this chapter. Moving the mouse or the trackball results in consecutively lighting
up of the LEDs behind the characters on the front of LUCY. As soon as the correct
character lights up, it can be selected with a mouse click or with the button on the
trackball. LUCY sounds a short beep to indicate that the character has been sent to the
computer.
Target group
Mouse control is suitable for people with a reasonable proficiency of arm and/or hand.
Because one can rest the arm on the table while working, this method is also suitable
for people with little strength in their arms. The friction of the arm on the table will
cushion any involuntary movements. This can be a good control method for spastic
people too. If holding the mouse or using the switch poses any problems a suitable
handle on the mouse can be supplied by your dealer.
A trackball stands at a fixed place on table. Moreover very little strength is necessary
for back and forth rolling of the ball. Therefore this control method is very suitable for
people with minimal motor control over the hands and the arm.
IMPORTANT CONTROL FUNCTIONS
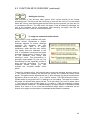
Sensitivity
The size of the movement necessary to
jump from one character to the next can
be adjusted with the step-like symbols.
As soon as you choose one of these
symbols - and the LUCY program is
active - the current setting is indicated on
a small screen. The LED behind the
return ↵ symbol blinks as a sign that
LUCY is waiting for new input. As long as
the switch on mouse or trackball remains
pressed, the value is reduced or
increased automatically.
As soon as the desired value is reached you can fix the setting by selecting return ↵.
The correct setting can only be found in practice because it differs from case to case. A
suitable start value for the mouse is 16.
For the trackball you can start with a setting in which the light can be sent from one
side to the other side of LUCY without releasing the ball. Certainly in the beginning it
can be rewarding to experiment with the settings.
10
3.2 MOUSE OR TRACKBALL CONTROL (continued)
rep
Repeating mode
When you have selected a character with a mouse click or with the button of the
trackball, only one character will be sent to the computer, regardless how long you
keep the button pressed. To choose the same character again, you have to release the
switch and then press it again. In some cases it can be helpful to put LUCY in
repeating mode. If you keep the button pressed in this mode, the selected character
will be typed repeatedly. To set the repeating mode, you have to select the rep key on
LUCY. The LED behind rep will light up. Selecting the rep key once again returns
LUCY to the normal setting. Some experienced users keep their LUCY permanently in
the repeating mode. This is a matter of personal preference. The symbols for
establishing the sensitivity are always repeating.
The repeat rate of the characters can be adjusted with Fun Rep. see page 24.
11
3.3 SWITCH CONTROL
Functionality
Because one and two-switch control show many similarities, both are dealt with in this
chapter. When switch control is used, the characters on LUCY are selected in two
steps. First the row in which the desired character resides has to be selected, then the
character itself.
Two-switch control
After turning on, LUCY is in a state of rest, with all the LEDs turned off. As soon as the
row-switch is briefly pressed, the LEDs behind the upper row of characters will light up.
By pressing the row-switch again, the current row is switched off and the next row is
switched on, and so on. When the desired row is reached, the lights within this row can
be switched on one by one, by pressing the character-switch repeatedly. As soon as
the desired character lights up, pressing the row-switch again will send the character to
the computer. LUCY produces a short beep as a sign that the character has been
accepted.
When the desired row is accidentally passed, one has to continue pressing the rowswitch until the last row is passed. LUCY is then back to the state of rest.
When the desired character within a row is accidentally passed, one should continue
pressing the character-switch until all lights are off. With the character-switch, the first
symbol in the row will light up again. With the row-switch, the first row will be selected.
By keeping one of the switches pressed, LUCY will cycle through the rows or
characters automatically.
One-Switch control
After turning on, LUCY is in a state of rest, with all the LEDs turned off. As soon as the
switch is briefly pressed, the LEDs behind the upper row of characters will light up. A
moment later LUCY produces a click sound and the LEDs in the upper row are
extinguished, while the LEDs in the second row are lighting up. Thereafter the third
row, etc. To select a certain character, you have to wait till the row with that character
lights up and than press the switch. After pressing the switch as soon as the desired
row is lighted, each character in the selected row will light up sequentially. By pressing
the switch again as soon as the desired character lights up, this character will be sent
to the computer.
LUCY produces a short beep as a sign that the character has been accepted. If you
react too late, so that the desired character is passed by, you do not have to press the
switch again. After reaching the last character LUCY returns automatically to the first
row.
The first row lights up twice as long as the next rows. This also applies to the first
character from a row. This way choosing the first row or the first character from a row is
possible without the need to switch very fast. If the switch is not pressed, LUCY goes
through the lighting sequence five times before returning to the state of rest.
Target group
Step by step selection by means of a control switch makes minimum demands on the
motion ability of the user. In nearly all cases with only a very small motility, a solution
can be found with switch control. The disadvantage is the relatively low speed. Before
deciding for this solution it is recommended to try other control methods first.
Control switches are available in many constructions, designs and types. There are
miniature touch-sensitive switches that can be operated with extremely small
movements. But there are also many sizes of push buttons, lever switches, blow
switches, air cushion switches, etc..
12
3.3 SWITCH CONTROL (continued)
IMPORTANT CONTROL FUNCTIONS
Scan rate
The scan rate, the speed with which the
LEDs behind the characters light up, can
be adjusted using the step-like symbols.
As soon as you choose one of these
symbols - and the LUCY program is
active - the current setting is indicated on
a small screen. The LED behind the
return ↵ symbol blinks as a sign that
LUCY is waiting for new input.
As soon as the desired value is reached you can fix the setting by selecting return ↵.
The correct setting can only be found in practice because it differs from case to case
and depends to a large extend on experience, fatigue, etc. A suitable start value for
switch control is 19. Certainly in the beginning it can be rewarding to experiment with
the scan rate settings.
Scan rate too high
If you choose the scan rate higher, the LEDs succession will be faster and the waiting
time before the desired character has been reached will be shorter. However, it
becomes more difficult to react in time when the desired row or character lights up. It is
even possible to accidentally select a scan rate that makes it impossible to select any
character or symbol at all. When this problem arises you can wait until the scanning
stops and LUCY returns to the state of the rest. Then, by keeping the switch pressed
down, the upper row will light up and extinguish after some time. The scan rate is now
set to a lower value (default, 19).
rep
Repeating mode
When you have selected a character by pressing the switch, only one character will be
sent to the computer, regardless how long you keep the switch pressed. To choose the
same character again, you have to release the switch and then start scanning again
from the upper left. In some cases it can be helpful to put LUCY in a repeating mode. If
you keep the switch pressed in this mode, the selected character will be typed
repeatedly. To set the repeating mode, you have to select the rep key on LUCY. The
LED behind rep will light up. Selecting the rep key once again returns LUCY to the
normal setting. Some experienced users keep their LUCY permanently in the repeating
mode. This is a matter of personal preference. The step-like symbols for establishing
the scan rate are always repeating.
The repeat rate of the characters can be adjusted with Fun Rep. see page 24.
13
4. MACROS
Frequently used words, sentences or control tasks can be stored in a so-called macro.
During the preparation of such a macro LUCY remembers all the selected symbols in
the right order. The chosen items can simply be repeated afterwards as many times as
you wish by selecting only one or two symbols. The contents of a macro are kept, even
if LUCY is not used for a long time. LUCY knows two kinds of macros: simple macros,
where the stored items can be repeated using only one symbol, and two-step macros,
where two symbols are necessary to reproduce the item. Working with macros is very
simple and can save a lot of time.
4.1 SIMPLE MACROS
The bottom row of the keyboard overlay contains a set of special symbols. On
themselves these symbols have no particular meaning. The form has been chosen to
distinguish them easily.
mac
In addition to these special symbols, there is the symbol Mac, which is used
for storing and erasing a macro.
How to store a macro
1.
2.
3.
4.
Select mac.
Select the special symbol with which you want to call back the macro.
Next select the string of characters you want to put in the macro.
Select mac once again.
As from this moment the macro is ready for use. To recall the macro you have only to
select the matching symbol. While storing a macro, the LEDs under mac and under the
selected symbol will light up. Apart from that, LUCY will behave exactly as usual.
During storing, the string of characters and other symbols which will be in the macro,
are simply sent to the computer. The special control functions of LUCY, preceded by
the symbol fun, can also be incorporated in a macro.
How to erase a macro
1.
2.
3.
Select mac.
Select del.
Select the symbol for the macro you want to erase.
The selected macro is now removed from the memory and the symbol can be used
again. Choosing an 'empty' macro has no influence on the text which is sent to the
computer.
14
4.2 TWO-STEP MACROS
Beside the simple macros, which can be called back by choosing a single symbol,
LUCY also knows so-called two-step macros. Recalling two-step macros always starts
with mac. Then a character or another symbol is selected (all characters and symbols
are allowed except del and the special symbols in the bottom row).
How to store a two-step macro
1.
2.
3.
4.
Select mac.
Select the character with which you want to call back the macro.
Next select the string of characters you want to put in the macro.
Select mac once again.
How to recall a two-step macro
1.
2.
Select mac.
Select the matching character.
How to erase a two-step macro
1.
2.
3.
Select mac.
Select del.
Select the matching character.
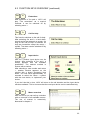
4.3 GROUPS OF MACROS
A keyboard overlay contains 88 cells. All symbols, except mac and del, can be used to
store macros. Such a collection of 86 possible macros is called a macro group. When
the LUCY program is active on the computer, it is possible to store a complete macro
group on the computer and to replace it by another group. If you choose the symbol fun
followed by mac, the next window will appear on the computer monitor:
One of the macro symbols in the bottom
row will also light up to indicate which
macro group is active. By choosing
another symbol from this row, the current
group will be stored on the computer and
the newly chosen group will be made
active. After loading the new macro group
LUCY will return to the normal mode.
If no new macro group has to be activated, you can leave the function by selecting the
return ↵ symbol. When the LUCY program is not active on the computer, no new
macro group can be loaded and the current group will stay active.
15
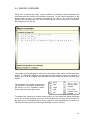
4.4 MACRO OVERVIEW
When a lot of macros are used, it can be difficult to remember which characters are
used and what the content of the different macros is. To get a quick impression of the
stored macro groups, you choose successively fun and m. An overview window
appears with the contents of the current macro group. In the example it is group M3,
the third group from the left.
The symbol at the beginning of each line is the symbol under which a macro has been
stored. To distinguish between the left and the right symbols (which are identical in
shape), an L or an R is added. All characters which are used, are shown as lower case
letters.
The depiction of a number of symbols in
the overview is somewhat different from
the picture on the keyboard overlay.
Some cells are shown as pictures.
alt gr
bsp
caps
The +, - and *
from the num
keypad
shift
The 1 till 9
from the num
keypad
tab
To examine the contents of another macro group, you can select the group concerned
in the row of macro symbols. However, this only gives an overview of the contents of
the other group. Exchanging active macro groups is only possible with fun and mac.
The macro overview can be closed by selecting the return ↵ symbol.
16
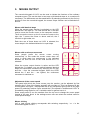
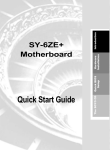
5. MOUSE OUTPUT
The numerical keypad of LUCY can be used to imitate the functions of the ordinary
computer mouse. This can be done in two ways: with identical steps or in a continuous
movement. The differences are discussed below. By selecting successively the fun key
and the 5 from the numerical keypad, the mouse output function can be switched on
and off.
Mouse with identical steps
When the mouse output function is switched on, the LED
behind the 5 will light up. The cells around the 5 are then
used to move the mouse cursor on the computer monitor.
The 8 moves the cursor up; the 6 moves the cursor to the
right; the 7 moves the cursor to above and left; the 3
moves it to right under, etc.
Each time one of these boxes on LUCY is selected, the
cursor steps in the indicated direction in equal steps.
Mouse with continuous movement
Some people prefer the mouse
continuously. In this mode the mouse
move in small steps but continuously
direction as soon as one of the cells
selected.
cursor moving
cursor does not
in the indicated
around the 5 is
When the mouse output function is active and the LED
behind the 5 is lighted, you can switch between identical
steps and continuous movement by selecting the fun key
and the – from the numerical keypad. When the LEDs
behind the 5 and the – are lighted, the continuous
movement is switched on.
-
*
7
8
home 4
5
2
3
pgdn
-
*
7
8
home 4
5
1
end
9
pgup
6
1
end
+
+
9
pgup
6
2
3
pgdn
Adjustment of the cursor speed
The speed with which the cursor moves over the monitor, can be adjusted by first
selecting the 5. One of the figures around 5 will now light up. This is a measure for the
current speed: the figure 1 corresponds with a very low speed, figure 9 with a very high
speed. By selecting another figure around the 5 the speed is modified and LUCY is
immediately ready again for use. A suitable value for general use is 4.
Some users prefer to use the numbers from the top row to change the cursor speed
instead of the num block. In the settings screen one can select the method used for
cursor speed change.
Mouse clicking
Left or right mouse clicking corresponds with selecting respectively * or + in the
numerical keypad of LUCY.
17
5.
MOUSE OUTPUT (continued)
Double click
LUCY can imitate a mouse double click by selecting the concerned symbol twice in fast
succession. If the required speed is a problem, you can put LUCY in the repeating
mode with rep and then keep selecting the symbol till LUCY has sounded two small
beeps. Selecting the return ↵ symbol on LUCY is a good alternative for a double click.
Dragging the mouse
Sometimes you have to move the mouse while keeping the mouse button pressed at
the same time. You can imitate this so-called ‘dragging’ by first selecting fun and then
one of the mouse button symbols (* or +). You can move the mouse cursor in the usual
way along the screen. Selecting the mouse button once again ends the dragging.
During the dragging, the LED behind the button will light up to indicate that dragging is
selected.
Mousetrap
Sometimes it is difficult to find the mouse cursor on a busy display. The cursor can
even run entirely of the screen. It seems then as if the mouse function is defective.
Therefore LUCY has a function that brings the mouse cursor simply back to the middle
of the screen. With the mouse function switched on, you select the 5 and then the – in
the numerical box; the mouse cursor will jump to the middle of the screen. This function
only works when the LUCY program is active. Otherwise LUCY will sound a double
beep when you try to use this function.
18
6. CONTROL FUNCTIONS OVERVIEW
6.1 SPECIAL SYMBOLS
Speed or sensitivity
These symbols are used for adjusting the speed or sensitivity of the control method.
With laser pointer control you can regulate the speed with which the characters react to
the light spot. With mouse or Trackball control you can regulate the sensitivity and with
switch control you can adjust the scan rate. Detailed information is given in chapter 3.
rep
Repeating mode
When you select a character, it will be sent to the computer only once, no matter how
long you hit the character. You can put LUCY in a repeating mode by selecting rep. In
this mode the chosen character will be sent repeatedly to the computer as long as you
keep the selection active. The LED behind rep will stay lit as long as the repeating
mode is switched on. If you select rep once again, the repeating mode is switched off.
The repeat rate of the characters can be adjusted with Fun Rep. see page 24.
mac
Macro symbols
It is possible to store frequently used words, sentences or control tasks in the memory
of LUCY. Such a stored word or sentence is called a macro. The stored item can be
called back with only one or two selections. Working with macros is simple and can
save a lot of time. Chapter 4 contains a detailed explanation of the use of macros.
fun
Function key
The function symbol is used to change certain settings of LUCY and also to use the
function keys of a computer. After selecting the fun key, the LED behind it will light up
to indicate that more characters or symbols must be selected. By selecting fun once
again, LUCY returns to the normal mode and the LED will be extinguished. If you have
activated a function accidentally and want to return to the normal mode, you can do so
safely in most cases by selecting the return ↵ symbol.
The next pages list an alphabetical overview of all control functions.
19
6.2 FUNCTION KEYS OVERVIEW
fun
1
0
till
Computer function keys F1 till F10
These symbols correspond with the function keys F1 till F10 of the computer (where
fun 0 stands for F10).
fun 1
end
and
2
Computer function keys F11 and F12
The function keys F11 and F12 can be selected with fun and the figures 1 and 2 of the
numerical keypad.
fun 5
Mouse output on/off
With fun and the 5 of the numerical keypad the mouse output to the computer is
switched on or off. After selecting fun and 5 the LED behind the 5 will light up as a sign
that the mouse output is active. Once again selecting fun and 5 will switch the mouse
output off and extinguish the LED. The use of the computer mouse with LUCY is
explained extensively in chapter 5.
fun
alt
Holding the Alt key
After selection of alt and another symbol LUCY returns directly to the normal operating
mode. This fits in with the usual way to work with the alt key. In (rare) cases where the
alt key must be held while several other keys are pressed, you can use alt in
combination with fun. The LED under alt stays lit and all following characters are sent
to the computer as alt combinations. After selecting alt again, the LED will extinguish
and LUCY returns to the normal mode.
fun altgr
Holding the Alt gr key
Like most modern keyboards LUCY has two alt keys, of which the right one is called alt
gr (alt ground). The function of both keys depends on the program you work with. You
can hold the alt gr key in the same way as the alt key.
20
6.2 FUNCTION KEYS OVERVIEW (continued)
fun
b
Adjusting the beep
This function is used to adjust the
loudness of the beep. During normal use
LUCY gives a short beep as soon as a
character has been accepted. With fun
and b you can adjust the loudness of the
beep by choosing a figure of 1 to 9. You
can try several figures after each other to
find the desired loudness.
It is also possible to eliminate the beep entirely by choosing the figure 0. In that case
you can still see whether the chosen character has been accepted by the lighting up of
the concerned character. During adjustment of the beep, the current value is visible in
the window. Selecting the return ↵ symbol brings you back to the normal operating
mode.
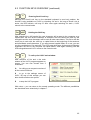
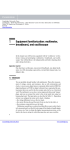
fun
c
To assign a key code for special keys
As the keyboard overlay of LUCY has
less keys than a standard keyboard, not
all keys are directly available. With fun c it
is nevertheless possible to assign a key
code for the missing keys, if needed up to
six at the same time.
After selecting fun and c a small window
appears. Each key can be emulated with
a number between 0 and 255, the socalled key code. The English name of the
concerned key appears in the upper part
of the window. In the guide on the CDRom you will find an appendix with all key
codes.
If required you can try several numbers in succession. After typing three figures the
formation of a number starts again. As soon as the correct code has been introduced,
this can be sent to the computer by selecting the c.
It is also possible to assign more than one key code at the same time. After the code
for the first key has been typed, you select the space. The first code then appears on
the first line in the window and the second code can be typed. This way up to six key
codes can be assigned. After selecting c all codes are sent to the computer at the
same time.
By placing fun c and the assignment of codes in a macro, you have to do this only once
to have the concerned keys within easy reach.
21
6.2 FUNCTION KEYS OVERVIEW (continued)
fun
ctrl
Holding the Ctrl key
After selection of Ctrl and any other symbol LUCY returns directly to the normal
operating mode. This fits in with the usual way to work with the Ctrl key. In (rare) cases
where the Ctrl key must be held while several other keys are pressed, you can use Ctrl
in combination with fun. The LED under Ctrl stays lit and all following characters are
sent to the computer as Ctrl combinations. After selecting Ctrl again, the LED will
extinguish and LUCY returns to the normal mode.
fun
d
To suppress unwanted double strikes
This function is only available with laser
pointer control. Sometimes a double
character appears on screen although
seemingly the character was only
selected once. There is a simple
explanation: when the light spot moves
very rapidly from one character to the
next, it sometimes overshoots the target
character slightly before it comes to rest
on the character, thus hitting and
selecting it twice. This phenomenon is
generally imperceptible for the eye but
nevertheless occurs, especially in case of
large and fast movements. To reduce
unwanted double strikes you can
increase the so-called double strike
pause.
To select a character twice, the light spot has to leave the character and then return to
it. The minimal time between the first and the second hit is called the double strike
pause. This pause can be adjusted with fun d. After selecting fun and d a small screen
appears in which a new value 1, 2 or 3 can be chosen. The LED behind the return ↵
symbol blinks as a sign that LUCY is waiting for a new setting. The larger the number,
the longer the double strike pause will be. To fix the setting, you have to select return
↵. The most usual value for the pause is 2. A value of 1 has the advantage of faster
selecting double characters. The disadvantage is a larger chance of unwanted double
strikes. At a value of 3 one must wait somewhat longer before a character can be
chosen once again, but the chance of unwanted double strikes is smallest.
22
6.2 FUNCTION KEYS OVERVIEW (continued)
fun
e
Entertainer
After selection of fun and e, LUCY will
play "The entertainer" as a musical
interlude. It can be switched off by
selecting return ↵.
fun
h
Call for help
This function switches on the call for help.
After selecting fun and h, a loud alarm
sounds and a text appears on screen. As
long as the call for help is selected, all
keys are insensitive except the return ↵
symbol. The alarm can be switched off by
selecting return ↵.
fun
i
Input device
With fun i another input device can be
chosen. After selection of fun and i a
screen appears with the available
possibilities. The desired method is
chosen with a number.
After selecting a new number and return
↵, another window appears on the
monitor with a slowly shortening blue
beam. You now have approximately 15
seconds to select the return ↵ symbol
with the new device, to implement your
choice.
If you don’t do this in time, LUCY will return to the old situation and the input device
remains unaltered. This is to ensure that the new input device can be used effectively.
fun
m
Macro overview
With fun and m you can call up a window
with an overview of all available macros.
The use of macros is extensively
discussed in chapter 4.
23
6.2 FUNCTION KEYS OVERVIEW (continued)
fun mac
To choose a macro
group
By selecting fun and mac and one of the
macro symbols, you activate one of the
11 possible macro groups. This function
only works if the LUCY program in the
computer is active. The use of macros is
extensively discussed in chapter 4.
fun
p
Pause
This function is only available with laser
pointer control. After selecting these
symbols LUCY becomes temporarily
insensitive for the light spot. An
information message appears on the
screen. The LEDs behind the fun and p
will light up as a sign that LUCY does not
work normally. After four seconds the
screen message disappears, so the
entire screen can be read.
This way one can prevent uncontrolled selection of random characters during a rest
pause. By selecting fun and p once again LUCY will return to the normal operating
mode.
fun
rep
To adjust the repeating speed
With the rep symbol LUCY can be placed
in the repeating mode: a selected
character is sent to the computer
repeatedly as long as character stays
selected. The speed with which the
characters are sent can be adjusted with
fun and rep. The current value is visible in
a small window on the screen. The higher
the value, the faster the characters will
succeed each other. With return ↵ you go
back to the normal situation.
24
6.2 FUNCTION KEYS OVERVIEW (continued)
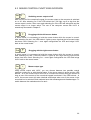
fun
s
Pressing Scroll Lock key
Although the Scroll Lock key on the standard keyboard is used only seldom, the
function is also available on LUCY by choosing fun and s. As long as Scroll Lock is
active, the LED behind s will stay lit. After once again selecting fun and s, LUCY
returns to the normal mode.
fun shift
Holding the Shift key
After selecting the shift symbol the next character will be sent to the computer as a
capital letter. As soon as the character is accepted, the LED behind the shift key will
extinguish and the next characters will be sent as lower case letters. This fits in with the
usual way to work with the shift key: a capital letter at the beginning of the sentence
and afterwards small characters. If you want several capital letters in a row, you can
use the combination of fun and shift. The LED under shift stays lit then and all following
characters are sent to the computer as capital letters. After again selecting shift the
LED extinguishes and LUCY returns to the normal mode.
fun
x
To call up the LUCY main window
After selection of fun and x the main
window of the LUCY program appears on
screen. You can now choose from 3
characters:
O
for calling up a compact overview of
all the control functions.
S
to go to the settings screen of
LUCY. By way of this window you can
also choose another user profile.
E
to stop the LUCY program.
With return ↵ you can return to the normal operating mode. The different possibilities
are described more extensively in chapter 7.
25
6.3 MOUSE CONTROL FUNCTIONS OVERVIEW
fun 5
Switching mouse output on/off
With fun and 5 of the numerical keypad, the mouse output to the computer is switched
on or off. After selecting fun 5 the LED behind the 5 will light up as a sign that the
mouse output is active. After once again selecting fun 5 the LED will extinguish and the
mouse output is no longer active. The use of the computer mouse with LUCY is
extensively discussed in chapter 5.
fun
*
Dragging with the left mouse button
In some cases it is necessary to hold the mouse button while the mouse is moved.
After selecting fun and * the LED behind * lights up as a sign that the left mouse button
has been fixed. Selecting fun * once again extinguishes the LED and brings LUCY
back to the normal mode.
fun
+
Dragging with the right mouse button
In some cases it is necessary to hold the mouse button while the mouse is moved.
After selecting fun and + the LED behind + lights up as a sign that the right mouse
button has been fixed. Selecting fun + once again extinguishes the LED and brings
LUCY back to the normal mode.
fun
-
Mouse output type
Using mouse output with LUCY, you can choose between two possible control
methods; continuous or with identical steps. If the mouse output is active and the LED
behind – is lit, the mouse cursor will move in a continuous motion along the screen as
long as one of the arrows of the numerical keypad is selected. If the LED behind – is
not lit, the mouse cursor will make identical small steps when one of the arrows in the
numerical box is selected. Both methods have their advantages and disadvantages. To
switch between the methods select fun and -.
26
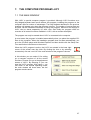
7. THE COMPUTER PROGRAM LUCY
7.1 THE MAIN WINDOW
With LUCY a special computer program is provided. Although LUCY functions as a
fully-fledged keyboard and mouse without this program, installing the program on the
computer offers a number of advantages. The help windows described in the previous
chapters, will appear only when the program is active. The number of macros that can
be used, can be extended indefinitely by using the program. Moreover the settings of
LUCY can be stored separately for each user. And finally the program offers an
overview of all control functions available in LUCY, with a concise description.
The program can only be started when LUCY is connected to the computer.
In most cases the program is installed automatically when you place the supplied CDRom in the computer. When the installation program does not start automatically, you
go to the CD-Rom player with Windows Explorer and then double click the Setup icon.
You read further instructions on the screen.
When the LUCY program is active, the LUCY icon stands in the lower right
corner of the screen near the clock. By clicking the icon or by selecting
successively fun and x on LUCY the main window of the program is shown.
In this window you can select O for calling
up a compact overview of all the control
functions. Choose S to go to the adjustment
screen of LUCY. By selecting E you can
stop the LUCY program. With return ↵ you
can return to the normal operating mode;
the main window will close down, but the
program remains active.
27
7. 2 CONTROL FUNCTIONS OVERVIEW
The overview contains a number of information windows in which is concisely
described which control functions are available in LUCY.
With the arrow keys 2↑ and 8↓ you can scroll through the different screens. With return
↵ the overview is closed and the program returns to the main window.
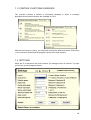
7.3 SETTINGS
When the S is selected in the main window, the settings screen is opened. Top right
you see the current program version.
Software version: 2.0 US
28
7.3 SETTINGS (continued)
All user settings of LUCY can be viewed and changed in this screen. Most of these
settings can also be changed using LUCY functions as described in earlier chapters.
This screen is intended especially for therapists who want to adapt LUCY rapidly for
several users. The one setting that can only be changed by means of this screen is that
for the keyboard overlay. The overlay cannot be selected by any LUCY function.
The values shown in the settings screen correspond with the current values in LUCY.
Using the arrow keys 2↑ and 8↓ you can jump to the following or the previous box. After
the last box you reach the switch buttons. The selected button colours red. The button
can be pressed by clicking on it with the mouse or by selecting the space.
To activate new settings you have to click on the button To LUCY. The program then
asks to confirm the settings by selecting return ↵. This is possible both with LUCY and
with the ordinary keyboard. If you don’t select return ↵ within a certain time, a double
beep will sound, and the current settings will remain unchanged.
NB If you select return ↵ without the programme asking for it, the settings window is
closed and the old settings remain unchanged.
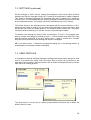
7.4 USER PROFILES
It is possible to store all individual settings including macros and macro groups for each
user in a so-called user profile. With the button Save a profile can be stored on the
hard disk of the computer. With the button Load an earlier stored profile can be chosen
from the list of existing profiles.
The arrow keys 2↑ and 8↓ can be used to jump between the boxes and to select the
buttons Save or Load.
29
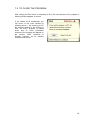
7.5 TO CLOSE THE PROGRAM
After clicking the Exit button or selecting an E in the main window of the program a
warning window appears on screen.
If you clicked the E accidentally, you
can return to the main window by
selecting return ↵. By choosing a Q in
the warning window or by clicking on
Quit, the LUCY program is closed
down and no more information
screens of the program will appear on
the monitor. LUCY continues to
function, however, as an ordinary
keyboard and mouse.
30
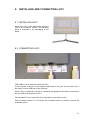
8. INSTALLING AND CONNECTING LUCY
8.1 INSTALLING LUCY
Mount the LUCY on the table stand and put it
next to the computer monitor. An assembly
guide is enclosed in the packaging of the
stand.
8.2 CONNECTING LUCY
THE USB port is located at the back of LUCY.
Put the square connector of the supplied USB cable in this port. Put the other end of
the cable in a free USB port of the computer.
When LUCY is used with a mouse or a trackball, this apparatus should be connected to
the port USB in at the back of LUCY.
The standard 3.5 mm connection S1 is intended for one-switch control.
With two-switch control, S1 is used for the row-switch and S2 is used to connect the
character-switch.
31
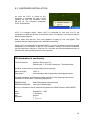
8.3 HARDWARE INSTALLATION
As soon as LUCY is linked to the
computer, in Windows XP and in Vista
systems the text ‘new hardware found’
will pop up. The computer recognises
LUCY automatically.
LUCY is a complex device. When LUCY is connected for first time, the PC will
recognise four different devices: a composite device, a keyboard, a mouse and finally a
data processing device.
After a short time the text ‘your new hardware is ready for use’ will appear. This
indicates that the hardware has been installed successfully.
When LUCY is connected to a Windows 98 PC, you may be asked to insert the original
installation CD of Windows. If this CD is not available, usually a successful installation
can be reached by clicking on ‘Skip this file’, because the required standard drivers of
Windows are often already present in the computer.
CE declaration of conformity
The manufacturer
Shannon Electronics vof
Gebrokenwit 1, 2718 AX Zoetermeer, The Netherlands
declares under exclusive responsibility that the product
Name and type:
Description:
LUCY 4
Communication aid for physically handicapped people
has been designed, produced and tested according to the following harmonized
standards for Information Technology Equipment
EN55022:2006
EN55024:1998/2003
Radio Disturbance Characteristics
Immunity Characteristics
and is in compliance with all essential requirements of EMC directive 2004/108/EG.
date:
name:
title:
signature:
September 1, 2007
J. Goezinne
director
32
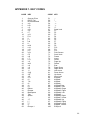
APPENDIX 1. KEY CODES
CODE KEY
CODE KEY
1
2
3
4
5
6
7
8
9
10
11
12
13
14
15
16
17
18
19
20
21
22
23
24
25
26
27
28
29
30
31
32
33
34
35
36
37
38
39
40
41
42
43
44
45
46
47
48
49
50
51
52
53
54
55
56
57
58
59
60
61
62
63
64
65
66
67
68
69
70
71
72
73
74
75
76
77
78
79
80
81
82
83
84
85
86
87
88
89
90
91
92
93
94
95
96
97
98
99
100
Overrun Error
POST Fail
ErrorUndefined
aA
bB
cC
dD
eE
fF
gG
hH
iI
jJ
kK
lL
mM
nN
oO
pP
qQ
rR
sS
tT
uU
vV
wW
xX
yY
zZ
1!
2@
3#
4$
5%
6^
7&
8*
9(
0)
Return
Escape
Backspace
Tab
Space
-_
=+
[{
]}
\|
Europe 1
;:
''
`~
,<
.>
/?
Caps Lock
F1
F2
F3
F4
F5
F6
F7
F8
F9
F10
F11
F12
Print Screen
Scroll Lock
Pause
Insert
Home
Page Up
Delete
End
Page Down
Right Arrow
Left Arrow
Down Arrow
Up Arrow
Num Lock
Keypad /
Keypad *
Keypad Keypad +
Keypad Enter
Keypad 1 End
Keypad 2 Down
Keypad 3 PgDn
Keypad 4 Left
Keypad 5
Keypad 6 Right
Keypad 7 Home
Keypad 8 Up
Keypad 9 PgUp
Keypad 0 Insert
Keypad . Delete
Europe 2
33
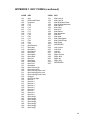
APPENDIX 1. KEY CODES (continued)
CODE KEY
CODE KEY
101
102
103
104
105
106
107
108
109
110
111
112
113
114
115
116
117
118
119
120
121
122
123
124
125
126
127
128
129
130
131
132
133
134
135
136
137
138
139
140
141
142
143
144
145
146
147
148
149
150
151
152
153
154
155
156
157
158
158
160
161
162
163
164
165 /
223
224
225
226
227
228
229
230
231
232 /
255
App
Keyboard Power
Keypad =
F13
F14
F15
F16
F17
F18
F19
F20
F21
F22
F23
F24
Kbd Execute
Kbd Help
Kbd Menu
Kbd Select
Kbd Stop
Kbd Again
Kbd Undo
Kbd Cut
Kbd Copy
Kbd Paste
Kbd Find
Kbd Mute
Kbd Volume Up
Kbd Volume Dn
Kbd Locking Caps Lock
Kbd Locking Num Lock
Kbd Locking Scroll Lock
Keypad , '
Kbd Equal Sign
Kbd Int 1
Kbd Int 2
Kbd Int 3
Kbd Int 4
Kbd Int 5
Kbd Int 6
Kbd Int 7
Kbd Int 8
Kbd Int 9
Kbd Lang 1
Kbd Lang 2
Kbd Lang 3
Kbd Lang 4
Kbd Lang 5
Kbd Lang 6
Kbd Lang 7
Kbd Lang 8
Kbd Lang 9
Kbd Alternate Erase
Kbd SysReq/Attention
Kbd Cancel
Kbd Clear
Kbd Prior
Kbd Return
Kbd Separator
Kbd Out
Kbd Oper
Kbd Clear/Again
Kbd CrSel/Props
Kbd ExSel
RESERVED
Left Control
Left Shift
Left Alt
Left GUI
Right Control
Right Shift
Right Alt
Right GUI
RESERVED
34
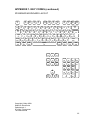
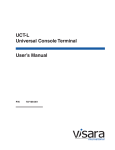
APPENDIX 1. KEY CODES (continued)
STANDARD KEYBOARD LAYOUT
esc
41
`
53
tab
43
1
30
ctrl
224
f2
59
f3
60
f4
61
2
31
3
32
4
33
5
34
q
20
caps
57
shift
225
f1
58
w
26
a
4
\
100
gui
227
e
8
s
22
z
29
r
21
d
7
x
27
alt
226
f5
62
6
35
t
23
f
9
c
6
7
36
y
28
g
10
v
25
f6
63
8
37
u
24
h
11
b
5
f7
64
9
38
i
12
j
13
n
17
f8
65
0
39
o
18
k
14
m
16
space
44
f10
67
45
=
46
p
19
l
15
,
54
f9
66
[
47
;
51
.
55
alt
230
f11
68
bsp
42
]
48
‘
52
return
40
\
49
/
56
gui
231
f12
69
shift
229
app
101
ctrl
228
prts
70
scrl
71
pau
72
ins
73
hom
74
pgu
75
num
83
/
84
*
85
86
del
76
end
77
pgd
78
7
95
8
96
9
98
+
87
4
92
5
93
6
94
1
89
2
90
3
91
82
80
81
79
0
98
entr
88
.
99
Copyright © May 2008
Shannon Electronics
Gebrokenwit 1
2718 AX Zoetermeer
The Netherlands
35