1
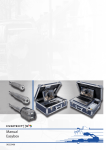
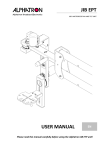
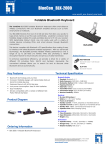
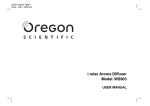
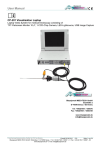
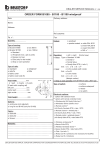
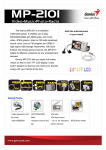
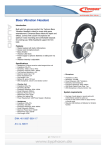
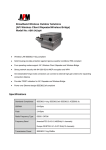
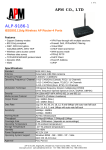
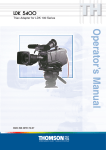
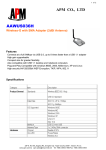
POLAR
User Manual
Contents
Product Outlook......................................................4
Getting Started........................................................7
Pull Out The Tube...........................................................9
Retrieve The Tube ................................................10
Main System Holder...................................................11
Use The Reel................................................................12
Accessories (Optional).............................................13
Clean ................................................................................16
Spectifications.......................................................17
Cautions For Use..........................................................20
Product Outlook
Reel
Side view
Main system
holder
Handle
Tube wheel
Camera head
Camera head
stopper
Reel
stand
Wheel stopper
Main system
connector
4
5
Getting Started
Probe
Work with ball head connection
For main systems with embeded threaded holes
Camera head
Mounting head
(for accessories)
Ball head connect
to main system
Soft-bending
tube
Main system connector
Joint ball
Tube
6
Screw the main system to the ball head tightly until fixed
7
Insert the host connector cable into the connector
accordingly to the direction of the dot and tighten the
screw nut.
8
Pull Out The Tube
Step1:
Make sure the tube wheel stopper is loosened
before using.
Step2:
Take out tube horizontally from camera head
stopper.(Do not pull up over 45°)
9
Step3:
When you get the required tube length, you can
fasten wheel stopper on tube wheel to avoid
rolling.
Retrieve the tube
Step1:
Push tube backward and horizontally to the tube
wheel within 30cm distances from camera head
stopper.
30cm from camerahead stopper
10
Step2:
Fix camera head on camera head stopper after
the tube is retireved in the tube wheel.
Step3:
Fix wheel stopper on the tube wheel to avoid
rolling.
Main system holder
When you put main system on holder, you can adjust the
holder for your inspection but do not bend holder over90°
90°
11
Use The Reel
Accessories(Optional)
Put the reel on a surface and make sure it's steadfast.
Brush
100mm
Step1:
Vertical Use
150mm
Move the Mounting ring to align with the screw
holes.
Horizontal Use
Screw holes
Step 2: Lock the screw.
12
13
Metal ring
Meter
Power/Reset
Step1:
Move the Mounting ring to align with the screw
holes.
Backlight
m/ft counter
Screw holes
•
•
•
•
Step2:
14
Lock the screw.
•
Press 3 secs for power on/off, 1 sec to reset.
Press
for meter/feet swith.
Press
to turn on backlight, it will last 10 secs.
The power will be off automatically, if it's idled for 1
hour.
Please change battery when the screen display battery
power indication" ": To replace battery,unscrew the
cover below the buttons and change.
15
Clean
Step 1: Remove the main system from holder before
cleaning, wipe dry with clean cloth.
Specifications
Reel
Reel Frame Diameter
300mm
IP Protection
IP65
Working Temperature
-10ºC~60ºC
Weight (Reel)
3kg
Tube
Step 2: Cover the protector cap on the main system
connector.
Pipe Diameter
6mm
Length
Optional (standard 22M)
Bending Radius
R=150mm
Weight (Tube)
100g/m
Tip - 22mm
Outlook
Camera Diameter
22mm
Camera Length
25mm
Step 3: Use cleaning liquid and swab provided in the
cleaning kit for camera head cleaning.
DOF
30mm ~ 100mm
FOV
62.5° (Diagonal)
Step 4: Let the reel stand on the ground then make sure
water will not outflow after rinsing.(It is better to
put on the ground over 5 minutes and dry out)
Lighting
8 LEDs (white)
Working Temperature
-10ºC~60ºC
Dust/Water protection
IP 68 (10M)
Step 5: Wipe with dry clean cloth then put in the case.
Applicable pipe size (mm)
Ø30mm ~ Ø100mm
16
17
Meter
Tip - 28mm
Outlook
Outlook
18
Camera Diameter
28mm
Camera Length
24.3mm
DOF
10mm ~ ∞
FOV
150.8° (Diagonal)
Lighting
8 LEDs (white)
Working Temperature
-10ºC~60ºC
Dust/Water protection
IP 68 (10M)
Applicable pipe size (mm)
Ø40mm ~ Ø100mm
Power / Reset
m/ft counter
Switches
Backlight
Dimension
62 x 110 x 24mm
Meter counts
Forward / Rewind
Display dIgits
3 (1 decimal place)
Meter display
m/ft
Deviation
± 0.4m(±1.3ft)
IP protection
IP 55
Power source
2 x AAA (DC 3V)
Power capacity
≥ 90hrs
19
Cautions for Use
--
Pay attention on taking tube out or in because the
tube is the high strength structure and can be used as
a push rod in pipe. If taking out the tube not carefully,
it may roll out from the reel.
--
Do not use this product in a fuel tank or other
dangerous environment such as a gasoline or alcohol
storage tank.
--
Do not use any corrosive liquid for cleaning, such as
alcohol.
--
Do not try to disassemble this product, it might cause
damage or electric shock .
--
Please use only recommended components or
accessories. Unapproved accessories and components
may cause damages.
--
Do not use the product in medical facilities, airplanes
or environment with explosive atmosphere.
--
The pipeline can pass through four perpendicular
curves, more curves or over 90°would cause
unsuccessful operations (moving forward / backward)
or product damages. Damages that caused by the
operations not instructed by this Manual will not be
under our warranty policy.
--
Camera lens cleaning : use cotton swab and small
amount of cleaning naphtha.
--
Whole set cleaning : rinse with water and wipe with
dry cloth or dry out. Please do not jet from hose or
20
nozzle.
--
Do not remove the SD card when capturing photos or
video.This may cause data loss and damage the SD
cards.
--
For better video quality we recommend 80X(or above
) writing speed SD cards.
--
This product is designed for industrial use only. Do not
use the system for human or biological inspection.
--
Avoid direct exposure of sunshine for long periond
of time.Store the system in a cool, dry and wellventilated place.
21
NOTE
VER.1