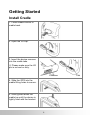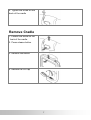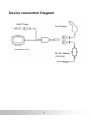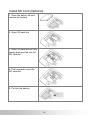
1
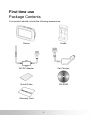
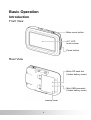
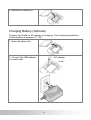
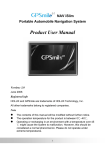
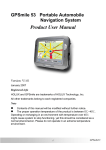
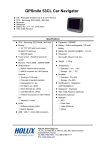
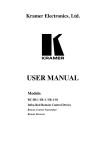
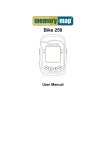
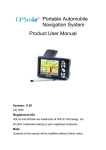
Portable Automobile Navigation System
Product User Manual
Registered info
HOLUX and GPSmile are trademarks of HOLUX Technology, Inc.
All other trademarks belong to registered companies.
Note
The contents of this manual will be modified without further notice.
The operation temperature for the product is between -10℃~50℃.
Operating or recharging in an environment with a temperature
over 50℃ might cause the system to malfunction. However, this
should be considered a normal phenomenon. Please do not
operate under extreme temperatures.
Safety Precautions
•
The device should only be used with the supplied batteries.
•
About the battery
1. A Lithium battery is built into the device. To prevent fire or skin
burns, do not disassemble, pierce, impact, or expose the battery to
fire. The battery will crack, explode, or release dangerous
chemicals if placed in a fire.
•
Important instructions
1. Note: Replacing with an incorrect battery may result in an explosion.
When disposing of the battery, follow the instructions. The
replacement battery must be a factory approved original.
2. Regulations must be observed when recycling or disposing of
batteries.
3. The battery should only be used in this device.
ii
Warranty Statement
•
This warranty applies to parts and services that are manufactured and
sold through Holux Technology Inc. The local area covered is Taiwan;
the warranty length is one year from date of purchase (starting from the
date on the sales receipt). Under normal user operation, Holux
Technology provides free repair services.
After repair, the replaced parts are the properties of Holux
Technology Inc.
•
Holux Technology is not responsible for providing repairs or
replacements of any software; Holux Technology does not provide any
warranty service for third party software/hardware.
•
Important instructions
Note: This warranty does not cover damage or malfunction from the
below causes: unauthorized disassembly/modification of unit, abuse or
incorrect usage, accidental and other unpreventable causes, operation
under variables mentioned that are different from those in this product
user manual, using parts not made or sold by Holux Technology, or
repairs done by anyone other than Holux Technology and authorized
retail/service providers.
Expendable parts are not covered in the warranty.
Holux Technology is not responsible for any program, data, or
portable storage media damages or loss. Please contact your
local Holux Technology authorized service provider to learn more
about geographical limitations, proof of purchase requests,
response time agreements, and other specific maintenance
service requests.
iii
Technical Support
•
If there are any questions regarding the use of this product, please
log on to the website www.holux.com and see the FAQ.
Maintenance Service
HOLUX Technology, Inc.
+886-3-6687000
Web Site: www.holux.com
or
Contact your nearest dealer, for further support.
HOLUX Technology, Inc.
www.holux.com
iv
Table of Contents
Safety Precautions............................................................ii
Warranty Statement .........................................................iii
Technical Support............................................................iv
Maintenance Service........................................................iv
Preface ...............................................................................1
Precautions and Notices ..................................................1
Copyright .......................................................................2
Important Notice ............................................................2
First time use.....................................................................3
Package Contents .........................................................3
Basic Operation ................................................................4
Introduction ...................................................................4
Front View............................................................................ 4
Rear View............................................................................. 4
Accessories ...................................................................5
Cradle................................................................................... 5
Optional Accessories......................................................... 5
Getting Started ..................................................................6
Install Cradle..................................................................6
Remove Cradle ..............................................................7
Install/ Remove Battery...................................................... 8
Device connection Diagram .........................................9
Charging Battery (Optional) ............................................ 11
v
Preface
We appreciate your purchase of the HOLUX car navigation.
Please read all instructions thoroughly for a full understanding of the
products’ features.
Precautions and Notices
•
For your own safety, do not operate the controls of the product while
driving.
•
Use this product prudently. The product is intended to be used only
as a navigation aid. It is not for precise measurement of direction,
distance, location or topography.
•
The calculated route is for reference only. It is the user's
responsibility to follow the traffic signs and local regulations along the
roads.
•
GPS is operated by the United States government, which is solely
responsible for the performance of GPS. Any change to the GPS
system can affect the accuracy of all GPS equipments.
•
When you are inside a tunnel or building, GPS positioning is not
available.
•
A minimum of 4 GPS satellite signals is needed to determine current
GPS position. Signal reception can be affected by situations such as
bad weather or dense overhead obstacles (e.g. trees and tall
buildings).
•
Other wireless devices in the vehicle might interfere with the
reception of satellite signals and cause the reception to be unstable.
1
Copyright
Without the written consent of HOLUX Technology, Inc, this manual,
including the product and the software, may not be duplicated, transmitted,
recorded or saved on storage devices. Furthermore, it shall not be
translated under any circumstances into any other languages.
Copyright ©2012 HOLUX Technology, Inc. All rights reserved.
Important Notice
Please thoroughly read this manual of operating instructions and
explanations. Only use original factory approved batteries and accessories
to prevent unexpected damage. If the correct procedures were not followed
for operation or incompatible accessories were connected, this is a
violation of the warrantee agreement and will automatically void the
warrantee. This may also cause personal safety issues.
2
First time use
Package Contents
Your product should include the following accessories:
Device
Cradle
DC-DC Adapter
Car Charger
Quick Guide
CD-ROM
Warranty Card
3
Basic Operation
Introduction
Front View
Main menu button
4.3’’ LCD
touch screen
Power button
Rear View
Micro SD card slot
(Under battery cover)
Mini-USB connector
(Under battery cover)
Battery cover
4
Accessories
Cradle
I/O interface
Release button
Screw
I/O cap
Optional Accessories
Extension UART cable
Bluetooth headset
5
Getting Started
Install Cradle
1. Press release button of
cradle back.
2. Open the I/O cap.
3. Insert the device concave
into the cradle tabs.
※ Please make sure the I/O
pin is not wet or dirty.
Concave
4. Slide the GPS into the
cradle fitting holes to secure.
5. Gently press down the
cradle top until the device is
tightly fixed with the bracket.
6
Tab
6. Tighten the screw on the
back of the cradle
Remove Cradle
1. Loosen the screw on the
back of the cradle.
2. Press release button
3. Remove the device
4. Restore the I/O cap
7
Install/ Remove Battery
Please make sure the battery is installed before using the device.
1. Open the battery lid
2. Install or Remove the
battery
Printing side
facing up
Pull the
plastic to
remove the
battery
3. Restore the battery lid.
8
Device connection Diagram
UART Cable
Car Charger
GPSmile 61CS
DC-DC Adapter
(12V5V)
9
Install SD Card (Optional)
1. Open the battery lid and
remove the battery.
2. Open SD card slot
3. Insert SD card with its chip
facing down and flat into the
SD card slot.
4. Push upward to lock the
SD card slot.
5. Put into the battery.
10
6. Restore the battery lid.
Charging Battery (Optional)
Connect the Cradle or AC adapter to charging. The charging temperature
for the product is between 0℃~50℃.
1. Open the battery lid
AC adapter
2. Connect the USB adapter
to a wall outlet.
USB
11