1
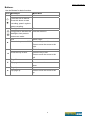
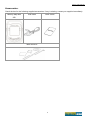
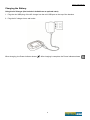
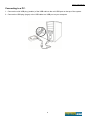
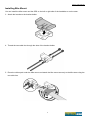
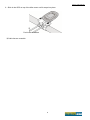
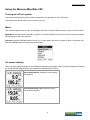
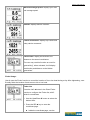
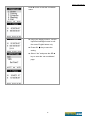
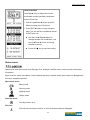
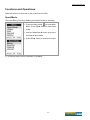
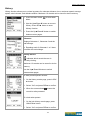
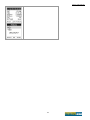
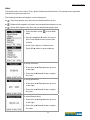
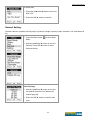
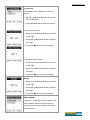
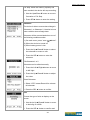
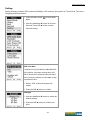
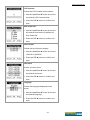
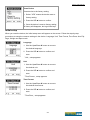
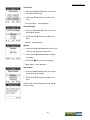
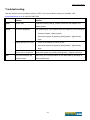
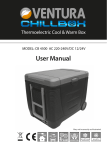
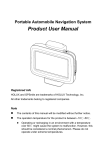
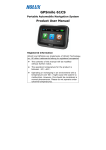
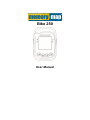
Bike 250 User Manual Memory-Map Bike 250 Safety Precautions Use the power adapter included with the package, using power adapters other than the one provided will result in malfunction and could prove dangerous. About the power adapter: 1. Do not use the power adapter in a wet environment. When hands and feet are wet, do not touch the power adapter. 2. While using the power adaptor, ensure that the area is well ventilated. Do not let paper or other material cover the power adaptor, as this will interfere with cooling. Do not use the power adaptor whilst it is in a bag. 3. Do not attempt to repair the device. If device is damaged or is in a wet environment, replace the device immediately. 4. It is not recommended to charge from a PC because the PC power voltage is not enough to supply the device. Warranty Information This warranty applies to parts and services that are manufactured and sold through SNOOPER. The warranty length is one year from date of purchase (starting from the date on the sales receipt). Under normal user operation, SNOOPER provides free repair services. SNOOPER is not responsible for providing repairs or replacements of any software; SNOOPER does not provide any warranty service for third party software/hardware. Important instructions 1. Note: This warranty does not cover damage or malfunction from the below causes: unauthorized disassembly/modification of unit, abuse or incorrect usage, accidental and other unpreventable causes, operation under variables mentioned that are different from those in this product user manual, using parts not made or sold by SNOOPER, or repairs done by anyone other than SNOOPER and authorized retail/service providers. 2. Expendable parts are not covered in the warranty. 3. SNOOPER is not responsible for any program, data, or portable storage media damages or loss. Please contact your local SNOOPER authorized service provider to learn more about geographical limitations, proof of purchase requests, response time agreements, and other specific maintenance service requests. Memory-Map Bike 250 Copyright Information No part of this manual, including the products and software described in it, may be reproduced, transmitted, transcribed, stored in a retrieval system, or translated into any language in any form or by any mean, without the express written permission of SNOOPER Technology, Inc. Copyright, All Rights Reserved. RF Exposure Warning This equipment must be installed and operated in accordance with provided instructions and the antenna(s) used for this transmitter must be installed to End-users and installers must be provided with antenna installation instructions and transmitter operating conditions for satisfying RF exposure compliance. Memory-Map Bike 250 Table of Contents TABLE OF CONTENTS .................................................................................4 GETTING STARTED ......................................................................................1 FEATURES ............................................................................................ 1 UNIT OVERVIEW. ................................................................................... 2 BUTTONS.............................................................................................. 3 ACCESSORIES. ..................................................................................... 4 CHARGING THE BATTERY. ...................................................................... 5 CONNECTING TO A PC. .......................................................................... 6 INSTALLING BIKE MOUNT. ...................................................................... 7 USING THE MEMORY-MAP BIKE 250. .....................................................9 TURNING ON/ OFF THE SYSTEM. ............................................................. 9 MENU. .................................................................................................. 9 ON SCREEN DISPLAY. ............................................................................ 9 STATUS ICONS. ................................................................................... 12 FUNCTIONS AND OPERATIONS. .............................................................14 SPORT MODE. .................................................................................... 14 HISTORY. ............................................................................................ 15 ALERT. ............................................................................................... 17 GENERAL SETTING. ............................................................................. 18 SETTING. ............................................................................................ 22 Initial setup ..................................................................................... 24 TROUBLESHOOTING. ................................................................................27 SPECIFICATIONS. .......................................................................................29 Memory-Map Bike 250 Getting Started Congratulations on purchasing the Memory-Map Bike 250. The Memory-Map Bike 250 is a compact, lightweight device with GPS finder and calorie calculation designed for sporting use, plus GPS coordinates record storage to calculate CO2 emissions saved and calories expended from not driving. Features GPS positioning Auto flip page Automatic shutdown within set time when no signal is detected. ‘Place Finder’ function capable of leading the user to up to 5 recorded locations. 3 Sport modes for calorie calculation Auto Log function starts log as soon as the satellite signal is fixed One touch POI recording Multi-language support Support both metric and imperial unit Support time zone setting Support both 12:00 and 24:00 time format 1 Memory-Map Bike 250 Unit Overview. Front View Backlight/ Power/ Record Menu LCD Screen Left Right button Up Down button Rear View Left View Mounting slot Mini USB Port 2 Memory-Map Bike 250 Buttons. Use the Buttons for basic functions. Icon Main Menu Power/ Record Menu Mode OK Turns the unit on and off. Press this button to start recording; press it again to pause recording. Backlight/ Menu Exit Long press to activates the Exits the submenu. backlight; short press to enter menu mode. ► POI Select/ Right Press the key to set a POI. Press the key to confirm and save. Press to move the cursor to the right. ◄ Save Exit/ Left Press the key to save. Press the key to exit. Press to move the cursor to the left. ▼ Page Down Down Flip page down. Press to move the cursor to the down ▲ Page Up Up Flip page up. Press to move the cursor to the up. 3 Memory-Map Bike 250 Accessories. Check the box for the following supplied accessories. If any is missing, contact your supplier immediately. Memory-Map Bike USB cable Quick Guide 250 Bike mount kit 4 Memory-Map Bike 250 Charging the Battery. Using the AC Charger (Not included. Available as an optional extra) 1. Plug the mini USB plug of the AC charger into the mini USB port on the top of the handset. 2. Plug the AC charger into a wall outlet. When charging, the Power indicator shows . After charging is complete, the Power indicator shows 5 . Memory-Map Bike 250 Connecting to a PC. 1. Connect the mini USB plug (smaller) of the USB cable to the mini USB port on the top of the system. 2. Connect the USB plug (larger) or the USB cable to a USB port on your computer. 6 Memory-Map Bike 250 Installing Bike Mount. You can install the bike mount and the GPS on the left or right side of the handlebar or on the stem. 3. Attach the bracket to the bracket holder. 4. Thread the two cable ties through the slots of the bracket holder. 5. Place the rubber pad under the bike mount and attach the bike mount securely to the bike stem using the two cable ties. 7 Memory-Map Bike 250 6. Slide in the GPS on top of the bike mount until it snaps into place. Push here to release ※ Cable ties are reusable. 8 Memory-Map Bike 250 Using the Memory-Map Bike 250. Turning on/ off the system. Press and hold the Power button until the opening screen appears on the LCD screen. Press the Power button until the LCD screen turns off. Menu. This section explains how to open and navigate the menu. Press the Menu button to open or exit the menu. Main Menu: the Main Menu consists of 5 options. Use the Up/Down button to move to the option and press SEL► button to enter the submenu. Submenu: press the SEL► button to move up, or down within the menu to select an item or adjust an item and press SEL► button to accept the selected item. On screen display. The on-screen display changes to show different navigation information when you flip the pages by pressing the Up▲/ Down▼ page button or by enabling the automatic flip function. Speed and Distance: displays current speed and distance. Time and Running Time: displays current time and running time. 9 Memory-Map Bike 250 Max and Average Speed: displays your max and average speed. Altitude: displays altitude variation. Calorie information: displays lap calorie and today calorie consumed. Place Finder: display the direction and distance to the stored coordinates. The user may use this function as a tool for “geocaching”, when activated, it will display the direction and distance to the hidden “geocaches”. Finder Usage: User A uses the Finder function to record the location of his or her hotel during a trip. After sightseeing, user B easily finds the location of and return to his or her hotel. Finder List Press the Left ◄ button in the Place Finder function to configure the Finder list, with 5 fields for coordinates. 1. Use the Up▲/Down▼ button to select the desired item. 2. Press the SEL► key to enter the coordinate page. Inside the coordinate page, use the 10 Memory-Map Bike 250 Down▼ button to edit the coordinate name. During the editing function, use the Up/Down/Left/Right button to edit the name; English letters only. Press OK ● key to save the setting. Select “Yes” and press the SEL► key to enter the ‘set coordinates’ page. 11 Memory-Map Bike 250 Edit Coordinates Press Right► Key to display the current coordinates and the specified coordinates from the Finder list. 在 1. Use the Up▲/Down▼ button to switch between points in the Finder list. 2. Press EDIT ►button to enter edit point page, you can edit the coordinates stored in the Finder List. Use the Left◄/ Right ►button to change between list coordinates. Use the Up▲/Down▼ button to change between numbers. Press OK ● key to save the setting. Status icons. Status icons show sport mode, auto flip page, POI, backlight, satellite status, memory mode, and battery information. Sport mode for calorie calculation. It also indicates that Log is started. When sport mode icon disappeared, the Log is stopped or paused. Sport mode icons: Biking mode Running mode Walking mode Vehicle mode Auto fliip icons: Auto flip function is on POI icon: POI has been recorded; it will be on for five seconds and then disappear 12 Memory-Map Bike 250 Backlight icon: Backlight switch is on Satellite mode icons: Satellites is fixed The device is trying to fix the satellites Memory status icons: Memory mode: indicates the memory is in overwrite mode Full stop mode: indicates the remaining memory capacity Battery status icons: Battery is in full status Battery is in charging status Battery is done charging Battery low message appears every 5 minutes. Press any key to disable the alert 13 Memory-Map Bike 250 Functions and Operations. Read this section to learn how to set up and use the GPS. Sport Mode. There are Biking, Running, Walking and Vehicle mode for choosing. 1. Press the Menu button to enter Main Menu. Press SEL► button to enter Sport mode. 2. Use the Up▲/Down▼ button to move to the desired sport mode. 3. Press SEL► button to confirm and save. ※ In Vehicle mode, calorie calculation is disabled. 14 Memory-Map Bike 250 History. History function allows you to review log status for odometer, distance, time, maximum speed, average speed, calorie burned, and altitude variation. Maximum 10 records can be saved in device memory. 1. Press the Menu button to enter Main Menu. 2. Use the Up▲/Down▼ button to move to History. Press SEL► button to enter History function. 3. Press the Up▲/Down▼ button to switch between menu pages. Odometer Displays Odometer 1, Odometer 2 and the total mileage. ※ Resetting each of Odometer 1 or 2 does not affect the total mileage. History Record indicates which record the user is currently viewing. Maximum 10 records can be saved in device memory. Use the Up▲/Down▼ button to switch between data pages. To write-protect specific records: 1. On the history recode page, press LOCK ► button. 2. Select “Yes” and press SEL► to confirm. 3. When the screen shows means the recode is write-protected. To unlock write-protect: 1. On the lock history recode page, press UNLOCK ► button. 2. Select “Yes” and press SEL► to confirm. 15 Memory-Map Bike 250 16 Memory-Map Bike 250 Alert. The Alert function can be set for Time, Speed, Distance and Reset Alert. The asterisk on the right side indicates this option has been set. The following indicators will appear on the message bar Time Alert appears only when the pre-determined time is due. Distance Alert appears only when the pre-determined distance is due. Speed Alert appears only when the pre-determined speed is due. 1. Press the Menu button to enter Main Menu. 2. Use the Up▲/Down▼ button to move to Alert. Press SEL► button to enter Alert function. 3. Select Time, Speed, or Distance item. Press SEL► button to enter submenu. To setup Time Alert: 1. Press the Left◄/ Right ►button to move to left/ right. 2. Press the Up▲/Down▼ button to adjust the value. To setup Speed Alert: 1. Press the Left◄/ Right ►button to move to left/ right. 2. Press the Up▲/Down▼ button to adjust the value. To setup Distance Alert: 1. Press the Left◄/ Right ►button to move to left/ right. 2. Press the Up▲/Down▼ button to adjust the value. 17 Memory-Map Bike 250 To Reset Alert: 1. Press the Up▲/Down▼ button to move to NO/ YES. 2. Press the SEL ► button to confirm. General Setting. General submenu contains auto flip page, log interval, weight, memory mode, odometer, unit, and delete all log. 1. Press the Menu button to enter Main Menu. 2. Use the Up▲/Down▼ button to move to General. Press SEL► button to enter General setting. Auto Flip Page 1. Use the Up▲/Down▼ button to move to the desired time interval or Manual for manual page flip. 2. Press the SEL ► button to confirm and save. 18 Memory-Map Bike 250 Log Interval Select either time or distance for your log interval. 1. Use the Up▲/Down▼ button to move to Time or Distance. 2. Press SEL► button to enter the setting. To setup Time Interval 1. Press the Left◄/ Right ►button to move to left/ right. 2. Press the Up▲/Down▼ button to adjust the value. 3. Press OK ● key to save the setting. To setup Distance Interval 1. Press the Left◄/ Right ►button to move to left/ right. 2. Press the Up▲/Down▼ button to adjust the value. 3. Press OK ● key to save the setting. Weight 1. Press the Left◄/ Right ►button to move to left/ right. 2. Press the Up▲/Down▼ button to adjust the value. 3. Press OK ● key to save the setting. Memory Mode Overwrite: When the memory capacity has been reached; the device will continue to record and overwrite the oldest information on the memory. 19 Memory-Map Bike 250 Full Stop: When the memory capacity has been reached, the device will stop recording. 1. Use the Up▲/Down▼ button to move to Overwrite or Full Stop. 2. Press SEL► button to enter the setting. Odometer The device is able to accumulate mileage in Odometer 1 or Odometer 2, identical to how motor vehicles store mileage data. Odometer will be accumulated when one of the following conditions exists: (1) On main menu, press “save ◄button”. (2) When the device is turned off. (3) When battery power is low. 1. Press the Up▲/Down▼ button to select the odometer to erase or edit. 2. Press the SEL► button to enter the submenu. Edit Odometer1 or 2 Odometer can be edited manually. 1. Press the Left◄/ Right ►button to move to left/ right. 2. Press the Up▲/Down▼ button to adjust the value. Reset Odometer 1. Select “YES” means Reset All to release all odometer. 2. Press the SEL ► button to confirm. Unit Choose the type of units to display on the screen. 1. Use the he Up▲/Down▼ button to move to km/m/kg or mi/ft/lb. 2. Press the SEL ► button to confirm and 20 Memory-Map Bike 250 save. Delete All Log 1. Select “YES” means delete all log. 2. Press the SEL► button to confirm and delete. 21 Memory-Map Bike 250 Setting. Setting submenu contains GPS cold start, Backlight, LCD contrast, Auto power off, Time format, Time zone, Language and Reset device. 1. Press the Menu button to enter Main Menu. 2. Use the Up▲/Down▼ button to move to General. Press SEL► button to enter General setting. GPS Cold Start If it takes too long for Memory-Map Bike 250 to fix position, say when moving away 300 KM or the device is powered off more than 2 hours; perform cold start to reset data in chip to shorten fix time. 1. Select “YES” means the system will restart. 2. Press the SEL► button to confirm. Backlight 1. Use the Up▲/Down▼ button to select the desired setting. 2. Press the SEL► button to confirm and save. 22 Memory-Map Bike 250 LCD Contrast Choose the LCD Contrast on the screen. 1. Use the Up▲/Down▼ button to move to the desired LCD Contrast value. 2. Press the SEL► button to confirm and save. Auto Power Off 1. Use the Up▲/Down▼ button to move to the desired time interval or Manual for Auto Power Off. 2. Press the SEL► button to confirm and save. Time Format Choose the time format to display. 1. Use the Up▲/Down▼ button to move to 12:00:00 or 24:00:00. 2. Press the SEL► button to confirm and save. Time Zone Choose your time zone. 1. Use the Up▲/Down▼ button to move to the desired time zone. 2. Press the SEL► button to confirm and save. Language Choose the language displayed on the screen. 1. Use the Up▲/Down▼ button to move to the desired language. 2. Press the SEL► button to confirm and save. 23 Memory-Map Bike 250 Reset Device Reset device to the factory setting. 1. Select “YES” means the device reset to factory setting. 2. Press the SEL► button to confirm. ※ Once the device is reset to factory setting, all history will disappear, but log will be kept. Initial setup When you reset the device, the initial setup menu will appear on the screen. Follow the step-by-step procedures to setup the common settings in the device: Language, Unit, Time Format, Time Zone, Auto Flip Page, Weight and Sport mode. Language 1. Use the Up▲/Down▼ button to move to the desired language. 2. Press the SEL► button to confirm and save. 「Unit」setup appears. Unit 1. Use the Up▲/Down▼ button to move to the desired unit. 2. Press the SEL► button to confirm and save. 「Time Format」setup appears. Time Format 1. Use the Up▲/Down▼ button to move to the desired time format. 2. Press the SEL► button to confirm and save. 「Time Zone」setup appears. 24 Memory-Map Bike 250 Time Zone 1. Use the Up▲/Down▼ button to move to the desired time zone. 2. Press the SEL► button to confirm and save. 「Auto Flip Page」setup appears. Auto Flip Page 1. Use the Up▲/Down▼ button to move to the desired setting. 2. Press the SEL► button to confirm and save. 「Weight」setup appears. Weight 1. Use the Left◄/ Right ►button to move the cursor to the digit you want to edit. 2. Press the Up▲/Down▼ button to adjust the value. 3. Press OK ● key to save the setting. 「Sport Mode」setup appears. Sport Mode 1. Use the Up▲/Down▼ button to move to the desired sport setting. 2. Press the SEL► button to confirm and save. Initial setup is now completed. Press OK ► button to start. 25 Memory-Map Bike 250 Sport mode also indicates that Log is started. When sport mode icon disappeared, the Log is paused or stopped. Biking mode: calculate calories burned when bike riding. Running mode: calculate calories burned when running. Walking mode: calculate calories burned when walking. Vehicle mode: calorie calculation is disabled in Vehicle mode. 26 Memory-Map Bike 250 Troubleshooting. Use this section to solve problems with your GPS. If you are unable to solve your problem, visit www.snooperneo.co.uk or call 0333 240 1000. Power Problem Solution Cannot start Insufficient battery charge, please connect to the adapter and restart system. Screen No screen displayed After powering up, if the system does not respond, try the following: 1. Connect adapter, restart system. 2. Hard reset system by pressing both [power] + [right arrow] keys. Display speed is too slow 1. Check if the battery is low on power. 2. Hard reset system by pressing both [power] + [right arrow] keys. GPS Screen has no response Hard reset system by pressing both [power] + [right arrow] keys. GPS cannot display my Make sure your current location is not obstructed by buildings or current location other interferences. 27 Memory-Map Bike 250 Normal Care and Maintenance. To ensure the unit’s normal operation and extended life span, please note the following while using and storing: ˙ Do not drop the unit If violently impacted or shocked, serious damage may be caused. ˙ Avoid sudden temperature changes Condensation may occur when entering a warm room on a cold day. To prevent condensation from damaging the unit, please place into an airtight plastic bag before sudden temperature changes. ˙ Keep away from strong magnetic fields When using or storing, please keep away from strong electromagnetic/ radioactive or magnetic field equipment. ˙ Operating temperature The products operating temperature is between -10°C ~ 60°C; please do not operate under extreme temperatures. ˙ Avoid exposure to sunlight Please avoid long periods of sunlight or high temperature exposure. ˙ Cleaning the screen Using a soft clean cloth to wipe the screen is recommended; do not use ordinary tissue to wipe the screen. ˙ Do not disassemble Please do not disassemble the product, this may void the warranty and damage the unit. ˙ Storage When the product is not being used for a long period, store the device in a cool and dry place. For long-term storage, keeping the unit in a dry box is recommended. Please do not keep the product in the following environments: Unventilated and humid locations. In a car window that is exposed to excessive amounts of sunlight. In an environment where humidity is over 90%. 28 Memory-Map Bike 250 Specifications. GPS chip High Sensitivity GPS Chip ROM: 512K + 4MB Memory RAM: 64K Record up to 200,000 waypoints. Display High-contrast electro luminescent back light display 4 level gray scale LCD. Size: 33.5 × 33.5 mm, 1.8" Resolution: 128 ×128 pixels Dimension 81.7x 54x 22 mm Weight <72g Battery Rechargeable 1050mAh Li-ion battery 5hrs charging time. 18hrs working time (Backlight ON); 28hrs working time (Backlight Off) Key Six buttons Menu/ Backlight, Left, Up, Down, Right, Power/ Record IO interface Mini-USB Environment Operating Temp: -10°C to 60°C Temperature Storage Temp: -20°C to 70°C Multi-Language (English/French/ German/ Language Support Spain/Italian/Dutch/Portuguese/Traditional Chinese/ Simplified Chinese/Japanese/ Czech/ Slovakian) Waterproof IPX-6 29 Memory-Map Bike 250 Service under Warranty. Your device comes with a standard one year manufacturer’s warranty. If, for some reason, your unit requires service under warranty return your device, via special delivery (insured) and in suitable packaging to: The Returns Department, Performance Products Limited, Cleaver House, Sarus Court, Manor Park, Cheshire WA7 1UL Enclose the following information: (a) Your name, address and a full description of the problem. (b) A telephone number where you can be reached during business hours. (c) Your units’ serial number. Disposal of Old Electrical & Electronic Equipment. (Applicable in the European Union). This symbol on a product or its packaging indicates that this product shall not be treated as household waste. It should be handed over to an applicable collection point for the recycling of electrical equipment. By ensuring that this product is disposed of correctly you will help/prevent potential negative impact on the environment. The recycling of materials will help to conserve natural resources. For further details about recycling please contact your local civic office or the shop where it was originally purchased. Performance Products Ltd, Cleaver House, Sarus Court, Manor Park, Runcorn WA7 1UL. Tel 0333 240 1000 Fax 0333 240 1100 www.snooper.co.uk 30