1
Sample Applications User Guide
Release 2.0.0
April 24, 2015
CONTENTS
1 Introduction
1.1 Documentation Roadmap . . . . . . . . . . . . . . . . . . . . . . . . . . . . . . .
2
2
2 Command Line Sample Application
2.1 Overview . . . . . . . . . . . . .
2.2 Compiling the Application . . . .
2.3 Running the Application . . . . .
2.4 Explanation . . . . . . . . . . . .
.
.
.
.
3
3
3
4
4
.
.
.
.
6
6
7
7
8
3 Exception Path Sample Application
3.1 Overview . . . . . . . . . . . . .
3.2 Compiling the Application . . . .
3.3 Running the Application . . . . .
3.4 Explanation . . . . . . . . . . . .
.
.
.
.
.
.
.
.
.
.
.
.
.
.
.
.
.
.
.
.
.
.
.
.
.
.
.
.
.
.
.
.
.
.
.
.
.
.
.
.
.
.
.
.
.
.
.
.
.
.
.
.
.
.
.
.
.
.
.
.
.
.
.
.
.
.
.
.
.
.
.
.
.
.
.
.
.
.
.
.
.
.
.
.
.
.
.
.
.
.
.
.
.
.
.
.
.
.
.
.
.
.
.
.
.
.
.
.
.
.
.
.
.
.
.
.
.
.
.
.
.
.
.
.
.
.
.
.
.
.
.
.
.
.
.
.
.
.
.
.
.
.
.
.
.
.
.
.
.
.
.
.
.
.
.
.
.
.
.
.
.
.
.
.
.
.
.
.
.
.
.
.
.
.
.
.
.
.
.
.
.
.
.
.
.
.
.
.
.
.
.
.
.
.
.
.
.
.
.
.
.
.
.
.
.
.
.
.
4 Hello World Sample Application
12
4.1 Compiling the Application . . . . . . . . . . . . . . . . . . . . . . . . . . . . . . . 12
4.2 Running the Application . . . . . . . . . . . . . . . . . . . . . . . . . . . . . . . . 12
4.3 Explanation . . . . . . . . . . . . . . . . . . . . . . . . . . . . . . . . . . . . . . . 12
5 Basic Forwarding Sample Application
14
5.1 Compiling the Application . . . . . . . . . . . . . . . . . . . . . . . . . . . . . . . 14
5.2 Running the Application . . . . . . . . . . . . . . . . . . . . . . . . . . . . . . . . 14
5.3 Explanation . . . . . . . . . . . . . . . . . . . . . . . . . . . . . . . . . . . . . . . 14
6 RX/TX Callbacks Sample Application
19
6.1 Compiling the Application . . . . . . . . . . . . . . . . . . . . . . . . . . . . . . . 19
6.2 Running the Application . . . . . . . . . . . . . . . . . . . . . . . . . . . . . . . . 19
6.3 Explanation . . . . . . . . . . . . . . . . . . . . . . . . . . . . . . . . . . . . . . . 20
7 IP Fragmentation Sample Application
23
7.1 Overview . . . . . . . . . . . . . . . . . . . . . . . . . . . . . . . . . . . . . . . . 23
7.2 Building the Application . . . . . . . . . . . . . . . . . . . . . . . . . . . . . . . . 23
7.3 Running the Application . . . . . . . . . . . . . . . . . . . . . . . . . . . . . . . . 24
8 IPv4 Multicast Sample Application
8.1 Overview . . . . . . . . . . . .
8.2 Building the Application . . . .
8.3 Running the Application . . . .
8.4 Explanation . . . . . . . . . . .
.
.
.
.
.
.
.
.
.
.
.
.
.
.
.
.
.
.
.
.
.
.
.
.
.
.
.
.
.
.
.
.
.
.
.
.
.
.
.
.
.
.
.
.
.
.
.
.
.
.
.
.
.
.
.
.
.
.
.
.
.
.
.
.
.
.
.
.
.
.
.
.
.
.
.
.
.
.
.
.
.
.
.
.
.
.
.
.
.
.
.
.
.
.
.
.
.
.
.
.
.
.
.
.
.
.
.
.
.
.
.
.
26
26
26
27
27
i
9 IP Reassembly Sample Application
9.1 Overview . . . . . . . . . . . . . . . . . . . . . . . . . . . . . . . . . . . . . . .
9.2 The Longest Prefix Match (LPM for IPv4, LPM6 for IPv6) table is used to
store/lookup an outgoing port number, associated with that IPv4 address. Any
unmatched packets are forwarded to the originating port.Compiling the Application . . . . . . . . . . . . . . . . . . . . . . . . . . . . . . . . . . . . . . . . .
9.3 Running the Application . . . . . . . . . . . . . . . . . . . . . . . . . . . . . . .
9.4 Explanation . . . . . . . . . . . . . . . . . . . . . . . . . . . . . . . . . . . . . .
. 32
. 33
. 34
10 Kernel NIC Interface Sample Application
10.1 Overview . . . . . . . . . . . . . . . .
10.2 Compiling the Application . . . . . . .
10.3 Loading the Kernel Module . . . . . .
10.4 Running the Application . . . . . . . .
10.5 KNI Operations . . . . . . . . . . . .
10.6 Explanation . . . . . . . . . . . . . . .
.
.
.
.
.
.
.
.
.
.
.
.
11 L2 Forwarding Sample Application (in
core load statistics.
11.1 Overview . . . . . . . . . . . . . . .
11.2 Compiling the Application . . . . . .
11.3 Running the Application . . . . . . .
11.4 Explanation . . . . . . . . . . . . . .
.
.
.
.
.
.
.
.
.
.
.
.
.
.
.
.
.
.
.
.
.
.
.
.
.
.
.
.
.
.
.
.
.
.
.
.
.
.
.
.
.
.
.
.
.
.
.
.
.
.
.
.
.
.
.
.
.
.
.
.
.
.
.
.
.
.
.
.
.
.
.
.
.
.
.
.
.
.
.
.
.
.
.
.
.
.
.
.
.
.
.
.
.
.
.
.
.
.
.
.
.
.
.
.
.
.
.
.
.
.
.
.
.
.
.
.
.
.
.
.
.
.
.
.
.
.
.
.
.
.
.
.
.
.
.
.
32
. 32
37
37
38
38
39
40
40
Real and Virtualized Environments) with
.
.
.
.
.
.
.
.
.
.
.
.
.
.
.
.
.
.
.
.
47
47
49
49
49
12 L2 Forwarding Sample Application (in Real and Virtualized Environments)
12.1 Overview . . . . . . . . . . . . . . . . . . . . . . . . . . . . . . . . . . . .
12.2 Compiling the Application . . . . . . . . . . . . . . . . . . . . . . . . . . .
12.3 Running the Application . . . . . . . . . . . . . . . . . . . . . . . . . . . .
12.4 Explanation . . . . . . . . . . . . . . . . . . . . . . . . . . . . . . . . . . .
.
.
.
.
.
.
.
.
.
.
.
.
.
.
.
.
58
58
60
60
60
13 L3 Forwarding Sample Application
13.1 Overview . . . . . . . . . . . . .
13.2 Compiling the Application . . . .
13.3 Running the Application . . . . .
13.4 Explanation . . . . . . . . . . . .
.
.
.
.
.
.
.
.
.
.
.
.
.
.
.
.
.
.
.
.
.
.
.
.
.
.
.
.
.
.
.
.
.
.
.
.
.
.
.
.
.
.
.
.
.
.
.
.
.
.
.
.
.
.
.
.
.
.
.
.
.
.
.
.
.
.
.
.
.
.
.
.
.
.
.
.
.
.
.
.
.
.
.
.
.
.
.
.
.
.
.
.
.
.
.
.
.
.
.
.
.
.
.
.
.
.
.
.
.
.
.
.
.
.
.
.
.
.
.
.
.
.
.
.
.
.
.
.
67
67
67
68
69
14 L3 Forwarding with Power Management Sample Application
14.1 Introduction . . . . . . . . . . . . . . . . . . . . . . . . . . .
14.2 Overview . . . . . . . . . . . . . . . . . . . . . . . . . . . .
14.3 Compiling the Application . . . . . . . . . . . . . . . . . . .
14.4 Running the Application . . . . . . . . . . . . . . . . . . . .
14.5 Explanation . . . . . . . . . . . . . . . . . . . . . . . . . . .
.
.
.
.
.
.
.
.
.
.
.
.
.
.
.
.
.
.
.
.
.
.
.
.
.
.
.
.
.
.
.
.
.
.
.
.
.
.
.
.
.
.
.
.
.
.
.
.
.
.
.
.
.
.
.
.
.
.
.
.
73
73
73
74
75
75
15 L3 Forwarding with Access Control Sample Application
15.1 Overview . . . . . . . . . . . . . . . . . . . . . . . . .
15.2 Compiling the Application . . . . . . . . . . . . . . . .
15.3 Running the Application . . . . . . . . . . . . . . . . .
15.4 Explanation . . . . . . . . . . . . . . . . . . . . . . . .
.
.
.
.
.
.
.
.
.
.
.
.
.
.
.
.
.
.
.
.
.
.
.
.
.
.
.
.
.
.
.
.
.
.
.
.
.
.
.
.
.
.
.
.
.
.
.
.
80
80
84
84
85
.
.
.
.
.
.
.
.
.
.
.
.
.
.
.
.
.
.
.
.
.
.
.
.
.
.
.
.
.
.
.
.
.
.
.
.
.
.
.
.
.
.
.
.
.
.
.
.
.
.
.
.
.
.
.
.
.
.
.
.
.
.
.
.
.
.
.
.
16 L3 Forwarding in a Virtualization Environment Sample Application
87
16.1 Overview . . . . . . . . . . . . . . . . . . . . . . . . . . . . . . . . . . . . . . . . 87
16.2 Compiling the Application . . . . . . . . . . . . . . . . . . . . . . . . . . . . . . . 87
16.3 Running the Application . . . . . . . . . . . . . . . . . . . . . . . . . . . . . . . . 88
ii
16.4 Explanation . . . . . . . . . . . . . . . . . . . . . . . . . . . . . . . . . . . . . . . 89
17 Link Status Interrupt Sample Application
17.1 Overview . . . . . . . . . . . . . . . .
17.2 Compiling the Application . . . . . . .
17.3 Running the Application . . . . . . . .
17.4 Explanation . . . . . . . . . . . . . . .
.
.
.
.
.
.
.
.
.
.
.
.
.
.
.
.
.
.
.
.
.
.
.
.
.
.
.
.
.
.
.
.
.
.
.
.
.
.
.
.
.
.
.
.
.
.
.
.
.
.
.
.
.
.
.
.
.
.
.
.
.
.
.
.
.
.
.
.
.
.
.
.
.
.
.
.
.
.
.
.
.
.
.
.
.
.
.
.
.
.
.
.
.
.
.
.
90
90
90
91
91
18 Load Balancer Sample Application
18.1 Overview . . . . . . . . . . . . .
18.2 Compiling the Application . . . .
18.3 Running the Application . . . . .
18.4 Explanation . . . . . . . . . . . .
.
.
.
.
.
.
.
.
.
.
.
.
.
.
.
.
.
.
.
.
.
.
.
.
.
.
.
.
.
.
.
.
.
.
.
.
.
.
.
.
.
.
.
.
.
.
.
.
.
.
.
.
.
.
.
.
.
.
.
.
.
.
.
.
.
.
.
.
.
.
.
.
.
.
.
.
.
.
.
.
.
.
.
.
.
.
.
.
.
.
.
.
.
.
.
.
98
98
99
99
100
.
.
.
.
.
.
.
.
.
.
.
.
19 Multi-process Sample Application
103
19.1 Example Applications . . . . . . . . . . . . . . . . . . . . . . . . . . . . . . . . . 103
20 QoS Metering Sample Application
20.1 Overview . . . . . . . . . . . .
20.2 Compiling the Application . . .
20.3 Running the Application . . . .
20.4 Explanation . . . . . . . . . . .
.
.
.
.
.
.
.
.
.
.
.
.
.
.
.
.
.
.
.
.
.
.
.
.
.
.
.
.
.
.
.
.
.
.
.
.
.
.
.
.
.
.
.
.
.
.
.
.
.
.
.
.
.
.
.
.
.
.
.
.
.
.
.
.
.
.
.
.
.
.
.
.
.
.
.
.
.
.
.
.
.
.
.
.
.
.
.
.
.
.
.
.
.
.
.
.
.
.
.
.
.
.
.
.
.
.
.
.
118
. 118
. 118
. 119
. 119
21 QoS Scheduler Sample Application
21.1 Overview . . . . . . . . . . . . .
21.2 Compiling the Application . . . .
21.3 Running the Application . . . . .
21.4 Explanation . . . . . . . . . . . .
.
.
.
.
.
.
.
.
.
.
.
.
.
.
.
.
.
.
.
.
.
.
.
.
.
.
.
.
.
.
.
.
.
.
.
.
.
.
.
.
.
.
.
.
.
.
.
.
.
.
.
.
.
.
.
.
.
.
.
.
.
.
.
.
.
.
.
.
.
.
.
.
.
.
.
.
.
.
.
.
.
.
.
.
.
.
.
.
.
.
.
.
.
.
.
.
.
.
.
.
.
.
.
.
.
.
.
.
121
121
121
122
125
22 Intel® QuickAssist Technology Sample Application
127
22.1 Overview . . . . . . . . . . . . . . . . . . . . . . . . . . . . . . . . . . . . . . . . 127
22.2 Building the Application . . . . . . . . . . . . . . . . . . . . . . . . . . . . . . . . 129
22.3 Running the Application . . . . . . . . . . . . . . . . . . . . . . . . . . . . . . . . 129
23 Quota and Watermark Sample Application
23.1 Overview . . . . . . . . . . . . . . . . .
23.2 Compiling the Application . . . . . . . .
23.3 Running the Application . . . . . . . . .
23.4 Code Overview . . . . . . . . . . . . .
.
.
.
.
.
.
.
.
.
.
.
.
.
.
.
.
.
.
.
.
.
.
.
.
.
.
.
.
.
.
.
.
.
.
.
.
.
.
.
.
.
.
.
.
.
.
.
.
.
.
.
.
.
.
.
.
.
.
.
.
.
.
.
.
.
.
.
.
.
.
.
.
.
.
.
.
.
.
.
.
.
.
.
.
.
.
.
.
.
.
.
.
131
131
133
133
134
24 Timer Sample Application
141
24.1 Compiling the Application . . . . . . . . . . . . . . . . . . . . . . . . . . . . . . . 141
24.2 Running the Application . . . . . . . . . . . . . . . . . . . . . . . . . . . . . . . . 141
24.3 Explanation . . . . . . . . . . . . . . . . . . . . . . . . . . . . . . . . . . . . . . . 141
25 Packet Ordering Application
145
25.1 Overview . . . . . . . . . . . . . . . . . . . . . . . . . . . . . . . . . . . . . . . . 145
25.2 Compiling the Application . . . . . . . . . . . . . . . . . . . . . . . . . . . . . . . 145
25.3 Running the Application . . . . . . . . . . . . . . . . . . . . . . . . . . . . . . . . 145
26 VMDQ and DCB Forwarding Sample Application
147
26.1 Overview . . . . . . . . . . . . . . . . . . . . . . . . . . . . . . . . . . . . . . . . 147
26.2 Compiling the Application . . . . . . . . . . . . . . . . . . . . . . . . . . . . . . . 148
iii
26.3 Running the Application . . . . . . . . . . . . . . . . . . . . . . . . . . . . . . . . 148
26.4 Explanation . . . . . . . . . . . . . . . . . . . . . . . . . . . . . . . . . . . . . . . 149
27 Vhost Sample Application
27.1 Background . . . . . . . . . . . . . . . . . .
27.2 Sample Code Overview . . . . . . . . . . . .
27.3 Supported Distributions . . . . . . . . . . . .
27.4 Prerequisites . . . . . . . . . . . . . . . . . .
27.5 Compiling the Sample Code . . . . . . . . .
27.6 Running the Sample Code . . . . . . . . . .
27.7 Running the Virtual Machine (QEMU) . . . .
27.8 Running DPDK in the Virtual Machine . . . .
27.9 Passing Traffic to the Virtual Machine Device
28 Netmap Compatibility Sample Application
28.1 Introduction . . . . . . . . . . . . . . . . . .
28.2 Available APIs . . . . . . . . . . . . . . . .
28.3 Caveats . . . . . . . . . . . . . . . . . . . .
28.4 Porting Netmap Applications . . . . . . . .
28.5 Compiling the “bridge” Sample Application
28.6 Running the “bridge” Sample Application .
.
.
.
.
.
.
.
.
.
.
.
.
.
.
.
.
.
.
.
.
.
.
.
.
.
.
.
.
.
.
.
.
.
.
.
.
.
.
.
.
.
.
.
.
.
.
.
.
.
.
.
.
.
.
.
.
.
.
.
.
.
.
.
.
.
.
.
.
.
.
.
.
.
.
.
.
.
.
.
.
.
.
.
.
.
.
.
.
.
.
.
.
.
.
.
.
.
.
.
.
.
.
.
.
.
.
.
.
.
.
.
.
.
.
.
.
.
.
.
.
.
.
.
.
.
.
.
.
.
.
.
.
.
.
.
.
.
.
.
.
.
.
.
.
.
.
.
.
.
.
.
.
.
.
.
.
.
.
.
.
.
.
.
.
.
.
.
.
.
.
.
.
.
.
.
.
.
.
.
.
.
.
.
.
.
.
.
.
.
.
.
.
.
.
.
.
.
.
.
.
.
.
.
.
.
.
.
.
.
.
.
.
.
.
.
.
.
.
.
.
.
.
.
.
.
.
.
.
.
.
.
.
.
.
.
.
.
.
.
.
.
.
.
.
.
.
.
.
.
.
.
.
.
.
.
.
.
.
.
.
.
.
.
.
.
.
.
.
.
.
.
.
.
.
.
.
152
152
154
154
154
159
159
162
165
167
.
.
.
.
.
.
.
.
.
.
.
.
.
.
.
.
.
.
.
.
.
.
.
.
168
. 168
. 168
. 168
. 169
. 170
. 170
29 Internet Protocol (IP) Pipeline Sample Application
171
29.1 Overview . . . . . . . . . . . . . . . . . . . . . . . . . . . . . . . . . . . . . . . . 171
29.2 Compiling the Application . . . . . . . . . . . . . . . . . . . . . . . . . . . . . . . 171
29.3 Running the Sample Code . . . . . . . . . . . . . . . . . . . . . . . . . . . . . . 171
30 Test Pipeline Application
173
30.1 Overview . . . . . . . . . . . . . . . . . . . . . . . . . . . . . . . . . . . . . . . . 173
30.2 Compiling the Application . . . . . . . . . . . . . . . . . . . . . . . . . . . . . . . 173
30.3 Running the Application . . . . . . . . . . . . . . . . . . . . . . . . . . . . . . . . 174
31 Distributor Sample Application
31.1 Overview . . . . . . . . . .
31.2 Compiling the Application .
31.3 Running the Application . .
31.4 Explanation . . . . . . . . .
31.5 Debug Logging Support . .
31.6 Statistics . . . . . . . . . .
31.7 Application Initialization . .
.
.
.
.
.
.
.
.
.
.
.
.
.
.
.
.
.
.
.
.
.
.
.
.
.
.
.
.
.
.
.
.
.
.
.
.
.
.
.
.
.
.
.
.
.
.
.
.
.
.
.
.
.
.
.
.
.
.
.
.
.
.
.
.
.
.
.
.
.
.
.
.
.
.
.
.
.
32 VM Power Management Application
32.1 Introduction . . . . . . . . . . . . . . . . . . . .
32.2 Overview . . . . . . . . . . . . . . . . . . . . .
32.3 Configuration . . . . . . . . . . . . . . . . . . .
32.4 Compiling and Running the Host Application .
32.5 Compiling and Running the Guest Applications
.
.
.
.
.
.
.
.
.
.
.
.
.
.
.
.
.
.
.
.
.
.
.
.
.
.
.
.
.
.
.
.
.
.
.
.
.
.
.
.
.
.
.
.
.
.
.
.
.
.
.
.
.
.
.
.
.
.
.
.
.
.
.
.
.
.
.
.
.
.
.
.
.
.
.
.
.
.
.
.
.
.
.
.
.
.
.
.
.
.
.
.
.
.
.
.
.
.
.
.
.
.
.
.
.
.
.
.
.
.
.
.
.
.
.
.
.
.
.
.
.
.
.
.
.
.
.
.
.
.
.
.
.
.
.
.
.
.
.
.
.
.
.
.
.
.
.
.
.
.
.
.
.
.
.
.
.
.
.
.
.
.
.
.
.
.
.
.
.
.
.
.
.
.
.
.
.
.
.
.
.
.
.
.
.
.
.
.
.
.
.
.
.
.
.
.
.
.
.
.
.
.
.
.
.
.
.
.
.
.
.
177
. 177
. 178
. 178
. 178
. 179
. 179
. 180
.
.
.
.
.
181
. 181
. 183
. 184
. 185
. 186
iv
Sample Applications User Guide, Release 2.0.0
April 24, 2015
Contents
CONTENTS
1
CHAPTER
ONE
INTRODUCTION
This document describes the sample applications that are included in the Data Plane Development Kit (DPDK). Each chapter describes a sample application that showcases specific
functionality and provides instructions on how to compile, run and use the sample application.
1.1 Documentation Roadmap
The following is a list of DPDK documents in suggested reading order:
• Release Notes : Provides release-specific information, including supported features,
limitations, fixed issues, known issues and so on. Also, provides the answers to frequently
asked questions in FAQ format.
• Getting Started Guides : Describes how to install and configure the DPDK software for
your operating system; designed to get users up and running quickly with the software.
• Programmer’s Guide: Describes:
– The software architecture and how to use it (through examples), specifically in a
Linux* application (linuxapp) environment.
– The content of the DPDK, the build system (including the commands that can be
used in the root DPDK Makefile to build the development kit and an application) and
guidelines for porting an application.
– Optimizations used in the software and those that should be considered for new
development
A glossary of terms is also provided.
• API Reference : Provides detailed information about DPDK functions, data structures
and other programming constructs.
• Sample Applications User Guide : Describes a set of sample applications. Each chapter describes a sample application that showcases specific functionality and provides
instructions on how to compile, run and use the sample application.
2
CHAPTER
TWO
COMMAND LINE SAMPLE APPLICATION
This chapter describes the Command Line sample application that is part of the Data Plane
Development Kit (DPDK).
2.1 Overview
The Command Line sample application is a simple application that demonstrates the use of
the command line interface in the DPDK. This application is a readline-like interface that can
be used to debug a DPDK application, in a Linux* application environment.
Note: The rte_cmdline library should not be used in production code since it is not validated
to the same standard as other Intel® DPDK libraries. See also the “rte_cmdline library should
not be used in production code due to limited testing” item in the “Known Issues” section of the
Release Notes.
The Command Line sample application supports some of the features of the GNU readline
library such as, completion, cut/paste and some other special bindings that make configuration
and debug faster and easier.
The application shows how the rte_cmdline application can be extended to handle a list of
objects. There are three simple commands:
• add obj_name IP: Add a new object with an IP/IPv6 address associated to it.
• del obj_name: Delete the specified object.
• show obj_name: Show the IP associated with the specified object.
Note: To terminate the application, use Ctrl-d.
2.2 Compiling the Application
1. Go to example directory:
export RTE_SDK=/path/to/rte_sdk
cd ${RTE_SDK}/examples/cmdline
2. Set the target (a default target is used if not specified). For example:
export RTE_TARGET=x86_64-native-linuxapp-gcc
3
Sample Applications User Guide, Release 2.0.0
Refer to the DPDK Getting Started Guide for possible RTE_TARGET values.
3. Build the application:
make
2.3 Running the Application
To run the application in linuxapp environment, issue the following command:
$ ./build/cmdline -c f -n 4
Refer to the DPDK Getting Started Guide for general information on running applications and
the Environment Abstraction Layer (EAL) options.
2.4 Explanation
The following sections provide some explanation of the code.
2.4.1 EAL Initialization and cmdline Start
The first task is the initialization of the Environment Abstraction Layer (EAL). This is achieved
as follows:
int main(int argc, char **argv)
{
ret = rte_eal_init(argc, argv);
if (ret < 0)
rte_panic("Cannot init EAL\n");
Then, a new command line object is created and started to interact with the user through the
console:
cl = cmdline_stdin_new(main_ctx, "example> ");
cmdline_interact(cl);
cmdline_stdin_exit(cl);
The cmd line_interact() function returns when the user types Ctrl-d and in this case, the application exits.
2.4.2 Defining a cmdline Context
A cmdline context is a list of commands that are listed in a NULL-terminated table, for example:
cmdline_parse_ctx_t main_ctx[] = {
(cmdline_parse_inst_t *) &cmd_obj_del_show,
(cmdline_parse_inst_t *) &cmd_obj_add,
(cmdline_parse_inst_t *) &cmd_help,
NULL,
};
2.3. Running the Application
4
Sample Applications User Guide, Release 2.0.0
Each command (of type cmdline_parse_inst_t) is defined statically. It contains a pointer to a
callback function that is executed when the command is parsed, an opaque pointer, a help
string and a list of tokens in a NULL-terminated table.
The rte_cmdline application provides a list of pre-defined token types:
• String Token: Match a static string, a list of static strings or any string.
• Number Token: Match a number that can be signed or unsigned, from 8-bit to 32-bit.
• IP Address Token: Match an IPv4 or IPv6 address or network.
• Ethernet* Address Token: Match a MAC address.
In this example, a new token type obj_list is defined and implemented in the parse_obj_list.c
and parse_obj_list.h files.
For example, the cmd_obj_del_show command is defined as shown below:
struct cmd_obj_add_result {
cmdline_fixed_string_t action;
cmdline_fixed_string_t name;
struct object *obj;
};
static void cmd_obj_del_show_parsed(void *parsed_result, struct cmdline *cl, attribute ((unuse
{
/* ... */
}
cmdline_parse_token_string_t cmd_obj_action = TOKEN_STRING_INITIALIZER(struct cmd_obj_del_show
parse_token_obj_list_t cmd_obj_obj = TOKEN_OBJ_LIST_INITIALIZER(struct cmd_obj_del_show_result
cmdline_parse_inst_t cmd_obj_del_show = {
.f = cmd_obj_del_show_parsed, /* function to call */
.data = NULL, /* 2nd arg of func */
.help_str = "Show/del an object",
.tokens = { /* token list, NULL terminated */
(void *)&cmd_obj_action,
(void *)&cmd_obj_obj,
NULL,
},
};
This command is composed of two tokens:
• The first token is a string token that can be show or del.
• The second token is an object that was previously added using the add command in the
global_obj_list variable.
Once the command is parsed, the rte_cmdline application fills a cmd_obj_del_show_result
structure. A pointer to this structure is given as an argument to the callback function and can
be used in the body of this function.
2.4. Explanation
5
CHAPTER
THREE
EXCEPTION PATH SAMPLE APPLICATION
The Exception Path sample application is a simple example that demonstrates the use of the
DPDK to set up an exception path for packets to go through the Linux* kernel. This is done
by using virtual TAP network interfaces. These can be read from and written to by the DPDK
application and appear to the kernel as a standard network interface.
3.1 Overview
The application creates two threads for each NIC port being used. One thread reads from
the port and writes the data unmodified to a thread-specific TAP interface. The second thread
reads from a TAP interface and writes the data unmodified to the NIC port.
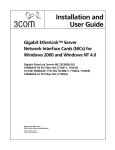
The packet flow through the exception path application is as shown in the following figure.
User-space:
DPDK application
Port0
Traffic
Generator
Kernel-space:
bridging/forwarding
CoreA0
tapA0
CoreA1
tapA1
CoreAN
tapAN
CoreB0
tapB0
CoreB1
tapB1
CoreBN
tapBN
Port1
PortN
Figure 3.1: Packet Flow
To make throughput measurements, kernel bridges must be setup to forward data between the
bridges appropriately.
6
Sample Applications User Guide, Release 2.0.0
3.2 Compiling the Application
1. Go to example directory:
export RTE_SDK=/path/to/rte_sdk
cd ${RTE_SDK}/examples/exception_path
2. Set the target (a default target will be used if not specified). For example:
export RTE_TARGET=x86_64-native-linuxapp-gcc
This application is intended as a linuxapp only. See the DPDK Getting Started Guide for
possible RTE_TARGET values.
1. Build the application:
make
3.3 Running the Application
The application requires a number of command line options:
.build/exception_path [EAL options] -- -p PORTMASK -i IN_CORES -o OUT_CORES
where:
• -p PORTMASK: A hex bitmask of ports to use
• -i IN_CORES: A hex bitmask of cores which read from NIC
• -o OUT_CORES: A hex bitmask of cores which write to NIC
Refer to the DPDK Getting Started Guide for general information on running applications and
the Environment Abstraction Layer (EAL) options.
The number of bits set in each bitmask must be the same. The coremask -c parameter of
the EAL options should include IN_CORES and OUT_CORES. The same bit must not be set
in IN_CORES and OUT_CORES. The affinities between ports and cores are set beginning
with the least significant bit of each mask, that is, the port represented by the lowest bit in
PORTMASK is read from by the core represented by the lowest bit in IN_CORES, and written
to by the core represented by the lowest bit in OUT_CORES.
For example to run the application with two ports and four cores:
./build/exception_path -c f -n 4 -- -p 3 -i 3 -o c
3.3.1 Getting Statistics
While the application is running, statistics on packets sent and received can be displayed by
sending the SIGUSR1 signal to the application from another terminal:
killall -USR1 exception_path
The statistics can be reset by sending a SIGUSR2 signal in a similar way.
3.2. Compiling the Application
7
Sample Applications User Guide, Release 2.0.0
3.4 Explanation
The following sections provide some explanation of the code.
3.4.1 Initialization
Setup of the mbuf pool, driver and queues is similar to the setup done in the L2 Forwarding
sample application (see Chapter 9 “L2 forwarding Sample Application (in Real and Virtualized
Environments” for details). In addition, the TAP interfaces must also be created. A TAP interface is created for each lcore that is being used. The code for creating the TAP interface is as
follows:
/*
*
*
*/
Create a tap network interface, or use existing one with same name.
If name[0]='\0' then a name is automatically assigned and returned in name.
static int tap_create(char *name)
{
struct ifreq ifr;
int fd, ret;
fd = open("/dev/net/tun", O_RDWR);
if (fd < 0)
return fd;
memset(&ifr, 0, sizeof(ifr));
/* TAP device without packet information */
ifr.ifr_flags = IFF_TAP | IFF_NO_PI;
if (name && *name)
rte_snprinf(ifr.ifr_name, IFNAMSIZ, name);
ret = ioctl(fd, TUNSETIFF, (void *) &ifr);
if (ret < 0) {
close(fd);
return ret;
}
if (name)
rte_snprintf(name, IFNAMSIZ, ifr.ifr_name);
}
return fd;
The other step in the initialization process that is unique to this sample application is the association of each port with two cores:
• One core to read from the port and write to a TAP interface
• A second core to read from a TAP interface and write to the port
This is done using an array called port_ids[], which is indexed by the lcore IDs. The population
of this array is shown below:
tx_port = 0;
rx_port = 0;
3.4. Explanation
8
Sample Applications User Guide, Release 2.0.0
}
RTE_LCORE_FOREACH(i) {
if (input_cores_mask & (1ULL << i)) {
/* Skip ports that are not enabled */
while ((ports_mask & (1 << rx_port)) == 0) {
rx_port++;
if (rx_port > (sizeof(ports_mask) * 8))
goto fail; /* not enough ports */
}
port_ids[i] = rx_port++;
} else if (output_cores_mask & (1ULL << i)) {
/* Skip ports that are not enabled */
while ((ports_mask & (1 << tx_port)) == 0) {
tx_port++;
if (tx_port > (sizeof(ports_mask) * 8))
goto fail; /* not enough ports */
}
port_ids[i] = tx_port++;
}
3.4.2 Packet Forwarding
After the initialization steps are complete, the main_loop() function is run on each lcore.
This function first checks the lcore_id against the user provided input_cores_mask and output_cores_mask to see if this core is reading from or writing to a TAP interface.
For the case that reads from a NIC port, the packet reception is the same as in the L2 Forwarding sample application (see Section Receive, Process and Transmit Packets). The packet
transmission is done by calling write() with the file descriptor of the appropriate TAP interface
and then explicitly freeing the mbuf back to the pool.
/* Loop forever reading from NIC and writing to tap */
for (;;) {
struct rte_mbuf *pkts_burst[PKT_BURST_SZ];
unsigned i;
const unsigned nb_rx = rte_eth_rx_burst(port_ids[lcore_id], 0, pkts_burst, PKT_BURST_SZ);
lcore_stats[lcore_id].rx += nb_rx;
for (i = 0; likely(i < nb_rx); i++) {
struct rte_mbuf *m = pkts_burst[i];
int ret = write(tap_fd, rte_pktmbuf_mtod(m, void*),
}
}
rte_pktmbuf_data_len(m));
rte_pktmbuf_free(m);
if (unlikely(ret<0))
lcore_stats[lcore_id].dropped++;
else
lcore_stats[lcore_id].tx++;
For the other case that reads from a TAP interface and writes to a NIC port, packets are
retrieved by doing a read() from the file descriptor of the appropriate TAP interface. This fills in
the data into the mbuf, then other fields are set manually. The packet can then be transmitted
as normal.
3.4. Explanation
9
Sample Applications User Guide, Release 2.0.0
/* Loop forever reading from tap and writing to NIC */
for (;;) {
int ret;
struct rte_mbuf *m = rte_pktmbuf_alloc(pktmbuf_pool);
if (m == NULL)
continue;
ret = read(tap_fd, m->pkt.data, MAX_PACKET_SZ); lcore_stats[lcore_id].rx++;
if (unlikely(ret < 0)) {
FATAL_ERROR("Reading from %s interface failed", tap_name);
}
m->pkt.nb_segs = 1;
m->pkt.next = NULL;
m->pkt.data_len = (uint16_t)ret;
}
ret = rte_eth_tx_burst(port_ids[lcore_id], 0, &m, 1);
if (unlikely(ret < 1)) {
rte_pktmuf_free(m);
lcore_stats[lcore_id].dropped++;
}
else {
lcore_stats[lcore_id].tx++;
}
To set up loops for measuring throughput, TAP interfaces can be connected using bridging.
The steps to do this are described in the section that follows.
3.4.3 Managing TAP Interfaces and Bridges
The Exception Path sample application creates TAP interfaces with names of the format
tap_dpdk_nn, where nn is the lcore ID. These TAP interfaces need to be configured for use:
ifconfig tap_dpdk_00 up
To set up a bridge between two interfaces so that packets sent to one interface can be read
from another, use the brctl tool:
brctl addbr "br0"
brctl addif br0 tap_dpdk_00
brctl addif br0 tap_dpdk_03
ifconfig br0 up
The TAP interfaces created by this application exist only when the application is running, so
the steps above need to be repeated each time the application is run. To avoid this, persistent
TAP interfaces can be created using openvpn:
openvpn --mktun --dev tap_dpdk_00
If this method is used, then the steps above have to be done only once and the same TAP
interfaces can be reused each time the application is run. To remove bridges and persistent
TAP interfaces, the following commands are used:
ifconfig br0 down
brctl delbr br0
3.4. Explanation
10
Sample Applications User Guide, Release 2.0.0
openvpn --rmtun --dev tap_dpdk_00
3.4. Explanation
11
CHAPTER
FOUR
HELLO WORLD SAMPLE APPLICATION
The Hello World sample application is an example of the simplest DPDK application that can
be written. The application simply prints an “helloworld” message on every enabled lcore.
4.1 Compiling the Application
1. Go to the example directory:
export RTE_SDK=/path/to/rte_sdk
cd ${RTE_SDK}/examples/helloworld
2. Set the target (a default target is used if not specified). For example:
export RTE_TARGET=x86_64-native-linuxapp-gcc
See the DPDK Getting Started Guide for possible RTE_TARGET values.
3. Build the application:
make
4.2 Running the Application
To run the example in a linuxapp environment:
$ ./build/helloworld -c f -n 4
Refer to DPDK Getting Started Guide for general information on running applications and the
Environment Abstraction Layer (EAL) options.
4.3 Explanation
The following sections provide some explanation of code.
4.3.1 EAL Initialization
The first task is to initialize the Environment Abstraction Layer (EAL). This is done in the main()
function using the following code:
12
Sample Applications User Guide, Release 2.0.0
int
main(int argc, char **argv)
{
ret = rte_eal_init(argc, argv);
if (ret < 0)
rte_panic("Cannot init EAL\n");
This call finishes the initialization process that was started before main() is called (in case
of a Linuxapp environment). The argc and argv arguments are provided to the rte_eal_init()
function. The value returned is the number of parsed arguments.
4.3.2 Starting Application Unit Lcores
Once the EAL is initialized, the application is ready to launch a function on an lcore. In this
example, lcore_hello() is called on every available lcore. The following is the definition of the
function:
static int
lcore_hello( attribute ((unused)) void *arg)
{
unsigned lcore_id;
}
lcore_id = rte_lcore_id();
printf("hello from core %u\n", lcore_id);
return 0;
The code that launches the function on each lcore is as follows:
/* call lcore_hello() on every slave lcore */
RTE_LCORE_FOREACH_SLAVE(lcore_id) {
rte_eal_remote_launch(lcore_hello, NULL, lcore_id);
}
/* call it on master lcore too */
lcore_hello(NULL);
The following code is equivalent and simpler:
rte_eal_mp_remote_launch(lcore_hello, NULL, CALL_MASTER);
Refer to the DPDK API Reference for detailed information on the rte_eal_mp_remote_launch()
function.
4.3. Explanation
13
CHAPTER
FIVE
BASIC FORWARDING SAMPLE APPLICATION
The Basic Forwarding sample application is a simple skeleton example of a forwarding application.
It is intended as a demonstration of the basic components of a DPDK forwarding application.
For more detailed implementations see the L2 and L3 forwarding sample applications.
5.1 Compiling the Application
To compile the application export the path to the DPDK source tree and go to the example
directory:
export RTE_SDK=/path/to/rte_sdk
cd ${RTE_SDK}/examples/skeleton
Set the target, for example:
export RTE_TARGET=x86_64-native-linuxapp-gcc
See the DPDK Getting Started Guide for possible RTE_TARGET values.
Build the application as follows:
make
5.2 Running the Application
To run the example in a linuxapp environment:
./build/basicfwd -c 2 -n 4
Refer to DPDK Getting Started Guide for general information on running applications and the
Environment Abstraction Layer (EAL) options.
5.3 Explanation
The following sections provide an explanation of the main components of the code.
14
Sample Applications User Guide, Release 2.0.0
All DPDK library functions used in the sample code are prefixed with rte_ and are explained
in detail in the DPDK API Documentation.
5.3.1 The Main Function
The main() function performs the initialization and calls the execution threads for each lcore.
The first task is to initialize the Environment Abstraction Layer (EAL). The argc and argv
arguments are provided to the rte_eal_init() function. The value returned is the number
of parsed arguments:
int ret = rte_eal_init(argc, argv);
if (ret < 0)
rte_exit(EXIT_FAILURE, "Error with EAL initialization\n");
The main() also allocates a mempool to hold the mbufs (Message Buffers) used by the application:
mbuf_pool = rte_mempool_create("MBUF_POOL",
NUM_MBUFS * nb_ports,
MBUF_SIZE,
MBUF_CACHE_SIZE,
sizeof(struct rte_pktmbuf_pool_private),
rte_pktmbuf_pool_init, NULL,
rte_pktmbuf_init,
NULL,
rte_socket_id(),
0);
Mbufs are the packet buffer structure used by DPDK. They are explained in detail in the “Mbuf
Library” section of the DPDK Programmer’s Guide.
The main() function also initializes all the ports using the user defined port_init() function
which is explained in the next section:
for (portid = 0; portid < nb_ports; portid++) {
if (port_init(portid, mbuf_pool) != 0) {
rte_exit(EXIT_FAILURE,
"Cannot init port %" PRIu8 "\n", portid);
}
}
Once the initialization is complete, the application is ready to launch a function on an lcore. In
this example lcore_main() is called on a single lcore.
lcore_main();
The lcore_main() function is explained below.
5.3.2 The Port Initialization Function
The main functional part of the port initialization used in the Basic Forwarding application is
shown below:
static inline int
port_init(uint8_t port, struct rte_mempool *mbuf_pool)
{
struct rte_eth_conf port_conf = port_conf_default;
5.3. Explanation
15
Sample Applications User Guide, Release 2.0.0
const uint16_t rx_rings = 1, tx_rings = 1;
struct ether_addr addr;
int retval;
uint16_t q;
if (port >= rte_eth_dev_count())
return -1;
/* Configure the Ethernet device. */
retval = rte_eth_dev_configure(port, rx_rings, tx_rings, &port_conf);
if (retval != 0)
return retval;
/* Allocate and set up 1 RX queue per Ethernet port. */
for (q = 0; q < rx_rings; q++) {
retval = rte_eth_rx_queue_setup(port, q, RX_RING_SIZE,
rte_eth_dev_socket_id(port), NULL, mbuf_pool);
if (retval < 0)
return retval;
}
/* Allocate and set up 1 TX queue per Ethernet port. */
for (q = 0; q < tx_rings; q++) {
retval = rte_eth_tx_queue_setup(port, q, TX_RING_SIZE,
rte_eth_dev_socket_id(port), NULL);
if (retval < 0)
return retval;
}
/* Start the Ethernet port. */
retval = rte_eth_dev_start(port);
if (retval < 0)
return retval;
/* Enable RX in promiscuous mode for the Ethernet device. */
rte_eth_promiscuous_enable(port);
}
return 0;
The
Ethernet
ports
are
configured
with
default
settings
rte_eth_dev_configure() function and the port_conf_default struct:
using
the
static const struct rte_eth_conf port_conf_default = {
.rxmode = { .max_rx_pkt_len = ETHER_MAX_LEN }
};
For this example the ports are set up with 1 RX and 1 TX queue using the
rte_eth_rx_queue_setup() and rte_eth_tx_queue_setup() functions.
The Ethernet port is then started:
retval
= rte_eth_dev_start(port);
Finally the RX port is set in promiscuous mode:
rte_eth_promiscuous_enable(port);
5.3. Explanation
16
Sample Applications User Guide, Release 2.0.0
5.3.3 The Lcores Main
As we saw above the main() function calls an application function on the available lcores. For
the Basic Forwarding application the lcore function looks like the following:
static __attribute__((noreturn)) void
lcore_main(void)
{
const uint8_t nb_ports = rte_eth_dev_count();
uint8_t port;
/*
* Check that the port is on the same NUMA node as the polling thread
* for best performance.
*/
for (port = 0; port < nb_ports; port++)
if (rte_eth_dev_socket_id(port) > 0 &&
rte_eth_dev_socket_id(port) !=
(int)rte_socket_id())
printf("WARNING, port %u is on remote NUMA node to "
"polling thread.\n\tPerformance will "
"not be optimal.\n", port);
printf("\nCore %u forwarding packets. [Ctrl+C to quit]\n",
rte_lcore_id());
/* Run until the application is quit or killed. */
for (;;) {
/*
* Receive packets on a port and forward them on the paired
* port. The mapping is 0 -> 1, 1 -> 0, 2 -> 3, 3 -> 2, etc.
*/
for (port = 0; port < nb_ports; port++) {
/* Get burst of RX packets, from first port of pair. */
struct rte_mbuf *bufs[BURST_SIZE];
const uint16_t nb_rx = rte_eth_rx_burst(port, 0,
bufs, BURST_SIZE);
if (unlikely(nb_rx == 0))
continue;
/* Send burst of TX packets, to second port of pair. */
const uint16_t nb_tx = rte_eth_tx_burst(port ^ 1, 0,
bufs, nb_rx);
}
}
}
/* Free any unsent packets. */
if (unlikely(nb_tx < nb_rx)) {
uint16_t buf;
for (buf = nb_tx; buf < nb_rx; buf++)
rte_pktmbuf_free(bufs[buf]);
}
The main work of the application is done within the loop:
for (;;) {
for (port = 0; port < nb_ports; port++) {
/* Get burst of RX packets, from first port of pair. */
5.3. Explanation
17
Sample Applications User Guide, Release 2.0.0
struct rte_mbuf *bufs[BURST_SIZE];
const uint16_t nb_rx = rte_eth_rx_burst(port, 0,
bufs, BURST_SIZE);
if (unlikely(nb_rx == 0))
continue;
/* Send burst of TX packets, to second port of pair. */
const uint16_t nb_tx = rte_eth_tx_burst(port ^ 1, 0,
bufs, nb_rx);
}
}
/* Free any unsent packets. */
if (unlikely(nb_tx < nb_rx)) {
uint16_t buf;
for (buf = nb_tx; buf < nb_rx; buf++)
rte_pktmbuf_free(bufs[buf]);
}
Packets are received in bursts on the RX ports and transmitted in bursts on the TX ports.
The ports are grouped in pairs with a simple mapping scheme using the an XOR on the port
number:
0 -> 1
1 -> 0
2 -> 3
3 -> 2
etc.
The rte_eth_tx_burst() function frees the memory buffers of packets that are transmitted. If packets fail to transmit, (nb_tx < nb_rx), then they must be freed explicitly using
rte_pktmbuf_free().
The forwarding loop can be interrupted and the application closed using Ctrl-C.
5.3. Explanation
18
CHAPTER
SIX
RX/TX CALLBACKS SAMPLE APPLICATION
The RX/TX Callbacks sample application is a packet forwarding application that demonstrates
the use of user defined callbacks on received and transmitted packets. The application performs a simple latency check, using callbacks, to determine the time packets spend within the
application.
In the sample application a user defined callback is applied to all received packets to add a
timestamp. A separate callback is applied to all packets prior to transmission to calculate the
elapsed time, in CPU cycles.
6.1 Compiling the Application
To compile the application export the path to the DPDK source tree and go to the example
directory:
export RTE_SDK=/path/to/rte_sdk
cd ${RTE_SDK}/examples/rxtx_callbacks
Set the target, for example:
export RTE_TARGET=x86_64-native-linuxapp-gcc
See the DPDK Getting Started Guide for possible RTE_TARGET values.
The callbacks feature requires that the CONFIG_RTE_ETHDEV_RXTX_CALLBACKS setting is
on in the config/common_ config file that applies to the target. This is generally on by default:
CONFIG_RTE_ETHDEV_RXTX_CALLBACKS=y
Build the application as follows:
make
6.2 Running the Application
To run the example in a linuxapp environment:
./build/rxtx_callbacks -c 2 -n 4
19
Sample Applications User Guide, Release 2.0.0
Refer to DPDK Getting Started Guide for general information on running applications and the
Environment Abstraction Layer (EAL) options.
6.3 Explanation
The rxtx_callbacks application is mainly a simple forwarding application based on the
Basic Forwarding Sample Application. See that section of the documentation for more details
of the forwarding part of the application.
The sections below explain the additional RX/TX callback code.
6.3.1 The Main Function
The main() function performs the application initialization and calls the execution threads for
each lcore. This function is effectively identical to the main() function explained in Basic
Forwarding Sample Application.
The lcore_main() function is also identical.
The main difference is in the user defined port_init() function where the callbacks are
added. This is explained in the next section:
6.3.2 The Port Initialization Function
The main functional part of the port initialization is shown below with comments:
static inline int
port_init(uint8_t port, struct rte_mempool *mbuf_pool)
{
struct rte_eth_conf port_conf = port_conf_default;
const uint16_t rx_rings = 1, tx_rings = 1;
struct ether_addr addr;
int retval;
uint16_t q;
if (port >= rte_eth_dev_count())
return -1;
/* Configure the Ethernet device. */
retval = rte_eth_dev_configure(port, rx_rings, tx_rings, &port_conf);
if (retval != 0)
return retval;
/* Allocate and set up 1 RX queue per Ethernet port. */
for (q = 0; q < rx_rings; q++) {
retval = rte_eth_rx_queue_setup(port, q, RX_RING_SIZE,
rte_eth_dev_socket_id(port), NULL, mbuf_pool);
if (retval < 0)
return retval;
}
/* Allocate and set up 1 TX queue per Ethernet port. */
for (q = 0; q < tx_rings; q++) {
retval = rte_eth_tx_queue_setup(port, q, TX_RING_SIZE,
rte_eth_dev_socket_id(port), NULL);
if (retval < 0)
6.3. Explanation
20
Sample Applications User Guide, Release 2.0.0
}
return retval;
/* Start the Ethernet port. */
retval = rte_eth_dev_start(port);
if (retval < 0)
return retval;
/* Enable RX in promiscuous mode for the Ethernet device. */
rte_eth_promiscuous_enable(port);
/* Add the callbacks for RX and TX.*/
rte_eth_add_rx_callback(port, 0, add_timestamps, NULL);
rte_eth_add_tx_callback(port, 0, calc_latency, NULL);
}
return 0;
The RX and TX callbacks are added to the ports/queues as function pointers:
rte_eth_add_rx_callback(port, 0, add_timestamps, NULL);
rte_eth_add_tx_callback(port, 0, calc_latency,
NULL);
More than one callback can be added and additional information can be passed to callback
function pointers as a void*. In the examples above NULL is used.
The add_timestamps() and calc_latency() functions are explained below.
6.3.3 The add_timestamps() Callback
The add_timestamps() callback is added to the RX port and is applied to all packets received:
static uint16_t
add_timestamps(uint8_t port __rte_unused, uint16_t qidx __rte_unused,
struct rte_mbuf **pkts, uint16_t nb_pkts, void *_ __rte_unused)
{
unsigned i;
uint64_t now = rte_rdtsc();
for (i = 0; i < nb_pkts; i++)
pkts[i]->udata64 = now;
}
return nb_pkts;
The DPDK function rte_rdtsc() is used to add a cycle count timestamp to each packet (see
the cycles section of the DPDK API Documentation for details).
6.3.4 The calc_latency() Callback
The calc_latency() callback is added to the TX port and is applied to all packets prior to
transmission:
static uint16_t
calc_latency(uint8_t port __rte_unused, uint16_t qidx __rte_unused,
struct rte_mbuf **pkts, uint16_t nb_pkts, void *_ __rte_unused)
6.3. Explanation
21
Sample Applications User Guide, Release 2.0.0
{
uint64_t cycles = 0;
uint64_t now = rte_rdtsc();
unsigned i;
for (i = 0; i < nb_pkts; i++)
cycles += now - pkts[i]->udata64;
latency_numbers.total_cycles += cycles;
latency_numbers.total_pkts
+= nb_pkts;
if (latency_numbers.total_pkts > (100 * 1000 * 1000ULL)) {
printf("Latency = %"PRIu64" cycles\n",
latency_numbers.total_cycles / latency_numbers.total_pkts);
}
}
latency_numbers.total_cycles = latency_numbers.total_pkts = 0;
return nb_pkts;
The calc_latency() function accumulates the total number of packets and the total number
of cycles used. Once more than 100 million packets have been transmitted the average cycle
count per packet is printed out and the counters are reset.
6.3. Explanation
22
CHAPTER
SEVEN
IP FRAGMENTATION SAMPLE APPLICATION
The IPv4 Fragmentation application is a simple example of packet processing using the Data
Plane Development Kit (DPDK). The application does L3 forwarding with IPv4 and IPv6 packet
fragmentation.
7.1 Overview
The application demonstrates the use of zero-copy buffers for packet fragmentation. The initialization and run-time paths are very similar to those of the L2 forwarding application (see
Chapter 9 “L2 Forwarding Simple Application (in Real and Virtualized Environments)” for more
information). This guide highlights the differences between the two applications.
There are three key differences from the L2 Forwarding sample application:
• The first difference is that the IP Fragmentation sample application makes use of indirect
buffers.
• The second difference is that the forwarding decision is taken based on information read
from the input packet’s IP header.
• The third difference is that the application differentiates between IP and non-IP traffic by
means of offload flags.
The Longest Prefix Match (LPM for IPv4, LPM6 for IPv6) table is used to store/lookup an
outgoing port number, associated with that IP address. Any unmatched packets are forwarded
to the originating port.
By default, input frame sizes up to 9.5 KB are supported. Before forwarding, the input IP packet
is fragmented to fit into the “standard” Ethernet* v2 MTU (1500 bytes).
7.2 Building the Application
To build the application:
1. Go to the sample application directory:
export RTE_SDK=/path/to/rte_sdk
cd ${RTE_SDK}/examples/ip_fragmentation
2. Set the target (a default target is used if not specified). For example:
export RTE_TARGET=x86_64-native-linuxapp-gcc
23
Sample Applications User Guide, Release 2.0.0
See the DPDK Getting Started Guide for possible RTE_TARGET values.
1. Build the application:
make
7.3 Running the Application
The LPM object is created and loaded with the pre-configured entries read from global
l3fwd_ipv4_route_array and l3fwd_ipv6_route_array tables. For each input packet, the packet
forwarding decision (that is, the identification of the output interface for the packet) is taken as
a result of LPM lookup. If the IP packet size is greater than default output MTU, then the input
packet is fragmented and several fragments are sent via the output interface.
Application usage:
./build/ip_fragmentation [EAL options] -- -p PORTMASK [-q NQ]
where:
• -p PORTMASK is a hexadecimal bitmask of ports to configure
• -q NQ is the number of queue (=ports) per lcore (the default is 1)
To run the example in linuxapp environment with 2 lcores (2,4) over 2 ports(0,2) with 1 RX
queue per lcore:
./build/ip_fragmentation
EAL: coremask set to 14
EAL: Detected lcore 0 on
EAL: Detected lcore 1 on
EAL: Detected lcore 2 on
EAL: Detected lcore 3 on
EAL: Detected lcore 4 on
...
-c 0x14 -n 3 -- -p 5
socket
socket
socket
socket
socket
0
1
0
1
0
Initializing port 0 on lcore 2... Address:00:1B:21:76:FA:2C, rxq=0 txq=2,0 txq=4,1
done: Link Up - speed 10000 Mbps - full-duplex
Skipping disabled port 1
Initializing port 2 on lcore 4... Address:00:1B:21:5C:FF:54, rxq=0 txq=2,0 txq=4,1
done: Link Up - speed 10000 Mbps - full-duplex
Skipping disabled port 3IP_FRAG: Socket 0: adding route 100.10.0.0/16 (port 0)
IP_FRAG: Socket 0: adding route 100.20.0.0/16 (port 1)
...
IP_FRAG: Socket 0: adding route 0101:0101:0101:0101:0101:0101:0101:0101/48 (port 0)
IP_FRAG: Socket 0: adding route 0201:0101:0101:0101:0101:0101:0101:0101/48 (port 1)
...
IP_FRAG: entering main loop on lcore 4
IP_FRAG: -- lcoreid=4 portid=2
IP_FRAG: entering main loop on lcore 2
IP_FRAG: -- lcoreid=2 portid=0
To run the example in linuxapp environment with 1 lcore (4) over 2 ports(0,2) with 2 RX queues
per lcore:
./build/ip_fragmentation -c 0x10 -n 3 -- -p 5 -q 2
7.3. Running the Application
24
Sample Applications User Guide, Release 2.0.0
To test the application, flows should be set up in the flow generator that match the values in
the l3fwd_ipv4_route_array and/or l3fwd_ipv6_route_array table.
The default l3fwd_ipv4_route_array table is:
struct l3fwd_ipv4_route l3fwd_ipv4_route_array[] = {
{IPv4(100, 10, 0, 0), 16, 0},
{IPv4(100, 20, 0, 0), 16, 1},
{IPv4(100, 30, 0, 0), 16, 2},
{IPv4(100, 40, 0, 0), 16, 3},
{IPv4(100, 50, 0, 0), 16, 4},
{IPv4(100, 60, 0, 0), 16, 5},
{IPv4(100, 70, 0, 0), 16, 6},
{IPv4(100, 80, 0, 0), 16, 7},
};
The default l3fwd_ipv6_route_array table is:
struct l3fwd_ipv6_route
{{1, 1, 1, 1, 1, 1,
{{2, 1, 1, 1, 1, 1,
{{3, 1, 1, 1, 1, 1,
{{4, 1, 1, 1, 1, 1,
{{5, 1, 1, 1, 1, 1,
{{6, 1, 1, 1, 1, 1,
{{7, 1, 1, 1, 1, 1,
{{8, 1, 1, 1, 1, 1,
};
l3fwd_ipv6_route_array[] =
1, 1, 1, 1, 1, 1, 1, 1, 1,
1, 1, 1, 1, 1, 1, 1, 1, 1,
1, 1, 1, 1, 1, 1, 1, 1, 1,
1, 1, 1, 1, 1, 1, 1, 1, 1,
1, 1, 1, 1, 1, 1, 1, 1, 1,
1, 1, 1, 1, 1, 1, 1, 1, 1,
1, 1, 1, 1, 1, 1, 1, 1, 1,
1, 1, 1, 1, 1, 1, 1, 1, 1,
{
1},
1},
1},
1},
1},
1},
1},
1},
48,
48,
48,
48,
48,
48,
48,
48,
0},
1},
2},
3},
4},
5},
6},
7},
For example, for the input IPv4 packet with destination address: 100.10.1.1 and packet length
9198 bytes, seven IPv4 packets will be sent out from port #0 to the destination address
100.10.1.1: six of those packets will have length 1500 bytes and one packet will have length
318 bytes. IP Fragmentation sample application provides basic NUMA support in that all the
memory structures are allocated on all sockets that have active lcores on them.
Refer to the DPDK Getting Started Guide for general information on running applications and
the Environment Abstraction Layer (EAL) options.
7.3. Running the Application
25
CHAPTER
EIGHT
IPV4 MULTICAST SAMPLE APPLICATION
The IPv4 Multicast application is a simple example of packet processing using the Data Plane
Development Kit (DPDK). The application performs L3 multicasting.
8.1 Overview
The application demonstrates the use of zero-copy buffers for packet forwarding. The initialization and run-time paths are very similar to those of the L2 forwarding application (see Chapter
9 “L2 Forwarding Sample Application (in Real and Virtualized Environments)” for details more
information). This guide highlights the differences between the two applications. There are two
key differences from the L2 Forwarding sample application:
• The IPv4 Multicast sample application makes use of indirect buffers.
• The forwarding decision is taken based on information read from the input packet’s IPv4
header.
The lookup method is the Four-byte Key (FBK) hash-based method. The lookup table is composed of pairs of destination IPv4 address (the FBK) and a port mask associated with that IPv4
address.
For convenience and simplicity, this sample application does not take IANA-assigned multicast
addresses into account, but instead equates the last four bytes of the multicast group (that is,
the last four bytes of the destination IP address) with the mask of ports to multicast packets
to. Also, the application does not consider the Ethernet addresses; it looks only at the IPv4
destination address for any given packet.
8.2 Building the Application
To compile the application:
1. Go to the sample application directory:
export RTE_SDK=/path/to/rte_sdk
cd ${RTE_SDK}/examples/ipv4_multicast
2. Set the target (a default target is used if not specified). For example:
export RTE_TARGET=x86_64-native-linuxapp-gcc
See the DPDK Getting Started Guide for possible RTE_TARGET values.
26
Sample Applications User Guide, Release 2.0.0
1. Build the application:
make
Note: The compiled application is written to the build subdirectory. To have the application
written to a different location, the O=/path/to/build/directory option may be specified in the make
command.
8.3 Running the Application
The application has a number of command line options:
./build/ipv4_multicast [EAL options] -- -p PORTMASK [-q NQ]
where,
• -p PORTMASK: Hexadecimal bitmask of ports to configure
• -q NQ: determines the number of queues per lcore
Note: Unlike the basic L2/L3 Forwarding sample applications, NUMA support is not provided
in the IPv4 Multicast sample application.
Typically, to run the IPv4 Multicast sample application, issue the following command (as root):
./build/ipv4_multicast -c 0x00f -n 3 -- -p 0x3 -q 1
In this command:
• The -c option enables cores 0, 1, 2 and 3
• The -n option specifies 3 memory channels
• The -p option enables ports 0 and 1
• The -q option assigns 1 queue to each lcore
Refer to the DPDK Getting Started Guide for general information on running applications and
the Environment Abstraction Layer (EAL) options.
8.4 Explanation
The following sections provide some explanation of the code. As mentioned in the overview
section, the initialization and run-time paths are very similar to those of the L2 Forwarding
sample application (see Chapter 9 “L2 Forwarding Sample Application in Real and Virtualized
Environments” for more information). The following sections describe aspects that are specific
to the IPv4 Multicast sample application.
8.4.1 Memory Pool Initialization
The IPv4 Multicast sample application uses three memory pools. Two of the pools are for
indirect buffers used for packet duplication purposes. Memory pools for indirect buffers are
8.3. Running the Application
27
Sample Applications User Guide, Release 2.0.0
initialized differently from the memory pool for direct buffers:
packet_pool = rte_mempool_create("packet_pool", NB_PKT_MBUF, PKT_MBUF_SIZE, 32, sizeof(struct
rte_pktmbuf_pool_init, NULL, rte_pktmbuf_init, NULL, rte_sock
header_pool = rte_mempool_create("header_pool", NB_HDR_MBUF, HDR_MBUF_SIZE, 32, 0, NULL, NULL,
clone_pool = rte_mempool_create("clone_pool", NB_CLONE_MBUF,
CLONE_MBUF_SIZE, 32, 0, NULL, NULL, rte_pktmbuf_init, NULL, rte_socket_id(), 0);
The reason for this is because indirect buffers are not supposed to hold any packet data and
therefore can be initialized with lower amount of reserved memory for each buffer.
8.4.2 Hash Initialization
The hash object is created and loaded with the pre-configured entries read from a global array:
static int
init_mcast_hash(void)
{
uint32_t i;
mcast_hash_params.socket_id = rte_socket_id();
mcast_hash = rte_fbk_hash_create(&mcast_hash_params);
if (mcast_hash == NULL){
return -1;
}
}
for (i = 0; i < N_MCAST_GROUPS; i ++){
if (rte_fbk_hash_add_key(mcast_hash, mcast_group_table[i].ip, mcast_group_table[i].por
return -1;
}
}
return 0;
8.4.3 Forwarding
All forwarding is done inside the mcast_forward() function. Firstly, the Ethernet* header is
removed from the packet and the IPv4 address is extracted from the IPv4 header:
/* Remove the Ethernet header from the input packet */
iphdr = (struct ipv4_hdr *)rte_pktmbuf_adj(m, sizeof(struct ether_hdr));
RTE_MBUF_ASSERT(iphdr != NULL);
dest_addr = rte_be_to_cpu_32(iphdr->dst_addr);
Then, the packet is checked to see if it has a multicast destination address and if the routing
table has any ports assigned to the destination address:
if (!IS_IPV4_MCAST(dest_addr) ||
(hash = rte_fbk_hash_lookup(mcast_hash, dest_addr)) <= 0 ||
(port_mask = hash & enabled_port_mask) == 0) {
rte_pktmbuf_free(m);
return;
}
8.4. Explanation
28
Sample Applications User Guide, Release 2.0.0
Then, the number of ports in the destination portmask is calculated with the help of the bitcnt()
function:
/* Get number of bits set. */
static inline uint32_t bitcnt(uint32_t v)
{
uint32_t n;
for (n = 0; v != 0; v &= v - 1, n++)
;
return (n);
}
This is done to determine which forwarding algorithm to use. This is explained in more detail
in the next section.
Thereafter, a destination Ethernet address is constructed:
/* construct destination Ethernet address */
dst_eth_addr = ETHER_ADDR_FOR_IPV4_MCAST(dest_addr);
Since Ethernet addresses are also part of the multicast process, each outgoing packet carries
the same destination Ethernet address. The destination Ethernet address is constructed from
the lower 23 bits of the multicast group OR-ed with the Ethernet address 01:00:5e:00:00:00,
as per RFC 1112:
#define ETHER_ADDR_FOR_IPV4_MCAST(x) \
(rte_cpu_to_be_64(0x01005e000000ULL | ((x) & 0x7fffff)) >> 16)
Then, packets are dispatched to the destination ports according to the portmask associated
with a multicast group:
for (port = 0; use_clone != port_mask; port_mask >>= 1, port++) {
/* Prepare output packet and send it out. */
}
}
if ((port_mask & 1) != 0) {
if (likely ((mc = mcast_out_pkt(m, use_clone)) != NULL))
mcast_send_pkt(mc, &dst_eth_addr.as_addr, qconf, port);
else if (use_clone == 0)
rte_pktmbuf_free(m);
The actual packet transmission is done in the mcast_send_pkt() function:
static inline void mcast_send_pkt(struct rte_mbuf *pkt, struct ether_addr *dest_addr, struct l
{
struct ether_hdr *ethdr;
uint16_t len;
/* Construct Ethernet header. */
ethdr = (struct ether_hdr *)rte_pktmbuf_prepend(pkt, (uint16_t) sizeof(*ethdr));
RTE_MBUF_ASSERT(ethdr != NULL);
ether_addr_copy(dest_addr, ðdr->d_addr);
ether_addr_copy(&ports_eth_addr[port], ðdr->s_addr);
ethdr->ether_type = rte_be_to_cpu_16(ETHER_TYPE_IPv4);
8.4. Explanation
29
Sample Applications User Guide, Release 2.0.0
/* Put new packet into the output queue */
len = qconf->tx_mbufs[port].len;
qconf->tx_mbufs[port].m_table[len] = pkt;
qconf->tx_mbufs[port].len = ++len;
/* Transmit packets */
}
if (unlikely(MAX_PKT_BURST == len))
send_burst(qconf, port);
8.4.4 Buffer Cloning
This is the most important part of the application since it demonstrates the use of zero- copy
buffer cloning. There are two approaches for creating the outgoing packet and although both
are based on the data zero-copy idea, there are some differences in the detail.
The first approach creates a clone of the input packet, for example, walk though all segments
of the input packet and for each of segment, create a new buffer and attach that new buffer
to the segment (refer to rte_pktmbuf_clone() in the rte_mbuf library for more details). A new
buffer is then allocated for the packet header and is prepended to the cloned buffer.
The second approach does not make a clone, it just increments the reference counter for all
input packet segment, allocates a new buffer for the packet header and prepends it to the input
packet.
Basically, the first approach reuses only the input packet’s data, but creates its own copy of
packet’s metadata. The second approach reuses both input packet’s data and metadata.
The advantage of first approach is that each outgoing packet has its own copy of the metadata,
so we can safely modify the data pointer of the input packet. That allows us to skip creation
if the output packet is for the last destination port and instead modify input packet’s header in
place. For example, for N destination ports, we need to invoke mcast_out_pkt() (N-1) times.
The advantage of the second approach is that there is less work to be done for each outgoing
packet, that is, the “clone” operation is skipped completely. However, there is a price to pay.
The input packet’s metadata must remain intact, so for N destination ports, we need to invoke
mcast_out_pkt() (N) times.
Therefore, for a small number of outgoing ports (and segments in the input packet), first approach is faster. As the number of outgoing ports (and/or input segments) grows, the second
approach becomes more preferable.
Depending on the number of segments or the number of ports in the outgoing portmask, either
the first (with cloning) or the second (without cloning) approach is taken:
use_clone = (port_num <= MCAST_CLONE_PORTS && m->pkt.nb_segs <= MCAST_CLONE_SEGS);
It is the mcast_out_pkt() function that performs the packet duplication (either with or without
actually cloning the buffers):
static inline struct rte_mbuf *mcast_out_pkt(struct rte_mbuf *pkt, int use_clone)
{
struct rte_mbuf *hdr;
8.4. Explanation
30
Sample Applications User Guide, Release 2.0.0
/* Create new mbuf for the header. */
if (unlikely ((hdr = rte_pktmbuf_alloc(header_pool)) == NULL))
return (NULL);
/* If requested, then make a new clone packet. */
if (use_clone != 0 && unlikely ((pkt = rte_pktmbuf_clone(pkt, clone_pool)) == NULL)) {
rte_pktmbuf_free(hdr);
return (NULL);
}
/* prepend new header */
hdr->pkt.next = pkt;
/* update header's fields */
hdr->pkt.pkt_len = (uint16_t)(hdr->pkt.data_len + pkt->pkt.pkt_len);
hdr->pkt.nb_segs = (uint8_t)(pkt->pkt.nb_segs + 1);
/* copy metadata from source packet */
hdr->pkt.in_port = pkt->pkt.in_port;
hdr->pkt.vlan_macip = pkt->pkt.vlan_macip;
hdr->pkt.hash = pkt->pkt.hash;
hdr->ol_flags = pkt->ol_flags;
rte_mbuf_sanity_check(hdr, RTE_MBUF_PKT, 1);
}
return (hdr);
8.4. Explanation
31
CHAPTER
NINE
IP REASSEMBLY SAMPLE APPLICATION
The L3 Forwarding application is a simple example of packet processing using the DPDK. The
application performs L3 forwarding with reassembly for fragmented IPv4 and IPv6 packets.
9.1 Overview
The application demonstrates the use of the DPDK libraries to implement packet forwarding
with reassembly for IPv4 and IPv6 fragmented packets. The initialization and run- time paths
are very similar to those of the L2 forwarding application (see Chapter 9 “L2 Forwarding Sample Application” for more information). The main difference from the L2 Forwarding sample
application is that it reassembles fragmented IPv4 and IPv6 packets before forwarding. The
maximum allowed size of reassembled packet is 9.5 KB.
There are two key differences from the L2 Forwarding sample application:
• The first difference is that the forwarding decision is taken based on information read
from the input packet’s IP header.
• The second difference is that the application differentiates between IP and non-IP traffic
by means of offload flags.
9.2 The Longest Prefix Match (LPM for IPv4, LPM6 for IPv6) table
is used to store/lookup an outgoing port number, associated
with that IPv4 address. Any unmatched packets are forwarded
to the originating port.Compiling the Application
To compile the application:
1. Go to the sample application directory:
export RTE_SDK=/path/to/rte_sdk
cd ${RTE_SDK}/examples/ip_reassembly
1. Set the target (a default target is used if not specified). For example:
export RTE_TARGET=x86_64-native-linuxapp-gcc
See the DPDK Getting Started Guide for possible RTE_TARGET values.
1. Build the application:
32
Sample Applications User Guide, Release 2.0.0
make
9.3 Running the Application
The application has a number of command line options:
./build/ip_reassembly [EAL options] -- -p PORTMASK [-q NQ] [--maxflows=FLOWS>] [--flowttl=TTL[
where:
• -p PORTMASK: Hexadecimal bitmask of ports to configure
• -q NQ: Number of RX queues per lcore
• –maxflows=FLOWS: determines maximum number of active fragmented flows (1-65535).
Default value: 4096.
• –flowttl=TTL[(s|ms)]: determines maximum Time To Live for fragmented packet. If all
fragments of the packet wouldn’t appear within given time-out, then they are considered
as invalid and will be dropped. Valid range is 1ms - 3600s. Default value: 1s.
To run the example in linuxapp environment with 2 lcores (2,4) over 2 ports(0,2) with 1 RX
queue per lcore:
./build/ip_reassembly -c
EAL: coremask set to 14
EAL: Detected lcore 0 on
EAL: Detected lcore 1 on
EAL: Detected lcore 2 on
EAL: Detected lcore 3 on
EAL: Detected lcore 4 on
...
0x14 -n 3 -- -p 5
socket
socket
socket
socket
socket
0
1
0
1
0
Initializing port 0 on lcore 2... Address:00:1B:21:76:FA:2C, rxq=0 txq=2,0 txq=4,1
done: Link Up - speed 10000 Mbps - full-duplex
Skipping disabled port 1
Initializing port 2 on lcore 4... Address:00:1B:21:5C:FF:54, rxq=0 txq=2,0 txq=4,1
done: Link Up - speed 10000 Mbps - full-duplex
Skipping disabled port 3IP_FRAG: Socket 0: adding route 100.10.0.0/16 (port 0)
IP_RSMBL: Socket 0: adding route 100.20.0.0/16 (port 1)
...
IP_RSMBL: Socket 0: adding route 0101:0101:0101:0101:0101:0101:0101:0101/48 (port 0)
IP_RSMBL: Socket 0: adding route 0201:0101:0101:0101:0101:0101:0101:0101/48 (port 1)
...
IP_RSMBL:
IP_RSMBL:
IP_RSMBL:
IP_RSMBL:
entering main loop on lcore 4
-- lcoreid=4 portid=2
entering main loop on lcore 2
-- lcoreid=2 portid=0
To run the example in linuxapp environment with 1 lcore (4) over 2 ports(0,2) with 2 RX queues
per lcore:
./build/ip_reassembly -c 0x10 -n 3 -- -p 5 -q 2
9.3. Running the Application
33
Sample Applications User Guide, Release 2.0.0
To test the application, flows should be set up in the flow generator that match the values in
the l3fwd_ipv4_route_array and/or l3fwd_ipv6_route_array table.
Please note that in order to test this application, the traffic generator should be generating valid
fragmented IP packets. For IPv6, the only supported case is when no other extension headers
other than fragment extension header are present in the packet.
The default l3fwd_ipv4_route_array table is:
struct l3fwd_ipv4_route l3fwd_ipv4_route_array[] = {
{IPv4(100, 10, 0, 0), 16, 0},
{IPv4(100, 20, 0, 0), 16, 1},
{IPv4(100, 30, 0, 0), 16, 2},
{IPv4(100, 40, 0, 0), 16, 3},
{IPv4(100, 50, 0, 0), 16, 4},
{IPv4(100, 60, 0, 0), 16, 5},
{IPv4(100, 70, 0, 0), 16, 6},
{IPv4(100, 80, 0, 0), 16, 7},
};
The default l3fwd_ipv6_route_array table is:
struct l3fwd_ipv6_route
{{1, 1, 1, 1, 1, 1,
{{2, 1, 1, 1, 1, 1,
{{3, 1, 1, 1, 1, 1,
{{4, 1, 1, 1, 1, 1,
{{5, 1, 1, 1, 1, 1,
{{6, 1, 1, 1, 1, 1,
{{7, 1, 1, 1, 1, 1,
{{8, 1, 1, 1, 1, 1,
};
l3fwd_ipv6_route_array[] =
1, 1, 1, 1, 1, 1, 1, 1, 1,
1, 1, 1, 1, 1, 1, 1, 1, 1,
1, 1, 1, 1, 1, 1, 1, 1, 1,
1, 1, 1, 1, 1, 1, 1, 1, 1,
1, 1, 1, 1, 1, 1, 1, 1, 1,
1, 1, 1, 1, 1, 1, 1, 1, 1,
1, 1, 1, 1, 1, 1, 1, 1, 1,
1, 1, 1, 1, 1, 1, 1, 1, 1,
{
1},
1},
1},
1},
1},
1},
1},
1},
48,
48,
48,
48,
48,
48,
48,
48,
0},
1},
2},
3},
4},
5},
6},
7},
For example, for the fragmented input IPv4 packet with destination address: 100.10.1.1, a
reassembled IPv4 packet be sent out from port #0 to the destination address 100.10.1.1 once
all the fragments are collected.
9.4 Explanation
The following sections provide some explanation of the sample application code. As mentioned
in the overview section, the initialization and run-time paths are very similar to those of the L2
forwarding application (see Chapter 9 “L2 Forwarding Sample Application” for more information). The following sections describe aspects that are specific to the IP reassemble sample
application.
9.4.1 IPv4 Fragment Table Initialization
This application uses the rte_ip_frag library. Please refer to Programmer’s Guide for more
detailed explanation of how to use this library. Fragment table maintains information about already received fragments of the packet. Each IP packet is uniquely identified by triple <Source
IP address>, <Destination IP address>, <ID>. To avoid lock contention, each RX queue has its
own Fragment Table, e.g. the application can’t handle the situation when different fragments
of the same packet arrive through different RX queues. Each table entry can hold information
about packet consisting of up to RTE_LIBRTE_IP_FRAG_MAX_FRAGS fragments.
9.4. Explanation
34
Sample Applications User Guide, Release 2.0.0
frag_cycles = (rte_get_tsc_hz() + MS_PER_S - 1) / MS_PER_S * max_flow_ttl;
if ((qconf->frag_tbl[queue] = rte_ip_frag_tbl_create(max_flow_num, IPV4_FRAG_TBL_BUCKET_ENTRIE
{
RTE_LOG(ERR, IP_RSMBL, "ip_frag_tbl_create(%u) on " "lcore: %u for queue: %u failed\n", m
return -1;
}
9.4.2 Mempools Initialization
The reassembly application demands a lot of mbuf’s to be allocated. At any given time up to
(2 * max_flow_num * RTE_LIBRTE_IP_FRAG_MAX_FRAGS * <maximum number of mbufs
per packet>) can be stored inside Fragment Table waiting for remaining fragments. To keep
mempool size under reasonable limits and to avoid situation when one RX queue can starve
other queues, each RX queue uses its own mempool.
nb_mbuf
nb_mbuf
nb_mbuf
nb_mbuf
nb_mbuf
= RTE_MAX(max_flow_num, 2UL * MAX_PKT_BURST) * RTE_LIBRTE_IP_FRAG_MAX_FRAGS;
*= (port_conf.rxmode.max_rx_pkt_len + BUF_SIZE - 1) / BUF_SIZE;
*= 2; /* ipv4 and ipv6 */
+= RTE_TEST_RX_DESC_DEFAULT + RTE_TEST_TX_DESC_DEFAULT;
= RTE_MAX(nb_mbuf, (uint32_t)NB_MBUF);
rte_snprintf(buf, sizeof(buf), "mbuf_pool_%u_%u", lcore, queue);
if ((rxq->pool = rte_mempool_create(buf, nb_mbuf, MBUF_SIZE, 0, sizeof(struct rte_pktmbuf_pool
rte_pktmbuf_init, NULL, socket, MEMPOOL_F_SP_PUT | MEMPOOL_F_SC_GET)) == NULL) {
}
RTE_LOG(ERR, IP_RSMBL, "mempool_create(%s) failed", buf);
return -1;
9.4.3 Packet Reassembly and Forwarding
For each input packet, the packet forwarding operation is done by the l3fwd_simple_forward()
function. If the packet is an IPv4 or IPv6 fragment, then it calls rte_ipv4_reassemble_packet()
for IPv4 packets, or rte_ipv6_reassemble_packet() for IPv6 packets. These functions either
return a pointer to valid mbuf that contains reassembled packet, or NULL (if the packet can’t
be reassembled for some reason). Then l3fwd_simple_forward() continues with the code for
the packet forwarding decision (that is, the identification of the output interface for the packet)
and actual transmit of the packet.
The rte_ipv4_reassemble_packet() or rte_ipv6_reassemble_packet() are responsible for:
1. Searching the Fragment Table for entry with packet’s <IP Source Address, IP Destination
Address, Packet ID>
2. If the entry is found, then check if that entry already timed-out. If yes, then free all
previously received fragments, and remove information about them from the entry.
3. If no entry with such key is found, then try to create a new one by one of two ways:
(a) Use as empty entry
(b) Delete a timed-out entry, free mbufs associated with it mbufs and store a new entry
with specified key in it.
9.4. Explanation
35
Sample Applications User Guide, Release 2.0.0
4. Update the entry with new fragment information and check if a packet can be reassembled (the packet’s entry contains all fragments).
(a) If yes, then, reassemble the packet, mark table’s entry as empty and return the
reassembled mbuf to the caller.
(b) If no, then just return a NULL to the caller.
If at any stage of packet processing a reassembly function encounters an error (can’t insert
new entry into the Fragment table, or invalid/timed-out fragment), then it will free all associated
with the packet fragments, mark the table entry as invalid and return NULL to the caller.
9.4.4 Debug logging and Statistics Collection
The RTE_LIBRTE_IP_FRAG_TBL_STAT controls statistics collection for the IP Fragment Table. This macro is disabled by default. To make ip_reassembly print the statistics to the standard output, the user must send either an USR1, INT or TERM signal to the process. For all of
these signals, the ip_reassembly process prints Fragment table statistics for each RX queue,
plus the INT and TERM will cause process termination as usual.
9.4. Explanation
36
CHAPTER
TEN
KERNEL NIC INTERFACE SAMPLE APPLICATION
The Kernel NIC Interface (KNI) is a DPDK control plane solution that allows userspace applications to exchange packets with the kernel networking stack. To accomplish this, DPDK
userspace applications use an IOCTL call to request the creation of a KNI virtual device in the
Linux* kernel. The IOCTL call provides interface information and the DPDK’s physical address
space, which is re-mapped into the kernel address space by the KNI kernel loadable module
that saves the information to a virtual device context. The DPDK creates FIFO queues for
packet ingress and egress to the kernel module for each device allocated.
The KNI kernel loadable module is a standard net driver, which upon receiving the IOCTL
call access the DPDK’s FIFO queue to receive/transmit packets from/to the DPDK userspace
application. The FIFO queues contain pointers to data packets in the DPDK. This:
• Provides a faster mechanism to interface with the kernel net stack and eliminates system
calls
• Facilitates the DPDK using standard Linux* userspace net tools (tcpdump, ftp, and so on)
• Eliminate the copy_to_user and copy_from_user operations on packets.
The Kernel NIC Interface sample application is a simple example that demonstrates the use of
the DPDK to create a path for packets to go through the Linux* kernel. This is done by creating
one or more kernel net devices for each of the DPDK ports. The application allows the use of
standard Linux tools (ethtool, ifconfig, tcpdump) with the DPDK ports and also the exchange
of packets between the DPDK application and the Linux* kernel.
10.1 Overview
The Kernel NIC Interface sample application uses two threads in user space for each physical
NIC port being used, and allocates one or more KNI device for each physical NIC port with
kernel module’s support. For a physical NIC port, one thread reads from the port and writes to
KNI devices, and another thread reads from KNI devices and writes the data unmodified to the
physical NIC port. It is recommended to configure one KNI device for each physical NIC port.
If configured with more than one KNI devices for a physical NIC port, it is just for performance
testing, or it can work together with VMDq support in future.
The packet flow through the Kernel NIC Interface application is as shown in the following figure.
37
Sample Applications User Guide, Release 2.0.0
Figure 10.1: Kernel NIC Application Packet Flow
10.2 Compiling the Application
Compile the application as follows:
1. Go to the example directory:
export RTE_SDK=/path/to/rte_sdk cd
${RTE_SDK}/examples/kni
2. Set the target (a default target is used if not specified)
Note: This application is intended as a linuxapp only.
export RTE_TARGET=x86_64-native-linuxapp-gcc
3. Build the application:
make
10.3 Loading the Kernel Module
Loading the KNI kernel module without any parameter is the typical way a DPDK application
gets packets into and out of the kernel net stack. This way, only one kernel thread is created
for all KNI devices for packet receiving in kernel side:
#insmod rte_kni.ko
10.2. Compiling the Application
38
Sample Applications User Guide, Release 2.0.0
Pinning the kernel thread to a specific core can be done using a taskset command such as
following:
#taskset -p 100000 pgrep --fl kni_thread | awk '{print $1}'
This command line tries to pin the specific kni_thread on the 20th lcore (lcore numbering starts
at 0), which means it needs to check if that lcore is available on the board. This command must
be sent after the application has been launched, as insmod does not start the kni thread.
For optimum performance, the lcore in the mask must be selected to be on the same socket
as the lcores used in the KNI application.
To provide flexibility of performance, the kernel module of the KNI, located in the kmod subdirectory of the DPDK target directory, can be loaded with parameter of kthread_mode as
follows:
• #insmod rte_kni.ko kthread_mode=single
This mode will create only one kernel thread for all KNI devices for packet receiving in
kernel side. By default, it is in this single kernel thread mode. It can set core affinity for
this kernel thread by using Linux command taskset.
• #insmod rte_kni.ko kthread_mode =multiple
This mode will create a kernel thread for each KNI device for packet receiving in kernel side. The core affinity of each kernel thread is set when creating the KNI device.
The lcore ID for each kernel thread is provided in the command line of launching the
application. Multiple kernel thread mode can provide scalable higher performance.
To measure the throughput in a loopback mode, the kernel module of the KNI, located in the
kmod sub-directory of the DPDK target directory, can be loaded with parameters as follows:
• #insmod rte_kni.ko lo_mode=lo_mode_fifo
This loopback mode will involve ring enqueue/dequeue operations in kernel space.
• #insmod rte_kni.ko lo_mode=lo_mode_fifo_skb
This loopback mode will involve ring enqueue/dequeue operations and sk buffer copies
in kernel space.
10.4 Running the Application
The application requires a number of command line options:
kni [EAL options] -- -P -p PORTMASK --config="(port,lcore_rx,lcore_tx[,lcore_kthread,...])[,po
Where:
• -P: Set all ports to promiscuous mode so that packets are accepted regardless of the
packet’s Ethernet MAC destination address. Without this option, only packets with the
Ethernet MAC destination address set to the Ethernet address of the port are accepted.
• -p PORTMASK: Hexadecimal bitmask of ports to configure.
• –config=”(port,lcore_rx,
lcore_tx[,lcore_kthread,
...])
[,
port,lcore_rx,
lcore_tx[,lcore_kthread, ...]]”: Determines which lcores of RX, TX, kernel thread
are mapped to which ports.
10.4. Running the Application
39
Sample Applications User Guide, Release 2.0.0
Refer to DPDK Getting Started Guide for general information on running applications and the
Environment Abstraction Layer (EAL) options.
The -c coremask parameter of the EAL options should include the lcores indicated by the
lcore_rx and lcore_tx, but does not need to include lcores indicated by lcore_kthread as they
are used to pin the kernel thread on. The -p PORTMASK parameter should include the ports
indicated by the port in –config, neither more nor less.
The lcore_kthread in –config can be configured none, one or more lcore IDs. In multiple kernel
thread mode, if configured none, a KNI device will be allocated for each port, while no specific
lcore affinity will be set for its kernel thread. If configured one or more lcore IDs, one or more
KNI devices will be allocated for each port, while specific lcore affinity will be set for its kernel
thread. In single kernel thread mode, if configured none, a KNI device will be allocated for each
port. If configured one or more lcore IDs, one or more KNI devices will be allocated for each
port while no lcore affinity will be set as there is only one kernel thread for all KNI devices.
For example, to run the application with two ports served by six lcores, one lcore of RX, one
lcore of TX, and one lcore of kernel thread for each port:
./build/kni -c 0xf0 -n 4 -- -P -p 0x3 -config="(0,4,6,8),(1,5,7,9)"
10.5 KNI Operations
Once the KNI application is started, one can use different Linux* commands to manage the
net interfaces. If more than one KNI devices configured for a physical port, only the first KNI
device will be paired to the physical device. Operations on other KNI devices will not affect the
physical port handled in user space application.
Assigning an IP address:
#ifconfig vEth0_0 192.168.0.1
Displaying the NIC registers:
#ethtool -d vEth0_0
Dumping the network traffic:
#tcpdump -i vEth0_0
When the DPDK userspace application is closed, all the KNI devices are deleted from Linux*.
10.6 Explanation
The following sections provide some explanation of code.
10.6.1 Initialization
Setup of mbuf pool, driver and queues is similar to the setup done in the L2 Forwarding sample
application (see Chapter 9 “L2 Forwarding Sample Application (in Real and Virtualized Environments” for details). In addition, one or more kernel NIC interfaces are allocated for each of
the configured ports according to the command line parameters.
10.5. KNI Operations
40
Sample Applications User Guide, Release 2.0.0
The code for creating the kernel NIC interface for a specific port is as follows:
kni = rte_kni_create(port, MAX_PACKET_SZ, pktmbuf_pool, &kni_ops);
if (kni == NULL)
rte_exit(EXIT_FAILURE, "Fail to create kni dev "
"for port: %d\n", port);
The code for allocating the kernel NIC interfaces for a specific port is as follows:
static int
kni_alloc(uint8_t port_id)
{
uint8_t i;
struct rte_kni *kni;
struct rte_kni_conf conf;
struct kni_port_params **params = kni_port_params_array;
if (port_id >= RTE_MAX_ETHPORTS || !params[port_id])
return -1;
params[port_id]->nb_kni = params[port_id]->nb_lcore_k ? params[port_id]->nb_lcore_k : 1;
for (i = 0; i < params[port_id]->nb_kni; i++) {
/* Clear conf at first */
memset(&conf, 0, sizeof(conf));
if (params[port_id]->nb_lcore_k) {
rte_snprintf(conf.name, RTE_KNI_NAMESIZE, "vEth%u_%u", port_id, i);
conf.core_id = params[port_id]->lcore_k[i];
conf.force_bind = 1;
} else
rte_snprintf(conf.name, RTE_KNI_NAMESIZE, "vEth%u", port_id);
conf.group_id = (uint16_t)port_id;
conf.mbuf_size = MAX_PACKET_SZ;
/*
*
*
*
*/
The first KNI device associated to a port
is the master, for multiple kernel thread
environment.
if (i == 0) {
struct rte_kni_ops ops;
struct rte_eth_dev_info dev_info;
memset(&dev_info, 0, sizeof(dev_info)); rte_eth_dev_info_get(port_id, &dev_in
conf.addr = dev_info.pci_dev->addr;
conf.id = dev_info.pci_dev->id;
memset(&ops, 0, sizeof(ops));
ops.port_id = port_id;
ops.change_mtu = kni_change_mtu;
ops.config_network_if = kni_config_network_interface;
kni = rte_kni_alloc(pktmbuf_pool, &conf, &ops);
} else
kni = rte_kni_alloc(pktmbuf_pool, &conf, NULL);
if (!kni)
rte_exit(EXIT_FAILURE, "Fail to create kni for "
10.6. Explanation
41
Sample Applications User Guide, Release 2.0.0
"port: %d\n", port_id);
}
params[port_id]->kni[i] = kni;
}
return 0;
The other step in the initialization process that is unique to this sample application is the association of each port with lcores for RX, TX and kernel threads.
• One lcore to read from the port and write to the associated one or more KNI devices
• Another lcore to read from one or more KNI devices and write to the port
• Other lcores for pinning the kernel threads on one by one
This is done by using the‘kni_port_params_array[]‘ array, which is indexed by the port ID. The
code is as follows:
static int
parse_config(const char *arg)
{
const char *p, *p0 = arg;
char s[256], *end;
unsigned size;
enum fieldnames {
FLD_PORT = 0,
FLD_LCORE_RX,
FLD_LCORE_TX,
_NUM_FLD = KNI_MAX_KTHREAD + 3,
};
int i, j, nb_token;
char *str_fld[_NUM_FLD];
unsigned long int_fld[_NUM_FLD];
uint8_t port_id, nb_kni_port_params = 0;
memset(&kni_port_params_array, 0, sizeof(kni_port_params_array));
while (((p = strchr(p0, '(')) != NULL) && nb_kni_port_params < RTE_MAX_ETHPORTS) {
p++;
if ((p0 = strchr(p, ')')) == NULL)
goto fail;
size = p0 - p;
if (size >= sizeof(s)) {
printf("Invalid config parameters\n");
goto fail;
}
rte_snprintf(s, sizeof(s), "%.*s", size, p);
nb_token = rte_strsplit(s, sizeof(s), str_fld, _NUM_FLD, ',');
if (nb_token <= FLD_LCORE_TX) {
printf("Invalid config parameters\n");
goto fail;
}
for (i = 0; i < nb_token; i++) {
errno = 0;
int_fld[i] = strtoul(str_fld[i], &end, 0);
if (errno != 0 || end == str_fld[i]) {
printf("Invalid config parameters\n");
10.6. Explanation
42
Sample Applications User Guide, Release 2.0.0
}
}
goto fail;
i = 0;
port_id = (uint8_t)int_fld[i++];
if (port_id >= RTE_MAX_ETHPORTS) {
printf("Port ID %u could not exceed the maximum %u\n", port_id, RTE_MAX_ETHPORTS);
goto fail;
}
if (kni_port_params_array[port_id]) {
printf("Port %u has been configured\n", port_id);
goto fail;
}
kni_port_params_array[port_id] = (struct kni_port_params*)rte_zmalloc("KNI_port_params
kni_port_params_array[port_id]->port_id = port_id;
kni_port_params_array[port_id]->lcore_rx = (uint8_t)int_fld[i++];
kni_port_params_array[port_id]->lcore_tx = (uint8_t)int_fld[i++];
}
if (kni_port_params_array[port_id]->lcore_rx >= RTE_MAX_LCORE || kni_port_params_array
printf("lcore_rx %u or lcore_tx %u ID could not "
"exceed the maximum %u\n",
kni_port_params_array[port_id]->lcore_rx, kni_port_params_array[port_id]->
goto fail;
for (j = 0; i < nb_token && j < KNI_MAX_KTHREAD; i++, j++)
kni_port_params_array[port_id]->lcore_k[j] = (uint8_t)int_fld[i];
kni_port_params_array[port_id]->nb_lcore_k = j;
}
print_config();
return 0;
fail:
for (i = 0; i < RTE_MAX_ETHPORTS; i++) {
if (kni_port_params_array[i]) {
rte_free(kni_port_params_array[i]);
kni_port_params_array[i] = NULL;
}
}
return -1;
}
10.6.2 Packet Forwarding
After the initialization steps are completed, the main_loop() function is run on each lcore. This
function first checks the lcore_id against the user provided lcore_rx and lcore_tx to see if this
lcore is reading from or writing to kernel NIC interfaces.
For the case that reads from a NIC port and writes to the kernel NIC interfaces, the packet
reception is the same as in L2 Forwarding sample application (see Section Receive, Process
and Transmit Packets). The packet transmission is done by sending mbufs into the kernel NIC
10.6. Explanation
43
Sample Applications User Guide, Release 2.0.0
interfaces by rte_kni_tx_burst(). The KNI library automatically frees the mbufs after the kernel
successfully copied the mbufs.
/**
*
*/
Interface to burst rx and enqueue mbufs into rx_q
static void
kni_ingress(struct kni_port_params *p)
{
uint8_t i, nb_kni, port_id;
unsigned nb_rx, num;
struct rte_mbuf *pkts_burst[PKT_BURST_SZ];
if (p == NULL)
return;
nb_kni = p->nb_kni;
port_id = p->port_id;
for (i = 0; i < nb_kni; i++) {
/* Burst rx from eth */
nb_rx = rte_eth_rx_burst(port_id, 0, pkts_burst, PKT_BURST_SZ);
if (unlikely(nb_rx > PKT_BURST_SZ)) {
RTE_LOG(ERR, APP, "Error receiving from eth\n");
return;
}
/* Burst tx to kni */
num = rte_kni_tx_burst(p->kni[i], pkts_burst, nb_rx);
kni_stats[port_id].rx_packets += num;
rte_kni_handle_request(p->kni[i]);
}
}
if (unlikely(num < nb_rx)) {
/* Free mbufs not tx to kni interface */
kni_burst_free_mbufs(&pkts_burst[num], nb_rx - num);
kni_stats[port_id].rx_dropped += nb_rx - num;
}
For the other case that reads from kernel NIC interfaces and writes to a physical NIC port,
packets are retrieved by reading mbufs from kernel NIC interfaces by rte_kni_rx_burst(). The
packet transmission is the same as in the L2 Forwarding sample application (see Secion Receive, Process and Transmit Packets).
/**
*
*/
Interface to dequeue mbufs from tx_q and burst tx
static void
kni_egress(struct kni_port_params *p)
{
uint8_t i, nb_kni, port_id;
unsigned nb_tx, num;
struct rte_mbuf *pkts_burst[PKT_BURST_SZ];
if (p == NULL)
return;
nb_kni = p->nb_kni;
10.6. Explanation
44
Sample Applications User Guide, Release 2.0.0
port_id = p->port_id;
for (i = 0; i < nb_kni; i++) {
/* Burst rx from kni */
num = rte_kni_rx_burst(p->kni[i], pkts_burst, PKT_BURST_SZ);
if (unlikely(num > PKT_BURST_SZ)) {
RTE_LOG(ERR, APP, "Error receiving from KNI\n");
return;
}
/* Burst tx to eth */
nb_tx = rte_eth_tx_burst(port_id, 0, pkts_burst, (uint16_t)num);
kni_stats[port_id].tx_packets += nb_tx;
}
}
if (unlikely(nb_tx < num)) {
/* Free mbufs not tx to NIC */
kni_burst_free_mbufs(&pkts_burst[nb_tx], num - nb_tx);
kni_stats[port_id].tx_dropped += num - nb_tx;
}
10.6.3 Callbacks for Kernel Requests
To execute specific PMD operations in user space requested by some Linux* commands, callbacks must be implemented and filled in the struct rte_kni_ops structure. Currently, setting a
new MTU and configuring the network interface (up/ down) are supported.
static struct rte_kni_ops kni_ops = {
.change_mtu = kni_change_mtu,
.config_network_if = kni_config_network_interface,
};
/* Callback for request of changing MTU */
static int
kni_change_mtu(uint8_t port_id, unsigned new_mtu)
{
int ret;
struct rte_eth_conf conf;
if (port_id >= rte_eth_dev_count()) {
RTE_LOG(ERR, APP, "Invalid port id %d\n", port_id);
return -EINVAL;
}
RTE_LOG(INFO, APP, "Change MTU of port %d to %u\n", port_id, new_mtu);
/* Stop specific port */
rte_eth_dev_stop(port_id);
memcpy(&conf, &port_conf, sizeof(conf));
/* Set new MTU */
if (new_mtu > ETHER_MAX_LEN)
conf.rxmode.jumbo_frame = 1;
else
10.6. Explanation
45
Sample Applications User Guide, Release 2.0.0
conf.rxmode.jumbo_frame = 0;
/* mtu + length of header + length of FCS = max pkt length */
conf.rxmode.max_rx_pkt_len = new_mtu + KNI_ENET_HEADER_SIZE + KNI_ENET_FCS_SIZE;
ret = rte_eth_dev_configure(port_id, 1, 1, &conf);
if (ret < 0) {
RTE_LOG(ERR, APP, "Fail to reconfigure port %d\n", port_id);
return ret;
}
/* Restart specific port */
ret = rte_eth_dev_start(port_id);
if (ret < 0) {
RTE_LOG(ERR, APP, "Fail to restart port %d\n", port_id);
return ret;
}
}
return 0;
/* Callback for request of configuring network interface up/down */
static int
kni_config_network_interface(uint8_t port_id, uint8_t if_up)
{
int ret = 0;
if (port_id >= rte_eth_dev_count() || port_id >= RTE_MAX_ETHPORTS) {
RTE_LOG(ERR, APP, "Invalid port id %d\n", port_id);
return -EINVAL;
}
RTE_LOG(INFO, APP, "Configure network interface of %d %s\n",
port_id, if_up ? "up" : "down");
if (if_up != 0) {
/* Configure network interface up */
rte_eth_dev_stop(port_id);
ret = rte_eth_dev_start(port_id);
} else /* Configure network interface down */
rte_eth_dev_stop(port_id);
}
if (ret < 0)
RTE_LOG(ERR, APP, "Failed to start port %d\n", port_id);
return ret;
10.6. Explanation
46
CHAPTER
ELEVEN
L2 FORWARDING SAMPLE APPLICATION (IN REAL AND
VIRTUALIZED ENVIRONMENTS) WITH CORE LOAD STATISTICS.
The L2 Forwarding sample application is a simple example of packet processing using the Data
Plane Development Kit (DPDK) which also takes advantage of Single Root I/O Virtualization
(SR-IOV) features in a virtualized environment.
Note: This application is a variation of L2 Forwarding sample application. It demonstrate
possible scheme of job stats library usage therefore some parts of this document is identical
with original L2 forwarding application.
11.1 Overview
The L2 Forwarding sample application, which can operate in real and virtualized environments,
performs L2 forwarding for each packet that is received. The destination port is the adjacent
port from the enabled portmask, that is, if the first four ports are enabled (portmask 0xf), ports
1 and 2 forward into each other, and ports 3 and 4 forward into each other. Also, the MAC
addresses are affected as follows:
• The source MAC address is replaced by the TX port MAC address
• The destination MAC address is replaced by 02:00:00:00:00:TX_PORT_ID
This application can be used to benchmark performance using a traffic-generator, as shown in
the Fig. 11.1.
The application can also be used in a virtualized environment as shown in Fig. 11.2.
The L2 Forwarding application can also be used as a starting point for developing a new application based on the DPDK.
11.1.1 Virtual Function Setup Instructions
This application can use the virtual function available in the system and therefore can be used
in a virtual machine without passing through the whole Network Device into a guest machine
in a virtualized scenario. The virtual functions can be enabled in the host machine or the
hypervisor with the respective physical function driver.
For example, in a Linux* host machine, it is possible to enable a virtual function using the
following command:
47
Sample Applications User Guide, Release 2.0.0
0
1
2
0
Flow 0
Flow 1
1
Flow 2
2
Flow 3
3
3
...
Traffic
Generator
NUT
(RTE)
Figure 11.1: Performance Benchmark Setup (Basic Environment)
Figure 11.2: Performance Benchmark Setup (Virtualized Environment)
11.1. Overview
48
Sample Applications User Guide, Release 2.0.0
modprobe ixgbe max_vfs=2,2
This command enables two Virtual Functions on each of Physical Function of the NIC, with
two physical ports in the PCI configuration space. It is important to note that enabled Virtual
Function 0 and 2 would belong to Physical Function 0 and Virtual Function 1 and 3 would
belong to Physical Function 1, in this case enabling a total of four Virtual Functions.
11.2 Compiling the Application
1. Go to the example directory:
export RTE_SDK=/path/to/rte_sdk cd ${RTE_SDK}/examples/l2fwd-jobstats
2. Set the target (a default target is used if not specified). For example:
export RTE_TARGET=x86_64-native-linuxapp-gcc
See the DPDK Getting Started Guide for possible RTE_TARGET values.
3. Build the application:
make
11.3 Running the Application
The application requires a number of command line options:
./build/l2fwd-jobstats [EAL options] -- -p PORTMASK [-q NQ] [-l]
where,
• p PORTMASK: A hexadecimal bitmask of the ports to configure
• q NQ: A number of queues (=ports) per lcore (default is 1)
• l: Use locale thousands separator when formatting big numbers.
To run the application in linuxapp environment with 4 lcores, 16 ports, 8 RX queues per lcore
and thousands separator printing, issue the command:
$ ./build/l2fwd-jobstats -c f -n 4 -- -q 8 -p ffff -l
Refer to the DPDK Getting Started Guide for general information on running applications and
the Environment Abstraction Layer (EAL) options.
11.4 Explanation
The following sections provide some explanation of the code.
11.2. Compiling the Application
49
Sample Applications User Guide, Release 2.0.0
11.4.1 Command Line Arguments
The L2 Forwarding sample application takes specific parameters, in addition to Environment
Abstraction Layer (EAL) arguments (see previous section). The preferred way to parse parameters is to use the getopt() function, since it is part of a well-defined and portable library.
The parsing of arguments is done in the l2fwd_parse_args() function. The method of argument
parsing is not described here. Refer to the glibc getopt(3) man page for details.
EAL arguments are parsed first, then application-specific arguments. This is done at the beginning of the main() function:
/* init EAL */
ret = rte_eal_init(argc, argv);
if (ret < 0)
rte_exit(EXIT_FAILURE, "Invalid EAL arguments\n");
argc -= ret;
argv += ret;
/* parse application arguments (after the EAL ones) */
ret = l2fwd_parse_args(argc, argv);
if (ret < 0)
rte_exit(EXIT_FAILURE, "Invalid L2FWD arguments\n");
11.4.2 Mbuf Pool Initialization
Once the arguments are parsed, the mbuf pool is created. The mbuf pool contains a set of
mbuf objects that will be used by the driver and the application to store network packet data:
/* create the mbuf pool */
l2fwd_pktmbuf_pool =
rte_mempool_create("mbuf_pool", NB_MBUF,
MBUF_SIZE, 32,
sizeof(struct rte_pktmbuf_pool_private),
rte_pktmbuf_pool_init, NULL,
rte_pktmbuf_init, NULL,
rte_socket_id(), 0);
if (l2fwd_pktmbuf_pool == NULL)
rte_exit(EXIT_FAILURE, "Cannot init mbuf pool\n");
The rte_mempool is a generic structure used to handle pools of objects. In this case, it is
necessary to create a pool that will be used by the driver, which expects to have some reserved
space in the mempool structure, sizeof(struct rte_pktmbuf_pool_private) bytes. The number of
allocated pkt mbufs is NB_MBUF, with a size of MBUF_SIZE each. A per-lcore cache of 32
mbufs is kept. The memory is allocated in rte_socket_id() socket, but it is possible to extend
this code to allocate one mbuf pool per socket.
Two callback pointers are also given to the rte_mempool_create() function:
• The first callback pointer is to rte_pktmbuf_pool_init() and is used to initialize the private
data of the mempool, which is needed by the driver. This function is provided by the mbuf
API, but can be copied and extended by the developer.
11.4. Explanation
50
Sample Applications User Guide, Release 2.0.0
• The second callback pointer given to rte_mempool_create() is the mbuf initializer. The
default is used, that is, rte_pktmbuf_init(), which is provided in the rte_mbuf library. If a
more complex application wants to extend the rte_pktmbuf structure for its own needs, a
new function derived from rte_pktmbuf_init( ) can be created.
11.4.3 Driver Initialization
The main part of the code in the main() function relates to the initialization of the driver. To fully
understand this code, it is recommended to study the chapters that related to the Poll Mode
Driver in the DPDK Programmer’s Guide and the DPDK API Reference.
nb_ports = rte_eth_dev_count();
if (nb_ports == 0)
rte_exit(EXIT_FAILURE, "No Ethernet ports - bye\n");
if (nb_ports > RTE_MAX_ETHPORTS)
nb_ports = RTE_MAX_ETHPORTS;
/* reset l2fwd_dst_ports */
for (portid = 0; portid < RTE_MAX_ETHPORTS; portid++)
l2fwd_dst_ports[portid] = 0;
last_port = 0;
/*
* Each logical core is assigned a dedicated TX queue on each port.
*/
for (portid = 0; portid < nb_ports; portid++) {
/* skip ports that are not enabled */
if ((l2fwd_enabled_port_mask & (1 << portid)) == 0)
continue;
if (nb_ports_in_mask % 2) {
l2fwd_dst_ports[portid] = last_port;
l2fwd_dst_ports[last_port] = portid;
}
else
last_port = portid;
nb_ports_in_mask++;
}
rte_eth_dev_info_get((uint8_t) portid, &dev_info);
The next step is to configure the RX and TX queues. For each port, there is only one RX queue
(only one lcore is able to poll a given port). The number of TX queues depends on the number
of available lcores. The rte_eth_dev_configure() function is used to configure the number of
queues for a port:
ret = rte_eth_dev_configure((uint8_t)portid, 1, 1, &port_conf);
if (ret < 0)
rte_exit(EXIT_FAILURE, "Cannot configure device: "
"err=%d, port=%u\n",
ret, portid);
The global configuration is stored in a static structure:
11.4. Explanation
51
Sample Applications User Guide, Release 2.0.0
static const struct rte_eth_conf port_conf = {
.rxmode = {
.split_hdr_size = 0,
.header_split = 0,
/**< Header Split disabled */
.hw_ip_checksum = 0, /**< IP checksum offload disabled */
.hw_vlan_filter = 0, /**< VLAN filtering disabled */
.jumbo_frame = 0,
/**< Jumbo Frame Support disabled */
.hw_strip_crc= 0,
/**< CRC stripped by hardware */
},
};
.txmode = {
.mq_mode = ETH_DCB_NONE
},
11.4.4 RX Queue Initialization
The application uses one lcore to poll one or several ports, depending on the -q option, which
specifies the number of queues per lcore.
For example, if the user specifies -q 4, the application is able to poll four ports with one lcore.
If there are 16 ports on the target (and if the portmask argument is -p ffff ), the application will
need four lcores to poll all the ports.
ret = rte_eth_rx_queue_setup(portid, 0, nb_rxd,
rte_eth_dev_socket_id(portid),
NULL,
l2fwd_pktmbuf_pool);
if (ret < 0)
rte_exit(EXIT_FAILURE, "rte_eth_rx_queue_setup:err=%d, port=%u\n",
ret, (unsigned) portid);
The list of queues that must be polled for a given lcore is stored in a private structure called
struct lcore_queue_conf.
struct lcore_queue_conf {
unsigned n_rx_port;
unsigned rx_port_list[MAX_RX_QUEUE_PER_LCORE];
truct mbuf_table tx_mbufs[RTE_MAX_ETHPORTS];
struct rte_timer rx_timers[MAX_RX_QUEUE_PER_LCORE];
struct rte_jobstats port_fwd_jobs[MAX_RX_QUEUE_PER_LCORE];
struct
struct
struct
struct
rte_timer flush_timer;
rte_jobstats flush_job;
rte_jobstats idle_job;
rte_jobstats_context jobs_context;
rte_atomic16_t stats_read_pending;
rte_spinlock_t lock;
} __rte_cache_aligned;
Values of struct lcore_queue_conf:
• n_rx_port and rx_port_list[] are used in the main packet processing loop (see the “Receive, Process and Transmit Packets” below).
• rx_timers and flush_timer are used to ensure forced TX on low packet rate.
11.4. Explanation
52
Sample Applications User Guide, Release 2.0.0
• flush_job, idle_job and jobs_context are librte_jobstats objects used for managing l2fwd
jobs.
• stats_read_pending and lock are used during job stats read phase.
11.4.5 TX Queue Initialization
Each lcore should be able to transmit on any port. For every port, a single TX queue is
initialized.
/* init one TX queue on each port */
fflush(stdout);
ret = rte_eth_tx_queue_setup(portid, 0, nb_txd,
rte_eth_dev_socket_id(portid),
NULL);
if (ret < 0)
rte_exit(EXIT_FAILURE, "rte_eth_tx_queue_setup:err=%d, port=%u\n",
ret, (unsigned) portid);
11.4.6 Jobs statistics initialization
There are several statistics objects available:
• Flush job statistics
rte_jobstats_init(&qconf->flush_job, "flush", drain_tsc, drain_tsc,
drain_tsc, 0);
rte_timer_init(&qconf->flush_timer);
ret = rte_timer_reset(&qconf->flush_timer, drain_tsc, PERIODICAL,
lcore_id, &l2fwd_flush_job, NULL);
if (ret < 0) {
rte_exit(1, "Failed to reset flush job timer for lcore %u: %s",
lcore_id, rte_strerror(-ret));
}
• Statistics per RX port
rte_jobstats_init(job, name, 0, drain_tsc, 0, MAX_PKT_BURST);
rte_jobstats_set_update_period_function(job, l2fwd_job_update_cb);
rte_timer_init(&qconf->rx_timers[i]);
ret = rte_timer_reset(&qconf->rx_timers[i], 0, PERIODICAL, lcore_id,
l2fwd_fwd_job, (void *)(uintptr_t)i);
if (ret < 0) {
rte_exit(1, "Failed to reset lcore %u port %u job timer: %s",
lcore_id, qconf->rx_port_list[i], rte_strerror(-ret));
}
Following parameters are passed to rte_jobstats_init():
• 0 as minimal poll period
• drain_tsc as maximum poll period
• MAX_PKT_BURST as desired target value (RX burst size)
11.4. Explanation
53
Sample Applications User Guide, Release 2.0.0
11.4.7 Main loop
The forwarding path is reworked comparing to original L2 Forwarding application. In the
l2fwd_main_loop() function three loops are placed.
for (;;) {
rte_spinlock_lock(&qconf->lock);
do {
rte_jobstats_context_start(&qconf->jobs_context);
/* Do the Idle job:
* - Read stats_read_pending flag
* - check if some real job need to be executed
*/
rte_jobstats_start(&qconf->jobs_context, &qconf->idle_job);
do {
uint8_t i;
uint64_t now = rte_get_timer_cycles();
need_manage = qconf->flush_timer.expire < now;
/* Check if we was esked to give a stats. */
stats_read_pending =
rte_atomic16_read(&qconf->stats_read_pending);
need_manage |= stats_read_pending;
for (i = 0; i < qconf->n_rx_port && !need_manage; i++)
need_manage = qconf->rx_timers[i].expire < now;
} while (!need_manage);
rte_jobstats_finish(&qconf->idle_job, qconf->idle_job.target);
rte_timer_manage();
rte_jobstats_context_finish(&qconf->jobs_context);
} while (likely(stats_read_pending == 0));
}
rte_spinlock_unlock(&qconf->lock);
rte_pause();
First infinite for loop is to minimize impact of stats reading. Lock is only locked/unlocked when
asked.
Second inner while loop do the whole jobs management. When any job is ready, the use
rte_timer_manage() is used to call the job handler. In this place functions l2fwd_fwd_job() and
l2fwd_flush_job() are called when needed. Then rte_jobstats_context_finish() is called to mark
loop end - no other jobs are ready to execute. By this time stats are ready to be read and if
stats_read_pending is set, loop breaks allowing stats to be read.
Third do-while loop is the idle job (idle stats counter). Its only purpose is monitoring if any job
is ready or stats job read is pending for this lcore. Statistics from this part of code is considered
as the headroom available for additional processing.
11.4.8 Receive, Process and Transmit Packets
The main task of l2fwd_fwd_job() function is to read ingress packets from the RX queue of
particular port and forward it. This is done using the following code:
11.4. Explanation
54
Sample Applications User Guide, Release 2.0.0
total_nb_rx = rte_eth_rx_burst((uint8_t) portid, 0, pkts_burst,
MAX_PKT_BURST);
for (j = 0; j < total_nb_rx; j++) {
m = pkts_burst[j];
rte_prefetch0(rte_pktmbuf_mtod(m, void *));
l2fwd_simple_forward(m, portid);
}
Packets are read in a burst of size MAX_PKT_BURST. Then, each mbuf in the table is processed by the l2fwd_simple_forward() function. The processing is very simple: process the TX
port from the RX port, then replace the source and destination MAC addresses.
The rte_eth_rx_burst() function writes the mbuf pointers in a local table and returns the number
of available mbufs in the table.
After first read second try is issued.
if (total_nb_rx == MAX_PKT_BURST) {
const uint16_t nb_rx = rte_eth_rx_burst((uint8_t) portid, 0, pkts_burst,
MAX_PKT_BURST);
}
total_nb_rx += nb_rx;
for (j = 0; j < nb_rx; j++) {
m = pkts_burst[j];
rte_prefetch0(rte_pktmbuf_mtod(m, void *));
l2fwd_simple_forward(m, portid);
}
This second read is important to give job stats library a feedback how many packets was
processed.
/* Adjust period time in which we are running here. */
if (rte_jobstats_finish(job, total_nb_rx) != 0) {
rte_timer_reset(&qconf->rx_timers[port_idx], job->period, PERIODICAL,
lcore_id, l2fwd_fwd_job, arg);
}
To maximize performance exactly MAX_PKT_BURST is expected (the target value) to be read
for each l2fwd_fwd_job() call. If total_nb_rx is smaller than target value job->period will be
increased. If it is greater the period will be decreased.
Note: In the following code, one line for getting the output port requires some explanation.
During the initialization process, a static array of destination ports (l2fwd_dst_ports[]) is filled
such that for each source port, a destination port is assigned that is either the next or previous
enabled port from the portmask. Naturally, the number of ports in the portmask must be even,
otherwise, the application exits.
static void
l2fwd_simple_forward(struct rte_mbuf *m, unsigned portid)
{
struct ether_hdr *eth;
void *tmp;
unsigned dst_port;
dst_port = l2fwd_dst_ports[portid];
11.4. Explanation
55
Sample Applications User Guide, Release 2.0.0
eth = rte_pktmbuf_mtod(m, struct ether_hdr *);
/* 02:00:00:00:00:xx */
tmp = ð->d_addr.addr_bytes[0];
*((uint64_t *)tmp) = 0x000000000002 + ((uint64_t) dst_port << 40);
/* src addr */
ether_addr_copy(&l2fwd_ports_eth_addr[dst_port], ð->s_addr);
}
l2fwd_send_packet(m, (uint8_t) dst_port);
Then, the packet is sent using the l2fwd_send_packet (m, dst_port) function. For this test
application, the processing is exactly the same for all packets arriving on the same RX port.
Therefore, it would have been possible to call the l2fwd_send_burst() function directly from the
main loop to send all the received packets on the same TX port, using the burst-oriented send
function, which is more efficient.
However, in real-life applications (such as, L3 routing), packet N is not necessarily forwarded
on the same port as packet N-1. The application is implemented to illustrate that, so the same
approach can be reused in a more complex application.
The l2fwd_send_packet() function stores the packet in a per-lcore and per-txport table. If the
table is full, the whole packets table is transmitted using the l2fwd_send_burst() function:
/* Send the packet on an output interface */
static int
l2fwd_send_packet(struct rte_mbuf *m, uint8_t port)
{
unsigned lcore_id, len;
struct lcore_queue_conf *qconf;
lcore_id = rte_lcore_id();
qconf = &lcore_queue_conf[lcore_id];
len = qconf->tx_mbufs[port].len;
qconf->tx_mbufs[port].m_table[len] = m;
len++;
/* enough pkts to be sent */
if (unlikely(len == MAX_PKT_BURST)) {
l2fwd_send_burst(qconf, MAX_PKT_BURST, port);
len = 0;
}
}
qconf->tx_mbufs[port].len = len; return 0;
To ensure that no packets remain in the tables, the flush job exists. The l2fwd_flush_job() is
called periodically to for each lcore draining TX queue of each port. This technique introduces
some latency when there are not many packets to send, however it improves performance:
static void
l2fwd_flush_job(__rte_unused struct rte_timer *timer, __rte_unused void *arg)
{
uint64_t now;
11.4. Explanation
56
Sample Applications User Guide, Release 2.0.0
unsigned lcore_id;
struct lcore_queue_conf *qconf;
struct mbuf_table *m_table;
uint8_t portid;
lcore_id = rte_lcore_id();
qconf = &lcore_queue_conf[lcore_id];
rte_jobstats_start(&qconf->jobs_context, &qconf->flush_job);
now = rte_get_timer_cycles();
lcore_id = rte_lcore_id();
qconf = &lcore_queue_conf[lcore_id];
for (portid = 0; portid < RTE_MAX_ETHPORTS; portid++) {
m_table = &qconf->tx_mbufs[portid];
if (m_table->len == 0 || m_table->next_flush_time <= now)
continue;
}
}
l2fwd_send_burst(qconf, portid);
/* Pass target to indicate that this job is happy of time interval
* in which it was called. */
rte_jobstats_finish(&qconf->flush_job, qconf->flush_job.target);
11.4. Explanation
57
CHAPTER
TWELVE
L2 FORWARDING SAMPLE APPLICATION (IN REAL AND
VIRTUALIZED ENVIRONMENTS)
The L2 Forwarding sample application is a simple example of packet processing using the Data
Plane Development Kit (DPDK) which also takes advantage of Single Root I/O Virtualization
(SR-IOV) features in a virtualized environment.
Note: Please note that previously a separate L2 Forwarding in Virtualized Environments
sample application was used, however, in later DPDK versions these sample applications have
been merged.
12.1 Overview
The L2 Forwarding sample application, which can operate in real and virtualized environments,
performs L2 forwarding for each packet that is received on an RX_PORT. The destination port is
the adjacent port from the enabled portmask, that is, if the first four ports are enabled (portmask
0xf), ports 1 and 2 forward into each other, and ports 3 and 4 forward into each other. Also, the
MAC addresses are affected as follows:
• The source MAC address is replaced by the TX_PORT MAC address
• The destination MAC address is replaced by 02:00:00:00:00:TX_PORT_ID
This application can be used to benchmark performance using a traffic-generator, as shown in
the Fig. 12.1.
The application can also be used in a virtualized environment as shown in Fig. 12.2.
The L2 Forwarding application can also be used as a starting point for developing a new application based on the DPDK.
12.1.1 Virtual Function Setup Instructions
This application can use the virtual function available in the system and therefore can be used
in a virtual machine without passing through the whole Network Device into a guest machine
in a virtualized scenario. The virtual functions can be enabled in the host machine or the
hypervisor with the respective physical function driver.
For example, in a Linux* host machine, it is possible to enable a virtual function using the
following command:
58
Sample Applications User Guide, Release 2.0.0
0
1
2
0
Flow 0
Flow 1
1
Flow 2
2
Flow 3
3
3
...
Traffic
Generator
NUT
(RTE)
Figure 12.1: Performance Benchmark Setup (Basic Environment)
Figure 12.2: Performance Benchmark Setup (Virtualized Environment)
12.1. Overview
59
Sample Applications User Guide, Release 2.0.0
modprobe ixgbe max_vfs=2,2
This command enables two Virtual Functions on each of Physical Function of the NIC, with
two physical ports in the PCI configuration space. It is important to note that enabled Virtual
Function 0 and 2 would belong to Physical Function 0 and Virtual Function 1 and 3 would
belong to Physical Function 1, in this case enabling a total of four Virtual Functions.
12.2 Compiling the Application
1. Go to the example directory:
export RTE_SDK=/path/to/rte_sdk cd ${RTE_SDK}/examples/l2fwd
2. Set the target (a default target is used if not specified). For example:
export RTE_TARGET=x86_64-native-linuxapp-gcc
See the DPDK Getting Started Guide for possible RTE_TARGET values.
3. Build the application:
make
12.3 Running the Application
The application requires a number of command line options:
./build/l2fwd [EAL options] -- -p PORTMASK [-q NQ]
where,
• p PORTMASK: A hexadecimal bitmask of the ports to configure
• q NQ: A number of queues (=ports) per lcore (default is 1)
To run the application in linuxapp environment with 4 lcores, 16 ports and 8 RX queues per
lcore, issue the command:
$ ./build/l2fwd -c f -n 4 -- -q 8 -p ffff
Refer to the DPDK Getting Started Guide for general information on running applications and
the Environment Abstraction Layer (EAL) options.
12.4 Explanation
The following sections provide some explanation of the code.
12.2. Compiling the Application
60
Sample Applications User Guide, Release 2.0.0
12.4.1 Command Line Arguments
The L2 Forwarding sample application takes specific parameters, in addition to Environment
Abstraction Layer (EAL) arguments (see above). The preferred way to parse parameters is to
use the getopt() function, since it is part of a well-defined and portable library.
The parsing of arguments is done in the l2fwd_parse_args() function. The method of argument
parsing is not described here. Refer to the glibc getopt(3) man page for details.
EAL arguments are parsed first, then application-specific arguments. This is done at the beginning of the main() function:
/* init EAL */
ret = rte_eal_init(argc, argv);
if (ret < 0)
rte_exit(EXIT_FAILURE, "Invalid EAL arguments\n");
argc -= ret;
argv += ret;
/* parse application arguments (after the EAL ones) */
ret = l2fwd_parse_args(argc, argv);
if (ret < 0)
rte_exit(EXIT_FAILURE, "Invalid L2FWD arguments\n");
12.4.2 Mbuf Pool Initialization
Once the arguments are parsed, the mbuf pool is created. The mbuf pool contains a set of
mbuf objects that will be used by the driver and the application to store network packet data:
/* create the mbuf pool */
l2fwd_pktmbuf_pool = rte_mempool_create("mbuf_pool", NB_MBUF, MBUF_SIZE, 32, sizeof(struct rte
rte_pktmbuf_pool_init, NULL, rte_pktmbuf_init, NULL, SOCKET0, 0);
if (l2fwd_pktmbuf_pool == NULL)
rte_panic("Cannot init mbuf pool\n");
The rte_mempool is a generic structure used to handle pools of objects. In this case, it is
necessary to create a pool that will be used by the driver, which expects to have some reserved
space in the mempool structure, sizeof(struct rte_pktmbuf_pool_private) bytes. The number of
allocated pkt mbufs is NB_MBUF, with a size of MBUF_SIZE each. A per-lcore cache of 32
mbufs is kept. The memory is allocated in NUMA socket 0, but it is possible to extend this code
to allocate one mbuf pool per socket.
Two callback pointers are also given to the rte_mempool_create() function:
• The first callback pointer is to rte_pktmbuf_pool_init() and is used to initialize the private
data of the mempool, which is needed by the driver. This function is provided by the mbuf
API, but can be copied and extended by the developer.
• The second callback pointer given to rte_mempool_create() is the mbuf initializer. The
default is used, that is, rte_pktmbuf_init(), which is provided in the rte_mbuf library. If a
more complex application wants to extend the rte_pktmbuf structure for its own needs, a
new function derived from rte_pktmbuf_init( ) can be created.
12.4. Explanation
61
Sample Applications User Guide, Release 2.0.0
12.4.3 Driver Initialization
The main part of the code in the main() function relates to the initialization of the driver. To fully
understand this code, it is recommended to study the chapters that related to the Poll Mode
Driver in the DPDK Programmer’s Guide - Rel 1.4 EAR and the DPDK API Reference.
if (rte_eal_pci_probe() < 0)
rte_exit(EXIT_FAILURE, "Cannot probe PCI\n");
nb_ports = rte_eth_dev_count();
if (nb_ports == 0)
rte_exit(EXIT_FAILURE, "No Ethernet ports - bye\n");
if (nb_ports > RTE_MAX_ETHPORTS)
nb_ports = RTE_MAX_ETHPORTS;
/* reset l2fwd_dst_ports */
for (portid = 0; portid < RTE_MAX_ETHPORTS; portid++)
l2fwd_dst_ports[portid] = 0;
last_port = 0;
/*
* Each logical core is assigned a dedicated TX queue on each port.
*/
for (portid = 0; portid < nb_ports; portid++) {
/* skip ports that are not enabled */
if ((l2fwd_enabled_port_mask & (1 << portid)) == 0)
continue;
if (nb_ports_in_mask % 2) {
l2fwd_dst_ports[portid] = last_port;
l2fwd_dst_ports[last_port] = portid;
}
else
last_port = portid;
nb_ports_in_mask++;
}
rte_eth_dev_info_get((uint8_t) portid, &dev_info);
Observe that:
• rte_igb_pmd_init_all() simultaneously registers the driver as a PCI driver and as an Ethernet* Poll Mode Driver.
• rte_eal_pci_probe() parses the devices on the PCI bus and initializes recognized devices.
The next step is to configure the RX and TX queues. For each port, there is only one RX queue
(only one lcore is able to poll a given port). The number of TX queues depends on the number
of available lcores. The rte_eth_dev_configure() function is used to configure the number of
queues for a port:
ret = rte_eth_dev_configure((uint8_t)portid, 1, 1, &port_conf);
if (ret < 0)
rte_exit(EXIT_FAILURE, "Cannot configure device: "
12.4. Explanation
62
Sample Applications User Guide, Release 2.0.0
"err=%d, port=%u\n",
ret, portid);
The global configuration is stored in a static structure:
static const struct rte_eth_conf port_conf = {
.rxmode = {
.split_hdr_size = 0,
.header_split = 0,
/**< Header Split disabled */
.hw_ip_checksum = 0, /**< IP checksum offload disabled */
.hw_vlan_filter = 0, /**< VLAN filtering disabled */
.jumbo_frame = 0,
/**< Jumbo Frame Support disabled */
.hw_strip_crc= 0,
/**< CRC stripped by hardware */
},
};
.txmode = {
.mq_mode = ETH_DCB_NONE
},
12.4.4 RX Queue Initialization
The application uses one lcore to poll one or several ports, depending on the -q option, which
specifies the number of queues per lcore.
For example, if the user specifies -q 4, the application is able to poll four ports with one lcore.
If there are 16 ports on the target (and if the portmask argument is -p ffff ), the application will
need four lcores to poll all the ports.
ret = rte_eth_rx_queue_setup((uint8_t) portid, 0, nb_rxd, SOCKET0, &rx_conf, l2fwd_pktmbuf_poo
if (ret < 0)
rte_exit(EXIT_FAILURE, "rte_eth_rx_queue_setup: "
"err=%d, port=%u\n",
ret, portid);
The list of queues that must be polled for a given lcore is stored in a private structure called
struct lcore_queue_conf.
struct lcore_queue_conf {
unsigned n_rx_port;
unsigned rx_port_list[MAX_RX_QUEUE_PER_LCORE];
struct mbuf_table tx_mbufs[L2FWD_MAX_PORTS];
} rte_cache_aligned;
struct lcore_queue_conf lcore_queue_conf[RTE_MAX_LCORE];
The values n_rx_port and rx_port_list[] are used in the main packet processing loop (see the
“Receive, Process and Transmit Packets” section below).
The global configuration for the RX queues is stored in a static structure:
static const struct rte_eth_rxconf rx_conf = {
.rx_thresh = {
.pthresh = RX_PTHRESH,
.hthresh = RX_HTHRESH,
.wthresh = RX_WTHRESH,
},
};
12.4. Explanation
63
Sample Applications User Guide, Release 2.0.0
12.4.5 TX Queue Initialization
Each lcore should be able to transmit on any port. For every port, a single TX queue is
initialized.
/* init one TX queue on each port */
fflush(stdout);
ret = rte_eth_tx_queue_setup((uint8_t) portid, 0, nb_txd, rte_eth_dev_socket_id(portid), &tx_c
if (ret < 0)
rte_exit(EXIT_FAILURE, "rte_eth_tx_queue_setup:err=%d, port=%u\n", ret, (unsigned) portid)
The global configuration for TX queues is stored in a static structure:
static const struct rte_eth_txconf tx_conf = {
.tx_thresh = {
.pthresh = TX_PTHRESH,
.hthresh = TX_HTHRESH,
.wthresh = TX_WTHRESH,
},
.tx_free_thresh = RTE_TEST_TX_DESC_DEFAULT + 1, /* disable feature */
};
12.4.6 Receive, Process and Transmit Packets
In the l2fwd_main_loop() function, the main task is to read ingress packets from the RX queues.
This is done using the following code:
/*
* Read packet from RX queues
*/
for (i = 0; i < qconf->n_rx_port; i++) {
portid = qconf->rx_port_list[i];
nb_rx = rte_eth_rx_burst((uint8_t) portid, 0,
}
pkts_burst, MAX_PKT_BURST);
for (j = 0; j < nb_rx; j++) {
m = pkts_burst[j];
rte_prefetch0[rte_pktmbuf_mtod(m, void *)); l2fwd_simple_forward(m, portid);
}
Packets are read in a burst of size MAX_PKT_BURST. The rte_eth_rx_burst() function writes
the mbuf pointers in a local table and returns the number of available mbufs in the table.
Then, each mbuf in the table is processed by the l2fwd_simple_forward() function. The processing is very simple: process the TX port from the RX port, then replace the source and
destination MAC addresses.
Note: In the following code, one line for getting the output port requires some explanation.
During the initialization process, a static array of destination ports (l2fwd_dst_ports[]) is filled
such that for each source port, a destination port is assigned that is either the next or previous
enabled port from the portmask. Naturally, the number of ports in the portmask must be even,
otherwise, the application exits.
12.4. Explanation
64
Sample Applications User Guide, Release 2.0.0
static void
l2fwd_simple_forward(struct rte_mbuf *m, unsigned portid)
{
struct ether_hdr *eth;
void *tmp;
unsigned dst_port;
dst_port = l2fwd_dst_ports[portid];
eth = rte_pktmbuf_mtod(m, struct ether_hdr *);
/* 02:00:00:00:00:xx */
tmp = ð->d_addr.addr_bytes[0];
*((uint64_t *)tmp) = 0x000000000002 + ((uint64_t) dst_port << 40);
/* src addr */
ether_addr_copy(&l2fwd_ports_eth_addr[dst_port], ð->s_addr);
}
l2fwd_send_packet(m, (uint8_t) dst_port);
Then, the packet is sent using the l2fwd_send_packet (m, dst_port) function. For this test
application, the processing is exactly the same for all packets arriving on the same RX port.
Therefore, it would have been possible to call the l2fwd_send_burst() function directly from the
main loop to send all the received packets on the same TX port, using the burst-oriented send
function, which is more efficient.
However, in real-life applications (such as, L3 routing), packet N is not necessarily forwarded
on the same port as packet N-1. The application is implemented to illustrate that, so the same
approach can be reused in a more complex application.
The l2fwd_send_packet() function stores the packet in a per-lcore and per-txport table. If the
table is full, the whole packets table is transmitted using the l2fwd_send_burst() function:
/* Send the packet on an output interface */
static int
l2fwd_send_packet(struct rte_mbuf *m, uint8_t port)
{
unsigned lcore_id, len;
struct lcore_queue_conf \*qconf;
lcore_id = rte_lcore_id();
qconf = &lcore_queue_conf[lcore_id];
len = qconf->tx_mbufs[port].len;
qconf->tx_mbufs[port].m_table[len] = m;
len++;
/* enough pkts to be sent */
if (unlikely(len == MAX_PKT_BURST)) {
l2fwd_send_burst(qconf, MAX_PKT_BURST, port);
len = 0;
}
}
qconf->tx_mbufs[port].len = len; return 0;
12.4. Explanation
65
Sample Applications User Guide, Release 2.0.0
To ensure that no packets remain in the tables, each lcore does a draining of TX queue in its
main loop. This technique introduces some latency when there are not many packets to send,
however it improves performance:
cur_tsc = rte_rdtsc();
/*
*
*/
TX burst queue drain
diff_tsc = cur_tsc - prev_tsc;
if (unlikely(diff_tsc > drain_tsc)) {
for (portid = 0; portid < RTE_MAX_ETHPORTS; portid++) {
if (qconf->tx_mbufs[portid].len == 0)
continue;
l2fwd_send_burst(&lcore_queue_conf[lcore_id], qconf->tx_mbufs[portid].len, (uint8_t) p
}
qconf->tx_mbufs[portid].len = 0;
/* if timer is enabled */
if (timer_period > 0) {
/* advance the timer */
timer_tsc += diff_tsc;
/* if timer has reached its timeout */
if (unlikely(timer_tsc >= (uint64_t) timer_period)) {
/* do this only on master core */
if (lcore_id == rte_get_master_lcore()) {
print_stats();
}
}
}
}
/* reset the timer */
timer_tsc = 0;
prev_tsc = cur_tsc;
12.4. Explanation
66
CHAPTER
THIRTEEN
L3 FORWARDING SAMPLE APPLICATION
The L3 Forwarding application is a simple example of packet processing using the DPDK. The
application performs L3 forwarding.
13.1 Overview
The application demonstrates the use of the hash and LPM libraries in the DPDK to implement packet forwarding. The initialization and run-time paths are very similar to those of the
L2 forwarding application (see Chapter 9 “L2 Forwarding Sample Application (in Real and Virtualized Environments)” for more information). The main difference from the L2 Forwarding
sample application is that the forwarding decision is made based on information read from the
input packet.
The lookup method is either hash-based or LPM-based and is selected at compile time. When
the selected lookup method is hash-based, a hash object is used to emulate the flow classification stage. The hash object is used in correlation with a flow table to map each input packet
to its flow at runtime.
The hash lookup key is represented by a DiffServ 5-tuple composed of the following fields read
from the input packet: Source IP Address, Destination IP Address, Protocol, Source Port and
Destination Port. The ID of the output interface for the input packet is read from the identified
flow table entry. The set of flows used by the application is statically configured and loaded
into the hash at initialization time. When the selected lookup method is LPM based, an LPM
object is used to emulate the forwarding stage for IPv4 packets. The LPM object is used as the
routing table to identify the next hop for each input packet at runtime.
The LPM lookup key is represented by the Destination IP Address field read from the input
packet. The ID of the output interface for the input packet is the next hop returned by the LPM
lookup. The set of LPM rules used by the application is statically configured and loaded into
the LPM object at initialization time.
In the sample application, hash-based forwarding supports IPv4 and IPv6. LPM-based forwarding supports IPv4 only.
13.2 Compiling the Application
To compile the application:
1. Go to the sample application directory:
67
Sample Applications User Guide, Release 2.0.0
export RTE_SDK=/path/to/rte_sdk cd ${RTE_SDK}/examples/l3fwd
2. Set the target (a default target is used if not specified). For example:
export RTE_TARGET=x86_64-native-linuxapp-gcc
See the DPDK Getting Started Guide for possible RTE_TARGET values.
3. Build the application:
make
13.3 Running the Application
The application has a number of command line options:
./build/l3fwd [EAL options] -- -p PORTMASK [-P]
--config(port,queue,lcore)[,(port,queue,lcore
where,
• -p PORTMASK: Hexadecimal bitmask of ports to configure
• -P: optional, sets all ports to promiscuous mode so that packets are accepted regardless
of the packet’s Ethernet MAC destination address. Without this option, only packets
with the Ethernet MAC destination address set to the Ethernet address of the port are
accepted.
• –config (port,queue,lcore)[,(port,queue,lcore)]: determines which queues from which
ports are mapped to which cores
• –enable-jumbo: optional, enables jumbo frames
• –max-pkt-len: optional, maximum packet length in decimal (64-9600)
• –no-numa: optional, disables numa awareness
• –hash-entry-num: optional, specifies the hash entry number in hexadecimal to be setup
• –ipv6: optional, set it if running ipv6 packets
For example, consider a dual processor socket platform where cores 0-7 and 16-23 appear
on socket 0, while cores 8-15 and 24-31 appear on socket 1. Let’s say that the programmer
wants to use memory from both NUMA nodes, the platform has only two ports, one connected
to each NUMA node, and the programmer wants to use two cores from each processor socket
to do the packet processing.
To enable L3 forwarding between two ports, using two cores, cores 1 and 2, from each processor, while also taking advantage of local memory access by optimizing around NUMA, the
programmer must enable two queues from each port, pin to the appropriate cores and allocate
memory from the appropriate NUMA node. This is achieved using the following command:
./build/l3fwd -c 606 -n 4 -- -p 0x3 --config="(0,0,1),(0,1,2),(1,0,9),(1,1,10)"
In this command:
• The -c option enables cores 0, 1, 2, 3
13.3. Running the Application
68
Sample Applications User Guide, Release 2.0.0
• The -p option enables ports 0 and 1
• The –config option enables two queues on each port and maps each (port,queue) pair to
a specific core. Logic to enable multiple RX queues using RSS and to allocate memory
from the correct NUMA nodes is included in the application and is done transparently.
The following table shows the mapping in this example:
Port
0
0
1
1
Queue
0
1
0
1
lcore
0
2
1
3
Description
Map queue 0 from port 0 to lcore 0.
Map queue 1 from port 0 to lcore 2.
Map queue 0 from port 1 to lcore 1.
Map queue 1 from port 1 to lcore 3.
Refer to the DPDK Getting Started Guide for general information on running applications and
the Environment Abstraction Layer (EAL) options.
13.4 Explanation
The following sections provide some explanation of the sample application code. As mentioned
in the overview section, the initialization and run-time paths are very similar to those of the
L2 forwarding application (see Chapter 9 “L2 Forwarding Sample Application (in Real and
Virtualized Environments)” for more information). The following sections describe aspects that
are specific to the L3 Forwarding sample application.
13.4.1 Hash Initialization
The hash object is created and loaded with the pre-configured entries read from a global array,
and then generate the expected 5-tuple as key to keep consistence with those of real flow for
the convenience to execute hash performance test on 4M/8M/16M flows.
Note: The Hash initialization will setup both ipv4 and ipv6 hash table, and populate the either
table depending on the value of variable ipv6. To support the hash performance test with
up to 8M single direction flows/16M bi-direction flows, populate_ipv4_many_flow_into_table()
function will populate the hash table with specified hash table entry number(default 4M).
Note: Value of global variable ipv6 can be specified with –ipv6 in the command line. Value
of global variable hash_entry_number, which is used to specify the total hash entry number
for all used ports in hash performance test, can be specified with –hash-entry-num VALUE in
command line, being its default value 4.
#if (APP_LOOKUP_METHOD == APP_LOOKUP_EXACT_MATCH)
static void
setup_hash(int socketid)
{
// ...
if (hash_entry_number != HASH_ENTRY_NUMBER_DEFAULT) {
if (ipv6 == 0) {
/* populate the ipv4 hash */
populate_ipv4_many_flow_into_table(ipv4_l3fwd_lookup_struct[socketid], hash_en
} else {
13.4. Explanation
69
Sample Applications User Guide, Release 2.0.0
/* populate the ipv6 hash */
populate_ipv6_many_flow_into_table( ipv6_l3fwd_lookup_struct[socketid], hash_e
}
#endif
}
} else
if (ipv6 == 0) {
/* populate the ipv4 hash */
populate_ipv4_few_flow_into_table(ipv4_l3fwd_lookup_struct[socketid]);
} else {
/* populate the ipv6 hash */
populate_ipv6_few_flow_into_table(ipv6_l3fwd_lookup_struct[socketid]);
}
}
13.4.2 LPM Initialization
The LPM object is created and loaded with the pre-configured entries read from a global array.
#if (APP_LOOKUP_METHOD == APP_LOOKUP_LPM)
static void
setup_lpm(int socketid)
{
unsigned i;
int ret;
char s[64];
/* create the LPM table */
rte_snprintf(s, sizeof(s), "IPV4_L3FWD_LPM_%d", socketid);
ipv4_l3fwd_lookup_struct[socketid] = rte_lpm_create(s, socketid, IPV4_L3FWD_LPM_MAX_RULES,
if (ipv4_l3fwd_lookup_struct[socketid] == NULL)
rte_exit(EXIT_FAILURE, "Unable to create the l3fwd LPM table"
" on socket %d\n", socketid);
/* populate the LPM table */
for (i = 0; i < IPV4_L3FWD_NUM_ROUTES; i++) {
/* skip unused ports */
if ((1 << ipv4_l3fwd_route_array[i].if_out & enabled_port_mask) == 0)
continue;
ret = rte_lpm_add(ipv4_l3fwd_lookup_struct[socketid], ipv4_l3fwd_route_array[i].ip,
ipv4_l3fwd_route_array[i].depth, ipv4_l3fwd_route_array[i].if_
if (ret < 0) {
rte_exit(EXIT_FAILURE, "Unable to add entry %u to the "
"l3fwd LPM table on socket %d\n", i, socketid);
}
}
}
#endif
printf("LPM: Adding route 0x%08x / %d (%d)\n",
(unsigned)ipv4_l3fwd_route_array[i].ip, ipv4_l3fwd_route_array[i].depth, ipv4_l3fw
13.4. Explanation
70
Sample Applications User Guide, Release 2.0.0
13.4.3 Packet Forwarding for Hash-based Lookups
For each input packet, the packet forwarding operation is done by the l3fwd_simple_forward()
or simple_ipv4_fwd_4pkts() function for IPv4 packets or the simple_ipv6_fwd_4pkts() function for IPv6 packets. The l3fwd_simple_forward() function provides the basic functionality
for both IPv4 and IPv6 packet forwarding for any number of burst packets received, and the
packet forwarding decision (that is, the identification of the output interface for the packet) for
hash-based lookups is done by the get_ipv4_dst_port() or get_ipv6_dst_port() function. The
get_ipv4_dst_port() function is shown below:
static inline uint8_t
get_ipv4_dst_port(void *ipv4_hdr, uint8_t portid, lookup_struct_t *ipv4_l3fwd_lookup_struct)
{
int ret = 0;
union ipv4_5tuple_host key;
ipv4_hdr = (uint8_t \*)ipv4_hdr + offsetof(struct ipv4_hdr, time_to_live);
m128i data = _mm_loadu_si128(( m128i*)(ipv4_hdr));
/* Get 5 tuple: dst port, src port, dst IP address, src IP address and protocol */
key.xmm = _mm_and_si128(data, mask0);
/* Find destination port */
ret = rte_hash_lookup(ipv4_l3fwd_lookup_struct, (const void *)&key);
}
return (uint8_t)((ret < 0)? portid : ipv4_l3fwd_out_if[ret]);
The get_ipv6_dst_port() function is similar to the get_ipv4_dst_port() function.
The simple_ipv4_fwd_4pkts() and simple_ipv6_fwd_4pkts() function are optimized for continuous 4 valid ipv4 and ipv6 packets, they leverage the multiple buffer optimization to boost the
performance of forwarding packets with the exact match on hash table. The key code snippet
of simple_ipv4_fwd_4pkts() is shown below:
static inline void
simple_ipv4_fwd_4pkts(struct rte_mbuf* m[4], uint8_t portid, struct lcore_conf *qconf)
{
// ...
data[0]
data[1]
data[2]
data[3]
=
=
=
=
_mm_loadu_si128((
_mm_loadu_si128((
_mm_loadu_si128((
_mm_loadu_si128((
key[0].xmm
key[1].xmm
key[2].xmm
key[3].xmm
=
=
=
=
m128i*)(rte_pktmbuf_mtod(m[0],
m128i*)(rte_pktmbuf_mtod(m[1],
m128i*)(rte_pktmbuf_mtod(m[2],
m128i*)(rte_pktmbuf_mtod(m[3],
_mm_and_si128(data[0],
_mm_and_si128(data[1],
_mm_and_si128(data[2],
_mm_and_si128(data[3],
unsigned
unsigned
unsigned
unsigned
char
char
char
char
*)
*)
*)
*)
+
+
+
+
mask0);
mask0);
mask0);
mask0);
const void *key_array[4] = {&key[0], &key[1], &key[2],&key[3]};
rte_hash_lookup_multi(qconf->ipv4_lookup_struct, &key_array[0], 4, ret);
dst_port[0]
dst_port[1]
dst_port[2]
dst_port[3]
13.4. Explanation
=
=
=
=
(ret[0]
(ret[1]
(ret[2]
(ret[3]
<
<
<
<
0)?
0)?
0)?
0)?
portid:ipv4_l3fwd_out_if[ret[0]];
portid:ipv4_l3fwd_out_if[ret[1]];
portid:ipv4_l3fwd_out_if[ret[2]];
portid:ipv4_l3fwd_out_if[ret[3]];
71
sizeof(struc
sizeof(struc
sizeof(struc
sizeof(struc
Sample Applications User Guide, Release 2.0.0
}
// ...
The simple_ipv6_fwd_4pkts() function is similar to the simple_ipv4_fwd_4pkts() function.
13.4.4 Packet Forwarding for LPM-based Lookups
For each input packet, the packet forwarding operation is done by the l3fwd_simple_forward()
function, but the packet forwarding decision (that is, the identification of the output interface for
the packet) for LPM-based lookups is done by the get_ipv4_dst_port() function below:
static inline uint8_t
get_ipv4_dst_port(struct ipv4_hdr *ipv4_hdr, uint8_t portid, lookup_struct_t *ipv4_l3fwd_looku
{
uint8_t next_hop;
}
return (uint8_t) ((rte_lpm_lookup(ipv4_l3fwd_lookup_struct, rte_be_to_cpu_32(ipv4_hdr->dst
13.4. Explanation
72
CHAPTER
FOURTEEN
L3 FORWARDING WITH POWER MANAGEMENT SAMPLE
APPLICATION
14.1 Introduction
The L3 Forwarding with Power Management application is an example of power-aware packet
processing using the DPDK. The application is based on existing L3 Forwarding sample application, with the power management algorithms to control the P-states and C-states of the Intel
processor via a power management library.
14.2 Overview
The application demonstrates the use of the Power libraries in the DPDK to implement packet
forwarding. The initialization and run-time paths are very similar to those of the L3 forwarding
sample application (see Chapter 10 “L3 Forwarding Sample Application” for more information).
The main difference from the L3 Forwarding sample application is that this application introduces power-aware optimization algorithms by leveraging the Power library to control P-state
and C-state of processor based on packet load.
The DPDK includes poll-mode drivers to configure Intel NIC devices and their receive (Rx) and
transmit (Tx) queues. The design principle of this PMD is to access the Rx and Tx descriptors
directly without any interrupts to quickly receive, process and deliver packets in the user space.
In general, the DPDK executes an endless packet processing loop on dedicated IA cores that
include the following steps:
• Retrieve input packets through the PMD to poll Rx queue
• Process each received packet or provide received packets to other processing cores
through software queues
• Send pending output packets to Tx queue through the PMD
In this way, the PMD achieves better performance than a traditional interrupt-mode driver, at
the cost of keeping cores active and running at the highest frequency, hence consuming the
maximum power all the time. However, during the period of processing light network traffic,
which happens regularly in communication infrastructure systems due to well-known “tidal effect”, the PMD is still busy waiting for network packets, which wastes a lot of power.
Processor performance states (P-states) are the capability of an Intel processor to switch between different supported operating frequencies and voltages. If configured correctly, according to system workload, this feature provides power savings. CPUFreq is the infrastructure
provided by the Linux* kernel to control the processor performance state capability. CPUFreq
73
Sample Applications User Guide, Release 2.0.0
supports a user space governor that enables setting frequency via manipulating the virtual file
device from a user space application. The Power library in the DPDK provides a set of APIs for
manipulating a virtual file device to allow user space application to set the CPUFreq governor
and set the frequency of specific cores.
This application includes a P-state power management algorithm to generate a frequency hint
to be sent to CPUFreq. The algorithm uses the number of received and available Rx packets
on recent polls to make a heuristic decision to scale frequency up/down. Specifically, some
thresholds are checked to see whether a specific core running an DPDK polling thread needs
to increase frequency a step up based on the near to full trend of polled Rx queues. Also, it
decreases frequency a step if packet processed per loop is far less than the expected threshold
or the thread’s sleeping time exceeds a threshold.
C-States are also known as sleep states. They allow software to put an Intel core into a low
power idle state from which it is possible to exit via an event, such as an interrupt. However,
there is a tradeoff between the power consumed in the idle state and the time required to wake
up from the idle state (exit latency). Therefore, as you go into deeper C-states, the power
consumed is lower but the exit latency is increased. Each C-state has a target residency. It is
essential that when entering into a C-state, the core remains in this C-state for at least as long
as the target residency in order to fully realize the benefits of entering the C-state. CPUIdle is
the infrastructure provide by the Linux kernel to control the processor C-state capability. Unlike
CPUFreq, CPUIdle does not provide a mechanism that allows the application to change Cstate. It actually has its own heuristic algorithms in kernel space to select target C-state to
enter by executing privileged instructions like HLT and MWAIT, based on the speculative sleep
duration of the core. In this application, we introduce a heuristic algorithm that allows packet
processing cores to sleep for a short period if there is no Rx packet received on recent polls.
In this way, CPUIdle automatically forces the corresponding cores to enter deeper C-states
instead of always running to the C0 state waiting for packets.
Note: To fully demonstrate the power saving capability of using C-states, it is recommended
to enable deeper C3 and C6 states in the BIOS during system boot up.
14.3 Compiling the Application
To compile the application:
1. Go to the sample application directory:
export RTE_SDK=/path/to/rte_sdk cd ${RTE_SDK}/examples/l3fwd-power
2. Set the target (a default target is used if not specified). For example:
export RTE_TARGET=x86_64-native-linuxapp-gcc
See the DPDK Getting Started Guide for possible RTE_TARGET values.
3. Build the application:
make
14.3. Compiling the Application
74
Sample Applications User Guide, Release 2.0.0
14.4 Running the Application
The application has a number of command line options:
./build/l3fwd_power [EAL options] -- -p PORTMASK [-P]
--config(port,queue,lcore)[,(port,queue
where,
• -p PORTMASK: Hexadecimal bitmask of ports to configure
• -P: Sets all ports to promiscuous mode so that packets are accepted regardless of the
packet’s Ethernet MAC destination address. Without this option, only packets with the
Ethernet MAC destination address set to the Ethernet address of the port are accepted.
• –config (port,queue,lcore)[,(port,queue,lcore)]: determines which queues from which
ports are mapped to which cores.
• –enable-jumbo: optional, enables jumbo frames
• –max-pkt-len: optional, maximum packet length in decimal (64-9600)
• –no-numa: optional, disables numa awareness
See Chapter 10 “L3 Forwarding Sample Application” for details. The L3fwd-power example
reuses the L3fwd command line options.
14.5 Explanation
The following sections provide some explanation of the sample application code. As mentioned
in the overview section, the initialization and run-time paths are identical to those of the L3
forwarding application. The following sections describe aspects that are specific to the L3
Forwarding with Power Management sample application.
14.5.1 Power Library Initialization
The Power library is initialized in the main routine. It changes the P-state governor to userspace
for specific cores that are under control. The Timer library is also initialized and several timers
are created later on, responsible for checking if it needs to scale down frequency at run time
by checking CPU utilization statistics.
Note: Only the power management related initialization is shown.
int main(int argc, char **argv)
{
struct lcore_conf *qconf;
int ret;
unsigned nb_ports;
uint16_t queueid;
unsigned lcore_id;
uint64_t hz;
uint32_t n_tx_queue, nb_lcores;
uint8_t portid, nb_rx_queue, queue, socketid;
// ...
14.4. Running the Application
75
Sample Applications User Guide, Release 2.0.0
/* init RTE timer library to be used to initialize per-core timers */
rte_timer_subsystem_init();
// ...
/* per-core initialization */
for (lcore_id = 0; lcore_id < RTE_MAX_LCORE; lcore_id++) {
if (rte_lcore_is_enabled(lcore_id) == 0)
continue;
/* init power management library for a specified core */
ret = rte_power_init(lcore_id);
if (ret)
rte_exit(EXIT_FAILURE, "Power management library "
"initialization failed on core%d\n", lcore_id);
/* init timer structures for each enabled lcore */
rte_timer_init(&power_timers[lcore_id]);
hz = rte_get_hpet_hz();
rte_timer_reset(&power_timers[lcore_id], hz/TIMER_NUMBER_PER_SECOND, SINGLE, lcore_id,
}
}
// ...
// ...
14.5.2 Monitoring Loads of Rx Queues
In general, the polling nature of the DPDK prevents the OS power management subsystem
from knowing if the network load is actually heavy or light. In this sample, sampling network
load work is done by monitoring received and available descriptors on NIC Rx queues in recent
polls. Based on the number of returned and available Rx descriptors, this example implements
algorithms to generate frequency scaling hints and speculative sleep duration, and use them
to control P-state and C-state of processors via the power management library. Frequency (Pstate) control and sleep state (C-state) control work individually for each logical core, and the
combination of them contributes to a power efficient packet processing solution when serving
light network loads.
The rte_eth_rx_burst() function and the newly-added rte_eth_rx_queue_count() function are
used in the endless packet processing loop to return the number of received and available Rx
descriptors. And those numbers of specific queue are passed to P-state and C-state heuristic
algorithms to generate hints based on recent network load trends.
Note: Only power control related code is shown.
static
attribute ((noreturn)) int main_loop( attribute ((unused)) void *dummy)
{
// ...
14.5. Explanation
76
Sample Applications User Guide, Release 2.0.0
while (1) {
// ...
/**
* Read packet from RX queues
*/
lcore_scaleup_hint = FREQ_CURRENT;
lcore_rx_idle_count = 0;
for (i = 0; i < qconf->n_rx_queue; ++i)
{
rx_queue = &(qconf->rx_queue_list[i]);
rx_queue->idle_hint = 0;
portid = rx_queue->port_id;
queueid = rx_queue->queue_id;
nb_rx = rte_eth_rx_burst(portid, queueid, pkts_burst, MAX_PKT_BURST);
stats[lcore_id].nb_rx_processed += nb_rx;
if (unlikely(nb_rx == 0)) {
/**
* no packet received from rx queue, try to
* sleep for a while forcing CPU enter deeper
* C states.
*/
rx_queue->zero_rx_packet_count++;
if (rx_queue->zero_rx_packet_count <= MIN_ZERO_POLL_COUNT)
continue;
rx_queue->idle_hint = power_idle_heuristic(rx_queue->zero_rx_packet_count);
lcore_rx_idle_count++;
} else {
rx_ring_length = rte_eth_rx_queue_count(portid, queueid);
rx_queue->zero_rx_packet_count = 0;
/**
* do not scale up frequency immediately as
* user to kernel space communication is costly
* which might impact packet I/O for received
* packets.
*/
}
rx_queue->freq_up_hint = power_freq_scaleup_heuristic(lcore_id, rx_ring_length);
/* Prefetch and forward packets */
}
// ...
if (likely(lcore_rx_idle_count != qconf->n_rx_queue)) {
for (i = 1, lcore_scaleup_hint = qconf->rx_queue_list[0].freq_up_hint; i < qconf->n_rx
x_queue = &(qconf->rx_queue_list[i]);
if (rx_queue->freq_up_hint > lcore_scaleup_hint)
}
14.5. Explanation
lcore_scaleup_hint = rx_queue->freq_up_hint;
77
Sample Applications User Guide, Release 2.0.0
if (lcore_scaleup_hint == FREQ_HIGHEST)
rte_power_freq_max(lcore_id);
else if (lcore_scaleup_hint == FREQ_HIGHER)
rte_power_freq_up(lcore_id);
} else {
/**
* All Rx queues empty in recent consecutive polls,
* sleep in a conservative manner, meaning sleep as
* less as possible.
*/
for (i = 1, lcore_idle_hint = qconf->rx_queue_list[0].idle_hint; i < qconf->n_rx_q
rx_queue = &(qconf->rx_queue_list[i]);
if (rx_queue->idle_hint < lcore_idle_hint)
lcore_idle_hint = rx_queue->idle_hint;
}
if ( lcore_idle_hint < SLEEP_GEAR1_THRESHOLD)
/**
*
execute "pause" instruction to avoid context
*
switch for short sleep.
*/
rte_delay_us(lcore_idle_hint);
else
/* long sleep force ruining thread to suspend */
usleep(lcore_idle_hint);
}
}
}
stats[lcore_id].sleep_time += lcore_idle_hint;
14.5.3 P-State Heuristic Algorithm
The power_freq_scaleup_heuristic() function is responsible for generating a frequency hint
for the specified logical core according to available descriptor number returned from
rte_eth_rx_queue_count(). On every poll for new packets, the length of available descriptor
on an Rx queue is evaluated, and the algorithm used for frequency hinting is as follows:
• If the size of available descriptors exceeds 96, the maximum frequency is hinted.
• If the size of available descriptors exceeds 64, a trend counter is incremented by 100.
• If the length of the ring exceeds 32, the trend counter is incremented by 1.
• When the trend counter reached 10000 the frequency hint is changed to the next higher
frequency.
Note: The assumption is that the Rx queue size is 128 and the thresholds specified above
must be adjusted accordingly based on actual hardware Rx queue size, which are configured
via the rte_eth_rx_queue_setup() function.
In general, a thread needs to poll packets from multiple Rx queues. Most likely, different queue
have different load, so they would return different frequency hints. The algorithm evaluates
all the hints and then scales up frequency in an aggressive manner by scaling up to highest
14.5. Explanation
78
Sample Applications User Guide, Release 2.0.0
frequency as long as one Rx queue requires. In this way, we can minimize any negative
performance impact.
On the other hand, frequency scaling down is controlled in the timer callback function. Specifically, if the sleep times of a logical core indicate that it is sleeping more than 25% of the
sampling period, or if the average packet per iteration is less than expectation, the frequency
is decreased by one step.
14.5.4 C-State Heuristic Algorithm
Whenever recent rte_eth_rx_burst() polls return 5 consecutive zero packets, an idle counter
begins incrementing for each successive zero poll.
At the same time, the function
power_idle_heuristic() is called to generate speculative sleep duration in order to force logical to enter deeper sleeping C-state. There is no way to control C- state directly, and the
CPUIdle subsystem in OS is intelligent enough to select C-state to enter based on actual sleep
period time of giving logical core. The algorithm has the following sleeping behavior depending
on the idle counter:
• If idle count less than 100, the counter value is used as a microsecond sleep value
through rte_delay_us() which execute pause instructions to avoid costly context switch
but saving power at the same time.
• If idle count is between 100 and 999, a fixed sleep interval of 100 𝜇s is used. A 100 𝜇s
sleep interval allows the core to enter the C1 state while keeping a fast response time in
case new traffic arrives.
• If idle count is greater than 1000, a fixed sleep value of 1 ms is used until the next timer
expiration is used. This allows the core to enter the C3/C6 states.
Note: The thresholds specified above need to be adjusted for different Intel processors and
traffic profiles.
If a thread polls multiple Rx queues and different queue returns different sleep duration values,
the algorithm controls the sleep time in a conservative manner by sleeping for the least possible
time in order to avoid a potential performance impact.
14.5. Explanation
79
CHAPTER
FIFTEEN
L3 FORWARDING WITH ACCESS CONTROL SAMPLE
APPLICATION
The L3 Forwarding with Access Control application is a simple example of packet processing
using the DPDK. The application performs a security check on received packets. Packets that
are in the Access Control List (ACL), which is loaded during initialization, are dropped. Others
are forwarded to the correct port.
15.1 Overview
The application demonstrates the use of the ACL library in the DPDK to implement access
control and packet L3 forwarding. The application loads two types of rules at initialization:
• Route information rules, which are used for L3 forwarding
• Access Control List (ACL) rules that blacklist (or block) packets with a specific characteristic
When packets are received from a port, the application extracts the necessary information
from the TCP/IP header of the received packet and performs a lookup in the rule database to
figure out whether the packets should be dropped (in the ACL range) or forwarded to desired
ports. The initialization and run-time paths are similar to those of the L3 forwarding application
(see Chapter 10, “L3 Forwarding Sample Application” for more information). However, there
are significant differences in the two applications. For example, the original L3 forwarding
application uses either LPM or an exact match algorithm to perform forwarding port lookup,
while this application uses the ACL library to perform both ACL and route entry lookup. The
following sections provide more detail.
Classification for both IPv4 and IPv6 packets is supported in this application. The application
also assumes that all the packets it processes are TCP/UDP packets and always extracts
source/destination port information from the packets.
15.1.1 Tuple Packet Syntax
The application implements packet classification for the IPv4/IPv6 5-tuple syntax specifically.
The 5-tuple syntax consist of a source IP address, a destination IP address, a source port, a
destination port and a protocol identifier. The fields in the 5-tuple syntax have the following
formats:
• Source IP address and destination IP address : Each is either a 32-bit field (for IPv4),
or a set of 4 32-bit fields (for IPv6) represented by a value and a mask length. For
80
Sample Applications User Guide, Release 2.0.0
example, an IPv4 range of 192.168.1.0 to 192.168.1.255 could be represented by a value
= [192, 168, 1, 0] and a mask length = 24.
• Source port and destination port : Each is a 16-bit field, represented by a lower start
and a higher end. For example, a range of ports 0 to 8192 could be represented by lower
= 0 and higher = 8192.
• Protocol identifier : An 8-bit field, represented by a value and a mask, that covers a
range of values. To verify that a value is in the range, use the following expression: “(VAL
& mask) == value”
The trick in how to represent a range with a mask and value is as follows. A range can be
enumerated in binary numbers with some bits that are never changed and some bits that are
dynamically changed. Set those bits that dynamically changed in mask and value with 0. Set
those bits that never changed in the mask with 1, in value with number expected. For example,
a range of 6 to 7 is enumerated as 0b110 and 0b111. Bit 1-7 are bits never changed and bit
0 is the bit dynamically changed. Therefore, set bit 0 in mask and value with 0, set bits 1-7 in
mask with 1, and bits 1-7 in value with number 0b11. So, mask is 0xfe, value is 0x6.
Note: The library assumes that each field in the rule is in LSB or Little Endian order when creating the database. It internally converts them to MSB or Big Endian order. When performing
a lookup, the library assumes the input is in MSB or Big Endian order.
15.1.2 Access Rule Syntax
In this sample application, each rule is a combination of the following:
• 5-tuple field: This field has a format described in Section.
• priority field: A weight to measure the priority of the rules. The rule with the higher priority
will ALWAYS be returned if the specific input has multiple matches in the rule database.
Rules with lower priority will NEVER be returned in any cases.
• userdata field: A user-defined field that could be any value. It can be the forwarding port
number if the rule is a route table entry or it can be a pointer to a mapping address if
the rule is used for address mapping in the NAT application. The key point is that it is a
useful reserved field for user convenience.
15.1.3 ACL and Route Rules
The application needs to acquire ACL and route rules before it runs. Route rules are mandatory, while ACL rules are optional. To simplify the complexity of the priority field for each rule,
all ACL and route entries are assumed to be in the same file. To read data from the specified
file successfully, the application assumes the following:
• Each rule occupies a single line.
• Only the following four rule line types are valid in this application:
• ACL rule line, which starts with a leading character ‘@’
• Route rule line, which starts with a leading character ‘R’
• Comment line, which starts with a leading character ‘#’
15.1. Overview
81
Sample Applications User Guide, Release 2.0.0
• Empty line, which consists of a space, form-feed (‘f’), newline (‘n’), carriage return (‘r’),
horizontal tab (‘t’), or vertical tab (‘v’).
Other lines types are considered invalid.
• Rules are organized in descending order of priority, which means rules at the head of the
file always have a higher priority than those further down in the file.
• A typical IPv4 ACL rule line should have a format as shown below:
Figure 15.1: A typical IPv4 ACL rule
IPv4 addresses are specified in CIDR format as specified in RFC 4632. They consist of the dot
notation for the address and a prefix length separated by ‘/’. For example, 192.168.0.34/32,
where the address is 192.168.0.34 and the prefix length is 32.
Ports are specified as a range of 16-bit numbers in the format MIN:MAX, where MIN and MAX
are the inclusive minimum and maximum values of the range. The range 0:65535 represents all
possible ports in a range. When MIN and MAX are the same value, a single port is represented,
for example, 20:20.
The protocol identifier is an 8-bit value and a mask separated by ‘/’. For example: 6/0xfe
matches protocol values 6 and 7.
• Route rules start with a leading character ‘R’ and have the same format as ACL rules
except an extra field at the tail that indicates the forwarding port number.
15.1.4 Rules File Example
Figure 15.2: Rules example
Each rule is explained as follows:
• Rule 1 (the first line) tells the application to drop those packets with source IP address =
[1.2.3.*], destination IP address = [192.168.0.36], protocol = [6]/[7]
• Rule 2 (the second line) is similar to Rule 1, except the source IP address is ignored.
It tells the application to forward packets with destination IP address = [192.168.0.36],
protocol = [6]/[7], destined to port 1.
• Rule 3 (the third line) tells the application to forward all packets to port 0. This is something like a default route entry.
15.1. Overview
82
Sample Applications User Guide, Release 2.0.0
As described earlier, the application assume rules are listed in descending order of priority,
therefore Rule 1 has the highest priority, then Rule 2, and finally, Rule 3 has the lowest priority.
Consider the arrival of the following three packets:
• Packet 1 has source IP address = [1.2.3.4], destination IP address = [192.168.0.36], and
protocol = [6]
• Packet 2 has source IP address = [1.2.4.4], destination IP address = [192.168.0.36], and
protocol = [6]
• Packet 3 has source IP address = [1.2.3.4], destination IP address = [192.168.0.36], and
protocol = [8]
Observe that:
• Packet 1 matches all of the rules
• Packet 2 matches Rule 2 and Rule 3
• Packet 3 only matches Rule 3
For priority reasons, Packet 1 matches Rule 1 and is dropped. Packet 2 matches Rule 2 and
is forwarded to port 1. Packet 3 matches Rule 3 and is forwarded to port 0.
For more details on the rule file format, please refer to rule_ipv4.db and rule_ipv6.db files
(inside <RTE_SDK>/examples/l3fwd-acl/).
15.1.5 Application Phases
Once the application starts, it transitions through three phases:
• Initialization Phase - Perform the following tasks:
• Parse command parameters. Check the validity of rule file(s) name(s), number of logical
cores, receive and transmit queues. Bind ports, queues and logical cores. Check ACL
search options, and so on.
• Call Environmental Abstraction Layer (EAL) and Poll Mode Driver (PMD) functions to
initialize the environment and detect possible NICs. The EAL creates several threads
and sets affinity to a specific hardware thread CPU based on the configuration specified
by the command line arguments.
• Read the rule files and format the rules into the representation that the ACL library can
recognize. Call the ACL library function to add the rules into the database and compile
them as a trie of pattern sets. Note that application maintains a separate AC contexts for
IPv4 and IPv6 rules.
• Runtime Phase - Process the incoming packets from a port. Packets are processed in
three steps:
– Retrieval: Gets a packet from the receive queue. Each logical core may process
several queues for different ports. This depends on the configuration specified by
command line arguments.
– Lookup: Checks that the packet type is supported (IPv4/IPv6) and performs a 5tuple lookup over corresponding AC context. If an ACL rule is matched, the packets
will be dropped and return back to step 1. If a route rule is matched, it indicates the
15.1. Overview
83
Sample Applications User Guide, Release 2.0.0
packet is not in the ACL list and should be forwarded. If there is no matches for the
packet, then the packet is dropped.
– Forwarding: Forwards the packet to the corresponding port.
• Final Phase - Perform the following tasks:
Calls the EAL, PMD driver and ACL library to free resource, then quits.
15.2 Compiling the Application
To compile the application:
1. Go to the sample application directory:
export RTE_SDK=/path/to/rte_sdk
cd ${RTE_SDK}/examples/l3fwd-acl
2. Set the target (a default target is used if not specified). For example:
export RTE_TARGET=x86_64-native-linuxapp-gcc
See the DPDK IPL Getting Started Guide for possible RTE_TARGET values.
3. Build the application:
make
15.3 Running the Application
The application has a number of command line options:
./build/l3fwd-acl [EAL options] -- -p PORTMASK [-P] --config(port,queue,lcore)[,(port,queue,lc
where,
• -p PORTMASK: Hexadecimal bitmask of ports to configure
• -P: Sets all ports to promiscuous mode so that packets are accepted regardless of the
packet’s Ethernet MAC destination address. Without this option, only packets with the
Ethernet MAC destination address set to the Ethernet address of the port are accepted.
• –config (port,queue,lcore)[,(port,queue,lcore)]: determines which queues from which
ports are mapped to which cores
• –rule_ipv4 FILENAME: Specifies the IPv4 ACL and route rules file
• –rule_ipv6 FILENAME: Specifies the IPv6 ACL and route rules file
• –scalar: Use a scalar function to perform rule lookup
• –enable-jumbo: optional, enables jumbo frames
• –max-pkt-len: optional, maximum packet length in decimal (64-9600)
• –no-numa: optional, disables numa awareness
15.2. Compiling the Application
84
Sample Applications User Guide, Release 2.0.0
As an example, consider a dual processor socket platform where cores 0, 2, 4, 6, 8 and 10
appear on socket 0, while cores 1, 3, 5, 7, 9 and 11 appear on socket 1. Let’s say that the user
wants to use memory from both NUMA nodes, the platform has only two ports and the user
wants to use two cores from each processor socket to do the packet processing.
To enable L3 forwarding between two ports, using two cores from each processor, while also
taking advantage of local memory access by optimizing around NUMA, the user must enable
two queues from each port, pin to the appropriate cores and allocate memory from the appropriate NUMA node. This is achieved using the following command:
./build/l3fwd-acl -c f -n 4 -- -p 0x3 --config="(0,0,0),(0,1,2),(1,0,1),(1,1,3)" --rule_ipv4="
In this command:
• The -c option enables cores 0, 1, 2, 3
• The -p option enables ports 0 and 1
• The –config option enables two queues on each port and maps each (port,queue) pair to
a specific core. Logic to enable multiple RX queues using RSS and to allocate memory
from the correct NUMA nodes is included in the application and is done transparently.
The following table shows the mapping in this example:
Port
0
0
1
1
Queue
0
1
0
1
lcore
0
2
1
3
Description
Map queue 0 from port 0 to lcore 0.
Map queue 1 from port 0 to lcore 2.
Map queue 0 from port 1 to lcore 1.
Map queue 1 from port 1 to lcore 3.
• The –rule_ipv4 option specifies the reading of IPv4 rules sets from the ./ rule_ipv4.db file.
• The –rule_ipv6 option specifies the reading of IPv6 rules sets from the ./ rule_ipv6.db file.
• The –scalar option specifies the performing of rule lookup with a scalar function.
15.4 Explanation
The following sections provide some explanation of the sample application code. The aspects
of port, device and CPU configuration are similar to those of the L3 forwarding application (see
Chapter 10, “L3 Forwarding Sample Application” for more information). The following sections
describe aspects that are specific to L3 forwarding with access control.
15.4.1 Parse Rules from File
As described earlier, both ACL and route rules are assumed to be saved in the same file. The
application parses the rules from the file and adds them to the database by calling the ACL library function. It ignores empty and comment lines, and parses and validates the rules it reads.
If errors are detected, the application exits with messages to identify the errors encountered.
The application needs to consider the userdata and priority fields. The ACL rules save the index
to the specific rules in the userdata field, while route rules save the forwarding port number.
In order to differentiate the two types of rules, ACL rules add a signature in the userdata field.
As for the priority field, the application assumes rules are organized in descending order of
priority. Therefore, the code only decreases the priority number with each rule it parses.
15.4. Explanation
85
Sample Applications User Guide, Release 2.0.0
15.4.2 Setting Up the ACL Context
For each supported AC rule format (IPv4 5-tuple, IPv6 6-tuple) application creates a separate
context handler from the ACL library for each CPU socket on the board and adds parsed rules
into that context.
Note, that for each supported rule type, application needs to calculate the expected offset of
the fields from the start of the packet. That’s why only packets with fixed IPv4/ IPv6 header are
supported. That allows to perform ACL classify straight over incoming packet buffer - no extra
protocol field retrieval need to be performed.
Subsequently, the application checks whether NUMA is enabled. If it is, the application records
the socket IDs of the CPU cores involved in the task.
Finally, the application creates contexts handler from the ACL library, adds rules parsed from
the file into the database and build an ACL trie. It is important to note that the application
creates an independent copy of each database for each socket CPU involved in the task to
reduce the time for remote memory access.
15.4. Explanation
86
CHAPTER
SIXTEEN
L3 FORWARDING IN A VIRTUALIZATION ENVIRONMENT SAMPLE
APPLICATION
The L3 Forwarding in a Virtualization Environment sample application is a simple example of
packet processing using the DPDK. The application performs L3 forwarding that takes advantage of Single Root I/O Virtualization (SR-IOV) features in a virtualized environment.
16.1 Overview
The application demonstrates the use of the hash and LPM libraries in the DPDK to implement
packet forwarding. The initialization and run-time paths are very similar to those of the L3 forwarding application (see Chapter 10 “L3 Forwarding Sample Application” for more information).
The forwarding decision is taken based on information read from the input packet.
The lookup method is either hash-based or LPM-based and is selected at compile time. When
the selected lookup method is hash-based, a hash object is used to emulate the flow classification stage. The hash object is used in correlation with the flow table to map each input packet
to its flow at runtime.
The hash lookup key is represented by the DiffServ 5-tuple composed of the following fields
read from the input packet: Source IP Address, Destination IP Address, Protocol, Source Port
and Destination Port. The ID of the output interface for the input packet is read from the
identified flow table entry. The set of flows used by the application is statically configured and
loaded into the hash at initialization time. When the selected lookup method is LPM based, an
LPM object is used to emulate the forwarding stage for IPv4 packets. The LPM object is used
as the routing table to identify the next hop for each input packet at runtime.
The LPM lookup key is represented by the Destination IP Address field read from the input
packet. The ID of the output interface for the input packet is the next hop returned by the LPM
lookup. The set of LPM rules used by the application is statically configured and loaded into
the LPM object at the initialization time.
Note:
setup.
Please refer to Section Virtual Function Setup Instructions for virtualized test case
16.2 Compiling the Application
To compile the application:
1. Go to the sample application directory:
87
Sample Applications User Guide, Release 2.0.0
export RTE_SDK=/path/to/rte_sdk
cd ${RTE_SDK}/examples/l3fwd-vf
2. Set the target (a default target is used if not specified). For example:
export RTE_TARGET=x86_64-native-linuxapp-gcc
See the DPDK Getting Started Guide for possible RTE_TARGET values.
3. Build the application:
make
Note: The compiled application is written to the build subdirectory. To have the application
written to a different location, the O=/path/to/build/directory option may be specified in the make
command.
16.3 Running the Application
The application has a number of command line options:
./build/l3fwd-vf [EAL options] -- -p PORTMASK
--config(port,queue,lcore)[,(port,queue,lcore)]
where,
• –p PORTMASK: Hexadecimal bitmask of ports to configure
• –config (port,queue,lcore)[,(port,queue,lcore]: determines which queues from which
ports are mapped to which cores
• –no-numa: optional, disables numa awareness
For example, consider a dual processor socket platform where cores 0,2,4,6, 8, and 10 appear
on socket 0, while cores 1,3,5,7,9, and 11 appear on socket 1. Let’s say that the programmer
wants to use memory from both NUMA nodes, the platform has only two ports and the programmer wants to use one core from each processor socket to do the packet processing since
only one Rx/Tx queue pair can be used in virtualization mode.
To enable L3 forwarding between two ports, using one core from each processor, while also
taking advantage of local memory accesses by optimizing around NUMA, the programmer can
pin to the appropriate cores and allocate memory from the appropriate NUMA node. This is
achieved using the following command:
./build/l3fwd-vf -c 0x03 -n 3 -- -p 0x3 --config="(0,0,0),(1,0,1)"
In this command:
• The -c option enables cores 0 and 1
• The -p option enables ports 0 and 1
• The –config option enables one queue on each port and maps each (port,queue) pair to
a specific core. Logic to enable multiple RX queues using RSS and to allocate memory
from the correct NUMA nodes is included in the application and is done transparently.
The following table shows the mapping in this example:
16.3. Running the Application
88
Sample Applications User Guide, Release 2.0.0
Port
0
1
Queue
0
1
lcore
0
1
Description
Map queue 0 from port 0 to lcore 0
Map queue 0 from port 1 to lcore 1
Refer to the DPDK Getting Started Guide for general information on running applications and
the Environment Abstraction Layer (EAL) options.
16.4 Explanation
The operation of this application is similar to that of the basic L3 Forwarding Sample Application. See Section L3 Forwarding Explanation for more information.
16.4. Explanation
89
CHAPTER
SEVENTEEN
LINK STATUS INTERRUPT SAMPLE APPLICATION
The Link Status Interrupt sample application is a simple example of packet processing using
the Data Plane Development Kit (DPDK) that demonstrates how network link status changes
for a network port can be captured and used by a DPDK application.
17.1 Overview
The Link Status Interrupt sample application registers a user space callback for the link status interrupt of each port and performs L2 forwarding for each packet that is received on an
RX_PORT. The following operations are performed:
• RX_PORT and TX_PORT are paired with available ports one-by-one according to the
core mask
• The source MAC address is replaced by the TX_PORT MAC address
• The destination MAC address is replaced by 02:00:00:00:00:TX_PORT_ID
This application can be used to demonstrate the usage of link status interrupt and its user
space callbacks and the behavior of L2 forwarding each time the link status changes.
17.2 Compiling the Application
1. Go to the example directory:
export RTE_SDK=/path/to/rte_sdk
cd ${RTE_SDK}/examples/link_status_interrupt
2. Set the target (a default target is used if not specified). For example:
export RTE_TARGET=x86_64-native-linuxapp-gcc
See the DPDK Getting Started Guide for possible RTE_TARGET values.
3. Build the application:
make
Note: The compiled application is written to the build subdirectory. To have the application
written to a different location, the O=/path/to/build/directory option may be specified on the
make command line.
90
Sample Applications User Guide, Release 2.0.0
17.3 Running the Application
The application requires a number of command line options:
./build/link_status_interrupt [EAL options] -- -p PORTMASK [-q NQ][-T PERIOD]
where,
• -p PORTMASK: A hexadecimal bitmask of the ports to configure
• -q NQ: A number of queues (=ports) per lcore (default is 1)
• -T PERIOD: statistics will be refreshed each PERIOD seconds (0 to disable, 10 default)
To run the application in a linuxapp environment with 4 lcores, 4 memory channels, 16 ports
and 8 RX queues per lcore, issue the command:
$ ./build/link_status_interrupt -c f -n 4-- -q 8 -p ffff
Refer to the DPDK Getting Started Guide for general information on running applications and
the Environment Abstraction Layer (EAL) options.
17.4 Explanation
The following sections provide some explanation of the code.
17.4.1 Command Line Arguments
The Link Status Interrupt sample application takes specific parameters, in addition to Environment Abstraction Layer (EAL) arguments (see Section Running the Application).
Command line parsing is done in the same way as it is done in the L2 Forwarding Sample
Application. See Section Command Line Arguments for more information.
17.4.2 Mbuf Pool Initialization
Mbuf pool initialization is done in the same way as it is done in the L2 Forwarding Sample
Application. See Section Mbuf Pool Initialization for more information.
17.4.3 Driver Initialization
The main part of the code in the main() function relates to the initialization of the driver. To fully
understand this code, it is recommended to study the chapters that related to the Poll Mode
Driver in the DPDK Programmer’s Guide and the DPDK API Reference.
if (rte_eal_pci_probe() < 0)
rte_exit(EXIT_FAILURE, "Cannot probe PCI\n");
nb_ports = rte_eth_dev_count();
if (nb_ports == 0)
rte_exit(EXIT_FAILURE, "No Ethernet ports - bye\n");
if (nb_ports > RTE_MAX_ETHPORTS)
17.3. Running the Application
91
Sample Applications User Guide, Release 2.0.0
nb_ports = RTE_MAX_ETHPORTS;
/*
* Each logical core is assigned a dedicated TX queue on each port.
*/
for (portid = 0; portid < nb_ports; portid++) {
/* skip ports that are not enabled */
if ((lsi_enabled_port_mask & (1 << portid)) == 0)
continue;
/* save the destination port id */
if (nb_ports_in_mask % 2) {
lsi_dst_ports[portid] = portid_last;
lsi_dst_ports[portid_last] = portid;
}
else
portid_last = portid;
nb_ports_in_mask++;
}
rte_eth_dev_info_get((uint8_t) portid, &dev_info);
Observe that:
• rte_eal_pci_probe() parses the devices on the PCI bus and initializes recognized devices.
The next step is to configure the RX and TX queues. For each port, there is only one RX queue
(only one lcore is able to poll a given port). The number of TX queues depends on the number
of available lcores. The rte_eth_dev_configure() function is used to configure the number of
queues for a port:
ret = rte_eth_dev_configure((uint8_t) portid, 1, 1, &port_conf);
if (ret < 0)
rte_exit(EXIT_FAILURE, "Cannot configure device: err=%d, port=%u\n", ret, portid);
The global configuration is stored in a static structure:
static const struct rte_eth_conf port_conf = {
.rxmode = {
.split_hdr_size = 0,
.header_split = 0,
/**< Header Split disabled */
.hw_ip_checksum = 0, /**< IP checksum offload disabled */
.hw_vlan_filter = 0, /**< VLAN filtering disabled */
.hw_strip_crc= 0,
/**< CRC stripped by hardware */
},
.txmode = {},
.intr_conf = {
.lsc = 1, /**< link status interrupt feature enabled */
},
};
Configuring lsc to 0 (the default) disables the generation of any link status change interrupts in kernel space and no user space interrupt event is received. The public interface
rte_eth_link_get() accesses the NIC registers directly to update the link status. Configuring
lsc to non-zero enables the generation of link status change interrupts in kernel space when a
link status change is present and calls the user space callbacks registered by the application.
17.4. Explanation
92
Sample Applications User Guide, Release 2.0.0
The public interface rte_eth_link_get() just reads the link status in a global structure that would
be updated in the interrupt host thread only.
17.4.4 Interrupt Callback Registration
The application can register one or more callbacks to a specific port and interrupt event. An
example callback function that has been written as indicated below.
static void
lsi_event_callback(uint8_t port_id, enum rte_eth_event_type type, void *param)
{
struct rte_eth_link link;
RTE_SET_USED(param);
printf("\n\nIn registered callback...\n");
printf("Event type: %s\n", type == RTE_ETH_EVENT_INTR_LSC ? "LSC interrupt" : "unknown eve
rte_eth_link_get_nowait(port_id, &link);
}
if (link.link_status) {
printf("Port %d Link Up - speed %u Mbps - %s\n\n", port_id, (unsigned)link.link_speed,
(link.link_duplex == ETH_LINK_FULL_DUPLEX) ? ("full-duplex") : ("half-duplex"));
} else
printf("Port %d Link Down\n\n", port_id);
This function is called when a link status interrupt is present for the right port. The port_id
indicates which port the interrupt applies to. The type parameter identifies the interrupt event
type, which currently can be RTE_ETH_EVENT_INTR_LSC only, but other types can be added
in the future. The param parameter is the address of the parameter for the callback. This
function should be implemented with care since it will be called in the interrupt host thread,
which is different from the main thread of its caller.
The application registers the lsi_event_callback and a NULL parameter to the link status interrupt event on each port:
rte_eth_dev_callback_register((uint8_t)portid, RTE_ETH_EVENT_INTR_LSC, lsi_event_callback, NUL
This registration can be done only after calling the rte_eth_dev_configure() function and before
calling any other function. If lsc is initialized with 0, the callback is never called since no interrupt
event would ever be present.
17.4.5 RX Queue Initialization
The application uses one lcore to poll one or several ports, depending on the -q option, which
specifies the number of queues per lcore.
For example, if the user specifies -q 4, the application is able to poll four ports with one lcore.
If there are 16 ports on the target (and if the portmask argument is -p ffff), the application will
need four lcores to poll all the ports.
ret = rte_eth_rx_queue_setup((uint8_t) portid, 0, nb_rxd, SOCKET0, &rx_conf, lsi_pktmbuf_pool)
if (ret < 0)
rte_exit(EXIT_FAILURE, "rte_eth_rx_queue_setup: err=%d, port=%u\n", ret, portid);
17.4. Explanation
93
Sample Applications User Guide, Release 2.0.0
The list of queues that must be polled for a given lcore is stored in a private structure called
struct lcore_queue_conf.
struct lcore_queue_conf {
unsigned n_rx_port;
unsigned rx_port_list[MAX_RX_QUEUE_PER_LCORE]; unsigned tx_queue_id;
struct mbuf_table tx_mbufs[LSI_MAX_PORTS];
} rte_cache_aligned;
struct lcore_queue_conf lcore_queue_conf[RTE_MAX_LCORE];
The n_rx_port and rx_port_list[] fields are used in the main packet processing loop (see the
“Receive, Process and Transmit Packets” section below).
The global configuration for the RX queues is stored in a static structure:
static const struct rte_eth_rxconf rx_conf = {
.rx_thresh = {
.pthresh = RX_PTHRESH,
.hthresh = RX_HTHRESH,
.wthresh = RX_WTHRESH,
},
};
17.4.6 TX Queue Initialization
Each lcore should be able to transmit on any port. For every port, a single TX queue is
initialized.
/* init one TX queue logical core on each port */
fflush(stdout);
ret = rte_eth_tx_queue_setup(portid, 0, nb_txd, rte_eth_dev_socket_id(portid), &tx_conf);
if (ret < 0)
rte_exit(EXIT_FAILURE, "rte_eth_tx_queue_setup: err=%d,port=%u\n", ret, (unsigned) portid)
The global configuration for TX queues is stored in a static structure:
static const struct rte_eth_txconf tx_conf = {
.tx_thresh = {
.pthresh = TX_PTHRESH,
.hthresh = TX_HTHRESH,
.wthresh = TX_WTHRESH,
},
.tx_free_thresh = RTE_TEST_TX_DESC_DEFAULT + 1, /* disable feature */
};
17.4.7 Receive, Process and Transmit Packets
In the lsi_main_loop() function, the main task is to read ingress packets from the RX queues.
This is done using the following code:
/*
*
*/
Read packet from RX queues
for (i = 0; i < qconf->n_rx_port; i++) {
17.4. Explanation
94
Sample Applications User Guide, Release 2.0.0
portid = qconf->rx_port_list[i];
nb_rx = rte_eth_rx_burst((uint8_t) portid, 0, pkts_burst, MAX_PKT_BURST);
port_statistics[portid].rx += nb_rx;
}
for (j = 0; j < nb_rx; j++) {
m = pkts_burst[j];
rte_prefetch0(rte_pktmbuf_mtod(m, void *));
lsi_simple_forward(m, portid);
}
Packets are read in a burst of size MAX_PKT_BURST. The rte_eth_rx_burst() function writes
the mbuf pointers in a local table and returns the number of available mbufs in the table.
Then, each mbuf in the table is processed by the lsi_simple_forward() function. The processing
is very simple: processes the TX port from the RX port and then replaces the source and
destination MAC addresses.
Note: In the following code, the two lines for calculating the output port require some explanation. If portId is even, the first line does nothing (as portid & 1 will be 0), and the second line
adds 1. If portId is odd, the first line subtracts one and the second line does nothing. Therefore,
0 goes to 1, and 1 to 0, 2 goes to 3 and 3 to 2, and so on.
static void
lsi_simple_forward(struct rte_mbuf *m, unsigned portid)
{
struct ether_hdr *eth;
void *tmp;
unsigned dst_port = lsi_dst_ports[portid];
eth = rte_pktmbuf_mtod(m, struct ether_hdr *);
/* 02:00:00:00:00:xx */
tmp = ð->d_addr.addr_bytes[0];
*((uint64_t *)tmp) = 0x000000000002 + (dst_port << 40);
/* src addr */
ether_addr_copy(&lsi_ports_eth_addr[dst_port], ð->s_addr);
}
lsi_send_packet(m, dst_port);
Then, the packet is sent using the lsi_send_packet(m, dst_port) function. For this test application, the processing is exactly the same for all packets arriving on the same RX port. Therefore,
it would have been possible to call the lsi_send_burst() function directly from the main loop to
send all the received packets on the same TX port using the burst-oriented send function,
which is more efficient.
However, in real-life applications (such as, L3 routing), packet N is not necessarily forwarded
on the same port as packet N-1. The application is implemented to illustrate that so the same
approach can be reused in a more complex application.
The lsi_send_packet() function stores the packet in a per-lcore and per-txport table. If the table
is full, the whole packets table is transmitted using the lsi_send_burst() function:
/* Send the packet on an output interface */
17.4. Explanation
95
Sample Applications User Guide, Release 2.0.0
static int
lsi_send_packet(struct rte_mbuf *m, uint8_t port)
{
unsigned lcore_id, len;
struct lcore_queue_conf *qconf;
lcore_id = rte_lcore_id();
qconf = &lcore_queue_conf[lcore_id];
len = qconf->tx_mbufs[port].len;
qconf->tx_mbufs[port].m_table[len] = m;
len++;
/* enough pkts to be sent */
if (unlikely(len == MAX_PKT_BURST)) {
lsi_send_burst(qconf, MAX_PKT_BURST, port);
len = 0;
}
qconf->tx_mbufs[port].len = len;
}
return 0;
To ensure that no packets remain in the tables, each lcore does a draining of the TX queue
in its main loop. This technique introduces some latency when there are not many packets to
send. However, it improves performance:
cur_tsc = rte_rdtsc();
/*
*
*/
TX burst queue drain
diff_tsc = cur_tsc - prev_tsc;
if (unlikely(diff_tsc > drain_tsc)) {
/* this could be optimized (use queueid instead of * portid), but it is not called so oft
for (portid = 0; portid < RTE_MAX_ETHPORTS; portid++) {
if (qconf->tx_mbufs[portid].len == 0)
continue;
}
lsi_send_burst(&lcore_queue_conf[lcore_id],
qconf->tx_mbufs[portid].len, (uint8_t) portid);
qconf->tx_mbufs[portid].len = 0;
/* if timer is enabled */
if (timer_period > 0) {
/* advance the timer */
timer_tsc += diff_tsc;
/* if timer has reached its timeout */
if (unlikely(timer_tsc >= (uint64_t) timer_period)) {
/* do this only on master core */
if (lcore_id == rte_get_master_lcore()) {
print_stats();
17.4. Explanation
96
Sample Applications User Guide, Release 2.0.0
}
}
}
/* reset the timer */
timer_tsc = 0;
}
prev_tsc = cur_tsc;
17.4. Explanation
97
CHAPTER
EIGHTEEN
LOAD BALANCER SAMPLE APPLICATION
The Load Balancer sample application demonstrates the concept of isolating the packet I/O
task from the application-specific workload. Depending on the performance target, a number
of logical cores (lcores) are dedicated to handle the interaction with the NIC ports (I/O lcores),
while the rest of the lcores are dedicated to performing the application processing (worker
lcores). The worker lcores are totally oblivious to the intricacies of the packet I/O activity and
use the NIC-agnostic interface provided by software rings to exchange packets with the I/O
cores.
18.1 Overview
The architecture of the Load Balance application is presented in the following figure.
Figure 18.1: Load Balancer Application Architecture
For the sake of simplicity, the diagram illustrates a specific case of two I/O RX and two I/O TX
lcores off loading the packet I/O overhead incurred by four NIC ports from four worker cores,
with each I/O lcore handling RX/TX for two NIC ports.
98
Sample Applications User Guide, Release 2.0.0
18.1.1 I/O RX Logical Cores
Each I/O RX lcore performs packet RX from its assigned NIC RX rings and then distributes
the received packets to the worker threads. The application allows each I/O RX lcore to communicate with any of the worker threads, therefore each (I/O RX lcore, worker lcore) pair is
connected through a dedicated single producer - single consumer software ring.
The worker lcore to handle the current packet is determined by reading a predefined 1-byte
field from the input packet:
worker_id = packet[load_balancing_field] % n_workers
Since all the packets that are part of the same traffic flow are expected to have the same value
for the load balancing field, this scheme also ensures that all the packets that are part of the
same traffic flow are directed to the same worker lcore (flow affinity) in the same order they
enter the system (packet ordering).
18.1.2 I/O TX Logical Cores
Each I/O lcore owns the packet TX for a predefined set of NIC ports. To enable each worker
thread to send packets to any NIC TX port, the application creates a software ring for each
(worker lcore, NIC TX port) pair, with each I/O TX core handling those software rings that are
associated with NIC ports that it handles.
18.1.3 Worker Logical Cores
Each worker lcore reads packets from its set of input software rings and routes them to the NIC
ports for transmission by dispatching them to output software rings. The routing logic is LPM
based, with all the worker threads sharing the same LPM rules.
18.2 Compiling the Application
The sequence of steps used to build the application is:
1. Export the required environment variables:
export RTE_SDK=<Path to the DPDK installation folder>
export RTE_TARGET=x86_64-native-linuxapp-gcc
2. Build the application executable file:
cd ${RTE_SDK}/examples/load_balancer make
For more details on how to build the DPDK libraries and sample applications, please refer
to the DPDK Getting Started Guide.
18.3 Running the Application
To successfully run the application, the command line used to start the application has to be in
sync with the traffic flows configured on the traffic generator side.
18.2. Compiling the Application
99
Sample Applications User Guide, Release 2.0.0
For examples of application command lines and traffic generator flows, please refer to the
DPDK Test Report. For more details on how to set up and run the sample applications provided
with DPDK package, please refer to the DPDK Getting Started Guide.
18.4 Explanation
18.4.1 Application Configuration
The application run-time configuration is done through the application command line parameters. Any parameter that is not specified as mandatory is optional, with the default value
hard-coded in the main.h header file from the application folder.
The list of application command line parameters is listed below:
1. –rx “(PORT, QUEUE, LCORE), ...”: The list of NIC RX ports and queues handled by the
I/O RX lcores. This parameter also implicitly defines the list of I/O RX lcores. This is a
mandatory parameter.
2. –tx “(PORT, LCORE), ... ”: The list of NIC TX ports handled by the I/O TX lcores. This
parameter also implicitly defines the list of I/O TX lcores. This is a mandatory parameter.
3. –w “LCORE, ...”: The list of the worker lcores. This is a mandatory parameter.
4. –lpm “IP / PREFIX => PORT; ...”: The list of LPM rules used by the worker lcores for
packet forwarding. This is a mandatory parameter.
5. –rsz “A, B, C, D”: Ring sizes:
(a) A = The size (in number of buffer descriptors) of each of the NIC RX rings read by
the I/O RX lcores.
(b) B = The size (in number of elements) of each of the software rings used by the I/O
RX lcores to send packets to worker lcores.
(c) C = The size (in number of elements) of each of the software rings used by the
worker lcores to send packets to I/O TX lcores.
(d) D = The size (in number of buffer descriptors) of each of the NIC TX rings written by
I/O TX lcores.
6. –bsz “(A, B), (C, D), (E, F)”: Burst sizes:
(a) A = The I/O RX lcore read burst size from NIC RX.
(b) B = The I/O RX lcore write burst size to the output software rings.
(c) C = The worker lcore read burst size from the input software rings.
(d) D = The worker lcore write burst size to the output software rings.
(e) E = The I/O TX lcore read burst size from the input software rings.
(f) F = The I/O TX lcore write burst size to the NIC TX.
7. –pos-lb POS: The position of the 1-byte field within the input packet used by the I/O RX
lcores to identify the worker lcore for the current packet. This field needs to be within the
first 64 bytes of the input packet.
18.4. Explanation
100
Sample Applications User Guide, Release 2.0.0
The infrastructure of software rings connecting I/O lcores and worker lcores is built by the application as a result of the application configuration provided by the user through the application
command line parameters.
A specific lcore performing the I/O RX role for a specific set of NIC ports can also perform the
I/O TX role for the same or a different set of NIC ports. A specific lcore cannot perform both
the I/O role (either RX or TX) and the worker role during the same session.
Example:
./load_balancer -c 0xf8 -n 4 -- --rx "(0,0,3),(1,0,3)" --tx "(0,3),(1,3)" --w "4,5,6,7" --lpm
There is a single I/O lcore (lcore 3) that handles RX and TX for two NIC ports (ports 0 and 1)
that handles packets to/from four worker lcores (lcores 4, 5, 6 and 7) that are assigned worker
IDs 0 to 3 (worker ID for lcore 4 is 0, for lcore 5 is 1, for lcore 6 is 2 and for lcore 7 is 3).
Assuming that all the input packets are IPv4 packets with no VLAN label and the source IP
address of the current packet is A.B.C.D, the worker lcore for the current packet is determined
by byte D (which is byte 29). There are two LPM rules that are used by each worker lcore to
route packets to the output NIC ports.
The following table illustrates the packet flow through the system for several possible traffic
flows:
Flow
#
1
2
3
4
Source IP
Address
0.0.0.0
0.0.0.1
0.0.0.14
0.0.0.15
Destination IP
Address
1.0.0.1
1.0.1.2
1.0.0.3
1.0.1.4
Worker ID (Worker
lcore)
0 (4)
1 (5)
2 (6)
3 (7)
Output NIC
Port
0
1
0
1
18.4.2 NUMA Support
The application has built-in performance enhancements for the NUMA case:
1. One buffer pool per each CPU socket.
2. One LPM table per each CPU socket.
3. Memory for the NIC RX or TX rings is allocated on the same socket with the lcore handling the respective ring.
In the case where multiple CPU sockets are used in the system, it is recommended to enable
at least one lcore to fulfill the I/O role for the NIC ports that are directly attached to that CPU
socket through the PCI Express* bus. It is always recommended to handle the packet I/O with
lcores from the same CPU socket as the NICs.
Depending on whether the I/O RX lcore (same CPU socket as NIC RX), the worker lcore and
the I/O TX lcore (same CPU socket as NIC TX) handling a specific input packet, are on the
same or different CPU sockets, the following run-time scenarios are possible:
1. AAA: The packet is received, processed and transmitted without going across CPU sockets.
2. AAB: The packet is received and processed on socket A, but as it has to be transmitted
on a NIC port connected to socket B, the packet is sent to socket B through software
rings.
18.4. Explanation
101
Sample Applications User Guide, Release 2.0.0
3. ABB: The packet is received on socket A, but as it has to be processed by a worker
lcore on socket B, the packet is sent to socket B through software rings. The packet is
transmitted by a NIC port connected to the same CPU socket as the worker lcore that
processed it.
4. ABC: The packet is received on socket A, it is processed by an lcore on socket B, then
it has to be transmitted out by a NIC connected to socket C. The performance price for
crossing the CPU socket boundary is paid twice for this packet.
18.4. Explanation
102
CHAPTER
NINETEEN
MULTI-PROCESS SAMPLE APPLICATION
This chapter describes the example applications for multi-processing that are included in the
DPDK.
19.1 Example Applications
19.1.1 Building the Sample Applications
The multi-process example applications are built in the same way as other sample applications,
and as documented in the DPDK Getting Started Guide. To build all the example applications:
1. Set RTE_SDK and go to the example directory:
export RTE_SDK=/path/to/rte_sdk
cd ${RTE_SDK}/examples/multi_process
2. Set the target (a default target will be used if not specified). For example:
export RTE_TARGET=x86_64-native-linuxapp-gcc
See the DPDK Getting Started Guide for possible RTE_TARGET values.
3. Build the applications:
make
Note: If just a specific multi-process application needs to be built, the final make command
can be run just in that application’s directory, rather than at the top-level multi-process directory.
19.1.2 Basic Multi-process Example
The examples/simple_mp folder in the DPDK release contains a basic example application to
demonstrate how two DPDK processes can work together using queues and memory pools to
share information.
Running the Application
To run the application, start one copy of the simple_mp binary in one terminal, passing at least
two cores in the coremask, as follows:
103
Sample Applications User Guide, Release 2.0.0
./build/simple_mp -c 3 -n 4 --proc-type=primary
For the first DPDK process run, the proc-type flag can be omitted or set to auto, since all
DPDK processes will default to being a primary instance, meaning they have control over
the hugepage shared memory regions. The process should start successfully and display a
command prompt as follows:
$ ./build/simple_mp -c 3
EAL: coremask set to 3
EAL: Detected lcore 0 on
EAL: Detected lcore 1 on
EAL: Detected lcore 2 on
EAL: Detected lcore 3 on
...
-n 4 --proc-type=primary
socket
socket
socket
socket
0
0
0
0
EAL:
EAL:
EAL:
EAL:
...
Requesting 2 pages of size 1073741824
Requesting 768 pages of size 2097152
Ask a virtual area of 0x40000000 bytes
Virtual area found at 0x7ff200000000 (size = 0x40000000)
EAL:
EAL:
EAL:
EAL:
check igb_uio module
check module finished
Master core 0 is ready (tid=54e41820)
Core 1 is ready (tid=53b32700)
Starting core 1
simple_mp >
To run the secondary process to communicate with the primary process, again run the same
binary setting at least two cores in the coremask:
./build/simple_mp -c C -n 4 --proc-type=secondary
When running a secondary process such as that shown above, the proc-type parameter can
again be specified as auto. However, omitting the parameter altogether will cause the process
to try and start as a primary rather than secondary process.
Once the process type is specified correctly, the process starts up, displaying largely similar
status messages to the primary instance as it initializes. Once again, you will be presented
with a command prompt.
Once both processes are running, messages can be sent between them using the send command. At any stage, either process can be terminated using the quit command.
EAL: Master core 10 is ready (tid=b5f89820)
EAL: Core 11 is ready (tid=84ffe700)
Starting core 11
simple_mp > send hello_secondary
simple_mp > core 11: Received 'hello_primary'
simple_mp > quit
EAL: Master core 8 is ready (tid=864a382
EAL: Core 9 is ready (tid=85995700)
Starting core 9
simple_mp > core 9: Received 'hello_seco
simple_mp > send hello_primary
simple_mp > quit
Note: If the primary instance is terminated, the secondary instance must also be shut-down
and restarted after the primary. This is necessary because the primary instance will clear and
reset the shared memory regions on startup, invalidating the secondary process’s pointers.
The secondary process can be stopped and restarted without affecting the primary process.
19.1. Example Applications
104
Sample Applications User Guide, Release 2.0.0
How the Application Works
The core of this example application is based on using two queues and a single memory pool
in shared memory. These three objects are created at startup by the primary process, since
the secondary process cannot create objects in memory as it cannot reserve memory zones,
and the secondary process then uses lookup functions to attach to these objects as it starts
up.
if (rte_eal_process_type() == RTE_PROC_PRIMARY){
send_ring = rte_ring_create(_PRI_2_SEC, ring_size, SOCKET0, flags);
recv_ring = rte_ring_create(_SEC_2_PRI, ring_size, SOCKET0, flags);
message_pool = rte_mempool_create(_MSG_POOL, pool_size, string_size, pool_cache, priv_data
} else {
recv_ring = rte_ring_lookup(_PRI_2_SEC);
send_ring = rte_ring_lookup(_SEC_2_PRI);
message_pool = rte_mempool_lookup(_MSG_POOL);
}
Note, however, that the named ring structure used as send_ring in the primary process is the
recv_ring in the secondary process.
Once the rings and memory pools are all available in both the primary and secondary processes, the application simply dedicates two threads to sending and receiving messages respectively. The receive thread simply dequeues any messages on the receive ring, prints them,
and frees the buffer space used by the messages back to the memory pool. The send thread
makes use of the command-prompt library to interactively request user input for messages to
send. Once a send command is issued by the user, a buffer is allocated from the memory pool,
filled in with the message contents, then enqueued on the appropriate rte_ring.
19.1.3 Symmetric Multi-process Example
The second example of DPDK multi-process support demonstrates how a set of processes can
run in parallel, with each process performing the same set of packet- processing operations.
(Since each process is identical in functionality to the others, we refer to this as symmetric
multi-processing, to differentiate it from asymmetric multi- processing - such as a client-server
mode of operation seen in the next example, where different processes perform different tasks,
yet co-operate to form a packet-processing system.) The following diagram shows the dataflow through the application, using two processes.
As the diagram shows, each process reads packets from each of the network ports in use.
RSS is used to distribute incoming packets on each port to different hardware RX queues.
Each process reads a different RX queue on each port and so does not contend with any other
process for that queue access. Similarly, each process writes outgoing packets to a different
TX queue on each port.
Running the Application
As with the simple_mp example, the first instance of the symmetric_mp process must be run
as the primary instance, though with a number of other application- specific parameters also
provided after the EAL arguments. These additional parameters are:
• -p <portmask>, where portmask is a hexadecimal bitmask of what ports on the system
are to be used. For example: -p 3 to use ports 0 and 1 only.
19.1. Example Applications
105
Sample Applications User Guide, Release 2.0.0
Figure 19.1: Example Data Flow in a Symmetric Multi-process Application
19.1. Example Applications
106
Sample Applications User Guide, Release 2.0.0
• –num-procs <N>, where N is the total number of symmetric_mp instances that will be
run side-by-side to perform packet processing. This parameter is used to configure the
appropriate number of receive queues on each network port.
• –proc-id <n>, where n is a numeric value in the range 0 <= n < N (number of processes,
specified above). This identifies which symmetric_mp instance is being run, so that each
process can read a unique receive queue on each network port.
The secondary symmetric_mp instances must also have these parameters specified, and the
first two must be the same as those passed to the primary instance, or errors result.
For example, to run a set of four symmetric_mp instances, running on lcores 1-4, all performing
level-2 forwarding of packets between ports 0 and 1, the following commands can be used
(assuming run as root):
#
#
#
#
./build/symmetric_mp
./build/symmetric_mp
./build/symmetric_mp
./build/symmetric_mp
-c
-c
-c
-c
2 -n 4 --proc-type=auto -- -p 3 --num-procs=4 --proc-id=0
4 -n 4 --proc-type=auto -- -p 3 --num-procs=4 --proc-id=1
8 -n 4 --proc-type=auto -- -p 3 --num-procs=4 --proc-id=2
10 -n 4 --proc-type=auto -- -p 3 --num-procs=4 --proc-id=3
Note: In the above example, the process type can be explicitly specified as primary or secondary, rather than auto. When using auto, the first process run creates all the memory structures needed for all processes - irrespective of whether it has a proc-id of 0, 1, 2 or 3.
Note: For the symmetric multi-process example, since all processes work in the same manner,
once the hugepage shared memory and the network ports are initialized, it is not necessary
to restart all processes if the primary instance dies. Instead, that process can be restarted
as a secondary, by explicitly setting the proc-type to secondary on the command line. (All
subsequent instances launched will also need this explicitly specified, as auto-detection will
detect no primary processes running and therefore attempt to re-initialize shared memory.)
How the Application Works
The initialization calls in both the primary and secondary instances are the same for the most
part, calling the rte_eal_init(), 1 G and 10 G driver initialization and then rte_eal_pci_probe()
functions. Thereafter, the initialization done depends on whether the process is configured as
a primary or secondary instance.
In the primary instance, a memory pool is created for the packet mbufs and the network ports
to be used are initialized - the number of RX and TX queues per port being determined by the
num-procs parameter passed on the command-line. The structures for the initialized network
ports are stored in shared memory and therefore will be accessible by the secondary process
as it initializes.
if (num_ports & 1)
rte_exit(EXIT_FAILURE, "Application must use an even number of ports\n");
for(i = 0; i < num_ports; i++){
if(proc_type == RTE_PROC_PRIMARY)
if (smp_port_init(ports[i], mp, (uint16_t)num_procs) < 0)
rte_exit(EXIT_FAILURE, "Error initializing ports\n");
}
19.1. Example Applications
107
Sample Applications User Guide, Release 2.0.0
In the secondary instance, rather than initializing the network ports, the port information exported by the primary process is used, giving the secondary process access to the hardware
and software rings for each network port. Similarly, the memory pool of mbufs is accessed by
doing a lookup for it by name:
mp = (proc_type == RTE_PROC_SECONDARY) ? rte_mempool_lookup(_SMP_MBUF_POOL) : rte_mempool_crea
Once this initialization is complete, the main loop of each process, both primary and secondary,
is exactly the same - each process reads from each port using the queue corresponding to its
proc-id parameter, and writes to the corresponding transmit queue on the output port.
19.1.4 Client-Server Multi-process Example
The third example multi-process application included with the DPDK shows how one can use
a client-server type multi-process design to do packet processing. In this example, a single
server process performs the packet reception from the ports being used and distributes these
packets using round-robin ordering among a set of client processes, which perform the actual packet processing. In this case, the client applications just perform level-2 forwarding of
packets by sending each packet out on a different network port.
The following diagram shows the data-flow through the application, using two client processes.
Figure 19.2: Example Data Flow in a Client-Server Symmetric Multi-process Application
Running the Application
The server process must be run initially as the primary process to set up all memory structures
for use by the clients. In addition to the EAL parameters, the application- specific parameters
are:
• -p <portmask >, where portmask is a hexadecimal bitmask of what ports on the system
are to be used. For example: -p 3 to use ports 0 and 1 only.
19.1. Example Applications
108
Sample Applications User Guide, Release 2.0.0
• -n <num-clients>, where the num-clients parameter is the number of client processes that
will process the packets received by the server application.
Note: In the server process, a single thread, the master thread, that is, the lowest numbered
lcore in the coremask, performs all packet I/O. If a coremask is specified with more than a
single lcore bit set in it, an additional lcore will be used for a thread to periodically print packet
count statistics.
Since the server application stores configuration data in shared memory, including the network
ports to be used, the only application parameter needed by a client process is its client instance
ID. Therefore, to run a server application on lcore 1 (with lcore 2 printing statistics) along with
two client processes running on lcores 3 and 4, the following commands could be used:
# ./mp_server/build/mp_server -c 6 -n 4 -- -p 3 -n 2
# ./mp_client/build/mp_client -c 8 -n 4 --proc-type=auto -- -n 0
# ./mp_client/build/mp_client -c 10 -n 4 --proc-type=auto -- -n 1
Note: If the server application dies and needs to be restarted, all client applications also need
to be restarted, as there is no support in the server application for it to run as a secondary
process. Any client processes that need restarting can be restarted without affecting the server
process.
How the Application Works
The server process performs the network port and data structure initialization much as the
symmetric multi-process application does when run as primary. One additional enhancement
in this sample application is that the server process stores its port configuration data in a
memory zone in hugepage shared memory. This eliminates the need for the client processes
to have the portmask parameter passed into them on the command line, as is done for the
symmetric multi-process application, and therefore eliminates mismatched parameters as a
potential source of errors.
In the same way that the server process is designed to be run as a primary process instance
only, the client processes are designed to be run as secondary instances only. They have
no code to attempt to create shared memory objects. Instead, handles to all needed rings
and memory pools are obtained via calls to rte_ring_lookup() and rte_mempool_lookup(). The
network ports for use by the processes are obtained by loading the network port drivers and
probing the PCI bus, which will, as in the symmetric multi-process example, automatically
get access to the network ports using the settings already configured by the primary/server
process.
Once all applications are initialized, the server operates by reading packets from each network
port in turn and distributing those packets to the client queues (software rings, one for each
client process) in round-robin order. On the client side, the packets are read from the rings in
as big of bursts as possible, then routed out to a different network port. The routing used is
very simple. All packets received on the first NIC port are transmitted back out on the second
port and vice versa. Similarly, packets are routed between the 3rd and 4th network ports and
so on. The sending of packets is done by writing the packets directly to the network ports; they
are not transferred back via the server process.
In both the server and the client processes, outgoing packets are buffered before being sent, so
as to allow the sending of multiple packets in a single burst to improve efficiency. For example,
19.1. Example Applications
109
Sample Applications User Guide, Release 2.0.0
the client process will buffer packets to send, until either the buffer is full or until we receive no
further packets from the server.
19.1.5 Master-slave Multi-process Example
The fourth example of DPDK multi-process support demonstrates a master-slave model that
provide the capability of application recovery if a slave process crashes or meets unexpected
conditions. In addition, it also demonstrates the floating process, which can run among different
cores in contrast to the traditional way of binding a process/thread to a specific CPU core, using
the local cache mechanism of mempool structures.
This application performs the same functionality as the L2 Forwarding sample application,
therefore this chapter does not cover that part but describes functionality that is introduced in
this multi-process example only. Please refer to Chapter 9, “L2 Forwarding Sample Application
(in Real and Virtualized Environments)” for more information.
Unlike previous examples where all processes are started from the command line with input
arguments, in this example, only one process is spawned from the command line and that
process creates other processes. The following section describes this in more detail.
Master-slave Process Models
The process spawned from the command line is called the master process in this document. A
process created by the master is called a slave process. The application has only one master
process, but could have multiple slave processes.
Once the master process begins to run, it tries to initialize all the resources such as memory,
CPU cores, driver, ports, and so on, as the other examples do. Thereafter, it creates slave
processes, as shown in the following figure.
Figure 19.3: Master-slave Process Workflow
19.1. Example Applications
110
Sample Applications User Guide, Release 2.0.0
The master process calls the rte_eal_mp_remote_launch() EAL function to launch an application function for each pinned thread through the pipe. Then, it waits to check if any slave
processes have exited. If so, the process tries to re-initialize the resources that belong to that
slave and launch them in the pinned thread entry again. The following section describes the
recovery procedures in more detail.
For each pinned thread in EAL, after reading any data from the pipe, it tries to call the function
that the application specified. In this master specified function, a fork() call creates a slave
process that performs the L2 forwarding task. Then, the function waits until the slave exits, is
killed or crashes. Thereafter, it notifies the master of this event and returns. Finally, the EAL
pinned thread waits until the new function is launched.
After discussing the master-slave model, it is necessary to mention another issue, global and
static variables.
For multiple-thread cases, all global and static variables have only one copy and they can be
accessed by any thread if applicable. So, they can be used to sync or share data among
threads.
In the previous examples, each process has separate global and static variables in memory and
are independent of each other. If it is necessary to share the knowledge, some communication
mechanism should be deployed, such as, memzone, ring, shared memory, and so on. The
global or static variables are not a valid approach to share data among processes. For variables
in this example, on the one hand, the slave process inherits all the knowledge of these variables
after being created by the master. On the other hand, other processes cannot know if one or
more processes modifies them after slave creation since that is the nature of a multiple process
address space. But this does not mean that these variables cannot be used to share or sync
data; it depends on the use case. The following are the possible use cases:
1. The master process starts and initializes a variable and it will never be changed after
slave processes created. This case is OK.
2. After the slave processes are created, the master or slave cores need to change a variable, but other processes do not need to know the change. This case is also OK.
3. After the slave processes are created, the master or a slave needs to change a variable.
In the meantime, one or more other process needs to be aware of the change. In this
case, global and static variables cannot be used to share knowledge. Another communication mechanism is needed. A simple approach without lock protection can be a heap
buffer allocated by rte_malloc or mem zone.
Slave Process Recovery Mechanism
Before talking about the recovery mechanism, it is necessary to know what is needed before a
new slave instance can run if a previous one exited.
When a slave process exits, the system returns all the resources allocated for this process
automatically. However, this does not include the resources that were allocated by the DPDK.
All the hardware resources are shared among the processes, which include memzone, mempool, ring, a heap buffer allocated by the rte_malloc library, and so on. If the new instance runs
and the allocated resource is not returned, either resource allocation failed or the hardware
resource is lost forever.
When a slave process runs, it may have dependencies on other processes. They could have
execution sequence orders; they could share the ring to communicate; they could share the
19.1. Example Applications
111
Sample Applications User Guide, Release 2.0.0
same port for reception and forwarding; they could use lock structures to do exclusive access
in some critical path. What happens to the dependent process(es) if the peer leaves? The
consequence are varied since the dependency cases are complex. It depends on what the
processed had shared. However, it is necessary to notify the peer(s) if one slave exited. Then,
the peer(s) will be aware of that and wait until the new instance begins to run.
Therefore, to provide the capability to resume the new slave instance if the previous one exited,
it is necessary to provide several mechanisms:
1. Keep a resource list for each slave process. Before a slave process run, the master
should prepare a resource list. After it exits, the master could either delete the allocated
resources and create new ones, or re-initialize those for use by the new instance.
2. Set up a notification mechanism for slave process exit cases. After the specific slave
leaves, the master should be notified and then help to create a new instance. This mechanism is provided in Section Master-slave Process Models.
3. Use a synchronization mechanism among dependent processes. The master should
have the capability to stop or kill slave processes that have a dependency on the one
that has exited. Then, after the new instance of exited slave process begins to run,
the dependency ones could resume or run from the start. The example sends a STOP
command to slave processes dependent on the exited one, then they will exit. Thereafter,
the master creates new instances for the exited slave processes.
The following diagram describes slave process recovery.
Figure 19.4: Slave Process Recovery Process Flow
Floating Process Support
When the DPDK application runs, there is always a -c option passed in to indicate the cores
that are enabled. Then, the DPDK creates a thread for each enabled core. By doing so, it
creates a 1:1 mapping between the enabled core and each thread. The enabled core always
has an ID, therefore, each thread has a unique core ID in the DPDK execution environment.
With the ID, each thread can easily access the structures or resources exclusively belonging
to it without using function parameter passing. It can easily use the rte_lcore_id() function to
get the value in every function that is called.
For threads/processes not created in that way, either pinned to a core or not, they will not own a
unique ID and the rte_lcore_id() function will not work in the correct way. However, sometimes
these threads/processes still need the unique ID mechanism to do easy access on structures or
resources. For example, the DPDK mempool library provides a local cache mechanism (refer
19.1. Example Applications
112
Sample Applications User Guide, Release 2.0.0
to the “Local Cache” section of the DPDK Programmer’s Guide) for fast element allocation and
freeing. If using a non-unique ID or a fake one, a race condition occurs if two or more threads/
processes with the same core ID try to use the local cache.
Therefore, unused core IDs from the passing of parameters with the -c option are used to
organize the core ID allocation array. Once the floating process is spawned, it tries to allocate
a unique core ID from the array and release it on exit.
A natural way to spawn a floating process is to use the fork() function and allocate a unique
core ID from the unused core ID array. However, it is necessary to write new code to provide
a notification mechanism for slave exit and make sure the process recovery mechanism can
work with it.
To avoid producing redundant code, the Master-Slave process model is still used to spawn
floating processes, then cancel the affinity to specific cores. Besides that, clear the core ID assigned to the DPDK spawning a thread that has a 1:1 mapping with the core mask. Thereafter,
get a new core ID from the unused core ID allocation array.
Run the Application
This example has a command line similar to the L2 Forwarding sample application with a few
differences.
To run the application, start one copy of the l2fwd_fork binary in one terminal. Unlike the L2
Forwarding example, this example requires at least three cores since the master process will
wait and be accountable for slave process recovery. The command is as follows:
#./build/l2fwd_fork -c 1c -n 4 -- -p 3 -f
This example provides another -f option to specify the use of floating process. If not specified,
the example will use a pinned process to perform the L2 forwarding task.
To verify the recovery mechanism, proceed as follows: First, check the PID of the slave processes:
#ps -fe |
root 5136
root 5145
root 5146
grep
4843
5136
5136
l2fwd_fork
29 11:11 pts/1 00:00:05 ./build/l2fwd_fork
98 11:11 pts/1 00:00:11 ./build/l2fwd_fork
98 11:11 pts/1 00:00:11 ./build/l2fwd_fork
Then, kill one of the slaves:
#kill -9 5145
After 1 or 2 seconds, check whether the slave has resumed:
#ps -fe |
root 5136
root 5247
root 5248
grep
4843
5136
5136
l2fwd_fork
3 11:11 pts/1 00:00:06 ./build/l2fwd_fork
99 11:14 pts/1 00:00:01 ./build/l2fwd_fork
99 11:14 pts/1 00:00:01 ./build/l2fwd_fork
It can also monitor the traffic generator statics to see whether slave processes have resumed.
19.1. Example Applications
113
Sample Applications User Guide, Release 2.0.0
Explanation
As described in previous sections, not all global and static variables need to change to be
accessible in multiple processes; it depends on how they are used. In this example, the statics
info on packets dropped/forwarded/received count needs to be updated by the slave process,
and the master needs to see the update and print them out. So, it needs to allocate a heap
buffer using rte_zmalloc. In addition, if the -f option is specified, an array is needed to store
the allocated core ID for the floating process so that the master can return it after a slave has
exited accidentally.
static int
l2fwd_malloc_shared_struct(void)
{
port_statistics = rte_zmalloc("port_stat", sizeof(struct l2fwd_port_statistics) * RTE_MAX_
if (port_statistics == NULL)
return -1;
/* allocate mapping_id array */
if (float_proc) {
int i;
mapping_id = rte_malloc("mapping_id", sizeof(unsigned) * RTE_MAX_LCORE, 0);
if (mapping_id == NULL)
return -1;
for (i = 0 ;i < RTE_MAX_LCORE; i++)
mapping_id[i] = INVALID_MAPPING_ID;
}
}
return 0;
For each slave process, packets are received from one port and forwarded to another port
that another slave is operating on. If the other slave exits accidentally, the port it is operating
on may not work normally, so the first slave cannot forward packets to that port. There is a
dependency on the port in this case. So, the master should recognize the dependency. The
following is the code to detect this dependency:
for (portid = 0; portid < nb_ports; portid++) {
/* skip ports that are not enabled */
if ((l2fwd_enabled_port_mask & (1 << portid)) == 0)
continue;
/* Find pair ports' lcores */
find_lcore = find_pair_lcore = 0;
pair_port = l2fwd_dst_ports[portid];
for (i = 0; i < RTE_MAX_LCORE; i++) {
if (!rte_lcore_is_enabled(i))
continue;
for (j = 0; j < lcore_queue_conf[i].n_rx_port;j++) {
if (lcore_queue_conf[i].rx_port_list[j] == portid) {
lcore = i;
find_lcore = 1;
break;
19.1. Example Applications
114
Sample Applications User Guide, Release 2.0.0
}
}
if (lcore_queue_conf[i].rx_port_list[j] == pair_port) {
pair_lcore = i;
find_pair_lcore = 1;
break;
}
if (find_lcore && find_pair_lcore)
break;
}
if (!find_lcore || !find_pair_lcore)
rte_exit(EXIT_FAILURE, "Not find port=%d pair\\n", portid);
printf("lcore %u and %u paired\\n", lcore, pair_lcore);
}
lcore_resource[lcore].pair_id = pair_lcore;
lcore_resource[pair_lcore].pair_id = lcore;
Before launching the slave process, it is necessary to set up the communication channel between the master and slave so that the master can notify the slave if its peer process with the
dependency exited. In addition, the master needs to register a callback function in the case
where a specific slave exited.
for (i = 0; i < RTE_MAX_LCORE; i++) {
if (lcore_resource[i].enabled) {
/* Create ring for master and slave communication */
ret = create_ms_ring(i);
if (ret != 0)
rte_exit(EXIT_FAILURE, "Create ring for lcore=%u failed",i);
}
}
if (flib_register_slave_exit_notify(i,slave_exit_cb) != 0)
rte_exit(EXIT_FAILURE, "Register master_trace_slave_exit failed");
After launching the slave process, the master waits and prints out the port statics periodically.
If an event indicating that a slave process exited is detected, it sends the STOP command to
the peer and waits until it has also exited. Then, it tries to clean up the execution environment
and prepare new resources. Finally, the new slave instance is launched.
while (1) {
sleep(1);
cur_tsc = rte_rdtsc();
diff_tsc = cur_tsc - prev_tsc;
/* if timer is enabled */
if (timer_period > 0) {
/* advance the timer */
timer_tsc += diff_tsc;
/* if timer has reached its timeout */
if (unlikely(timer_tsc >= (uint64_t) timer_period)) {
print_stats();
/* reset the timer */
19.1. Example Applications
115
Sample Applications User Guide, Release 2.0.0
}
}
timer_tsc = 0;
prev_tsc = cur_tsc;
/* Check any slave need restart or recreate */
rte_spinlock_lock(&res_lock);
for (i = 0; i < RTE_MAX_LCORE; i++) {
struct lcore_resource_struct *res = &lcore_resource[i];
struct lcore_resource_struct *pair = &lcore_resource[res->pair_id];
/* If find slave exited, try to reset pair */
if (res->enabled && res->flags && pair->enabled) {
if (!pair->flags) {
master_sendcmd_with_ack(pair->lcore_id, CMD_STOP);
rte_spinlock_unlock(&res_lock);
sleep(1);
rte_spinlock_lock(&res_lock);
if (pair->flags)
continue;
}
if (reset_pair(res->lcore_id, pair->lcore_id) != 0)
rte_exit(EXIT_FAILURE, "failed to reset slave");
res->flags = 0;
pair->flags = 0;
}
}
}
rte_spinlock_unlock(&res_lock);
When the slave process is spawned and starts to run, it checks whether the floating process
option is applied. If so, it clears the affinity to a specific core and also sets the unique core
ID to 0. Then, it tries to allocate a new core ID. Since the core ID has changed, the resource
allocated by the master cannot work, so it remaps the resource to the new core ID slot.
static int
l2fwd_launch_one_lcore( attribute ((unused)) void *dummy)
{
unsigned lcore_id = rte_lcore_id();
if (float_proc) {
unsigned flcore_id;
/* Change it to floating process, also change it's lcore_id */
clear_cpu_affinity();
RTE_PER_LCORE(_lcore_id) = 0;
/* Get a lcore_id */
if (flib_assign_lcore_id() < 0 ) {
printf("flib_assign_lcore_id failed\n");
return -1;
}
19.1. Example Applications
116
Sample Applications User Guide, Release 2.0.0
flcore_id = rte_lcore_id();
/* Set mapping id, so master can return it after slave exited */
}
mapping_id[lcore_id] = flcore_id;
printf("Org lcore_id = %u, cur lcore_id = %u\n",lcore_id, flcore_id);
remapping_slave_resource(lcore_id, flcore_id);
l2fwd_main_loop();
}
/* return lcore_id before return */
if (float_proc) {
flib_free_lcore_id(rte_lcore_id());
mapping_id[lcore_id] = INVALID_MAPPING_ID;
}
return 0;
19.1. Example Applications
117
CHAPTER
TWENTY
QOS METERING SAMPLE APPLICATION
The QoS meter sample application is an example that demonstrates the use of DPDK to provide QoS marking and metering, as defined by RFC2697 for Single Rate Three Color Marker
(srTCM) and RFC 2698 for Two Rate Three Color Marker (trTCM) algorithm.
20.1 Overview
The application uses a single thread for reading the packets from the RX port, metering, marking them with the appropriate color (green, yellow or red) and writing them to the TX port.
A policing scheme can be applied before writing the packets to the TX port by dropping or
changing the color of the packet in a static manner depending on both the input and output
colors of the packets that are processed by the meter.
The operation mode can be selected as compile time out of the following options:
• Simple forwarding
• srTCM color blind
• srTCM color aware
• srTCM color blind
• srTCM color aware
Please refer to RFC2697 and RFC2698 for details about the srTCM and trTCM configurable
parameters (CIR, CBS and EBS for srTCM; CIR, PIR, CBS and PBS for trTCM).
The color blind modes are functionally equivalent with the color-aware modes when all the
incoming packets are colored as green.
20.2 Compiling the Application
1. Go to the example directory:
export RTE_SDK=/path/to/rte_sdk
cd ${RTE_SDK}/examples/qos_meter
2. Set the target (a default target is used if not specified):
Note: This application is intended as a linuxapp only.
118
Sample Applications User Guide, Release 2.0.0
export RTE_TARGET=x86_64-native-linuxapp-gcc
3. Build the application:
make
20.3 Running the Application
The application execution command line is as below:
./qos_meter [EAL options] -- -p PORTMASK
The application is constrained to use a single core in the EAL core mask and 2 ports only in
the application port mask (first port from the port mask is used for RX and the other port in the
core mask is used for TX).
Refer to DPDK Getting Started Guide for general information on running applications and the
Environment Abstraction Layer (EAL) options.
20.4 Explanation
Selecting one of the metering modes is done with these defines:
#define
#define
#define
#define
#define
APP_MODE_FWD
0
APP_MODE_SRTCM_COLOR_BLIND
APP_MODE_SRTCM_COLOR_AWARE
APP_MODE_TRTCM_COLOR_BLIND
APP_MODE_TRTCM_COLOR_AWARE
#define APP_MODE
1
2
3
4
APP_MODE_SRTCM_COLOR_BLIND
To simplify debugging (for example, by using the traffic generator RX side MAC address based
packet filtering feature), the color is defined as the LSB byte of the destination MAC address.
The traffic meter parameters are configured in the application source code with following default
values:
struct rte_meter_srtcm_params app_srtcm_params[] = {
{.cir = 1000000 * 46, .cbs = 2048, .ebs = 2048},
};
struct rte_meter_trtcm_params app_trtcm_params[] = {
{.cir = 1000000 * 46, .pir = 1500000 * 46, .cbs = 2048, .pbs = 2048},
};
Assuming the input traffic is generated at line rate and all packets are 64 bytes Ethernet frames
(IPv4 packet size of 46 bytes) and green, the expected output traffic should be marked as
shown in the following table:
20.3. Running the Application
119
Sample Applications User Guide, Release 2.0.0
Table 20.1: Output Traffic Marking
Mode
srTCM blind
srTCM color
trTCM blind
trTCM color
FWD
Green (Mpps)
1
1
1
1
14.88
Yellow (Mpps)
1
1
0.5
0.5
0
Red (Mpps)
12.88
12.88
13.38
13.38
0
To set up the policing scheme as desired, it is necessary to modify the main.h source file,
where this policy is implemented as a static structure, as follows:
int policer_table[e_RTE_METER_COLORS][e_RTE_METER_COLORS] =
{
{ GREEN, RED, RED},
{ DROP, YELLOW, RED},
{ DROP, DROP, RED}
};
Where rows indicate the input color, columns indicate the output color, and the value that is
stored in the table indicates the action to be taken for that particular case.
There are four different actions:
• GREEN: The packet’s color is changed to green.
• YELLOW: The packet’s color is changed to yellow.
• RED: The packet’s color is changed to red.
• DROP: The packet is dropped.
In this particular case:
• Every packet which input and output color are the same, keeps the same color.
• Every packet which color has improved is dropped (this particular case can’t happen, so
these values will not be used).
• For the rest of the cases, the color is changed to red.
20.4. Explanation
120
CHAPTER
TWENTYONE
QOS SCHEDULER SAMPLE APPLICATION
The QoS sample application demonstrates the use of the DPDK to provide QoS scheduling.
21.1 Overview
The architecture of the QoS scheduler application is shown in the following figure.
Figure 21.1: QoS Scheduler Application Architecture
There are two flavors of the runtime execution for this application, with two or three threads per
each packet flow configuration being used. The RX thread reads packets from the RX port,
classifies the packets based on the double VLAN (outer and inner) and the lower two bytes of
the IP destination address and puts them into the ring queue. The worker thread dequeues the
packets from the ring and calls the QoS scheduler enqueue/dequeue functions. If a separate
TX core is used, these are sent to the TX ring. Otherwise, they are sent directly to the TX port.
The TX thread, if present, reads from the TX ring and write the packets to the TX port.
21.2 Compiling the Application
To compile the application:
1. Go to the sample application directory:
121
Sample Applications User Guide, Release 2.0.0
export RTE_SDK=/path/to/rte_sdk cd ${RTE_SDK}/examples/qos_sched
2. Set the target (a default target is used if not specified). For example:
Note: This application is intended as a linuxapp only.
export RTE_TARGET=x86_64-native-linuxapp-gcc
3. Build the application:
make
Note: To get statistics on the sample app using the command line interface as described in the
next section, DPDK must be compiled defining CONFIG_RTE_SCHED_COLLECT_STATS,
which can be done by changing the configuration file for the specific target to be compiled.
21.3 Running the Application
Note: In order to run the application, a total of at least 4 G of huge pages must be set up for
each of the used sockets (depending on the cores in use).
The application has a number of command line options:
./qos_sched [EAL options] -- <APP PARAMS>
Mandatory application parameters include:
• –pfc “RX PORT, TX PORT, RX LCORE, WT LCORE, TX CORE”: Packet flow configuration. Multiple pfc entities can be configured in the command line, having 4 or 5 items (if
TX core defined or not).
Optional application parameters include:
• -i: It makes the application to start in the interactive mode. In this mode, the application
shows a command line that can be used for obtaining statistics while scheduling is taking
place (see interactive mode below for more information).
• –mst n: Master core index (the default value is 1).
• –rsz “A, B, C”: Ring sizes:
• A = Size (in number of buffer descriptors) of each of the NIC RX rings read by the I/O RX
lcores (the default value is 128).
• B = Size (in number of elements) of each of the software rings used by the I/O RX lcores
to send packets to worker lcores (the default value is 8192).
• C = Size (in number of buffer descriptors) of each of the NIC TX rings written by worker
lcores (the default value is 256)
• –bsz “A, B, C, D”: Burst sizes
• A = I/O RX lcore read burst size from the NIC RX (the default value is 64)
21.3. Running the Application
122
Sample Applications User Guide, Release 2.0.0
• B = I/O RX lcore write burst size to the output software rings, worker lcore read burst size
from input software rings,QoS enqueue size (the default value is 64)
• C = QoS dequeue size (the default value is 32)
• D = Worker lcore write burst size to the NIC TX (the default value is 64)
• –msz M: Mempool size (in number of mbufs) for each pfc (default 2097152)
• –rth “A, B, C”: The RX queue threshold parameters
• A = RX prefetch threshold (the default value is 8)
• B = RX host threshold (the default value is 8)
• C = RX write-back threshold (the default value is 4)
• –tth “A, B, C”: TX queue threshold parameters
• A = TX prefetch threshold (the default value is 36)
• B = TX host threshold (the default value is 0)
• C = TX write-back threshold (the default value is 0)
• –cfg FILE: Profile configuration to load
Refer to DPDK Getting Started Guide for general information on running applications and the
Environment Abstraction Layer (EAL) options.
The profile configuration file defines all the port/subport/pipe/traffic class/queue parameters
needed for the QoS scheduler configuration.
The profile file has the following format:
; port configuration [port]
frame overhead = 24
number of subports per port = 1
number of pipes per subport = 4096
queue sizes = 64 64 64 64
; Subport configuration
[subport 0]
tb rate = 1250000000; Bytes per second
tb size = 1000000; Bytes
tc 0 rate = 1250000000;
Bytes per second
tc 1 rate = 1250000000;
Bytes per second
tc 2 rate = 1250000000;
Bytes per second
tc 3 rate = 1250000000;
Bytes per second
tc period = 10;
Milliseconds
tc oversubscription period = 10;
Milliseconds
pipe 0-4095 = 0;
These pipes are configured with pipe profile 0
; Pipe configuration
[pipe profile 0]
tb rate = 305175; Bytes per second
tb size = 1000000; Bytes
tc 0 rate = 305175; Bytes per second
tc 1 rate = 305175; Bytes per second
tc 2 rate = 305175; Bytes per second
21.3. Running the Application
123
Sample Applications User Guide, Release 2.0.0
tc 3 rate = 305175; Bytes per second
tc period = 40; Milliseconds
tc
tc
tc
tc
0
1
2
3
oversubscription
oversubscription
oversubscription
oversubscription
tc
tc
tc
tc
0
1
2
3
wrr
wrr
wrr
wrr
weights
weights
weights
weights
=
=
=
=
1
1
1
1
weight
weight
weight
weight
1
1
1
1
1
1
1
1
=
=
=
=
1
1
1
1
1
1
1
1
; RED params per traffic class and color (Green / Yellow / Red)
[red]
tc 0 wred
tc 0 wred
tc 0 wred
tc 0 wred
min = 48
max = 64
inv prob
weight =
40 32
64 64
= 10 10 10
9 9 9
tc
tc
tc
tc
1
1
1
1
wred
wred
wred
wred
min = 48
max = 64
inv prob
weight =
40 32
64 64
= 10 10 10
9 9 9
tc
tc
tc
tc
2
2
2
2
wred
wred
wred
wred
min = 48
max = 64
inv prob
weight =
40 32
64 64
= 10 10 10
9 9 9
tc
tc
tc
tc
3
3
3
3
wred
wred
wred
wred
min = 48
max = 64
inv prob
weight =
40 32
64 64
= 10 10 10
9 9 9
21.3.1 Interactive mode
These are the commands that are currently working under the command line interface:
• Control Commands
• –quit: Quits the application.
• General Statistics
– stats app: Shows a table with in-app calculated statistics.
– stats port X subport Y: For a specific subport, it shows the number of packets that
went through the scheduler properly and the number of packets that were dropped.
The same information is shown in bytes. The information is displayed in a table
separating it in different traffic classes.
– stats port X subport Y pipe Z: For a specific pipe, it shows the number of packets that
went through the scheduler properly and the number of packets that were dropped.
The same information is shown in bytes. This information is displayed in a table
separating it in individual queues.
• Average queue size
21.3. Running the Application
124
Sample Applications User Guide, Release 2.0.0
All of these commands work the same way, averaging the number of packets throughout a
specific subset of queues.
Two parameters can be configured for this prior to calling any of these commands:
• qavg n X: n is the number of times that the calculation will take place. Bigger numbers
provide higher accuracy. The default value is 10.
• qavg period X: period is the number of microseconds that will be allowed between each
calculation. The default value is 100.
The commands that can be used for measuring average queue size are:
• qavg port X subport Y: Show average queue size per subport.
• qavg port X subport Y tc Z: Show average queue size per subport for a specific traffic
class.
• qavg port X subport Y pipe Z: Show average queue size per pipe.
• qavg port X subport Y pipe Z tc A: Show average queue size per pipe for a specific traffic
class.
• qavg port X subport Y pipe Z tc A q B: Show average queue size of a specific queue.
21.3.2 Example
The following is an example command with a single packet flow configuration:
./qos_sched -c a2 -n 4 -- --pfc "3,2,5,7" --cfg ./profile.cfg
This example uses a single packet flow configuration which creates one RX thread on lcore 5
reading from port 3 and a worker thread on lcore 7 writing to port 2.
Another example with 2 packet flow configurations using different ports but sharing the same
core for QoS scheduler is given below:
./qos_sched -c c6 -n 4 -- --pfc "3,2,2,6,7" --pfc "1,0,2,6,7" --cfg ./profile.cfg
Note that independent cores for the packet flow configurations for each of the RX, WT and TX
thread are also supported, providing flexibility to balance the work.
The EAL coremask is constrained to contain the default mastercore 1 and the RX, WT and TX
cores only.
21.4 Explanation
The Port/Subport/Pipe/Traffic Class/Queue are the hierarchical entities in a typical QoS application:
• A subport represents a predefined group of users.
• A pipe represents an individual user/subscriber.
• A traffic class is the representation of a different traffic type with a specific loss rate, delay
and jitter requirements; such as data voice, video or data transfers.
21.4. Explanation
125
Sample Applications User Guide, Release 2.0.0
• A queue hosts packets from one or multiple connections of the same type belonging to
the same user.
The traffic flows that need to be configured are application dependent. This application classifies based on the QinQ double VLAN tags and the IP destination address as indicated in the
following table.
Table 21.1: Entity Types
Level Name
Siblings per Parent
Port
•
Subport
Config (8)
Pipe
Config (4k)
Traffic Class
4
Queue
4
QoS Functional Description
Ethernet port
Selected By
Traffic shaped (token
bucket)
Traffic shaped (token
bucket)
TCs of the same pipe
services in strict priority
Queue of the same
TC serviced in WRR
Outer VLAN tag
Physical port
Inner VLAN tag
Destination IP
dress (0.0.X.0)
ad-
Destination IP
dress (0.0.0.X)
ad-
Please refer to the “QoS Scheduler” chapter in the DPDK Programmer’s Guide for more information about these parameters.
21.4. Explanation
126
CHAPTER
TWENTYTWO
INTEL® QUICKASSIST TECHNOLOGY SAMPLE APPLICATION
This sample application demonstrates the use of the cryptographic operations provided by
the Intel® QuickAssist Technology from within the DPDK environment. Therefore, building
and running this application requires having both the DPDK and the QuickAssist Technology
Software Library installed, as well as at least one Intel® QuickAssist Technology hardware
device present in the system.
For this sample application, there is a dependency on either of:
• Intel® Communications Chipset 8900 to 8920 Series Software for Linux* package
• Intel® Communications Chipset 8925 to 8955 Series Software for Linux* package
22.1 Overview
An overview of the application is provided in Fig. 22.1. For simplicity, only two NIC ports and
one Intel® QuickAssist Technology device are shown in this diagram, although the number of
NIC ports and Intel® QuickAssist Technology devices can be different.
Figure 22.1: Intel® QuickAssist Technology Application Block Diagram
The application allows the configuration of the following items:
127
Sample Applications User Guide, Release 2.0.0
• Number of NIC ports
• Number of logical cores (lcores)
• Mapping of NIC RX queues to logical cores
Each lcore communicates with every cryptographic acceleration engine in the system through
a pair of dedicated input - output queues. Each lcore has a dedicated NIC TX queue with
every NIC port in the system. Therefore, each lcore reads packets from its NIC RX queues
and cryptographic accelerator output queues and writes packets to its NIC TX queues and
cryptographic accelerator input queues.
Each incoming packet that is read from a NIC RX queue is either directly forwarded to its destination NIC TX port (forwarding path) or first sent to one of the Intel® QuickAssist Technology
devices for either encryption or decryption before being sent out on its destination NIC TX port
(cryptographic path).
The application supports IPv4 input packets only. For each input packet, the decision between
the forwarding path and the cryptographic path is taken at the classification stage based on the
value of the IP source address field read from the input packet. Assuming that the IP source
address is A.B.C.D, then if:
• D = 0: the forwarding path is selected (the packet is forwarded out directly)
• D = 1: the cryptographic path for encryption is selected (the packet is first encrypted and
then forwarded out)
• D = 2: the cryptographic path for decryption is selected (the packet is first decrypted and
then forwarded out)
For the cryptographic path cases (D = 1 or D = 2), byte C specifies the cipher algorithm and byte
B the cryptographic hash algorithm to be used for the current packet. Byte A is not used and
can be any value. The cipher and cryptographic hash algorithms supported by this application
are listed in the crypto.h header file.
For each input packet, the destination NIC TX port is decided at the forwarding stage (executed
after the cryptographic stage, if enabled for the packet) by looking at the RX port index of the
dst_ports[ ] array, which was initialized at startup, being the outport the adjacent enabled port.
For example, if ports 1,3,5 and 6 are enabled, for input port 1, outport port will be 3 and vice
versa, and for input port 5, output port will be 6 and vice versa.
For the cryptographic path, it is the payload of the IPv4 packet that is encrypted or decrypted.
22.1.1 Setup
Building and running this application requires having both the DPDK package and the QuickAssist Technology Software Library installed, as well as at least one Intel® QuickAssist Technology hardware device present in the system.
For more details on how to build and run DPDK and Intel® QuickAssist Technology applications, please refer to the following documents:
• DPDK Getting Started Guide
• Intel® Communications Chipset 8900 to 8920 Series Software for Linux* Getting Started
Guide (440005)
22.1. Overview
128
Sample Applications User Guide, Release 2.0.0
• Intel® Communications Chipset 8925 to 8955 Series Software for Linux* Getting Started
Guide (523128)
For more details on the actual platforms used to validate this application, as well as performance numbers, please refer to the Test Report, which is accessible by contacting your Intel
representative.
22.2 Building the Application
Steps to build the application:
1. Set up the following environment variables:
export RTE_SDK=<Absolute path to the DPDK installation folder>
export ICP_ROOT=<Absolute path to the Intel QAT installation folder>
2. Set the target (a default target is used if not specified). For example:
export RTE_TARGET=x86_64-native-linuxapp-gcc
Refer to the DPDK Getting Started Guide for possible RTE_TARGET values.
3. Build the application:
cd ${RTE_SDK}/examples/dpdk_qat
make
22.3 Running the Application
22.3.1 Intel® QuickAssist Technology Configuration Files
The Intel® QuickAssist Technology configuration files used by the application are located in
the config_files folder in the application folder. There following sets of configuration files are
included in the DPDK package:
• Stargo CRB (single CPU socket): located in the stargo folder
– dh89xxcc_qa_dev0.conf
• Shumway CRB (dual CPU socket): located in the shumway folder
– dh89xxcc_qa_dev0.conf
– dh89xxcc_qa_dev1.conf
• Coleto Creek: located in the coleto folder
– dh895xcc_qa_dev0.conf
The relevant configuration file(s) must be copied to the /etc/ directory.
Please note that any change to these configuration files requires restarting the Intel® QuickAssist Technology driver using the following command:
# service qat_service restart
22.2. Building the Application
129
Sample Applications User Guide, Release 2.0.0
Refer to the following documents for information on the Intel® QuickAssist Technology configuration files:
• Intel® Communications Chipset 8900 to 8920 Series Software Programmer’s Guide
• Intel® Communications Chipset 8925 to 8955 Series Software Programmer’s Guide
• Intel® Communications Chipset 8900 to 8920 Series Software for Linux* Getting Started
Guide.
• Intel® Communications Chipset 8925 to 8955 Series Software for Linux* Getting Started
Guide.
22.3.2 Traffic Generator Setup and Application Startup
The application has a number of command line options:
dpdk_qat [EAL options] – -p PORTMASK
‘(port,queue,lcore)[,(port,queue,lcore)]’]
[–no-promisc]
[–config
where,
• -p PORTMASK: Hexadecimal bitmask of ports to configure
• –no-promisc: Disables promiscuous mode for all ports, so that only packets with the
Ethernet MAC destination address set to the Ethernet address of the port are accepted.
By default promiscuous mode is enabled so that packets are accepted regardless of the
packet’s Ethernet MAC destination address.
• –config’(port,queue,lcore)[,(port,queue,lcore)]’: determines which queues from which
ports are mapped to which cores.
Refer to Chapter 10 , “L3 Forwarding Sample Application” for more detailed descriptions of the
–config command line option.
As an example, to run the application with two ports and two cores, which are using different
Intel® QuickAssist Technology execution engines, performing AES-CBC-128 encryption with
AES-XCBC-MAC-96 hash, the following settings can be used:
• Traffic generator source IP address: 0.9.6.1
• Command line:
./build/dpdk_qat -c 0xff -n 2 -- -p 0x3 --config '(0,0,1),(1,0,2)'
Refer to the DPDK Test Report for more examples of traffic generator setup and the application
startup command lines. If no errors are generated in response to the startup commands, the
application is running correctly.
22.3. Running the Application
130
CHAPTER
TWENTYTHREE
QUOTA AND WATERMARK SAMPLE APPLICATION
The Quota and Watermark sample application is a simple example of packet processing using
Data Plane Development Kit (DPDK) that showcases the use of a quota as the maximum
number of packets enqueue/dequeue at a time and low and high watermarks to signal low and
high ring usage respectively.
Additionally, it shows how ring watermarks can be used to feedback congestion notifications
to data producers by temporarily stopping processing overloaded rings and sending Ethernet
flow control frames.
This sample application is split in two parts:
• qw - The core quota and watermark sample application
• qwctl - A command line tool to alter quota and watermarks while qw is running
23.1 Overview
The Quota and Watermark sample application performs forwarding for each packet that is
received on a given port. The destination port is the adjacent port from the enabled port mask,
that is, if the first four ports are enabled (port mask 0xf), ports 0 and 1 forward into each other,
and ports 2 and 3 forward into each other. The MAC addresses of the forwarded Ethernet
frames are not affected.
Internally, packets are pulled from the ports by the master logical core and put on a variable
length processing pipeline, each stage of which being connected by rings, as shown in Fig.
23.1.
An adjustable quota value controls how many packets are being moved through the pipeline
per enqueue and dequeue. Adjustable watermark values associated with the rings control a
back-off mechanism that tries to prevent the pipeline from being overloaded by:
• Stopping enqueuing on rings for which the usage has crossed the high watermark threshold
• Sending Ethernet pause frames
• Only resuming enqueuing on a ring once its usage goes below a global low watermark
threshold
This mechanism allows congestion notifications to go up the ring pipeline and eventually lead
to an Ethernet flow control frame being send to the source.
131
Sample Applications User Guide, Release 2.0.0
Figure 23.1: Pipeline Overview
23.1. Overview
132
Sample Applications User Guide, Release 2.0.0
On top of serving as an example of quota and watermark usage, this application can be used to
benchmark ring based processing pipelines performance using a traffic- generator, as shown
in Fig. 23.2.
Figure 23.2: Ring-based Processing Pipeline Performance Setup
23.2 Compiling the Application
1. Go to the example directory:
export RTE_SDK=/path/to/rte_sdk
cd ${RTE_SDK}/examples/quota_watermark
2. Set the target (a default target is used if not specified). For example:
export RTE_TARGET=x86_64-native-linuxapp-gcc
See the DPDK Getting Started Guide for possible RTE_TARGET values.
3. Build the application:
make
23.3 Running the Application
The core application, qw, has to be started first.
23.2. Compiling the Application
133
Sample Applications User Guide, Release 2.0.0
Once it is up and running, one can alter quota and watermarks while it runs using the control
application, qwctl.
23.3.1 Running the Core Application
The application requires a single command line option:
./qw/build/qw [EAL options] -- -p PORTMASK
where,
-p PORTMASK: A hexadecimal bitmask of the ports to configure
To run the application in a linuxapp environment with four logical cores and ports 0 and 2, issue
the following command:
./qw/build/qw -c f -n 4 -- -p 5
Refer to the DPDK Getting Started Guide for general information on running applications and
the Environment Abstraction Layer (EAL) options.
23.3.2 Running the Control Application
The control application requires a number of command line options:
./qwctl/build/qwctl [EAL options] --proc-type=secondary
The –proc-type=secondary option is necessary for the EAL to properly initialize the control
application to use the same huge pages as the core application and thus be able to access its
rings.
To run the application in a linuxapp environment on logical core 0, issue the following command:
./qwctl/build/qwctl -c 1 -n 4 --proc-type=secondary
Refer to the DPDK Getting Started Guide for general information on running applications and
the Environment Abstraction Layer (EAL) options.
qwctl is an interactive command line that let the user change variables in a running instance of
qw. The help command gives a list of available commands:
$ qwctl > help
23.4 Code Overview
The following sections provide a quick guide to the application’s source code.
23.4.1 Core Application - qw
EAL and Drivers Setup
The EAL arguments are parsed at the beginning of the main() function:
23.4. Code Overview
134
Sample Applications User Guide, Release 2.0.0
ret = rte_eal_init(argc, argv);
if (ret < 0)
rte_exit(EXIT_FAILURE, "Cannot initialize EAL\n");
argc -= ret;
argv += ret;
Then, a call to init_dpdk(), defined in init.c, is made to initialize the poll mode drivers:
void
init_dpdk(void)
{
int ret;
/* Bind the drivers to usable devices */
ret = rte_eal_pci_probe();
if (ret < 0)
rte_exit(EXIT_FAILURE, "rte_eal_pci_probe(): error %d\n", ret);
}
if (rte_eth_dev_count() < 2)
rte_exit(EXIT_FAILURE, "Not enough Ethernet port available\n");
To fully understand this code, it is recommended to study the chapters that relate to the Poll
Mode Driver in the DPDK Getting Started Guide and the DPDK API Reference.
Shared Variables Setup
The quota and low_watermark shared variables are put into an rte_memzone using a call to
setup_shared_variables():
void
setup_shared_variables(void)
{
const struct rte_memzone *qw_memzone;
qw_memzone = rte_memzone_reserve(QUOTA_WATERMARK_MEMZONE_NAME, 2 * sizeof(int), rte_socke
if (qw_memzone == NULL)
rte_exit(EXIT_FAILURE, "%s\n", rte_strerror(rte_errno));
}
quota = qw_memzone->addr;
low_watermark = (unsigned int *) qw_memzone->addr + sizeof(int);
These two variables are initialized to a default value in main() and can be changed while qw is
running using the qwctl control program.
Application Arguments
The qw application only takes one argument: a port mask that specifies which ports should be
used by the application. At least two ports are needed to run the application and there should
be an even number of ports given in the port mask.
The port mask parsing is done in parse_qw_args(), defined in args.c.
23.4. Code Overview
135
Sample Applications User Guide, Release 2.0.0
Mbuf Pool Initialization
Once the application’s arguments are parsed, an mbuf pool is created. It contains a set of mbuf
objects that are used by the driver and the application to store network packets:
/* Create a pool of mbuf to store packets */
mbuf_pool = rte_mempool_create("mbuf_pool", MBUF_PER_POOL, MBUF_SIZE, 32, sizeof(struct rte_pk
rte_pktmbuf_pool_init, NULL, rte_pktmbuf_init, NULL, rte_socket_id(), 0);
if (mbuf_pool == NULL)
rte_panic("%s\n", rte_strerror(rte_errno));
The rte_mempool is a generic structure used to handle pools of objects. In this case, it is
necessary to create a pool that will be used by the driver, which expects to have some reserved
space in the mempool structure, sizeof(struct rte_pktmbuf_pool_private) bytes.
The number of allocated pkt mbufs is MBUF_PER_POOL, with a size of MBUF_SIZE each. A
per-lcore cache of 32 mbufs is kept. The memory is allocated in on the master lcore’s socket,
but it is possible to extend this code to allocate one mbuf pool per socket.
Two callback pointers are also given to the rte_mempool_create() function:
• The first callback pointer is to rte_pktmbuf_pool_init() and is used to initialize the private
data of the mempool, which is needed by the driver. This function is provided by the mbuf
API, but can be copied and extended by the developer.
• The second callback pointer given to rte_mempool_create() is the mbuf initializer.
The default is used, that is, rte_pktmbuf_init(), which is provided in the rte_mbuf library. If a
more complex application wants to extend the rte_pktmbuf structure for its own needs, a new
function derived from rte_pktmbuf_init() can be created.
Ports Configuration and Pairing
Each port in the port mask is configured and a corresponding ring is created in the master
lcore’s array of rings. This ring is the first in the pipeline and will hold the packets directly
coming from the port.
for (port_id = 0; port_id < RTE_MAX_ETHPORTS; port_id++)
if (is_bit_set(port_id, portmask)) {
configure_eth_port(port_id);
init_ring(master_lcore_id, port_id);
}
pair_ports();
The configure_eth_port() and init_ring() functions are used to configure a port and a ring respectively and are defined in init.c. They make use of the DPDK APIs defined in rte_eth.h and
rte_ring.h.
pair_ports() builds the port_pairs[] array so that its key-value pairs are a mapping between
reception and transmission ports. It is defined in init.c.
23.4. Code Overview
136
Sample Applications User Guide, Release 2.0.0
Logical Cores Assignment
The application uses the master logical core to poll all the ports for new packets and enqueue
them on a ring associated with the port.
Each logical core except the last runs pipeline_stage() after a ring for each used port is initialized on that core. pipeline_stage() on core X dequeues packets from core X-1’s rings and
enqueue them on its own rings. See Fig. 23.3.
/* Start pipeline_stage() on all the available slave lcore but the last */
for (lcore_id = 0 ; lcore_id < last_lcore_id; lcore_id++) {
if (rte_lcore_is_enabled(lcore_id) && lcore_id != master_lcore_id) {
for (port_id = 0; port_id < RTE_MAX_ETHPORTS; port_id++)
if (is_bit_set(port_id, portmask))
init_ring(lcore_id, port_id);
}
}
rte_eal_remote_launch(pipeline_stage, NULL, lcore_id);
The last available logical core runs send_stage(), which is the last stage of the pipeline dequeuing packets from the last ring in the pipeline and sending them out on the destination port
setup by pair_ports().
/* Start send_stage() on the last slave core */
rte_eal_remote_launch(send_stage, NULL, last_lcore_id);
Receive, Process and Transmit Packets
In the receive_stage() function running on the master logical core, the main task is to read
ingress packets from the RX ports and enqueue them on the port’s corresponding first ring in
the pipeline. This is done using the following code:
lcore_id = rte_lcore_id();
/* Process each port round robin style */
for (port_id = 0; port_id < RTE_MAX_ETHPORTS; port_id++) {
if (!is_bit_set(port_id, portmask))
continue;
ring = rings[lcore_id][port_id];
if (ring_state[port_id] != RING_READY) {
if (rte_ring_count(ring) > *low_watermark)
continue;
else
ring_state[port_id] = RING_READY;
}
/* Enqueue received packets on the RX ring */
nb_rx_pkts = rte_eth_rx_burst(port_id, 0, pkts, *quota);
ret = rte_ring_enqueue_bulk(ring, (void *) pkts, nb_rx_pkts);
if (ret == -EDQUOT) {
ring_state[port_id] = RING_OVERLOADED;
23.4. Code Overview
137
Sample Applications User Guide, Release 2.0.0
Figure 23.3: Threads and Pipelines
23.4. Code Overview
138
Sample Applications User Guide, Release 2.0.0
}
}
send_pause_frame(port_id, 1337);
For each port in the port mask, the corresponding ring’s pointer is fetched into ring and that
ring’s state is checked:
• If it is in the RING_READY state, *quota packets are grabbed from the port and put on
the ring. Should this operation make the ring’s usage cross its high watermark, the ring
is marked as overloaded and an Ethernet flow control frame is sent to the source.
• If it is not in the RING_READY state, this port is ignored until the ring’s usage crosses
the *low_watermark value.
The pipeline_stage() function’s task is to process and move packets from the preceding pipeline
stage. This thread is running on most of the logical cores to create and arbitrarily long pipeline.
lcore_id = rte_lcore_id();
previous_lcore_id = get_previous_lcore_id(lcore_id);
for (port_id = 0; port_id < RTE_MAX_ETHPORTS; port_id++) {
if (!is_bit_set(port_id, portmask))
continue;
tx = rings[lcore_id][port_id];
rx = rings[previous_lcore_id][port_id];
if (ring_state[port_id] != RING_READY) {
if (rte_ring_count(tx) > *low_watermark)
continue;
else
ring_state[port_id] = RING_READY;
}
/* Dequeue up to quota mbuf from rx */
nb_dq_pkts = rte_ring_dequeue_burst(rx, pkts, *quota);
if (unlikely(nb_dq_pkts < 0))
continue;
/* Enqueue them on tx */
}
ret = rte_ring_enqueue_bulk(tx, pkts, nb_dq_pkts);
if (ret == -EDQUOT)
ring_state[port_id] = RING_OVERLOADED;
The thread’s logic works mostly like receive_stage(), except that packets are moved from ring
to ring instead of port to ring.
In this example, no actual processing is done on the packets, but pipeline_stage() is an ideal
place to perform any processing required by the application.
Finally, the send_stage() function’s task is to read packets from the last ring in a pipeline and
send them on the destination port defined in the port_pairs[] array. It is running on the last
available logical core only.
lcore_id = rte_lcore_id();
previous_lcore_id = get_previous_lcore_id(lcore_id);
23.4. Code Overview
139
Sample Applications User Guide, Release 2.0.0
for (port_id = 0; port_id < RTE_MAX_ETHPORTS; port_id++) {
if (!is_bit_set(port_id, portmask)) continue;
dest_port_id = port_pairs[port_id];
tx = rings[previous_lcore_id][port_id];
if (rte_ring_empty(tx)) continue;
/* Dequeue packets from tx and send them */
}
nb_dq_pkts = rte_ring_dequeue_burst(tx, (void *) tx_pkts, *quota);
nb_tx_pkts = rte_eth_tx_burst(dest_port_id, 0, tx_pkts, nb_dq_pkts);
For each port in the port mask, up to *quota packets are pulled from the last ring in its pipeline
and sent on the destination port paired with the current port.
23.4.2 Control Application - qwctl
The qwctl application uses the rte_cmdline library to provide the user with an interactive command line that can be used to modify and inspect parameters in a running qw application.
Those parameters are the global quota and low_watermark value as well as each ring’s built-in
high watermark.
Command Definitions
The available commands are defined in commands.c.
It is advised to use the cmdline sample application user guide as a reference for everything
related to the rte_cmdline library.
Accessing Shared Variables
The setup_shared_variables() function retrieves the shared
low_watermark from the rte_memzone previously created by qw.
variables
quota
and
static void
setup_shared_variables(void)
{
const struct rte_memzone *qw_memzone;
qw_memzone = rte_memzone_lookup(QUOTA_WATERMARK_MEMZONE_NAME);
if (qw_memzone == NULL)
rte_exit(EXIT_FAILURE, "Couldn't find memzone\n");
quota = qw_memzone->addr;
}
low_watermark = (unsigned int *) qw_memzone->addr + sizeof(int);
23.4. Code Overview
140
CHAPTER
TWENTYFOUR
TIMER SAMPLE APPLICATION
The Timer sample application is a simple application that demonstrates the use of a timer in
a DPDK application. This application prints some messages from different lcores regularly,
demonstrating the use of timers.
24.1 Compiling the Application
1. Go to the example directory:
export RTE_SDK=/path/to/rte_sdk cd ${RTE_SDK}/examples/timer
2. Set the target (a default target is used if not specified). For example:
export RTE_TARGET=x86_64-native-linuxapp-gcc
See the DPDK Getting Started Guide for possible RTE_TARGET values.
3. Build the application:
make
24.2 Running the Application
To run the example in linuxapp environment:
$ ./build/timer -c f -n 4
Refer to the DPDK Getting Started Guide for general information on running applications and
the Environment Abstraction Layer (EAL) options.
24.3 Explanation
The following sections provide some explanation of the code.
24.3.1 Initialization and Main Loop
In addition to EAL initialization, the timer subsystem must be initialized, by calling the
rte_timer_subsystem_init() function.
141
Sample Applications User Guide, Release 2.0.0
/* init EAL */
ret = rte_eal_init(argc, argv);
if (ret < 0)
rte_panic("Cannot init EAL\n");
/* init RTE timer library */
rte_timer_subsystem_init();
After timer creation (see the next paragraph), the main loop is executed on each slave lcore
using the well-known rte_eal_remote_launch() and also on the master.
/* call lcore_mainloop() on every slave lcore
*/
RTE_LCORE_FOREACH_SLAVE(lcore_id) {
rte_eal_remote_launch(lcore_mainloop, NULL, lcore_id);
}
/* call it on master lcore too */
(void) lcore_mainloop(NULL);
The main loop is very simple in this example:
while (1) {
/*
*
Call the timer handler on each core: as we don't
*
need a very precise timer, so only call
*
rte_timer_manage() every ~10ms (at 2 GHz). In a real
*
application, this will enhance performances as
*
reading the HPET timer is not efficient.
*/
cur_tsc = rte_rdtsc();
diff_tsc = cur_tsc - prev_tsc;
}
if (diff_tsc > TIMER_RESOLUTION_CYCLES) {
rte_timer_manage();
prev_tsc = cur_tsc;
}
As explained in the comment, it is better to use the TSC register (as it is a per-lcore register) to
check if the rte_timer_manage() function must be called or not. In this example, the resolution
of the timer is 10 milliseconds.
24.3.2 Managing Timers
In the main() function, the two timers are initialized. This call to rte_timer_init() is necessary
before doing any other operation on the timer structure.
/* init timer structures */
rte_timer_init(&timer0);
rte_timer_init(&timer1);
24.3. Explanation
142
Sample Applications User Guide, Release 2.0.0
Then, the two timers are configured:
• The first timer (timer0) is loaded on the master lcore and expires every second. Since the
PERIODICAL flag is provided, the timer is reloaded automatically by the timer subsystem.
The callback function is timer0_cb().
• The second timer (timer1) is loaded on the next available lcore every 333 ms. The SINGLE flag means that the timer expires only once and must be reloaded manually if required. The callback function is timer1_cb().
/* load timer0, every second, on master lcore, reloaded automatically */
hz = rte_get_hpet_hz();
lcore_id = rte_lcore_id();
rte_timer_reset(&timer0, hz, PERIODICAL, lcore_id, timer0_cb, NULL);
/* load timer1, every second/3, on next lcore, reloaded manually */
lcore_id = rte_get_next_lcore(lcore_id, 0, 1);
rte_timer_reset(&timer1, hz/3, SINGLE, lcore_id, timer1_cb, NULL);
The callback for the first timer (timer0) only displays a message until a global counter reaches
20 (after 20 seconds). In this case, the timer is stopped using the rte_timer_stop() function.
/* timer0 callback */
static void
timer0_cb( attribute ((unused)) struct rte_timer *tim, __attribute ((unused)) void *arg)
{
static unsigned counter = 0;
unsigned lcore_id = rte_lcore_id();
printf("%s() on lcore %u\n", FUNCTION , lcore_id);
/* this timer is automatically reloaded until we decide to stop it, when counter reaches 2
}
if ((counter ++) == 20)
rte_timer_stop(tim);
The callback for the second timer (timer1) displays a message and reloads the timer on the
next lcore, using the rte_timer_reset() function:
/* timer1 callback */
static void
timer1_cb( attribute ((unused)) struct rte_timer *tim, _attribute ((unused)) void *arg)
{
unsigned lcore_id = rte_lcore_id();
uint64_t hz;
printf("%s() on lcore %u\\n", FUNCTION , lcore_id);
/* reload it on another lcore */
hz = rte_get_hpet_hz();
lcore_id = rte_get_next_lcore(lcore_id, 0, 1);
24.3. Explanation
143
Sample Applications User Guide, Release 2.0.0
}
rte_timer_reset(&timer1, hz/3, SINGLE, lcore_id, timer1_cb, NULL);
24.3. Explanation
144
CHAPTER
TWENTYFIVE
PACKET ORDERING APPLICATION
The Packet Ordering sample app simply shows the impact of reordering a stream. It’s meant
to stress the library with different configurations for performance.
25.1 Overview
The application uses at least three CPU cores:
• RX core (maser core) receives traffic from the NIC ports and feeds Worker cores with
traffic through SW queues.
• Worker core (slave core) basically do some light work on the packet. Currently it modifies
the output port of the packet for configurations with more than one port enabled.
• TX Core (slave core) receives traffic from Worker cores through software queues, inserts
out-of-order packets into reorder buffer, extracts ordered packets from the reorder buffer
and sends them to the NIC ports for transmission.
25.2 Compiling the Application
1. Go to the example directory:
export RTE_SDK=/path/to/rte_sdk
cd ${RTE_SDK}/examples/helloworld
2. Set the target (a default target is used if not specified). For example:
export RTE_TARGET=x86_64-native-linuxapp-gcc
See the DPDK Getting Started Guide for possible RTE_TARGET values.
3. Build the application:
make
25.3 Running the Application
Refer to DPDK Getting Started Guide for general information on running applications and the
Environment Abstraction Layer (EAL) options.
145
Sample Applications User Guide, Release 2.0.0
25.3.1 Application Command Line
The application execution command line is:
./test-pipeline [EAL options] -- -p PORTMASK [--disable-reorder]
The -c EAL CPU_COREMASK option has to contain at least 3 CPU cores. The first CPU core
in the core mask is the master core and would be assigned to RX core, the last to TX core and
the rest to Worker cores.
The PORTMASK parameter must contain either 1 or even enabled port numbers. When setting
more than 1 port, traffic would be forwarded in pairs. For example, if we enable 4 ports, traffic
from port 0 to 1 and from 1 to 0, then the other pair from 2 to 3 and from 3 to 2, having [0,1]
and [2,3] pairs.
The disable-reorder long option does, as its name implies, disable the reordering of traffic,
which should help evaluate reordering performance impact.
25.3. Running the Application
146
CHAPTER
TWENTYSIX
VMDQ AND DCB FORWARDING SAMPLE APPLICATION
The VMDQ and DCB Forwarding sample application is a simple example of packet processing
using the DPDK. The application performs L2 forwarding using VMDQ and DCB to divide the
incoming traffic into 128 queues. The traffic splitting is performed in hardware by the VMDQ
and DCB features of the Intel® 82599 10 Gigabit Ethernet Controller.
26.1 Overview
This sample application can be used as a starting point for developing a new application that
is based on the DPDK and uses VMDQ and DCB for traffic partitioning.
The VMDQ and DCB filters work on VLAN traffic to divide the traffic into 128 input queues on
the basis of the VLAN ID field and VLAN user priority field. VMDQ filters split the traffic into 16
or 32 groups based on the VLAN ID. Then, DCB places each packet into one of either 4 or 8
queues within that group, based upon the VLAN user priority field.
In either case, 16 groups of 8 queues, or 32 groups of 4 queues, the traffic can be split into 128
hardware queues on the NIC, each of which can be polled individually by a DPDK application.
All traffic is read from a single incoming port (port 0) and output on port 1, without any processing being performed. The traffic is split into 128 queues on input, where each thread of
the application reads from multiple queues. For example, when run with 8 threads, that is, with
the -c FF option, each thread receives and forwards packets from 16 queues.
As supplied, the sample application configures the VMDQ feature to have 16 pools with 8
queues each as indicated in Fig. 26.1. The Intel® 82599 10 Gigabit Ethernet Controller NIC
also supports the splitting of traffic into 32 pools of 4 queues each and this can be used by
changing the NUM_POOLS parameter in the supplied code. The NUM_POOLS parameter
can be passed on the command line, after the EAL parameters:
./build/vmdq_dcb [EAL options] -- -p PORTMASK --nb-pools NP
where, NP can be 16 or 32.
In Linux* user space, the application can display statistics with the number of packets received
on each queue. To have the application display the statistics, send a SIGHUP signal to the
running application process, as follows:
where, <pid> is the process id of the application process.
The VMDQ and DCB Forwarding sample application is in many ways simpler than the L2
Forwarding application (see Chapter 9 , “L2 Forwarding Sample Application (in Real and Virtualized Environments)”) as it performs unidirectional L2 forwarding of packets from one port to
147
Sample Applications User Guide, Release 2.0.0
HW RX Queue 0
(VLAN 0, Prio 0)
HW RX Queue 7
(VLAN 0, Prio 7)
User Thread
0
HW TX Queue 0
NIC Port 0
RX
NIC Port 0
TX
HW RX Queue 120
(VLAN 15, Prio 0)
HW RX Queue 127
(VLAN 15, Prio 7)
User Thread
15
HW TX Queue 15
Figure 26.1: Packet Flow Through the VMDQ and DCB Sample Application
a second port. No command-line options are taken by this application apart from the standard
EAL command-line options.
Note: Since VMD queues are being used for VMM, this application works correctly when VTd
is disabled in the BIOS or Linux* kernel (intel_iommu=off).
26.2 Compiling the Application
1. Go to the examples directory:
export RTE_SDK=/path/to/rte_sdk cd ${RTE_SDK}/examples/vmdq_dcb
2. Set the target (a default target is used if not specified). For example:
export RTE_TARGET=x86_64-native-linuxapp-gcc
See the DPDK Getting Started Guide for possible RTE_TARGET values.
3. Build the application:
make
26.3 Running the Application
To run the example in a linuxapp environment:
user@target:~$ ./build/vmdq_dcb -c f -n 4 -- -p 0x3 --nb-pools 16
26.2. Compiling the Application
148
Sample Applications User Guide, Release 2.0.0
Refer to the DPDK Getting Started Guide for general information on running applications and
the Environment Abstraction Layer (EAL) options.
26.4 Explanation
The following sections provide some explanation of the code.
26.4.1 Initialization
The EAL, driver and PCI configuration is performed largely as in the L2 Forwarding sample
application, as is the creation of the mbuf pool. See Chapter 9, “L2 Forwarding Sample Application (in Real and Virtualized Environments)”. Where this example application differs is in the
configuration of the NIC port for RX.
The VMDQ and DCB hardware feature is configured at port initialization time by setting the
appropriate values in the rte_eth_conf structure passed to the rte_eth_dev_configure() API.
Initially in the application, a default structure is provided for VMDQ and DCB configuration to
be filled in later by the application.
/* empty vmdq+dcb configuration structure. Filled in programmatically */
static const struct rte_eth_conf vmdq_dcb_conf_default = {
.rxmode = {
.mq_mode = ETH_VMDQ_DCB,
.split_hdr_size = 0,
.header_split = 0,
/**< Header Split disabled */
.hw_ip_checksum = 0, /**< IP checksum offload disabled */
.hw_vlan_filter = 0, /**< VLAN filtering disabled */
.jumbo_frame = 0,
/**< Jumbo Frame Support disabled */
},
.txmode = {
.mq_mode = ETH_DCB_NONE,
},
.rx_adv_conf = {
/*
*
should be overridden separately in code with
*
appropriate values
*/
};
},
.vmdq_dcb_conf = {
.nb_queue_pools = ETH_16_POOLS,
.enable_default_pool = 0,
.default_pool = 0,
.nb_pool_maps = 0,
.pool_map = {{0, 0},},
.dcb_queue = {0},
},
The get_eth_conf() function fills in an rte_eth_conf structure with the appropriate values, based
on the global vlan_tags array, and dividing up the possible user priority values equally among
the individual queues (also referred to as traffic classes) within each pool, that is, if the number
of pools is 32, then the user priority fields are allocated two to a queue. If 16 pools are used,
26.4. Explanation
149
Sample Applications User Guide, Release 2.0.0
then each of the 8 user priority fields is allocated to its own queue within the pool. For the VLAN
IDs, each one can be allocated to possibly multiple pools of queues, so the pools parameter in
the rte_eth_vmdq_dcb_conf structure is specified as a bitmask value.
const uint16_t vlan_tags[] = {
0, 1, 2, 3, 4, 5, 6, 7,
8, 9, 10, 11, 12, 13, 14, 15,
16, 17, 18, 19, 20, 21, 22, 23,
24, 25, 26, 27, 28, 29, 30, 31
};
/* Builds up the correct configuration for vmdq+dcb based on the vlan tags array
* given above, and the number of traffic classes available for use. */
static inline int
get_eth_conf(struct rte_eth_conf *eth_conf, enum rte_eth_nb_pools num_pools)
{
struct rte_eth_vmdq_dcb_conf conf;
unsigned i;
if (num_pools != ETH_16_POOLS && num_pools != ETH_32_POOLS ) return -1;
conf.nb_queue_pools = num_pools;
conf.enable_default_pool = 0;
conf.default_pool = 0; /* set explicit value, even if not used */
conf.nb_pool_maps = sizeof( vlan_tags )/sizeof( vlan_tags[ 0 ]);
for (i = 0; i < conf.nb_pool_maps; i++){
conf.pool_map[i].vlan_id = vlan_tags[ i ];
conf.pool_map[i].pools = 1 << (i % num_pools);
}
for (i = 0; i < ETH_DCB_NUM_USER_PRIORITIES; i++){
conf.dcb_queue[i] = (uint8_t)(i % (NUM_QUEUES/num_pools));
}
(void) rte_memcpy(eth_conf, &vmdq_dcb_conf_default, sizeof(\*eth_conf));
(void) rte_memcpy(ð_conf->rx_adv_conf.vmdq_dcb_conf, &conf, sizeof(eth_conf->rx_adv_con
}
return 0;
Once the network port has been initialized using the correct VMDQ and DCB values, the
initialization of the port’s RX and TX hardware rings is performed similarly to that in the L2
Forwarding sample application. See Chapter 9, “L2 Forwarding Sample Application (in Real
and Virtualized Environments)” for more information.
26.4.2 Statistics Display
When run in a linuxapp environment, the VMDQ and DCB Forwarding sample application can
display statistics showing the number of packets read from each RX queue. This is provided
by way of a signal handler for the SIGHUP signal, which simply prints to standard output the
packet counts in grid form. Each row of the output is a single pool with the columns being the
queue number within that pool.
To generate the statistics output, use the following command:
user@host$ sudo killall -HUP vmdq_dcb_app
26.4. Explanation
150
Sample Applications User Guide, Release 2.0.0
Please note that the statistics output will appear on the terminal where the vmdq_dcb_app is
running, rather than the terminal from which the HUP signal was sent.
26.4. Explanation
151
CHAPTER
TWENTYSEVEN
VHOST SAMPLE APPLICATION
The vhost sample application demonstrates integration of the Data Plane Development Kit
(DPDK) with the Linux* KVM hypervisor by implementing the vhost-net offload API. The sample application performs simple packet switching between virtual machines based on Media
Access Control (MAC) address or Virtual Local Area Network (VLAN) tag. The splitting of
Ethernet traffic from an external switch is performed in hardware by the Virtual Machine Device Queues (VMDQ) and Data Center Bridging (DCB) features of the Intel® 82599 10 Gigabit
Ethernet Controller.
27.1 Background
Virtio networking (virtio-net) was developed as the Linux* KVM para-virtualized method for
communicating network packets between host and guest. It was found that virtio-net performance was poor due to context switching and packet copying between host, guest, and QEMU.
The following figure shows the system architecture for a virtio-based networking (virtio-net).
The Linux* Kernel vhost-net module was developed as an offload mechanism for virtio-net.
The vhost-net module enables KVM (QEMU) to offload the servicing of virtio-net devices to
the vhost-net kernel module, reducing the context switching and packet copies in the virtual
dataplane.
This is achieved by QEMU sharing the following information with the vhost-net module through
the vhost-net API:
• The layout of the guest memory space, to enable the vhost-net module to translate addresses.
• The locations of virtual queues in QEMU virtual address space, to enable the vhost
module to read/write directly to and from the virtqueues.
• An event file descriptor (eventfd) configured in KVM to send interrupts to the virtio- net
device driver in the guest. This enables the vhost-net module to notify (call) the guest.
• An eventfd configured in KVM to be triggered on writes to the virtio-net device’s Peripheral Component Interconnect (PCI) config space. This enables the vhost-net module to
receive notifications (kicks) from the guest.
The following figure shows the system architecture for virtio-net networking with vhost-net offload.
152
Sample Applications User Guide, Release 2.0.0
Figure 27.1: System Architecture for Virtio-based Networking (virtio-net).
Figure 27.2: Virtio with Linux
27.1. Background
153
Sample Applications User Guide, Release 2.0.0
27.2 Sample Code Overview
The DPDK vhost-net sample code demonstrates KVM (QEMU) offloading the servicing of a
Virtual Machine’s (VM’s) virtio-net devices to a DPDK-based application in place of the kernel’s
vhost-net module.
The DPDK vhost-net sample code is based on vhost library. Vhost library is developed for user
space Ethernet switch to easily integrate with vhost functionality.
The vhost library implements the following features:
• Management of virtio-net device creation/destruction events.
• Mapping of the VM’s physical memory into the DPDK vhost-net’s address space.
• Triggering/receiving notifications to/from VMs via eventfds.
• A virtio-net back-end implementation providing a subset of virtio-net features.
There are two vhost implementations in vhost library, vhost cuse and vhost user. In vhost cuse,
a character device driver is implemented to receive and process vhost requests through ioctl
messages. In vhost user, a socket server is created to received vhost requests through socket
messages. Most of the messages share the same handler routine.
Note: Any vhost cuse specific requirement in the following sections will be emphasized.
Two implementations are turned on and off statically through configure file. Only one implementation could be turned on. They don’t co-exist in current implementation.
The vhost sample code application is a simple packet switching application with the following
feature:
• Packet switching between virtio-net devices and the network interface card, including
using VMDQs to reduce the switching that needs to be performed in software.
The following figure shows the architecture of the Vhost sample application based on vhostcuse.
The following figure shows the flow of packets through the vhost-net sample application.
27.3 Supported Distributions
The example in this section have been validated with the following distributions:
• Fedora* 18
• Fedora* 19
• Fedora* 20
27.4 Prerequisites
This section lists prerequisite packages that must be installed.
27.2. Sample Code Overview
154
Sample Applications User Guide, Release 2.0.0
Figure 27.3: Vhost-net Architectural Overview
27.4. Prerequisites
155
Sample Applications User Guide, Release 2.0.0
Figure 27.4: Packet Flow Through the vhost-net Sample Application
27.4. Prerequisites
156
Sample Applications User Guide, Release 2.0.0
27.4.1 Installing Packages on the Host(vhost cuse required)
The vhost cuse code uses the following packages; fuse, fuse-devel, and kernel-modules-extra.
The vhost user code don’t rely on those modules as eventfds are already installed into vhost
process through Unix domain socket.
1. Install Fuse Development Libraries and headers:
yum -y install fuse fuse-devel
2. Install the Cuse Kernel Module:
yum -y install kernel-modules-extra
27.4.2 QEMU simulator
For vhost user, qemu 2.2 is required.
27.4.3 Setting up the Execution Environment
The vhost sample code requires that QEMU allocates a VM’s memory on the hugetlbfs file
system. As the vhost sample code requires hugepages, the best practice is to partition the
system into separate hugepage mount points for the VMs and the vhost sample code.
Note: This is best-practice only and is not mandatory. For systems that only support 2
MB page sizes, both QEMU and vhost sample code can use the same hugetlbfs mount point
without issue.
QEMU
VMs with gigabytes of memory can benefit from having QEMU allocate their memory from 1 GB
huge pages. 1 GB huge pages must be allocated at boot time by passing kernel parameters
through the grub boot loader.
1. Calculate the maximum memory usage of all VMs to be run on the system. Then, round
this value up to the nearest Gigabyte the execution environment will require.
2. Edit the /etc/default/grub file, and add the following to the GRUB_CMDLINE_LINUX entry:
GRUB_CMDLINE_LINUX="... hugepagesz=1G hugepages=<Number of hugepages required> default_hu
3. Update the grub boot loader:
grub2-mkconfig -o /boot/grub2/grub.cfg
4. Reboot the system.
5. The hugetlbfs mount point (/dev/hugepages) should now default to allocating gigabyte
pages.
Note: Making the above modification will change the system default hugepage size to 1 GB
for all applications.
27.4. Prerequisites
157
Sample Applications User Guide, Release 2.0.0
Vhost Sample Code
In this section, we create a second hugetlbs mount point to allocate hugepages for the DPDK
vhost sample code.
1. Allocate sufficient 2 MB pages for the DPDK vhost sample code:
echo 256 > /sys/kernel/mm/hugepages/hugepages-2048kB/nr_hugepages
2. Mount hugetlbs at a separate mount point for 2 MB pages:
mount -t hugetlbfs nodev /mnt/huge -o pagesize=2M
The above steps can be automated by doing the following:
1. Edit /etc/fstab to add an entry to automatically mount the second hugetlbfs mount point:
hugetlbfs <tab> /mnt/huge <tab> hugetlbfs defaults,pagesize=1G 0 0
2. Edit the /etc/default/grub file, and add the following to the GRUB_CMDLINE_LINUX entry:
GRUB_CMDLINE_LINUX="... hugepagesz=2M hugepages=256 ... default_hugepagesz=1G"
3. Update the grub bootloader:
grub2-mkconfig -o /boot/grub2/grub.cfg
4. Reboot the system.
Note: Ensure that the default hugepage size after this setup is 1 GB.
27.4.4 Setting up the Guest Execution Environment
It is recommended for testing purposes that the DPDK testpmd sample application is used in
the guest to forward packets, the reasons for this are discussed in Section Running the Virtual
Machine (QEMU).
The testpmd application forwards packets between pairs of Ethernet devices, it requires an
even number of Ethernet devices (virtio or otherwise) to execute. It is therefore recommended
to create multiples of two virtio-net devices for each Virtual Machine either through libvirt or at
the command line as follows.
Note: Observe that in the example, “-device” and “-netdev” are repeated for two virtio-net
devices.
For vhost cuse:
user@target:~$ qemu-system-x86_64 ... \
-netdev tap,id=hostnet1,vhost=on,vhostfd=<open fd> \
-device virtio-net-pci, netdev=hostnet1,id=net1 \
-netdev tap,id=hostnet2,vhost=on,vhostfd=<open fd> \
-device virtio-net-pci, netdev=hostnet2,id=net1
For vhost user:
27.4. Prerequisites
158
Sample Applications User Guide, Release 2.0.0
user@target:~$ qemu-system-x86_64 ... \
-chardev socket,id=char1,path=<sock_path> \
-netdev type=vhost-user,id=hostnet1,chardev=char1 \
-device virtio-net-pci,netdev=hostnet1,id=net1 \
-chardev socket,id=char2,path=<sock_path> \
-netdev type=vhost-user,id=hostnet2,chardev=char2 \
-device virtio-net-pci,netdev=hostnet2,id=net2
sock_path is the path for the socket file created by vhost.
27.5 Compiling the Sample Code
1. Compile vhost lib:
To enable vhost, turn on vhost library in the configure file config/common_linuxapp.
CONFIG_RTE_LIBRTE_VHOST=n
vhost user is turned on by default in the configure file config/common_linuxapp. To enable
vhost cuse, disable vhost user.
CONFIG_RTE_LIBRTE_VHOST_USER=y
After vhost is enabled and the implementation is selected, build the vhost library.
2. Go to the examples directory:
export RTE_SDK=/path/to/rte_sdk
cd ${RTE_SDK}/examples/vhost
3. Set the target (a default target is used if not specified). For example:
export RTE_TARGET=x86_64-native-linuxapp-gcc
See the DPDK Getting Started Guide for possible RTE_TARGET values.
4. Build the application:
cd ${RTE_SDK}
make config ${RTE_TARGET}
make install ${RTE_TARGET}
cd ${RTE_SDK}/examples/vhost
make
5. Go to the eventfd_link directory(vhost cuse required):
cd ${RTE_SDK}/lib/librte_vhost/eventfd_link
6. Build the eventfd_link kernel module(vhost cuse required):
make
27.6 Running the Sample Code
1. Install the cuse kernel module(vhost cuse required):
27.5. Compiling the Sample Code
159
Sample Applications User Guide, Release 2.0.0
modprobe cuse
2. Go to the eventfd_link directory(vhost cuse required):
export RTE_SDK=/path/to/rte_sdk
cd ${RTE_SDK}/lib/librte_vhost/eventfd_link
3. Install the eventfd_link module(vhost cuse required):
insmod ./eventfd_link.ko
4. Go to the examples directory:
export RTE_SDK=/path/to/rte_sdk
cd ${RTE_SDK}/examples/vhost
5. Run the vhost-switch sample code:
vhost cuse:
user@target:~$ ./build/app/vhost-switch -c f -n 4 --huge-dir / mnt/huge -- -p 0x1 --dev-b
vhost user: a socket file named usvhost will be created under current directory. Use its
path as the socket path in guest’s qemu commandline.
user@target:~$ ./build/app/vhost-switch -c f -n 4 --huge-dir / mnt/huge -- -p 0x1 --dev-b
Note: Please note the huge-dir parameter instructs the DPDK to allocate its memory from the
2 MB page hugetlbfs.
27.6.1 Parameters
Basename and Index. vhost cuse uses a Linux* character device to communicate with QEMU.
The basename and the index are used to generate the character devices name.
/dev/<basename>-<index>
The index parameter is provided for a situation where multiple instances of the virtual switch is
required.
For compatibility with the QEMU wrapper script, a base name of “usvhost” and an index of “1”
should be used:
user@target:~$ ./build/app/vhost-switch -c f -n 4 --huge-dir / mnt/huge -- -p 0x1 --dev-basena
vm2vm. The vm2vm parameter disable/set mode of packet switching between guests in the
host. Value of “0” means disabling vm2vm implies that on virtual machine packet transmission
will always go to the Ethernet port; Value of “1” means software mode packet forwarding between guests, it needs packets copy in vHOST, so valid only in one-copy implementation, and
invalid for zero copy implementation; value of “2” means hardware mode packet forwarding
between guests, it allows packets go to the Ethernet port, hardware L2 switch will determine
which guest the packet should forward to or need send to external, which bases on the packet
destination MAC address and VLAN tag.
user@target:~$ ./build/app/vhost-switch -c f -n 4 --huge-dir /mnt/huge -- --vm2vm [0,1,2]
27.6. Running the Sample Code
160
Sample Applications User Guide, Release 2.0.0
Mergeable Buffers. The mergeable buffers parameter controls how virtio-net descriptors are
used for virtio-net headers. In a disabled state, one virtio-net header is used per packet buffer;
in an enabled state one virtio-net header is used for multiple packets. The default value is 0 or
disabled since recent kernels virtio-net drivers show performance degradation with this feature
is enabled.
user@target:~$ ./build/app/vhost-switch -c f -n 4 --huge-dir / mnt/huge -- --mergeable [0,1]
Stats. The stats parameter controls the printing of virtio-net device statistics. The parameter
specifies an interval second to print statistics, with an interval of 0 seconds disabling statistics.
user@target:~$ ./build/app/vhost-switch -c f -n 4 --huge-dir / mnt/huge -- --stats [0,n]
RX Retry. The rx-retry option enables/disables enqueue retries when the guests RX queue is
full. This feature resolves a packet loss that is observed at high data-rates, by allowing it to
delay and retry in the receive path. This option is enabled by default.
user@target:~$ ./build/app/vhost-switch -c f -n 4 --huge-dir / mnt/huge -- --rx-retry [0,1]
RX Retry Number. The rx-retry-num option specifies the number of retries on an RX burst, it
takes effect only when rx retry is enabled. The default value is 4.
user@target:~$ ./build/app/vhost-switch -c f -n 4 --huge-dir / mnt/huge -- --rx-retry 1 --rx-r
RX Retry Delay Time. The rx-retry-delay option specifies the timeout (in micro seconds)
between retries on an RX burst, it takes effect only when rx retry is enabled. The default value
is 15.
user@target:~$ ./build/app/vhost-switch -c f -n 4 --huge-dir / mnt/huge -- --rx-retry 1 --rx-r
Zero copy. The zero copy option enables/disables the zero copy mode for RX/TX packet, in
the zero copy mode the packet buffer address from guest translate into host physical address
and then set directly as DMA address. If the zero copy mode is disabled, then one copy mode
is utilized in the sample. This option is disabled by default.
user@target:~$ ./build/app/vhost-switch -c f -n 4 --huge-dir /mnt/huge -- --zero-copy [0,1]
RX descriptor number. The RX descriptor number option specify the Ethernet RX descriptor
number, Linux legacy virtio-net has different behavior in how to use the vring descriptor from
DPDK based virtio-net PMD, the former likely allocate half for virtio header, another half for
frame buffer, while the latter allocate all for frame buffer, this lead to different number for available frame buffer in vring, and then lead to different Ethernet RX descriptor number could be
used in zero copy mode. So it is valid only in zero copy mode is enabled. The value is 32 by
default.
user@target:~$ ./build/app/vhost-switch -c f -n 4 --huge-dir /mnt/huge -- --zero-copy 1 --rx-d
TX descriptor number. The TX descriptor number option specify the Ethernet TX descriptor
number, it is valid only in zero copy mode is enabled. The value is 64 by default.
user@target:~$ ./build/app/vhost-switch -c f -n 4 --huge-dir /mnt/huge -- --zero-copy 1 --tx-d
VLAN strip. The VLAN strip option enable/disable the VLAN strip on host, if disabled, the
guest will receive the packets with VLAN tag. It is enabled by default.
user@target:~$ ./build/app/vhost-switch -c f -n 4 --huge-dir /mnt/huge -- --vlan-strip [0, 1]
27.6. Running the Sample Code
161
Sample Applications User Guide, Release 2.0.0
27.7 Running the Virtual Machine (QEMU)
QEMU must be executed with specific parameters to:
• Ensure the guest is configured to use virtio-net network adapters.
user@target:~$ qemu-system-x86_64 ... -device virtio-net-pci,netdev=hostnet1,id=net1 ...
• Ensure the guest’s virtio-net network adapter is configured with offloads disabled.
user@target:~$ qemu-system-x86_64 ... -device virtio-net-pci,netdev=hostnet1,id=net1,csum
• Redirect QEMU to communicate with the DPDK vhost-net sample code in place of the
vhost-net kernel module(vhost cuse).
user@target:~$ qemu-system-x86_64 ... -netdev tap,id=hostnet1,vhost=on,vhostfd=<open fd>
• Enable the vhost-net sample code to map the VM’s memory into its own process address
space.
user@target:~$ qemu-system-x86_64 ... -mem-prealloc -mem-path / dev/hugepages ...
Note: The QEMU wrapper (qemu-wrap.py) is a Python script designed to automate the QEMU
configuration described above. It also facilitates integration with libvirt, although the script may
also be used standalone without libvirt.
27.7.1 Redirecting QEMU to vhost-net Sample Code(vhost cuse)
To redirect QEMU to the vhost-net sample code implementation of the vhost-net API, an open
file descriptor must be passed to QEMU running as a child process.
#!/usr/bin/python
fd = os.open("/dev/usvhost-1", os.O_RDWR)
subprocess.call("qemu-system-x86_64 ... . -netdev tap,id=vhostnet0,vhost=on,vhostfd=" + fd +".
Note: This process is automated in the QEMU wrapper script described below.
27.7.2 Mapping the Virtual Machine’s Memory
For the DPDK vhost-net sample code to be run correctly, QEMU must allocate the VM’s memory on hugetlbfs. This is done by specifying mem-prealloc and mem-path when executing
QEMU. The vhost-net sample code accesses the virtio-net device’s virtual rings and packet
buffers by finding and mapping the VM’s physical memory on hugetlbfs. In this case, the path
passed to the guest should be that of the 1 GB page hugetlbfs:
user@target:~$ qemu-system-x86_64 ... -mem-prealloc -mem-path / dev/hugepages ...
Note: This process is automated in the QEMU wrapper script described below. The following
two sections only applies to vhost cuse. For vhost-user, please make corresponding changes
to qemu-wrapper script and guest XML file.
27.7. Running the Virtual Machine (QEMU)
162
Sample Applications User Guide, Release 2.0.0
27.7.3 QEMU Wrapper Script
The QEMU wrapper script automatically detects and calls QEMU with the necessary parameters required to integrate with the vhost sample code. It performs the following actions:
• Automatically detects the location of the hugetlbfs and inserts this into the command line
parameters.
• Automatically open file descriptors for each virtio-net device and inserts this into the
command line parameters.
• Disables offloads on each virtio-net device.
• Calls Qemu passing both the command line parameters passed to the script itself and
those it has auto-detected.
The QEMU wrapper script will automatically configure calls to QEMU:
user@target:~$ qemu-wrap.py -machine pc-i440fx-1.4,accel=kvm,usb=off -cpu SandyBridge -smp 4,s
-netdev tap,id=hostnet1,vhost=on -device virtio-net-pci,netdev=hostnet1,id=net1 -hda <disk img
which will become the following call to QEMU:
/usr/local/bin/qemu-system-x86_64 -machine pc-i440fx-1.4,accel=kvm,usb=off -cpu SandyBridge -s
-netdev tap,id=hostnet1,vhost=on,vhostfd=<open fd> -device virtio-net-pci,netdev=hostnet1,id=n
csum=off,gso=off,guest_tso4=off,guest_tso6=off,guest_ecn=off -hda <disk img> -m 4096 -mem-path
27.7.4 Libvirt Integration
The QEMU wrapper script (qemu-wrap.py) “wraps” libvirt calls to QEMU, such that QEMU is
called with the correct parameters described above. To call the QEMU wrapper automatically
from libvirt, the following configuration changes must be made:
• Place the QEMU wrapper script in libvirt’s binary search PATH ($PATH). A good location
is in the directory that contains the QEMU binary.
• Ensure that the script has the same owner/group and file permissions as the QEMU
binary.
• Update the VM xml file using virsh edit <vm name>:
– Set the VM to use the launch script
– Set the emulator path contained in the #<emulator><emulator/> tags For example,
replace <emulator>/usr/bin/qemu-kvm<emulator/> with <emulator>/usr/bin/qemuwrap.py<emulator/>
– Set the VM’s virtio-net device’s to use vhost-net offload:
<interface type="network">
<model type="virtio"/>
<driver name="vhost"/>
<interface/>
– Enable libvirt to access the DPDK Vhost sample code’s character device file by
adding it to controllers cgroup for libvirtd using the following steps:
cgroup_controllers = [ ... "devices", ... ] clear_emulator_capabilities = 0
user = "root" group = "root"
27.7. Running the Virtual Machine (QEMU)
163
Sample Applications User Guide, Release 2.0.0
cgroup_device_acl = [
"/dev/null", "/dev/full", "/dev/zero",
"/dev/random", "/dev/urandom",
"/dev/ptmx", "/dev/kvm", "/dev/kqemu",
"/dev/rtc", "/dev/hpet", "/dev/net/tun",
"/dev/<devbase-name>-<index>",
]
• Disable SELinux or set to permissive mode.
• Mount cgroup device controller:
user@target:~$ mkdir /dev/cgroup
user@target:~$ mount -t cgroup none /dev/cgroup -o devices
• Restart the libvirtd system process
For example, on Fedora* “systemctl restart libvirtd.service”
• Edit the configuration parameters section of the script:
– Configure the “emul_path” variable to point to the QEMU emulator.
emul_path = "/usr/local/bin/qemu-system-x86_64"
– Configure the “us_vhost_path” variable to point to the DPDK vhost-net sample
code’s character devices name. DPDK vhost-net sample code’s character device
will be in the format “/dev/<basename>-<index>”.
us_vhost_path = "/dev/usvhost-1"
27.7.5 Common Issues
• QEMU failing to allocate memory on hugetlbfs, with an error like the following:
file_ram_alloc: can't mmap RAM pages: Cannot allocate memory
When running QEMU the above error indicates that it has failed to allocate memory for
the Virtual Machine on the hugetlbfs. This is typically due to insufficient hugepages being
free to support the allocation request. The number of free hugepages can be checked as
follows:
cat /sys/kernel/mm/hugepages/hugepages-<pagesize>/nr_hugepages
The command above indicates how many hugepages are free to support QEMU’s allocation request.
• User space VHOST when the guest has 2MB sized huge pages:
The guest may have 2MB or 1GB sized huge pages. The user space VHOST should
work properly in both cases.
• User space VHOST will not work with QEMU without the -mem-prealloc option:
The current implementation works properly only when the guest memory is pre-allocated,
so it is required to use a QEMU version (e.g. 1.6) which supports -mem-prealloc. The
-mem-prealloc option must be specified explicitly in the QEMU command line.
27.7. Running the Virtual Machine (QEMU)
164
Sample Applications User Guide, Release 2.0.0
• User space VHOST will not work with a QEMU version without shared memory mapping:
As shared memory mapping is mandatory for user space VHOST to work properly with
the guest, user space VHOST needs access to the shared memory from the guest to
receive and transmit packets. It is important to make sure the QEMU version supports
shared memory mapping.
• Issues with virsh destroy not destroying the VM:
Using libvirt virsh create the qemu-wrap.py spawns a new process to run qemukvm. This impacts the behavior of virsh destroy which kills the process running
qemu-wrap.py without actually destroying the VM (it leaves the qemu-kvm process
running):
This following patch should fix this issue: http://dpdk.org/ml/archives/dev/2014June/003607.html
• In an Ubuntu environment, QEMU fails to start a new guest normally with user space
VHOST due to not being able to allocate huge pages for the new guest:
The solution for this issue is to add -boot c into the QEMU command line to make sure
the huge pages are allocated properly and then the guest should start normally.
Use cat /proc/meminfo to check if there is any changes in the value of
HugePages_Total and HugePages_Free after the guest startup.
• Log message: eventfd_link: module verification failed:
and/or required key missing - tainting kernel:
signature
This log message may be ignored. The message occurs due to the kernel module
eventfd_link, which is not a standard Linux module but which is necessary for the
user space VHOST current implementation (CUSE-based) to communicate with the
guest.
27.8 Running DPDK in the Virtual Machine
For the DPDK vhost-net sample code to switch packets into the VM, the sample code must first
learn the MAC address of the VM’s virtio-net device. The sample code detects the address
from packets being transmitted from the VM, similar to a learning switch.
This behavior requires no special action or configuration with the Linux* virtio-net driver in
the VM as the Linux* Kernel will automatically transmit packets during device initialization.
However, DPDK-based applications must be modified to automatically transmit packets during
initialization to facilitate the DPDK vhost- net sample code’s MAC learning.
The DPDK testpmd application can be configured to automatically transmit packets during
initialization and to act as an L2 forwarding switch.
27.8.1 Testpmd MAC Forwarding
At high packet rates, a minor packet loss may be observed. To resolve this issue, a “wait and
retry” mode is implemented in the testpmd and vhost sample code. In the “wait and retry”
mode if the virtqueue is found to be full, then testpmd waits for a period of time before retrying
to enqueue packets.
27.8. Running DPDK in the Virtual Machine
165
Sample Applications User Guide, Release 2.0.0
The “wait and retry” algorithm is implemented in DPDK testpmd as a forwarding method call
“mac_retry”. The following sequence diagram describes the algorithm in detail.
Figure 27.5: Packet Flow on TX in DPDK-testpmd
27.8.2 Running Testpmd
The testpmd application is automatically built when DPDK is installed. Run the testpmd application as follows:
user@target:~$ x86_64-native-linuxapp-gcc/app/testpmd -c 0x3 -- n 4 -socket-mem 128 -- --burst
The destination MAC address for packets transmitted on each port can be set at the command
line:
user@target:~$ x86_64-native-linuxapp-gcc/app/testpmd -c 0x3 -- n 4 -socket-mem 128 -- --burst
• Packets received on port 1 will be forwarded on port 0 to MAC address
aa:bb:cc:dd:ee:ff.
27.8. Running DPDK in the Virtual Machine
166
Sample Applications User Guide, Release 2.0.0
• Packets received on port 0 will be forwarded on port 1 to MAC address
ff,ee,dd,cc,bb,aa.
The testpmd application can then be configured to act as an L2 forwarding application:
testpmd> set fwd mac_retry
The testpmd can then be configured to start processing packets, transmitting packets first so
the DPDK vhost sample code on the host can learn the MAC address:
testpmd> start tx_first
Note: Please note “set fwd mac_retry” is used in place of “set fwd mac_fwd” to ensure the
retry feature is activated.
27.9 Passing Traffic to the Virtual Machine Device
For a virtio-net device to receive traffic, the traffic’s Layer 2 header must include both the
virtio-net device’s MAC address and VLAN tag. The DPDK sample code behaves in a similar
manner to a learning switch in that it learns the MAC address of the virtio-net devices from the
first transmitted packet. On learning the MAC address, the DPDK vhost sample code prints a
message with the MAC address and VLAN tag virtio-net device. For example:
DATA: (0) MAC_ADDRESS cc:bb:bb:bb:bb:bb and VLAN_TAG 1000 registered
The above message indicates that device 0 has been registered with MAC address
cc:bb:bb:bb:bb:bb and VLAN tag 1000. Any packets received on the NIC with these values
is placed on the devices receive queue. When a virtio-net device transmits packets, the VLAN
tag is added to the packet by the DPDK vhost sample code.
27.9. Passing Traffic to the Virtual Machine Device
167
CHAPTER
TWENTYEIGHT
NETMAP COMPATIBILITY SAMPLE APPLICATION
28.1 Introduction
The Netmap compatibility library provides a minimal set of APIs to give the ability to programs
written against the Netmap APIs to be run with minimal changes to their source code, using
the DPDK to perform the actual packet I/O.
Since Netmap applications use regular system calls, like open(), ioctl() and mmap() to communicate with the Netmap kernel module performing the packet I/O, the compat_netmap library
provides a set of similar APIs to use in place of those system calls, effectively turning a Netmap
application into a DPDK one.
The provided library is currently minimal and doesn’t support all the features that Netmap
supports, but is enough to run simple applications, such as the bridge example detailed below.
Knowledge of Netmap is required to understand the rest of this section. Please refer to the
Netmap distribution for details about Netmap.
28.2 Available APIs
The library provides the following drop-in replacements for system calls usually used in Netmap
applications:rte_netmap_close()
• rte_netmap_ioctl()
• rte_netmap_open()
• rte_netmap_mmap()
• rte_netmap_poll()
They use the same signature as their libc counterparts, and can be used as drop-in replacements in most cases.
28.3 Caveats
Given the difference between the way Netmap and the DPDK approach packet I/O, there
are caveats and limitations to be aware of when trying to use the compat_netmap library,
the most important of which are listed below. Additional caveats are presented in the
$RTE_SDK/examples/netmap_compat/README.md file. These can change as the library is
updated:
168
Sample Applications User Guide, Release 2.0.0
• Any system call that can potentially affect file descriptors cannot be used with a descriptor
returned by the rte_netmap_open() function.
Note that:
• rte_netmap_mmap() merely returns the address of a DPDK memzone. The address,
length, flags, offset, and so on arguments are therefore ignored completely.
• rte_netmap_poll() only supports infinite (negative) or zero time outs. It effectively turns
calls to the poll() system call made in a Netmap application into polling of the DPDK
ports, changing the semantics of the usual POSIX defined poll.
• Not all of Netmap’s features are supported: “host rings”, slot flags and so on are not
supported or are simply not relevant in the DPDK model.
• The Netmap manual page states that “a device obtained through /dev/netmap also supports the ioctl supported by network devices”. It is not the case with this compatibility
layer.
• The Netmap kernel module exposes a sysfs interface to change some internal parameters, such as the size of the shared memory region. This interface is not available when
using this compatibility layer.
28.4 Porting Netmap Applications
Porting Netmap applications typically involves two major steps:
• Changing the system calls to use their compat_netmap library counterparts
• Adding further DPDK initialization code
Since the compat_netmap functions have the same signature as the usual libc calls, the
change is in most cases trivial.
The usual DPDK initialization code involving rte_eal_init() and rte_eal_pci_probe() has to be
added to the Netmap application in the same way it is used in all other DPDK sample applications. Please refer to the DPDK Programmer’s Guide - Rel 1.4 EAR and example source code
for details about initialization.
In addition of the regular DPDK initialization code, the ported application needs to
call initialization functions for the compat_netmap library, namely rte_netmap_init() and
rte_netmap_init_port().
These two initialization functions take compat_netmap specific data structures as parameters: struct rte_netmap_conf and struct rte_netmap_port_conf. Those structures’ fields are
Netmap related and are self-explanatory for developers familiar with Netmap. They are defined in $RTE_SDK/examples/netmap_compat/ lib/compat_netmap.h.
The bridge application is an example largely based on the bridge example shipped with
the Netmap distribution. It shows how a minimal Netmap application with minimal and
straightforward source code changes can be run on top of the DPDK. Please refer to
$RTE_SDK/examples/netmap_compat/bridge/bridge.c for an example of ported application.
28.4. Porting Netmap Applications
169
Sample Applications User Guide, Release 2.0.0
28.5 Compiling the “bridge” Sample Application
1. Go to the example directory:
export RTE_SDK=/path/to/rte_sdk
cd ${RTE_SDK}/examples/netmap_compat
2. Set the target (a default target is used if not specified). For example:
export RTE_TARGET=x86_64-native-linuxapp-gcc
See the DPDK Getting Started Guide for possible RTE_TARGET values.
3. Build the application:
make
28.6 Running the “bridge” Sample Application
The application requires a single command line option:
./build/packet_ordering [EAL options] -- -p PORT_A [-p PORT_B]
where,
• -p INTERFACE is the number of a valid DPDK port to use.
If a single -p parameter is given, the interface will send back all the traffic it receives. If
two -p parameters are given, the two interfaces form a bridge, where traffic received on
one interface is replicated and sent by the other interface.
To run the application in a linuxapp environment using port 0 and 2, issue the following command:
./build/packet_ordering [EAL options] -- -p 0 -p 2
Refer to the DPDK Getting Started Guide for general information on running applications and
the Environment Abstraction Layer (EAL) options.
Note that unlike a traditional bridge or the l2fwd sample application, no MAC address changes
are done on the frames. Do not forget to take that into account when configuring your traffic
generators if you decide to test this sample application.
28.5. Compiling the “bridge” Sample Application
170
CHAPTER
TWENTYNINE
INTERNET PROTOCOL (IP) PIPELINE SAMPLE APPLICATION
The Internet Protocol (IP) Pipeline application illustrates the use of the DPDK Packet Framework tool suite. The DPDK pipeline methodology is used to implement functional blocks such
as packet RX, packet TX, flow classification, firewall, routing, IP fragmentation, IP reassembly,
etc which are then assigned to different CPU cores and connected together to create complex
multi-core applications.
29.1 Overview
The pipelines for packet RX, packet TX, flow classification, firewall, routing, IP fragmentation,
IP reassembly, management, etc are instantiated and different CPU cores and connected together through software queues. One of the CPU cores can be designated as the management
core to run a Command Line Interface (CLI) to add entries to each table (e.g. flow table, firewall
rule database, routing table, Address Resolution Protocol (ARP) table, and so on), bring NIC
ports up or down, and so on.
29.2 Compiling the Application
1. Go to the examples directory:
export RTE_SDK=/path/to/rte_sdk
cd ${RTE_SDK}/examples/ip_pipeline
2. Set the target (a default target is used if not specified):
export RTE_TARGET=x86_64-native-linuxapp-gcc
3. Build the application:
make
29.3 Running the Sample Code
The application execution command line is:
./ip_pipeline [EAL options] -- -p PORTMASK [-f CONFIG_FILE]
171
Sample Applications User Guide, Release 2.0.0
The number of ports in the PORTMASK can be either 2 or 4.
The config file assigns functionality to the CPU core by deciding the pipeline type to run on each
CPU core (e.g. master, RX, flow classification, firewall, routing, IP fragmentation, IP reassembly, TX) and also allows creating complex topologies made up of CPU cores by interconnecting
the CPU cores through SW queues.
Once the application is initialized, the CLI is available for populating the application tables,
bringing NIC ports up or down, and so on.
The flow classification pipeline implements the flow table by using a large (multi-million entry)
hash table with a 16-byte key size. The lookup key is the IPv4 5-tuple, which is extracted from
the input packet by the packet RX pipeline and saved in the packet meta-data, has the following
format:
[source IP address, destination IP address, L4 protocol, L4 protocol source port, L4
protocol destination port]
The firewall pipeline implements the rule database using an ACL table.
The routing pipeline implements an IP routing table by using an LPM IPv4 table and an ARP
table by using a hash table with an 8-byte key size. The IP routing table lookup provides the
output interface ID and the next hop IP address, which are stored in the packet meta-data,
then used as the lookup key into the ARP table. The ARP table lookup provides the destination
MAC address to be used for the output packet. The action for the default entry of both the IP
routing table and the ARP table is packet drop.
The following CLI operations are available:
• Enable/disable NIC ports (RX pipeline)
• Add/delete/list flows (flow classification pipeline)
• Add/delete/list firewall rules (firewall pipeline)
• Add/delete/list routes (routing pipeline)
• Add/delete/list ARP entries (routing pipeline)
In addition, there are two special commands:
• flow add all: Populate the flow classification table with 16 million flows (by iterating
through the last three bytes of the destination IP address). These flows are not displayed when using the flow print command. When this command is used, the following
traffic profile must be used to have flow table lookup hits for all input packets. TCP/IPv4
packets with:
– destination IP address = A.B.C.D with A fixed to 0 and B,C,D random
– source IP address fixed to 0
– source TCP port fixed to 0
– destination TCP port fixed to 0
• run cmd_file_path: Read CLI commands from an external file and run them one by one.
The full list of the available CLI commands can be displayed by pressing the TAB key while the
application is running.
29.3. Running the Sample Code
172
CHAPTER
THIRTY
TEST PIPELINE APPLICATION
The Test Pipeline application illustrates the use of the DPDK Packet Framework tool suite. Its
purpose is to demonstrate the performance of single-table DPDK pipelines.
30.1 Overview
The application uses three CPU cores:
• Core A (“RX core”) receives traffic from the NIC ports and feeds core B with traffic through
SW queues.
• Core B (“Pipeline core”) implements a single-table DPDK pipeline whose type is selectable through specific command line parameter. Core B receives traffic from core A
through software queues, processes it according to the actions configured in the table
entries that are hit by the input packets and feeds it to core C through another set of
software queues.
• Core C (“TX core”) receives traffic from core B through software queues and sends it to
the NIC ports for transmission.
Figure 30.1: Test Pipeline Application
30.2 Compiling the Application
1. Go to the app/test directory:
173
Sample Applications User Guide, Release 2.0.0
export RTE_SDK=/path/to/rte_sdk
cd ${RTE_SDK}/app/test/test-pipeline
2. Set the target (a default target is used if not specified):
export RTE_TARGET=x86_64-native-linuxapp-gcc
3. Build the application:
make
30.3 Running the Application
30.3.1 Application Command Line
The application execution command line is:
./test-pipeline [EAL options] -- -p PORTMASK --TABLE_TYPE
The -c EAL CPU core mask option has to contain exactly 3 CPU cores. The first CPU core in
the core mask is assigned for core A, the second for core B and the third for core C.
The PORTMASK parameter must contain 2 or 4 ports.
30.3.2 Table Types and Behavior
Table 3 describes the table types used and how they are populated.
The hash tables are pre-populated with 16 million keys. For hash tables, the following parameters can be selected:
• Configurable key size implementation or fixed (specialized) key size implementation (e.g. hash-8-ext or hash-spec-8-ext). The key size specialized implementations
are expected to provide better performance for 8-byte and 16-byte key sizes, while the
key-size-non-specialized implementation is expected to provide better performance for
larger key sizes;
• Key size (e.g. hash-spec-8-ext or hash-spec-16-ext). The available options are 8, 16
and 32 bytes;
• Table type (e.g. hash-spec-16-ext or hash-spec-16-lru). The available options are ext
(extendable bucket) or lru (least recently used).
30.3. Running the Application
174
Sample Applications User Guide, Release 2.0.0
Table 30.1: Table Types
#
1
2
3
4
5
TADescription of Core B Table
BLE_TYPE
none Core B is not implementing a DPDK
pipeline. Core B is implementing a
pass-through from its input set of
software queues to its output set of
software queues.
stub Stub table. Core B is implementing
the same pass-through functionality
as described for the “none” option by
using the DPDK Packet Framework by
using one stub table for each input
NIC port.
hash- LRU hash table with 8-byte key size
[spec]- and 16 million entries.
8-lru
hash- Extendable bucket hash table with
[spec]- 8-byte key size and 16 million entries.
8ext
hash- LRU hash table with 16-byte key size
[spec]- and 16 million entries.
16lru
30.3. Running the Application
6
hash- Extendable bucket hash table with
Pre-added Table Entries
N/A
N/A
16 million entries are successfully
added to the hash table with the
following key format:
[4-byte index, 4 bytes of 0]
The action configured for all table
entries is “Sendto output port”, with
the output port index uniformly
distributed for the range of output
ports.
The default table rule (used in the
case of a lookup miss) is to drop the
packet.
At run time, core A is creating the
following lookup key and storing it into
the packet meta data for core B to use
for table lookup:
[destination IPv4 address, 4 bytes of
0]
Same as hash-[spec]-8-lru table
entries, above.
16 million entries are successfully
added to the hash table with the
following key format:
[4-byte index, 12 bytes of 0]
The action configured for all table
entries is “Send to output port”, with
the output port index uniformly
distributed for the range of output
ports.
The default table rule (used in the
case of a lookup miss) is to drop the
packet.
At run time, core A is creating the
following lookup key and storing it into
the packet meta data for core B to use
for table lookup:
[destination IPv4 address, 12 bytes 175
of
0]
Same as hash-[spec]-16-lru table
Sample Applications User Guide, Release 2.0.0
30.3.3 Input Traffic
Regardless of the table type used for the core B pipeline, the same input traffic can be used
to hit all table entries with uniform distribution, which results in uniform distribution of packets
sent out on the set of output NIC ports. The profile for input traffic is TCP/IPv4 packets with:
• destination IP address as A.B.C.D with A fixed to 0 and B, C,D random
• source IP address fixed to 0.0.0.0
• destination TCP port fixed to 0
• source TCP port fixed to 0
30.3. Running the Application
176
CHAPTER
THIRTYONE
DISTRIBUTOR SAMPLE APPLICATION
The distributor sample application is a simple example of packet distribution to cores using the
Data Plane Development Kit (DPDK).
31.1 Overview
The distributor application performs the distribution of packets that are received on an
RX_PORT to different cores. When processed by the cores, the destination port of a packet
is the port from the enabled port mask adjacent to the one on which the packet was received,
that is, if the first four ports are enabled (port mask 0xf), ports 0 and 1 RX/TX into each other,
and ports 2 and 3 RX/TX into each other.
This application can be used to benchmark performance using the traffic generator as shown
in the figure below.
Port0
Port0
Port1
Port1
DPDK board
Traffic Generator
Port2
Port2
Port3
Port3
Figure 31.1: Performance Benchmarking Setup (Basic Environment)
177
Sample Applications User Guide, Release 2.0.0
31.2 Compiling the Application
1. Go to the sample application directory:
export RTE_SDK=/path/to/rte_sdk
cd ${RTE_SDK}/examples/distributor
2. Set the target (a default target is used if not specified). For example:
export RTE_TARGET=x86_64-native-linuxapp-gcc
See the DPDK Getting Started Guide for possible RTE_TARGET values.
3. Build the application:
make
31.3 Running the Application
1. The application has a number of command line options:
./build/distributor_app [EAL options] -- -p PORTMASK
where,
• -p PORTMASK: Hexadecimal bitmask of ports to configure
2. To run the application in linuxapp environment with 10 lcores, 4 ports, issue the command:
$ ./build/distributor_app -c 0x4003fe -n 4 -- -p f
3. Refer to the DPDK Getting Started Guide for general information on running applications
and the Environment Abstraction Layer (EAL) options.
31.4 Explanation
The distributor application consists of three types of threads: a receive thread (lcore_rx()), a set
of worker threads(lcore_worker()) and a transmit thread(lcore_tx()). How these threads work
together is shown in Fig. 31.2 below. The main() function launches threads of these three
types. Each thread has a while loop which will be doing processing and which is terminated
only upon SIGINT or ctrl+C. The receive and transmit threads communicate using a software
ring (rte_ring structure).
The receive thread receives the packets using rte_eth_rx_burst() and gives them to the distributor (using rte_distributor_process() API) which will be called in context of the receive thread
itself. The distributor distributes the packets to workers threads based on the tagging of the
packet - indicated by the hash field in the mbuf. For IP traffic, this field is automatically filled by
the NIC with the “usr” hash value for the packet, which works as a per-flow tag.
More than one worker thread can exist as part of the application, and these worker threads
do simple packet processing by requesting packets from the distributor, doing a simple XOR
operation on the input port mbuf field (to indicate the output port which will be used later for
31.2. Compiling the Application
178
Sample Applications User Guide, Release 2.0.0
packet transmission) and then finally returning the packets back to the distributor in the RX
thread.
Meanwhile, the receive thread will call the distributor api rte_distributor_returned_pkts() to get
the packets processed, and will enqueue them to a ring for transfer to the TX thread for transmission on the output port. The transmit thread will dequeue the packets from the ring and
transmit them on the output port specified in packet mbuf.
Users who wish to terminate the running of the application have to press ctrl+C (or send SIGINT to the app). Upon this signal, a signal handler provided in the application will terminate all
running threads gracefully and print final statistics to the user.
Request packet
WorkerThread1
Mbuf pointer
Mbufs In
WorkerThread2
RX thread & Distributor
WorkerThread3
WorkerThreadN
SW Ring
Mbufs Out
TX thread
Figure 31.2: Distributor Sample Application Layout
31.5 Debug Logging Support
Debug logging is provided as part of the application; the user needs to uncomment the line
“#define DEBUG” defined in start of the application in main.c to enable debug logs.
31.6 Statistics
Upon SIGINT (or) ctrl+C, the print_stats() function displays the count of packets processed at
the different stages in the application.
31.5. Debug Logging Support
179
Sample Applications User Guide, Release 2.0.0
31.7 Application Initialization
Command line parsing is done in the same way as it is done in the L2 Forwarding Sample
Application. See Section Command Line Arguments.
Mbuf pool initialization is done in the same way as it is done in the L2 Forwarding Sample
Application. See Section Mbuf Pool Initialization.
Driver Initialization is done in same way as it is done in the L2 Forwarding Sample Application.
See Section Driver Initialization.
RX queue initialization is done in the same way as it is done in the L2 Forwarding Sample
Application. See Section RX Queue Initialization.
TX queue initialization is done in the same way as it is done in the L2 Forwarding Sample
Application. See Section RX Queue Initialization.
31.7. Application Initialization
180
CHAPTER
THIRTYTWO
VM POWER MANAGEMENT APPLICATION
32.1 Introduction
Applications running in Virtual Environments have an abstract view of the underlying hardware on the Host, in particular applications cannot see the binding of virtual to physical hardware. When looking at CPU resourcing, the pinning of Virtual CPUs(vCPUs) to Host Physical
CPUs(pCPUS) is not apparent to an application and this pinning may change over time. Furthermore, Operating Systems on virtual machines do not have the ability to govern their own
power policy; the Machine Specific Registers (MSRs) for enabling P-State transitions are not
exposed to Operating Systems running on Virtual Machines(VMs).
The Virtual Machine Power Management solution shows an example of how a DPDK application can indicate its processing requirements using VM local only information(vCPU/lcore) to
a Host based Monitor which is responsible for accepting requests for frequency changes for a
vCPU, translating the vCPU to a pCPU via libvirt and affecting the change in frequency.
The solution is comprised of two high-level components:
1. Example Host Application
Using a Command Line Interface(CLI) for VM->Host communication channel management allows adding channels to the Monitor, setting and querying the vCPU to pCPU
pinning, inspecting and manually changing the frequency for each CPU. The CLI runs on
a single lcore while the thread responsible for managing VM requests runs on a second
lcore.
VM requests arriving on a channel for frequency changes are passed to the librte_power
ACPI cpufreq sysfs based library. The Host Application relies on both qemu-kvm and
libvirt to function.
2. librte_power for Virtual Machines
Using an alternate implementation for the librte_power API, requests for frequency
changes are forwarded to the host monitor rather than the APCI cpufreq sysfs interface
used on the host.
The l3fwd-power application will use this implementation when deployed on a VM (see
Chapter 11 “L3 Forwarding with Power Management Application”).
181
Sample Applications User Guide, Release 2.0.0
DPDK Application
DPDK Application
librte_power(vm)
lcore
lcore
lcore
lcore
channel channel channel channel
0
1
2
librte_power(vm)
lcore
lcore
channel channel
3
0
VM 0
Virtual
Core 0
Virtual
Core 1
Virtual
Core 2
1
Virtual
Core 0
provides a new implementation that
forwards frequency set requests to host
via lcore
Virtio-Serial
channelaccess to a
·Each
has exclusive
VM 1
Virtual
Core 3
DPDK
Application
·ReuseVM
librte_powerinterface,
but
Virtual
Core 1
single channel re-uses l3fwd_power
·Sample
·A CLI forapplication
changing frequency from within
a VM is also included.
VM Power
Monitor
·Accepts
VM
Commands over
Virtio Serial endpoints,
Endpoint Monitor(lcore channels)
QEMU
monitoredinclude
via epoll
Channel Manager Map vCPU to pCPU
libvirt
·Commands
the
librte_power(Host)
Linux “userspace” power governorvirtual core to be modified,
VM Power CLI
/sys/devices/system/cpu/cpuN/cpufreq/
using libvirt to get physical
core
mapping to affect
·Uses
librte_power
VM Power Monitor Application
OS/Hypervisor
frequency changes via Linux
userspace power
Core 0
Core 1
Core 2
Core 3
Core 4
Core 5
Core 6
governor(APCI
cpufreq)
Core 7 ·CLI:
For adding VM
channels
Host
to monitor, inspecting and
changing channel state,
manually altering CPU
frequency. Also allows for the
changing of vCPU to pCPU
pinning.
Figure 32.1: Highlevel Solution
32.1. Introduction
182
Sample Applications User Guide, Release 2.0.0
32.2 Overview
VM Power Management employs qemu-kvm to provide communications channels between the
host and VMs in the form of Virtio-Serial which appears as a paravirtualized serial device on
a VM and can be configured to use various backends on the host. For this example each
Virtio-Serial endpoint on the host is configured as AF_UNIX file socket, supporting poll/select
and epoll for event notification. In this example each channel endpoint on the host is monitored
via epoll for EPOLLIN events. Each channel is specified as qemu-kvm arguments or as libvirt
XML for each VM, where each VM can have a number of channels up to a maximum of 64 per
VM, in this example each DPDK lcore on a VM has exclusive access to a channel.
To enable frequency changes from within a VM, a request via the librte_power interface is
forwarded via Virtio-Serial to the host, each request contains the vCPU and power command(scale up/down/min/max). The API for host and guest librte_power is consistent across
environments, with the selection of VM or Host Implementation determined at automatically at
runtime based on the environment.
Upon receiving a request, the host translates the vCPU to a pCPU via the libvirt API before
forwarding to the host librte_power.
Sequence
librte_power(VM)
guest_channel(VM)
channel_monitor(Host)
channel_manager(Host)
power_manager(Host)
librte_power(Host)
Loop: for each epoll event
rte_power_freq_up()
status
guest_channel_send_msg()
process_request
get_pcpu_mask()
pcpu_mask
scale_freq_up(pcpu_mask)
rte_power_freq_up()
status
status
Figure 32.2: VM request to scale frequency
32.2.1 Performance Considerations
While Haswell Microarchitecture allows for independent power control for each core, earlier
Microarchtectures do not offer such fine grained control. When deployed on pre-Haswell plat32.2. Overview
183
Sample Applications User Guide, Release 2.0.0
forms greater care must be taken in selecting which cores are assigned to a VM, for instance
a core will not scale down until its sibling is similarly scaled.
32.3 Configuration
32.3.1 BIOS
Enhanced Intel SpeedStep® Technology must be enabled in the platform BIOS if the
power management feature of DPDK is to be used.
Otherwise, the sys file folder
/sys/devices/system/cpu/cpu0/cpufreq will not exist, and the CPU frequency-based power
management cannot be used. Consult the relevant BIOS documentation to determine how
these settings can be accessed.
32.3.2 Host Operating System
The Host OS must also have the apci_cpufreq module installed, in some cases the intel_pstate
driver may be the default Power Management environment. To enable acpi_cpufreq and disable intel_pstate, add the following to the grub Linux command line:
intel_pstate=disable
Upon rebooting, load the acpi_cpufreq module:
modprobe acpi_cpufreq
32.3.3 Hypervisor Channel Configuration
Virtio-Serial channels are configured via libvirt XML:
<name>{vm_name}</name>
<controller type='virtio-serial' index='0'>
<address type='pci' domain='0x0000' bus='0x00' slot='0x06' function='0x0'/>
</controller>
<channel type='unix'>
<source mode='bind' path='/tmp/powermonitor/{vm_name}.{channel_num}'/>
<target type='virtio' name='virtio.serial.port.poweragent.{vm_channel_num}/>
<address type='virtio-serial' controller='0' bus='0' port='{N}'/>
</channel>
Where a single controller of type virtio-serial is created and up to 32 channels can be associated with a single controller and multiple controllers can be specified. The convention is to
use the name of the VM in the host path {vm_name} and to increment {channel_num} for each
channel, likewise the port value {N} must be incremented for each channel.
Each channel on the host will appear in path, the directory /tmp/powermonitor/ must first be
created and given qemu permissions
mkdir /tmp/powermonitor/
chown qemu:qemu /tmp/powermonitor
Note that files and directories within /tmp are generally removed upon rebooting the host and
the above steps may need to be carried out after each reboot.
32.3. Configuration
184
Sample Applications User Guide, Release 2.0.0
The serial device as it appears on a VM is configured with the target element attribute
name and must be in the form of virtio.serial.port.poweragent.{vm_channel_num}, where
vm_channel_num is typically the lcore channel to be used in DPDK VM applications.
Each
channel
on
a
VM
will
be
ports/virtio.serial.port.poweragent.{vm_channel_num}
present
at
/dev/virtio-
32.4 Compiling and Running the Host Application
32.4.1 Compiling
1. export RTE_SDK=/path/to/rte_sdk
2. cd ${RTE_SDK}/examples/vm_power_manager
3. make
32.4.2 Running
The application does not have any specific command line options other than EAL:
./build/vm_power_mgr [EAL options]
The application requires exactly two cores to run, one core is dedicated to the CLI, while the
other is dedicated to the channel endpoint monitor, for example to run on cores 0 & 1 on a
system with 4 memory channels:
./build/vm_power_mgr -c 0x3 -n 4
After successful initialization the user is presented with VM Power Manager CLI:
vm_power>
Virtual Machines can now be added to the VM Power Manager:
vm_power> add_vm {vm_name}
When a {vm_name} is specified with the add_vm command a lookup is performed with libvirt
to ensure that the VM exists, {vm_name} is used as an unique identifier to associate channels
with a particular VM and for executing operations on a VM within the CLI. VMs do not have to
be running in order to add them.
A number of commands can be issued via the CLI in relation to VMs:
Remove a Virtual Machine identified by {vm_name} from the VM Power Manager.
rm_vm {vm_name}
Add communication channels for the specified VM, the virtio channels must be enabled in the VM configuration(qemu/libvirt) and the associated VM must be active.
{list} is a comma-separated list of channel numbers to add, using the keyword ‘all’
will attempt to add all channels for the VM:
add_channels {vm_name} {list}|all
32.4. Compiling and Running the Host Application
185
Sample Applications User Guide, Release 2.0.0
Enable or disable the communication channels in {list}(comma-separated) for the
specified VM, alternatively list can be replaced with keyword ‘all’. Disabled channels
will still receive packets on the host, however the commands they specify will be
ignored. Set status to ‘enabled’ to begin processing requests again:
set_channel_status {vm_name} {list}|all enabled|disabled
Print to the CLI the information on the specified VM, the information lists the number
of vCPUS, the pinning to pCPU(s) as a bit mask, along with any communication
channels associated with each VM, along with the status of each channel:
show_vm {vm_name}
Set the binding of Virtual CPU on VM with name {vm_name} to the Physical CPU
mask:
set_pcpu_mask {vm_name} {vcpu} {pcpu}
Set the binding of Virtual CPU on VM to the Physical CPU:
set_pcpu {vm_name} {vcpu} {pcpu}
Manual control and inspection can also be carried in relation CPU frequency scaling:
Get the current frequency for each core specified in the mask:
show_cpu_freq_mask {mask}
Set the current frequency for the cores specified in {core_mask} by scaling each
up/down/min/max:
set_cpu_freq {core_mask} up|down|min|max
Get the current frequency for the specified core:
show_cpu_freq {core_num}
Set the current frequency for the specified core by scaling up/down/min/max:
set_cpu_freq {core_num} up|down|min|max
32.5 Compiling and Running the Guest Applications
For compiling and running l3fwd-power, see Chapter 11 “L3 Forwarding with Power Management Application”.
A guest CLI is also provided for validating the setup.
For both l3fwd-power and guest CLI, the channels for the VM must be monitored by the host
application using the add_channels command on the host.
32.5.1 Compiling
1. export RTE_SDK=/path/to/rte_sdk
32.5. Compiling and Running the Guest Applications
186
Sample Applications User Guide, Release 2.0.0
2. cd ${RTE_SDK}/examples/vm_power_manager/guest_cli
3. make
32.5.2 Running
The application does not have any specific command line options other than EAL:
./build/vm_power_mgr [EAL options]
The application for example purposes uses a channel for each lcore enabled, for example to
run on cores 0,1,2,3 on a system with 4 memory channels:
./build/guest_vm_power_mgr -c 0xf -n 4
After successful initialization the user is presented with VM Power Manager Guest CLI:
vm_power(guest)>
To change the frequency of a lcore, use the set_cpu_freq command. Where {core_num} is the
lcore and channel to change frequency by scaling up/down/min/max.
set_cpu_freq {core_num} up|down|min|max
Figures
Fig. 3.1 Packet Flow
Fig. 10.1 Kernel NIC Application Packet Flow
Fig. 11.1 Performance Benchmark Setup (Basic Environment)
Fig. 11.2 Performance Benchmark Setup (Virtualized Environment)
Fig. 12.1 Performance Benchmark Setup (Basic Environment)
Fig. 12.2 Performance Benchmark Setup (Virtualized Environment)
Fig. 15.1 A typical IPv4 ACL rule
Fig. 15.2 Rules example
Fig. 18.1 Load Balancer Application Architecture
Fig. 19.1 Example Data Flow in a Symmetric Multi-process Application
Fig. 19.2 Example Data Flow in a Client-Server Symmetric Multi-process Application
Fig. 19.3 Master-slave Process Workflow
Fig. 19.4 Slave Process Recovery Process Flow
Fig. 21.1 QoS Scheduler Application Architecture
Fig. 22.1 Intel® QuickAssist Technology Application Block Diagram
Fig. 23.1 Pipeline Overview
Fig. 23.2 Ring-based Processing Pipeline Performance Setup
Fig. 23.3 Threads and Pipelines
Fig. 26.1 Packet Flow Through the VMDQ and DCB Sample Application
32.5. Compiling and Running the Guest Applications
187
Sample Applications User Guide, Release 2.0.0
Fig. 27.1 System Architecture for Virtio-based Networking (virtio-net).
Fig. 27.2 Virtio with Linux
Fig. 27.3 Vhost-net Architectural Overview
Fig. 27.4 Packet Flow Through the vhost-net Sample Application
Fig. 27.5 Packet Flow on TX in DPDK-testpmd
Fig. 30.1 Test Pipeline Application
Fig. 31.1 Performance Benchmarking Setup (Basic Environment)
Fig. 31.2 Distributor Sample Application Layout
Fig. 32.1 Highlevel Solution
Fig. 32.2 VM request to scale frequency
Tables
Table 20.1 Output Traffic Marking
Table 21.1 Entity Types
Table 30.1 Table Types
32.5. Compiling and Running the Guest Applications
188