1
Premie HAL
®
Premature Neonatal Simulator
S3009
User Guide B 12.7.1
Premie HAL is an interactive educational system developed to
assist a certified instructor. It is not a substitute for a
comprehensive understanding of the subject matter and not
intended for clinical decision making.
© Gaumard Scientific Company, 2012
All Rights Reserved
www.Gaumard.com
2 | User Guide | Premie HAL |
Contents
Contents ............................................................................................................ 3
End User License Agreement .......................................................................... 4
Care and Cautions ............................................................................................ 6
Overall Warnings................................................................................................................. 7
Electrical Therapy ............................................................................................................... 7
Getting Started .................................................................................................. 8
Overview ............................................................................................................................. 9
Terminology ...................................................................................................................... 10
Equipment Set-up ............................................................................................11
Control Tablet Computer ................................................................................................... 12
Premie HAL Battery .......................................................................................................... 13
Virtual Monitor ................................................................................................................... 14
Working with GaumardUI ................................................................................15
Initializing Premie HAL ...................................................................................................... 16
Profiles and Operating Modes .......................................................................................... 16
Environment ...................................................................................................................... 18
Details ............................................................................................................................... 22
Palette ............................................................................................................................... 32
Scenarios .......................................................................................................................... 33
Lab .................................................................................................................................... 49
Drugs (Automatic Mode Only) ........................................................................................... 55
Model ................................................................................................................................ 69
Log .................................................................................................................................... 70
Evaluation Form ................................................................................................................ 74
Menus ............................................................................................................................... 81
Working with Premie HAL ..............................................................................99
Airway ............................................................................................................................. 101
Breathing ......................................................................................................................... 101
Cardiac ............................................................................................................................ 102
Circulation ....................................................................................................................... 103
Systemic .......................................................................................................................... 105
Other ............................................................................................................................... 106
Appendix ........................................................................................................107
More about Scenarios ..................................................................................................... 108
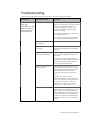
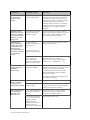
Troubleshooting .............................................................................................................. 121
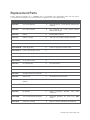
Replacement Parts.......................................................................................................... 125
Warranty.......................................................................................................................... 126
Contact Us ...................................................................................................................... 127
| Premie HAL | User Guide | 3
End User License Agreement
This is a legal agreement between you, the end user, and Gaumard Scientific Company, Inc.
(“Gaumard”). This software is protected by copyright laws and remains the sole property of
Gaumard. By installing the GaumardUI (the "Software") media, you agree to be bound by the
terms of this agreement. If you do not agree to the terms of this agreement, promptly return the
uninstalled media and accompanying items to Gaumard at the address indicated below.
1. Grant of License. Gaumard hereby grants to you (an individual or institution) the right to install
and activate the Software on one computer for use with one Interactive patient simulator system.
The software may also be installed on any number of other computers at the same institution so
that students may access the learning resources. One copy of the software may be made for
backup purposes. You may not network this Software, or allow multiple users unless you
purchased a multi-user workstation license. Sharing this Software with other individuals or allowing
other individuals to view the contents of this Software is in violation of this license.
2. Copyright. The Software is owned by Gaumard and protected by United States copyright laws
and international treaty provisions. Therefore, you must treat this Software like any other
copyrighted material. You may not make this Software or copies thereof available in any manner or
form or use, copy or transfer the Software, in whole or in part, except as provided herein.
3. Other Restrictions. You may not rent or lease this Software to any other party. You may not alter,
merge, modify, adapt, reverse engineer, decompile or disassemble the software, or disclose the
contents of this Software to any other party.
4. Electronic Transmission of Software. If you received the Software by electronic transmission or
by Internet delivery, by installation of the Software, you acknowledge that you have read and
understand this license agreement and agree to be bound by its terms and conditions.
5. Term of Agreement. The term of this Agreement and the license granted to you pursuant hereto
shall commence upon installation of this Software. This Agreement and the license granted herein
may otherwise be terminated by Gaumard in the event that you are in breach of any provision of
this Agreement. In the event of termination, you agree to immediately return this Software,
accompanying items, and any copies thereof to Gaumard.
6. LIMITED WARRANTY
(A) THE CD-ROM MEDIA (THE "MEDIA") WHICH CONTAINS THIS SOFTWARE IS
WARRANTED, FOR A PERIOD OF 30 DAYS FROM THE DATE OF PURCHASE, TO BE FREE
FROM DEFECTS IN MATERIAL AND WORKMANSHIP. ELECTRONIC TRANSMISSION IS
WARRANTED TO BE FREE FROM DEFECTS AT THE MOMENT OF TRANSMISSION. YOUR
SOLE AND EXCLUSIVE REMEDY, AND GAUMARD'S SOLE LIABILITY, IS TO REPLACE THE
DEFECTIVE MEDIA OR TO REPEAT THE ELECTRONIC TRANSMISSION PROVIDED THAT
YOU NOTIFY GAUMARD IN WRITING OF SUCH DEFECT OR DEFECTIVE TRANSMISSION
AND RETURN THE DEFECTIVE MEDIA, IF ANY, DURING THE 30-DAY WARRANTY PERIOD.
(B) EXCEPT AND TO THE EXTENT EXPRESSLY PROVIDED IN PARAGRAPH (A), THE
SOFTWARE AND ACCOMPANYING WRITTEN MATERIALS ARE PROVIDED ON AN "AS IS"
BASIS, WITHOUT ANY WARRANTIES OF ANY KIND, INCLUDING, BUT NOT LIMITED TO, ANY
IMPLIED WARRANTIES OF MERCHANTABILITY OR FITNESS FOR ANY PARTICULAR
PURPOSE. NO ORAL OR WRITTEN INFORMATION OR ADVICE GIVEN BY GAUMARD, ITS
DEALERS, DISTRIBUTORS, AGENTS OR EMPLOYEES SHALL CREATE A WARRANTY OR IN
ANY WAY INCREASE THE SCOPE OF THIS WARRANTY, AND YOU MAY NOT RELY ON ANY
SUCH INFORMATION OR ADVICE. GAUMARD DOES NOT WARRANT, GUARANTEE, OR
MAKE ANY REPRESENTATIONS REGARDING THE USE OR THE RESULTS OF USE, OF THE
SOFTWARE OR WRITTEN MATERIALS IN TERMS OF CORRECTNESS, ACCURACY,
RELIABILITY, CURRENTNESS, OR OTHERWISE, AND THE ENTIRE RISK AS TO THE
RESULTS AND PERFORMANCE OF THE SOFTWARE IS ASSUMED BY YOU. IF THE
SOFTWARE OR WRITTEN MATERIALS ARE DEFECTIVE, YOU AND NOT GAUMARD OR ITS
DEALERS, DISTRIBUTORS, AGENTS, OR EMPLOYEES, ASSUME THE ENTIRE COST OF ALL
NECESSARY SERVICING, REPAIR OR CORRECTION OTHER THAN EXPRESSLY
DESCRIBED ABOVE.
4 | User Guide | Premie HAL |
(C) NEITHER GAUMARD NOR ANYONE ELSE WHO HAS BEEN INVOLVED IN THE CREATION,
PRODUCTION OR DELIVERY OF THIS PRODUCT SHALL BE LIABLE FOR ANY DIRECT,
INDIRECT, CONSEQUENTIAL OR INCIDENTAL DAMAGES (INCLUDING DAMAGES FOR LOSS
OF BUSINESS PROFITS, BUSINESS INTERRUPTION, LOSS OF BUSINESS INFORMATION,
AND THE LIKE) ARISING OUT OF THE USE OR INABILITY TO USE SUCH PRODUCT OR
RELATED TO THIS AGREEMENT EVEN IF GAUMARD HAS BEEN ADVISED OF THE
POSSIBILITY OF SUCH DAMAGES. GAUMARD SHALL NOT BE LIABLE TO YOU FOR ANY
INDIRECT, SPECIAL, INCIDENTAL, OR CONSEQUENTIAL DAMAGES OR LOST PROFITS
ARISING OUT OF OR RELATED TO THIS AGREEMENT OR YOUR USE OF THE SOFTWARE
AND/OR THE RELATED DOCUMENTATION, EVEN IF GAUMARD HAS BEEN ADVISED OF THE
POSSIBILITY OF SUCH DAMAGES. IN NO EVENT SHALL GAUMARD'S LIABILITY HERE
UNDER, IF ANY, EXCEED THE PURCHASE PRICE PAID BY YOU FOR THE SOFTWARE.
ALL RIGHTS NOT EXPRESSLY GRANTED IN THIS LICENSE AGREEMENT ARE RESERVED
BY GAUMARD.
ACKNOWLEDGMENT
BY INSTALLATION OF THIS SOFTWARE, YOU ACKNOWLEDGE THAT YOU HAVE READ AND
UNDERSTAND THE FORE GOING AND THAT YOU AGREE TO BE BOUND BY ITS TERMS
AND CONDITIONS. YOU ALSO AGREE THAT THIS AGREEMENT IS THE COMPLETE AND
EXCLUSIVE STATEMENT OF AGREEMENT BETWEEN THE PARTIES AND SUPERSEDES ALL
PROPOSED OR PRIOR AGREEMENTS, ORAL OR WRITTEN, AND ANY OTHER
COMMUNICATIONS BETWEEN THE PARTIES RELATING TO THE LICENSE DESCRIBED
HEREIN.
| Premie HAL | User Guide | 5
Care and Cautions
6 | User Guide | Premie HAL |
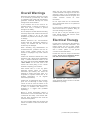
Overall Warnings
Remember that damage caused by misuse
is not covered by your warranty. It is critical
to understand and comply with the following
guidelines. Additional warnings are found
throughout the documentation
If the simulator will not be used for an
extended period, re-charge the battery at
least once every 3 months to prevent
damage to the battery.
Do not attempt to intubate without lubricating
the airway adjunct with a silicone oil lubricant
(provided). Failure to do so will make
intubation very difficult and is likely to result
in damage.
NEVER disconnect the communications
module while the GaumardUI software is
running. The software will halt, and the
module may be damaged.
When simulating drug administration via
endotracheal tube, providers must use an
empty syringe. Passing liquids into the
trachea or esophagus may cause internal
damage.
Premie HAL should be cleaned with a cloth
dampened with diluted liquid dishwashing
soap. If medical adhesives remain on the
skin, clean with alcohol wipes. DO NOT USE
“GOO GONE” as the citric acid in the
formula will cause pitting of the various
materials comprising your simulator.
Store Premie HAL in a cool, dry place.
Extended storage above 85 degrees
Fahrenheit (29 Celsius) will cause the
simulator to soften and slowly warp. It is
acceptable to operate Premie HAL at an
ambient temperature of 95 degrees
Fahrenheit (35 Celsius).
Premie HAL is "splash-proof" but not waterproof. Do not submerge or allow a large
volume of fluid to enter the interior of the
simulator. Do not expose the tablet computer
to water or excessive dust unless it is
protected by a rugged case (available
separately).
When the arm veins require replacement,
contact Gaumard to arrange for a lower arm
exchange. Refer to the Consumables and
Replacement Parts section of this guide, and
contact
customer
service for
more
information.
Do not inject fluids into the intramuscular
sites. Intramuscular sites are for placement
exercises only.
Do not remove or replace the umbilical cord
while Premie HAL is in operation. Doing so
will cause damage to the system.
Do not pull or carry the simulator by the
limbs. Handle Premie HAL with the same
care as a human patient.
Electrical Therapy
Premie HAL’s conductive skin sites allow the
attachment of real EKG electrodes. This
feature permits the user to track cardiac
rhythms with their own equipment just like
with a human patient. A few special
concerns are described below.
Premie HAL does not accept real electrical
therapy. Do not pace or defibrillate Premie
HAL with real electrical equipment.
The Gaumard User Interface features a
virtual electrical therapy function to simulate
defibrillation or pacing.
Mouth to mouth resuscitation without a
barrier device is not recommended, as it will
contaminate the airway. Treat Premie HAL
with the same precautions that would be
used with a real patient.
The use of needles larger than 22 gauge will
reduce the lifetime of the lower arms' skin
and veins.
| Premie HAL | User Guide | 7
Getting Started
8 | User Guide | Premie HAL |
Overview
GENERAL
Tetherless and fully responsive even
while being transported
Powered from an internal rechargeable
battery or wall outlet using power
adapter
Battery capable of 300 recharges and
Simulator receives commands from a
wireless tablet PC and operate at
distances up to 150 feet
Option to operate automatically using
Automatic mode or manually by the
Instructor
Training Guide with both basic and
advanced interactive scenarios
Use pre-programmed scenarios, modify
them or create your own quickly and
easily
Installation and training worldwide
Simulation Made Easy TM
SIMULATOR
Oral and nasal intubation
Use an ET tube or LMA
Unilateral chest rise with right main
stem intubation
Multiple
upper
airway
sounds
synchronized with breathing
APPEARANCE
Color responds to hypoxic events and
interventions (healthy, mild cyanosis,
severe cyanosis)
BREATHING
Internal rechargeable NiMH battery
Venous access
Bilateral IV training arms
Patent umbilicus
Intraosseous access at tibia
CONTROL
AIRWAY
Heart sounds include a normal heart as
well as atrial and ventricular septal
defects
Chest compressions are measured and
logged
Palpable fontanelle, brachial, femoral,
and umbilical pulse sites
Pulse strengths vary with blood pressure
and pulses are synchronized with ECG
Wireless tablet PC with stylus control
Communication modules are FCC and
CE Compliant
Communications module can be used
simultaneously
with
the
tablet
computer's integrated wireless (IEEE
802.11b) networking device
ACCESSORIES
100-240 VAC Charger
Power supply adapter
Battery Charger
Instructions
Carrying case
OTHER
One year limited warranty, extended
warranty to three years option
Installation
and
training
services
available
Control rate and depth of respiration
and observe chest rise
Ventilation is measured and logged
Select independent left and right lung
sounds
Chest rise and lung sounds are
synchronized with selectable breathing
patterns
Accommodates assisted ventilation,
including BVM and mechanical support
Unilateral chest rise
CIRCULATION
Conductive skin regions allow for ECG
monitoring with real equipment
Multiple heart rhythms, rates and
complications
| Premie HAL | User Guide | 9
Terminology
It is wise to spend a moment familiarizing
yourself with some of the terminology that
will be used to discuss simulation with the
Premie HAL system.
Automatic Mode - In this mode, vital signs
respond
automatically
to
caregiver
participation, instructor specifications, and
pharmacologic intervention. The model used
in this operating mode was developed based
on physiologic principles. Features unique to
this mode include: a comprehensive list of
drugs for easy administration, a drug profile
editor for adding new drugs or editing
existing ones, among other things.
Facilitator - the person conducting the
simulation; an instructor or lab staff member.
GUI - the Gaumard User Interface - is the
software application, used to control the
simulator and evaluate care providers.
Palette - a collection of Palette Items. Each
profile has its own palette.
Palette Item - Any full or partial set of
physiological parameters that have been
grouped and saved together under a single
name.
Profile - a unique Premie HAL software
configuration, including custom Palette,
Scenarios, and options. Each Profile acts as
a separate program, in that changes made to
one profile have no effect on the others.
Provider - a person participating in the
simulation as a healthcare provider.
Scenario - a saved sequence of
physiological states, like a "playlist."
Scenarios provide a level of automation that
unburdens the facilitator and allows
standardized presentation of symptoms.
Scenario Item - a Palette Item that is part of
a scenario. Scenario Items may also
represent a fixed delay period ("Wait") or a
pause ("Wait Indefinitely").
Stylus - a special pointing device for the
tablet computer. The stylus is the fastest and
easiest means of controlling the Premie HAL
software. See the Equipment Set-up section
of this guide for more information on working
with the stylus.
10 | User Guide | Premie HAL |
Equipment Set-up
| Premie HAL | User Guide | 11
Control Tablet
Computer
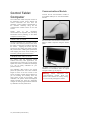
Communications Module
Connect the RF communication module to
an available USB port on the tablet’s/PRO+
left side.
The touchscreen tablet computer serves as
the simulator’s control center. Startup and
control commands are sent from the
Gaumard control software (GaumardUI) to
the simulator wirelessly using the RF
communication module shown in the next
section.
Please
refer
to
the
computer’s
documentation for important user and safety
information before powering on the tablet
computer for the first time.
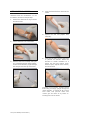
USING THE STYLUS
The stylus operates very much like a mouse.
You will notice that the pointer moves when
the stylus is held near, but without touching
the screen. Tapping the screen with the
stylus tip is like clicking the primary (usually
left) mouse button. Holding the stylus button
while tapping the screen is like clicking the
secondary (usually right) mouse button.
Secure the RF communication module to the
tablet or PRO+ computer using the Velcro
patch.
CALIBRATING THE STYLUS
For working with the Gaumard control
software and many other applications, the
stylus input is far superior to a mouse in both
speed and comfort. An additional advantage
is it can be easily calibrated for your
personal comfort.
The calibration utility found in the control
panel will present the user with crosshair
targets at each of the four corners of the
screen. Position yourself and the tablet as if
you are working, and carefully touch the
exact center of each of the targets. After
calibration, the pointer should be displayed
directly beneath the stylus tip. Significant
changes to viewing angle should be followed
by calibration for best performance.
12 | User Guide | Premie HAL |
The tablet is now ready to communicate with
simulator. For information about the signal
strength indicator, go to page 20.
Warning:
Never
disconnect
the
communications module while the
Premie HAL software is running. Doing
so can seriously damage the module.
Premie HAL
Battery
Premie HAL (S/N p6009067 or higher)
includes two separate power adapters
labeled “Premie HAL Charger” and “Premie
HAL Power Supply”. Before using the
simulator for the first time, reference the use
for each adapter below.
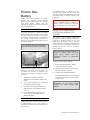
CHARGING THE BATTERY
To charge the battery, connect the adapter
labeled “Premie HAL Charger” to the battery
port and charge Premie HAL for 2-3 hours
(or until the charger displays a green light).
The charger indicator light will show red
during the charge period and green once the
process is complete.
The simulator’s battery charges only
when the control software is disabled.
The battery status is displayed on the
software status panel after the connection
with the simulator is established. For more
information about the battery indicator, refer
to page 20.
Warning: If the simulator will not be used
for an extended period, re-charge the
battery at least once every 3 months to
prevent damage to the internal battery.
USING THE POWER SUPPLY
(SYSTEM S/N p6009067 OR
HIGHER)
The power supply adapter allows the
simulator to operate through long simulations
sessions by drawing power from the wall
outlet and not battery reserve. Use the
power supply for simulation sessions lasting
2 hours or more. If simulation sessions are
shorter than 2 hours, use the simulator’s
battery reserve.
The power supply adapter will NOT recharge the battery. Avoid using the
power supply adapter when the
simulator’s battery is completely
depleted.
To use the power supply adapter:
Avoid using the simulator while the battery
charger is connected. If the simulator is in
use while the charger is connected, the
battery will not charge. To charge the battery
you must:
1.
If connected, unplug the charger
adapter from the simulator and the wall
outlet.
2.
Turn off the simulator by closing the
GaumardUI control software.
3.
Re-connect the charger adapter to the
wall outlet and the simulator’s battery
port.
4.
Leave the simulator charging for 2-3
hours with the GaumardUI control
software disabled.
1.
Fully charge the simulator’s battery
using the “Charger” adapter.
2.
Disconnect the “Charger” and connect
the “Power Supply” adapter.
3.
Activate the GaumardUI software.
The GaumardUI battery icon will display
a lightning icon when the power supply
is connected.
Please
contact
Gaumard
for
information on the power supply
upgrade for earlier Premie HAL
models.
BATTERY LIFE
Premie HAL has a maximum battery runtime
of approximately 2 hrs. Total runtime is
dependent on factors such as breathing rate
and sounds.
| Premie HAL | User Guide | 13
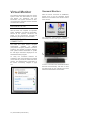
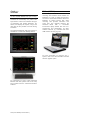
Virtual Monitor
Gaumard Monitors
The optional virtual patient vital sign monitor
system works with GaumardUI to receive
and display the simulator’s vital sign
information. The system includes an all-inone touchscreen computer and the Gaumard
Virtual Monitor software.
After the ad-hoc connection is established,
double click or tap the Gaumard Virtual
Monitors icon located on the virtual monitor’s
home screen.
EQUIPMENT SETUP
Please refer to the documentation included
with the all-in one computer for important
safety, installation, and start-up information.
Secure all the system’s connection and
power on the touchscreen computer as
indicated by the product’s documentation.
WIRELESS AD-HOC
CONNECTIVITY
The Gaumard Virtual Monitor software is
now ready to receive vital sign information.
The tablet and virtual monitor computer
automatically
establish
an
ad-hoc
(computer-to-computer) wireless connection
at startup. The wireless connection between
both systems allows GaumardUI to update
the vital signs information displayed on the
Gaumard Monitors program.
To verify the connection between the
computers, click on the wireless icon located
on the task tray of both the tablet and virtual
monitor. For troubleshooting information on
the ad-hoc connectivity, navigate to page
121.
14 | User Guide | Premie HAL |
To learn more about the Gaumard Monitors
features and functionality, click then V menu
and select Help to open a digital copy of the
Gaumard Virtual Monitor User Guide.
Working with
GaumardUI
| Premie HAL | User Guide | 15
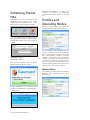
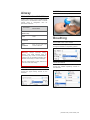
Initializing Premie
HAL
After reading the Care and Cautions, and
Equipment Set-Up section of the guide,
double click the “GaumardUI” icon on the
tablet’s home screen to start the simulator.
When the GaumardUI is not active, the
simulator is in stand-by. To troubleshoot
connection and startup issues, go to page
121.
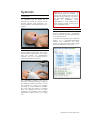
Profiles and
Operating Modes
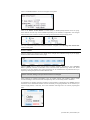
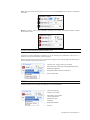
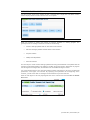
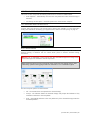
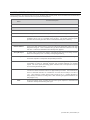
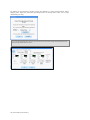
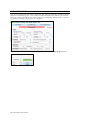
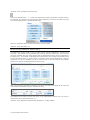
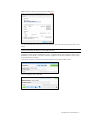
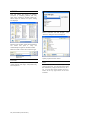
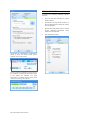
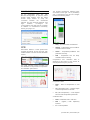
After the startup screen, the profile and
operating mode selection menu is shown.
If you are working with the PRO+ system,
login by entering admin for the user name
and password fields, then click submit to
continue.
User Name: admin
Password:
admin
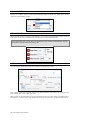
The simulator selection menu is shown.
Select Premie HAL and click “Start”.
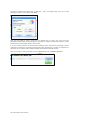
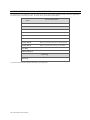
The GaumardUI control software has two
modes of operation: Manual and Automatic.
Each mode includes a Quick Start profile
with preprogrammed scenarios exercises
created in conjunction with experienced
healthcare instructors and working medical
professionals. Continue to the next section to
learn more about the each operating mode
and the profiles included. After selecting an
option for each, click “Load” to continue.
Manual Mode
In the manual operating mode, the facilitator
programs the simulator’s vital signs
independently.
The RF link between the computer and the
simulator is established in approximately 1
minute or less.
16 | User Guide | Premie HAL |
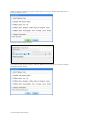
The profiles available under Manual Mode
are the following:
Default
Profile
–
includes
one
preprogrammed palette with healthy vital
signs.
Quick Start Premie HAL – contains nine
preprogrammed scenarios exercises.
Automatic Mode
In the automatic mode, the software’s
physiologic model assists the facilitator by
automatically changing vital signs in
response
to
caregiver
participation,
pharmacologic intervention, and manual
input. The physiologic model calculates
responses based on physiologic principles.
For example, when facilitator increases the
heart rate, the physiologic model will
calculate the response and automatically
adjust the blood pressure. To activate this
operating mode as an upgrade option, go to
page 85. For more information on this mode
and its features, go to page 25.
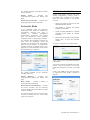
CREATING A NEW PROFILE
Profiles store palette, scenario, and option
settings independently; changes made to
one profile have no effect on the others.
Below are some examples on how profiles
are used.
Assign one profile to each user of your
Gaumard simulator system
Use profiles to organize and protect
palettes and scenarios
Create a profile dedicated to a specific
academic course taught by multiple
instructors
Devote an entire profile to one particular
subject area, or even one particular
scenario
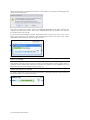
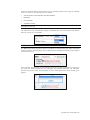
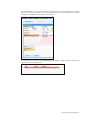
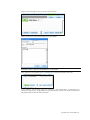
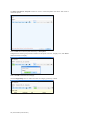
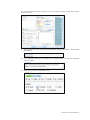
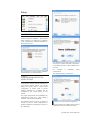
To create a new profile, click “New Profile”.
Enter a name for the new profile followed by
a description.
To include scenarios and palettes from other
profiles, click the check box. For security,
enable PIN protection and enter a four-digit
key
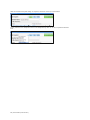
The profiles available for the Automatic
operating mode are:
Finally, click create to save the new profile.
To import and export profiles, navigate to
page 81.
Default
Modeling
–
includes
one
preprogrammed palette with healthy vital
signs.
Meds Profile – contains a library of
preprogrammed medications.
Quick Start Premie Modeling – includes
four linear scenarios and six branching
scenario allowing instant simulation of a wide
range of conditions.
For more information on each of the scenario
exercises included with the Quick Start
profile, go to page 47.
| Premie HAL | User Guide | 17
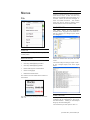
Environment
The GaumardUI environment is used by the facilitator as the simulation command center. In
addition to controlling the simulator’s functionality and vital signs, the facilitator can evaluate
student training. This powerful combination of tools provides the facilitator with an indispensable
tool for simulation, training, and testing.
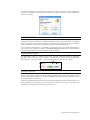
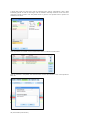
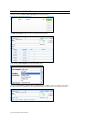
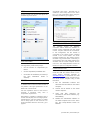
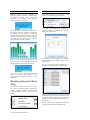
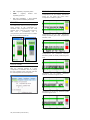
STATUS PANEL
The Status panel is visible along the left edge of the GaumardUI window at all times. After the
connection with the simulator is established, the status panel displays the current information about
the battery level, signal strength, volume controls/levels, and vital signs in real time.
Click the right arrow to expand the status viewer.
MANUAL MODE
AUTOMATIC MODE
18 | User Guide | Premie HAL |
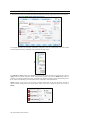
Status panel entries and features mirror the simulator’s hardware configuration. Light blue icons
show active features and values undergoing changes are highlighted yellow. Click on the volume
bars to adjust the volume of each sound.
Some status panel entries and features might not be visible depending on the
simulator’s hardware configuration.
Battery Level
Simulator
Connectivity
Active
feature
Volume
Control
| Premie HAL | User Guide | 19
SIGNAL STRENGTH INDICATOR
The communication indicator shows the status of the radio link between the control computer and
the simulator. Full bars indicate excellent communication between the computer and the simulator
(i.e., normal operation). The indicator is clear when no attempts to communicate with the simulator
are being made; for example when the module is not connected to the computer or the system is in
STAND-BY mode.
The warning icon indicates a signal conflict with another simulator. Click the exclamation icon for
more information. To configure individual communication channels for each simulator manually, go
to 84.
BATTERY INDICATOR
The battery status indicator progresses as the battery in the simulator is used. Premie HAL has a
maximum battery runtime of approximately 2 hrs. Total runtime is dependent on factors such as
breathing and sounds.
The exclamation mark indicator is shown when there is no communication with the simulator and
the program cannot get the battery information. The bolt symbol indicates that the power supply is
connected.
When the battery is so low that the indicator turns blinking red, the simulator is sent automatically to
STAND-BY mode (to protect some of the simulator's internal components) and will not operate until
the battery is recharged.
Please note that the power supply will not re-charge the battery and an initial charge is
necessary for the power supply to maintain Premie HAL operating. To recharge the
battery, turn off the GaumardUI software, and connect the adapter labeled “Charger”.
SIMULATOR VOLUMES
The volume of each sound can be adjusted from the Status Panel. Click on the volume level
indicator next to each sound and a volume control will display. Select the volume level you want
and the sound will be adjusted instantly on the simulator (i.e., there is no need to click “Apply”).
20 | User Guide | Premie HAL |
SOFT POWER AND STANDBY
The standby button is located on the bottom right corner of the GaumardUI software. Use the
standby mode to save battery power between exercises.
Premie HAL will establish a connection less than one minute after resuming from standby. The
connection bars will display the connection strength, confirming that the wireless RF link between
the controller and model has been established.
| Premie HAL | User Guide | 21
Details
It is best to think of controlling the simulator in terms of three levels of complexity: Details, then the
Palette, and finally Scenarios. From the details tab, facilitators can manually control the simulator’s
vitals, enable/disable features, or complications and create palette items later used to build labor
scenarios. Changing controls directly from the details page is the simplest form of control available
to the facilitator.
Vital controls are divided in several categories. For each vital control on the details tab, there is a
corresponding entry on the status panel providing real time information.
CHANGING VITALS
Set the changes on the available fields, and then use the Apply panel located at the bottom of the
Details tab area to submit. GaumardUI only sends updated vital information to the simulator and
the virtual monitors; settings not specified will remain unchanged. Outlined below are common
control behaviors in the Manual operating mode.
Click or tap slider control to adjust numerical values using the stylus. Alternatively, use the
onscreen keyboard to manually type in a numerical value.
22 | User Guide | Premie HAL |
Click on the down arrow to access sound types and rhythms.
Click on the feature control button to enable (blue) or disable (black) features such as crying.
Some feature controls may not be available depending on the simulator configuration. No changes
will be made to the simulator until the new settings are submitted using the apply panel.
For more information about the simulator’s features, navigate to the Working with Premie HAL
section of this guide.
APPLY PANEL
After the settings are selected in the details area, changes are submitted using any of the apply
buttons located near the bottom of the page.
Click the NOW button to change the simulator’s condition instantly. Alternatively, click a trending
time to gradually increase or decrease to the numerical value specified (e.g. heart rate, blood
pressure) in the time allotted. The right-most button can be customized to any transition time you
require by clicking the part of the button labeled “Edit”.
Please note that settings not specified will remain unchanged.
Some settings are applied immediately, such as cardiac rhythm and breathing pattern, while
numerical settings, such as heart rate and respiratory rate, can be easily made to transition.
As transitions are applied, the time remaining in the transition is displayed in the Clocks panel at
the bottom of the GaumardUI window. If there is already an ongoing transition at the moment you
click an Apply button, it will stop, and a new transition will begin from the current physiological
state.
| Premie HAL | User Guide | 23
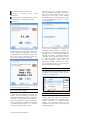
When cardiac rhythm is maintained at Ventricular Tachycardia for one minute, the following prompt
dialog box will be displayed:
Click Yes to degrade the cardiac rhythm to ventricular fibrillation. Click No to maintain the
cardiac rhythm and recheck after 1 more minute. Click Cancel to stop the software from checking
the cardiac rhythm every minute.
To use virtual electrical therapy, click the shock panel shortcut near the top of the screen. If the
Shock Panel shortcut is not displayed, click Setup>Options>General and check mark “Show
defibrillation/cardioversion/pacer panel” on the menu bar.
PALETTE ITEMS
The Details page is also used to create Palette Items. A Palette Item is any full or partial set of
physiological parameters that have been grouped and saved together under a single name. A
collection of these palette items applied in succession are referred to as a scenario. For more
information about scenario building, navigate to page 33.
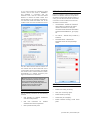
CREATING PALETTE ITEMS
To create a Palette Item, choose the desired parameters on the Details page and click the Save as
Palette Item button near the top of the page.
24 | User Guide | Premie HAL |
You will be prompted to name the palette, specify a description, and color code. Click Save to
create the new palette Item. Navigate to the Palette tab to view a collection of all the palette items
in the current profile.
AUTOMATIC MODE
In the automatic mode, the software’s physiologic model assists the facilitator by automatically
changing vital signs in response to caregiver participation, pharmacologic intervention, and manual
input. For example, if the instructor increases the heart rate, the physiologic model will calculate a
realistic response to the event and automatically adjust the blood pressure values.
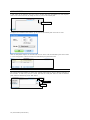
If the Automatic mode option is not available on the Profiles menu, click “Setup>Options>Other”
and enter the code included the feature in the Model Activation Code field. To switch between
operating modes without restarting the software, click File>Profile.
PHYSIOLOGIC MODEL
The physiologic model is a software engine that calculates responses based on physiologic
principles. Click the “Pause” button located on the right panel to freeze the model calculations
during lectures, and then to resume. To return the patient to the initial state, click “Reset”.
PATIENT PROFILE
Patient files store general information such as weight, height, and age. The physiologic model
factors in the patient’s weight as it adjust related physiological parameters. GaumardUI includes
several preprogrammed patients in the Quick Start Modeling profile. For more information on the
each patient profile, go to page 90.
Premie is the default patient loaded when the Quick Start Modeling Profile is selected and it is an
ideal candidate for most simulations. Information about the patient is shown on the right panel. For
information on creating new patient profiles, go to page 90.
| Premie HAL | User Guide | 25
AUTOMATIC MODE CONTROLS
In the automatic mode, the Details tab includes additional vital sign parameters and control options.
To navigate between the vital sign parameter categories, click the vertical tabs. The tabs divide
controls related to airway, breathing, and circulation among others.
The HOLD and Auto buttons are unique to the automatic mode. Similar to manual mode, click an
apply button to submit changes. Some changes are gradual and even the NOW apply button is
pressed. The delay results from using a closed loop model that adjusts other related values over
time, rather than displaying a unique value that is unrelated to other parameters.
HOLD: Allows you to keep a current value constant. Recall, that in the manual mode, to keep a
value constant, simply leave the control blank. Click on the H to change the option from Auto to
HOLD.
26 | User Guide | Premie HAL |
Auto: Allow the model to auto-adjust the value. Click the input field blank to return to the default
auto state.
Manual: Input the value of the parameter manually. The model automatically adjusts related
physiological values.
AIRWAY/APPEARANCE/BREATHING TAB
The A-B vertical details tab includes the airway, appearance, and breathing controls.
Change the oxygen saturation by adjusting one of the following four parameters. Click on the “?”
button to view a brief description of the four options.
Options 2-4 take from 30 seconds to 3 minutes to change. Lower OSat settings will decrease the
model’s stability and put patient into crisis.
Total O2 level: oxygen reserve in the body.
Shunt flow: the percentage of deoxygenated blood in
pulmonary capillaries.
Respiratory pattern Airway construction
Airway obstruction
ETCO2
Similarly, EtCO2 can be changed by adjusting one of four parameters:
Total CO2 level: CO2
build-up in the body;
Dead Space: part of tidal
volume that doesn’t
participate in gas
exchange.
Respiratory Pattern
Ph level
| Premie HAL | User Guide | 27
LUNG CONDITION
Change the condition and the model will automatically adjust the shunt flow, dead space, airway
resistance, and respiratory pattern.
TIDAL VOLUME
Adjust the tidal volume or amount of air breathed in or out during normal respiration. In the model, a
tidal volume of 500 m/L is considered the normal level for an average adult build.
If the respiratory rate goes to zero, the model does not restore it automatically. Always
remember to specify a new respiratory rate.
CIRCULATION AND OTHER TAB
The C/O vertical details tab includes the circulation and breathing controls.
Each cardiac rhythm has a specific effect on the blood pressure wave forms. The pressure wave
forms include ABP, CVP, PAWP and Pulse.
Mild cyanosis is activated when the oxygen saturation is less than 92% and/or the temperature is
less than 35° C. Values under these thresholds will cause the cyanosis to get progressively worse.
28 | User Guide | Premie HAL |
Similar to O2Sat and EtCO2, blood pressure can be changed indirectly when using the modeling
mode. You can do so by selecting one of four options.
Vascular profiles: vessel diameter and vessel stiffness.
Heart Rate
LV Contractility
Total Blood Volume
PATIENT STATUS
Set the patient status to “Excited” (after exercise) to increases heart rate, temperature, respiratory
rate, tidal volume, O2, CO2 diffusion capacity, metabolism rate, and CO2 formation rate. Set the
status to “resting” for a normal state.
BLEED AND WOUND SIZE
The Bleed and Wound size option allows the facilitator to simulate blood loss within the patient
model. To start the virtual bleeding, click the “Bleed” button and adjust the bleeding rate using the
“Wound Size” control.
Once activated, the physiologic model gradually adjusts the simulator’s vital signs in response to
the blood loss. Without intervention, the vital signs will gradually deteriorate until eventually,
ischemia of the heart occurs. For information on how to infuse blood to the model virtually, go to
page 55.
| Premie HAL | User Guide | 29
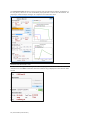
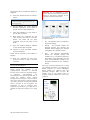
ADVANCED TAB
The Adv vertical tab includes advanced cardiac, circulatory, respiratory and environment controls.
All the controls in this page are unique to the automatic mode.
The advanced tab gives you more control over the model by allowing you to edit additional
parameters that have an effect on the cardiovascular and respiratory systems. Use this page if you
want to add complexity to a scenario or if you need to superimpose special conditions.
Cardiac irritability can be used to modify cardiac rhythms indirectly. You can improve (move
towards normal sinus rhythm), or deteriorate (move towards ventricular fibrillation and asystole) any
of the rhythms.
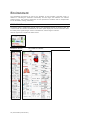
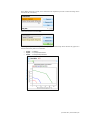
30 | User Guide | Premie HAL |
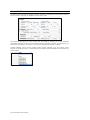
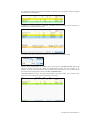
The progression of rhythms generally follows the pattern displayed in the figure below, where “X”
represents normal sinus rhythm, multifocal atrial tachycardia, atrial flutter, atrial fibrillation,
junctional rhythm, left or right bundle branch block, or atrio-ventricular block:
| Premie HAL | User Guide | 31
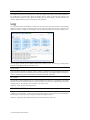
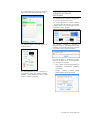
Palette
Use the Palette tab to sort, manage, and edit the palette items in the current profile. Each profile
stores an independent library of palette items.
To modify the vital sign parameters programmed into a palette, select a palette and click the Edit
button. After the changes are made using the Details tab, click the “Save as Palette” Item button.
For more information on customizing the Palette, see the Tips on Palette Item and Scenario
Creation section of the appendix.
To apply a palette and change the simulator’s condition, select the palette item and click one of the
“Apply” menu options.
32 | User Guide | Premie HAL |
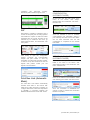
Scenarios
The most advanced method of controlling Premie HAL is to build a scenario-- a sequence of
Palette Items and delay periods played back in succession. Scenarios let the facilitator automate
changes to the simulator’s condition, so their attention can remain on the providers' actions. The
scenario feature also standardizes the patient's presentation of symptoms. For fair assessment of
providers and any research application, such standardization is key.
PREPROGRAMMED LINEAR SCENARIOS
GaumardUI includes several preprogrammed scenarios to simulate variety of complications. All
preprogrammed scenarios are included in the Quick Start Profile. To switch between profiles
without exiting the software, click FILE> Profile. For this example select and load the Quick Start
Profile.
To use a preprogrammed scenario, go to the Scenario tab and click Load Scenario.
The Load Scenario dialog box appears. Select a scenario and click on Load. For a list of all the
scenarios available, go to page 47.
LINEAR SCENARIOS OVERVIEW
Linear scenarios are composed of vital signs palette items and wait palette items played in
succession.
Vital sign
Palette items
Progress
indicator
Wait palette
items
During the scenario, each vital signs palette updates the patient’s condition. As outlined previously,
palette items are created using the Details tab.
The transition time trends the increase or decrease of numerical vital signs such as blood pressure
over seconds or minutes.
Wait palettes do not update or change vital signs. Instead, wait palettes give the provider time to
perform an action; this may be treatment in response to a complication or performing a standard
assessment.
| Premie HAL | User Guide | 33
SCENARIO CONTROLS
Scenarios are controlled using the buttons at the bottom of the tab. The same way a music player
plays songs, the scenario plays palette items. Intuitively, the facilitator can play, stop, pause, skip,
or repeat items as necessary.
Previous
palette
Pause/
Play
Next
palette
Reset
SCENARIO POSITION INDICATOR
An unfilled triangle means that the scenario is stopped.
clicked, the item pointed by the indicator is be played.
When the Play button is
A rapidly blinking triangle means that the scenario is playing the item to which the
indicator is pointing.
A slowly blinking triangle means that the scenario is paused at the item to which the
indicator is pointing.
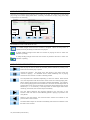
SCENARIO PLAYER CONTROLS
Start or play the item to which the scenario position indicator is pointing. This
button has two states: play or pause.
Pauses the scenario. This state of the play button is only active when the
scenario is playing. It is disabled when a 'Wait indefinitely' item is playing
because in such case the scenario is already paused.
The stop button has 2 behaviors depending on when it is clicked. When clicked
once, the Stop button halts the scenario at the end of the currently playing item.
When clicked a second time, the scenario is stopped immediately. For example,
if the currently playing item has a transition of 1:00 minute and the Stop button is
pressed when it has 0:10 seconds left, the scenario will be halted at the end the
transition (i.e., in 10 seconds). If the Stop button is clicked again within those
remaining 10 seconds, the scenario stops immediately.
The next button advances the progress indicator to the next item on the
scenario. Click next when a wait indefinitely palette is playing to proceed to the
next palette.
Similar to the Next button, the Previous button returns the indicator to the
previous item in the scenario.
The Reset button stops the scenario immediately and returns the indicator to the
first item in the scenario.
34 | User Guide | Premie HAL |
SCENARIO QUICK LAUNCH
Use the scenario quick launch window to start a scenario with a single click. The Quick Launch
window displays all the scenarios saved in the current profile.
CREATING A NEW LINEAR SCENARIO
Build new scenarios to expand the number of exercises available in a training program. The
general process of creating a new linear scenario is the following:
Create a vital sign palette item for each state in the scenario
Add the vital signs palettes and wait times to the scenario
Play the scenario
Modify and edit palettes
Save the scenario
The first step is to create several vital sign palette items using the Details tab. Each palette item will
represent a physiological state in the patient’s condition during the scenario. Remember to program
the vital signs for the target state; the transition time will handle trending the values.
It is recommended that the first vital signs palette includes instructions for all of the physiological
parameters, sound types, and volumes. By specifying each parameter at the beginning of the
scenario, you will ensure that no vital signs are inherited from a previous exercise.
Enter the vital signs for the first physiological state in the scenario and click the Save as Palette
Item button.
| Premie HAL | User Guide | 35
The Save as Palette Item dialog box is displayed. Type in the palette item name and a brief
description; assign a color tag and click Save.
After the first palette is saved, create the next palette item by saving only those vital sign
parameters that simulate the second stage in the patient’s condition. Repeat this process to create
palettes for the third and final stage in the scenario.
If you are creating scenarios for the automatic operating mode, recall that the physiologic model’s
calculations are based on accurate physiologic principles, and therefore, choosing a combination of
vitals that are inconsistent with medical principles will not deliver desirable results.
After all creating the vital sign palettes go to the Scenario tab and click Add to Scenario.
36 | User Guide | Premie HAL |
The Add Palette item menu is shown. Select the vital sign palette previously programmed to be first
state in the scenario. Enter 0min 0sec for the transition time so the initial vital signs are applied
immediately. Click Add to add the palette to the scenario.
The first palette is now added. Click Add Palette to Scenario… again to add the following vital
sign palettes and wait palette items.
| Premie HAL | User Guide | 37
A Wait item holds the vital signs until the transition time expires. Alternatively, add a Wait
Indefinitely palette to hold the vital signs until the facilitator manually advances to the next item
using the scenario controls. Use wait palette items to give the care provider time to perform an
assessment or action.
After the palettes are loaded, use the Selected Item menu to edit the scenario items.
After the scenario is completed, click Save Scenario to store the scenario in the current profile for
later use.
38 | User Guide | Premie HAL |
ADDITIONAL SCENARIO FEATURES
Instructors can also incorporate the following features into a scenario for added realism.
Auto responses – Automatically move onto the next palette item when electric therapy is
detected.
File sharing and lab reports – Send lab reports to the virtual monitor computer.
FILE SHARING AND LAB REPORTS
The scenario can also automate the distribution of shared files and labs. Click on the “Add to
scenario” button the select the File and Lab tabs to view the files available. For more information
making files available for file sharing go to page 92 and to create a new lab report go to page 49.
AUTO RESPONSES
The scenario auto-response settings move the scenario to the next palette item when virtual
electrical therapy is detected. Use the Virtual Shock panel to simulate electrical therapy
intervention.
Warning: Do not defibrillate or pace Premie HAL with real medical equipment. Doing so will
result in damage to the simulator’s internal components.
Auto-responses advance to the next palette if the virtual shock is applied while a “wait
indefinitely” palette is being played and if the simulator’s is in a shockable rhythm.
The three response options are defined below:
Off - The scenario does not respond to the electric therapy.
Prompt - The software detects the electrical therapy and prompts the facilitator if they
would like to advance to the next palette.
Auto – Automatically advance to the next palette only if the electrical therapy meets the
threshold specified.
| Premie HAL | User Guide | 39
BRANCHING SCENARIOS
Unlike linear scenarios, which progress from one palette to the next, the interactive branching
scenario controls allow the facilitator to change the scenario’s trajectory in response to provider
actions. To access the Branching window, click the “Go to Branching Scenario” button on the
Scenario tab.
BRANCHING SCENARIO SCREEN
The top panel buttons are used to clear, load and save a scenario, or to switch from branching to
linear scenarios. Click “Load Scenario” to access the preprogrammed branched scenarios in the
Quick Start Profile.
CREATING A NEW BRANCHING SCENARIO
The basic process of creating a new branching scenario is the following:
Add nodes
Add palettes or scenarios to each node
Add paths to nodes that require provider action
Create key events to alter the progress and trajectory of the nodes within the scenario
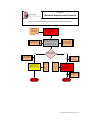
ADDING NODES
A branching scenario consists of several “Nodes”. Each node is preconfigured to run a normal
scenario or a series of palettes simulating a specific condition or effect. To add nodes, click the
“Add node” button.
40 | User Guide | Premie HAL |
Click the node’s identifier number to edit the node properties.
Enter a name for the node and description, then click “Save”.
ADDING PALETTES OR SCENARIOS TO A NODE
Click “Add Item” to add palette items or “Add Scenario” to add full scenarios to this node.
In this example, the following nodes are created: [1] Start Bradycardia, [2] Deteriorate, [3]
Interventions, [4] Atropine, [5] Epinephrine, [6] Dopamine and [7] Pace. Each node is programmed
with palettes that simulate the effect described.
| Premie HAL | User Guide | 41
ADDING PATHS
A path refers to the trajectory from one node to another after the last palette in a node expires.
Click on the “Time Limit” icon to modify the “Go To” point for the default path.
Path “Go to”
Configure the countdown timer and the “go to” point for the default path. Click “OK” to save.
After the last palette expires, the scenario will move on to the node as indicated by the arrow. Node
1 is now configured to continue to Node 2 as indicated by the path’s time limit.
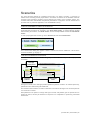
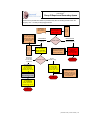
KEY EVENTS
Key events allow the facilitator to select from multiple paths within a node to alter the trajectory of
the scenario. To add a key event to a node, first click the “Add path” button to add an alternate
path, and then click the key event “Edit” button.
Edit
Delete
Copy
42 | User Guide | Premie HAL |
Use the Edit Path window to name, sort and create key events. First, type a name for the action,
and then click “Add”.
After the action is added to the Key Events list, assign the node that this action will move the
scenario to using the “Go to” menu. Click “OK” to save changes.
| Premie HAL | User Guide | 43
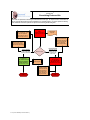
In the example below, node 2 is configured with four alternate paths. Once the provider performs
any one of the actions listed as key events, the facilitator will checkmark the key event to alter the
trajectory of the node sequence.
If the provider administers Dopamine, the facilitator checkmarks the Dopamine key event to
progress the scenario to node 6. Node 6 is programmed with the effects of the medication.
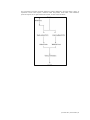
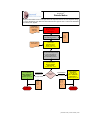
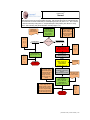
SAMPLE BRANCH SCENARIO DIAGRAM
Node
Node
Name
Description
1
Start
bradycardia
Node vital signs palettes simulate bradycardia. Go to node
2.
Vital signs palettes deteriorate the patient’s condition by 15%.
2
Deteriorate
Care provider has 4 options. Each option (key event)
moves the scenario to the node specified. If no action is
taken, the scenario will move to node 3 at the end of the
time limit.
Key event
Atropine
Epinephrine
Dopamine
Pace
Node 4
Node 5
Node 6
Node 7
Wait indefinitely, vital signs are on hold. Provider is to
intervene again.
3
Key event
Intervention
Atropine
Node 4
4
Atropine
5
Epinephrine
6
Dopamine
7
Pace
Epinephrine
Node 5
Dopamine
Node 6
Pace
Node 7
Node vital signs palettes simulate the response to atropine.
Time limit: Go to node 3 after 1 minute.
Node vital signs palettes simulate the response to
epinephrine. Time limit: Go to node 3 after 1 minute.
Node vital signs palettes simulate the response to
dopamine. Time limit: Go to node 3 after 1 minute.
Vital signs simulate the effect of pacing. Scenario ends.
44 | User Guide | Premie HAL |
LINKED ACTIONS
A Linked action automatically triggers a key event when virtual electrical therapy is detected. To
add a linked action, first open the Edit Path window.
Click the Linked Action radio button and select from Defibrillation Shock, Cardioversion Shock,
Non-Sync Shock or External Pacing. Then, set the parameters for response to either joules or
number of shocks.
Specify the “Go To” node the linked action will move the scenario to and click “Add” to insert the
electrical therapy into the Key Events list. Click OK to save the changes.
Specify the Go To node the linked action will move the scenario to and click the Add to insert the
electrical therapy into the Key Events. Click OK to save the changes. To apply electrical therapy,
use the virtual shock panel.
| Premie HAL | User Guide | 45
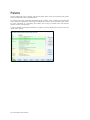
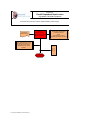
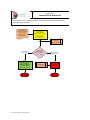
MODEL MEDICATION
In Automatic Mode, use the model medication tab add medications from the Drugs list to the
branching scenario. Similarly, to the Electrical Therapy entries, the Model Medication is added via
Edit Path, Linked Action. Select from a list of medications, dose, and routes; click Add to list in the
Key events window, then OK to add to the path itself.
Node 1 of a Cardiac Arrest branching scenario with Model Medication and Electrical Therapy paths
added. Model Medication events use blue text in the node display.
46 | User Guide | Premie HAL |
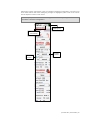
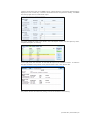
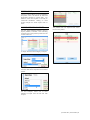
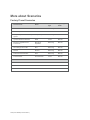
FACTORY PRESET SCENARIOS - MANUAL MODE
These scenarios in the manual mode are found in the Quick Start Premie profile. There are three linear scenarios and
six branching scenarios. All shown are for a premature infant patient.
Scenario
Name
Scenario Description
Linear
HLHS
A 32 week premie remains cyanotic despite breathing
HMD
A teenage mother who received no prenatal care delivered a 1300g infant in L/D
Pneumothorax
Infant delivered at 32 weeks had no respiratory effort at birth. The baby required
intubation and is now on a ventilator set at 40 bpm. The mother received regular
prenatal care and was given two doses of antenatal steroids prior to delivery
Branching
Diabetic Mother
A thirty two week infant is born to a 23 year old insulin dependent mother who was
diagnosed at age 21. She is classified as Type B and has been followed in the high
risk clinic. Suction and stimulation have already been applied.
Group B Sepsis
A mother with no prenatal care delivers a premature baby with foul smelling amniotic
fluid in the emergency room. The baby is being bagged with O 2.
Meconium Aspiration
31 week infant delivered with thick meconium staining. Baby is not breathing and
meconium aspiration is suspected with possible pneumonia
NEC
A two week old premature infant began enteral feeds a week ago. He required some
resuscitation at birth for perinatal asphyxia and received antibiotics for possible
sepsis. His nurse reports increasing gastric residuals and a few episodes of apnea
and increasing abdominal girths.
Normal
A mother is admitted to the hospital for preterm labor. She has had good prenatal
care and her dates show the infant to be approximately 32 weeks. She received two
doses of antenatal steroids, her membranes are intact and the baby’s L/S ratio is
1.9:1. She continues to labor and the baby’s scalp pH is 7.5. Despite attempts to
delay delivery she delivers a 1300g infant. After suctioning and gentle stimulation, the
baby begins to cry.
PDA
On the second day of life, a premie who has had a good response to surfactant and
ventilation develops deteriorating vital signs.
| Premie HAL | User Guide | 47
FACTORY PRESET SCENARIOS - AUTOMATIC MODE
The scenarios in the Automatic mode are found in the Quick Start Premie Modeling profile. There are eight linear
scenarios and one branching scenario. All shown are for a premature infant patient.
Scenario
Name
Scenario Description
Linear
Variations A
Uterine Rupture A
Shoulder Dystocia A
Preeclampsia A
Healthy Baby B
Baby was delivered SVD and is fairly vigorous.
Healthy Baby A
Baby is vigorous and earns good APGARS.
Faye Baby
Embolism Baby A
Branching
Variations
Branching
To view a flowchart of the scenario information, go to page 108.
48 | User Guide | Premie HAL |
Lab
Laboratory tests are helpful tools for evaluating the health of a patient. To simulate this process, the
Lab tab allows the facilitator to create laboratory tests to aid the provider during simulation. Any
number of custom templates can be created to supplement many types of scenarios. In addition,
the facilitator is in control of the results of each test. Once a laboratory test is prepared, the
facilitator can send the results to the virtual monitor computer for the provider access during the
exercise.
The Gaumard Virtual monitors must be connected before using the file sharing feature. To verify
the connection, go to page 95.
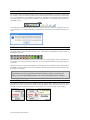
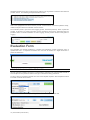
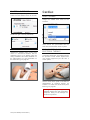
CREATING A LAB TEMPLATE
To begin, navigate to the bottom of the tab and click on the New Template button on the right
panel.
| Premie HAL | User Guide | 49
The Edit Lab Results Template window is used to create templates that will be later used to
create lab reports.
Enter a name for the lab template followed by a description.
Categories are used to group a series of tests in a lab report. From the “category” box, click Add to
name and create a category.
Then, click OK to save the new category.
Use the Single Entry menu to add a test under the category previously created.
50 | User Guide | Premie HAL |
Use the Add/Edit Entry menu to customize the different parameters on a specific test. Begin by
providing the name of the test, unit and decimal precision. The Normal Range will be displayed on
the lab report for the provider to use as guide while reading the results. Meanwhile, the Allowed
Range restricts the minimum and maximum value a facilitator can input as a test result. Once the
test entry is configured, click OK to add the new test.
Repeat the process to add more tests and categories using the Category and Single Entry menu.
Please note that individual items can be moved, deleted or modified after they are created. Click
the “Save” button to create the new lab template.
Once a new format is created, it is listed on the “Lab Template” section at the bottom of the Lab
tab. Use the buttons on the left panel to edit or delete lab templates.
| Premie HAL | User Guide | 51
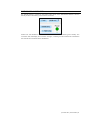
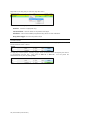
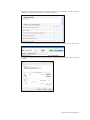
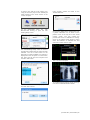
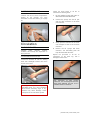
CREATING A LAB REPORT
To begin, click on Create a New Lab Report from the right panel.
The Edit Lab Report window is used to prepare new lab report.
First, select a Lab Template from the drop down menu.
Provide a Report Name, Report Time and Description. In addition, select a condition color tag for
the lab report on the right panel. Color tags aid the sorting of lab reports on the report list window.
52 | User Guide | Premie HAL |
Input the results of the tests on the Value column. Values above the normal range specified will be
displayed in bold. Include any comments associated with the test performed. Finally, click Save
from the top right menu to create the lab report.
The newly created lab report is now listed in the “Lab Reports” section. Sort lab reports by name,
template, description, or color tag.
On the right panel, click “Preview” to view final lab report on the facilitator’s screen. To make the
lab report available to the provider on the patient monitor screen, click “Send to VM”.
The preview window also allows the printing of results for distribution and archiving.
| Premie HAL | User Guide | 53
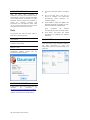
SEND TO MONITOR
Send the completed lab report to the virtual monitor screen to assist the care provider. Begin by
selecting the report from the lab reports list.
Click the Send to Monitor button to transfer the lab report to the virtual monitor.
On the virtual monitor window, an exclamation icon notifies the provider a file is ready for access.
Click the patient monitor drop down menu to select the available lab report.
The lab report will open using the system’s default application.
Once the report is sent, the letter Y will be present on the Sent column. Use the Stop Sharing
button on the right panel to remove any items on the virtual monitors file list.
An editable copy of the lab report is also copied onto the Gaumard_UI folder on the laptop’s home
screen. For information on how to access other files from the Gaumard Monitor screen, go to page
92.
54 | User Guide | Premie HAL |
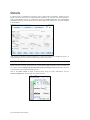
Drugs (Automatic Mode Only)
The drug tab is available only in automatic operating mode. It is used by facilitators to simulate the
physiological effects and reactions of medications administered to the patient model. The
physiologic model processes the drug’s properties, dosage, administration time and interactions
then adjusts the patient model vital signs accordingly.
While operating in the automatic mode, select the Meds Profile to load the library of
preprogrammed drugs. The built in drug editor allows facilitators to stay current with new
medications or make changes to the properties of existing drugs. All of the preprogrammed drugs
included in the library are found in the 2008 Handbook of Emergency Cardiovascular Care
published by the American Heart Association.
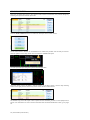
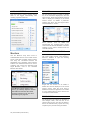
ADMINISTERING MEDICATIONS
Follow the steps below to administer a medication directly from the medication tab. Begin by
selecting a medication from the drug list.
A brief description is displayed at the top of the window. The half-life, peak time and drug
concentration are listed in addition to the standard and over dose dosages.
Enter the dose, units, route and rate (if applicable), and click the Administer button.
| Premie HAL | User Guide | 55
By default, the Proceed Drug window prompts the facilitator to confirm dosage effects before
applying them. Adjust the peak effect percentage and/or the dosage effect. Click Yes to begin
administering the drug.
To turn off the Proceed Drug prompt, go to the menu bar and click Setup>Auto Responses then
change Drug Model Effect to Auto.
56 | User Guide | Premie HAL |
The administered drug panel displays information on dosage rate, percentage of dose completed
and total time of administration.
In addition, if a drug interaction is detected, information about the effect and the interactor is
displayed in the interaction status panel.
Increase the warp factor to speed up the effect of a medication on the patient model.
After the drug’s administration is complete, select the drug and click Remove from list. Drugs
cannot be removed from the list during the administration process with the exception of IV
infusions. However, the drug effects for each medication can be turned off. To remove all the drugs
from the list and reset the patient model, click File and New Session.
Click Stop Infusion to pause the drug’s administration. During this state, the IV infusion dose
and/or rate can be adjusted or removed altogether if necessary.
| Premie HAL | User Guide | 57
Right click on the drug entry to show the drug effect menu.
Select from the following options.
Unselect - Unselect a highlighted drug.
Current Effects - View the effect on the patient’s vital signs.
All effects - View all the available programmed drug effects for this medication.
Drug effect toggle -Turn the drug effect off/on.
FLUID & GAS
Controls for fluids and gas administration are found at the bottom of the Drugs page. Two fluids can
be administered, saline or blood.
To apply any of these options, including oxygen, select the desired choice and specify the volume
or concentration and the rate. Then click on Start IV or Start O2. You can pause the
administration at any time by clicking Stop.
58 | User Guide | Premie HAL |
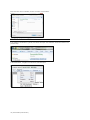
DRUG LIST MANAGER
To add new drugs, edit or update existing items and program drug interactions, click the Manage
Drug List button.
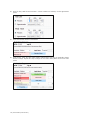
Select a drug from the Medication List and click edit to view the medication’s properties.
| Premie HAL | User Guide | 59
ADDING NEW DRUGS
First, go to the Details tab and create a palette item with vital sign parameters consistent with the
effects of a standard drug dose. Then, create an additional palette for the effects of an overdose.
These two palette items will be later used to program the medication’s dosage effect. For general
information on creating a palette items, go to page 32.
After creating the dose effect palettes got to the drug tab and click the Manage Drug List button.
60 | User Guide | Premie HAL |
The Add New Medication window appears. A list of all the drugs included with the Meds Profile is
shown on the right.
1.
Type the name of the new drug under New Medication following this pattern: Generic Name
(Brand Name).
2.
In the Description field, type the condition this medication treats and reference information
about the dosage.
3.
Select the units and the administration route.
| Premie HAL | User Guide | 61
4.
Enter the drug’s Half Life and Peak time. If these numbers are unknown, use the approximate
option.
5.
Enter half maximal effective concentration.
6.
From the list, select the dose effect palette created earlier and click the applicable dosage
button to assign. Repeat this step to assign the over dose effect palette to the Over Dose
option.
62 | User Guide | Premie HAL |
7.
Select the threshold unit and adjust the value for each dosage effect.
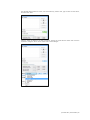
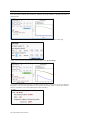
DRUG EFFECT TESTER
After configuring the drug properties, click the Update Graph button to generate the effect-plasma
concentration results. Continue to the next section to program interactors for this drug.
DRUG INTERACTION EDITOR
Click on the Drug Interactions button to begin.
| Premie HAL | User Guide | 63
The Interaction Editor window is used to program and test interactions between medications in
the drug library. When two or more medications preprogrammed to interact are administered, the
physiologic model will adjust vital signs as a response of the interaction effect.
ADDING AN INTERACTOR
First, select the drug from the drug list that will be programmed to interact with the current
medication and click Add. Information about the interactor drug is displayed in the Interactor Data
window.
64 | User Guide | Premie HAL |
Once added, the drug is shown in the interactors list. Repeat the process to add more drugs to the
interactors list if necessary.
Select the interactor and click Edit.
On the right, adjust the Max Alpha to modify the type of interactivity effect. Monitor the graph for a
visual model of the plasma concentration.
Alpha = 1: Additive
Alpha < 1: Synergistic/Induction
Alpha > 1: Antagonistic/Inhibition
| Premie HAL | User Guide | 65
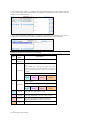
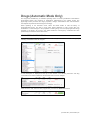
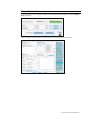
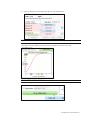
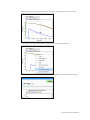
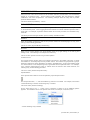
TEST PANEL
The test panel simulates the interactivity between the drugs based on dosage and time of
administration.
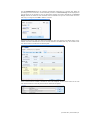
To simulate the interaction, first enter the patient’s weight and then the dose for each drug.
Lastly, enter the time of administration for each drug and click Update Graph.
The results indicate that the maximum interaction effect (93.38 %) occurs at 01:27:03. The alpha at
that point is 1.01 and the drug effect for each drug is reduced by 0.08%. If the drug interaction
effect is not realistic, fine tune the Max Alpha control and retest.
66 | User Guide | Premie HAL |
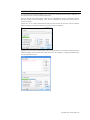
A time-effect graph is also generated from the test results. Tap and hold to draw a zoom area.
To un-zoom or print, right click anywhere on the graph to access additional options.
After all the interactors are configured and tested, click on Finish to save the interaction settings.
| Premie HAL | User Guide | 67
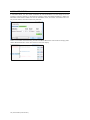
Lastly, review all the properties of the new medication and click Add to save.
In the example below, two drugs programmed with interactions have been administered. The
physiologic model has detected the interaction and displays additional information for the facilitator
to monitor.
68 | User Guide | Premie HAL |
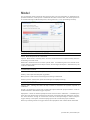
Model
The physiological model controls all vital signs and skin color and, depending on effectiveness of
provider intervention, it will improve or deteriorate the state of Premie HAL. The model speed can
be controlled through the Model warp-factor, which goes from 1 to 5 (1 representing real-time).
PHYSIOLOGICAL MODELING STATE
Pause: Model will pause at the current state.
Improve: Model trend to a healthy state. Once the model reaches the complete Healthy state, the
model will go to Pause mode.
Deteriorate: Model will trend to a severe cyanotic state. If ventilations given to the neonate are of
correct depth and between 40 and 60 per minute, the vital signs will improve. Otherwise, they will
continue to deteriorate.
CYANOSIS LEVELS
The facilitator can quickly jump to any of the three points in the state of the model.
Healthy: Pedi is pink with adequate oxygenation.
Mild Cyanosis: Pedi is bluish and vital signs are starting to deteriorate.
Severe Cyanosis: Pedi is blue, apneic and vital signs are rapidly worsening.
MODELED THERAPY
Improve Gain:
ventilations.
Moving this slider will help increase or decrease the cyanotic response to
Oxygen: By selecting an oxygen rate, the baby will improve faster with proper ventilation. Flow On
must be selected to activate the oxygen response.
Epinephrine: Select the desired epinephrine dose and then select “Administer”. Immediately the
heart rate of the Premie HAL should rise and the dose on board should start diminishing over time.
The dose should be enough to increase the heart rate a small percentage in order to help the
oxygen delivery in the system, therefore helping improve the neonate with proper ventilation.
Reset: By selecting “Reset” the oxygen flow and the epinephrine dose onboard will be eliminated.
| Premie HAL | User Guide | 69
CPR MONITOR
The CPR monitor has two bar graphs and a real time display that give the user some feedback on
the CPR given to Premie HAL. Both bar graphs have a label on the left that change color
representing low (yellow), correct (green) and high (red) levels of treatment. At the same time, the
real time graphs also show each compression and ventilation.
Log
The Log page allows the facilitator to keep track of every event during a session. It automatically
creates an entry whenever a detected event occurs as well as every time there is a change in the
patient's condition. In addition, the facilitator can log observed provider actions with a simple click.
The Log page consists of four different areas (from bottom to top): the text log, provider action
buttons, team logging buttons, and session info.
TEXT LOG
This is the large panel at the bottom of the Log Page, containing all the time-stamped text entries.
Every event in a session is recorded as an entry in the Text Log. The different types of entries are:
Actions, Applied Changes, Detected Events, Evaluations, Model, and Notes.
ACTIONS
Actions refer to those performed by one of the providers in the session. The facilitator can quickly
log actions from the Provider Actions section and make the entry more specific using the Team
Logging feature. The following is an example of an Action entry:
"00:07:24 Action (Assess responsiveness)"
APPLIED CHANGES
An “Applied” log entry occurs automatically every time there is a change to the physiological
condition of the simulator. In other words, every time changes are made from the Details page,
Palette page, or from a Scenario a log entry like the following is created:
"00:04:01 Applied (00:30): Details: Rhythm Sinus; Cardiac event 0; HR 140;"
70 | User Guide | Premie HAL |
DETECTED EVENTS
Every time one of the various sensors in the simulator detects a provider action, it is automatically
logged as a “Detected” entry. These actions include intubation, BP cuff placement, artificial
ventilations, and chest compressions. The following example shows an entry after a provider
performs BVM ventilation:
"00:03:26 Detected (ventilation): correct"
EVALUATIONS
Evaluations are added by the facilitator by clicking on the “Satisfactory” or “Unsatisfactory” buttons
on the Evaluation panel. Team Logging allows the facilitator to evaluate individual providers with a
single click. For example, if provider Charles Parker did a correct procedure, the Evaluation entry
would be:
"00:00:28 [Charles Parker] Evaluation (Care Provided): SATISFACTORY"
MODEL
When the facilitator changes the state of the cyanosis model from the Model page, an entry in the
text log is automatically generated:
"00:18:10 Action (Hypoxia Model): deteriorating
NOTES
Notes can be entered directly from the Evaluation panel or by right-clicking on the text log and
adding a note. The following is an example of a Note entry:
"00:10:10 Note: provider took too long to assess patient."
Provider actions
The Provider Actions section refers to the collection of buttons in the middle of the page. It allows
the facilitator to accurately keep track of provider actions. The buttons are grouped into 5 groups:
Emergency Reported, Airway, Breathing, Circulation, and Medication. Anytime the facilitator clicks
one of the buttons, a time-stamped log entry is generated with that particular action. For example,
if the “Assess responsiveness” button is clicked when the session clock reads 00:07:24, the
following entry is automatically generated:
"00:07:24 Action (Assess Responsiveness)"
Special Buttons
Some provider-action buttons are accompanied by a special option button:
The first special button, “ + “, lets the facilitator log actions in more detail. For example, if the button
“Assess breathing” is clicked, the following entry is created:
"00:01:28 Action (Assess breathing)"
On the other hand, if the “ + “ button next to “Ventilate” is clicked, a list of additional options
appears. The facilitator can be more specific and choose, for example, “look, listen, feel”…
...and the following entry is added:
| Premie HAL | User Guide | 71
"00:01:28 Action (Ventilate): look, listen, feel"
The second special button, “ > “, allows pre-programming common responses to specific actions.
For example, the facilitator can pre-program normal respiratory sounds and re-enable the lungs
when the provider performs a needle decompression.
When the “extubate” button is clicked, the following entry is created:
"00:01:28 Action (Extubate): cry"
MEDICATIONS (MANUAL MODE ONLY)
The Medications section allows for easy and fast logging of drugs administration, including dose
and route. The software comes preloaded with a set of commonly used drugs. Each of these
drugs has a default dose unit and a default route for administration (which can be overwritten by
just typing over). For example, for Epinephrine the default dose unit is "ml/kg" and the default route
is "IVP" (intravenous push). In order to enter, for example, that a provider administered .1 ml/kg of
epinephrine via IVP, the facilitator just has to enter the text "e" and the software automatically
searches the drug list and displays the best match (if any).
After a drug has been selected, just clicking on the “dose” text field automatically fills the units and
route fields with the default values for that particular drug.
The facilitator then enters the dose and clicks on the “Administered” button and a log entry is
created (let's say the dose entered was “.1”):
"00:05:43 Action (Medication Administered): Epinephrine, .1ml/kg, IVB/IVP"
72 | User Guide | Premie HAL |
TEAM LOGGING
The Team Logging feature allows the facilitator to designate which member of the team performed
a particular action. The Team Logging section is right above the Provider Actions section on the
Log page.
First, the facilitator should add all providers in the team, one by one, by clicking on the Add button
and filling the Add Provider window.
As shown in the Log Page image , a colored button is inserted on the Team Logging region for the
provider just added. There can be up to 6 different providers, each with a corresponding button.
Every time one of the provider buttons is clicked, that person becomes the active provider. To
indicate the active provider, the vertical bars on each side of the Log page will match the color
chosen for that person. On the Log Page image, for example, the provider "Charles Parker" is the
active provider, so the vertical bars are teal colored. While there is an active provider, every time a
Provider Action or Evaluation log entry is created it will have the name of the provider added to it as
follows:
"00:07:41 [Charles Parker] Action (Check for pulses): brachial"
To deactivate deselect the active provider and return to general logging, click the Team button and
the vertical bars will return to neutral color. All provider buttons can be edited or deleted by rightclicking them and selecting an option from the menu.
SESSION INFO
The session info area contains the “Session Title” and “Facilitator” fields at the top of the page.
These fields are included when a report is saved or printed.
EVALUATION
The Evaluation panel, always visible at the bottom of the software window, allows the facilitator to
insert standard evaluations or arbitrary notes into the log. The stylus device and hand-writing
recognition technology makes annotating in real-time very fast and convenient.
| Premie HAL | User Guide | 73
Standard evaluations are given context by their position in the log relative to detected and observed
provider actions. The following example illustrates this idea.
Note in the highlighted lines above that the provider "Charles Parker" cleared the patient's airway,
called for help and was then evaluated on those actions.
The evaluation panel is part of the team-logging system, described previously. When a particular
provider is selected, log entries generated via the Evaluation panel will be prepended with the
provider's name. For more information on Team Logging, see the previous section of this guide on
Logging.
Evaluation Form
The evaluation tool assists facilitators in reporting and assessing provider interaction using a
questionnaire form. A completed evaluation form can then be stored as a digital document or
printed for distribution.
USING BUILT-IN EVALUATION TEMPLATES
Several evaluation templates are built-in to GaumardUI’s evaluation tool. Each template includes a
set of multiple choice questions related to the type of assessment being performed.
To begin, select an evaluation template from the Load Template dropdown. New templates created
in the edit mode will also be listed.
Enter the name of the facilitator performing the review in the On-Site Reviewer field.
74 | User Guide | Premie HAL |
Complete the form by first entering the written response in the “Problems Identified” field and
selecting the applicable multiple choice responses throughout.
Once the evaluation is completed, click the Print button located at the top right corner of the screen.
To save the finished evaluation as digital document, select “Microsoft XPS Document” writer and
click Print.
| Premie HAL | User Guide | 75
Enter the name of the evaluation, Select a location and click Save.
PRINTING AN EVALUATION
If the tablet is connected to a printer, first select and open the evaluation document saved in the
previous step.
In the XPS Viewer, navigate to the file menu and select print.
76 | User Guide | Premie HAL |
Select the printer device from the list box and click print.
It is recommended that documents are first saved as XPS files before being printed into hard
copies.
CREATING NEW EVALUATION TEMPLATES
Each evaluation is based on an evaluation template. Facilitators can create new evaluation
templates to tailor specific assessment needs. Template design and creation is done in the
evaluation form edit mode. To enter the edit mode, toggle the Go To button located on the top right
of the evaluation form window.
In edit mode, enter the name of the evaluation template in the Evaluation Name field.
From the Category menu, click Add.
| Premie HAL | User Guide | 77
Select the Question with answer region category type and enter the category information title. To
save the changes, click OK.
The newly created category is shown.
Click, Add to include another category. Select the Multiple choice category type, enter the category
information title and click OK.
78 | User Guide | Premie HAL |
Highlight the Provider tasks and performance category and then click Add from the Multiple Choice
Entry menu.
Enter the multiple choice information in the entry fields.
Repeat the previous steps to add more categories, questions and multiple choice options.
| Premie HAL | User Guide | 79
After the evaluation template design is complete, click Save at the top of the window.
Finally, select the new template from the Load template drop down to use the completed evaluation
form.
80 | User Guide | Premie HAL |
Menus
File
RESET SESSION CLOCK
Clicking on Reset Session Clock resets the
clock back to zero. It does not have any
effect on the transition time remaining on a
scenario; it does not reset the vital signs, or
clear out loaded scenarios. The session
clock may also be reset by clicking on the
Session button next to the session time.
SAVE REPORT
This option allows all the information
recorded in the log page to be saved as a
text file. Clicking on it brings up the “Save
As” dialog box:
PROFILE
This option allows you to change your
current profile.
NEW SESSION
Clicking New Session in the file menu will:
Clear any loaded/playing scenario
Clear any loaded/playing palette
Resets vital signs to normal values
Clears out log page
Restart the session clock.
Select the desired name and path, and click
“Save”.
The shortcut key for saving a report is Ctrl +
S. For a sample report, look at the figure
below:
The session clock is located at the bottom of
the window.
The shortcut key for staring a new session is
Ctrl + N.
PRINT REPORT
This option allows printing a text file
containing all the information in the log for
the latest session. Clicking on Print Report
brings up the Print dialog box.
The shortcut key for this option is Ctrl + P.
| Premie HAL | User Guide | 81
IMPORT
This tool allows the import of palettes,
scenarios or modeling patients that may
have been created in another tablet PC.
When Import is clicked, the “Open” dialog
box displays:
Make a selection and click “Export”. The
“Save As” dialog box is then displayed:
Browse to the location where the documents
are saved and open it. They are
automatically brought into the GaumardUI.
Make sure that to select the correct file type.
Specify a path and click “Save”.
EXPORT
Palettes, scenarios (branched or linear),
model patients and drugs, and profiles may
be all exported.
82 | User Guide | Premie HAL |
EXIT
You can exit the software at any time by
going to File, Exit. You can also close down
the software by using the shortcut key Alt +
F4. You can also exit by clicking on the “x”
button at the top right corner of the user
interface.
Setup
CALIBRATION
This tool allows you to easily calibrate the
sensors inside the simulator. First choose
which function you would like to calibrate:
chest compressions, artificial ventilations, or
blood pressure cuff.
The facilitator should follow the text cue on
the screen to perform just ONE compression
or ventilation at a time, until prompted for the
next one.
The procedures for each specific calibration
are described in the sections below.
For
example,
compressions:
if
calibrating
chest
The wizard prompts you with a “#1”.
CHEST
COMPRESSIONS/ARTIFICIAL
VENTILATIONS
This tool helps you calibrate the chest
compressions and the artificial ventilations to
your specific criteria. That is, you will be
telling the system what a correct chest
compression is and/or what a correct
artificial ventilation is. Providers will be
evaluated by the system based on this
criteria.
The chest compressions and ventilations are
calibrated the same way. After making a
selection, this window is displayed:
The software will now ask you to perform a
number of “correct” chest compressions or
artificial ventilations, depending on what you
are calibrating.
Perform one correct chest compression.
A green filled oval indicates that the chest
compression was successfully recorded.
| Premie HAL | User Guide | 83
The wizard prompts you with a “#2”.
Perform a
compression.
second
correct
chest
A green filled oval indicates that the chest
compression was successfully recorded.
...and so on.
At the end of the calibrating session, the
wizard shows the average peak, depth, and
duration values for the procedure. If you feel
you performed the procedures correctly, click
the “Save” button. Otherwise, press the
“Back” button to repeat the calibration.
Each time that one of these sensors is
clicked a message will appear at the bottom
left of the screen notifying the user of the
status of the reset (OK, or TRY AGAIN).
Should the sensor not respond, please refer
to the troubleshooting guide or contact
Customer Support.
At the end of calibrating a function, the
Calibration Wizard resets the simulator for
the changes to take effect and displays the
message "Done". If the wizard displays the
message "Can't reset", it means that the new
calibration values will take effect next time
you start the software. If the changes need
to take immediate effect, close the
GaumardUI software, wait about 1 minute
(for the simulator to turn off), and then start
the GaumardUI software again.
OPTIONS
The GaumardUI has several options that can
be preset by the instructor. Each of these
sections is explained below.
Notice that you can go back, abort or cancel
at any time during the procedure.
FACTORY SETTINGS
Factory Settings is a very useful tool to
consider when recalibrating. It restores the
sensors to factory settings over-riding any
calibrations performed by users. Make sure
that when you are restoring the sensors to
the factory settings that no one is practicing
chest compressions, ventilations, intubation
or reading a blood pressure. Any of these
actions may interfere with the reset.
84 | User Guide | Premie HAL |
ENVIRONMENT
To connect to a specific simulator, select the
“FIXED” option and enter the simulator's
serial number in the text box. Establishing a
FIXED connection is required before
entering the activation codes for the
simulator’s add-ons features and detecting
hardware upgrades.
If you cannot locate the simulator’s serial
number, first set the mode to “GENERIC”
and establish a connection with the
simulator. Then, click the “Can't find Serial
Number” to retrieve the serial number from
the simulator you are currently connected to.
Jot down the serial and switch over to the
“FIXED” mode once the information is saved.
PREMIE HAL ADD-ONS
Enter the activation code to enable upgrade
features. Activation codes are unique to the
simulator’s serial number. Before entering a
code, go to the Environment tab and set the
connection mode to FIXED, then enter the
simulator’s serial number.
Virtual Monitor - Enable the “Monitors”
menu option to configure the virtual
monitor connection. To verify the
connection status between GaumardUI
and the Gaumard Monitors, go to page
95.
S.T.A.B.L.E. – Activate the (S.T.A.B.L.E.)
scenarios.
Automatic Mode – Activate the
Automatic mode and the physiologic
model.
Use the “Select desired channel” field to set
the channel that the RF module will use to
communicate with the simulator. Checkmark
the “Check noise in channel” button to switch
automatically to a cleaner channel if poor
signal or interference is detected.
Manually assign a unique channel for
each simulator to prevent crosstalk
when operating multiple Gaumard
simulators in close proximity. For best
results, leave one channel open
between the channels in use.
TOLERANCES
Set the intensity tolerances for the following
features:
CPR intensity for artificial ventilations
and chest compressions
CPR rate tolerances for artificial
ventilation and chest compression
Max cyanosis intensity level
GENERAL
This tab allows the facilitator to:
Enable auto saving of the log.
Save your current log report.
Enable stand-by warning.
Select units (SI or English).
Enable electrical therapy virtual shock
panel
| Premie HAL | User Guide | 85
PREMIE FEATURES
Customize the following simulator specific
features:
Checkmark the “Defibrillation/ Cardioversion
Panel” to show the virtual “Shock Panel”
shortcut on the main screen.
The shock panel is a floating control used by
the facilitator to administer electrical therapy
to the patient via software. For more
information on working with the shock panel
during a scenario, go to page 22.
86 | User Guide | Premie HAL |
Fine-tune the pulse intensity for normal
blood pressure.
Synchronize the leg blood pressure to
the arm blood pressure when the values
are not specified.
Synchronize post-ductal and pre ductal
oxygen saturation parameters when
values are not specified.
Use temperature sensor
LOG
On the Log tab, color set the color tag for the
available log event entries.
Checkmark “Use Fetus – Neonate Link” to
enable the “F/N” setup menu on the menu
bar. For more information about using the
Neonate Link feature, go to page 87.
REMOTE ACCESS VIA NETWORK
Customize the compression to ventilation
ratio signaled by CPR Trainer prompt.
The “Remote Access via Network”
connection feature allows the simulator to
receive control commands from the virtual
monitor computer stationed at the bedside.
In this configuration, the RF module is
connected to the virtual monitor computer
instead of the control tablet. The close
proximity between the RF module and the
simulator may provide better connectivity in
environments with solid walls between the
simulator and the control computer. On the
menu bar, click Setup>Remote Access via
Network to open the configuration window.
Set the number of compressions per
minute
CONFIGURATION
Set the compression/ventilation ratio
Set number of ventilations per minute (if
the ‘Only Ventilations’ button is
selected).
To use this alternate configuration, first
install the USB RF module drivers on the
virtual monitor computer. Navigate to
www.Gaumard.com to download the USB
RF module drivers, and then transfer them to
the virtual monitor computer using a USB
flash drive.
CPR OPTIONS
OTHER
Checkmark "Once a 'Palette' is applied load
to “Details Tab'" to show the value of each of
the palette’s vital signs parameters on the
Detail’s tab control entries.
Link the respiration sensor to the ECG to
generate a waveform every time a
compression is performed.
GaumardUI is capable of interfacing with a
number of third-party A/V recording systems.
Checkmark the “Use AV System” to enable
the AV setup option on the menu bar. For
more information about the A/V menu, go to
page 97.
1.
Exit the GaumardUI software and
disconnect the RF module on the control
computer.
2.
Connect the RF module to the virtual
monitor computer.
3.
Verify that both computers are
connected to the ad-hoc network (e.g.
GaumardNet,)
4.
Initialize the GaumardUI software on
the tablet computer and on the menu
bar, click Setup>Remote Access via
Network.
| Premie HAL | User Guide | 87
The Remote Access via Network Window is
displayed.
5.
Select the “Remote access via network”
option.
6.
On the adapter list, select “Wireless
Network Connection”. If the option is
greyed, click the “Stop” button first.
7.
Click “Find available” to auto assign a
port for this connection.
8.
Write down the “Controller IP” and
“Port” number, then click the “Connect”
button. The status will not show
connected until the last step of this
guide.
9.
Open the Gaumard Monitors software
on the virtual monitor computer.
Warning: Do not defibrillate or pace
Premie HAL with real medical equipment.
Doing so will result in damage to the
simulator’s internal components.
The behavior of each auto response option
is explained below.
Off - The software does not respond to
the electric therapy
Prompt - The software detects the
electrical therapy and prompts the
facilitator before applying the changes
configured in the “Settings” section.
Auto - The software automatically
detects the electrical therapy and
compares it to a threshold selected by
the provider. If the threshold is met, the
vitals will automatically change to the
parameters specified on the “Settings”
section.
10. Click the “V” menu and select “Remote
access Via Network”.
Please wait 30 seconds for the feature to
initialize.
11. Enter the “Controller IP” and “port”
number as shown on step 7 and click
“Connect”.
AUTO RESPONSES
The Non-Scenario Automatic Response
feature allows the facilitator to set
preprogrammed responses to electrical
therapy events. When the electrical therapy
is
detected,
auto-responses
can
automatically load a specific palette item or
prompt the facilitator before making
preprogrammed changes to the simulator’s
vital signs. Non-scenario response settings
only detect electrical therapy administered
when a scenario is not in progress. For
information on how to configure autoresponses for scenarios, go to page 39. To
activate the virtual shock panel, go to page
85.
88 | User Guide | Premie HAL |
Each type of electrical therapy has a unique
set of default parameters. For example, the
default response to a virtual defibrillation
Shock applies the following vital sign
parameter changes: NSR, 75 bpm, BP
120/80. Click on the palette button to
program a specific palette item as the autoresponse.
The “Load Palette Item” window is displayed.
Select the desired palette and click “Load”.
AUTOMATIC MODE NONSCENARIO AUTOMATIC
RESPONSES
The additional auto-responses listed below
are unique to the automatic mode.
Link All Auto Response to Cardiac Irritability
- Auto-responses will work only if the cardiac
irritability option on the details page matches
the selection on this window.
The desired palette is now displayed in the
“Setting” section.
The following message is displayed if
electrical therapy is detected and the cardiac
irritability on the details page does not match
the selection on the responses window.
Drug Model Effect – Configure the autoresponse behavior when the administration
of a medication is detected.
The auto-response is now configured to
automatically apply the “Healthy Resting”
palette if a virtual defibrillation shock of 200
Joules or greater is detected.
Auto – Apply the drug effects based on
medication’s programmed properties
and dosage.
Prompt – Display a confirm prompt
before applying the drug’s effects.
| Premie HAL | User Guide | 89
SCAN RF CHANNELS
MODELING PATIENT
Manually select the best possible RF
channel for tablet-simulator communications
by selecting “Setup”, then “Scan RF
channels”. The following notice displays
while the scan is in progress:
This option allows you to create a new
patient or load an already existing one.
When the scan is complete, a series of bars
will display, with the highest bar indicating
the best signal. On mouseover, a popup will
display “Recommended Channel” over the
channel bar with the best measured signal.
The other bars will only display a “Double
Click to Select Channel” message.
Click on the recommended channel in the
graph to select it. The following message will
display while the command is processed.
To create a new patient, go to Modeling,
Modeling Patient, new patient. The following
dialog box is displayed:
Enter the name of the patient, age, gender,
height, weight and/or additional notes. Then,
click “Save”.
To load an already existing patient, go to
Modeling, Modeling Patient, Load Patient.
The new channel should subsequently
ensure four solid bars display in the
communications indicator at the top of the
Status bar.
Modeling (Automatic Mode
Only)
The “Modeling” drop down menu in the top
left corner of the GaumardUI contains four
options: Modeling Patient, Reset Model,
Import Between Patients, and Auto Log
Setting.
Select the desired patient, and click on Load.
Notice that the factory pre-set patient Premie
cannot be deleted, as opposed to any of the
patients that you create yourself, which can
be deleted.
Patient information is displayed on the right
side and near the top of the Details tab.
90 | User Guide | Premie HAL |
RESET MODEL
Clicking on Reset Model under the Modeling
drop down menu, will restore all vitals and
physiologic controls to normal state. For
instance, if the ECG rhythm is currently on
Ventricular Fibrillation, clicking on reset
model changes the ECG rhythm back to
sinus.
IMPORT BETWEEN PATIENTS
Use the “Import between patients” menu to
import palettes, scenarios, and branching
scenarios from other patient profiles into the
current active one.
The palettes are now imported and saved
into the HAL patient.
To begin, select the item category to import.
Then, select the patient name that contains
the items that will be imported into the active
patient.
For this example, select one or more
palettes to import from the list and click
“Import”.
| Premie HAL | User Guide | 91
AUTO LOG SETTING
SENSORS
This menu option is used to specify various
vitals to be logged automatically after
reaching a specific threshold.
Use the sensors option to enable or disable
any of the waveforms displayed in the vital
signs monitor. Select the waveform and click
“ON” to display the readings on the virtual
monitor screen. To disable a parameter
reading, click “OFF”. The vital signs monitor
sensors defaults to “All On.”
Some sensors, such as NIBP and
Thermometer are equipped with a STAT
control that will allow the facilitator to activate
readings on the virtual monitors from the
controller software.
Monitors
Use the Monitors drop down menu to
enable/disable sensors on the virtual monitor
screen, share files, program custom scalars,
and verify the connection between the
GaumardUI and Gaumard Virtual Monitor
software. For detailed instructions on how to
configure and connect the Gaumard Vital
Signs Monitors, refer to the Gaumard
Monitors User Guide.
If the Monitors menu option is not
shown, go to Setup> Options> Premie
HAL Add-Ons and enter the virtual
monitors activation code. For more
information go to page 85.
SENSOR CONTROL WINDOW
The sensor control window is a floating panel
with on/off toggle controls. Click Monitors>
Sensors> Window to open the floating
sensor control panel.
Single click the circular icon to enable or
disable the sensors displayed on the virtual
monitor screen. Click the circle dark to
disable the sensor and light blue to re-enable
it. In the example above, all the sensors are
on except the thermometer.
FILE SHARING
The file sharing menu allows the facilitator to
send images, audio, and text files to the
virtual monitor screen. Use the “file sharing”
feature to fulfill laboratory reports and x-ray
requests by the provider during simulation.
92 | User Guide | Premie HAL |
To begin, first add the mock image (.jpg,
.bmp) or text files (.txt) into the Gaumar_UI
folder located on the home screen of the
control computer.
On the GaumardUI menu bar, click
Monitors>File sharing, to open the “File
Sharing Setup” menu.
Files currently shared are listed on the
“Shared Files” list.
Once a file is added to the “Shared Files” list,
a yellow notification icon is shown on the
patient menu at the top left of the virtual
monitor screen. The icon notifies the
provider that a file is available for viewing.
Click on the patient name button to bring
down the selection of available files and
select the context name to open.
The “File Sharing Setup” menu is used to
manage files shared with the virtual monitor
software. The list of files stored on the
Gaumard_UI folder available for sharing is
displayed on the left panel. To share a file,
first select the file from the left panel and
click the “Add” button.
The x-ray file is now open.
Enter a context name on the pop-up menu
and click “OK” to share.
To troubleshoot file sharing access errors go
refer to the Gaumard Monitors Guide.
| Premie HAL | User Guide | 93
CUSTOM NUMBERS
The scalar entry is now a blank field.
Use the custom numbers menu to add
custom numerical parameters to the virtual
monitor main screen, such as a glucose
levels or a platelet count.
On the GaumardUI menu bar, click
Monitors>Custom Numbers, to open the
“Custom Numerical Parameters on Monitor”
menu. Click the “Add” button to create a new
parameter.
Type the name and units of the new
parameter and then click “OK”.
Click on the empty scalar menu and select
“Other” from the list of available scalar
parameters. Select the name of the custom
parameter.
The scalar parameter is now created. Enter
a value for the parameter and click “Update”.
On the virtual monitor screen, click on a
scalar’s menu and select “Close” to make
the entry available for the custom parameter.
94 | User Guide | Premie HAL |
The figure below shows two new values:
Glucose level and hematocrit levels. Return
to the custom parameter menu on the
GaumardUI software to update the values
when necessary.
CONFIGURATION
On the GaumardUI menu bar, click
Monitors>Configuration, to open the virtual
monitor setup window. Use the virtual
monitor setup window to verify the
connection
between
the
GaumardUI
software and the Gaumard Monitors vital
signs
software,
re-configure
the
communication ports and view the controller
IP address. To troubleshoot connectivity
issues, go to page 121.
CPR
GaumardUI features a CPR performance
evaluator and trainer. On the menu bar, click
CPR>Evaluator to access the CPR Evaluator
window.
The provider performance indicator boxes
are located on the right. The V (ventilation)
and C (compression) box fill color changes
between the following states:
Grey – No intervention was detected.
Yellow – Compression was too shallow.
Ventilation was too weak.
Green – Compression/ventilation was
performed correctly.
Red – Compression was too deep.
Ventilation was too strong.
Compression and ventilation data is
displayed at the bottom of the window as
CPR is performed by the provider.
The CPR evaluator feature provides real
time feedback on the provider’s compression
and ventilation performance.
Compression Data
Rate – Rate of compressions in real
time.
Ct (Compression time) – Average length
of each compression in seconds.
LC (Last Compression) – Time elapsed
since the last compression performed.
Ventilation Data
Rate – Ventilation rate in real time.
PIP – (approx.)
Pressure
Ti – Time Inspiration
Peak
Inspiratory
| Premie HAL | User Guide | 95
I:E – Inspiratory: Expiratory Ratio
PEEP - (approx.)
expiratory pressure.
LV (Last Ventilation) – Time elapsed
since the last ventilation performed.
Positive
PERFORMANCE EXAMPLES
end-
Compressions are too shallow. Waveforms
mostly do not reach the green zone.
Compression indicator is yellow.
TRAINER
The CPR trainer reference boxes generate a
visual prompt of the compression to
ventilation ratio programmed in the “CPR
Options” menu. Click the “Trainer” button to
start. The V (ventilations) and C
(compressions) box borders blink to indicate
the correct reference CPR rate.
Compressions are too deep. Waveforms
mostly exceed the green zone. Compression
indicator is red.
Compressions are performed correctly.
Waveform peaks are mostly inside the green
zone.
CPR OPTIONS
By default, the CPR trainer is configured to
blink the reference borders at a 30:2
compression to ventilation ratio. To change
the ratio, navigate to the menu bar and click
the CPR dropdown and CPR Options.
Ventilations are too shallow. Waveform
peaks do not reach the green zone.
Ventilations are too strong. Waveform peaks
exceed the green zone.
96 | User Guide | Premie HAL |
Ventilation
was
performed
correctly.
Waveform peak is inside the green zone.
NOELLE GAUMARDUI
CONFIGURATION
(AUTOMATIC MODE)
On the menu bar, click FN> Setup. If the
menu is not shown, click Setup>
Options>Other and checkmark “Use fetus –
Neonate Link”
A/V
GaumardUI is capable of interfacing with a
number of third-party A/V recording systems
that enable the capture of Audio and Video
interlaced with the events recorded in the
software log. To enable the A/V menu, go
Setup>Options>Other, and checkmark “Use
A/V system.”
Click Setup to open the configuration
window. Configure the communication
adapter and port number to send log
information to a third party recording system.
In order to set up the connection on the A/V
System side, please consult your A/V
System’s documentation.
Fetal Neo Link (Automatic
Mode)
The Fetal Neo Link feature automatically
transfers fetal vitals to the Premie HAL
tablet, once a labor scenario is complete. To
configure this feature, follow the steps below
to establish a connection between the
NOELLE Model and the Premie HAL model.
Click find available to find an available
communication port. Alternately, assign a
port manually, then click connect. The status
will not read connected until the F/N
configuration is completed on the Premie
HAL tablet.
PREMIE HAL GAUMARDUI
(AUTOMATIC MODE)
Access the F/N setup menu on Premie HAL
tablet. If the menu is not shown, click
Setup>Options>Other and checkmark “Use
fetus – Neonate Link”
Enter the IP address of the NOELLE tablet
and matching port number and click connect.
Once the connection is established the
system is ready to transfer the information
between computers.
| Premie HAL | User Guide | 97
USING THE NEO LINK
After the NEO LINK connection is
established, the fetal vital information will be
automatically sent to the Premie HAL tablet
when a labor scenario is complete. The Data
Received window prompts the facilitator to
accept
the
incoming
neonatal
vital
information from the NOELLE model. Click
Yes to load the information onto the Premie
HAL tablet and continue the scenario.
Help
On the menu bar, click the “Help” option to
perform the following options.
GUI HELP
GUI Help option opens a digital copy of the
simulator’s User Guide.
ABOUT GUI
Click “About GUI” for information on the
GaumardUI software version and the
simulator’s firmware revision.
CHECK FOR UPDATES
Redistributable GaumardUI installer files are
available
for
download
at
http://www.gaumard.com/software-updates/.
Follow the steps below to check for software
updates using the built in update feature.
98 | User Guide | Premie HAL |
1.
Connect an Ethernet cable to the laptop
PC.
2.
Go to the Help menu, and click on
Check for Updates. The GaumardUI
automatically starts searching for
available updates.
3.
Click “Install” to begin the update. The
download progress bar begins to autofill as the setup file is downloaded.
Upon
completion,
the
software
automatically launches the setup wizard.
4.
Click “Next”, and follow the wizard
instructions to complete the software
download.
DIAGNOSTICS
Use this feature as a troubleshooting tool to
verify the status of the simulator’s features.
For more information on using the
diagnostics screen for troubleshooting, go to
page 124.
Working with
Premie HAL
| Premie HAL | User Guide | 99
Disclaimer: The content of this table are subject to change without prior notice. Please
contact Gaumard Scientific for the most current information.
Category
Simulator Feature
Nasal Intubation
Oral Intubation
Airway
Breathing/Airway Sounds
Suction exercises
Automatic Chest Rise
Independent chest rise
Breathing
Lung Sounds
Heart Sounds
Cardiac
ECG generated in real time
4 patches
Chest compressions sensor
Bilateral IV
Circulation
Fontanel, Brachial, Umbilical,
Femoral
Pulses
Cyanosis
Pedal Vein (left)
Frog legs position
Systemic
Intraosseous access
Temperature sensor
Other
Physiologic Model
Optional
ETC Pro+
Optional
Gaumard Virtual Monitor
Optional
100 | User Guide | Premie HAL |
Audio/Video recording and
debriefing
SUCTION
Airway
Simulate suction technique.
ORAL AND NASAL INTUBATION
Premie HAL’s airway can be intubated orally
using LMA or endotracheal tubes. Intubate
nasally using a nasogastric tube for
placement exercises.
Procedure
Recommended
Device Size
Intubation
(Blade size)
Miller 0
LMA
Size 1
Nasal
Intubation
8 Fr catheter
Oral
Intubation
ETT 2.5 no cuff, 6 Fr
suction catheter
Breathing
RESPIRATORY PATTERN
Use the Detail tab parameter controls to
change the simulator’s respiratory pattern.
Warning: Always lubricate tubing,
airway, and nasal opening prior to
performing any nasal or oral intubation.
Failure to do so will make intubation very
difficult and is likely to result in damage.
Do not insert liquids or spray silicone oil
into the mouth and airway.
AIRWAY SOUNDS
LUNG SOUNDS
Use the Detail tab parameter controls to
change the audible respiratory sounds on
the simulator.
Use the Detail tab parameter controls to
change the upper airway sounds on the
simulator.
| Premie HAL | User Guide | 101
BILATERAL CHEST RISE
Set the respiratory rate higher than zero to
enable automatic bilateral chest rise and fall.
Cardiac
HEART SOUNDS
Use the Detail tab parameter controls to
change the audible heart tones on the
simulator.
Disable the right or left lung individually.
Heart sounds are synchronized with the
heart rate and selectable cardiac rhythms.
PULMONARY VENTILATION
Ventilate the simulator using a bag valve
mask or a mechanical ventilator. Set the
respiratory rate to “0” to display chest rise
during ventilation and receive feedback on
the CPR window. For more information on
the CPR trainer, go to page 95.
ECG MONITORING AND
ELECTRICAL THERAPY
Conductive skin sites allow the attachment
of real EKG electrodes. This feature permits
the provider to track cardiac rhythms with
real medical equipment just like with a
human patient.
Use the virtual shock panel to simulate the
administration of electrical therapy via
software. To enable the virtual shock panel
feature, go to page 85.
Warning: Do not physically pace or
defibrillate Premie HAL with real medical
equipment. Doing so will damage the
electrical components.
102 | User Guide | Premie HAL |
CHEST COMPRESSIONS
From the CPR trainer window, monitor the
cadence and force of chest compressions
applied by the provider. For more
information on the CPR trainer, go to page
95.
Circulation
PALPABLE PULSES
Palpable
pulses
(fontanel,
brachial,
umbilical, and femoral) are dependent on
blood pressure.
INTRAVENOUS ACCESS
Bilateral IV training arms allow for
intravenous infusions as well as drawing
fluids. Use a flashlight to detect veins in the
dorsum of the hand.
Warning: Use only Gaumard’s provided
simulated blood. Any other simulated
blood brand containing sugar or any
additive may cause blockage and/or
interruption of the vasculature system.
Follow the steps below to fill the IV
vasculature for drawing fluids.
1.
Fill the modified syringe with water or
diluted Gaumard simulated blood.
2.
Connect the syringe into the fill port
and the drain connector to the drain
port as shown.
3.
Slowly push the fluid into the IV circuit
until it begins to flow out of the drain
connector.
4.
Remove the fill syringe and drain
connector. The self-sealing ports will
keep the fluid inside the veins.
Repeat the procedure to fill the IV
vasculature on the lower leg. Use a
flashlight to detect veins.
For simulation of high volume
infusions, it is necessary to leave the
drain tube attached and run it to a
suitable outlet or container.
| Premie HAL | User Guide | 103
INTRAOSSEOUS ACCESS
4.
Insert the fluid filled bone back into the
holder.
5.
Replace the skin and palpate tibial
tuberosity.
6.
Insert the IO device into the tibia bone
to perform an exercise. Notice the
decrease in needle resistance as it
passes into the bone marrow cavity.
Remove stylet, aspirate bone marrow,
and infuse fluids.
Establish intraosseous infusions access to
administer fluids and medications. To use
this feature, follow these simple steps:
1.
2.
3.
Remove the skin from the leg to access
tibia bone insert.
Lift the tibia insert out of the holder.
Hold the tibia bone vertically and inject
2cc of fluid through the rubber stopper.
Air and excess fluid are purged through
the vent port near the top of the bone.
Following the procedures, aspirate infused
fluids using an empty syringe through the
rubber stoppers. To extend the life of each
bone insert, seal puncture marks with
cement glue and leave to dry before reinserting them into the holder.
104 | User Guide | Premie HAL |
Systemic
CYANOSIS
Control and program the visible cyanosis on
the simulator. Use the Model tab to
automate the change in cyanosis as the
provider performs CPR intervention. For
more information on the Model feature, go to
page 95.
Warning: Do not remove umbilical cord
while Premie HAL® is in operation. To
remove the umbilical cord, first turn the
simulator off (by clicking on File, Exit on
the GaumardUI software), or set the
manikin
on
STAND-BY
mode.
Replacement of cords should also be
done while the manikin is turned off or
set on STAND-BY mode.
TEMPERATURE PROBE
The temperature reading on the vital signs
monitor is displayed when a temperature
probe is placed on the lower right quadrant
of the abdominal area.
To enable the temperature sensor detection
feature, go to Setup>Options>Neonate
features Tab. Checkmark “Use temp.
sensor” and click OK to save. The log panel
detects the placement of the sensor.
CATHETERIZATION
Catheterize or inject the umbilical cord. To
fill the umbilical cord with fluid, inject any of
the three blood vessels with 2 mL of water
using the syringe. For catheterization
exercises, use a 6 Fr urethral round tip
catheter lubricated with silicon oil.
The replaceable umbilical cord can be
trimmed or cut. Before removing or replacing
the umbilical cord after an exercise, turn off
the simulator by exiting the software
(File>Exit), or set the simulator on STANDBY mode. After the simulator is powered
down, the umbilical cord can be safely
unplugged. For information about ordering
replacement umbilical cords, go to page
125.
| Premie HAL | User Guide | 105
Other
VITAL SIGNS MONITOR (OPTION)
The Gaumard Monitors touchscreen display
simulates the functionality of a patient vital
signs monitor. Users can customize the type
of waveforms and scalars displayed, set
alarms, and display lab reports, x-rays, and
other files for the provider to access during
simulation.
The Gaumard Monitors vital signs system is
available in a mobile and desktop solution.
PRO + (OPTION)
The Pro+ system is an all-in-one session
recording and simulator control solution for
facilitators in a lab or mobile environment.
The built in GaumardUI software allows the
facilitator to control Premie HAL while
recording care provider interaction and
event logs. The upgrade replaces the
standard
tablet
with
a
convertible
touchscreen laptop loaded with the Pro+
environment and GaumardUI, (2) WIFI
enabled cameras, (1) motorized 180 view
USB camera and carrying case.
For more information on using the Pro +
system, refer to the documentation included
with the upgrade option.
For information on how to setup Gaumard
Monitors with GUI, please refer to the help
File included with the Gaumard Monitors
software.
106 | User Guide | Premie HAL |
Appendix
| Premie HAL | User Guide | 107
More about Scenarios
Factory Preset Scenarios
Scenario Title
Name
Scenario
Type
Operating
mode
1
Diabetic Mother
Diabetic Mother
Branching
Manual
2
Ductal Dependant Heart Lesion
HLHS
Linear
Manual
3
Group B Sepsis and Secondary
Apnea
Group B Sepsis
Branching
Manual
4
Hyaline Membrane Disease
HMD
Linear
Manual
5
Meconium Aspiration and
Pneumonia
Meconium
Aspiration
Branching
Manual
6
Necrotizing Enterocolitis
NEC
Branching
Manual
7
Normal
Normal
Branching
Manual
8
Patent Ductus Arteriosus
PDA
Branching
Manual
9
Pneumothorax
Pneumothorax
Linear
Manual
Meds Profile
1
Adenosine OD
Adenosine OD
Linear
Automatic
2
Adenosine SD
Adenosine SD
Linear
Automatic
3
Adenosine UD
Adenosine UD
Linear
Automatic
108 | User Guide | Premie HAL |
Premie HAL®
Diabetic Mother
A thirty two week infant is born to a 23 year old insulin dependant mother who was diagnosed at age
21. She is classified as Type B and has been followed in the high risk clinic. Suction and stimulation
have already been applied.
Appearance:
Cyanotic, gasping
respirations,
slightly limp
Diabetic Mother 1
HR 140, BP 45/26
RR 40, O2 Sat 83%
Dextrostick 20
A=0
P=2
G=1
A=0
R=2
-----5
Begin BVM with O2
Wait indefinitely for action
Diabetic Mother 2
“5 minutes later”
HR 160, BP 45/26
RR 80, O2 Sat 83%
Transition Time: 1 min
Cyanotic, grunting
and retracting
Transfer to NICU. Treat for RDS.
Give a mini bolus 2ml/kg of D10W
at 1 ml/min followed by an
infusion by peripheral IV
Wait indefinitely for actions
Diabetic Mother 3
HR 160, BP 45/26
RR 72, O2 Sat 88%
Dextrostick 40
Transition Time: 45 sec
Diabetic Mother 4
HR 160, BP 50/30
RR 60, O2 Sat 93%
Dextrostick 53
Transition Time: 30 sec
End
Correct Action
Begin Calcium
Gluconate IV to
treat hypocalcemia
A=2
P=2
G=2
A=1
R=2
-----9
Check Serum
Calcium
Incorrect Action
Failure to treat
hypocalcemia
A=2
P=2
G=0
A=1
R=2
-----7
Diabetic Mother 5
ST elevation
HR 160, BP 45/26
RR 72, O2 Sat 93%
Dextrostick 53
Transition Time: 30 sec
End
| Premie HAL | User Guide | 109
Premie HAL®
Ductal Dependant Heart Lesion
Hypoplastic Left Heart Syndrome
A 32 week premie remains cyanotic despite breathing 100% Oxygen
Appearance:
Pale and cyanotic
HLHS 1
HR 150, BP 60/35
Heart Sound: S4 gallop
RR 80, O2 Sat 83%
Begin prostaglandin E1 infusion
and arrange for transport to a
center that performs cardiac
catheterization and surgical
correction.
A=0
P=2
G=0
A=0
R=2
-----4
End
110 | User Guide | Premie HAL |
Chest X-Ray:
Cardiomegaly with increased
pulmonary blood flow
Action:
Echocardiogram confirms
hypoplastic left ventricle and aorta.
Premie HAL®
Group B Sepsis and Secondary Apnea
A mother with no prenatal care delivers a premature baby with foul smelling amniotic fluid in the
emergency room. The baby is being bagged with O2.
Appearance:
Limp, cyanotic,
EGA 32 weeks
BVM for 15 sec and
then transfer to nursery.
Place on ventilator with
a PEEP of 4 and a rate
of 30, deliver surfactant
and treat sepsis
A=0
P=1
G=1
A=0
R=0
-----2
Place UAC to
monitor ABG,
BP, and deliver
a fluid bolus
Same Vital Signs
“15 minutes later”
HR 110, BP 30/15
RR 30, O2 Sat 92%
Transition Time: 15 sec
Correct Actions
Immediate intubation
with O2
Sepsis 3
HR 110, BP 30/15
RR 30, O2 Sat 92%
Transition Time: 30 sec
Secondary Actions
A=0
P=1
G=1
A=0
R=0
-----2
Sepsis 1
HR 100, BP 30/15
RR 0, O2 Sat 80%
Temp. 37 Deg C
Incorrect Actions
Continue BVM and
chest compressions
Perform Actions
Death occurs because
secondary apnea is not
reversed by vigorous
ventilatory intervention.
No UAC
(peripheral IV only)
Same Vital Signs
“30 minutes later”
HR 110, BP 30/15
RR 30, O2 Sat 92%
Transition Time: 1 min
Administer Pressor
Wait indefinitely for action
End
Sepsis 2
“15 minutes later”
Asystole
Immediate transition
after a 1 min wait
End
Increasing the rate of
peripheral IV causes
infiltration and loss of IV
access. Baby deteriorates
to irreversible hypotension
and septic shock.
Sepsis 4
“15 minutes later”
HR 110, BP 35/28
RR 30, O2 Sat 92%
Transition Time: 15 sec
End
| Premie HAL | User Guide | 111
Premie HAL®
Hyaline Membrane Disease
A teenage mother with no prenatal care delivers a 1300g Infant in L/D
Appearance:
Cyanotic Decreased tone
Tachypnea with retractions
A=2
P=2
G=0
A=1
R=2
-----7
HMD 1
HR 140, BP 50/30
RR 70, O2 Sat 80%
Administer supplemental
oxygen and transfer baby to
the NICU
Wait indefinitely for actions
HMD 2
HR 140, BP 50/30
RR 60, O2 Sat 85%
Transition Time: 20 sec
For mild HMD, consider
nasal c-pap. For severe
nasal c-pap, consider HFV.
Obtain an ABG and chest
X-Ray. Start a peripheral
IV. Arterial blood appears
slightly dark so you
increase the FiO2
Intubate and administer
surfactant.
Wait indefinitely for actions
HMD 3
HR 150, BP 52/33
RR 55, O2 Sat 94%
Transition Time: 1 min
End
112 | User Guide | Premie HAL |
Suction and gentle
stimulation in the
radiate warmer has
already been applied
A=2
P=2
G=0
A=1
R=2
-----7
Premie HAL®
Meconium Aspiration and Pneumonia
A thirty one week infant is delivered with thick meconium stained amniotic fluid.
Appearance:
Cyanotic, limp
muscle tone
Color improves
Active Muscle Tone
Mild
Meconium aspiration1
NSR
HR 100, BP 70/50
RR 0, O2 Sat 70%
Perform endotracheal
intubation. Suction meconium
from below the cords. Gentle
stimulation and warming
Wait indefinitely for actions
Mild / Severe
Meconium Aspiration
Obtain Chest X-ray,
CBC, blood cultures
and start broad
spectrum antibiotics
Severe
Chest X-Ray
shows diffuse
bilateral infiltrates
Appearance:
Cyanotic
Retractions
Meconium aspiration2
HR 140, BP 70/50
RR 40, O2 Sat 85%
Transition Time: 15 sec
A=1
P=2
G=1
A= 1
R=2
-----7
A=0
P=2
G=0
A= 0
R=2
-----4
Meconium aspiration3
Grunting
HR 140, BP 70/50
RR 80, O2 Sat 70%
Transition Time: 15 sec
Reintubate and
add surfactant
therapy
End
End
| Premie HAL | User Guide | 113
Premie HAL®
Necrotizing Enterocolitis
A two week old premature infant began enteral feeds a week ago. He required some resuscitation at
birth for perinatal asphyxia and received antibiotics for possible sepsis. His nurse reports increasing
gastric residuals and a few episodes of apnea and increasing abdominal girths.
Suspect NEC. Order XRays of abdomen. Check
CBC and platelets.
Check stool for blood.
Repeat septic work up.
NEC1
Apnea, O2 Sat 75%
HR 182, BP 75/45
Appearance:
Cyanotic
Pale and lethargic with
abdominal distension.
Abdominal film shows
gas in the peritoneal
cavity indicating
intestinal perforation.
Abdominal film shows
gas in the bowel wall
(pneumatosis intestinalis)
Correct Actions
Stop feeding by
mouth, Start TPN,
and begin antibiotics
NEC2
“2 weeks later”
Resp. Pattern: Normal
RR 55, O2 Sat 96%
HR 161, BP 51/32
Transition Time: 2 min
End
114 | User Guide | Premie HAL |
Perform actions
Begin enteral
feeding again
Intubate and provide
ventilatory support.
Treat for shock with
fluid and pressors.
Treat sepsis and
obtain emergency
surgical consult.
Incorrect Actions
Decrease enteral
feeding and delay
physical exam
and X-Ray
NEC3
“24 hours later”
RR 0, O2 Sat 70%
HR 142, BP 75/45
Transition Time: 45 sec
End
Premie HAL®
Normal
A mother is admitted to the hospital for preterm labor. She has had good prenatal care and her
dates show the infant to be approximately 32 weeks. She received two doses of antenatal steroids,
her membranes are intact and the baby’s Lecithin/Sphingomyelin (L/S) ratio is 1.9:1. She continues
to labor and the baby’s scalp pH is 7.5. Despite attempts to delay delivery she delivers a 1300g
infant. After suctioning and gentle stimulation, the baby begins to cry.
Normal 1
Sinus Rhythm
HR 140, BP 50/30
RR 50, O2 Sat 98%
Temp. 37 Deg C
Dextrostick 70
Appearance:
Acrocyanosis
Active movement
A=1
P=2
G=2
A=1
R=2
-----8
Correct Action
Supply O2 by blow-by
Perform Actions
Reflex bradycardia
results in unnecessary
BVM. Baby is
transferred to NICU for
evaluation and placed
in a oxy-hood with an
FiO2 of 40%
Incorrect Action
Prolonged suctioning
of posterior pharynx
Normal 2
HR 80, BP 50/30
RR 50, O2 Sat 98%
Transition Time: 30 sec
A=1
P=2
G=2
A=2
R=2
-----9
Same Vital Signs
Transition Time: 1 min
A=1
P=1
G=2
A=1
R=2
-----7
Transfer to NICU
Wait Time: 20 sec
Normal 3
HR 140, BP 40/35
RR 80, O2 Sat 98%
Temp. 38 Deg C
Dextrostick 50
Transition Time: 1 min
End
Wean from O2, place
in incubator, begin
enteral feedings with
pumped breast milk or
preterm formula.
Oxygen saturation
remains good with
feeding
Weeks later: In crib, temp.
stable, taking 45cc of
preterm formula or fortified
breast milk every three to
four hours, weight is 2000g.
No apneas or bradycardia.
Consider discharge to home
Start peripheral IV with
D10W and monitor pulse
oximetry.
Wait indefinitely for actions
Cyanosis
improving
Good color, reacts
to stimuli, and
sucks on pacifier
Normal 4
“24 hours later”
RR 50, O2 Sat 98%
HR 140, BP 40/35
Dextrostick 70
Transition Time: 2 min
End
A=2
P=2
G=1
A=2
R=2
-----9
| Premie HAL | User Guide | 115
Premie HAL®
Patent Ductus Arteriosus
On the second day of life, a premie who has had a good response to surfactant and ventilation
develops deteriorating vital signs.
Appearance:
Fair color, hyperactive
precordium and
bounding pulses.
ET tube clear
PDA1
Sinus Rhythm
HR 160, BP 40/30
Systolic Ejection Murmur
RR 42 (Ventilation)
O2 Sat 90%
Grunting Lung Sound
Confirm diagnosis
of PDA with
Echocardiogram
Improvement
after 24 hours
PDA2
HR 140, BP 58/40
RR 42 (Ventilation)
Heart Sound: Normal
Lung Sound: Normal
Transition Time: 30 sec
End
116 | User Guide | Premie HAL |
Increase PEEP
Restrict fluids
Begin Indomethacin IV
(up to 3 doses)
No Improvement
results in surgical
intervention
No improvement
after 24 hours
Same Vital Signs
End
Premie HAL®
Pneumothorax
This 32 week infant had no respiratory effort at birth and required intubation is now on a ventilator
with a setting of 40 The mother had good prenatal care and received two doses of antenatal
steroids prior to delivery.
Appearance:
Cyanotic
Chest film shows the
ET tube in the Right
Mainstem Bronchus
Pneumothorax 1
HR 180, BP 80/52
RR 40, O2 Sat 72%
Withdraw the ET tube slightly
Wait indefinitely for action
Pneumothorax 2
HR 165, BP 65/41
RR 40, O2 Sat 85%
Transition Time: 20 sec
Chest film confirms
development of
tension pneumothorax
A chest X-Ray needs to
be ordered to check the
tube placement.
Consider tension
pneumothorax.
Order repeat film and
try trans illumination.
Perform emergency needle
decompression followed by
chest tube placement
Wait indefinitely for actions
Pneumothorax 3
HR 160, BP 50/30
RR 40, O2 Sat 95%
Wait Time: 15 sec
End
| Premie HAL | User Guide | 117
Tips on Creating Scenarios
THINKING IN TERMS OF PALETTE ITEMS
As described previously, palette items represent complete or partial groups of settings that have
been stored as a single item. We learned how applying partial states will hold constant all settings
that are left unspecified.
Not only does it take time to customize the palette, but a very large palette also becomes difficult to
navigate. So, it is desirable to minimize the number of palette Items in each profile. To accomplish
this, an experienced facilitator tries to create items that are as generally applicable as possible and
can, thus, be applied to a wide range of scenarios. The key is to only include in your palette Items
the settings that are directly related to the physiological event represented by that palette Item.
SMART SCENARIOS
After reading the Details, Palette, and Scenarios sections of this guide, it should be clear how to
build a scenario. You may have already tried building your own or modifying some of the factory
presets. The following four guidelines will refine your ability to build the best possible scenarios.
1. How will the scenario begin?
The first thing to consider is the initial condition of the patient. Create a Palette Item to describe
this condition. Make sure that this first step in the scenario is a complete state that is, indicate
some selection for each and every available setting on the Details page. Remember that only the
settings you specify will cause a change in Premie HAL, and all other settings will remain constant.
So, by starting with a complete state, Premie HAL's condition will always be the same when the
scenario starts, regardless of what he was doing previously.
Likewise, the "transition duration" of the first step in the scenario should be zero, indicating that
changes are applied immediately.
There is one point that can cause confusion and warrants further explanation. It is an extension of
the above discussion of partial states. The issue is best illustrated through the following example:
Suppose that you are creating a Palette Item to start your scenario. In this case, you have decided
that the patient will be apneic. The question is, "How should the lung sounds be set?"
Most people's first inclination is to set the lung sounds to "none." This is incorrect, despite apnea.
Obviously, no lung sounds should be heard during apnea, but since you have already set
respiratory rate to zero, none will be. (Sounds are synchronized to the breathing cycle.)
What you are really setting here when you choose a lung sound is the condition of the lungs, given
respiratory drive. That is, if the patient's respiratory rate were changed from zero, what sound
would be heard? Assuming that the lungs themselves are normal in this scenario, you would
choose "normal" for the lung sound setting.
Then, as the scenario progresses, if the patient starts breathing, there will be no need to set the
lung sound again. It will already be set. The same principle applies to the heart sound and other
settings.
2. Include notes to guide the facilitator during the simulation.
It is common for scenario designers, especially those who act as facilitators, to neglect the
importance of notes in the scenario. They think that they will remember the learning objectives,
patient history, and other details at the time they are ready to conduct the simulation. They usually
don't, especially when revisiting a scenario months after creating it.
When you add "Wait" and "Wait Indefinitely" steps to a scenario, you have an opportunity to edit
the item description. Use this description field to hold notes to the facilitator. Typically, scenario
designers write notes in that space to indicate what the provider(s) or facilitator should be doing at
that point.
Further, when saving the scenario, you may edit the scenario description. This is the best place to
put patient history and any other longer notes and instructions.
3. Assume that providers will do the right thing.
118 | User Guide | Premie HAL |
Usually, you should create a scenario with the assumption that the providers will perform correctly.
As long as they do, the scenario can be allowed to continue.
Naturally, you must be prepared for what might happen to Premie HAL when providers deviate
from expectations. The consequences of such deviations can sometimes be included in the
scenario, punctuated by "Wait Indefinitely" items. In other cases, the simulation will require more
direct control by the facilitator via either the Palette or Details page.
4. Choose auto-response settings based on the scenario content and the objectives.
As you've seen, auto-responses can be used to free the facilitator’s attention. They also enhance
realism by presenting instant reactions to the care providers. On the other hand, sometimes it is
not possible or desirable to determine the responses before the simulation begins. Different
environments and applications call for different settings.
Some teaching practices are best done with the auto-response settings in Prompt mode.
Responses must be triggered by a vigilant facilitator. Though it is slower and requires more
attention, the benefit of Prompt over other modes is that the simulation can be allowed to go in any
direction, and it will be possible to choose the response on a case-by-case basis.
Other learning exercises require a higher degree of automation. For such applications, most
facilitators choose Auto mode for the auto-response settings. The key issue is standardized timing
of symptom presentation. A consistent, repeatable simulation is essential for fair assessment of
that care provider in relation to others and for the broader interpretation of results in the context of
training validation studies.
When in doubt, it is best to choose Prompt mode, in which the facilitator will be given direct control
of the responses as events are detected.
FILE STRUCTURE
Advanced users may find it helpful to understand the GaumardUI directory structure. With direct
file manipulation, one can easily move palette items and scenarios between profiles, as well as
move entire profiles from one computer to another.
PROFILES
In the GUI program folder is the “profiles” sub-folder (e.g. “C:\Program Files\Gaumard
Scientific\Gaumard User Interface\profiles\”). All user information is saved there, and it is the only
folder that should be modified manually. In the example shown, notice that there are 2 profiles in
this installation, “Default Profile,” and “Quick Start Scenarios.”
PALETTE ITEMS
Saved as “*.plt” files, palette items in each profile are located at the top-level of each profile folder.
To copy palette items from one profile to another, copy the .plt file found in the source profile folder.
| Premie HAL | User Guide | 119
SCENARIOS
Scenarios are stored as sub-folders within profile directories. Scenarios can also be transferred
between profiles by copying the scenario folder and its contents.
NEVER...
Modify files in the “resources” directory or those at the top-level of the “Gaumard User Interface”
directory.
Manipulate files or folders while the GaumardUI software is running.
Modify or delete “*.dll,” “*.scn,” or “*.sys” files.
120 | User Guide | Premie HAL |
Troubleshooting
Use the following table to find causes and solutions to a number of possible problems.
Symptom
Possible Cause
Solution
Communication
never gets
established or is lost
Battery is discharged
Turn off the software and plug “charger”
adapter to the simulator. The charger’s LED
will turn green when the simulator is
completely charged. Do not turn on the
GaumardUI software until the charging
process is complete.
(blinking communication indicator is
consistently red)
The adapter labeled “Power Supply” does
not recharge the battery.
Disconnect the “Power Supply” and follow
the charging procedure explained above.
Computer is too far away
from simulator
Get simulator closer to computer.
RF module is not
connected
Close the GaumardUI software and
connect the USB RF module to the tablet
computer.
Trying to communicate
with a different simulator
After clicking the GaumardUI icon, select
the name of the applicable simulator and
click “Start”.
On the menu bar go to Setup> Options>
Environment and select FIXED. Then, enter
the simulator’s serial number in the text
box. Finally, restart the software.
Multiple simulators are on
at the same time.
Select different channels for each of the
simulators, and then turn them on one at a
time, meaning: Wait until a link has been
established between the tablet and
the simulator (the yellow window goes
away).
Only after that, start running the
GaumardUI software in the second tablet,
and so on for the rest of the simulators. To
do so, go to menu Setup Options
Environment Select “Auto change to
channel: #” (# = number from 1 – 11).
All others
Close the GaumardUI software and unplug
the RF module for at least 5 seconds, then
plug it back in. Restart the software and
wait for initialization. On the menu bar go to
Setup>Options>Environment and select
FIXED. Then, enter the simulator’s serial
number in the text box. Finally, restart the
software.
| Premie HAL | User Guide | 121
Symptom
Possible Cause
Solution
Simulator doesn’t
run for the time
specified on the
manual
Battery not charged,
charger requires reset
Turn off the software and unplug “charger”
adapter from the wall and the simulator for
1 minute. Reconnect the “charger” to the
wall and the simulator. Unplug the charger
when the charger’s LED turns green
indicating that the simulator is completely
charged. Do not turn on the GaumardUI
software until the charging process is
complete.
Simulator doesn’t
respond to any command even that blinking communication
indicator is consistently green
The computer is properly
communicating with a
different simulator.
On the menu bar go to Setup> Options>
Environment and select FIXED. Then, enter
the simulator’s serial number in the text
box. Finally, restart the software.
Commands are
taking longer than
usual to take effect
or simulator is not
reporting every
action (blinking communication indicator
is consistently
yellow)
Distance between
computer and simulator is
reaching its limit
Get simulator closer to computer or move
away from obstructions
GaumardUI has set
the power mode to
STAND-BY
automatically
or
there are too many obstructions between (walls,
etc)
There’s too much RF interference either from
another Gaumard
tetherless simulator in the
vicinity or an RF radiator.
Try changing the RF channel by going to
the menu for Setup Options
Environment Select “Auto change to
channel: #” (# = number from 1 – 11).
The battery on the
simulator is depleted
Turn off the software and plug “charger”
adapter to the simulator. The charger’s LED
will turn green when the simulator is
completely charged. Do not turn on the
GaumardUI software until the charging
process is complete.
The adapter labeled “Power Supply” does
not recharge the battery.
"RF module not
found" message is
displayed when
GaumardUI is started
RF module not connected
Connect the RF module to any USB port.
RF module not identified
by the computer
Close the software and disconnect the RF
module for at least five seconds, then plug
it back in and restart the software
Chest compressions
are not properly
detected or not
detected at all
Is the communication indicator panel consistently
yellow?
See solution above in section making
reference to “blinking communication
indicator is consistently yellow”
Is the respiratory rate set
to “0 / min”? Chest compressions are only
detected when the
respiratory rate is set to 0
per minute (0 / min).
Otherwise they are ignored
Set respiration rate to zero
122 | User Guide | Premie HAL |
Symptom
Artificial ventilations
are not properly
detected or not
detected at all
Simulator’s chest
does not rise with
artificial ventilation
(e.g. BVM)
Low chest rise (or no
chest rise at all)
while breathing
Possible Cause
Solution
All others
See “Calibration Wizard” section inside
User’s Manual
Is the communication indicator panel consistently
yellow?
See solution above in section making
reference to “blinking communication
indicator is consistently yellow”
All others
See “Calibration Wizard” section inside
User’s Manual
Simulator not running
In some simulators, the trachea is
disconnected from the lungs when they are
not on.
Disable lung/s
Enable the lungs from “Detail” page on the
GaumardUI software
Wrong settings or disabled
lungs
Make sure lungs are enabled and both
respiration rate and inspiration percent are
different than “0”. Try changing the
respiration rate to a different value, and if
still nothing happens, try turning the restart
the simulator.
Select “Quick Start Scenarios” when
starting the software.
Pre-built scenarios
don’t show up
Should user forget to do so, there’s no
need to shut down the software and open it
again in order to load the pre-built
scenarios. Go to “File/Profile” menu and
then select “Modeled Scenarios”
A sound is absent or
is not heard at
desired volume level
Volume not set to user’s
criterion.
Every sound has a volume control. Play
with the volume control to get it to the
desired level.
| Premie HAL | User Guide | 123
Diagnostics
On the menu bard, click Help>Diagnostics to open the module diagnostics window. The diagnostics
window is used to test the status of each of the modules equipped in the simulator during
troubleshooting. Click "Check All Modules" to perform a full status test.
Active modules report light blue, and inactive modules report black. If there is a specific module
that fails to respond please contact customer support.
Modules for features not installed on the simulator will report inactive.
To perform an individual module check, first select the module and click “Check Single Module”.
Notice that the name of the module is displayed on the right column when it is selected.
124 | User Guide | Premie HAL |
Replacement Parts
Contact Gaumard Scientific for a complete list of consumables and replacement parts and their prices.
C=Consumables; R=Replacements; A=Accessories; U=Upgrades; M = Factory Repair ONLY
Item ID
Name
Type
S3009.001
A/C Virtual Monitor
A
A/C Powered 17" Touch Screen monitor and
desktop
S3009.002
D/C Virtual Monitor
A
D/C Powered 12" Touch Screen Mobile
Monitor with stylus
S3009.010
Battery
C
Rechargeable battery
S3009.011
Battery Charger
R
100-240 V AC battery charger with label
S3009.020
Umbilical Cord Kit
C
Set of 3
S3009.023L.M
Lower Left Arm
C
Lower left IV arm, medium color
S3009.023R.M
Lower Right Arm
C
Lower IV right arm, medium color
S3009.026L.D
Lower Left Leg Skin Cover
C
S3009.026L.L
Lower Left Leg Skin Cover
C
S3009.027L.L
Lower Left Leg
R
S3009.029R.L
I/O Leg Skin Cover
C
S3009.031
I/O Tibia Bones
C
I/O Tibia bones
S3009.048
Neonatal Filling Kit
R
Fluid dispensing syringe for Premie HAL
S3009.060
Simulator Transport Case
R
Soft storage and transport case
S3009.080
Simulated Blood Concentrate
C
S3009.081
Silicone Oil
C
S3009.200
Audio &
System
S3009.204
Tablet PC
R
Wireless tablet PC with stylus control
S3009.205
Bump Case
R
Bump case for tablet PC
S3009.206
RF Module
R
Radio Frequency
connector
S3009.EXW
Two Year Extended Warranty
A
Extended warranty for years Two AND
Three
S3009.INST
In-Service Training
A
Day of in-service training and installation
Video
Recording
Description
Oil-based silicone lubricant
A
Module
with
USB
| Premie HAL | User Guide | 125
Warranty
EXCLUSIVE ONE-YEAR LIMITED WARRANTY
Gaumard warrants that if the accompanying Gaumard product proves to be defective in material or workmanship
within one year from the date on which the product is shipped from Gaumard to the customer, Gaumard will, at
Gaumard’s option, repair or replace the Gaumard product.
This limited warranty covers all defects in material and workmanship in the Gaumard product, except:
Damage resulting from accident, misuse, abuse, neglect, or unintended use of the Gaumard product;
Damage resulting from failure to properly maintain the Gaumard product in accordance with Gaumard product
instructions, including failure to property clean the Gaumard product; and
Damage resulting from a repair or attempted repair of the Gaumard product by anyone other than Gaumard or a
Gaumard representative.
This one-year limited warranty is the sole and exclusive warranty provided by Gaumard for the accompanying
Gaumard product, and Gaumard hereby explicitly disclaims the implied warranties of merchantability, satisfactory
quality, and fitness for a particular purpose. Except for the limited obligations specifically set forth in this one-year
limited warranty, Gaumard will not be liable for any direct, indirect, special, incidental, or consequential damages,
whether based on contract, tort, or any other legal theory regardless of whether Gaumard has been advised of the
possibilities of such damages. Some jurisdictions do not allow disclaimers of implied warranties or the exclusion or
limitation of consequential damages, so the above disclaimers and exclusions may not apply and the first purchaser
may have other legal rights.
This limited warranty applies only to the first purchaser of the product and is not transferable. Any subsequent
purchasers or users of the product acquire the product “as is” and this limited warranty does not apply.
This limited warranty applies only to the products manufactured and produced by Gaumard. This limited warranty
does not apply to any products provided along with the Gaumard product that are manufactured by third-parties. For
example, third-party products such as computers (desktop, laptop, tablet, or handheld) and monitors (standard or
touch-screen) are not covered by this limited warranty. Gaumard does not provide any warranty, express or implied,
with respect to any third-party products. Defects in third-party products are covered exclusively by the warranty, if
any, provided by the third-party.
Any waiver or amendment of this warranty must be in writing and signed by an officer of Gaumard.
In the event of a perceived defect in material or workmanship of the Gaumard product, the first purchaser must:
Contact Gaumard and request authorization to return the Gaumard product. Do NOT return the Gaumard product to
Gaumard without prior authorization.
Upon receiving authorization from Gaumard, send the Gaumard product along with copies of (1) the original bill of
sale or receipt and (2) this limited warranty document to Gaumard at 14700 SW 136 Street, Miami, FL, 33196-5691
USA.
If the necessary repairs to the Gaumard product are covered by this limited warranty, then the first purchaser will pay
only the incidental expenses associated with the repair, including any shipping, handling, and related costs for
sending the product to Gaumard and for sending the product back to the first purchaser. However, if the repairs are
not covered by this limited warranty, then the first purchaser will be liable for all repair costs in addition to costs of
shipping and handling.
EXTENDED WARRANTY
In addition to the standard one year of coverage, the following support plans are available:
Two-Year Extension (covers second and third years)
Call for pricing (USA only)
126 | User Guide | Premie HAL |
Contact Us
E-mail Technical Support: [email protected]
E-mail Sales and Customer Service: [email protected]
Phone:
Toll-free in the USA: (800) 882-6655
Worldwide: 01 (305) 971-3790
Fax: (305) 667-6085
Before contacting Tech Support you must:
1.
Have the simulator’s Serial Number (located in the left leg under the IM site)
2.
Access to the simulator and the control computer if troubleshooting is needed.
Post: Gaumard Scientific
14700 SW 136 Street
Miami, FL 33196-5691
USA
Office hours: Monday-Friday, 8:30am - 4:30pm EST (GMT -4 Summer Time)
Gaumard®, Premie™, and HAL® are trademarks of Gaumard Scientific Company, Inc.
©Gaumard Scientific Company, 2012. All rights reserved.
All rights reserved.
| Premie HAL | User Guide | 127