1
OBDA plugin for NeOn Toolkit User Guide
Mariano Rodrı́guez-Muro
Manfred Gerstgrasser
Free University of Bozen-Bolzano
31 of October 2008
Contents
1 User Guide
1.1 Installation . . . . . . . . . . . . . . . . . .
1.1.1 Requirements . . . . . . . . . . . . .
1.1.2 Obtaining the software . . . . . . . .
1.2 OBDA files . . . . . . . . . . . . . . . . . .
1.3 OBDA Perspective . . . . . . . . . . . . . .
1.4 OBDA View . . . . . . . . . . . . . . . . . .
1.5 Visual guide for the OBDA view . . . . . .
1.6 The IndividualQueriesView . . . . . . . . .
1.7 Visual guide for the IndividualQueriesView
.1
The OBDA extension to DIG 1.1 . . . . . .
2
.
.
.
.
.
.
.
.
.
.
.
.
.
.
.
.
.
.
.
.
.
.
.
.
.
.
.
.
.
.
.
.
.
.
.
.
.
.
.
.
.
.
.
.
.
.
.
.
.
.
.
.
.
.
.
.
.
.
.
.
.
.
.
.
.
.
.
.
.
.
.
.
.
.
.
.
.
.
.
.
.
.
.
.
.
.
.
.
.
.
.
.
.
.
.
.
.
.
.
.
.
.
.
.
.
.
.
.
.
.
.
.
.
.
.
.
.
.
.
.
.
.
.
.
.
.
.
.
.
.
.
.
.
.
.
.
.
.
.
.
.
.
.
.
.
.
.
.
.
.
.
.
.
.
.
.
.
.
.
.
.
.
.
.
.
.
.
.
.
.
3
3
3
3
5
6
7
8
10
11
13
1 User Guide
1.1 Installation
1.1.1 Requirements
1. Java 1.5 or above
2. NeOn-Toolkit 1.2
3. An OBDA Enabled Reasoner
Note: The OBDA Plugin requires an OBDA enabled reasoner for query answering
support. An OBDA enabled reasoner is a DL reasoner that supports the OBDA architecture and implements the OBDA-extension to DIG used by the OBDA Plugin. At the
moment of writing this manual, the only the DIG-Server for QuOnto works with this
architecture.
The DIG server for the QuOnto reasoner is available for academic use with agreement to the authors. Please contact them directly to obtain a copy of the reasoner.
Information about QuOnto can be found at http://www.dis.uniroma1.it/quonto/
1.1.2 Obtaining the software
The OBDA Plugin for the NeOn toolkit can be downloaded from:
http : //obda.inf.unibz.it/neon − plugin/
The package is composed by
• The OBDA-PLUGIN. An open source plugin for the NeOn toolkit which provides
facilities to create an associate RDBMS data sources and source-ontology mappings
to ontologies. It is built on top of the OBDA-API-PLUGIN and the DIG-PLUGIN.
• The OBDA-API. An open source library that allows for the manipulation of data
sources and mappings.
• The OBDA-API-PLUGIN. An open source Neon plugin which exposes the OBDAAPI classes to the Neon Toolkit, enabling third parties to use the API in their own
projects.
• The DIG-PLUGIN. A Neon Toolkit plugin which enables interaction with DIG
reasoners. Developed by the University of Karlsruhe in cooperation with the Free
University of Bozen Bolzano.
3
The package can be downloaded in binary format as well as source code. In the
following sections we will explain the procedure for compiling the sources into binaries
and the binary installation procedure.
Compiling the sources
Requirements. Compilation of the plugins from the sources requires:
• Java JDK 1.5 or greater.
• A properly installed java ANT system.
• The contents of the ntk1.2.0-2008-10-02-datamodel package from the NeOn toolkit
developers package.
• The contents of the ntk1.2.0-2008-10-02-plugins package from the NeOn toolkit
developers package.
1. Unpack the source package onto any folder. From now on we will refer to this
folder as workspace
2. Open the file workspace
build
build.xml with any text editor and edit the 3 first properties as specified in the
file. The property dir.workspace is the folder where the sources where unpacked.
The property dir.eclipseplugins is the folder that hold libraries of the eclipse plugins
required to build the NeOn toolkit (e.g., the contents of the plugins folder of the
ntk1.2.0-2008-10-02-datamodel package of the NeOn toolkit sources). The property
dir.neoneclipseplugins is the folder that holds the libraries of the main plugins of
the NeOn toolkit (e.g., the contents of the workspace folder of the ntk1.2.0-200810-02-plugins package of the NeOn toolkit sources).
3. Open a terminal window and CD into the workspace
build folder.
4. Build the sources by invoking the command: ant
After building the sources one can proceed with the binary installation steps.
Binary Installation steps
1. Close the NeOn Toolkit.
2. Copy the folders
• dig plugin 1.0.0,
• inf.unibz.it.obda.neon 1.0.0 and
• inf.unibz.it.obda.neon.api 1.0.0
into the plugin folder of your NeOn-Toolkit installation
4
Verifying the installation
1. Start your NeOn-Toolkit installation
2. Verify that a new perspective called OBDA perspective was added to the perspective lists and open it.
3. Verify that when opening the perspective a new menu item called OBDA is added
to the main menu bar
4. Verifiy that a folder called OBDA which contains two views called Individuals
Queries View and OBDA View was added the under Window → Show View
Updating an existing installation. To update a previous version of the OBDA plugin
simply remove the folders of the old version from the plugins folder of your NeOn-Toolkit
installation and repeat the installation steps for the new versions.
Remove the OBDA Plugin. To delete the OBDA plugin from your current NeOnToolkit installation simply remove the 3 plugins included in the package from the plugins
folder of you installation.
1.2 OBDA files
The OBDA plugin uses so called .obda files to store and load information about data
sources, mappings and queries. These files are created automatically for each ontology.
More over, each time the active ontology is changes, all OBDA data for the current
ontology is stored in its’ .obda file and the stored data for the newly selected ontology
is loaded from its .obda file.
The .obda files are located in a folder named obda located in each project folder with
in the workspace of the NeOn Toolkit installation. The .obda files are named as the
5
owl file of the ontologies related to them. For example if we have an owl-file called
ontology1.owl the corresponding obda-file will be ontology1 owl.obda.
If you already have an .obda file and you want to use it within the NeOn-Toolkit, you
can copy it into the obda folder of the project to which the ontology belongs. Note: the
.obda file has to explicitly relate the data sources to the ontology, for which you want to
use it. This can be easily checked by opening the file and comparing the ’DatasourceUri’
of the data source elements with the actual URI of the ontology.
1.3 OBDA Perspective
The default installation of the OBDA plugin adds a new perspective called ’OBDA
Perspective’. Switching to it opens all the needed components for working with the
OBDA Plugin. Specifically, it opens the OBDA View, the Individual Query View and
an output console.
The OBDA View is the main GUI component of the plugin and allows you to define
one or more data sources, to specify their access parameters and to create mappings,
which relate the data in those data sources to the Classes and Properties of the ontology.
The Individual Queries View provides a way to send and visualize the result of nonstandard ABox/individual centric queries to a reasoner. It also provides means to manage these queries (save/organize) plus visualize the results obtained from the reasoner.
The output console is mainly used for showing the progress of different operations.
Furthermore the perspective adds an additional menu item called ’OBDA’ to the main
menubar. This menu allows you to a) trigger a synchronization action with the server,
b) to enable an disable the OBDA synchronization, c) to change the server’s connection
parameters and d) to disable or enable reasoning in the server during query answering.
In case you changed something in the perspective and you want have back its initial
look, you can reset the perspective by right clicking on the OBDA perspective button in
the top right corner of the window and selecting ’reset’ in the appearing popup menu.
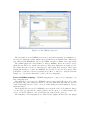
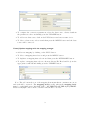
1.4 OBDA View
Overview. The OBDA View is the core GUI component of the OBDA plugin. It allows
you to define one or more data sources, to specify their access parameters and to create
mappings, which relate the data in those data sources to the Classes and Properties of
the ontology.
The default installation of the plugin allows you to create RDBMS data sources accessible through JDBC. Associated to a RDMBS data source one can define a set of
semantic mappings. These are on the form described in the OBDA extension to DIG
1.1, that is, a query over the ontology and a query over the data source. Specifically,
in the case for RDBMS data sources, a mapping is composed by a SQL query over the
RDBMS source (the mapping’s body) and a the query over the ontology is Conjunctive
Query (CQ) in data log syntax (the mappings head).
6
Figure 1.1: The OBDA perspective
The information about RDBMS data sources and their mappings is transmitted to
the reasoner during the synchronization stage in which it gets translated into DIG in the
way defined in the RDBMS Module for the OBDA extension to DIG 1.1 (see Appendix).
The OBDA plugin also adds facilities to inspect RDBMS data sources and to query
them directly. These two features are intend to help users during the modeling process.
We clarify that the reasoner doesnt intervene when using these features, instead the
plugin will attempt to contact the RDBMS directly and execute the users query. This
is helpful to verify the connection parameters specified, to inspect to databases schema
during or to test queries which later could be used for mappings.
Syntax of RDBMs mappings. RDBMS mappings are composed by a mapping body
and a mapping head.
The mapping body accepted for RDBMS sources is any valid SQL query. Note that
the plugin doesn’t parse this query, therefore, the user must make sure that the query is
really a valid SQL query in order to avoid problems during the synchronization or query
answering stages.
The mapping head accepted for RDBMS sources is in the form of a Conjunctive Query
over the ontology expressed in a datalog syntax. For the query to be valid, it must only
refer to predicates (Classes or Properties) already defined in the ontology.
The semantics of the mappings is not defined in the plugin. In that sense, the plugin
7
adopts the same position as the RDBMS module for the OBDA extension to DIG 1.1 in
which the semantics of the mappings is left undefined so that implementors of OBDA
reasoners are able to define the specific semantics they use. In short, it is crucial to
understand the semantics implemented by the reasoner as it defines the behavior of the
OBDA system modeled with the plugin.
Some valid sample mappings The following are a few examples of valid mappings. We
do not describe the ontologies nor the schemas of the databases as are self explanatory.
We stress that the exact meaning of these mappings depends solely on the semantics
implemented in the reasoner.
Example 1.4.1 A simple mapping for a class:
HEAD: Person(getPerson($id))
BODY: SELECT id FROM employee
Example 1.4.2 A mapping for an object property involving the a join between of two
tables and renaming of variables:
HEAD: worksFor(getPerson($employeeid), getPerson($managerid))
BODY: SELECT employee.id AS employeeid, area.managerid AS managerid
FROM employee, area WHERE employee.area = area.id
Example 1.4.3 A simple mapping for a datatype property:
HEAD: hasID(getPerson($id), $id)
BODY: SELECT $id FROM employee
Example 1.4.4 A complex class/property mapping asserting membership in a class
and participation in an object property at the same time.
HEAD: Woman(getPerson($childid)),
Daugther(getPerson($childid)),
daughterOf(getPerson($childid), getPerson($parentid))
BODY: SELECT childid, parentid FROM childof;
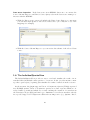
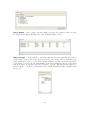
1.5 Visual guide for the OBDA view
Data source manager The data source manager allows one to add, delete and modify
data sources related to an ontology. The first step is to select the ontology to work with.
Once the ontology is selected all already existing obda data related to this ontology is
loaded automatically and than one can start modifying it.
8
• To configure the connection parameters, select the data source, edit its details in
the parameters editor and finally press the UPDATE button.
• To add a new data source click on the PLUS-button and enter a name for it.
• To delete a data source select it and than press the MINUS-button and the data
source will be removed.
Create/Update mappings with the mapping manager
• Add a new mapping by clicking on the PLUS button.
• To delete a mapping first select it and press the MINUS button.
• To duplicate a mapping first select it and then press the DUPLICATE button.
• To update a mapping first select it, then modify its ID, Head and Body in the
appropriate textfields and finally press the UPDATE button.
Note: The red bar in the icon of the mapping heas means that it contains some errors
and it should be reviewed. The mapping head is a CQ, wheras the mapping body
must be a valid SQL query. DO NOT USE ’;’ AT THE END OF THE SQL QUERIES.
That is a MySQL console client convention and should be avoided.
9
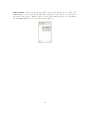
Data source inspection. If the data source is an RDBMS data source one can use the
Source Schema Inspector and Direct Source Query tabs in the data source manager to
interact with the RDBMS.
• With the Direct source query tab indside the Data Source Inspector component
you can issue SQL queries to the selected data source. (To verify the body of the
mappings for example)
• With the Source Schema Inspector you can review the schema of the selected data
source.
1.6 The IndividualQueriesView
The IndividualQueriesView provides a way to send and visualize the result of nonstandard ABox/individual centric queries to a reasoner. It also provides means to manage these queries (save/organize) plus visualize the results obtained from the reasoner.
At the moment, the plugin supports Union of Conjunctive Queries (UCQs) expressed
in a SPARQL syntax. Union of Conjunctive queries are a class of queries which is considered rather powerful and which are recently catching the attention of researchers in
the Description Logics (DL) and Ontology communities. Several reasoners have already
incorporated support for UCQs as an additional reasoning service (e.g., QuOnto, Racer,
10
Cerebra Engine, Pellet, KAON2, SHER). An important remark is that answering conjunctive queries about individuals over description logics ontologies is a complex problem
which, in general, requires complex and resource (time/memory) consuming algorithms,
therefore reasoners impose restrictions regarding the semantics and the structure of
queries. It is of great importance to understand these, as the answers obtained from the
reasoner depend directly on them.
UCQs written in this tab are sent to the reasoner through DIG. In order to acomplish
this, the plugin translates the queries into equivalent DIG 1.2 conjunctive queries. This
enables the OBDA plugin to interact with any reasoner offering UCQ answering services
as long as they implement the DIG 1.2 CQ extensions.
Some sample UCQs. The following are a couple of UCQs written as SPARQL queries
and their intended meaning (under traditional semantics).
Retrieve all parents and their children.
SELECT ?x ?y WHERE { ?x :hasChild ?y }
Retrieve all women and their children.
SELECT ?x ?y WHERE { ?x :hasChild ?y . ?x rdf:type Woman }
Retrieve all women which have a child which is itself a women with a child
SELECT ?x WHERE { ?x :hasChild ?y . ?x rdf:type Woman.
?y :hasChild ?z . ?y rdf:type Woman. }
Retrieve all women ( which have a child OR all women which work )
SELECT ?x WHERE { { ?x :hasChild ?y . ?x rdf:type Woman. }
{ ?x rdf:type Woman. ?x rdf:type Worker }
1.7 Visual guide for the IndividualQueriesView
Union of Conjunctive Queries. The basic query facility offered by the plugin is the
SPARQL query tab. Through this tab Union of Conjunctive Queries can be issued to
the reasoner. The UCQs are written in a limited SPARQL syntax. Write the query
in the input box and press the EXECUTE button. This will open a console window
and where the progress of the operation is shown. Once the dialog indicates that the
responses were retrieved, go back to the Individual Query View, where the results are
shown.
11
Query Results. Once a query was succesfully executed, the results, if there are any,
are shown in the Query Results part of the Individual Query View.
Query manager.
It is possible to save frequently used queries using the save button
on the right bottom corner of the query area, next to the execute button. A small popup
window will apear, were you can enter a unique identifier for this query and may add it
to an exiting or new group. By rightclicking on the Query Manager panel a popup menu
will apear and you can delete the selected querie or group. The queries saved there are
included in the .obda file for permanent storage, which means they will be available with
the project.
12
Query history. In the query hisotry panel, all executed queries are recorded. By
rightclicking on it a popup menu will apear; with the delete button one can remove
the selected query, the configure button opens a dialog window, where one can change
the maximum number of recorded query in the history.
13
.1 The OBDA extension to DIG 1.1
The OBDA Plugin for NeOn implements a combination of several standards for interaction with DL reasoners, specifically they implement the DIG 1.1 Interface, the DIG 1.2
extensions and the OBDA extensions for DIG 1.1. The later is an extension to the
original DIG protocol developed with in the TONES project and aimed at standardizing
access to reasoners which offer OBDA related functionality.
The OBDA extension to DIG 1.1 was designed to accommodate for the different
characterizations of the OBDA scenario. Specifically, the standardization proposal was
formulated with the following requirements in mind:
• To based on already available and used standards.
• To separate of the general OBDA related functionality and the details related to
specific types of sources and mappings.
• To be flexible with respect to the types of data sources allowed.
• To be flexible with respect to syntax and semantics for mapping formalisms.
• To be open standard which is easily available and extensible.
The resulting extension was presented in [?] and a full description is available at its’
website1 .
1
http://obda.inf.unibz.it/dig-11-obda/
14