1
Microchip Application
MaestroTM Software
User’s Guide
2003 Microchip Technology Inc.
DS51328A
Note the following details of the code protection feature on Microchip devices:
•
Microchip products meet the specification contained in their particular Microchip Data Sheet.
•
Microchip believes that its family of products is one of the most secure families of its kind on the market today, when used in the
intended manner and under normal conditions.
•
There are dishonest and possibly illegal methods used to breach the code protection feature. All of these methods, to our
knowledge, require using the Microchip products in a manner outside the operating specifications contained in Microchip's Data
Sheets. Most likely, the person doing so is engaged in theft of intellectual property.
•
Microchip is willing to work with the customer who is concerned about the integrity of their code.
•
Neither Microchip nor any other semiconductor manufacturer can guarantee the security of their code. Code protection does not
mean that we are guaranteeing the product as “unbreakable.”
Code protection is constantly evolving. We at Microchip are committed to continuously improving the code protection features of our
products. Attempts to break microchip’s code protection feature may be a violation of the Digital Millennium Copyright Act. If such acts
allow unauthorized access to your software or other copyrighted work, you may have a right to sue for relief under that Act.
Information contained in this publication regarding device
applications and the like is intended through suggestion only
and may be superseded by updates. It is your responsibility to
ensure that your application meets with your specifications. No
representation or warranty is given and no liability is assumed by
Microchip Technology Incorporated with respect to the accuracy
or use of such information, or infringement of patents or other
intellectual property rights arising from such use or otherwise.
Use of Microchip’s products as critical components in life
support systems is not authorized except with express written
approval by Microchip. No licenses are conveyed, implicitly or
otherwise, under any intellectual property rights.
Trademarks
The Microchip name and logo, the Microchip logo, KEELOQ,
MPLAB, PIC, PICmicro, PICSTART, PRO MATE and
PowerSmart are registered trademarks of Microchip Technology
Incorporated in the U.S.A. and other countries.
FilterLab, microID, MXDEV, MXLAB, PICMASTER, SEEVAL
and The Embedded Control Solutions Company are registered
trademarks of Microchip Technology Incorporated in the U.S.A.
Accuron, Application Maestro, dsPIC, dsPICDEM,
dsPICDEM.net, ECONOMONITOR, FanSense, FlexROM,
fuzzyLAB, In-Circuit Serial Programming, ICSP, ICEPIC,
microPort, Migratable Memory, MPASM, MPLIB, MPLINK,
MPSIM, PICC, PICkit, PICDEM, PICDEM.net, PowerCal,
PowerInfo, PowerMate, PowerTool, rfLAB, rfPIC, Select Mode,
SmartSensor, SmartShunt, SmartTel and Total Endurance are
trademarks of Microchip Technology Incorporated in the U.S.A.
and other countries.
Serialized Quick Turn Programming (SQTP) is a service mark of
Microchip Technology Incorporated in the U.S.A.
All other trademarks mentioned herein are property of their
respective companies.
© 2003, Microchip Technology Incorporated, Printed in the
U.S.A., All Rights Reserved.
Printed on recycled paper.
Microchip received QS-9000 quality system
certification for its worldwide headquarters,
design and wafer fabrication facilities in
Chandler and Tempe, Arizona in July 1999
and Mountain View, California in March 2002.
The Company’s quality system processes and
procedures are QS-9000 compliant for its
PICmicro® 8-bit MCUs, KEELOQ® code hopping
devices, Serial EEPROMs, microperipherals,
non-volatile memory and analog products. In
addition, Microchip’s quality system for the
design and manufacture of development
systems is ISO 9001 certified.
DS51328A - page ii
2003 Microchip Technology Inc.
Application Maestro Software
User’s Guide
Table of Contents
Preface
Highlights.................................................................................................... v
About This Guide........................................................................................ v
Recommended Reading............................................................................vii
Troubleshooting.........................................................................................vii
The Microchip Internet Web Site .............................................................. viii
Development Systems Customer Notification Service ............................. viii
Customer Support ......................................................................................ix
Chapter 1. Getting Started with the Application Maestro Software
1.1
Highlights ......................................................................................... 1
1.2
What is Microchip Application Maestro Software?........................... 1
1.3
How Microchip Application Maestro Software Helps You ................ 1
1.4
Installing the Microchip Application Maestro Software .................... 1
1.5
The Microchip Application Maestro Software Interface ................... 2
Chapter 2. Using the Application Maestro Software
2.1
Highlights ......................................................................................... 5
2.2
Adding and Removing Modules to an Application Maestro
Software Project .............................................................................. 5
2.3
Configuring a Module....................................................................... 6
2.4
Generating Code ............................................................................. 7
2.5
Exiting the Application Maestro Software ........................................ 7
Chapter 3. Working with Application Maestro Software Modules
and Generated Code
3.1
Highlights ......................................................................................... 9
3.2
What’s in a Module? ........................................................................ 9
3.3
Adding and Removing Available Modules ..................................... 10
3.4
Working with Generated Files........................................................ 11
2003 Microchip Technology Inc.
DS51328A-page iii
Application Maestro Software User’s Guide
Chapter 4. Troubleshooting
4.1
Highlights .......................................................................................13
4.2
Common Problems ........................................................................13
Appendix A. Application Maestro Software
Keyboard Command Summary
A.1
Highlights .......................................................................................15
A.2
Control-Key Shortcuts ....................................................................15
A.3
Other Keyboard Shortcuts..............................................................15
A.4
Alt-Key Menu Shortcuts .................................................................15
Index ......................................................................................................... 17
Worldwide Sales and Service ................................................................. 20
DS51328A-page iv
2003 Microchip Technology Inc.
Application Maestro Software
User’s Guide
Preface
This chapter contains general information about this manual and contacting customer
support.
HIGHLIGHTS
Topics covered in this chapter:
•
•
•
•
•
•
About this Guide
Recommended Reading
Troubleshooting
The Microchip Internet Web Site
Development Systems Customer Notification Service
Customer Support
ABOUT THIS GUIDE
Document Layout
This document describes how to use the Microchip Application Maestro Software as a
development tool for PICmicro® microcontrollers. The manual layout is as follows:
• Chapter 1: Getting Started with the Application Maestro Software –
Describes what the Microchip Application Maestro Software is, what makes it a
desirable development tool, how to install it, and the basic features of the
interface.
• Chapter 2: Using the Application Maestro Software – Describes how to use
the Application Maestro Software in creating modules for your applications.
• Chapter 3: Working with Application Maestro Software Modules and Generated
Code – Describes the content of the Application Maestro Software module
templates, and how to use the Application Maestro Software’s generated code in
applications.
• Chapter 4: Troubleshooting – Provides information on solving common
problems.
• Appendix A: Application Maestro Software Keyboard Command Summary –
Provides a list of keyboard shortcuts for Application Maestro Software.
• Worldwide Sales and Service – Lists Microchip sales and service locations and
telephone numbers worldwide.
2003 Microchip Technology Inc.
DS51328A-page v
Application Maestro Software User’s Guide
Conventions Used in this Guide
This manual uses the following documentation conventions:
Documentation Conventions
Description
Represents
Examples
Code (Courier font):
Plain characters
Sample code
Filenames and paths
#define START
c:\autoexec.bat
Angle brackets: < >
Variables
<label>, <exp>
Square brackets [ ]
Optional arguments
MPASMWIN
[main.asm]
Curly brackets and pipe Choice of mutually exclusive arguments
character: { | }
An OR selection
errorlevel {0|1}
Lower case characters
in quotes
Type of data
“filename”
Ellipses...
Used to imply (but not show) additional
text that is not relevant to the example
list
[“list_option...,
“list_option”]
0xnnn
A hexadecimal number where n is a
hexadecimal digit
0xFFFF, 0x007A
Italic characters
A variable argument; it can be either a
type of data (in lower case characters) or
a specific example (in uppercase
characters)
char isascii
(char, ch);
Underlined, italic text
with right arrow
A menu selection from the menu bar
File > Save
Bold characters
A window or dialog button to click
OK, Cancel
Characters in angle
brackets < >
A key on the keyboard
<Tab>, <Ctrl-C>
Referenced books
MPLAB IDE User’s
Guide
Interface (Arial font):
Documents (Arial font):
Italic characters
Documentation Updates
All documentation becomes dated, and this user’s guide is no exception. Since
MPLAB® IDE, MPLAB C1X and other Microchip tools are constantly evolving to meet
customer needs, some actual dialogs and/or tool descriptions may differ from those in
this document. Please refer to our web site (http://www.microchip.com) to obtain the
latest documentation available.
DS51328A-page vi
2003 Microchip Technology Inc.
Preface
RECOMMENDED READING
The following documents contain current information on programming the specific
microcontroller devices.
MPLAB® IDE User’s Guide (DS51025)
Comprehensive guide that describes installation and features of Microchip’s
MPLAB Integrated Development Environment (IDE), as well as the editor and
simulator functions in the MPLAB environment.
MPASMTM User’s Guide with MPLINKTM and MPLIBTM (DS33014)
Describes how to use Microchip Universal PICmicro Microcontroller Assembler
(MPASM), Linker (MPLINK), and Librarian (MPLIB).
Technical Library CD-ROM (DS00161)
This CD-ROM contains comprehensive data sheets for Microchip PICmicro® MCU
devices available at the time of print. To obtain this disk, contact the nearest
Microchip Sales and Service location (see back page) or download individual data
sheet files from the Microchip web site (http://www.microchip.com).
Embedded Control Handbook (DS00711)
This handbook consists of several documents that contain a wealth of information
about microcontroller applications. To obtain these documents, contact the nearest
Microchip Sales and Service location (see back page).
The application notes described in these manuals are also obtainable from
Microchip Sales and Service locations or from the Microchip web site
(http://www.microchip.com).
PICmicroTM Mid-Range MCU Family Reference Manual (DS33023) and
PICmicro® 18C MCU Family Reference Manual (DS39500)
These manuals explain the general details and operation of the mid-range and
advanced MCU family architecture and peripheral modules. They are designed to
complement the device data sheets.
Microsoft® Windows® Manuals
This manual assumes that users are familiar with Microsoft Windows operating
system. Many excellent references exist for this software program, and should be
consulted for general operation of Windows.
TROUBLESHOOTING
See Chapter 4 for information on common problems.
2003 Microchip Technology Inc.
Advance Information
DS51328A-page vii
Application Maestro Software User’s Guide
THE MICROCHIP INTERNET WEB SITE
Microchip provides easy access to our documentation and on-line support through our
World Wide Web Site at www.microchip.com. You can download files from the web site
or from our FTP site at ftp://ftp.microchip.com.
DEVELOPMENT SYSTEMS CUSTOMER NOTIFICATION SERVICE
Microchip started the customer notification service to help our customers keep current
on Microchip products with the least amount of effort. Once you subscribe, you will
receive email notification whenever we change, update, revise or have errata related
to your specified product family or development tool of interest.
Go to the Microchip World Wide Web page (http://www.microchip.com) and click on
Customer Change Notification under Items of Interest. Follow the instructions to
register.
The Development Systems product group categories are:
•
•
•
•
•
Compilers
Emulators
In-Circuit Debuggers
MPLAB
Programmers
Here is a description of these categories:
COMPILERS - The latest information on Microchip C compilers and other language
tools. These include the MPLAB C17, MPLAB C18 and MPLAB C30 C compilers;
MPASM and MPLAB ASM30 assemblers; MPLINK and MPLAB LINK30 object linkers;
and MPLIB and MPLAB LIB30 object librarians.
EMULATORS - The latest information on Microchip in-circuit emulators.This includes
the MPLAB ICE 2000 and MPLAB ICE 4000.
IN-CIRCUIT DEBUGGERS - The latest information on Microchip in-circuit debuggers.
These include the MPLAB ICD and MPLAB ICD 2.
MPLAB - The latest information on Microchip MPLAB IDE, the Windows Integrated
Development Environment for development systems tools. This list is focused on the
MPLAB IDE, MPLAB SIM and MPLAB SIM30 simulators, MPLAB IDE Project Manager
and general editing and debugging features.
PROGRAMMERS - The latest information on Microchip device programmers. These
include the PRO MATE® II device programmer and PICSTART® Plus development
programmer.
DS51328A-page viii
2003 Microchip Technology Inc.
Preface
CUSTOMER SUPPORT
Users of Microchip products can receive assistance through several channels:
•
•
•
•
•
Distributor or Representative
Local Sales Office
Field Application Engineer (FAE)
Corporate Applications Engineer (CAE)
Hotline
Customers should call their distributor, representative or field application engineer
(FAE) for support. Local sales offices are also available to help customers. See the
back cover for a listing of sales offices and locations.
Corporate Applications Engineers (CAEs) may be contacted at (480) 792-7627.
In addition, there is a Systems Information and Upgrade Line. This line provides system
users a listing of the latest versions of all of Microchip's development systems software
products. Plus, this line provides information on how customers can receive any
currently available upgrade kits.
The Hotline Numbers are:
1-800-755-2345 for U.S. and most of Canada.
1-480-792-7302 for the rest of the world.
2003 Microchip Technology Inc.
Advance Information
DS51328A-page ix
Application Maestro Software User’s Guide
NOTES:
DS51328A-page x
2003 Microchip Technology Inc.
Application Maestro Software
User’s Guide
Chapter 1. Getting Started with the Application Maestro Software
1.1
HIGHLIGHTS
This chapter covers the following topics:
• What the Microchip Application Maestro Software is (and what it is not)
• How to Install the Microchip Application Maestro Software
• The Microchip Application Maestro Software Interface
1.2
WHAT IS MICROCHIP APPLICATION MAESTRO SOFTWARE?
The Microchip Application Maestro Software is a stand-alone software tool that allows
users to configure and incorporate a range of pre-written firmware modules into their
applications. Its heart is a collection of modules developed by Microchip Technology
for use with its PICmicro microcontrollers. Starting from a graphic interface, the user
selects one or more available modules, then configures the parameters for each.
When this is complete, the Application Maestro Software then generates code that
can be incorporated into the user’s application project, using MPLAB IDE or any
compatible development environment.
It is important to note that the Application Maestro Software is not a plug-in or add-on to
the MPLAB line of development tools; it is a separate item in its own right. Application
Maestro Software also differs from other librarian systems, such as MPLIB, because it
does more than archive and manage related files for a single software project. Instead, it
manages a library of ready-to-configure modules that the user customizes to their needs,
and creates the necessary files for inclusion in the user’s projects on demand.
1.3
HOW MICROCHIP APPLICATION MAESTRO SOFTWARE HELPS YOU
Application Maestro Software is a repository of pre-written software solutions that lets
you take better advantage of the many peripheral features of Microchip controllers. It
is no longer necessary to spend hours digging through code archives or documentation, trying to find the source code for an RS-232 serial communication port or CAN
engine, then manually adding it to a new project. Nor do you have to re-invent a block
of application code when you can’t find that one elusive archive. With the Application
Maestro Software, it’s all in one place.
1.4
INSTALLING THE MICROCHIP APPLICATION MAESTRO SOFTWARE
The Application Maestro Software is designed to run under any 32-bit version of
Microsoft Windows. Users with Windows NT versions (NT 4.0, 2000 Professional
Desktop or XP) should not require Administrator rights to their system to install the
software. The minimum system requirements for the software are generally the same
as Microchip’s MPLAB IDE software:
• PC-compatible system with an Intel® Pentium® class or higher processor, or equivalent
• A minimum of 16 MB RAM (32 MB recommended)
• A minimum of 5 MB available hard drive space
• Any 32-bit version of Microsoft Windows (Windows 98, Windows NT,
Windows 2000 or Windows XP)
2003 Microchip Technology Inc.
DS51328A-page 1
Application Maestro Software User’s Guide
To install the Application Maestro Software, locate the installer file MpAMv1.x.x.exe
and double-click on its icon. The installation program automatically extracts the files,
creates the directory structure and installs all the necessary files.
By default, the program is installed in the directory C:\Program Files\MpAM.
Users have the option to change the default location and the Program Group in the
Start menu at the time of installation.
1.5
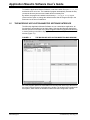
THE MICROCHIP APPLICATION MAESTRO SOFTWARE INTERFACE
The Microchip Application Maestro Software runs as a stand-alone application; all
functionality is accessible from its single dialog. Selecting the Microchip Application
Maestro option from the Start menu (Start>Programs>Microchip Application Maestro),
or double-clicking on the Microchip Application Maestro icon in Explorer, launches the
window (Figure 1-1).
FIGURE 1-1:
THE MICROCHIP APPLICATION MAESTRO MAIN WINDOW
All of the program options are accessible from the menu bar at the top of the screen;
the most common items are duplicated in the toolbar. The window itself is divided into
three panes, which define the available modules and their configuration options.
DS51328A-page 2
2003 Microchip Technology Inc.
Getting Started with the Application Maestro Software
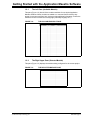
1.5.1
The Left Pane (Available Module)
This pane (Figure 1-2) lists all of the modules available for use by the Application
Maestro Software. When modules are added to or removed from the library, they
appear (or are removed) from here. It also provides additional information, such as the
module’s revision level and source language (assembly language or C).
FIGURE 1-2:
1.5.2
THE AVAILABLE MODULE PANE
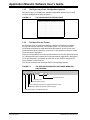
The Right Upper Pane (Selected Module)
This pane (Figure 1-3) displays the modules being configured for the current project.
FIGURE 1-3:
2003 Microchip Technology Inc.
THE SELECTED MODULE PANE
DS51328A-page 3
Application Maestro Software User’s Guide
1.5.3
The Right Lower Pane (Configuration Options)
This pane (Figure 1-4) displays the available configuration options for the module
currently highlighted in the right upper pane.
FIGURE 1-4:
1.5.4
THE CONFIGURATION OPTIONS PANE
The Menu Bar and Toolbar
As mentioned, all of the Application Maestro Software’s functionality is available
through either the top menu bar, or the toolbar (Figure 1-5). The most common
menu-based commands are duplicated with toolbar buttons. All of the menu commands also have Alt-key shortcuts, Control-key, or other keyboard shortcuts, or both.
These are listed in Appendix A.
One item not duplicated in the menu command structure is the clock speed select dialog. This allows the user to specify the clock speed that the application is designed to
run at; this information is necessary for most (but not all) modules, particularly for
timing sensitive communications.
The various commands are discussed further in the following chapters.
FIGURE 1-5:
THE APPLICATION MAESTRO SOFTWARE MENU BAR
AND TOOLBAR
Clock Speed Select
Generate Code
Configure Selected Option
Remove Module (from Microchip Application Maestro project)
Add Module (to Microchip Application Maestro project)
Open Module (add to Available Modules list)
DS51328A-page 4
2003 Microchip Technology Inc.
Application Maestro Software
User’s Guide
Chapter 2. Using the Application Maestro Software
2.1
HIGHLIGHTS
This chapter covers the following:
• Adding and Removing Modules to an Application Maestro Software Project
• Configuring a Module
• Generating Code
2.2
ADDING AND REMOVING MODULES TO AN APPLICATION MAESTRO
SOFTWARE PROJECT
When the Application Maestro Software is started for the first time, all of the modules
shipped with the application are listed in the left pane. You can immediately select
those modules needed for your application project and begin to configure them. For
convenience, we’ll refer to one or more open modules in the process of being configured as an “Application Maestro Software project”. Making those configured modules
a part of your application in the development environment will be discussed later.
Adding a module to your Application Maestro Software project can be done in several
ways:
1. Click on its name and drag it into the right upper pane, OR
2. Click on its name to select it, then do one of the following:
a) Click on the “Add Module” button;
b) Choose the “Add” option from the Edit menu; or
c) Press the <Ins> key.
In any case, the module appears in the upper right pane; it also remains listed in the
left pane. Additionally, a list of the configurable properties for that module appears in
the lower right pane.
Note:
Only one instance of a module may be configured at a time. The Application
Maestro Software will not permit multiple instances of a particular module
to appear in the upper right pane.
Similarly, removing a module from your Application Maestro Software project is done
in several ways:
1. Click on its name in the upper right pane, and drag it back into the left pane; OR
2. Click on its name to select it, then do one of the following:
a) Click on the “Remove Module” button;
b) Choose the “Remove” option from the Edit menu; or
c) Press the <Del> key.
In all cases, the module disappears from the upper right pane, and its options
disappear from the lower right pane.
2003 Microchip Technology Inc.
DS51328A-page 5
Application Maestro Software User’s Guide
2.2.1
Working with Multiple Items
It is not necessary to add or remove modules one at a time; several may be selected
at once from either pane by clicking on individual names while pressing <Ctrl>.
To select all of the available modules, select “Highlight All” from the Edit menu (keyboard shortcut, <Ctrl-A>); this will highlight all modules in the left pane. To de-select
individual modules, click on individual lines while pressing <Ctrl>.
When more than one module is added to the Application Maestro Software project at
one time, the configurable options for the first module in the list appears in the lower
right pane. To configure the options for any other open module, it is necessary to select
that module.
2.3
CONFIGURING A MODULE
Once a module has been added to the Application Maestro Software project, it needs
to be configured for the target application.
Each of the modules available through the Application Maestro Software has a
pre-defined list of configuration options; when the module is selected, the list of available options appears in the lower right pane. To change a particular option, single-click
on its line to select it, then select “Modify Params” from the Edit menu (or use the
keyboard shortcut <Ctrl-M>). Alternatively, double-click on the option.
A dialog box (Figure 2-1) appears with the current value of the option and instructions.
Change the value as required, then click “OK” to accept the change.
Each option has a defined valid range of values associated with it. Selecting a value
outside of the range generates an error message.
FIGURE 2-1:
DS51328A-page 6
TYPICAL CONFIGURATION OPTION DIALOG
2003 Microchip Technology Inc.
Using the Application Maestro Software
2.4
GENERATING CODE
Once the selected modules are configured, they can be saved to a project. At this point,
the required files are actually created.
To create the files with the configuration changes, select the “Generate Code” button
from the toolbar. Alternatively, select the “Generate Code” option from the Tools menu,
or use the keyboard shortcut <Ctrl-G>.
The Application Maestro Software prompts for a directory to write the files to. You can
select the directory where an existing software project resides, or any other convenient
directory you choose.
FIGURE 2-2:
SELECTING A DESTINATION FOR GENERATED FILES
The files that are actually created in the chosen directory vary from module to module.
In general, they will include at least one .asm (or .c) file, one .def file, and several
ASCII text files for code documentation. These are explained in Section 3.4 (“Working
with Generated Files”).
Changing the configuration of an Application Maestro Software module through the
lower right pane only reconfigures the generated code. The configuration of the original
Application Maestro Software module remains unchanged.
2.5
EXITING THE APPLICATION MAESTRO SOFTWARE
When you are finished with the Application Maestro Software, exit the application by
any of these three ways:
1. Click the main window’s “Close” button;
2. Select the “Exit” option from the File menu; or
3. Use the keyboard command <Alt-F>, X.
Because changes to the modules are saved to the application project that you specify
when you generate code, there is no separate Save on Exit option for the Application
Maestro Software. All configuration work that you perform on an Application Maestro
Software project is lost if you don’t generate code.
2.5.1
Application Maestro Software Window Configuration
The configuration of the Application Maestro Software window (size on launch, default
clock frequency, sizes of panes and their columns) is saved on exiting the application.
2003 Microchip Technology Inc.
DS51328A-page 7
Application Maestro Software User’s Guide
NOTES:
DS51328A-page 8
2003 Microchip Technology Inc.
Application Maestro Software
User’s Guide
Chapter 3. Working with Application Maestro Software
Modules and Generated Code
3.1
HIGHLIGHTS
This chapter covers the following:
• Contents of the Microchip Application Maestro Software Module
• Adding and Removing Modules
• Working with Generated Code
3.2
WHAT’S IN A MODULE?
In order to create the customized code for applications, the Application Maestro
Software uses a collection of files for each module. Each module has its own folder,
located in the Modules folder in the Application Maestro Software directory. The exact
number of files for each module varies, but includes at least one of each of the
following:
• One or more assembly language files (either.asm or .c)
• An include file (.inc) or header file (.h)
• The Module definition file (module_name.ReadMe.pdf), which describes the
logical structure of the module’s code, interfaces and methods, as well how to
integrate the code with an application
• The Example file (module_name.Ex.txt), which provides an example of how to
integrate the generated code with the user’s application
Additionally, there may be a module_name.lkr.txt, which provides an example of
how to use the generated linker file. This will only be found when a linker file is required.
Most of the modules provided with the Application Maestro Software are written in
assembly language. Some modules may include high-level language source files in C,
as well as object and header files. In these cases, the compiler type will be noted.
The content of a module is defined in the Application Maestro Software script file
named module_name.cls, which is located at the root level of the Modules folder.
The Application Maestro Software uses this file to provide information for the Available
Module pane (name, revision level, language format and descriptive comments), as
well as define the valid range of the configurable parameters and the output for the
module.
2003 Microchip Technology Inc.
DS51328A-page 9
Application Maestro Software User’s Guide
3.3
ADDING AND REMOVING AVAILABLE MODULES
On its initial launch, the Application Maestro Software will display those modules that
were included with the software package at the time of its installation. New modules
may be added as they become available, and old modules may be removed.
To Add a Module:
1. Copy the module folder and its associated .cls file into the Modules folder for
the Application Maestro Software.
2. Launch the Application Maestro Software.
3. From the File menu, select Open Module(s); alternatively, use the keyboard
shortcut <Ctrl-O>.
4. At the “Open Modules” dialog (Figure 3-1), browse to the Modules folder (if
necessary) and select the script file (with the extension .cls) for the new module.
Click OK.
FIGURE 3-1:
SELECTING A MODULE TO ADD TO THE LEFT PANE
The module name and its information are now listed in the Available Module pane.
DS51328A-page 10
Note 1:
You can place modules in locations other than the default Modules folder,
and use them in the same manner as modules in the default folder. Keep
in mind that the Application Maestro Software will remember the last
location that a module was selected from and make that the new default
location for opening new modules.
2:
It is possible to place copies of the same module in different folders and
open each copy as a unique module, which is separately configurable.
This is because the Application Maestro Software looks at the entire fully
qualified path name of the module in determining if a module is unique.
This does not mean, however, that you can generate code for each of
these instances in a single Application Maestro Software project. Even
though the instances are unique, they will generate output files with the
same names. When you generate code from several identical instances
at once, all of the output files will be written to the same directory. The end
result will be only one set of files with the configuration of the last module
in the Selected Modules list.
2003 Microchip Technology Inc.
Working with Application Maestro Software Modules and Generated Code
To Remove a Module:
1. Select the module from the list in Available Module pane.
2. From the File menu, select Close Module(s).
3. At the following dialog box, click Yes to continue.
The module name and its information are removed from the Available Module pane.
Like other changes to the Application Maestro Software window, modules added to or
removed from the left pane remain that way. Modules removed from the left pane
cannot be used for projects until they are added to the list of available modules again.
If a module is being permanently removed, it may be helpful to delete its folder from the
Modules folder. This prevents it from being added back to the list of available modules
and used by accident.
3.3.1
Obtaining New Modules
In addition to the selection provided with the software distribution, other modules for the
Application Maestro Software will be made available by Microchip from time to time.
These will include new modules for additional peripherals, as well as updated versions
of existing code (created as improved methods and as new ideas become available).
For information on how to obtain new and updated modules, be sure to check the
Microchip Technology web site (www.microchip.com) from time to time.
3.4
WORKING WITH GENERATED FILES
As mentioned before, the “Generate Files” command of the Application Maestro
Software produces output to a specified location. This output consists of not one, but
several files:
• One or more .asm (or .c) files containing the actual code
• module_name.def, which specifies the module configuration
• module_name.inc or module_name.h, the controller specific include or
header file for the module (for assembler or C code, respectively)
• module_name.Ex.txt, which provides an example of how to integrate the
generated code with the user’s application
• module_name.ReadMe.pdf, the module definition document
If you have already set up a project for the application being developed, it is probably
simpler to have the Application Maestro Software write the generated files directly into
the appropriate project directory. If a code project hasn’t been set up, the file output can
be directed to any convenient location, then copied as needed to the appropriate
directory.
3.4.1
The Final Step: Integrating the New Code
The method of including the generated files into the application code is a function of the
development environment; the user should refer to the documentation for their chosen
development tool for more information. The most important thing is that the generated
Application Maestro Software files will not automatically find their way into an application on their own; you must still link the generated code to the project. Specifically, the
application code that you have written and that will use the Application Maestro
Software generated code must be modified by adding the #include compiler
directive. Specific directions for using a particular module are located in the ReadMe
definition and module_name.Ex.txt documents.
2003 Microchip Technology Inc.
DS51328A-page 11
Application Maestro Software User’s Guide
NOTES:
DS51328A-page 12
2003 Microchip Technology Inc.
Application Maestro Software
User’s Guide
Chapter 4. Troubleshooting
4.1
HIGHLIGHTS
This chapter discusses the following:
• Common issues with the Microchip Application Maestro Software, and how to
solve them
4.2
COMMON PROBLEMS
1. When I attempt to add new modules, they aren’t listed in the
“Open Module(s)” dialog.
By default, library modules for the Application Maestro Software are located in the
Modules folder inside the Microchip Application Maestro folder. This is the default
location where Application Maestro Software looks for modules. It is possible that
the default location has changed, perhaps while looking for another file; the
Application Maestro Software will remember the last location browsed, and make
that the default. Use the browse tools for the dialog box to locate the Modules
folder.
If you are trying to locate a new module that you just downloaded from Microchip,
it is possible that the files have been saved to the wrong location. The best solution
is not to browse for the file from the Application Maestro Software, but search your
system for any new files with the .cls extension. When you find that file, the
chances are good that the new module’s folder is somewhere close by in the same
directory. When you locate the file and module folder, move them to the Modules
folder (or whatever folder you are using for your modules).
2003 Microchip Technology Inc.
DS51328A-page 13
Application Maestro Software User’s Guide
NOTES:
DS51328A-page 14
2003 Microchip Technology Inc.
Application Maestro Software
User’s Guide
Appendix A. Application Maestro Software
Keyboard Command Summary
A.1
HIGHLIGHTS
This chapter covers the following topics:
• Application Maestro Software Control-Key Commands
• Application Maestro Software Alt-Key Menu Shortcuts
A.2
A.3
A.4
CONTROL-KEY SHORTCUTS
<CTRL-A>
Select all modules in Available Module pane
<CTRL-G>
Generate code (Select Directory dialog)
<CTRL-M>
Modify configuration parameters of selected module
<CTRL-O>
Open module (Select Library Module dialog)
OTHER KEYBOARD SHORTCUTS
<Del>
Remove selected module in upper right pane from
open Application Maestro Software project
<Ins>
Add selected module in Available Module pane to open
Application Maestro Software project
ALT-KEY MENU SHORTCUTS
<Alt-E>
Select Edit Menu
<Alt-E>, A
<Alt-E>, D
Remove selected module from project
<Alt-E>, M
Modify configuration parameters of selected module
<Alt-E>, S
<Alt-F>
Add highlighted module to open project
Select File Menu
<Alt-E>, C
Close selected module (remove from Available Module pane)
<Alt-E>, O
Open module (Open Module(s) dialog)
<Alt-E>, X
<Alt-H>
Exit Application Maestro Software (no Save Option)
Select Help Menu
<Alt-H>, A
<Alt-T>
Provides information on current Application Maestro Software
revision
Select Tools Menu
<Alt-T>, G
2003 Microchip Technology Inc.
Select all modules in Available Module pane
Generates output code
DS51328A-page 15
Application Maestro Software User’s Guide
NOTES:
DS51328A-page 16
2003 Microchip Technology Inc.
Application Maestro Software
User’s Guide
Index
A
Adding Modules
to Application Maestro
Software Projects .......................... 5
to Available Module Pane ........................ 10
Application Maestro Software Interface
Exiting ........................................................ 7
Window Configuration ................................ 7
Application Maestro Software Modules
Adding to Available Modules ................... 10
Contents .................................................... 9
Obtaining New Modules ........................... 11
Removing ................................................. 11
Application Maestro Software Projects
Adding and Removing Modules ................. 5
Configuring Modules .................................. 6
Generating Code ....................................... 7
Working with Multiple Items ....................... 6
Available Module Pane ..................................... 3
C
Configuration Options Pane ............................. 4
Customer Notification Service ........................ viii
Customer Support ............................................ix
D
def Files ........................................................ 11
Document Conventions ....................................vi
Document Layout ..............................................v
Documentation
Updates .....................................................vi
G
Generated Files .............................................. 11
I
Integrated Generated Files ............................. 11
Internet Web Site ............................................ viii
M
Menu Bar .......................................................... 4
Microchip Application Maestro Software .......... 1
Installing ..................................................... 1
Microchip Application Maestro Software
Interface ............................................... 2
Left Pane (Available Module) ..................... 3
Menu Bar .................................................... 4
Right Lower Pane (Configuration Options) 4
Right Upper Pane (Selected Module) ........ 3
R
Recommended Reading ..................................vii
Removing Modules
from Application Maestro
Software Projects .......................... 5
from Available Module Pane .................... 11
S
Selected Module Pane ..................................... 3
T
Toolbar ............................................................. 4
Troubleshooting .............................................. 13
E
Ex.txt Files .................................................. 11
2003 Microchip Technology Inc.
DS51328A-page 17
WORLDWIDE SALES AND SERVICE
AMERICAS
ASIA/PACIFIC
Japan
Corporate Office
Australia
2355 West Chandler Blvd.
Chandler, AZ 85224-6199
Tel: 480-792-7200 Fax: 480-792-7277
Technical Support: 480-792-7627
Web Address: http://www.microchip.com
Microchip Technology Australia Pty Ltd
Marketing Support Division
Suite 22, 41 Rawson Street
Epping 2121, NSW
Australia
Tel: 61-2-9868-6733 Fax: 61-2-9868-6755
Microchip Technology Japan K.K.
Benex S-1 6F
3-18-20, Shinyokohama
Kohoku-Ku, Yokohama-shi
Kanagawa, 222-0033, Japan
Tel: 81-45-471- 6166 Fax: 81-45-471-6122
Rocky Mountain
2355 West Chandler Blvd.
Chandler, AZ 85224-6199
Tel: 480-792-7966 Fax: 480-792-4338
China - Beijing
3780 Mansell Road, Suite 130
Alpharetta, GA 30022
Tel: 770-640-0034 Fax: 770-640-0307
Microchip Technology Consulting (Shanghai)
Co., Ltd., Beijing Liaison Office
Unit 915
Bei Hai Wan Tai Bldg.
No. 6 Chaoyangmen Beidajie
Beijing, 100027, No. China
Tel: 86-10-85282100 Fax: 86-10-85282104
Boston
China - Chengdu
2 Lan Drive, Suite 120
Westford, MA 01886
Tel: 978-692-3848 Fax: 978-692-3821
Microchip Technology Consulting (Shanghai)
Co., Ltd., Chengdu Liaison Office
Rm. 2401-2402, 24th Floor,
Ming Xing Financial Tower
No. 88 TIDU Street
Chengdu 610016, China
Tel: 86-28-86766200 Fax: 86-28-86766599
Atlanta
Chicago
333 Pierce Road, Suite 180
Itasca, IL 60143
Tel: 630-285-0071 Fax: 630-285-0075
Dallas
4570 Westgrove Drive, Suite 160
Addison, TX 75001
Tel: 972-818-7423 Fax: 972-818-2924
Detroit
Tri-Atria Office Building
32255 Northwestern Highway, Suite 190
Farmington Hills, MI 48334
Tel: 248-538-2250 Fax: 248-538-2260
Kokomo
2767 S. Albright Road
Kokomo, Indiana 46902
Tel: 765-864-8360 Fax: 765-864-8387
Los Angeles
18201 Von Karman, Suite 1090
Irvine, CA 92612
Tel: 949-263-1888 Fax: 949-263-1338
San Jose
Microchip Technology Inc.
2107 North First Street, Suite 590
San Jose, CA 95131
Tel: 408-436-7950 Fax: 408-436-7955
Toronto
6285 Northam Drive, Suite 108
Mississauga, Ontario L4V 1X5, Canada
Tel: 905-673-0699 Fax: 905-673-6509
China - Fuzhou
Microchip Technology Consulting (Shanghai)
Co., Ltd., Fuzhou Liaison Office
Unit 28F, World Trade Plaza
No. 71 Wusi Road
Fuzhou 350001, China
Tel: 86-591-7503506 Fax: 86-591-7503521
China - Hong Kong SAR
Microchip Technology Hongkong Ltd.
Unit 901-6, Tower 2, Metroplaza
223 Hing Fong Road
Kwai Fong, N.T., Hong Kong
Tel: 852-2401-1200 Fax: 852-2401-3431
China - Shanghai
Microchip Technology Consulting (Shanghai)
Co., Ltd.
Room 701, Bldg. B
Far East International Plaza
No. 317 Xian Xia Road
Shanghai, 200051
Tel: 86-21-6275-5700 Fax: 86-21-6275-5060
China - Shenzhen
Microchip Technology Consulting (Shanghai)
Co., Ltd., Shenzhen Liaison Office
Rm. 1812, 18/F, Building A, United Plaza
No. 5022 Binhe Road, Futian District
Shenzhen 518033, China
Tel: 86-755-82901380 Fax: 86-755-82966626
China - Qingdao
Rm. B505A, Fullhope Plaza,
No. 12 Hong Kong Central Rd.
Qingdao 266071, China
Tel: 86-532-5027355 Fax: 86-532-5027205
India
Microchip Technology Inc.
India Liaison Office
Marketing Support Division
Divyasree Chambers
1 Floor, Wing A (A3/A4)
No. 11, O’Shaugnessey Road
Bangalore, 560 025, India
Tel: 91-80-2290061 Fax: 91-80-2290062
Korea
Microchip Technology Korea
168-1, Youngbo Bldg. 3 Floor
Samsung-Dong, Kangnam-Ku
Seoul, Korea 135-882
Tel: 82-2-554-7200 Fax: 82-2-558-5934
Singapore
Microchip Technology Singapore Pte Ltd.
200 Middle Road
#07-02 Prime Centre
Singapore, 188980
Tel: 65-6334-8870 Fax: 65-6334-8850
Taiwan
Microchip Technology (Barbados) Inc.,
Taiwan Branch
11F-3, No. 207
Tung Hua North Road
Taipei, 105, Taiwan
Tel: 886-2-2717-7175 Fax: 886-2-2545-0139
EUROPE
Austria
Microchip Technology Austria GmbH
Durisolstrasse 2
A-4600 Wels
Austria
Tel: 43-7242-2244-399
Fax: 43-7242-2244-393
Denmark
Microchip Technology Nordic ApS
Regus Business Centre
Lautrup hoj 1-3
Ballerup DK-2750 Denmark
Tel: 45 4420 9895 Fax: 45 4420 9910
France
Microchip Technology SARL
Parc d’Activite du Moulin de Massy
43 Rue du Saule Trapu
Batiment A - ler Etage
91300 Massy, France
Tel: 33-1-69-53-63-20 Fax: 33-1-69-30-90-79
Germany
Microchip Technology GmbH
Steinheilstrasse 10
D-85737 Ismaning, Germany
Tel: 49-089-627-144-100
Fax: 49-089-627-144-44
Italy
Microchip Technology SRL
Via Quasimodo, 12
20025 Legnano (MI)
Milan, Italy
Tel: 39-0331-742611 Fax: 39-0331-466781
United Kingdom
Microchip Ltd.
505 Eskdale Road
Winnersh Triangle
Wokingham
Berkshire, England RG41 5TU
Tel: 44 118 921 5869 Fax: 44-118 921-5820
02/12/03
DS51328A-page 18
2003 Microchip Technology Inc.