1
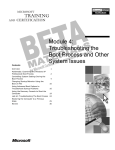
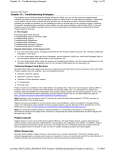
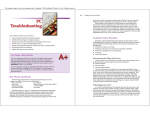
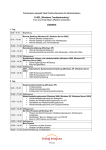
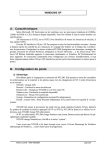
Modifying and Troubleshooting the Boot Process
Page 1 of 26
Chapter 18
Modifying and Troubleshooting the Boot Process
About This Chapter
This chapter introduces you to the Microsoft Windows XP Professional boot process. You learn about the
boot process, the BOOT.INI file, the Registry Editor, safe mode, the last known good configuration, and the
Recovery Console.
Before You Begin
To complete this chapter, you must have
A computer that meets the minimum hardware requirements listed in the preface, About This Book
The Windows XP Professional software installed on your computer
Lesson 1: Understanding the Boot Process
In this lesson, you learn about the files used in the Windows XP Professional boot process. You also learn
that the Windows XP Professional boot process occurs in five stages: the preboot sequence, boot sequence,
kernel load, kernel initialization, and logon. You learn during which phase each of the boot processes are
used and come to understand how to more effectively troubleshoot the Windows XP Professional boot
process by learning about its files and phases.
After this lesson, you will be able to
Explain the boot process
Describe the files used in the boot process
Explain the purpose and function of the BOOT.INI file
Estimated lesson time: 40 minutes
Files Used in the Boot Process
The boot sequence requires certain files. Table 18.1 lists the files used in the Windows XP Professional boot
process, the appropriate location of each file, and the stages of the boot process associated with each file.
Systemroot (typed as %systemroot%) represents the path to your Windows XP Professional installation
directory, which will be C:\Windows if you've followed the installation instructions in Chapter 2, "Installing
Windows XP Professional."
To view the files listed in Table 18.1, open Windows Explorer and click Folder Options on the Tools menu.
In the View tab of the Folder Options dialog box, under Hidden Files And Folders, click Show Hidden Files
And Folders. Clear the Hide Protected Operating System Files (Recommended) check box. A Warning
message box appears, indicating that it is not a good idea to display the protected operating system files.
Click Yes to display them. Click OK to close the Folder Options dialog box.
file://C:\Documents%20and%20Settings\alex\Local%20Settings\Temp\~hh60DF.htm
1/5/2005
Modifying and Troubleshooting the Boot Process
Page 2 of 26
Table 18.1 Files Used in the Windows XP Professional Boot Process
File
Location
Boot stage
NTLDR
System partition root (C:\ )
Preboot and boot
BOOT.INI
System partition root
Boot
BOOTSECT.DOS System partition root
Boot (optional)
NTDETECT.COM System partition root
Boot
NTBOOTDD.SYS System partition root
Boot (optional)
NTOSKRNL.EXE systemroot\System32
Kernel load
HAL.DLL
systemroot\System32
Kernel load
SYSTEM
systemroot\System32
Kernel initialization
Device drivers (.sys) systemroot \System32\Drivers Kernel initialization
The BOOT.INI File
When you install Windows XP Professional on a computer, Windows Setup saves the BOOT.INI file in the
active partition. NTLDR uses information in the BOOT.INI file to display the boot loader screen, from
which you select the operating system to start. In this lesson you learn how to modify the BOOT.INI file,
including modifying Advanced RISC Computing (ARC) paths and using the optional BOOT.INI switches.
The BOOT.INI file includes two sections, [boot loader] and [operating systems], that contain information
that NTLDR uses to create the Boot Loader Operating System Selection menu. A typical BOOT.INI might
contain the following lines:
[boot loader]
timeout=30
default=multi(0)disk(0)rdisk(0)partition(2)\WINDOWS
[operating systems]
multi(0)disk(0)rdisk(0)partition(2)\WINDOWS="Microsoft Windows XP Professional" /fastdetect
multi(0)disk(0)rdisk(0)partition(1)\WINNT="Windows NT Workstation Version 4.00"
multi(0)disk(0)rdisk(1)partition(1)\ WINNT="Windows NT Server Workstation 4.00 [VGA mode]" /ba
C:\CMDCONS\BOOTSECT.DAT="Microsoft Windows Recovery Console" /cmdcons
The [operating systems] section of a BOOT.INI file that is created during a default installation of Windows
XP Professional contains a single entry for Windows XP Professional. If your computer is a Microsoft
Windows 95-based or Microsoft Windows 98-based dual-boot system, the [operating systems] section also
contains an entry for starting the system using the other operating system. If you installed Windows XP
Professional on a computer and kept an installation of Microsoft Windows NT 4.0 on another partition of
the same computer, the [operating systems] section also contains an entry for starting the system using this
version of Windows NT.
ARC Paths
During installation, Windows XP Professional generates the BOOT.INI file, which contains Advanced
RISC Computing (ARC) paths pointing to the computer's boot partition. (RISC stands for Reduced
Instruction Set Computing, a microprocessor design that uses a small set of simple instructions for fast
file://C:\Documents%20and%20Settings\alex\Local%20Settings\Temp\~hh60DF.htm
1/5/2005
Modifying and Troubleshooting the Boot Process
Page 3 of 26
execution.) The following is an example of an ARC path:
multi(0)disk(0)rdisk(1)partition(2)
Table 18.2 describes the naming conventions for ARC paths.
Table 18.2 ARC Path Naming Conventions
Convention
Description
The adapter/disk controller. Use scsi to indicate a Small Computer System Interface (SCSI)
controller on which SCSI basic input/output system (BIOS) is not enabled. For all other
Multi (x) |
adapter/disk controllers, use multi, including SCSI disk controllers with the BIOS enabled.
scsi (x)
Here, x represents a number that indicates the load order of the hardware adapter. For
example, if you have two SCSI adapters in a computer, the first to load and initialize receives
number 0, and the next SCSI adapter receives number 1.
Disk(y)
The SCSI ID. For multi, this value is always 0.
Rdisk(z)
A number that identifies the disk (ignored for SCSI controllers).
Partition(a) A number that identifies the partition.
In both multi and scsi conventions, multi, scsi, disk, and rdisk numbers are assigned starting with 0. Partition
numbers start with 1. All nonextended partitions are assigned numbers first, followed by logical drives in
extended partitions.
See Figure 18.1 for some examples of how to determine the ARC path name.
Figure 18.1 ARC paths
The scsi ARC naming convention varies the disk(y) parameter for successive disks on one controller,
whereas the multi format varies the rdisk(z) parameter.
BOOT.INI Switches
You can add a variety of switches to the entries in the [operating systems] section of the BOOT.INI file to
provide additional functionality. Table 18.3 describes some of these optional switches that you can use for
entries in the BOOT.INI file.
file://C:\Documents%20and%20Settings\alex\Local%20Settings\Temp\~hh60DF.htm
1/5/2005
Modifying and Troubleshooting the Boot Process
Page 4 of 26
Table 18.3 BOOT.INI Optional Switches
Switch
Description
Boots the computer using the standard Video Graphics Adapter (VGA) video driver. If a
/basevideo
new video driver is not working correctly, use this switch to start Windows XP
Professional, and then change to a different driver.
Disables serial mouse detection. Without a port specification, this switch disables
/fastdetect=[comx
peripheral detection on all COM ports. This switch is included in every entry in the
| comx,y,z.]
BOOT.INI file by default.
Specifies the amount of random access memory (RAM) that Windows XP Professional
/maxmem:n
uses. Use this switch if you suspect that a memory chip is bad.
/noguiboot
Boots the computer without displaying the graphical boot status screen.
Displays the device driver names as they are loading. Use this switch when startup fails
/sos
while loading drivers to determine which driver is triggering the failure.
Modifications to BOOT.INI
You can modify the time out and default parameter values in the BOOT.INI file using System Properties in
Control Panel. In addition, you can manually edit these and other parameter values in the BOOT.INI file.
For example, you might modify the BOOT.INI file to add more descriptive entries for the Boot Loader
Operating System Selection menu or to include various switches to aid in troubleshooting the boot process.
During Windows XP Professional installation, Windows Setup sets the read-only and system attributes for
the BOOT.INI file. Before editing the BOOT.INI file with a text editor, you must make the file visible and
turn off the read-only attribute. You can change file attributes using My Computer, Windows Explorer, or
the command prompt.
To change file attributes by using My Computer or Windows Explorer, complete the following steps:
1.
2.
3.
4.
5.
6.
Double-click the icon for the drive containing the BOOT.INI file.
On the View menu, click Folder Options.
In the Folder Options dialog box, click the View tab.
Under Hidden Files, click Show All Files, and then click OK.
Right-click BOOT, and then click Properties.
In the General tab, under Attributes, clear the Read-Only check box, and then click OK.
To change file attributes using the command prompt, switch to the directory containing the BOOT.INI file if
necessary, and then type
attrib -s -r boot.ini
After you have changed the attributes of the BOOT.INI file, you can open and modify the file using a text
editor.
Preboot Sequence
During startup, a computer running Windows XP Professional initializes and then locates the boot portion of
the hard disk.
The following four steps occur during the preboot sequence:
1. The computer runs power-on self test (POST) routines to determine the amount of physical memory,
file://C:\Documents%20and%20Settings\alex\Local%20Settings\Temp\~hh60DF.htm
1/5/2005
Modifying and Troubleshooting the Boot Process
Page 5 of 26
whether the hardware components are present, and so on. If the computer has a Plug and Play BIOS,
enumeration and configuration of hardware devices occurs at this stage.
2. The computer BIOS locates the boot device and loads and runs the master boot record (MBR).
3. The MBR scans the partition table to locate the active partition, loads the boot sector on the active
partition into memory, and then executes it.
4. The computer loads and initializes the NTLDR file, which is the operating system loader.
Windows XP Professional Setup modifies the boot sector during installation so that NTLDR loads during
system startup.
Boot Sequence
After the computer loads NTLDR into memory, the boot sequence gathers information about hardware and
drivers in preparation for the Windows XP Professional load phases. The boot sequence uses the following
files: NTLDR, BOOT.INI, BOOTSECT.DOS (optional), NTDETECT.COM, and NTOSKRNL.EXE.
The boot sequence has four phases: initial boot loader phase, operating system selection, hardware
detection, and configuration selection.
Initial Boot Loader Phase
During the initial boot loader phase, NTLDR switches the microprocessor from real mode to 32-bit flat
memory mode, which NTLDR requires to carry out any additional functions. Next, NTLDR starts the
appropriate minifile system drivers. The minifile system drivers are built into NTLDR so that NTLDR can
find and load Windows XP Professional from partitions formatted with file allocation table (FAT), FAT32,
or NT file system (NTFS).
Operating System Selection
During the boot sequence, NTLDR reads the BOOT.INI file. If more than one operating system selection is
available in the BOOT.INI file, then the Please Select The Operating System To Start screen appears, listing
the operating systems specified in the BOOT.INI file. If you do not select an entry before the timer reaches
zero, NTLDR loads the operating system specified by the default parameter in the BOOT.INI file. Windows
XP Professional Setup sets the default parameter to the most recent Windows XP Professional installation. If
there is only one entry in the BOOT.INI file, the Please Select The Operating System To Start screen does
not appear and the default operating system is automatically loaded.
If the BOOT.INI file is not present, NTLDR attempts to load Windows XP Professional from the first
partition of the first disk, typically C:\.
Hardware Detection
NTDETECT.COM and NTOSKRNL.EXE perform hardware detection. NTDETECT.COM executes after
you select Windows XP Professional on the Please Select The Operating System To Start screen (or after
the timer times out).
If you select an operating system other than Windows XP Professional, such as Microsoft Windows 98,
NTLDR loads and executes BOOTSECT.DOS, which is a copy of the boot sector that was on the system
partition at the time that Windows XP Professional was installed. Passing execution to BOOTSECT.DOS
starts the boot process for the selected operating system.
NTDETECT.COM collects a list of currently installed hardware components and returns this list to NTLDR
for later inclusion in the registry under the HKEY_LOCAL_MACHINE\HARDWARE key.
file://C:\Documents%20and%20Settings\alex\Local%20Settings\Temp\~hh60DF.htm
1/5/2005
Modifying and Troubleshooting the Boot Process
Page 6 of 26
NTDETECT.COM detects the following components:
Bus/adapter type
Communication ports
Floating-point coprocessor
Floppy disks
Keyboard
Mouse/pointing device
Parallel ports
SCSI adapters
Video adapters
Configuration Selection
After NTLDR starts loading Windows XP Professional and collects hardware information, the operating
system loader presents you with the Hardware Profile/Configuration Recovery menu, which contains a list
of the hardware profiles that are set up on the computer. The first hardware profile is highlighted. You can
press the down-pointing arrow key to select another profile. You also can press L to invoke the
LastKnownGood configuration.
If there is only a single hardware profile, NTLDR does not display the Hardware Profile/Configuration
Recovery menu and loads Windows XP Professional using the default hardware profile configuration.
Kernel Load
After configuration selection, the Windows XP Professional kernel (NTOSKRNL.EXE) loads and
initializes. NTOSKRNL.EXE also loads and initializes device drivers and loads services. If you press Enter
when the Hardware Profile/Configuration Recovery menu appears, or if NTLDR makes the selection
automatically, the computer enters the kernel load phase. The screen clears and a series of white rectangles
appears across the bottom of the screen.
During the kernel load phase, NTLDR does the following:
Loads NTOSKRNL.EXE but does not initialize it.
Loads the hardware abstraction layer file (HAL.DLL).
Loads the HKEY_LOCAL_MACHINE\SYSTEM registry key from %systemroot%\System32
\Config\System.
Selects the control set it will use to initialize the computer. A control set contains configuration data
used to control the system, such as a list of the device drivers and services to load and start.
Loads device drivers with a value of 0x0 for the Start entry. These typically are low-level hardware
device drivers, such as those for a hard disk. The value for the List entry, which is specified in the
HKEY_LOCAL_MACHINE\SYSTEM\CurrentControlSet\Control\ServiceGroupOrder subkey of the
registry, defines the order in which NTLDR loads these device drivers.
Kernel Initialization
When the kernel load phase is complete, the kernel initializes, and then NTLDR passes control to the kernel.
At this point, the system displays a graphical screen with a status bar indicating load status. Four tasks are
accomplished during the kernel initialization stage:
1. The Hardware key is created. On successful initialization, the kernel uses the data collected during
hardware detection to create the registry key HKEY_LOCAL_MACHINE\HARDWARE. This key
contains information about hardware components on the system board and the interrupts used by
file://C:\Documents%20and%20Settings\alex\Local%20Settings\Temp\~hh60DF.htm
1/5/2005
Modifying and Troubleshooting the Boot Process
Page 7 of 26
specific hardware devices.
2. The Clone control set is created. The kernel creates the Clone control set by copying the control set
referenced by the value of the Current entry in the HKEY_LOCAL_MACHINE\SYSTEM\Select
subkey of the registry. The Clone control set is never modified, as it is intended to be an identical
copy of the data used to configure the computer and should not reflect changes made during the
startup process.
3. Device drivers are loaded and initialized. After creating the Clone control set, the kernel initializes
the low-level device drivers that were loaded during the kernel load phase. The kernel then scans the
HKEY_LOCAL_MACHINE\SYSTEM\CurrentControlSet\Services subkey of the registry for device
drivers with a value of 0x1 for the Start entry. As in the kernel load phase, a device driver's value for
the Group entry specifies the order in which it loads. Device drivers initialize as soon as they load.
If an error occurs while loading and initializing a device driver, the boot process proceeds based on
the value specified in the ErrorControl entry for the driver.
Table 18.4 describes the possible ErrorControl values and the resulting boot sequence actions.
Table 18.4 ErrorControl Values and Resulting Action
ErrorControl
value
0x0 (Ignore)
0x1 (Normal)
0x2 (Severe)
0x3 (Critical)
Action
The boot sequence ignores the error and proceeds without displaying an error
message.
The boot sequence displays an error message but ignores the error and proceeds.
The boot sequence fails and then restarts using the LastKnownGood control set. If
the boot sequence is currently using the LastKnownGood control set, the boot
sequence ignores the error and proceeds.
The boot sequence fails and then restarts using the LastKnownGood control set.
However, if the LastKnownGood control set is causing the critical error, the boot
sequence stops and displays an error message.
ErrorControl values appear in the registry under the subkey
HKEY_LOCAL_MACHINE\SYSTEM\CurrentControlSet\Services\name_of_service_or_driver\ErrorControl
4. Services are started. After the kernel loads and initializes devices drivers, the Session Manager
(SMSS.EXE) starts the higher order subsystems and services for Windows XP Professional. Session
Manager executes the instructions in the BootExecute data item, and in the Memory Management,
DOS Devices, and SubSystems keys.
Table 18.5 describes the function of each instruction set and the resulting Session Manager action.
Table 18.5 Session Manager Reads and Executes These Instruction Sets
Data item or key
BootExecute data
item
Memory
Management key
DOS Devices key
SubSystems key
Action
Session Manager executes the commands specified in this data item before it
loads any services.
Session Manager creates the paging file information required by the Virtual
Memory Manager.
Session Manager creates symbolic links that direct certain classes of commands
to the correct componentin the file system.
Session Manager starts the Win32 subsystem, which controls all input/output
(I/O) and access to the video screen and starts the WinLogon process.
file://C:\Documents%20and%20Settings\alex\Local%20Settings\Temp\~hh60DF.htm
1/5/2005
Modifying and Troubleshooting the Boot Process
Page 8 of 26
Logon
The logon process begins at the conclusion of the kernel initialization phase. The Win32 subsystem
automatically starts WINLOGON.EXE, which starts the Local Security Authority (LSASS.EXE) and
displays the Logon dialog box. You can log on at this time, even though Windows XP Professional might
still be initializing network device drivers.
Next, the Service Controller executes and makes a final scan of the HKEY_
LOCAL_MACHINE\SYSTEM\CurrentControlSet\Services subkey, looking for services with a value of 0x2
for the Start entry. These services, including the Workstation service and the Server service, are marked to
load automatically.
The services that load during this phase do so based on their values for the DependOnGroup or
DependOnService entries in the HKEY_LOCAL_MACHINE\SYSTEM\CurrentControlSet\ Services
registry subkey.
A Windows XP Professional startup is not considered good until a user successfully logs on to the system.
After a successful logon, the system copies the Clone control set to the LastKnownGood control set.
For more information on LastKnownGood configuration, see Lesson 3, "Using Startup and Recovery
Tools," later in this chapter.
Lesson Review
The following questions will help you determine whether you have learned enough to move on to the next
lesson. If you have difficulty answering these questions, review the material in this lesson before beginning
the next lesson. The answers are in Appendix A, "Questions and Answers."
1. Windows XP Professional modifies the boot sector during installation so that __________ loads
during system startup.
2. What is the purpose of the BOOT.INI file and what happens if it is not present?
3. What does the BOOTSECT.DOS file contain and when is it used?
4. A user calls you and tells you that Windows XP Professional does not appear to be loading correctly.
The Hardware Profile/Configuration Recovery menu does not appear when the computer is restarted,
but it does appear on the computer of the person sitting in the next cubicle when that computer is
restarted. What would you tell the user?
Lesson Summary
NTLDR and NTDETECT.COM are required files in the Windows XP Professional boot process.
BOOTSECT.DOS is a copy of the boot sector that was on the system partition at the time that
Windows XP Professional was installed. It is only used if you choose to load an operating system
other than Windows XP Professional.
When you install Windows XP Professional on a computer, Windows Setup saves the BOOT.INI file
in the active partition.
NTLDR uses information in the BOOT.INI file to display the boot loader screen, from which you
select the operating system to start.
You can edit the BOOT.INI file, including modifying ARC paths and using the optional BOOT.INI
file://C:\Documents%20and%20Settings\alex\Local%20Settings\Temp\~hh60DF.htm
1/5/2005
Modifying and Troubleshooting the Boot Process
Page 9 of 26
switches.
The Windows XP Professional boot process occurs in five phases: preboot sequence, boot sequence,
kernel load, kernel initialization, and logon.
Lesson 2: Editing the Registry
Microsoft Windows XP Professional stores hardware and software settings centrally in a hierarchical
database called the registry. The registry replaces many of the .ini, .sys, and .com configuration files used in
earlier versions of Microsoft Windows. The registry controls the Windows XP Professional operating
system by providing the appropriate initialization information to boot Windows XP Professional, to start
applications, and to load components, such as device drivers and network protocols.
Most users of Windows XP Professional never need to access the registry. However, management of the
registry is an important part of the system administrator's job and includes viewing, editing, backing up, and
restoring the registry. You use Registry Editor to view and change the registry configuration.
After this lesson, you will be able to
Identify the purpose of the registry
Define the hierarchical structure of the registry
View and edit the registry with Registry Editor
Estimated lesson time: 60 minutes
Understanding the Registry
The registry contains a variety of different types of data, including the following:
The hardware installed on the computer, including the central processing unit (CPU), bus type,
pointing device or mouse, and keyboard.
Installed device drivers.
Installed applications.
Installed network protocols.
Network adapter card settings. Examples include the interrupt request (IRQ) number, memory base
address, I/O port base address, I/O channel ready, and transceiver type.
The registry structure provides a secure set of records. The data in the registry is read, updated, or modified
by many of the Windows XP Professional components.
Table 18.6 describes some of the components that access and store data in the registry.
Table 18.6 Components That Use the Registry
Component
Windows XP
Professional kernel
Description
During startup, the Windows XP Professional kernel (NTOSKRNL.EXE) reads
information from the registry, including the device drivers to load and the order in
which they should be loaded. The kernel writes information about itself to the
registry, such as the version number.
file://C:\Documents%20and%20Settings\alex\Local%20Settings\Temp\~hh60DF.htm
1/5/2005
Modifying and Troubleshooting the Boot Process
Device drivers
User profiles
Setup programs
Hardware profiles
NTDETECT.COM
Page 10 of 26
Device drivers receive configuration parameters from the registry. They also write
information to the registry. A device driver informs the registry which system
resources it is using, such as hardware interrupts or direct memory access (DMA)
channels. Device drivers also report discovered configuration data.
Windows XP Professional creates and maintains user work environment settings in a
user profile. When a user logs on, the system caches the profile in the registry.
Windows XP Professional first writes user configuration changes to the registry and
then to the user profile.
During setup of a hardware device or application, a setup program can add new
configuration data to the registry. It can also query the registry to determine whether
required components have been installed.
Computers with two or more hardware configurations use hardware profiles. When
Windows XP Professional starts, the user selects a hardware profile and Windows
XP Professional configures the system accordingly.
During system startup, NTDETECT.COM performs hardware detection. This
dynamic hardware configuration data is stored in the registry.
Reviewing the Hierarchical Structure of the Registry
The registry is organized in a hierarchical structure similar to the hierarchical structure of folders and files
on a disk. Figure 18.2 shows the hierarchical structure of the registry as displayed by the Registry Editor.
Figure 18.2 Registry Editor displays the hierarchical structure of the registry
Table 18.7 describes the components that make up the hierarchical structure of the registry.
Table 18.7 Components That Make Up the Registry
Component
Description
file://C:\Documents%20and%20Settings\alex\Local%20Settings\Temp\~hh60DF.htm
1/5/2005
Modifying and Troubleshooting the Boot Process
Subtree
Keys
Entries
Hive
Page 11 of 26
A subtree (or subtree key) is analogous to the root folder of a disk. The Windows XP
Professional registry has two subtrees: HKEY_LOCAL_MACHINE and HKEY_USERS.
However, to make the information in the registry easier to find and view, there are five
predefined subtrees that can be seen in the editor:
HKEY_CLASSES_ROOT HKEY_CURRENT_USER HKEY_LOCAL_MACHINE
HKEY_USERS HKEY_CURRENT_CONFIG
Keys are analogous to folders and subfolders. Keys correspond to hardware or software
objects and groups of objects. Subkeys are keys within higher level keys.
Keys contain one or more entries. An entry has three parts: name, data type, and value (data or
configuration parameter).
A hive is a discrete body of keys, subkeys, and entries. Each hive has a corresponding registry
file and .log file located in %systemroot%\ System32\Config. Windows XP Professional uses
the .log file to record changes and ensure the integrity of the registry.
Each entry's value is expressed as one of these data types:
REG_SZ (String value). One value; Windows XP Professional interprets it as a string to
store.
REG_BINARY (Binary value). One value; it must be a string of hexadecimal digits.
Windows XP Professional interprets each pair as a byte value.
REG_DWORD (DWORD value). One value; must be a string of 1-8 hexadecimal digits.
Data types
REG_MULTI_SZ (Multistring value). Multiple values allowed; Windows XP Professional
interprets each string as a component of multi_sz separate entries.
REG_EXPAND_SZ (Expandable string value). Similar to REG_SZ, except the text can
contain a replaceable variable; for example, in the string %systemroot% \NTVDM.EXE,
Windows XP Professional replaces the systemroot environmental variable with the path to the
Windows XP Professional System32 folder.
REG_FULL_RESOURCE_DESCRIPTOR. Stores a resource list for hardware components
or drivers. You cannot add or modify an entry with this data type.
Registry Subtrees
Understanding the purpose of each subtree can help you locate specific keys and values in the registry. The
following five subtrees or subtree keys are displayed in the Registry Editor (see Figure 18.2):
HKEY_LOCAL_MACHINE. Contains all configuration data for the local computer, including
hardware and operating system data such as bus type, system memory, device drivers, and startup
control data. Applications, device drivers, and the operating system use this data to set the computer
configuration. The data in this subtree remains constant regardless of the user.
HKEY_USERS. Contains two subkeys:
DEFAULT. Contains the system default settings (system default profile) used to display the
Ctrl+Alt+Delete logon screen, and the security identifier (SID) of the current user.
HKEY_CURRENT_USER. Is a child of HKEY_USERS.
HKEY_CURRENT_USER. Contains data about the current user. Retrieves a copy of each user
account used to log on to the computer from the NTUSER.DAT file and stores it in the %systemroot%
\Profiles\username key. This subkey points to the same data contained in
HKEY_USERS\SID_currently_logged_on_user. This subtree takes precedence over
HKEY_LOCAL_MACHINE for duplicated values.
file://C:\Documents%20and%20Settings\alex\Local%20Settings\Temp\~hh60DF.htm
1/5/2005
Modifying and Troubleshooting the Boot Process
Page 12 of 26
HKEY_CLASSES_ROOT. Contains software configuration data: object linking and embedding
(OLE) and file-class association data. This subtree points to the Classes subkey under
HKEY_LOCAL_MACHINE\SOFTWARE.
HKEY_CURRENT_CONFIG. Contains data on the active hardware profile extracted from the
SOFTWARE and SYSTEM hives. This information is used to configure settings such as the device
drivers to load and the display resolution to use.
The HKEY_LOCAL_MACHINE Subtree
HKEY_LOCAL_MACHINE provides a good example of the subtrees in the registry for two reasons:
The structure of all subtrees is similar.
HKEY_LOCAL_MACHINE contains information specific to the local computer and is always the
same, regardless of the user who is logged on.
The HKEY_LOCAL_MACHINE root key has five subkeys, which are explained in Table 18.8.
Table 18.8 HKEY_LOCAL_MACHINE Subkeys
Subkey
Description
The type and state of physical devices attached to the computer. This subkey is volatile,
meaning that Windows XP Professional builds it from information gathered during startup.
HARDWARE Because the values for this subkey are volatile, it does not map to a file on the disk.
Applications query this subkey to determine the type and state of physical devices attached
to the computer.
The directory database for the computer. The SAM hive maps to the SAM and SAM.LOG
files in the %systemroot% \System32\Config directory. Applications that query SAM must
SAM
use the appropriate application programming interfaces (APIs). This hive is a pointer to the
same one accessible under HKEY_LOCAL_MACHINE\ SECURITY\SAM.
The security information for the local computer. The SECURITY hive maps to the Security
and SECURITY.LOG files in the %systemroot%\System32\Config directory.
SECURITY
Applications cannot modify the keys contained in the SECURITY subkey. Instead,
applications must query security information by using the security APIs.
Information about the local computer software that is independent of per-user configuration
information. This hive maps to the Software and SOFTWARE.LOG files in the %
SOFTWARE
systemroot%\System32\Config directory. It also contains file associations and OLE
information.
Information about system devices and services. When you install or configure device drivers
or services, they add or modify information under this hive. The SYSTEM hive maps to the
SYSTEM
System and SYSTEM.LOG files in the %systemroot% \System32\Config directory. The
registry keeps a backup of the data in the SYSTEM hive in the SYSTEM.ALT file.
Control Sets
A typical Windows XP Professional installation contains the following control set subkeys: Clone,
ControlSet001, ControlSet002, and CurrentControlSet. Control sets are stored as subkeys of the registry key
HKEY_LOCAL_MACHINE\SYSTEM (see Figure 18.3). The registry might contain several control sets,
depending on how often you change or have problems with system settings.
file://C:\Documents%20and%20Settings\alex\Local%20Settings\Temp\~hh60DF.htm
1/5/2005
Modifying and Troubleshooting the Boot Process
Page 13 of 26
Figure 18.3 Registry Editor displaying the control sets
The CurrentControlSet subkey is a pointer to one of the ControlSet00x keys. The Clone control set is a clone
of the control set used to initialize the computer (either Default or LastKnownGood), and is created by the
kernel initialization process each time you start your computer. The Clone control set is not available after
you log on.
To better understand control sets, you should know about the registry subkey
HKEY_LOCAL_MACHINE\SYSTEM\Select. The entries contained in this subkey include the following:
Current. Identifies which control set is the CurrentControlSet. When you use Control Panel options
or the Registry Editor to change the registry, you modify information in the CurrentControlSet.
Default. Identifies the control set to use the next time Windows XP Professional starts, unless you
select the LastKnownGood configuration. Default and Current typically contain the same control set
number.
Failed. Identifies the control set that was designated as failed the last time the computer was started
using the LastKnownGood control set.
LastKnownGood. Identifies a copy of the control set that was used the last time the computer started
Windows XP Professional successfully. After a successful logon, the Clone control set is copied to the
LastKnownGood control set.
Each of these entries in HKEY_LOCAL_MACHINE\SYSTEM\Select takes a REG_DWORD data type,
and the value for each entry refers to a specific control set. For example, if the value for the Current entry is
set to 0x1, the CurrentControlSet points to ControlSet001. Similarly, if the value for the LastKnownGood
entry is set to 0x2, the LastKnownGood control set points to ControlSet002.
Using the Registry Editor
Setup installs Registry Editor (REGEDT32.EXE) in the %systemroot%\System32 directory during
installation. However, because most users do not need to use Registry Editor, it does not appear on the Start
menu. You start Registry Editor by selecting Run on the Start menu.
Although Registry Editor allows you to perform manual edits on the registry, it is intended for
file://C:\Documents%20and%20Settings\alex\Local%20Settings\Temp\~hh60DF.htm
1/5/2005
Modifying and Troubleshooting the Boot Process
Page 14 of 26
troubleshooting and problem resolution. You should make most configuration changes through either
Control Panel or Administrative Tools. However, some configuration settings can only be made directly
through the registry.
Using Registry Editor incorrectly can cause serious, system-wide problems that could require reinstallation
of Windows XP Professional. When using Registry Editor to view or edit data, use a program such as
Windows Backup to save a backup copy of the registry file before viewing. In Windows XP Professional,
you can use Backup to back up the System State, which includes the registry, the COM class registration
database, and the system boot files.
Registry Editor saves data automatically as you make entries or corrections. New registry data takes effect
immediately.
You can select Find Key on the View menu to search the registry for a specific key. Key names appear in
the left pane of Registry Editor. The search begins at the currently selected key and parses all descendant
keys for the specified key name. The search is local to the subtree in which the search begins. For example,
a search for a key in the HKEY_LOCAL_MACHINE subtree does not include keys under
HKEY_CURRENT_USER.
Practice: Using the Registry Editor
In this practice, you use Registry Editor to view the information in the registry. You determine information
such as the BIOS, the processor on your computer, and the version of the operating system. You use
Registry Editor's Find Key command to search the registry for a specific word with key names. You then
modify the registry by adding a value to it, and you save a subtree as a file so that you can use an editor, like
Notepad, to search the file.
Exercise 1: Exploring the Registry
In this exercise, you use Registry Editor to view information in the registry.
To view information in the registry
1.
2.
3.
4.
5.
6.
Ensure that you are logged on as Administrator.
Click Start and then click Run.
In the Open text box, type Regedt32 and then click OK.
Maximize the Registry Editor window, and then expand HKEY_LOCAL_MACHINE.
Under HKEY_LOCAL_MACHINE, expand HARDWARE.
Expand DESCRIPTION and then double-click the System subkey.
What are the SystemBIOSDate and SystemBIOSVersion of your computer?
What is the computer type of your local machine according to the Identifier entry?
7. Expand SOFTWARE\Microsoft\Windows NT.
8. Click CurrentVersion, and then fill in the following information.
file://C:\Documents%20and%20Settings\alex\Local%20Settings\Temp\~hh60DF.htm
1/5/2005
Modifying and Troubleshooting the Boot Process
Page 15 of 26
Software configuration Value and string
Current build number
Current version
Registered organization
Registered owner
Exercise 2: Using the Find Command
In this exercise, you use the Registry Editor's Find command to search the registry to find a specific word in
the keys, values, and data in the registry.
To use the find command
1. Click the HKEY_LOCAL_MACHINE subkey to ensure that the entire subtree is searched.
2. On the Edit menu, click Find.
The Registry Editor displays the Find dialog box.
3. In the Find What text box, type serial, and clear Values and Data.
4. Click Find Next.
The Registry Editor locates and highlights the first entry containing serial.
5. Press F3 to find the next entry containing serial.
6. Continue pressing F3 until a Registry Editor dialog box appears, indicating that Registry Editor has
finished searching the registry.
Notice that serial appears in many locations in the registry.
7. Click OK to close the Registry Editor dialog box.
Exercise 3: Modifying the Registry
In this exercise, you add a value to the registry.
To add a value to the registry
1. Right-click HKEY_CURRENT_USER and then click Expand.
2. In the left pane of the Registry Editor window, click Environment.
The values in the Environment key appear in the right pane of the Registry Editor window.
3. On the Edit menu, click New, and then click String Value.
The Registry Editor adds A New Value #1 entry in the right pane of the Registry Editor window.
4. Type Test and then press Enter.
5. Right-click Test and then click Modify.
The Registry Editor displays an Edit String dialog box.
6. In the Value Data text box, type %windir%\system32 and then click OK.
file://C:\Documents%20and%20Settings\alex\Local%20Settings\Temp\~hh60DF.htm
1/5/2005
Modifying and Troubleshooting the Boot Process
Page 16 of 26
Test REG_SZ %windir%\ system32 is now an entry in the right pane of the Registry Editor window.
7. Minimize the Registry Editor window.
To verify the new registry value
1. Click Start, right-click My Computer, and then click Properties.
The System Properties dialog box appears.
2. Click the Advanced tab, and then click Environment Variables.
The Environment Variables dialog box appears.
Does the test variable appear in the User Variables For Administrator list?
3. Close the Environment Variables dialog box, and then close the System Properties dialog box.
Lesson Review
The following questions will help you determine whether you have learned enough to move on to the next
lesson. If you have difficulty answering these questions, review the material in this lesson before beginning
the next lesson. The answers are in Appendix A, "Questions and Answers."
1.
2.
3.
4.
5.
What is the registry and what does it do?
What is the purpose of the BOOTSECT.DOS file and what happens if it is not present?
What are some of the Windows XP Professional components that use the registry?
How do you access the Registry Editor?
Why should you make most of your configuration changes through either Control Panel or
Administrative Tools rather than by editing the registry directly with the Registry Editor?
Lesson Summary
Windows XP Professional stores hardware and software settings in the registry, a hierarchical
database that replaces many of the .ini, .sys, and .com configuration files used in earlier versions of
Windows.
The registry provides the appropriate initialization information to boot Windows XP Professional, to
start applications, and to load components, such as device drivers and network protocols.
The registry structure provides a secure set of records that can be read, updated, or modified by many
of the Windows XP Professional components.
The registry has two subtrees: HKEY_LOCAL_MACHINE and HKEY_USERS.
The Registry Editor (REGEDT32.EXE) allows you to view and change the registry.
The Registry Editor is primarily intended for troubleshooting. For most configuration changes, you
should use either Control Panel or Administrative Tools, not Registry Editor.
Lesson 3: Using Startup and Recovery Tools
file://C:\Documents%20and%20Settings\alex\Local%20Settings\Temp\~hh60DF.htm
1/5/2005
Modifying and Troubleshooting the Boot Process
Page 17 of 26
In this lesson, you learn about the tools and options Windows XP Professional provides to help you
troubleshoot problems with starting your computer and recovering from disasters. These tools include safe
mode, LastKnownGood configuration, the Recovery Console, and the Automated System Restore Wizard.
The Automated System Restore Wizard is explained in Chapter 16, "Backing Up and Restoring Data."
After this lesson, you will be able to
Describe how to use safe mode
Describe how to use the LastKnownGood configuration
Describe the advanced boot options
Install and use the Windows XP Professional Recovery Console
Estimated lesson time: 60 minutes
Using Safe Mode
If your computer will not start, you might be able to start it by using the safe mode. Pressing F8 during the
operating system selection phase displays a screen with advanced options for booting Windows XP
Professional. If you select safe mode, Windows XP Professional starts with limited device drivers and
system services. These basic device drivers and system services include the mouse, standard VGA monitor,
keyboard, mass storage, default system services, and no network connections. Safe mode also ignores
programs that automatically start up, user profiles, programs listed in the registry to automatically run, and
all local group policies.
Safe mode provides access to Windows XP Professional configuration files, so you can make configuration
changes. You can disable or delete a system service, a device driver, or an application that automatically
starts that prevents the computer from starting normally.
If you choose to start your computer in safe mode, the background will be black and "Safe Mode" will
appear in all four corners of the screen (see Figure 18.4). If your computer does not start using safe mode,
you can try Windows XP Professional Automatic System Recovery.
file://C:\Documents%20and%20Settings\alex\Local%20Settings\Temp\~hh60DF.htm
1/5/2005
Modifying and Troubleshooting the Boot Process
Page 18 of 26
Figure 18.4 Running Windows XP Professional in safe mode
Safe Mode with Networking
There are a couple of variations of safe mode. You can select safe mode with networking, which is identical
to safe mode except that it adds the drivers and services necessary to enable networking to function when
you restart your computer. Safe mode with networking allows Group Policy to be implemented, including
those implemented by the server during the logon process and those configured on the local computer.
Safe Mode with Command Prompt
A second variation of safe mode is safe mode with command prompt, which is similar to safe mode, but it
loads the command interpreter as the user shell, so when the computer restarts it displays a command
prompt.
Using the LastKnownGood Configuration
Selecting the LastKnownGood configuration advanced boot option starts Windows XP Professional using
the registry information that Windows XP Professional saved at the last shutdown.
If you change the Windows XP Professional configuration to load a driver and have problems rebooting,
you can use the last known good process to recover your working configuration. The last known good
process uses the LastKnownGood configuration, stored in the registry, to boot Windows XP Professional.
Windows XP Professional provides two configurations for starting a computer, Default and
LastKnownGood. Figure 18.5 shows the events that occur when you make configuration changes to your
file://C:\Documents%20and%20Settings\alex\Local%20Settings\Temp\~hh60DF.htm
1/5/2005
Modifying and Troubleshooting the Boot Process
Page 19 of 26
system. Any configuration changes (for example, adding or removing drivers) are saved in the Current
control set.
Figure 18.5 Using Default and LastKnownGood configurations
After you reboot the computer, the kernel copies the information in the Current control set to the Clone
control set during the kernel initialization phase. When you successfully log on to Windows XP
Professional, the information in the Clone control set is copied to the LastKnownGood control set, as shown
in the lower part of Figure 18.5.
If you experience startup problems that you think might relate to Windows XP Professional configuration
changes, shut down the computer without logging on, and then restart it. When you are prompted to select
the operating system to start from a list of the operating systems specified in the BOOT.INI file, press F8 to
open the Windows Advanced Options Menu screen. Then select the LastKnownGood Configuration option.
The next time you log on, the Current configuration is copied to the Default configuration. If your
configuration changes work correctly, the next time you log on, the Current configuration is copied to the
Default configuration. If your configuration changes do not work, you can restart and use the
LastKnownGood Configuration option to log on.
Table 18.9 summarizes the purpose of the Default and LastKnownGood configurations.
Table 18.9 Default and LastKnownGood Configurations
Configuration
Description
Contains information that the system saves when a computer shuts down. To start a
Default
computer using the default configuration, select Windows XP Professional on the Please
Select The Operating System To Start menu.
Contains information that the system saves after a successful logon. The
LastKnownGood LastKnownGood configuration loads only if the system is recovering from a severe or
critical device driver loading error or if it is selected during the boot process.
Table 18.10 lists situations in which you can use the LastKnownGood configuration and the related
file://C:\Documents%20and%20Settings\alex\Local%20Settings\Temp\~hh60DF.htm
1/5/2005
Modifying and Troubleshooting the Boot Process
Page 20 of 26
solutions.
Table 18.10 Situations in Which to Use the LastKnownGood Configuration
Situation
Solution
After a new device driver
is installed, Windows XP Use the LastKnownGoodConfiguration option to start Windows XP Professional
Professional restarts, but because the LastKnownGood configuration doesn't contain any reference to the
the system stops
new, and possibly faulty, driver.
responding.
Some critical drivers are written to keep users from making the mistake of
You accidentally disable
disabling them. With these drivers, the system automatically reverts to the
a critical device driver
LastKnownGood control set if a user disables the driver. If the driver does not
(such as the Scsiport
automatically cause the system to revert to the LastKnownGood control set, you
driver).
must manually select the LastKnownGood Configuration option.
Using the LastKnownGood configuration does not help in the following situations:
When the problem is not related to Windows XP Professional configuration changes. Such a problem
might arise from incorrectly configured user profiles or incorrect file permissions.
After you log on. The system updates the LastKnownGood control set with Windows XP Professional
configuration changes after a successful logon.
When startup failures relate to hardware failures or missing or corrupted files.
Starting Windows XP Professional using the LastKnownGood configuration overwrites any changes made
since the last successful boot of Windows XP Professional.
Using Other Advanced Boot Options
Pressing F8 during the operating system selection phase displays a screen with the Windows Advanced
Options menu. This menu provides the following options:
Enable Boot Logging. Selecting the Enable Boot Logging advanced boot option logs the loading and
initialization of drivers and services for troubleshooting boot problems. All drivers and services that
are loaded and initialized or that are not loaded in a file are logged. The log file, NTBTLOG.TXT, is
located in the %windir% folder. All three versions of safe mode automatically create this boot log file.
Enable VGA Mode. Selecting the Enable VGA Mode advanced boot option starts Windows XP
Professional with a basic VGA driver.
Directory Services Restore Mode. Selecting the Directory Services Restore Mode advanced boot
option is only applicable to domain controllers, so it does not apply to computers running Windows
XP Professional.
Debugging Mode. Selecting the Debugging Mode advanced boot option starts Windows XP
Professional in kernel debug mode, which allows a debugger to break into the kernel for
troubleshooting and system analysis.
When using the advanced boot options in Windows XP, logging is enabled with every option except
LastKnownGood Configuration. The system writes the log file (NTBTLOG.TXT) to the %systemroot%
folder. In addition, each option except LastKnownGood Configuration loads the default VGA driver.
Using an advanced boot option to boot the system sets the environment variable %SAFEBOOT_OPTION%
to indicate the mode used to boot the system.
file://C:\Documents%20and%20Settings\alex\Local%20Settings\Temp\~hh60DF.htm
1/5/2005
Modifying and Troubleshooting the Boot Process
Page 21 of 26
Using the Recovery Console
The Windows XP Professional Recovery Console is a text-mode command interpreter that you can use to
access NTFS, FAT, and FAT32 volumes without starting Windows XP Professional. The Recovery Console
allows you to perform a variety of troubleshooting and recovery tasks, including the following:
Starting and stopping services
Reading and writing data on a local drive
Formatting hard disks
Repairing the MBR
Installing and Starting the Recovery Console
To install the Recovery Console, insert the Microsoft Windows XP Professional CD-ROM into your CDROM drive, and close the Microsoft Windows XP Professional CD dialog box, if it opens. Open a Run
dialog box or a Command Prompt window in Windows XP Professional, change to the i386 folder on the
Windows XP Professional CD, and then run the winnt32 command with the /cmdcoms switch. After you
install the Recovery Console, you can use the Windows XP Professional CD-ROM to start your computer,
and then to access the Recovery Console, select the Recovery Console option when you are prompted to
choose repair options.
After you start the Recovery Console, you must specify which installation of Window XP Professional you
want to log on to (if you have a dual-boot or multiple-boot configuration), and then you must log on as the
Administrator.
Using the Windows XP Professional Recovery Console
You can also run the Recovery Console from the Windows XP Professional CD-ROM. The Recovery
Console provides a limited set of administrative commands that you can use to repair your Windows XP
Professional installation. You can use the following steps to start the Recovery Console from the Windows
XP Professional CD-ROM:
1. Insert the Windows XP Professional CD-ROM into the CD-ROM drive and restart the computer. If
your computer or the workstation you want to repair does not have a bootable CD-ROM drive, you
will need to insert your Windows XP Professional Setup Boot disk into your floppy disk drive. Insert
the additional Windows XP Professional Setup disks when you are prompted to do so.
2. When Setup displays the Setup Notification message, read it, and then press Enter to continue.
Setup displays the Welcome To Setup screen. In addition to the initial installation of Windows XP
Professional, you can use Windows Setup to repair or recover a damaged Windows XP Professional
installation.
3. Press R to repair a Windows XP Professional installation.
The Windows XP Recovery Console screen appears.
4. Press C to start the Recovery Console.
If you have more than one installation of Windows XP Professional on the computer, you are
prompted to select which installation you want to repair.
5. Type 1 and then press Enter.
file://C:\Documents%20and%20Settings\alex\Local%20Settings\Temp\~hh60DF.htm
1/5/2005
Modifying and Troubleshooting the Boot Process
Page 22 of 26
You are prompted to enter the Administrator's password.
6. Type the Administrator's password and then press Enter.
Setup displays a command prompt.
7. Type help and press Enter for a list of the commands available.
8. When you have completed the repair process, type exit and press Enter.
The computer will restart.
Understanding the Recovery Console Commands
There are a number of commands available in the Recovery Console, some of which are described in Table
18.11.
Table 18.11 Recovery Console Commands
Command
Description
Changes the attributes of a file or folder. - Clears an attribute+ Sets an attribute c Compressed
Attrib
file attribute h Hidden file attribute r Read-only attribute s System file attribute
Chdir (cd) Displays the name of the current folder or changes the current folder.
Chkdsk
Checks a disk and displays a status report.
Cls
Clears the screen.
Copies a single file to another location. You can't copy a file from a hard drive to a floppy
Copy
disk, but you can copy a file from a floppy disk or a CD-ROM to a hard drive or from a hard
drive to another hard drive.
Delete
Deletes one or more files.
(Del)
Displays a list of files and subfolders in a folder. The wildcard characters * and ? are
Dir
permitted.
Disable
Disables a system service or a device driver.
Creates, deletes, and manages partitions on your hard disk. /add Creates a new partition/delete
Diskpart
Deletes an existing partition Do not modify the structure of dynamic disks with this command,
because you might damage your partition table.
Enable
Starts or enables a system service or a device driver.
Exit
Exits the Recovery Console and restarts your computer.
Expands a compressed file stored on the Windows XP Professional CD-ROM or from within
Expand
a .cab file and copies it to a specified destination.
Fdisk
Manages partitions on your hard disk.
Fixboot
Writes a new partition boot sector onto the system partition.
Repairs the MBR of the partition boot sector. This command only overwrites the master boot
Fixmbr
code, leaving the existing partition table intact. If corruption in the MBR affects the partition
table, running fixmbr might not resolve the problem.
Format
Formats a disk. If no file system is specified, NTFS is used bydefault.
Help
Lists the commands you can use in the Recovery Console.
Logon
Logs on to a Windows XP Professional installation.
Map
Displays the drive letter mappings.
Mkdir (md) Creates a folder.
file://C:\Documents%20and%20Settings\alex\Local%20Settings\Temp\~hh60DF.htm
1/5/2005
Modifying and Troubleshooting the Boot Process
Page 23 of 26
More
Displays a test file.
Rmdir (rd) Deletes a folder.
Rename
Renames a single file.
(ren)
Sets the current folder to the %systemroot% folder of the system you are currently logged on
Systemroot
to.
Type
Displays a text file.
Practice: Using the Windows XP Professional Recovery Console
In this practice, you use the Windows XP Professional Recovery Console to troubleshoot a Windows XP
Professional installation that will not boot. You also install and then start the Recovery Console, and you
look at Help to determine what commands are available in the Recovery Console. You also use the Listsvc
command to view the services and then use the Disable command to disable the Alerter service.
If your computer is not equipped with a CD-ROM drive that is capable of booting from a CD-ROM, do not
do Exercise 1 or you might have to reinstall Windows XP Professional. Skip to Exercise 2.
Optional Exercise 1: Troubleshooting a Windows XP Professional Installation
In this exercise, you troubleshoot a Windows XP Professional installation and repair it using the Recovery
Console.
To create a system boot failure
1.
2.
3.
4.
Click Start, right-click My Computer, and then click Explore.
In the left pane of the Explorer window, click Local Disk (C:).
In the right pane of the Explorer window, right-click NTLDR and then click Rename.
Type oldntldr and then press Enter.
Windows XP Professional displays a Confirm File Rename dialog box asking if you are sure you want
to rename the system file NTLDR to OLDNTLDR.
5. Click Yes.
6. Restart the computer.
What error do you receive when attempting to restart the computer?
To use the Recovery Console to repair the installation
1. Insert the Windows XP Professional installation CD into the CD-ROM drive and press
Ctrl+Alt+Delete to restart the computer.
2. If your computer requires you to press a key to boot from the CD-ROM, press Spacebar when
prompted.
3. When Setup displays the Setup Notification message, read it, and then press Enter to continue.
Setup displays the Welcome To Setup screen.
file://C:\Documents%20and%20Settings\alex\Local%20Settings\Temp\~hh60DF.htm
1/5/2005
Modifying and Troubleshooting the Boot Process
Page 24 of 26
4. Press R to repair a Windows XP Professional installation.
Setup starts the Recovery Console.
5. Type 1 and then press Enter.
You are prompted to enter the Administrator's password.
6. Type password and then press Enter.
Setup displays a C:\Windows command prompt.
7. Type d: and press Enter.
If your CD-ROM drive is not drive d, use the correct drive letter.
8. Type cd i386 and press Enter.
9. Type dir and press Enter.
Most of the files on the CD-ROM end with an _, for example, NTOSKRNL.EX_.
10. Press Spacebar to scroll through the files and locate NTLDR.
NTLDR is not compressed so you can copy it directly to your computer.
11. Type copy ntldr c:\ntldr and then press Enter.
When the copy is complete, Setup displays a 1 file(s) copied message.
12. If there is a disk in your floppy drive, remove it. If your computer is capable of booting from the CDROM drive, remove the Windows XP Professional CD from your CD-ROM drive.
13. Type exit and press Enter.
The computer reboots and should start normally.
Exercise 2: Installing the Windows XP Professional Recovery Console
In this exercise, you install the Recovery Console.
1.
2.
3.
4.
5.
Log on as Administrator.
Insert the Windows XP Professional CD into the CD-ROM drive.
When the Microsoft Windows XP Professional CD window appears, close it.
Click Start, and then click Run.
In the Run dialog box, type <cd-drive>:\i386\winnt32 /cmdcons (where <cd-drive> represents the
letter assigned to your CD-ROM drive), and then click OK.
A Windows Setup message box appears, indicating that you can install the Windows Recovery
Console as a startup option.
6. Click Yes to install the Windows XP Professional Recovery Console.
Windows Setup attempts to contact Microsoft and confirm that you have the latest version of Setup
and then it installs the Windows XP Recovery Console on your hard disk.
Windows XP Professional displays a Microsoft Windows XP Professional Setup message box
file://C:\Documents%20and%20Settings\alex\Local%20Settings\Temp\~hh60DF.htm
1/5/2005
Modifying and Troubleshooting the Boot Process
Page 25 of 26
indicating that the Windows Recovery Console has been successfully installed.
7. Click OK to close the Microsoft Windows XP Professional Setup dialog box.
Exercise 3: Using the Windows XP Professional Recovery Console
In this exercise you use the Help command to view the available commands. You then use the available
Listsvc and Disable commands.
1. Restart your computer.
2. In the Please Select The Operating System To Start screen, select Microsoft Windows Recovery
Console.
The Microsoft Windows XP Recovery Console starts and prompts you to select which Windows
installation you would like to log on to. If you had more than one Windows XP Professional
installation on this computer, all of them would be listed here.
3.
4.
5.
6.
Type 1 and then press Enter.
Type password when prompted for the Administrator password, and then press Enter.
Type help and then press Enter to see the list of available commands.
Scroll through the list of commands.
The Listsvc command allows you to view all the available services.
7. Type listsvc and press Enter, and then scroll through the list of available services.
8. Press Esc to stop.
9. Type disable and then press Enter.
The Disable command allows you to disable a Windows system service or driver.
10. Type disable alerter and then press Enter.
Recovery Console displays several lines of text describing how the registry entry for the Alerter
service has been changed from Service_Demand_Start to Service_Disabled. The Alerter service is
now disabled.
11. Type exit and then press Enter to restart your computer.
Exercise 4: Restarting the Alerter Service
In this exercise you confirm that the Alerter service is disabled and then restart it.
1.
2.
3.
4.
5.
6.
7.
8.
Log on as Administrator.
Click Start, click All Programs, click Administrative Tools, and then click Computer Management.
In the Computer Management window, expand Services And Applications.
Under Services And Applications, click Services.
Double-click Alerter.
In the Alerter Properties dialog box, change the Startup Type option to Automatic and then click OK.
Right-click Alerter, and then click Start.
Close the Computer Management window.
file://C:\Documents%20and%20Settings\alex\Local%20Settings\Temp\~hh60DF.htm
1/5/2005
Modifying and Troubleshooting the Boot Process
Page 26 of 26
Lesson Review
The following questions will help you determine whether you have learned enough to move on to the next
lesson. If you have difficulty answering these questions, review the material in this lesson before beginning
the next chapter. The answers are in Appendix A, "Questions and Answers."
1.
2.
3.
4.
5.
What is safe mode and why do you use it?
How do you start Windows XP Professional in safe mode?
When is the LastKnownGood configuration created?
When do you use the LastKnownGood configuration?
How can you install the Windows XP Professional Recovery Console on your computer?
Lesson Summary
If your computer will not start, you might be able to start it by using the safe mode because Windows
XP Professional starts with limited device drivers and system services.
If you change the Windows XP Professional configuration to load a driver and have problems
rebooting, you can use the LastKnownGood process to recover your working configuration.
Pressing F8 during the operating system selection phase displays a screen with the Windows
Advanced Options menu that provides the following options: Safe Mode, Safe Mode With
Networking, Safe Mode With Command Prompt, Enable Boot Logging, Enable VGA Mode,
LastKnownGood Configuration, Directory Services Restore Mode, and Debugging Mode.
The Windows XP Professional Recovery Console is a command-line interface that you can use to
perform a variety of troubleshooting and recovery tasks.
file://C:\Documents%20and%20Settings\alex\Local%20Settings\Temp\~hh60DF.htm
1/5/2005