1
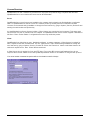
OpalisRendezVous
User’s Manual
version 1.60
Copyright (c) Opalis Software Inc., 1995-2000. All rights reserved.
Information in this document is subject to change without notice.
Copyright © 1998-2000 Opalis. All rights reserved.
Opalis is a registered trademark of Opalis b.v.
Microsoft and MS are registered trademarks and Windows and Windows NT, Windows 2000 are trademarks of
Microsoft Corporation. CompuServe is a registered trademark of Compuserve, Inc. Transact-SQL is a trademark
of Sybase, Inc. Other products and company names are trademarks or registered trademarks of their
respective holders.
Contact information
Head Office
Opalis Software, Inc.
833 Oxford Street, 2nd floor
Toronto ON, M8Z 5X4
Canada
European Office
Opalis Software B.V.
Engelandlaan180
Zoetermeer 2711 DW
The Netherlands
Tel: (416) 253-9383
Fax: (416) 253-7646
Toll-free: 1-888-OPALIS1
Tel: +31 79 346 2910
Fax: +31 79 346 2911
Opalis website
www.opalis.com
Technical Services
+1 (416) 253-1750
[email protected]
General information
[email protected]
TABLE OF CONTENTS
TABLE OF CONTENTS ____________________________________________________________ 3
GETTING STARTED _______________________________________________________________ 4
Overview .................................................................................................................................4
License Structure ....................................................................................................................5
System Requirements..............................................................................................................6
Installation ..............................................................................................................................7
Concept..................................................................................................................................8
The Service ........................................................................................................................... 11
CONFIGURING FLOWS___________________________________________________________ 12
File Flows ............................................................................................................................. 12
Database Flows..................................................................................................................... 19
LOG AND ALERTS _______________________________________________________________ 21
Logs..................................................................................................................................... 21
Alerts ................................................................................................................................... 21
OPTIONS_______________________________________________________________________ 22
Service Options ..................................................................................................................... 22
Administrator Options ............................................................................................................ 25
TROUBLESHOOTING_____________________________________________________________ 26
Nothing To Do ....................................................................................................................... 26
Access Denied...................................................................................................................... 26
Required Resource Not Found ................................................................................................ 26
If The Service Does Not Start .................................................................................................. 26
If You Cannot Connect To a Server .......................................................................................... 27
Help!..................................................................................................................................... 27
OpalisRendezVous Editions ................................................................................................... 27
INDEX__________________________________________________________________________ 28
GETTING STARTED
Overview
OpalisRendezVous is a powerful tool for maintaining and distributing files across the LAN, WAN, or Internet. It
automates data management functions such as replicating, transferring, archiving and mirroring of files and database
rows to enable proactive administration of data distribution in Windows NT/2000 environments.
OpalisRendezVous extends beyond simple copying to deliver the advanced features necessary to maintain data
integrity and availability. Flexible scheduling options and real-time monitoring enable automatic delivery of mission
critical files across the network.
File distribution, such as web-publishing tasks, can be initiated based on date modifications, security changes, file
attributes and size thresholds. Advanced features including overwrite, fail and unique name provide administrators with
greater control over data management and ensures that files, directories and servers have the most current copies of
files and application data.
OpalisRendezVous can also replicate database rows between any ODBC- compliant data source based on user
request, scheduled event or query result. Replicating SQL, Oracle and other DBMS ensures that secondary servers or
remote computers always contain the same up to date information as the primary servers.
OpalisRendezVous supports FTP, Copy and RDV protocol transfer methods. It takes care of establishing the
connection and hanging up when the transfer is done. The FTP transfer option enables administrators to distribute files
across multi-platform environments including Unix, VMS, MVS, AS/400 and Novell.
The RDV protocol is an Opalis innovation that allows transfers to be automated over the Internet (or intranets) or
between computers not permanently linked to the network, like regular Internet dial-up clients. The RDV protocol
enables compression to secure data transfers across a Windows NT/200 network. An intermediate entity called RDV
Server is used to help senders and receivers connect and exchange files. Purchase of OpalisRendezVous includes an
unlimited right to use Opalis Internet RDV Server (rdv.opalis.com).
A single graphical interface enables administrators to create, monitor and control data distribution across the
enterprise. Management features include a status log, an error log, report generation and notification via email.
Overview
4
License Structure
OpalisRendezVous has a client/server architecture. It uses push and pull technology to replicate files and data.
OpalisRendezVous runs on both an NT Server and an NT Workstation.
Server
OpalisRendezVous server licenses are installed on the computer that is triggering the file distribution or replication
tasks. An OpalisRendezVous Server License is a software product (a service) that runs on Windows NT/2000.
Licenses can be entered during installation or through the user interface by going to Options | Service | Product ID and
entering the serial number and product key.
An OpalisRendezVous Server License includes 1 Client License (not counting the local computer). This means each
server license can push or pull files from one computer. An OpalisRendezVous Server License supports a maximum of
256 flows. Flows are the number of configurations that are set-up within the product.
Client
OpalisRendezVous client license open ‘distribution privileges’ to remote computers. A Client License is required for
each computer where files are transferred. This is a ‘paper license’ that is entered during installation or through the
user interface by going to Options | Service | Product ID. Click on the ‘Extensions’ button to add client licenses. No
software is required on the ‘client’ where files are transferred.
A Client License is only required for Copy and FTP flows. Flows using RDV protocol and Database flows do not
require a Client License. Please refer to the System Requirements section for information on using the RDV protocol.
If no serial number is entered the product will run in evaluation mode for 30-days.
License Structure
5
System Requirements
Service
•
•
•
•
•
Windows 2000 or
Windows NT 4.0 or
Windows NT 3.51
5 MB disk space.
TCP/IP for RDV protocol, FTP protocol and SMTP functions - TCP/IP is included in Windows NT
distribution. *
• ODBC for database functions.
• Remote Access Service for dial-up operations - RAS is included in Windows NT distribution. *
Administrator
•
•
•
•
Windows 2000 or
Windows NT 4.0 or
Windows NT 3.51 or
Windows 98 or Windows 95
Windows 98 or 95: Microsoft Remote Registry Services must be installed, it is available on the CD-ROM.
Windows 98: ‘tools\reskit\netadmin\remotereg’
Windows 95: ‘Admin\Nettools\Remotereg’
5 MB of free disk space.
* It is not required to install this software if you do not intend to use the corresponding OpalisRendezVous functions. If
you use a function that requires this software to be installed and the software is not present at run-time, an alert will
remind you to install it.
Remote Computers
For Copy and ODBC flows, no particular software is required on the computers. In this case, the standard Windows
NT security will control that you have the rights to perform the intended action (for example, replicate files on a specific
directory).
For flows using the FTP protocol, an FTP server is required on the destination computer and security is ensured by
the connection settings.
For flows using the RDV protocol, OpalisRendezVous is required on the destination computer. OpalisRendezVous is
available in «Receiver» edition.
System Requirements
6
Installation
You must have administrative rights to install OpalisRendezVous. The default installation path is C:\Program
Files\Opalis\OpalisRendezVous.
1.
Run the Installer, by clicking the OpalisRendezVous install link from the HTML menu or double click the
OpalisRendezVous executable.
2.
Select ‘Install’, to begin copying files. The installer will display ‘setup completed’ when finished.
3.
Open the OpalisRendezVous user interface and go to Options | Service | Product ID and enter the serial number
and product key.
4.
Enter the any client licenses by clicking on the ‘Extensions’ button.
5.
Once a serial number and key are entered, select ‘OK’to finish.
6.
Restart the service.
ODBC Installation
After installing OpalisRendezVous, you may install ODBC Administrator if not already installed on your system.
ODBC distribution is usually provided with your database system.
RAS Installation
Install Remote Access Service, use Network applet of the Control Panel. Select « Services » tab, then click « Add... »
and select « Remote Access Service » (under Windows NT 3.5x, click « Add Software... » button). You may install
Remote Access Service even if you do not have a modem, by associating a communication port with NullModem (or
« Serial Cable between 2 PCs »).
TCP/IP Installation
Install TCP/IP, use Network applet of the Control Panel. Select « Protocols » tab, then click « Add... » and select
« TCP/IP Protocol » (under Windows NT 3.5x, click « Add Software... » button). If you’re not familiar with TCP/IP
concepts, contact your network administrator.
Installation
7
Concept
Flows
OpalisRendezVous is a program that lets you create automated data streams between two or more computers. Each
of these streams is called a flow. To create a flow, you simply need to answer to the following questions:
1- What is the direction of the flow (Incoming or Outgoing)?
2- When do I want the transfer to occur? Every five minutes? When there’s something new in a directory?
3- What type of data do I want to transfer? Files and folders? Database rows?
4- Where do I want the data to be transferred?
5- How do I want data to be transferred? By a standard copy? Using FTP? Using RDV protocol (an enhanced way to
link two dial-up computers)?
6- What links the source to the target computer? A permanent network? A dial-up line? The Internet?
In OpalisRendezVous, creating a flow is just the matter of answering to these simple questions into the corresponding
fields of the File or Database Flow dialogs. A basic flow setup is divided into a few tabs: When, What and Where.
Direction
Select Incoming if the origin computer is a remote server, and the destination computer is the local server. Select
Outgoing if the origin computer is the local server, and the destination computer is a remote server.
Once you have decided what direction you flow would go, its setup is divided into a few tabs: When, What and Where.
The following section describes the configuration of an outgoing flow.
When
In the When tab, you can choose to start the transfer:
• On user request,
• at regular intervals (for example, every 10 minutes or every day at the same time),
• at each modification of the source data (for example, when a new file is copied in a directory),
• when a sufficient amount of new data has arrived (for example, when the size of the watched directory
exceeds 250 KB).
Note: You can always manually trigger a transfer using Ctrl-T shortcut or menu commands.
What
In the What tab, you indicate what data has to be transferred, that is:
• the origin directory,
• files to include or exclude,
• sub-directories.
Concept
8
Where
In the Where tab, you choose how to transfer the files or rows:
• using the standard Windows NT copy,
• using the FTP protocol,
• using the RDV protocol, a convenient way to send files between two dial-up computers (over the Internet or
your intranet).
You also indicate if the link between the origin and the destination is direct (for example, when the destination is on
the same site) or needs to be established using RAS.
Finally, you enter the destination information such as the computer name, the directory and the necessary connect
information.
The RDV protocol
The RDV protocol is an Opalis innovation that allows transfers to be automated over the Internet (or intranets) even
between computers not permanently linked to the network, like regular Internet dial-up clients.
This means that if both sender and receiver have Internet access (and are Windows NT computers) they’ll be able to
automatically transfer files.
An intermediate entity called RDV server is used to help senders and receivers connect and exchange files. The
purchase of OpalisRendezVous includes an unlimited right to use the Opalis RDV Internet server (rdv.opalis.com).
Log
The log contains the history of flow execution. Each time the conditions for a flow to be triggered are met, a new
instance of the flow is created as well as a new log entry.
Log entries are per flow and per start time. The log of a flow instance contains information on the result of the flow as
well as the status of the transfer for each transferred file.
Alerts
Alerts keep you aware of any problem that may have occurred during flow execution. These problems or errors can be
temporary (disk full, FTP server down, etc.) or can prevent the execution of future instances of the flow (RAS or TCP/IP
not installed, etc.). An OpalisRendezVous alert gives you a clear status of the problem as well as directions on how to
solve it. You can view OpalisRendezVous alerts in the Administrator or receive them by e-mail.
OpalisRendezVous Architecture
OpalisRendezVous has a client/server architecture. The Administrator lets you configure flows, monitor activity,
consult log and alerts, while the OpalisRendezVous service performs the data transfer.
Figure 1
Concept
9
The OpalisRendezVous service runs unattended in the system background. It executes the flows as you configured
them using the Administrator, writes all its activity on the log and reports problems using alerts.
This architecture has numerous advantages:
• You can administer an OpalisRendezVous service running on a remote computer (even via a dial-up RAS
link).
• You can administer several OpalisRendezVous services from your computer, each one will have its own
window.
• The service can work even if no user is logged on the system console.
The OpalisRendezVous takes account dynamically of the changes you make in its configuration. If the settings of a
flow are changed while an occurrence of the flow is running, changes will take effect the next time it is executed.
Concept
10
The Service
The OpalisRendezVous is a service. Services are background processes that run with no console interaction.
Like all other Windows NT/2000 services, OpalisRendezVous can be started, stopped and configured from the
Services applet of the Control Panel (see Figure 2).
Figure 2
From the Service dialog box, you can control the behavior of your service at system startup. A Windows NT service
can either: start automatically when the system boots; or wait until you manually start it, either from the ‘Start’ button,
or with the ‘net start’ command.
Figure 3
You can also change the user account of the service from the same dialog. This allows you to fine-tune the security of
the service. The service is never able to bypass the rights of its user account.
We recommend that you do not run OpalisRendezVous under the default system account. We recommend that you
do not run OpalisRendezVous under the default system account.
The Service
11
CONFIGURING FLOWS
File Flows
Setting Up Flows
To setup a flow, you need to first decide of its direction (Incoming or Outgoing) and then go through the When, What
and Where tabs. You can also take a look at the Options tab, but for most flows the default values are appropriate.
The direction of the flow is considered from the local server. Incoming flows are from remote computers to the local
server; Outgoing flows are from the local server to remote computers.
The When and What tabs are common to all types of file flows.
When Tab
The When tab lets you define the conditions for the transfer to occur. It
can be:
« User request »: the flow will be executed when triggered manually (using
the Trigger command or the Ctrl-T shortcut).
« Every day at »: the flow will be triggered at the specified time of every
selected day of the Weekly Activity block.
« Every »: the flow will be executed upon the time interval you enter.
« Each time a file is modified »: the flow will be executed each time a file
is modified or a new file is copied in the origin directory (or its subdirectories if the Include sub-directories option is checked). This option
applies only for Outgoing flows.
F See also: the What tab and the Wait Delay option on the Options tab.
« When total directory size overpasses »: the flow will be executed each time the total directory size overpasses the
entered threshold.
The total directory size is the sum of the sizes of all its files, including files in sub-directories if the « Include subdirectories » option is checked. This option applies only for Outgoing flows.
Note that the flow will not be triggered again until the size of the directory first passes under the threshold.
¶ Tip: You can use the « Move instead of copying » option and the « Archive after transfer » option to empty the
directory after the transfer.
F See also: the What tab and the Options tab.
You can select a period of the day and the days of the week during which the flow is active. By default, flows are
active all days of the week and during all the day. If you select « Active Only » the flow will be executed only during
the period of time you enter.
• « Purge at » option is useful if you set the flow to be executed when the directory size overpasses a given
threshold. At the purge hour the flow will be executed, no matter what the size of the directory or the
periodicity.
File Flows
12
What Tab
If the flow direction is Outgoing, the What tab lets you define what data
has to be transferred. If the flow direction is Incoming, the What tab lets
you define how the files have to be transferred and what files have to be
transferred. For more details on how the files have to be transferred,
please refer to the Where tab.
In the Origin directory field, enter the origin directory. To include all subdirectories of the entered origin directory, check the « Include subdirectories » option. By default, all files are taken into account. You can
restrict file type to be processed using the «Filter» options. To do so,
click on the « Filter » button and input the list of files you want to include
and/or exclude from the flow transfer. Enter one file per line. ‘*’ and ‘?’
characters are authorized to create file filters.
If the flow direction is Outgoing, the Where tab lets you define how and where the files have to be transferred. If the
flow direction is Incoming, the Where tab lets you define where the files have to be transferred.
When you select a type in the How option, the other fields and labels of the dialog are dynamically modified to let you
enter the proper configuration values.
After Tab
The After Tab lets you define an optional action that should take place
on the local server or on the remote server after each flow transfer.
Actions can be:
Trigger OpalisRobot Event/Task on local/remote server: once the
transfer is done, OpalisRendezVous can trigger an event or a task in the
OpalisRobot service running on the origin or destination server. (For more
details on OpalisRobot, browse www.opalis.com).
Trigger OpalisRendezVous flows on local/remote server: once the
transfer is done, OpalisRendezVous can trigger another flow on the
OpalisRendezVous service running on the origin or destination server.
Send [detailed] flow report by email: once the transfer is done,
OpalisRendezVous can send the flow [detailed] report to the address
mentioned in the address field.
F See also: the Mail tab in Service Options.
Options Tab
In the Options tab, you can modify the default options of a flow, adjust
system values and select additional tasks to be performed when a
transfer is completed.
If destination file exists: If the destination file exists, the flow can either
overwrite the destination file (default), create a file with a unique name
(date and time is inserted in the filename before the extension) or fail (if
the current file transfer fails, transfer continues with the remaining files).
Destination date: (Flows using the Copy type only.) By default, the
destination file will have the same date as the origin file. If set to Date of
File Flows
13
transfer, the file date will be modified to the date and time of the transfer.
File-system: Wait delay: (Flows triggered « Each time a file is modified » or « When total directory size overpasses »
option only.) This value lets you adjust the reactivity of OpalisRendezVous to file-system notifications when files are
copied or modified in the origin directory. The correct value depends on the application and of the load of the computer.
The default value (3 seconds) is usually a satisfying one. If the flow is triggered several times when a file is modified or
when files are still being saved, increase this value.
To set the proper value: perform tests on a loaded computer. Start with a small delay (3 or 4 seconds) and increase
the delay until there's only one flow triggered for a large file save.
RAS options: (For flows using RAS.) If the modem is busy or the line is dropped before the connection is established,
OpalisRendezVous will retry to connect. Enter in the two fields the number of retries and the delay between retries.
Copy options: Modified files / All files: By default, only files modified since the previous transfer are taken into
account. You can choose to transfer all files each time the flow is triggered (note that this option will consume more
network resources and is not recommended when using dial-up lines).
If the option is set to Modified files, when the flow is executed for the first time after service startup, all files of the
directory are transferred. Then, during the next executions, only modified files are transferred.
The Modified files option is not available yet for incoming FTP flows.
Replicate Deletion: if this option is checked, when files are deleted on the origin directory, they are also deleted on the
destination directory.
Move instead of copying: If this option is set, files are removed from the origin directory after transfer completion.
Archive after transfer in directory: If this option is set, files are copied in the entered directory after transfer completion.
This option lets you keep a complete history of all file versions since the files will be copied in a separate directory for
each instance of a flow.
The directory name is formed using flow name and execution date:
<archive_dir>\<flow_name>\<execution_date>\
Note that if the flow name includes a character that is not authorized in a directory name, this character will be
replaced by an underscore ("_").
For example, files of a flow named « Files for Seattle » executed at 8PM on 1/1/2001, with "c:\archive" as archive
directory, will be archived in "c:\archive\Files for Seattle\2001-1-1_8-0-00".
Wait if origin directory/drive does not exist: By default, if the origin directory does not exist, the flow cannot execute (in
this case, the flow stops its execution, raising an alert). If this option is set, the flow will not fail and will wait for the
directory to be created before starting. This option is useful if the directory resides on a removable drive, in which case
the flow will start its operation when it will detect the insertion of a disk with the proper directory.
Important note for removable disk users:
1- If no disk is present when the flow is waiting, Windows NT sends an Abort/Retry/Ignore dialog to the system
console that blocks the execution of the flow. To prevent this behavior, create a shared directory of the removable
drive and input the UNC name of this shared directory in the Directory field of the What tab.
2- It is recommended to use the « User request » and « Wait if origin directory/drive does not exist » options.
File Flows
14
Create and Reset History commands
When you click with the right button of the mouse on a flow, a popup menu appears. This popup menu contains
various commands that will let you copy/paste, delete or trigger a flow. The last two items of the popup menu are:
Create History: This command creates the history for the flow taking into account the current state of the source
folder(s) and file(s) of the flow. When a new history is created, the existing file(s) and folder(s) are marked as ‘already
transferred’, thus after the command, only new or modified files are transferred by the flow.
Reset History: This command reset the history of the flow. Any file previously transferred will be transferred again
during the next execution of the flow.
Please note that the service has to be stopped for that commands to be issued.
Choosing the Right Type for your Flow
Follow the guide! Answer to the following questions and you will find out what type you should choose for the flow
you’re creating. In the following questions, we call Sender the origin computer and Receiver the destination computer.
Is the receiver on the same LAN as the sender?
Yes F Go to next question.
No F
Go to question 4.
Is the receiver a Windows NT, Windows 95, Windows for Workgroup, OS/2, Unix with Samba or any other system
with the SMB protocol installed?
Yes F Select Type = Copy and Access = Direct.
No F
Go to next question.
Is the receiver a Unix, mainframe or any system with an FTP Server installed?
Yes F Select Type = FTP and Access = Direct.
No F
Install FTP Server on the receiver.
Is there a « direct » dial-up link between the sender and the receiver?
Yes F Go to next question.
No F
Go to question 7.
Is the receiver a Windows NT computer?
Yes F Select Type = Copy and Access = RAS.
No F
Go to next question.
Is the receiver a system with FTP Server installed?
Yes F Select Type = FTP and Access = RAS.
No F
Install FTP Server on the receiver.
Is there a dial-up link between the sender and the receiver network?
Yes F Go to next question.
No F
Go to question 10.
Is the dial-up server a Windows NT computer or the destination network a Windows Network?
Yes F Select Type = Copy and Access = RAS.
No F
Go to next question.
Is the receiver a system with FTP Server installed?
Yes F Select Type = FTP.
No F
Go to next question.
Are both sender and receiver connected (directly or through a dial-up link) to the Internet or to your intranet?
Yes F Select Type = RDV and Access = RAS.
No F
We currently have no way to communicate with this system.
File Flows
15
Copy Flows
When Copy is selected in the How option, the flow will use the
standard Windows NT copy that allows to transfer files to any
computer using the SMB protocol (such as all network-enabled
versions of Windows, OS/2, Unix using Samba).
Security : The rights that apply to the transfer are those of the account
used by the service (this account is set during installation and can be
modified after installation using the Services applet of the Control
Panel).
RAS can be used to connect to the destination machine or network.
(The RAS entry is configured using the RAS Phonebook program.) The
destination machine is not necessarily the RAS server (i.e. the
machine that receives the dial-up connection). It can be another
computer of the destination network (in this case, ensure that this
computer will transmit network packets to the destination computer).
Destination: Enter in the two fields the computer name and the shared directory name of the destination. The shared
directory name can be followed by a sub-directory.
If you want to transfer files to a local drive, enter in the Computer name field the local computer name and input a local
directory path in the Shared directory field (e.g. C:\FILES_OUT).
Advanced Tab
This tab is available when the flow is using the Copy transport.
Copy Security: When this option is checked, the security information of
the origin file is applied to the destination file.
Ignore destination file attributes: When this option is checked, the file
attributes of the destination files are ignored. For example, if the
destination file already exists and is marked as read-only, if the
Overwrite option is checked in the Options tab, then the
OpalisRendezVous flow ignores the read-only attribute and overwrites
the destination file. After the copy, the destination file attributes are set
back to their original value.
To assign a privilege to a user account, contact your network
administrator or go to User Manager | Policies | User Rights, check
'Show Advanced user Rights' and assign the privilege.
Use the security of this account: When this option is checked, the flow uses the security of the specified account.
For this option to work, the specified account must have the 'Log On As a Service' privilege.
The account assigned to the service must have the following privileges: 'Act As a Part of the Operating System',
'Bypass Traverse Checking', 'Increase Quota' and 'Replace a Process Level Token'.
File Flows
16
FTP Flows
This transfer mode requires TCP/IP.
When FTP is selected in the How option, the flow will use the FTP
protocol to transfer the files.
Security: The rights that apply to the transfer are those of the account
entered in the FTP Settings fields.
RAS can be used to connect to the destination machine or network. (RAS
entry is configured in the RAS Phonebook program.) The destination
machine is not necessarily the RAS or PPP server (i.e. the machine that
receives the dial-up connection). It can be another computer of the
destination network (in this case, ensure that this computer will transmit
network packets to the destination computer).
Destination: Enter in the two fields the FTP server name and the directory of the destination in which the files have to
be transferred.
Note that the directory path can be relative to the home directory of the user entered in the FTP Settings (no ‘/’
character at the beginning of the path) or absolute if the FTP server and user rights allow it (a ‘/’ character at the
beginning of the path).
FTP Advanced Tab
This tab is available when the flow is using the FTP protocol.
Script files: Scripts are lists of FTP commands that are sent to the server
during the session. User-defined script can be sent to the server at four
different moments:
• After connection to the FTP server
• Before each file transfer
• After each file transfer
• Before disconnection of the FTP session
Scripts are located in the FTPScripts sub-directory of the
OpalisRendezVous directory. To create a new script file: type its name in
the proper field and click the E button. The new file is created by the
Administrator and Notepad is launched to edit the file.
Syntax of script files: Scripts can contain one or more FTP commands. Input only one FTP command per line. Lines
starting with the « ; » character are ignored.
You can use replacement codes to enter variable parameters such as the destination file name. Replacement codes
are replaced at execution time by the corresponding value. A replacement code begins with a « % » sign followed by a
letter:
%d : destination file name
%s : source file name (full path)
%r : destination directory
%u : user name
%p : password
%h : client host name (the computer name of the machine that connects to the FTP server)
%% : inserts a « % » sign
If a command in a script fails, the server response is sent to the log and depending on the script:
After connection: the session is aborted.
File Flows
17
Before each file transfer: the transfer of the file is aborted, transfer is resumed to the next file to be transferred.
After each file transfer: execution continues.
Before disconnection: execution continues.
Examples:
These 2 scripts modify permissions of files transferred on the destination server. (These scripts can be used with the
wu-ftpd FTP server on a Unix host.)
After Connection:
;
; Any created directory or file will be public
; (777 permission)
SITE UMASK 000
After transfer:
;
; Permissions on the file that was just
; transferred are set to 644 SITE CHMOD 644 %d
File name conversion: you can decide that all or some origin files are to be renamed during the transfer to the
destination. All the files that match the Origin file name list will be renamed to the corresponding Destination file
name.
To add a file name conversion, input the origin file name in the Origin file(s) field and the new file name in the
Destination file(s) field, then click on the Add button. To remove a file name conversion, select the conversion you
want to remove and click on the Remove button.
The ‘*’ and ‘?’ wildcards are authorized in the file name conversion list.
Transfer type: When set to Binary (default value), files are sent to the destination host without any modification. When
set to ASCII, end of line markers are replaced depending on the type of the remote host. Choosing ASCII transfer
mode may corrupt the files, do not use this option unless it is required by the application.
RDV Flows
This transfer mode requires TCP/IP.
When RDV is selected in the How option, the flow will use the RDV
protocol to transfer the files.
Security: the rights that apply to the transfer are those of the account
used by the OpalisRendezVous service of the destination machine.
Access options and general RDV settings are located in the Options |
Service dialog.
Destination:
Enter in the Directory field, the path in which the files have to be
transferred on the destination machine or network. You can enter a path
local to the destination machine (using drive letters) or a path using the
UNC notation (required if the destination machine is another machine on the network of the RDV receiver).
RDV connection:
Enter in the RDV ID field the RDV ID of the destination computer (or of the computer used to manage incoming flows
for the destination network).
Input the RDV Incoming password of the destination machine if one is set.
Select the type of encryption/compression you want for this flow. Note that compression requires free disk space
(approximately the two third of the size of the biggest file to be transferred).
F See also: Service Options.
File Flows
18
Database Flows
ODBC
As ODBC drivers exist for almost all database and data file formats, this function allows you to completely automate
the information flow of your organization.
For example, you can transfer data from and to text files, Excel, Access, dBase or Foxpro files, SQL Server, DB2,
Oracle, Paradox, etc.
You must first configure the sources on the ODBC Administrator (and before, be sure that the proper ODBC drivers are
installed).
When Tab
The When tab lets you define the conditions for the transfer to
occur. It can be:
« User request »: the flow will be executed when triggered manually
(using menus or the RendezVous Launcher).
« Every day at »: the flow will be triggered at the specified time of
every day selected in the Weekly Activity block.
« Every »: the flow will be executed upon the time interval you enter.
« When result of query »: the flow will be executed each time the
result of the query satisfies the entered test.
The result of the query must be a numeric value and is retrieved
from the first row of the first line returned by the entered query.
F See also: the Options tab.
You can select a period of the day and the days of the week during which the flow is active. By default, flows are
active during the whole day. If you select « Active Only », the flow will only be executed inside the time period you
enter.
« Purge at » option: At the purge hour, the flow will be executed no matter what may be the result of the test query or
the configured periodicity.
What & Where Tab
The What & Where tab lets you map origin to destination fields.
You must first input the information regarding origin and destination
ODBC sources. Then you enter origin table and origin column
names, destination table and destination column names and click
the Add button. The table/column pair is sent to the bottom list. To
remove a pair from the list, select the pair you want to remove and
click the Remove button.
There can be only one origin and one destination source, but you
can transfer columns from several tables to one destination table.
Basically, the database flow performs a merge between the result of
a SELECT statement on the origin source and the input of an
INSERT statement on the destination source.
If you use several origin tables, make sure that you enter a complete Where statement in the Options tab.
After Tab: this tab is the same as the After tab of file flow configuration.
Database Flows
19
Options Tab
The « ODBC Origin WHERE statement » is used to restrict the
rows involved in the transfer to those matching the specified
relation between the origin tables. If you fail to input a Where
statement, the number of the transferred rows will be the
multiplication of the number of rows of each table.
You do not have to input the « WHERE » word.
RAS can be used to connect to the destination machine or
network. (RAS entry is configured in the RAS Phonebook
program.) The destination machine is not necessarily the RAS or
PPP server (i.e. the machine that receives the dial-up connection).
Before transfer query (origin source) / After transfer query (origin source): You can input in each of these fields an
ODBC query that must be executed before and/or after the database transfer. The queries are not necessarily related
to the tables that are transferred. The queries are executed in the origin source.
Misc. Options: Test query every n minute(s): this option applies to the ‘When result of query’ trigger option (Where
tab). You indicate here the number of minutes that separate two tests for the query result.
Example
Let's say you want to transfer data from two tables of a source named INPUT to a table of a source named OUTPUT.
INPUT columns are NAME and ADDRESS from the PEOPLE table and CITY from the CITIES table. OUTPUT columns
are NAME, ADDRESS, CITY on the CUSTOMERS table.
First you decide when to transfer the rows in the When tab. In the What & Where tabs, you enter connect information
for the INPUT and OUTPUT sources.
Then, you enter by pair the tables/columns involved, and send them to the Relations list by clicking on the Add button.
The relation list then contains:
PEOPLE.NAME -> CUSTOMERS.NAME
PEOPLE.ADDRESS -> CUSTOMERS.ADDRESS
CITIES.CITY -> CUSTOMERS.CITY
In the Options tab, you enter a Where statement to restrict processing to the proper number of rows:
« PEOPLE.ZIPCODE = CITIES.ZIPCODE »
You can also add other restriction such as « AND PEOPLE.PRODUCT = 'TV' » if you want to select customers that
are interested by the TVs you sell.
Please note:
You must map columns that have compatible types, such as character to character, or numeric to numeric; however
automatic conversion is usually done during the transfer (for example, from a number stored in a character column to a
numeric column). This conversion depends on the ODBC driver used.
All tables must exist when the flow is executed.
Database Flows
20
LOG AND ALERTS
Logs
The log contains the history of flow execution. Each time the conditions for a flow to be triggered are met, a new
instance of the flow is executed and a new log entry is created.
Log entries are per flow and per start time. The log of a flow instance contains information on any problem that may
have occurred during the execution of the flow, as well as the status of its transfer for each transferred file.
You can sort the log entries by clicking on the label of each column of the list.
To view the detail of a log entry, select the entry and double-click or press on the Enter key, the Log Detail window
pops up. You can navigate in the entries using the Previous/Next buttons of the Log Detail dialog.
To interrupt a flow that is currently running, select the entry and choose the Interrupt command in the popup or Edit
menu. At this time, the execution of the flow is suspended and you can choose to interrupt the flow or cancel the
interruption. When you cancel the interruption, the flow resumes its execution normally.
Alerts
Alerts keep you aware of any problem that may have occurred during flows execution. These problems or errors can
be temporary (disk full, FTP server down, etc.) or can prevent the execution of future instances of the flow (RAS or
TCP/IP not installed, etc.).
An OpalisRendezVous alert gives you a clear status of the problem as well as directions on how to solve it.
You can view OpalisRendezVous alerts in the Administrator and receive them by e-mail.
You can sort the alerts by clicking on the label of each column of the list.
To view the detail of an alert, select the alert line then double-click or press on the Enter key, the Alert Detail window
pops up. You can also navigate in the list using the Previous/Next buttons of the Alert Detail dialog.
Logs
21
OPTIONS
Service Options
General Settings
Log & Alert Tab
Delete logs older than: if the value is 0, this means OpalisRendezVous will keep all logs, otherwise
OpalisRendezVous will delete logs older than the specified value in days.
Although not recommended, a manual purge is possible, you can delete the log file (flows.log) or the log detail files
(located in the log directory), this will not interrupt OpalisRendezVous operation.
Log directory: The Log directory is the place where log detail files are stored.
Email alerts to: OpalisRendezVous will send each alert in an e-mail message to the entered address. To send mail
messages, OpalisRendezVous uses the settings of the Mail tab.
Failure indicator: The failure indicator defines the level of error you want to set for your flows. Choose ‘Flow fails if at
least one file/row not transferred’ if you want the log to indicate an error when one or more files or database rows could
not be transferred; the flow log indicates a success for the flow only if all files or database rows are transferred.
Choose ‘Flow fails if all files/rows not transferred’ if you want the log to indicate an error only when no file could be
transferred; the flow log will indicate a success if at least one file or database row is correctly transferred.
Reporting Tab
Daily reports: Every day at midnight, OpalisRendezVous generates a daily report.
You can choose to receive reports by e-mail and/or to have them printed.
Printer name must be entered using the UNC notation (e.g. \\PrintServer\Laser1). For each choice, you can select a
normal report (all alerts and the status of all flows of the day) or a detailed report (all alerts and a detailed log of all
flows of the day).
Mail Tab
In this tab you configure the options that will be used by OpalisRendezVous to send electronic mails.
In the Mail system list, select the type of your mail system.
SMTP: (This option requires TCP/IP.) Input the name of your SMTP server in the Mail Server field and the e-mail
address you want to appear in the header of sent mails in the Username field.
RAS: Select Direct if the computer is on the same network as the mail server or is permanently connected to its
network.
Select RAS if the computer needs to establish a dial-up connection to connect to the mail server.
RAS options: If the modem is busy or the line is dropped before the connection is established, OpalisRendezVous will
retry to connect. Enter in the two fields the number of retries and the delay between retries.
Service Options
22
Product ID Tab
This tab contains the licensing information of your OpalisRendezVous product.
The Extensions button lets you access the License extensions dialog.
From this dialog you can add and remove Client Extension licenses as well as Flow Extension licenses.
A client is a computer from or to which files can be transferred by the
OpalisRendezVous service. One client is included in the standard license. Client Extension licenses increase the
number of clients.
A Flow Extension license increases the number of flows that can be active simultaneously. The standard license has
the ability to run 256 flows simultaneously.
Please note:
ODBC flows are not be accounted in the number of clients for a server.
The RDV protocol flows are not accounted in the number of clients for a server. However, for a flow to send files to
RDV protocol receivers, a Receiver license is necessary on the RDV receiver computer.
Please contact [email protected] for any question regarding licensing.
New values are taken into account only when the service starts. After inputting new values, stop the service and
restart it.
RDV Settings
The RDV functions require TCP/IP.
Settings configured using the three RDV tabs affect all flows using the RDV protocol and all incoming RDV flows.
Rdv Connect Tab
In this tab, you configure the frequency at which the client will connect to the RDV server. This is an important value
that will determine the time necessary for a flow to connect to the destination computer.
How it works:
To transfer files or to receive incoming flows, an RDV client needs to connect to the RDV server regularly.
When connected to the RDV server, the RDV client exchanges information with the Server about the destination
computers it needs to connect to.
If the destination computers are currently connected, the server gives their address to the RDV client. The latter then
contacts them directly in order to to exchange files.
If the destination computers are not currently connected, the server gives the RDV client information about their
intended future connection time.
To calculate its next connection time, the RDV client uses this information and the values of the Connect every,
Margin and Idle time fields.
Connect every is the average delay between two connections and can differ of plus or minus the Margin value.
Example: If Connect every is set to 10 minutes and Margin to 3 minutes, the next connection will always occur
between 7 and 13 minutes after the previous one.
Idle time corresponds to an inactivity period that the RDV client will always wait before disconnecting. This delay
enables to wait for possible incoming connections or destination computers to connect to the server. Before
disconnecting, the RDV client always checks that no more immediate connections are possible.
If you use a Custom frequency (that lets you input values in the Connect every, Margin and Idle time fields), be sure to
enter values that make sense for the application you want to setup. Do not hesitate to contact us for any help. We
recommend that you use pre-defined values.
F See also: Technical support.
¶ Tip: when you configure RDV clients that will exchange files, select frequency values that are close or, best, the
same for both sides. This way, they will naturally synchronize and use less time and resources to connect.
Service Options
23
In this tab you also configure how the computer accepts incoming RDV flows:
Select No incoming RDV if you do not want the system to accept incoming flows.
If you choose to accept incoming flows for this computer, you can restrict access to a period of the day and selected
days of the week.
You can add an additional protection using the Incoming password field. In this case, you have to input the same
password in the configuration of flows on the remote computer that will send files to this computer.
F See also: RDV Flows.
RDV port: this value is for advanced users only. Change this value if you want to be able to run the RDV server on the
same machine as an RDV client.
F See also: RendezVous editions.
Rdv System Tab
In the Rdv System tab, you configure permanent values such as computer identification or server address.
RDV ID: To work correctly, the RDV protocol needs to uniquely identify computers. This cannot be done using IP
addresses since they can differ from a connection to another on computers linked using dial-up lines.
Identification is ensured by using the RDV ID, that is a unique value, assigned by Opalis. This value is usually entered
at install time. It is printed in your Opalis License Card. Letter case is relevant.
If you don’t have an RDV ID, you can request one by writing to [email protected].
Validation is a string that ensures the RDV ID has a valid value. It comes with the RDV ID.
RDV servers: The Main and Secondary server fields contain the TCP/IP names for the RDV servers. The secondary
server is used when the main server is down or not accessible.
Port (numeric values at the right of the server fields) : this value should be changed by advanced users only. The
default value for the Opalis RDV protocol is 536.
F See also: RendezVous editions.
Program updates: Click this option if you want an alert to be generated each time a new OpalisRendezVous update is
released and available for download. This function works when you use Opalis Internet RDV server (rdv.opalis.com) to
synchronize your RDV transfers.
Rdv Access Tab
In the Rdv Access tab, you configure how the RDV client system will access to the RDV server.
Access: Select Direct if the origin computer is on the same network as the RDV server or is permanently connected
to it.
Select RAS if the origin computer needs to establish a dial-up connection to connect to the RDV server network.
If you want to use Opalis RDV Internet server (rdv.opalis.com), use the RAS entry to connect to the Internet.
RAS options: If the modem is busy or the line is dropped before the connection is established, OpalisRendezVous will
retry to connect. Enter in the two fields the number of retries and the delay between retries.
Service Options
24
Administrator Options
General options
If the Auto apply changes option is checked, modifications on a flow configuration are
immediately taken into account by the service. Otherwise, you must use the Service |
Apply changes command to ask the service to take account of modifications. Only
modified flows are affected by the command. If a flow is running while it is modified,
changes will take place when the transfer is complete.
Check Reconnect to previous server(s) at startup if you want the Administrator to automatically reconnect to the
servers that were opened at the end of the previous session. Up to 10 connections can be automatically established at
Administrator startup.
When Confirmation dialogs is checked, all warning and information dialog boxes are displayed. You can disable this
option if you are familiar to concepts and behavior of OpalisRendezVous and you don’t need the confirmation dialogs.
Auto-refresh: Input in the Every n seconds field the number of seconds between two log or alerts automatic refresh.
The value by default is 0, i.e. never refresh.
Administrator Options
25
TROUBLESHOOTING
Nothing To Do
Depending on its settings, a flow can be triggered although there is no job to do, even if files reside in the source
directory. If the « Nothing to do » messages regularly appear, you may want to reduce the frequency at which the flow
is executed (see When tab) or check the values of the Options tab (especially « Move instead of copying » and
« Copy options: All files / Modified files »).
Access Denied
If the log of a flow indicates that access to an origin or destination file is denied, check the following:
If access is denied to an origin file (a file that is « described » in the What tab), check that the account used by the
service has sufficient rights to access the file(s). You can change this account using the Startup button of the
Services applet of the Control Panel.
If the service is using the System account, change it for another account. Note that the System account has no rights
on remote computers so we recommend that you use another account.
If access is denied to a destination file or directory (« described » in the Where tab), check that the account used by
the service has sufficient rights to access the directory on the remote computer.
Required Resource Not Found
If you configured flows that require a system resource that is not installed in the system when the flow is initialized, an
alert is sent to the Alerts tab, giving you details about the missing resource and the name of the flows or
OpalisRendezVous functions that failed to start. You have to install the resource before trying to execute the flow
again. Flows that do not require the resource will continue their execution safely.
F See also: Requirements section at the beginning of this manual.
If The Service Does Not Start
To help you diagnose startup problems, a good thing is to browse possible alerts in the Alerts tab and new messages
in the Windows NT Event Log. As all Windows NT services, OpalisRendezVous cannot interact with the user and
uses the Event Viewer to send information about its execution and possible problems.
If the service does not start using the Administrator, check that you have administrative rights on the computer on
which the service is running, then go to the Services applet of the Control Panel and try to start it using the Start
button. If the service does not start, you can receive the following error messages:
Error 1069, logon failure. Ensure that the password of the account used by the service is correct.
Note that when the password of the account used by services is changed, you have to manually update it using the
Startup button of the Services applet of the Control Panel.
Error 1075, dependency does not exist. Check that Remote Access Service is installed if you're using RAS functions.
If you stopped using RAS functions and removed RAS from your system, delete the following values of the registry:
under key HEY_LOCAL_MACHINE\System\CurrentControlSet\Services\OpalisRendezVous delete the
DependOnGroup and DependOnService values.
(Be cautious when editing the registry, since incorrect use of the registry editor may cause system failures.)
Other error (such as error No 2040):
Go to the Windows NT Event Viewer (located in the Administrative Tools group) and check possible error messages in
the System or Application logs. If the Event Log is full, clear it.
Launch the OpalisRendezVous Administrator, check new alerts.
Nothing To Do
26
If You Cannot Connect To a Server
Make sure you input the correct name in the Server field. The server name is the name of the computer on which
OpalisRendezVous service is installed.
If you are using OpalisRendezVous service on the local computer and you don't know its name, you can enter a dot
"." instead of the name.
You can find the computer name in the Network applet of the Control Panel.
Check that you have sufficient rights to connect: you must have a valid administrative user account on the computer
on which the service is running.
Help!
You will find in the Online help:
Detailed information on how to setup flows and configure service options.
The Troubleshooting section.
General documentation of the Administrator or client utilities, advanced topics, examples, information about ordering,
and much more.
Your link to the Online help: the F1 key or the Help menu...
You can contact Opalis technical support at [email protected]. To help us quickly locate or reproduce your
problem, please indicate the version of Windows NT and OpalisRendezVous you are using as well as any information
about installed software that may interact with OpalisRendezVous.
You can also browse valuable and updated information in our Web pages at www.opalis.com.
OpalisRendezVous Editions
OpalisRendezVous exists in several editions:
OpalisRendezVous: includes outgoing and incoming flows as well as RDV receiver functions.
OpalisRendezVous, Receiver edition: includes RDV receiver functions only. Note that specific receiver software is
required in the destination computer only for RDV flows.
F See also: Requirements section at the beginning of this manual.
OpalisRendezVous RDV Server: used to synchronize clients using the RDV protocol.
If You Cannot Connect To a Server
27
INDEX
A
Administrator
Alerts
Archive
O
25
9, 21
14
B
Basic Concepts
8
C
Compression
Control Panel
18
11
E
Encryption
ODBC
6, 7, 19
OpalisRendezVous Architecture
9
OpalisRobot
13
OS/2
16
R
RAS
Remote Access Service
RendezVous
How it works
Incoming password
RendezVous ID
Settings
Requirements
7
6
9, 18
23
18
18
23
6
18
S
F
Flows
Concepts
Type
FTP
12
8
15
6, 17
Security
SMB
SMTP
System account
11, 16, 17
16
22
11
T
I
Information
Installation
2
7
TCP/IP
Technical Services
6, 7, 23
2
U
L
Log
9, 21, 22
OpalisRendezVous Editions
18, 22
16
W
M
Mail
UNC notation
Unix
22
Wait delay
Windows NT services
14
11
28