1
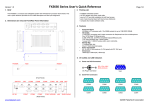
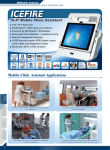
User Manual MPC-0812 Series Thin Client Computer Preliminary Revision 1.0 July 1,2010 Zerotech Technology Inc. 1. Features Fan/Fan-less Design and 0.29-Liter Compact Sized VIA Eden/Nano Processor VX800U Chipset Support DDR2 533 SODIMM up to 2GB 9 COM + 6 USB + Touch controller (option) 8G SSD + Micro SD + e-SATA VGA + LAN + WIFI (option) 2. Checklist 1x MPC-0812 1x 1x 1x Power Adapter Power Cord Driver CD Optional VESA Mounting Kit Optional DIN-Rail Mounting Kit 3. Product Specifications MPC-0812 Construction Aluminum extrusion System Board Proprietary MB, VIA Eden/NanoProcessor + VX800U Memory DDR2 533 SO-DIMM up to 2GB I/O Panel Front I/O panel 1x Phone Jack for Line-Out 1x Phone Jack for MIC-In 1x Push button for power on/off 1x POWER LED 1x HDD LED 2x USB2.0 Rear I/O panel 1x DC JACK for DC12V input 1x DB 15F VGA connector for CRT & LCD 2x USB2.0 1x RJ-45, LAN port (GbE option) 1x Micro SD slot Side I/O panel 2x Fan cover (optional, 2 Fans in both side) 1x Expansion I/O slot (optional, with extension I/O cable) 1x WIFI antenna (optional, with WIFI module built in) Others Reserve “ON/OFF”, ”Reset” connector inside can wire out to external switch through Expansion I/O slot Storage 1x Internal SSD 8G Maximum( need preinstall before shipment) Power Supply Input: 100-240 VAC, 50-60 Hz, Output: 36W, 12VDC , 3A Cooling Fan less by Aluminum extrusion / Fan assistant cooling (option) Operating: 0°C to 35°C, 0%-90%, non-condensing Temperature/ Humidity Dimensions Storage: -20°C to 80°C, 0%-90%, non-condensing 127 x 43.3 x 86.5 mm (WxHxD) Weight To be defined Mounting Desktop, VESA-mount, DIN-Rail mount Certification CE, FCC Class A Product Specifications (continued) Power Consumption Item System Power Consumption Eden 500MHz + VX800U 7.5 W Eden 1GHz + VX800U 10 W Nano 1GHz + VX800U 16W (Not Recommand) Nano 1.3GHz + VX800U 18W (Not Recommand) Note: MPC-0812 series can support Eden 500M/1G, Nano 1G/1.3G processor. However for thermal consideration, CPU grade with FAN combination should be confirmed by Zerotech technology. 4. System outlook Refer to the diagrams below to identify the components of the system. Front Panel – MPC-0812 Basic model (Type 1/2) Rear Panel –MPC-0812 Basic model (Type 1/2) Note: Expansion I/O slot and cover will omit if not option this feature. Front Panel – MPC-0812 Extension model (Type 1/2) Rear Panel –MPC-0812 Extension model (Type 1/2) Note: (1) Reserve “ON/OFF”, “Reset” connector inside can wire out to external switch through Expansion I/O slot (2) Extension RS-232 number are labeled on the cable connector. 5. Extension COM port definition I/O TYPE COM Port number TYPE 1 COM2, COM3, COM4, COM5, COM6, COM7, COM8, COM9, COM10 TYPE 2 COM3, COM7, COM8, COM9 Note: COM1 occupied by touch controller (option) COM3/COM7/COM8/COM9 Those DB-9 male connectors support RS-232 12V Level Pin Signal 1 DCD, Data carrier detect 2 RXD, Receive data 3 TXD, Transmit data 4 DTR, Data terminal ready 5 GND, ground 6 DSR, Data set ready 7 RTS, Request to send 8 RTS, Request to send 9 RTS, Request to send COM2/COM4/COM5/COM10 Pin Signal 1 NC 2 RXD, Receive data 3 TXD, Transmit data 4 DTR, Data terminal ready 5 GND, ground 6 DSR, Data set ready 7 RTS, Request to send 8 RTS, Request to send 9 NC 6. Mechanical Dimensions Dimensions in millimeters 7. Mounting your PC to a monitor VESA Mounting Kit Dimension 8. Install your DIN-Rail Mounting Kit DIN-Rail Mounting Kit Dimension 9. AWARD BIOS Setting COM port Main Menu The BIOS Setup is accessed by pressing the “DEL” key after the Power-On Self-Test (POST) memory test begins and before the operating system boot begins. Once you enter the BIOS Setup Utility, the Main Menu will appear on the screen. The Main Menu provides System Overview information and allows you to set the System Time and Date. Now use the “<” and “>” cursor keys to navigate to “Integrated Peripherals” menu screen, and depress “Enter”. Integrated Peripherals Sub-Menu Use the “Down” cursor keys to navigate to “Super IO Device” menu screen, and depress “Enter”. Super IO Device Sub-Menu From this menu, Use the “UP”, “Down” cursor keys and “Enter” key to select COM port “ADDRESS” with IRQ number. The default value was setting as following picture.