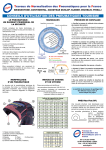
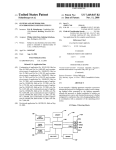
1
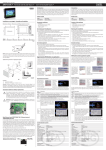
LuxMeter Pro Advanced
DIGITAL LUX METER
MANUALE UTENTE
INDICE
INTRODUCTION ................................................................................................................................................................................................ 2 HOW DOES LUX METER PRO WORK (Base Logic) ................................................................................................................................ 2 LIGHT SOURCE (Light Type) ......................................................................................................................................................................... 3 DISTANCE TO THE LIGHT SOURCE (Source Distance) ........................................................................................................................ 4 TAPER ANGLE OF ILLUMINATION (Viewing Angle) ............................................................................................................................. 5 SOURCE POWER EXPRESSED IN WATTS (Light Power) ...................................................................................................................... 6 MAIN MENU ....................................................................................................................................................................................................... 7 SETTING SLIDING PANEL (Slide up Settings Panel) ............................................................................................................................. 9 HOW TO MAKE A MEASURE (Measure Process) ................................................................................................................................ 10 PREVIEW MODE (Perview Mode) ............................................................................................................................................................ 11 SAVE MEASUREMENTS ND DB SAVES (Save Measure / DB) .......................................................................................................... 13 AUTOGAIN CAMERA CALIBRATION (Camera AutoGain ) ............................................................................................................. 14 CALIBRATION WHIT COMPARISON TOOL (LuxMeter Compare) ................................................................................................. 15 SCALE SETTING (Scale) ................................................................................................................................................................................ 15 NOTE .................................................................................................................................................................................................................. 16 Ver.1.0.0
1
1. INTRODUCTION
LuxMeter Pro is an Advanced application for iPhone and iPad, which uses the internal camera
to calculate, in real time, the level of illumination of the image captured by the camera. It
should be noted that the camera does not work like the brightness sensors used in traditional
light meters which measure the level of incident light, but in this case LuxMeter Pro measure
the light reflected from the objects present in the area shown by the camera. This substantial
difference makes the use of this application totally different from classic light meters, and it is
also not possible to perform the measurement of light emitted directly from the light source.
Pointing the camera at a lamp directly, this would be dazzled it by providing an image not be
used for the calculation of lighting.
There is also another very important factor which implies the proper functioning of LuxMeter
Pro Advanced, that is to use a white target areas where black or prevails particularly dark tones
are present into environments. In the case of dark or black objects or areas with a
predominance of dark object, you must enter a target blank object because black objects do
not reflect light preventing LuxMeter Pro to be able to analyze the lighting intensity. The white
target could be any white object that occupies 30% minimum of the illuminated area, in areas
with objects of various shades LuxMeter Pro automatically calculates the value of medium
gray and its lighting without the need to target white.
2. HOW DOES LUX METER PRO WORK (Measure Process)
LuxMeter Pro Advanced, being an application and not a specific device, in order to ensure a
reasonable accuracy in measurements, requires some precautions. The first thing to do before
the measurement is to correctly set the parameters for the type of lighting, so as to make it
possible for the correct setting LuxMeter Pro of the gain of the camera and the parameters of
calculation of luminous intensity. Considered that light follows a series of physical phenomena
to which attention must be paid.
Required parameters are:
· Type of light source.
· Source distance from the illuminated area.
· lighting Cone Viewing angle (in the case of headlamps or LED lights), or 180°.
· Wattage of the light source.
The parameters above are usually available on light sources except for the distance from the
area to be measured or estimated to be trying to get as close as possible to the real one. It
should be kept in mind that the light intensity attenuation increases with a value equal to the
square of the distance, this means that even a few inches of difference can result in large
decreases in the level of illumination.
2
This phenomenon can be seen by observing the effect of a lamp placed at different distances
from an object, we realize immediately that as well as the lamp the same power and then the
same luminous intensity, this illuminate with different intensities depending on the distance
from which the object is located.
The type of lighting is available from the source used, which can be of various kinds, for
example, an incandescent lamp, a fluorescent tubel, LED etc. the type of lamp is
indispensable in order to ascend LuxMeter Pro lighting efficiency is the value of
transformation from Watts to LUMENS which differs from type to type based on lamp
technology.
It is understood at this point, that the value in Watts is required to determine the value of the
lamp LIGHT or group of lights used.
The lighting angle is the angle of the cone generated by the projector used by the source, this
value is present in lamps which focus the beam of light in one direction, type lamps (PAR),
LED lamps and all the lights that have a worm or a reflective screen, in other cases where the
source illuminates the surrounding area in all directions is regarded as illumination angle an
angle of 180°.
3. LIGHT SOURCE (Light Type)
We see in detail the types of sources used in LuxMeter Pro Advanced:
Incandescent lamp:
Common lamp filament with power ranging between 5 and 500 Watt with color
temperature about 2400K.
Light source with low yield n = 15
Incandescent lamp: halide
Filament lamp with power ranging between 15 and 1500 Watts with about 2600 k
color temperature.
Light source with low yield n = 20
Hot-cathode fluorescent tube:
the fluorescent tubes have a power ranging between 18 and 65 Watt bulb with a
color temperature which varies between 2700 and 4500 K.
Light source with decent yields n = 60
LED Light:
Led lamps provide capacities between 10 and 70 Watts
With a color temperature of approximately 6200 k
Discrete performance light source n = 60
Quartz light:
3
Quartz lamps provide between 90 and power 450 Watt
With a color temperature ranging from 4500 to 6500 k
Light source with Good yield n = 87
Light high pressure sodium:
Sodium lamps provide powers between 250 and 800 Watts
With a color temperature that ranges from 30000 to which
Light source with high yield n = 117
Light to low-pressure sodium:
Sodium lamps provide powers between 250 and 800 Watts
With a color temperature that ranges from 30000 to which
Light source with high yield n = 150
Sunlight:
Sunlight provides an intensity of light varies depending on weather conditions
with values that correspond to the following table:
•
Cloudy: 10 ' 000 lumens
•
Daylight in shade 25 ' 000 lumens
•
Direct daylight 32 ' 000 lumens
•
Direct sunlight 130 ' 000 lumens
4. DISTANCE TO THE LIGHT SOURCE (Source Distance)
The distance of the light source from the illuminated area is important for the correct
measurement of lighting, let's see what are the conditions of proper measuring and how it
should be set in order to work Pro LuxMeter optimally.
Figure shows a simplified diagram of a possible
condition, as you can see the iPhone is pointed
toward the illuminated area and not to the light,
in this case the distance to set parameters
LIGHT
SOURCE
DISTANCE
LuxMeter Pro is the minimum distance from the
source to the surface or illuminated object, the
2,5 mt
image is marked by the red arrow.
AREA
Fig1
Fig2
4
The distance of the light source, it must be set in the LuxMeter Pro main screen by moving the
Slider "Distance mt" or by entering the value manually by tapping the icon that depicts a hand
next to the slider, thus enabling the input mask manually.
5. TAPER ANGLE OF ILLUMINATION (Viewing Angle)
Normally the light sources, particularly as except in LEDs, light is radiated into surrounding
space at the source. Usually the light sources are placed on walls or attics and under these
circumstances, a portion of the light is obscured from the wall where the lamp is placed, that
is why the lights that do not have a reflective screen or a projector must be set with the value
of the lighting angle 180°
The lamps without reflector and projector are
without illumination angle "Viewing Angle
180°"
Viewing Angle
180°
Fig4
Fig3
The parameter Viewing Angle must be set in the settings panel of the LuxMeter Pro using the
Slider or by entering manually the value.
In order to get a better yield of light is possible through a screen reflecting or parabolic
projectors, convey the light produced from the source in one direction, creating a cone of
light that will illuminate the area or object concerned. Based on the structural characteristics
of the shroud the light cone can have different lighting angles as shown in Figure 5
In this configuration, all the light is conveyed
in one direction, thereby improving the ability
to source lighting low power used.
As for the previous example, the lighting
angle value must be set in the settings panel
of the LuxMeter Pro using the Slider or by
entering manually the value of the angle.
Viewing Angle 40°
Fig5
5
6. SOURCE POWER EXPRESSED IN WATTS (Power Light)
The value in Watts of power of the light source is used by LuxMeter Pro to calculate the
equivalent Lumen brightness, depending on the type of lamp used and its coefficient of
lighting
.
The value in the lumen of the source or/and of the sources is given by the product of total
power in Watts x
.
For example, if in an environment there is only one light source, simply locate its power,
usually found printed on the lamp itself, and enter the value in Lux Meter Pro Advanced.
Some examples of visible Power on lamps:
25Watt halogen lamp
Halogen lamp with
integrated projector from
75 Watt
Con proiettore integrato
18 Watt fluorescent
tube
1 x 60 Watt
Total 60 Watts
5 x 60 Watt
Total 300 Watts
Fig 6
Fig 7
In case there are multiple environment lamps, the value to set in the LuxMeter Pro will be the
sum of all lamps are turned on simultaneously.
6
7. MAIN MENU
After giving a look at essential data to operate, now
analyze main menu structure and functions contained
therein.
1
Let's start with the most important elements:
Lux Value 1) – returns the maximum value of the
illumination measured by the camera, the value is
expressed in Lux (lumen/m2 ).
2
2) Preview – preview shows the processed image from
LuxMeter Pro, and you can select the display mode
between "normal" that shows the captured image
3
without elaboration, "CScale" that displays the image in
a variety of colors depending on the light intensity
4
Fig 8
present in that particular part of the image; the color
scale goes from dark blue – red brightness detected
minimum – maximum brightness.
"GScale" that consists in the view of the processed image in grayscale, as for CScale mode, in
this mode the minimum Intensity is Black and white the highest.
3) colour temperature Viewer -LuxMeter Pro calculates the color temperature of the
captured image, not to be confused with the color temperature of the light source. The color
temperature calculated from LuxMeter Pro is that derived from the dominant media present
in the image, in a nutshell LuxMeter Pro analyzes the colors present and find the white point
of the image using the reference table "CIE D65" with white point set at 6504K. The value then
does not express white light used to illuminate the object but the result depends on the
composition of the colors in the object illuminated.
This means that the calculated value may fluctuate depending on the dominant in the area
affected by the measure. For example, if the image contains only one color LuxMeter Pro in
color space conversion from RGB to YXZ fails to achieve the correct white point value,
because the colors in the image does not have the coordinates need to be able to calculate
this value. In this case we will return a LuxMeter Pro temperature value which is the dominant
color, which might be close to 2000 k for images with a predominance of red, or which tends
to 8000 k for those with a prevalence of blue. In order to obtain a correct temperature you can
put inside the frame a white object, such as a sheet of paper or do enter into the frame other
items of different colors in a way that LuxMeter Pro to calculate the correct coordinates of the
color components in the image.
7
In the color temperature value, in addition to the
numeric value is also a chart with the histogram of the
distribution of the components of whiteness. On the left
Fig9
side of the chart are the shades that converge towards
the red component of the "warm" light.
Fig 10
If you have a high concentration of hue in this fraction of the chart means that converge
toward temperature values from 2000 to 4000 k, the central part namely related to white, as
we mentioned earlier takes temperature values around 6500 k (CEI D65) and therefore the
right of the graph shows the concentration of the components that go into the blue with
temperatures up to 10000 k.
4) Control Panel – In Control Panel contains buttons that allow access to some functions of
LuxMeter Pro. In order we have the following functions:
Upload from photo library – allows you to analyze a picture in the library.
Return to LIVE mode with the use of the camera.
Temporarily freezes the screen, leaving the last value, when it is active in the
display appears the symbol “ HOLD “.
Enables and disables the camera's white balance, this function is useful if the area
to be analyzed has dominant colors that may affect the calculation of colour
temperature. When the function and activate icon appears in the display “ AWB “.
The SAVE Function lets you save the current measurement with all its values.
__
DB button opens the list of saved measurements see paragraph 11.
Change the camera used by the back to the front and vice versa.
Open the form of the type of setting the lamp used in the
measure, to select the just touch a lamp by sliding fig. 11
checklist
Fig 11
The new AutoGain function is useful when the camera gain setting is incorrect, the
Auto Gain calculates the correct value of Gain using as reference a lamp with
known characteristics, see section 12.
8
The SCALE function changes the underlying value scale by multiplying x 1, x 10, x
100 and x 1000 scale of measurable values, see paragraph 14
This button opens the LuxMeter information Mask Pro Advanced.
8. SETTING SLIDING PANEL (Slide up Settings Panel)
Running with his finger upwards starting from the buttons Panel, displays the settings panel.
In this Panel you can set the parameters of the light source as the lamp power in Watts and the
illumination angle in degrees, and the parameters of the camera Gain (Gain and Offset).
Slide UP
Slide UP
Queued the sliding panel is displayed in addition to the type of filament lamp chosen, the
amount of free memory on your device and the reset button to reset all Default values
9
9. HOW TO MAKE A MEASURE (Measure Process)
Let's see how you can use LuxMeter Pro to make a measure of illumination of an environment.
Consider a closed environment, such as an Office lit with fluorescent tubes mounted on the
ceiling, as shown in the figure below.
We want to assess the overall lighting of the Office, i.e. all 4 lamps that illuminate the
entire space below, the first thing to do is select the type of lighting used, in this case
the FLUORESCENT TUBE .
- Press the selection button of the typology of lamps
-
Select the type "fluorescent tube"
As a standard value the fluorescent tube has a
illumination angle of 180° which can be
modified, if necessary, through the appropriate slider
"Viewing Angle".
The next thing is that
you set the power of the lights installed in our
Here are 4 lamps each one with 2 fluorescent tubes from 45W, so we [45 W x 8 = 360 pipes]
Watt installed. This value must be set with the slider marked "Light Power Watt" sliding
panel.
The last phase of Setup is to set the distance of the light source from the illuminated area.
In this case, knowing the ceiling height which is 2.5 meters above the average value
between the sources and the area below may be approximated to 2.05-2.10 m. This value
10
is inserted in the main form of LuxMeter Pro via the slider ", Distance mt".
At this point it is sufficient to point the camera of the iPhone/iPad to the area to measure
trying to display within the preview pane, the affected area as seen in the example image,
we should have a situation as shown in the example below:
If all parameters are correct and the
Gain of the camera is set correctly,
the display will show the value of
consideration of overall lighting in
Lux. Of course if you move the
camera to a different zone, we'll
have to reconfigure the parameters
that have been changed such as the
power of the lights and/or the
distance of the source.
In case the lighting parameters are
correct and the value calculated
from LuxMeter Pro is not plausible,
you may need to recalibrate the
camera's
Gain.
The
calibration
procedure is described in section 12
"Auto Gain".
10. PREVIEW MODE (Preview Mode)
In order to get a detailed view of the detected light intensity in the various area affected by
observation, you can enable in addition to standard mode, as mentioned at the beginning of
this document, other two modes, called CScale "Color Scale" and another GScale "Gray Scale".
Specifically the CScale mode, reprocess the image captured by the camera by replacing with
different shades of color areas with different light intensity. Areas with less brightness will
appear in blue and Red will be brighter. Here is a demo that shows how image LuxMeter Pro
discriminates against various areas with different light intensity.
11
As you can see in the image to the left,
LuxMeter Pro view preview screen even a
scale of colors with brightness values, the
values refer to the minimum and maximum
value measured in the image captured by
the camera. But we must pay attention to a
particular condition, in this example you
can see an image where the walls and
ceiling are white while on a wall there is a
door that LuxMeter Pro depicts with color
"proffer". Anyone following the previous
reasoning and referring to the scale of
colors visible on the left, might think that
the area affected by the door has a lower
luminous intensity despite being in the area
of the wall where the intensity is higher, as
is visible from the surrounding red. In fact
even if the target is illuminated with the
considered darker than for the simple fact that is
same intensity in the area environment is
Brown and compared to wall white, reflects
much less light, tricking so LuxMeter Pro. In cases like this it's always best to make a
comparison with the captured image into normal mode and exclude from scans all areas
which have a much darker colour than the rest which could mislead the Viewer.
Compare the pictures capture in three different ways in order to understand how LuxMeter
Pro interprets the data collected by the camera.
CScale
GScale
Normal
Scale
Fig 22
Fig 23
Fig 24
12
Comparison of three images can be seen as LuxMeter Pro highlights areas with different light
intensity as CScale mode in GScale dark colors can I fool the process giving a result that is not
trusted, as seen in Fig23, where the target appears black, although located in the zone of
maximum exposure.
11. SAVE MEASUREMENTS ND DB SAVES (Save Measure / DB)
During a measurement, you can save all acquired data, including color temperature chart and
preview mode. The rescue work is enabled by the SAVE button and generates an image file
with all acquired data. You must enter a name for the Save and the data will be stored in the
application folder in "Documents/SaveData" accessible from iTunes when you connect the
device to your Mac/PC.
It is always possible to access saved measurements and using the "DB" button. The DB form
presents a list of all saved measurement as shown in Fig. 25, in the list of saved measurements
are visible measurement data is a miniature of the captured image. From this form you can
view the measure with all of its data, or send it via email by entering as an attachment to the
saved image. An example is shown in Figure 26.
Fig 25
Fig 26
13
12. AUTOGAIN CAMERA CALIBRATION (Camera AutoGain)
It may be necessary to recalibrate the camera gain of iDevice to achieve greater accuracy in
the measurement of light. This adjustment can be made manually by editing the value of the
Gain slider via the "Gain" in the settings panel.
The value can also be changed by inserting
The value via the keypad button enabled
depicting the hand.
The "Auto Gain" is activated with the button placed on the main screen buttons Panel.
The new AutoGain function requires the use of a light source with known characteristics and a
blank sheet of paper. The calibration procedure is to set correctly the parameters of the light
source and tap the button "AUTO GAIN" button to start the calibration process, focusing the
camera on white sheet illuminated by the light source. In Figure 27 is an example of possible
camera calibration using a desk lamp by mail 15Watt at a distance of 60 cm from the paper.
Lampada 15W
Viewingangle
120°
Distanza 60cm
Nella schermata di preview di
LuxMeter Pro deve essere visibile
tutto il foglio bianco in modo da
riempire la schermata per circa il
70%
Fig 27
14
13. CALIBRATION WHIT COMPARISON TOOL (LuxMeter Compare)
If necessary make a manual calibration by comparison with a sample LuxMeter, the procedure
is similar to that of only the new autogain value of gain should be set to manual until you get
the same value provided by comparison tool. Specifically the comparison tool sensor should
be positioned on the white sheet or adjacent to it so as to be illuminated in the same way as
the paper itself, and the value that appears to be the same that we get from LuxMeter Pro by
modifying the Gain value as shown in Figure 28
Fig 28
14. SCALE SETTING (Scale)
Depending on the type of measurement to be made you can change the full scale value of the
display using the "SCALE" button on the main screen buttons Panel. The Scale button changes
the scale factor between 4 options:
x 1 maximum
999.9 Lux
x 10 maximum
9999 Lux
x 100 maximum
99999 Lux
x 1000 maximum 999999 Lux
In the case of off the charts on the display you will see the following value "----" flashes
fig 29
Out Of Scale
Fig 29
15
15. NOTE
16