1
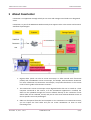
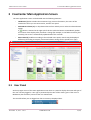
CaseCenter 2.4
User's Guide
CC24-UG-EN Rev1
November 11, 2013
Rev. 1
CaseCenter 2.4 User's Guide
Contents
Disclaimer....................................................................................................................................4
Character Types and Symbols.......................................................................................................6
Terms and Abbreviations..............................................................................................................7
1 About CaseCenter.....................................................................................................................8
1.1 Storing and Managing Digital Slides through CaseCenter.......................................................10
1.2 Accessing a Slide......................................................................................................................11
1.3 Uploading a Slide to a CaseCenter...........................................................................................11
2 Connecting to CaseCenter........................................................................................................13
2.1 Connecting through Pannoramic Viewer.................................................................................13
2.2 Logging in to CaseCenter through CaseViewer........................................................................13
2.3 Logging in to CaseCenter through the Web Interface.............................................................13
3 CaseCenter Main Application Screen.......................................................................................16
3.1 User Panel................................................................................................................................16
3.1.1 Managing a CaseCenter User Account...........................................................................................................18
3.1.2 Changing a User Password.............................................................................................................................18
3.2 Menu Options..........................................................................................................................19
4 Slides and Folders....................................................................................................................20
4.1 Folder Tree Panel.....................................................................................................................20
4.1.1 Folder Color Markings....................................................................................................................................21
4.1.2 Folder operation buttons...............................................................................................................................21
4.2 Slide Attributes and Process Options.......................................................................................25
4.2.1 Slide attributes...............................................................................................................................................25
4.2.2 Slide actions....................................................................................................................................................28
4.3 CaseView mode.......................................................................................................................35
5 Teleconsultation......................................................................................................................36
5.1 Overview of Teleconsultation..................................................................................................36
5.2 Requirements and Privileges for Hosts in a Teleconsultation Session.....................................36
5.3 Joining a Teleconsultation Session...........................................................................................37
5.4 Creating a Teleconsultation Session.........................................................................................38
5.5 Opening a slide via Teleconsultation.......................................................................................40
5.6 Working Simultaneously on a Slide in an Online Teleconsultation Session.............................41
6 Slide Sharing............................................................................................................................43
7 Search in CaseCenter Server....................................................................................................44
November 11, 2013 – Rev. 1
3DHISTECH Ltd.
2(49)
CaseCenter 2.4 User's Guide
8 Users & Groups.......................................................................................................................45
9 Troubleshooting......................................................................................................................46
9.1 I Cannot Connect to the CaseCenter from Pannoramic Viewer..............................................46
9.2 I Cannot Open the Slide from the Link Someone Sent Me......................................................46
9.3 I Cannot Change My CaseCenter Password.............................................................................46
9.4 CaseCenter Server upgraded by the Administrator.................................................................47
9.5 Slide cannot be opened in Viewer...........................................................................................48
9.6 Slide name is too long..............................................................................................................48
Index..........................................................................................................................................49
November 11, 2013 – Rev. 1
3DHISTECH Ltd.
3(49)
CaseCenter 2.4 User's Guide
Disclaimer
Copyright © 2001-2013 3DHISTECH Ltd.
All Rights Reserved
Intellectual property related to the 3DHISTECH products are as follows:
EP 1,789,831; US 7,663,078; EP 2,024,772; JP 2009-512685; US 12/301,781; EP 1,644,767; JP 2007516451; US7,327,515; EP 1,994,398; JP 2008-557835; US 12/281,566; U0700210; US 6,246,785;
HU0900142; HU0700404; PCT/HU2007/000065; EP 08762668.5; US 12/663,537;
PCT/AT2006/000492; JP 2008-542552; EP 06817469; US 12/095,545; PCT/AT2006/000493; EP
06817470.5; US 12/095,596; HU0900741; US 61/264,732; US 11/826,752; P0401870;
PCT/IB2005/050344; US 11/662,976; HU0700409; US 12/042,050; US 77/636,144 and 007502032.
The above mentioned granted patents, granted utility model, registered trademarks, pending
international and national patent applications and the other corresponding IP are the sole properties
of the 3DHISTECH Ltd.
3DHISTECH Ltd. is not liable for damage of whatever nature (including, but not limited to, general
or specific damage, indirect damage, consequential damage or incidental damage, including the
results of the analysis of the digitized slides, for example, change of health status related to
erroneous diagnosis from the digitized slide(s)) that stems from or is associated with use of
Product, digitized slides, quality of staining, quality of stained slides, quality of used method of
staining. 3DHISTECH Ltd. assumes no responsibility for the functionality and fault-free condition of
your “application programs” (Workflows, VBA macros, Commander scripts).
CAUTION
For research and education uses only, not for use in diagnostic procedures. This product has not been
approved or cleared as a medical device by the U.S. Food and Drug Administration, nor any other
regulatory authority. The data and images obtained or viewed using this product are not intended for
clinical or diagnostic use.
For performance evaluation only, the performance characteristics of this product have not been
established.
November 11, 2013 – Rev. 1
3DHISTECH Ltd.
4(49)
CaseCenter 2.4 User's Guide
Third-Party Disclaimer (LibTIFF – TIFF Library and Utilities)
3DHISTECH Ltd. is not liable for damage of whatever nature (including, but not limited to, general or
specific damage, indirect damage, consequential damage or incidental damage, including damage
resulting from lost profits, interruption of business, loss of business information, pecuniary loss or
similar damage) that stems from or is associated with the incorporated part of this Product that is
made by Silicon Graphics Inc.
THE SOFTWARE IS PROVIDED “AS IS” AND WITHOUT WARRANTY OF ANY KIND, EXPRESSED,
IMPLIED OR OTHERWISE, INCLUDING WITHOUT LIMITATION, ANY WARRANTY OF
MERCHANTABILITY OR FITNESS FOR A PARTICULAR PURPOSE.
IN NO EVENT SHALL SAM LEFFLER OR SILICON GRAPHICS BE LIABLE FOR ANY SPECIAL, INCIDENTAL,
INDIRECT OR CONSEQUENTIAL DAMAGES OF ANY KIND, OR FOR ANY DAMAGES WHATSOEVER
RESULTING FROM LOSS OF USE, DATA OR PROFITS, WHETHER OR NOT ADVISED OF THE POSSIBILITY
OF DAMAGE, AND ON ANY THEORY OF LIABILITY, ARISING OUT OF OR IN CONNECTION WITH THE
USE OR PERFORMANCE OF THIS SOFTWARE.
Further Information
For the latest information on 3DHISTECH products and services, please visit our website at:
http://www.3dhistech.com.
Company Address:
29-33 Konkoly-Thege Miklos Street, Building 6
1121 Budapest – HUNGARY
November 11, 2013 – Rev. 1
3DHISTECH Ltd.
5(49)
CaseCenter 2.4 User's Guide
Character Types and Symbols
Example
Abbreviation or term that is explained in section Terms and Abbreviations.
Example
Words or characters that appear on the screen. These include field names,
screen titles, push-buttons and menu names, paths or options.
Keys on the keyboard. For example, function keys (such as F11) or the
Ctrl+O key combination.
Example
Cross-references to other documents.
Warning!
Indicates that you need an additional module to use the feature or that
there are prerequisites for the task.
Important!
Contains an important piece of information or a recommendation. The
application will work if you choose not to follow the recommendation but
its performance might be less than optimal.
Tip!
Contains a suggestion about using the application in some other way or to
some interesting purpose.
November 11, 2013 – Rev. 1
3DHISTECH Ltd.
6(49)
CaseCenter 2.4 User's Guide
Terms and Abbreviations
Annotation
A particular detail of a digitized slide.
Host
User who uploaded the digital slide to CaseCenter and who initiates the
Teleconsultation about the slide.
CaseCenter user group
Group created by a CaseCenter administrator.
Participant
User invited to participate in the evaluation of a slide stored on
CaseCenter.
Teleconsultation
Provides access to digitized slides for several users and supports their
collaboration in inspecting and evaluating the virtual slide.
Teleconsultation group
Group created by the Host for a Teleconsultation session independently
of the user groups that exist on CaseCenter.
Several Teleconsultation sessions (and therefore several Teleconsultation
groups) can be activated on a CaseCenter in parallel.
Telepathology
November 11, 2013 – Rev. 1
Teleconsultation in the field of pathology: pathologists exchange
information and evaluate a slide together via Teleconsultation.
3DHISTECH Ltd.
7(49)
CaseCenter 2.4 User's Guide
1 About CaseCenter
1 About CaseCenter
CaseCenter is an application through which you can store and manage virtual slides on a designated
server.
CaseCenter is a part of the 3DHISTECH Product Family that supports tasks in the routine and research
workflow of pathologists.
1. Digitize slides (which can also be tissue microarrays or slides stained with fluorescent
probes) with a 3DHISTECH scanner microscope, for example, with Pannoramic SCAN 150.
For more information on Pannoramic microscopes, see product brochures or the current
issues of user's guides of Pannoramic scanners.
2. The Pannoramic scanner microscope creates digitized slides that can be saved on a local
computer connected to the scanner, or if the ScanToServer application is installed, the
slides can be uploaded through the scanner software directly to the CaseCenter server
where slides can be evaluated, shared, and you can also create Teleconsultation session to
discuss specific cases with pathologists.
3. Slides can be opened from the local computer or the CaseCenter via Pannoramic Viewer,
you can inspect the local slides and you can create annotations on them to mark
interesting areas.
November 11, 2013 – Rev. 1
3DHISTECH Ltd.
8(49)
CaseCenter 2.4 User's Guide
1 About CaseCenter
Pannoramic Viewer is a platform for the following applications, called modules:
•
With the Teleconsultation module, you can upload slides to a dedicated server and
share them with other Pannoramic Viewer users to request their analysis.
•
With the TMA module, you can view and analyze slide sets in which each slide is a
cut from a tissue microarray. Combined with the TumorBoard module, the TMA
module provides you with a powerful tool to perform research-scale analyses on
digital slides.
•
With the TumorBoard module, you can perform an immunohistochemical analysis
on a slide set. If you purchase the TMA module as well, you can run your
TumorBoard analysis on a tissue microarray and score the TMA project in
TumorBoard.
•
With HistoQuant, MembraneQuant, NuclearQuant, CytoFISHQuant, and
DensitoQuant modules, you can define algorithms to measure various parameters
on a slide. Combined with TumorBoard, you can run the Quant algorithm on one
slide or on a set of slides (grouped into an TumorBoard project).
For more information on Pannoramic Viewer modules, see Pannoramic Viewer 1.15.3
User's Guide.
4. You can upload slides to a CaseCenter server also from the local storage with file transfer
via Teleconsultation in Pannoramic Viewer.
Teleconsultation via Pannoramic Viewer allows you to view remote slides (slides stored on
a CaseCenter server). With this feature of Pannoramic Viewer, you can also host a
Teleconsultation session or participate in a session initiated by another user.
5. You can also share slides for E-School. For information on that product, see E-School 1.11
User's Guide. One example of a server-based teleconsultation solution is
www.pathonet.org.
6. Slides stored in CaseCenter server may be shared and can be opened with CaseViewer
application. CaseViewer can be downloaded by clicking
at the top left corner of the
CaseCenter login site. For more information the application and usage, see CaseViewer
Help Guide.
November 11, 2013 – Rev. 1
3DHISTECH Ltd.
9(49)
CaseCenter 2.4 User's Guide
1 About CaseCenter
1.1 Storing and Managing Digital Slides through CaseCenter
CaseCenter is a platform for managing folders, slides, cases, blocks and other documentations. The
figure below demonstrates how slides can be stored and managed on a server.
A Service Unit is an element of the system where slides are physically stored on and slide processes
take place at as well; slide access and management is attained through the HUB.
Users who have registered on the server (registration is performed by the server administrator or a
moderator user) can manage and use their slides on the server in the following ways:
•
upload slides to the server.
•
arrange slides in folders, cases, or blocks, for example, group slides according to their
staining types or your research projects.
•
share slides with other users:
◦
with users who have an account on the same CaseCenter (either having read only or
read/write access to the folder/case/block containing your slide, or if you share the
slide with them explicitly).
◦
with users who will access the slide via E-School.
•
invite other users into Teleconsultation sessions to discuss slides.
•
participate in Teleconsultation sessions initiated by another user.
November 11, 2013 – Rev. 1
3DHISTECH Ltd.
10(49)
CaseCenter 2.4 User's Guide
1 About CaseCenter
1.2 Accessing a Slide
Whether you can open and view a slide stored on a CaseCenter server depends on the following
criteria:
•
you can always access the slides for which you have read only, and upload slides with
read/write access rights.
•
you can see slides that other users share with you (for instructions, see section 6).
Administrators or users with moderator privilege can give permission to particular users or groups for
accessing specific folders/block/cases. This means that you might not be able to see all the slides
stored on the server, and it is possible that some of the slides are not even visible to other users
except they are shared.
For example, if a parent folder is protected (some of its content is hidden because you are a user with
limited user privileges, therefore, the folder name is grayed out), but it is possible for you to access
the content of a sub-folder if you are permitted by the administrator or a user with moderator rights.
1.3 Uploading a Slide to a CaseCenter
You need Pannoramic Viewer to upload files to the server.
Tip!
Since the upload may take a significant amount of time – depending on the slide size
– it is recommended that you upload the slide to the server before starting a
Teleconsultation session.
You can only upload one slide at a time from Pannoramic Viewer. Administrators can
perform bulk uploads via file transfer.
1. Launch Pannoramic Viewer on your computer.
2. To connect to the CaseCenter server, click
November 11, 2013 – Rev. 1
3DHISTECH Ltd.
in the toolbar.
11(49)
CaseCenter 2.4 User's Guide
1 About CaseCenter
3. Enter server address and your authorization information (User name and password) into
the corresponding field. HTTPS connection can be established by selecting the Secure
connection option. Click OK when finished.
NOTE: If you encounter a problem, contact the CaseCenter administrator.
4. Ensure that the slide is visible in the navigation tree on the Local tab in Pannoramic Viewer.
If the slide is not visible, add the containing folder to the navigation tree:
a. To open the slide, click
in the toolbar.
b. Browse for the folder that contains the slide
c. Click Add Folder then click Close.
5. Right-click the slide that you want to upload and then select Upload Slide to
Teleconsultation Server.
6. Set the properties for the copy of the slide to store on CaseCenter.
7. Click Start Upload.
Important!
Accessing Virtual Tray or Virtual Slide requires a license, therefore without a valid
license these type of slides cannot be opened nor edited with Pannoramic Viewer,
but it is available for you to edit slide data in CaseCenter.
November 11, 2013 – Rev. 1
3DHISTECH Ltd.
12(49)
CaseCenter 2.4 User's Guide
2 Connecting to CaseCenter
2 Connecting to CaseCenter
2.1 Connecting through Pannoramic Viewer
1. Launch Pannoramic Viewer on your computer.
2. To start Teleconsultation, click
in the toolbar.
3. Enter the server address and your authorization information into the corresponding field.
HTTPS connection can be established by selecting the Secure connection option. Click OK
when finished.
2.2 Logging in to CaseCenter through CaseViewer
After launching CaseViewer, select the CaseCenter panel from the startup page, then enter user
credentials to access the designated server.
For more information on CaseViewer, read CaseViewer Help Guide.
2.3 Logging in to CaseCenter through the Web Interface
1. Type the URL of the CaseCenter (the local System Administrator can assist you with the
proper address) in your web browser to access the CaseCenter.
Important!
The supported browser is Google Chrome.
November 11, 2013 – Rev. 1
3DHISTECH Ltd.
13(49)
CaseCenter 2.4 User's Guide
2 Connecting to CaseCenter
2. Enter your User name and Password, and click login to access the page. If a global cookie is
set to 'ON' by the administrator, the login box may contain a checkbox to make the
computer remember the user's login. Upon selecting this option, it is not necessary for the
user to log in to the server again through the same browser before the cookie expires.
Important!
Open CaseCenter interface in one tab only with your browser, because connection
issues may arise when working on the same server in several tabs.
If there are no free slots left to access the server, you receive a message displayed in the login
window informing you that you are placed in the login queue.
You get in the Login queue based on your user level, which means that the higher the level is,
the sooner you are allowed to log in (the higher ranked user is put forward, but behind the
users of the same level).
November 11, 2013 – Rev. 1
3DHISTECH Ltd.
14(49)
CaseCenter 2.4 User's Guide
2 Connecting to CaseCenter
Queue number (position in the queue) is displayed and automatically updated. You may leave
the queue by clicking Cancel, and every other user behind will be placed forward.
If you are at the first position in the queue and a license is set free, then you will be notified
that you can access the system. If you do not wish to log in, you will be removed from the
queue after a specified amount of time has passed since the notification is displayed, and the
possibility of logging in is given to the user next on hold.
November 11, 2013 – Rev. 1
3DHISTECH Ltd.
15(49)
CaseCenter 2.4 User's Guide
3 CaseCenter Main Application Screen
3 CaseCenter Main Application Screen
The main application screen can be divided into the following elements:
•
Header Bar (1) that includes the CaseCenter logo, version information, the name of the
CaseCenter server you are connected to, and the User panel.
•
Main Menu Selector (2) is a drop-down element from which you can select the desired menu
option.
A
button is situated at the right side of this bar. Click this button to immediately update
the content of the display after you effect a change (for example, in the folder structure), but
normally, the screen is automatically updated within four seconds.
•
Menu Panel (3) modifies according to the selected menu option. Panels may be displayed
differently (according to uniquely customized column settings for the specific user type).
1
2
3
3.1 User Panel
At the top right corner of the main application screen there is a panel to display the name and type of
the user currently logged in. User type is presented by the color of the avatar: green if the user is a
Moderator, blue if Normal, and red if the user is Restricted.
The time left before you are logged out due to inactivity is displayed here.
November 11, 2013 – Rev. 1
3DHISTECH Ltd.
16(49)
CaseCenter 2.4 User's Guide
3 CaseCenter Main Application Screen
For users who cannot modify their profile data (for example, LDAP users), View profile is displayed
instead of Change profile. Upon clicking View profile, the User data window is displayed.
If you click on the Change profile button the Edit user window opens in which the following options
are available for you to change user preferences:
•
You can change your title, family and given name, e-mail address, password, other contacts,
and specialties. User name and Moderator right is given by the administrator, therefore the
User name field is inactive in this window.
NOTE: Use only printable ASCII characters (32..126) when creating a new password.
November 11, 2013 – Rev. 1
3DHISTECH Ltd.
17(49)
CaseCenter 2.4 User's Guide
•
3 CaseCenter Main Application Screen
Open Slides in – Choose Pannoramic Viewer or Java Viewer as the default slide viewer
application in which the selected slides can be opened.
NOTE: Moderator user is allowed to set other users' access rights for folders to which he/she has RW
right (except to folders with R or 0 rights).
Click on the standby button to log out from the CaseCenter interface.
NOTE: If closing the browser tab/window, and your browser is set not to remember to previous
session, it may happen that you cannot log in again because of licensing issues (the maximum
number of user licenses is reached). Modify browser settings as follows:
If using Internet Explorer: open New Tab, then select Reopen last session option on the bottom of
the tab.
If using Mozilla Firefox: open Tools/Options menu, then select Show my windows and tabs from last
time from the Startup options drop-down menu on the General tab.
3.1.1 Managing a CaseCenter User Account
Your user account (user name and password) is created by the CaseCenter administrator. There are
no restrictions on how many slides you can upload to the CaseCenter server, assuming that there is
still enough storage place on the server.
Important!
You might not be able to change the password assigned to you by the administrator
who enables or disables password resetting when your account is created. If you have
trouble with resetting your password, contact your CaseCenter administrator.
3.1.2 Changing a User Password
If you are allowed to change your password, do the following:
1. Open the CaseCenter main page in your web browser.
2. Enter your User name and Password and click login.
3. Click Change profile in the User panel and modify the password in the Edit user window (see
this section above).
November 11, 2013 – Rev. 1
3DHISTECH Ltd.
18(49)
CaseCenter 2.4 User's Guide
3 CaseCenter Main Application Screen
3.2 Menu Options
Move the cursor over the menu selector to see the list of options.
•
Slides & Folders – Browse the folder structure of the server
•
Teleconsultation – Opens the Teleconsultation window
•
Share – View shares
•
Search – Search for slides or folders
•
Users & Groups – Show users and groups
NOTE: Only those tabs are visible that are selected to be accessible for the specific user type.
November 11, 2013 – Rev. 1
3DHISTECH Ltd.
19(49)
CaseCenter 2.4 User's Guide
4 Slides and Folders
4 Slides and Folders
Upon loading the CaseCenter web interface, the Slides & Folders window is displayed by default.
3
2
1
It consists of the following interface elements:
•
Folder Tree Panel (1) including a tree view of the server content and structure, and folder
operation buttons
•
An informational region related to the actual folder/case/block (its name and description)
together with the included slides and their attributes on the Folder Content Panel (2)
•
Action Field (3) with several additional options for searching through, ordering, and filtering
the content.
4.1 Folder Tree Panel
The tree structure of the server can be seen on this panel, where the actual folder is presented by
blue background. The number of the containing slide is written after the folder name (in brackets).
Hierarchically, the Case is a sub-level element within a folder, and the Block is a sub-level element of
a Case. You can create several cases within a folder and several blocks in a case.
Folder may contain slides and cases, case can contain slides and blocks, but only slides can be stored
within a block. The number of elements within a folder is specified in a bracket at the end of the
folder name.
November 11, 2013 – Rev. 1
3DHISTECH Ltd.
20(49)
CaseCenter 2.4 User's Guide
4 Slides and Folders
4.1.1 Folder Color Markings
User access rights are presented in different colors of folders in the tree panel.
Folder color marking and the tasks according to the different access rights are listed below:
•
Black – Folder Read and Write access
•
Blue – Folder Read only access
•
Gray – No access permission, but a sub-folder can be visible if you have read only or
read/write access rights for that specific sub-folder, case, or block.
Folders, cases, or blocks are hidden for which you have no permissions at all.
For example, if a folder name appears in black characters when it contains slides to which you have
read and write access, blue if the slides are read only, and gray if the slides in the folder are hidden
because the slides in it are not accessible.
4.1.2 Folder operation buttons
This section describes the buttons above the folder tree panel. Folder operation buttons may be
inactive depending on folder-related permissions.
November 11, 2013 – Rev. 1
3DHISTECH Ltd.
21(49)
CaseCenter 2.4 User's Guide
•
4 Slides and Folders
– New folder
Define properties of a new folder that you want to add to the structure. This option is
available for users with Read/Write access rights, therefore the button is inactive if a folder
cannot be created at that level.
Access permissions for the new folder can be added only when with Read/Write access
rights and in Moderator user level.
1. In the folder tree, click the desired folder in which you would like to create the subfolder, and if active, click this button.
2. The Create new folder window opens. Type in the Folder name, add some
information in the Description field if necessary.
3. Select users and/or groups you would like to give access to this folder, and set their
permissions.
Click the right arrow buttons to add them to the selection list. Click the left arrow
button to remove items from the lists.
By default, users are displayed with the given permissions for the parent folder, and
will be marked with red if you modify their permissions.
November 11, 2013 – Rev. 1
3DHISTECH Ltd.
22(49)
CaseCenter 2.4 User's Guide
•
4 Slides and Folders
– Edit folder
By default, you can modify the folder description only. Patient or case-related information
can be entered into the description field.
Upon clicking on the Description field (in case it includes any text) of the selected
folder/case/block in the Slides & Folders panel, a window similar to the following appears:
Description field becomes locked whenever a user has initiated editing, so you will not be
able to modify the content.
Moderator users are allowed to change user permissions. If you would like to have the
access right of a user or user group to be changed, you can contact a Moderator user. A
moderator is always marked with a green avatar.
Click Accept to confirm changes.
November 11, 2013 – Rev. 1
3DHISTECH Ltd.
23(49)
CaseCenter 2.4 User's Guide
•
4 Slides and Folders
– Delete folder
After clicking the Delete button a dialog window opens. Click Delete to confirm the removal
of the folder.
NOTE: Only empty folders can be deleted, therefore, upon clicking the Delete button a
notification message appears that the folder cannot be deleted as it contains subelement(s). The folder that will be deleted is highlighted on the left in the folder tree.
•
– New Case
Creates a case under the actual folder. Note, that a case cannot be created under an other
case or block. Similarly to the Create new folder window, description can be added to the
case as well as determining users and groups and their access rights to the case. Click the
Accept button to create the case.
November 11, 2013 – Rev. 1
3DHISTECH Ltd.
24(49)
CaseCenter 2.4 User's Guide
•
4 Slides and Folders
– New Block
Creates a block under the actual case. Note, that you cannot create a block under an other
block. Description can be added to the block as well as determining users and groups and
their access rights to the block. Click Accept to finalize block creation.
4.2 Slide Attributes and Process Options
4.2.1 Slide attributes
The view of slide attributes can be modified by selecting one of the four view modes (Default, Simple,
Show description, or Slide tray) from the View type drop-down list. Default view is Slide tray. The
folder content panel changes according to the selected view type, but if a Case contains several
Blocks, the root content of the Case and of the Blocks are displayed as well.
The order of attributes belonging to a specific view type may vary according to the settings made by
administrators. The selected View type will be saved automatically, and loaded next time you log in.
November 11, 2013 – Rev. 1
3DHISTECH Ltd.
25(49)
CaseCenter 2.4 User's Guide
4 Slides and Folders
Attributes
•
Checkbox
•
Preview (Thumbnail view of the slide or image)
•
Slide type (2D Slide, 3D Slide, MacroSlide, TMA Project, or TumorBoard Project)
•
Slide name
•
Barcode
•
Description
•
Organ (name of the organ where the tissue specimen was originally sectioned from)
•
Staining (name of the applied stain)
•
Scan date (time of slide digitization)
•
Status indicates the stage the slide is in. Status attribute can be selected from the drop-down
menu, and by default it is set to New (either newly imported, scanned, or uploaded). Once a
slide is opened, its status will be automatically switched to Examined. Statuses Diagnosed
and Reopened both can be set manually.
•
Edit (the
icon is displayed only if you have write access to the specific slide)
In the Edit Slide window the following slide attributes can be modified by default:
•
Slide name
NOTE: Slide name cannot be longer than 70 characters, and make sure it does not
include the '&' character. For more information, see sections 9.5 and 9.6.
•
Description
◦
•
Staining
◦
•
Types can be set by Administrator, select one from the drop-down menu
Organ
◦
•
Click the Description field to enter/modify information regarding the
specific Folder, Case, or Block.
Types can be set by Administrator, select one from the drop-down menu
Status
November 11, 2013 – Rev. 1
◦
New
◦
Examined
◦
Diagnosed
◦
Reopened
3DHISTECH Ltd.
26(49)
CaseCenter 2.4 User's Guide
4 Slides and Folders
•
Barcode
•
Automatic Slide deletion time
•
Select Never expire or specify a date
NOTE: Slide can be opened from the Edit Slide window by clicking on its thumbnail image.
November 11, 2013 – Rev. 1
3DHISTECH Ltd.
27(49)
CaseCenter 2.4 User's Guide
4 Slides and Folders
4.2.2 Slide actions
The elements of the action bar are as follows (from left to right if Default view is selected):
•
Tick the checkbox to select all folder items for further operation.
•
Quick search – Enter the text or character string you are looking for in the search field.
Search results are listed automatically in accordance with the entered text.
•
Duplicate –
After clicking this button the folder tree is displayed in the Duplicate Slide window. Click the
destination folder, case, or block and the slide(s) will be copied to that specific container by
clicking the Accept button.
A progress bar can be seen in the Slide name field, displaying the percentage of completion.
Important!
Duplication physically creates a copy of the selected slide(s) in the
destination folder.
November 11, 2013 – Rev. 1
3DHISTECH Ltd.
28(49)
CaseCenter 2.4 User's Guide
•
4 Slides and Folders
Move –
Moves the selected slides to the desired folder in the folder tree. A window similar to the
Duplicate slide window appears – select the destination folder to which the selected slide(s)
will be moved from the original folder.
•
Delete –
Removes the selected slides and the related data from the server.
•
Share –
Click this button to share the selected slide(s) or project(s) with users or groups. Sharing a
slide generates a link pointing to the original slide. When a slide is shared with a user or
groups, it will show up in their Share menu, and its status will be automatically set to New.
November 11, 2013 – Rev. 1
3DHISTECH Ltd.
29(49)
CaseCenter 2.4 User's Guide
•
4 Slides and Folders
Upload macro –
Click this button to upload macro images. Only JPEG or JPG images can be uploaded, file size
is maximum 1MB.
•
Create Virtual Slide or Virtual Tray –
With this feature a virtual slide or virtual tray can be created based on the original slide or
slides. If you select one slide only then you click this button, and the box in which the
following message appears, you can select the type of virtual item to be created.
In the folder content panel virtual slide is marked with a
label, and virtual tray is with a
label next to the preview image of the virtual item.
November 11, 2013 – Rev. 1
3DHISTECH Ltd.
30(49)
CaseCenter 2.4 User's Guide
4 Slides and Folders
If you edit the data of the virtual slide or tray the following windows are displayed:
At the bottom areas of these windows, sections such as VS Content and VT Content display
the preview image and related data of the included slide or slides.
NOTE: Staining and Expiration date cannot be modified for Virtual Slides.
November 11, 2013 – Rev. 1
3DHISTECH Ltd.
31(49)
CaseCenter 2.4 User's Guide
•
•
4 Slides and Folders
View type – select any of the following options:
◦
Default (Slide tray view)
◦
Simple
◦
Show description
◦
Slide tray
Order by – you can select any of the following ordering methods from the drop-down list:
◦
Image type
◦
Slide name
◦
Organ
◦
Staining
◦
Scan name
◦
Status
◦
Custom Order
Since slides can be reordered by dragging in Slide tray view mode, order will
automatically be displayed as Custom order.
November 11, 2013 – Rev. 1
3DHISTECH Ltd.
32(49)
CaseCenter 2.4 User's Guide
4 Slides and Folders
•
Checkbox – Check to select every item of the Folder/Case/Block to open them with
Pannoramic Viewer.
•
Align – Click
to align selected slides based on a reference degree by which slides in a set
can be rotated to an identical orientation.
•
Folder/Case/Block name
•
Attachment – Click
to upload files as attachments and to display the list of
attachments (if there is any) belonging to the actual folder.
NOTE: Attachments can be uploaded for the current folder and not for a specific slide.
Omit using accented letters in file names you want to upload, as these characters will
change after batch download of attachments and decompressing the ZIP file.
Important!
If an attached file name starts with a “.” character, or the file extension
contains a space, its downloading may fail depending on the browser type.
To attach a file to the actual folder, follow the below steps:
1. Click Browse in the Attachments window to upload a file as an attachment.
2. Select the file then click Open in the File Upload window.
3. Click the Upload button in the Attachments window to upload the file.
November 11, 2013 – Rev. 1
3DHISTECH Ltd.
33(49)
CaseCenter 2.4 User's Guide
4 Slides and Folders
•
Use the selection checkboxes at the first column or the select all checkbox at the
column header to select multiple files.
•
Multiple files can be downloaded by clicking the
icon to download a single attachment.
•
To delete attachment(s) click the
icon to delete a single file.
•
Click Yes to delete selected file(s) from the list.
button, or click the
button to batch deletion or the
To open a slide either in Pannoramic Viewer or in Java Viewer, click on the thumbnail image of the
slide.
To edit slide attributes click the corresponding
November 11, 2013 – Rev. 1
icon at the right side of the panel.
3DHISTECH Ltd.
34(49)
CaseCenter 2.4 User's Guide
4 Slides and Folders
4.3 CaseView mode
CaseView mode is available through HIS (Hospital Information System). A link is generated for a
specific case in HIS, and upon opening this link with a user account, in CaseView mode a restricted
user interface of the slidemanager view is displayed.
Available functions:
•
Editing or handling slide data
•
Attachments
•
Open slide
•
Change view type
•
Share
•
Upload macro
Inactive functions:
•
Folder tree
•
Copy slide
•
Move slide
•
Delete slide
November 11, 2013 – Rev. 1
3DHISTECH Ltd.
35(49)
CaseCenter 2.4 User's Guide
5 Teleconsultation
5 Teleconsultation
The Teleconsultation gives you access to digitized slides from a remote location. Slides can be
examined and evaluated by users who have invited by the host during a Teleconsultation session. You
can consult about slides with other users in real-time or in asynchronous mode also with the chat
support.
Important!
Note, that the file sizes of digitized slides are large: the size of the MRXS file and the
associated folder is often 1GB or above. Therefore, it is recommended that you use
an Internet connection that has at least 1000 kilobit/s capacity when you are
uploading slides or when you participate in a Teleconsultation.
5.1 Overview of Teleconsultation
You can use Teleconsultation for telepathology to evaluate digitized slides stored on a 3DHISTECH
CaseCenter server via the Internet using the CaseCenter application in online mode.
You will need the Teleconsultation module of the Pannoramic Viewer to upload slides (one-by-one) to
a 3DHISTECH CaseCenter server. Uploading the slide creates a copy on the Service Unit, keeping the
original slide on your local computer.
5.2 Requirements and Privileges for Hosts in a Teleconsultation
Session
•
If the Host quits the group, the Teleconsultation session closes for all participants. Other
participants can leave the session without terminating it.
•
The Host can modify the slide by adding annotations at any time. Other participants may
request permission to modify the slide from the Host.
•
Only the Host can edit a Teleconsultation report. Other participants can only read the report
after they received it from the Host.
November 11, 2013 – Rev. 1
3DHISTECH Ltd.
36(49)
CaseCenter 2.4 User's Guide
5 Teleconsultation
5.3 Joining a Teleconsultation Session
In the TC Invitations window there is a list of Teleconsultation sessions you have been invited to.
Select the one you want to participate in by clicking on the list item.
The pop-up window displays all the necessary information regarding the session, such as start date
and expiration date of teleconsultation, description, subject slides or projects, and attendees.
To close the window without participating in the session, click the Cancel button, or you can start
evaluating the slide or slides by clicking the Start Teleconsultation button.
November 11, 2013 – Rev. 1
3DHISTECH Ltd.
37(49)
CaseCenter 2.4 User's Guide
5 Teleconsultation
5.4 Creating a Teleconsultation Session
1. Switch to Teleconsultation window then select the TC Requests option.
2. Click
to create a Teleconsultation session.
•
Fill in the fields in the General Information window. You can name the session,
assign a start date and expiration date, as well as write a description about the
session itself.
November 11, 2013 – Rev. 1
3DHISTECH Ltd.
38(49)
CaseCenter 2.4 User's Guide
5 Teleconsultation
•
In the Slides window, click the desired folder in the folder tree, then click the Add
button next to the slide preview at the right side of the Select Slides panel.
•
Finally, select the participants in the Users and Groups window, and click Accept.
If the system is properly configured, a message will be sent to a participant’s e-mail address
whenever a Teleconsultation session is created, or there is any modification regarding the session.
November 11, 2013 – Rev. 1
3DHISTECH Ltd.
39(49)
CaseCenter 2.4 User's Guide
5 Teleconsultation
5.5 Opening a slide via Teleconsultation
In Pannoramic Viewer
1. Start Pannoramic Viewer.
2. Connect to the 3DHISTECH Teleconsultation Server:
a. To start Teleconsultation, click
in the toolbar.
b. Enter the server address and your authorization information in the dialog.
3. On the Teleconsultation server tab, folders and slides that you have been granted access to are
displayed.
4. Double-click the slide that you want to open.
In CaseCenter
After you opened the window of the selected Teleconsultation session you have been invited to, and
clicked the Start Teleconsultation button (see section 5.3 Joining a Teleconsultation Session), the
following window appears:
As you can see, Pannoramic Viewer is selected by default as the viewer application in which the slide
will be opened. If you would like to choose a different application, click the Choose button and
browse for it or click OK to continue with opening the slide with the default program. When the
Pannoramic Viewer is launched you are asked to write your name in the displaying window to
connect to the Teleconsultation session. You can start working on the slide after you logged in.
November 11, 2013 – Rev. 1
3DHISTECH Ltd.
40(49)
CaseCenter 2.4 User's Guide
5 Teleconsultation
5.6 Working Simultaneously on a Slide in an Online
Teleconsultation Session
1. The Host must ensure that all participants can access the slide. Note, that participants cannot
modify the slide or take over the control.
2. In CaseCenter, on the Teleconsultation panel select the session and click Start Teleconsultation.
3. Enter your nick or name into field of Create / connect to a teleconsultation group window.
4. If connected to server, select the slide you want to share with others either from the folder tree
on Teleconsultation server tab in Pannoramic Viewer, or in the Teleconsultation window in
CaseCenter, then open it.
5. Click the
button in the slide window in Pannoramic Viewer.
6. The slide is displayed in Pannoramic Viewer for all participants.
Warning!
If the Host tries to enable a slide that has not been uploaded to CaseCenter,
Teleconsultation starts uploading the slide. The upload, however, might take time
because digitized slides are usually large files (often 500MB, 1GB or larger).
Uploading a 1GB slide over a 2000 kilobits/sec connection requires more than 70
minutes. If uploading is started during Teleconsultation, the waiting period for the
slide might be unmanageably long and the background upload process might also
reduce the speed of Teleconsultation.
November 11, 2013 – Rev. 1
3DHISTECH Ltd.
41(49)
CaseCenter 2.4 User's Guide
5 Teleconsultation
7. It is possible to work with several slides at the same time. Participants always see the same
slide(s) and the same part of the active slide as the Host.
8. The Host can work with the slide, for example move around on it to check its parts as in
Pannoramic Viewer without Teleconsultation.
9. The Host should take into consideration that Pannoramic Viewer might be displayed with
different resolutions on other participants’ screens. The best Teleconsultation result can be
achieved with screen resolutions that do not differ significantly from each other.
10. Participants can take over from the Host: click Request control in the slide toolbar. A request is
sent to the Host. The Host can cede or deny control to the participant. The name of the user
who moderates the session is shown in red in the participant list (in the message box).
11. The Host and the participants can also exchange comments via the chat tool.
12. To quit a Teleconsultation session, click
November 11, 2013 – Rev. 1
in the Pannoramic Viewer toolbar.
3DHISTECH Ltd.
42(49)
CaseCenter 2.4 User's Guide
6 Slide Sharing
6 Slide Sharing
Select the Share menu option from the main menu. If a user has shared a slide with you it will be
listed in the Shared with me window.
You can share your slides with other users and/or groups in the Slides & Folders window (see section
4.2.2 Slide actions).
•
When you share a slide on the server, all the designated users will be able to see the slide if
they check their Shared with me window.
•
You can use the CaseCenter groups created by the administrator, for example a group of
users who specialize in a particular cancer type.
•
Click
•
Tick the checkbox on the left of the thumbnail image of the slide then click the
to cancel sharing them with a user.
to edit slide data.
November 11, 2013 – Rev. 1
3DHISTECH Ltd.
button
43(49)
CaseCenter 2.4 User's Guide
7 Search in CaseCenter Server
7 Search in CaseCenter Server
Select Search from the menu options to search for slides and folders stored on the CaseCenter server.
In this window you can search for the following attributes:
•
Text (search for character string in slide name and in the description fields of folders, cases,
blocks, and slides)
•
Date from/to
•
Organ (selectable from list)
•
Staining (selectable from list)
•
Status (selectable from list)
Except for temporary LDAP users, search parameters can be saved for later use by entering a text into
the Save as field and clicking Save, or delete after selecting the entry from the Saved searches dropdown list then clicking the Delete button.
Search results will be displayed after clicking the Search... button. You may narrow the list by adding
other criteria, such as Date From or Date To, Organ, Staining, or Status.
November 11, 2013 – Rev. 1
3DHISTECH Ltd.
44(49)
CaseCenter 2.4 User's Guide
8 Users & Groups
8 Users & Groups
The Users & Groups window displays information regarding the data of registered users and groups
created by administrators. The Users and Groups information is separately displayed on two different
panels. To select a user or group in order to see their data, scroll down the list in this window. Also,
you can search for users or groups, to narrow the search results enter the text in the Quick search
text box.
NOTE: Imported LDAP users are displayed with blue background.
To access user or group data, click the
or the
button.
User and group data can be edited by administrators only. If you find something that is needed to be
modified, contact your administrator directly.
November 11, 2013 – Rev. 1
3DHISTECH Ltd.
45(49)
CaseCenter 2.4 User's Guide
9 Troubleshooting
9 Troubleshooting
9.1 I Cannot Connect to the CaseCenter from Pannoramic
Viewer
Check the following to ensure that you can access the server:
1. Is your Internet connection in order?
2. Are you entering the correct name or address to the server?
•
If you are not sure that you are entering the correct data in the connection dialog,
contact your CaseCenter administrator who can give you the name and/or address of
the server.
3. Are you entering the correct user name and password?
•
You can double-check by logging in to CaseCenter via the web interface. If you can log
in to the Server that way, your user name and password is correct.
9.2 I Cannot Open the Slide from the Link Someone Sent Me
Check the following to ensure that you can access the server and the slide stored there:
1. Is your Internet connection in order?
2. Does the link point to a CaseCenter where you are a user?
•
Check the server name in the link.
3. Is the CaseCenter working?
•
Double-check by logging in to CaseCenter
- from Pannoramic Viewer, see section 2.1.
- via the web interface, see section.2.2.
9.3 I Cannot Change My CaseCenter Password
You might not be able to change the password assigned to you by the administrator who enables or
disables password resetting when your account is created.
If you have trouble with resetting your password, contact your CaseCenter administrator.
November 11, 2013 – Rev. 1
3DHISTECH Ltd.
46(49)
CaseCenter 2.4 User's Guide
9 Troubleshooting
9.4 CaseCenter Server upgraded by the Administrator
In case the CaseCenter server is reinstalled by the administrator, the browser cache must be cleared
on the client's side.
Follow the below procedure to clear browsing data in Google Chrome:
1. Press Ctrl+Shift+Del
OR
•
Click the Chrome menu
on the browser toolbar, then Tools.
•
Select Clear browsing data...
2. From the drop down menu at the top of the dialog window select the time how far back in
time you want to go. It is advised to select the beginning of time as time range.
Make sure that the following boxes are checked:
•
Delete cookies and other site and plug-in data
•
Empty the cache
3. When you finished checking boxes, click Clear browsing data.
November 11, 2013 – Rev. 1
3DHISTECH Ltd.
47(49)
CaseCenter 2.4 User's Guide
9 Troubleshooting
9.5 Slide cannot be opened in Viewer
Some minor known issues may arise when using IE8 or IE9 as the browser for using CaseCenter.
•
If you wan to open a slide starting with “&”, Pannoramic Viewer sends an error message:
"Unknown system error occurred".
•
If the slide name ends with a “&” character, you will get a "Connect to Teleconsultation
Server" message from Pannoramic Viewer.
•
In case the “&” character is present in the string of the file name, it will be opened in
Pannoramic Viewer, but its name will be displayed shorter – will end with the character
immediately preceding it.
Solution to all the above mentioned issues that you rename the slide and reopen it.
9.6 Slide name is too long
The maximum length of slide name is a string of 70 characters in CaseCenter, but if scanning options
are set in the Scanner software application that the digital slide receives its barcode string as its file
name, the name string can be as long as 256 characters.
In CaseCenter, during editing any of the attributes (organ, staining, etc.) of a slide which name
contains more than 70 characters, make sure to cut or rename the slide and type less than 70
characters in the file name field.
November 11, 2013 – Rev. 1
3DHISTECH Ltd.
48(49)
CaseCenter 2.4 User's Guide
Index
Index
B
Block............................................................................................10, 11, 20, 21, 23, 24, 25, 26, 28, 33
C
Case.......................................................................................10, 20, 21, 23, 24, 25, 26, 28, 33, 47, 48
CaseCenter...........................2, 3, 7, 8, 9, 10, 11, 12, 13, 14, 16, 18, 20, 36, 40, 41, 43, 44, 46, 47, 48
CaseView.......................................................................................................................................2, 35
E
Edit..............................................................................................12, 17, 18, 23, 26, 27, 31, 34, 36, 43
F
Fluorescent.........................................................................................................................................8
G
Group.................................................................7, 9, 10, 11, 19, 22, 23, 24, 25, 29, 36, 39, 41, 43, 45
H
HIS.....................................................................................................................................................35
HUB...................................................................................................................................................10
L
LDAP......................................................................................................................................17, 44, 45
P
Pannoramic Viewer.........................................2, 3, 8, 9, 11, 12, 13, 18, 33, 34, 36, 40, 41, 42, 46, 48
S
Search..................................................................................................2, 4, 8, 9, 10, 19, 20, 28, 44, 45
Server...........................2, 3, 8, 9, 10, 11, 12, 13, 14, 16, 18, 19, 20, 29, 36, 40, 41, 43, 44, 46, 47, 48
Service Unit.................................................................................................................................10, 36
Share.........................................................................................................9, 10, 11, 19, 29, 35, 41, 43
T
Teleconsultation........................................2, 7, 8, 9, 10, 11, 12, 13, 19, 36, 37, 38, 39, 40, 41, 42, 48
U
Upload...........................................................................................9, 10, 11, 12, 18, 30, 33, 35, 36, 41
November 11, 2013 – Rev. 1
3DHISTECH Ltd.
49(49)