1
ProCoder 3
Installation and User Guide
ProCoder 3
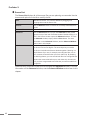
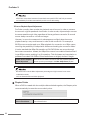
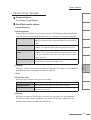
Cautions
(1) It is prohibited to copy a part or all of this product without prior permission.
(2) The contents or specifications of this product may be changed without prior notice.
(3) We have prepared the contents of this product to the best of our ability; however if you have any
questions about the contents, or if there are any errors or missing items, please contact Grass Valley.
(4) However we do not take any responsibility for malfunctions arising from use, irrespective of the points
outlined in (3).
(5) Irrespective of whether it was due to a usage error, Canopus takes no responsibility for extraordinary,
incidental or derivative claims, including those for lost earnings generated by the application of this
product.
(6) It is prohibited to analyze, reverse engineer, decompile, or disassemble any of the items included with
this product, including the software, hardware, and manuals.
(7) HDV is the trademark of Sony Corporation and Victor Company of Japan, Limited (JVC).
(8) Microsoft and Windows are registered trademarks of Microsoft Corporation, USA.
(9) Intel, Pentium and Xeon are the trademarks or registered trademarks of Intel Corporation or its
subsidiaries in the United States of America and other countries.
(10) QuickTime is the registered trademark of Apple Computer, Inc., USA.
(11) iPod and Final Cut Pro are the trademarks of Apple Computer, Inc.
(12) Macromedia and Flash are the trademarks of Macromedia, Inc.
(13) Adobe, Adobe logo, Adobe Reader and Adobe Premiere are registered trademarks of Adobe Systems
Incorporated.
(14)
Dolby, Dolby and the Double D symbol are registered trademarks of Dolby Laboratories.
They are manufactured based on their own license.
(15) Other product names or related brand names are trademarks or registered trademarks of their respective
companies.
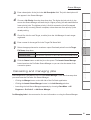
Manual Explanation
Information not described in this manual may be displayed in some cases. Make sure to read the text file
attached to the disc.
If there are any variations between the explanation in this manual and the actual application method,
priority is given to the actual application method.
This manual is written for people who have a basic knowledge of how to use a computer. If there are no
special instruction, perform the same operation as a normal computer operation.
Windows XP (collective term of Home Edition, Professional and Professional x64 Edition) in this book
means Microsoft® Windows® XP operating system.
In this manual, ProCoder 3 is called 'ProCoder'.
DANGER
Health Precautions
In rare cases, flashing lights or stimulation from the bright light of a computer display or TV monitor may
trigger temporary epileptic seizures or loss of consciousness. It is believed that even individuals whom have
never experienced such symptoms may be susceptible. If you or close relatives have experienced any of
these symptoms, consult a doctor before using this product.
Copyright
Do not use captured image/sound data created by other ones without authorization of the right holder
regardless of whether it is moving or still image, except for personal fun. Also, duplication of such data is
sometimes limited even for personal hobby. Please notice that we are exempted from responsibility for the
use of captured data.
ProCoder 3
Installation and User Guide
March, 2007
Copyright © 2007 Grass Valley.
All rights reserved.
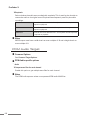
Contents
Minimum System Requirements.............................................. 12
CHAPTER 4
Helpful Hints
CHAPTER 5
ProCoder
Reference
CHAPTER 6
Glossary
CHAPTER 7
1 Using ProCoder 3 Wizard......................................... 24
Using ProCoder
Chapter 3 ProCoder 3 Wizard
ProCoder 3
1 Installing ProCoder.................................................. 14
2 Uninstalling ProCoder.............................................. 20
CHAPTER 3
Chapter 2 Installation
CHAPTER 2
2 Key Features.......................................................... 10
3 Navigating this Manual............................................. 12
d
r
a
z
i
W
Support................................................................................ 9
n
o
i
t
a
l
l
a
t
s
n
I
Before Using ProCoder........................................................... 8
CHAPTER 1
1 Before Installing ProCoder......................................... 8
n
o
i
t
c
u
d
o
r
t
n
I
Chapter 1 Introduction
s
t
n
e
t
n
o
C
Contents
Convert a Source.................................................................. 25
Choose Conversion Settings................................................... 28
Choosing Output Location...................................................... 31
Confiming Your Settings......................................................... 32
Converting Files.................................................................... 34
Conversion Finished............................................................... 35
Create a Watch Folder........................................................... 36
Other Watch Folder Options................................................... 38
Chapter 4 Using ProCoder
1 QuickStart............................................................. 40
Assigning a Target format...................................................... 42
Index
Converting the file................................................................. 44
2 Source Tab............................................................. 45
Source Properties................................................................. 45
Advanced window.................................................................. 50
Video Filter tab..................................................................... 52
Audio Filter tab..................................................................... 58
3 Target Tab.............................................................. 62
Assigning Targets.................................................................. 62
Modifying Targets.................................................................. 64
Customizing Advanced Settings............................................... 66
ProCoder 3
Advanced window.................................................................. 66
Video Filter tab..................................................................... 68
Audio Filter Tab..................................................................... 73
4 Convert Tab............................................................ 77
Playing converted files............................................................ 78
5 Presets and Profiles................................................ 79
Loading and Saving Custom Settings........................................ 79
Loading and Saving Target profiles........................................... 79
6 Queue Manager...................................................... 80
Cancelling and managing jobs.................................................. 81
Managing Jobs..................................................................... 82
Clearing the Queue................................................................ 83
7 Watch Folders........................................................ 84
Creating Permanent Watch Folders......................................... 85
Removing Permanent Watch Folders........................................ 88
Creating Temporary Watch Folders.......................................... 88
8 Transcoding Settings............................................... 89
Processing Options tab.......................................................... 89
Conversion Options tab.......................................................... 93
Default Target Folder Tab....................................................... 95
9 Application Settings................................................. 96
Settings.............................................................................. 96
Confirmation......................................................................... 96
10 Advanced Features................................................ 97
Droplets.............................................................................. 97
Command-line Automation...................................................... 99
Premiere Plug-in.................................................................. 101
EDIUS Plug-in...................................................................... 104
Chapter 5 Helpful Hints
1 Maximizing ProCoder performance................................................108
2 Using Filters ......................................................... 109
When to apply filters............................................................. 109
Why filters are necessary...................................................... 109
3 Improving your Video............................................... 110
Video is blocky or appears to break up.................................... 110
Video appears fuzzy or blurry................................................. 111
Video has halos or blocks near objects.................................... 113
Video appears to jitter.......................................................... 113
Video movement appears jumpy............................................. 114
Contents
Audio and video are out of sync.............................................. 115
1 Source Options...................................................... 120
Common Source Options...................................................... 120
AVI Source.......................................................................... 123
DV Source.......................................................................... 123
CHAPTER 2
AC3 Audio Source............................................................... 122
CHAPTER 1
Chapter 6 ProCoder Reference
n
o
i
t
a
l
l
a
t
s
n
I
Cannot load encoded MPEG files into DVD authoring software.... 118
n
o
i
t
c
u
d
o
r
t
n
I
Video appears stretched or squashed..................................... 117
s
t
n
e
t
n
o
C
Video shows strange patterns or blocks.................................. 116
d
r
a
z
i
W
H.264 Source..................................................................... 126
ProCoder 3
Flash Source....................................................................... 125
HDV(m2t) Source................................................................. 127
ProCoder
Reference
Glossary
CHAPTER 7
Still Image Source................................................................ 132
CHAPTER 6
RawDV Source.................................................................... 132
Helpful Hints
QuickTime Source................................................................ 131
CHAPTER 5
PCM (WAVE) Audio Source.................................................... 131
CHAPTER 4
MPEG Source..................................................................... 129
Using ProCoder
MP3 Audio Source............................................................... 129
Windows Media Source......................................................... 134
2 Target Options....................................................... 135
Common Target Options....................................................... 135
AC3 Audio Target................................................................. 139
AVI Target........................................................................... 140
DV Target........................................................................... 143
Flash Target........................................................................ 145
CHAPTER 3
DVD (VIDEO TS.IFO) Source.................................................. 124
H.264 Target...................................................................... 147
HDV Target......................................................................... 149
Index
MP3 Audio Target................................................................ 150
MPEG Target....................................................................... 151
PCM Audio Target................................................................ 156
Poster Frame (Still Image) Target............................................ 157
Preview DVD Target............................................................. 158
QuickTime Export Target....................................................... 160
QuickTime Target................................................................. 161
Raw DV Target.................................................................... 165
RealMedia Target................................................................. 166
Windows Media Target.......................................................... 170
ProCoder 3
3 Video Filters.......................................................... 177
601 Correction - Expand Color Space Filter............................. 177
601 Correction - Shrink Color Space Filter.............................. 177
601 to 709 Color Correction Filter........................................ 178
709 to 601 Color Correction Filter........................................ 178
Adaptive De-Interlace ........................................................... 179
Bitmap Keying Filter.............................................................. 179
Black/White Correction Filter.................................................. 181
Blur Filter........................................................................... 182
Broadcast Color Safe Filter................................................... 182
Circular Blur Filter................................................................ 183
Color Correction Filter.......................................................... 183
Fade In/Out Filter................................................................. 184
Gamma Correction Filter....................................................... 184
Gaussian Blur Filter.............................................................. 185
Median Filter....................................................................... 185
Pulldown Filter..................................................................... 186
Relative Crop Filter............................................................... 187
Rotate Filter........................................................................ 189
Sharpen Filter..................................................................... 190
Temporal Noise Reducer....................................................... 191
Video Inverse Telecine Filter................................................... 192
4 Audio Filters.......................................................... 193
Channel Mixer Filter.............................................................. 193
Fade In/Out Filter................................................................. 193
Lowpass Filter..................................................................... 194
Normalize Filter................................................................... 194
Volume Filter....................................................................... 195
5 ProCoder Preset Categories........................................ 196
Chapter 7 Glossary
Index
Index....................................................................... 206
Chapter 1
Introduction
ProCoder 3
1
Before Installing ProCoder
Before Using ProCoder
Precautions
IN NO EVENT SHALL GRASS VALLEY BE LIABLE TO USER OR ANY OTHER PARTY
FOR INCIDENTIAL, CONSEQUENTIAL OR SPECIAL DAMAGES ARISING UNDER
THE USE OF THIS PRODUCT WHETHER UNDER THEORY OF CONTRACT, TORT,
INDEMNITY, PRODUCT LIABILITY OR OTHERWISE.
EXCEPT AS OTHERWISE EXPRESSLY PROVIDED HEREIN, GRASS VALLEY MAKES
NO REPRESENTATIONS, EXTENDS NO WARRANTIES OF ANY KIND, EXPRESS OR
IMPLIED, INCLUDING THE WARRANTIES OF MARCHANTABILITY,
NON-INFRINGEMENT OR FITNESS FOR A PARTICULAR PURPOSE, AND ASSUMES
NO RESPONSIBILITY WITH RESPECT TO THE USE OF THIS PRODUCT HEREUNDER.
FURTHER, GRASS VALLEY MAKES NO WARRANTIES OF PROPER OPERATION
OF THIS PRODUCT UNDER OTHER USAGE ENVIRONMENT THAN THAT
RECOMMENDED BY GRASS VALLEY FOR THIS PRODUCT.
Unauthorized recording of copyrighted television programmes, compact discs, digital
versatile discs, video tapes and other materials may infringe the right of copyright
owners and be contrary to copyrights laws.
IN NO EVENT SHALL GRASS VALLEY BE LIABLE TO USER OR ANY OTHER PARTY
FOR WORKS AND/OR THEIR REPRODUCTIONS THAT PRODUCED, REPRODUCED,
OR EDITTED BY USE OF THIS PRODUCT.
IT IS SPECIFICALLY RECOMMENDED THAT USER SHALL CONSULT WITH ITS
LEGAL ADVISOR, FOR THE RISK OF INFRINGEMENT MAY DEPEND ON THE USAGE
ENVIRONMENTS.
Before Installing ProCoder
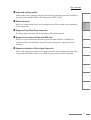
Support
n
o
i
t
a
l
l
a
t
s
n
I
ProCoder 3
d
r
a
z
i
W
You can register your ProCoder here.
http://www.canopus.com/support/
CHAPTER 3
Online User Registration
CHAPTER 2
Including ProCoder, the latest company information is announced at our web-site:
http://www.canopus.com/
The latest drivers utilities, product manuals, FAQs, etc. are also available at our website.
n
o
i
t
c
u
d
o
r
t
n
I
Web-site
CHAPTER 1
For questions regarding hardware setup and usage, please contact your local Grass
Valley office, distributor or the store where you have purchased this product.
s
t
n
e
t
n
o
C
Customer Support
Using ProCoder
CHAPTER 4
Helpful Hints
CHAPTER 5
ProCoder
Reference
CHAPTER 6
Glossary
CHAPTER 7
Index
ProCoder 3
2
Key Features
Whether you’re encoding MPEG for DVD production or a Windows Media Video for Web
streaming, ProCoder makes conversion from one video format to another quick and easy.
Featuring Grass Valley’s highly optimized DV and MPEG codec technologies, ProCoder
provides high-quality output without the long wait and guesswork of similar tools.
Supports the loading/exporting of Dolby Digital audio (.ac3)
Dolby Digital audio (.ac3) and MPEG files that contain Dolby Digital audio, such as a
video recorded with a DVD recorder, can be used as audio sources, as can AVCHD
files.
Dolby Digital audio can also be exported and you can map audio channels with an
audio filter, channel mixer.
Audio channel mixer
You can load a source file with multiple audio channels and allocate audio channels
before exporting the file.
You can allocate the audio tracks of an EDIUS project to specified channels and
export these as an audio file.
High-speed HDV encoder (Speed Encoder)
On a PC with multiple CPU cores, ProCoder 3 can export HDV MPEG-TS files at high
speed. By utilizing original GRID encoding technology, the encoding time can be
reduced, depending on the number of CPU cores.
* RAM larger than [number of the CPU cores] x [512MB] is required.
Supports Flash encoding
You can generate a file in the Flash7 format, which is suitable for Web Video contents.
Supports H.264 encoding
You can generate an H.264 file that can be played on mobile terminals, including
cellular phones.
Convenient features for loading DVD files
When you load a DVD (VOB) onto the ProCoder, the chapter information can be
retained for use. You can also load files and split these, based on the chapters.
Improved progressive video quality
The noise reduction filter has been improved, which reduces the combing noise
that ordinarily occurs when converting an interlaced video to a progressive format.
Another filter that specializes in Inverse Telecine has been added.
10
Key Features
Improved scaling quality
s
t
n
e
t
n
o
C
Video quality when changing the video size (scaling) has been improved. ProCoder 3
excels at converting SD video to HD video and/or NTSC to PAL.
Using ProCoder
CHAPTER 4
Helpful Hints
CHAPTER 5
ProCoder
Reference
CHAPTER 6
Glossary
CHAPTER 7
When a file is being converted, the original timecode can be retained and when a file
is exported from EDIUS version 4, the EDIUS project timecode will be retained.
ProCoder 3
Supports retention of the original timecode
CHAPTER 3
When you convert files that have their original size data (720x512, 720x608, etc.)
stored in a VBI (vertical blanking interval) format, scaling and cropping can done
properly.
d
r
a
z
i
W
Supports conversion of files with VBI data
n
o
i
t
a
l
l
a
t
s
n
I
Drop/Non-drop timecodes can be used during file seek operations.
CHAPTER 2
Supports Drop/Non-Drop timecodes
n
o
i
t
c
u
d
o
r
t
n
I
When you create a new file by joining multiple source files, markers can be added at
the joining points.
CHAPTER 1
Marker function
Index
11
ProCoder 3
3
Navigating this Manual
To install ProCoder 3 on your system, go to
Chapter 2: Installation.
To learn about the easy-to-use ProCoder 3 Wizard, go to
Chapter 3: ProCoder 3 Wizard.
For an overview on ProCoder 3 and its major features, go to
Chapter 4: Using ProCoder.
For some helpful hints and tips on how to improve video quality, go to
Chapter 5: Helpful Hints.
For a complete ProCoder Reference guide, go to
Chapter 6: ProCoder Reference.
For definitons of common video and compression terminology, go to
Chapter 7: Glossary.
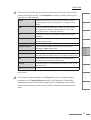
Minimum System Requirements
Intel® Celeron® / Intel Pentium® III 800MHz +, or AMD Athlon™ 800MHz +.
Multiple processors and Hyper-Threading support included
(If multiple CPU's are installed on a PC (including multi-core), the Speed Encoder
feature of ProCoder 3 will improves the HDV/MPEG2 conversion speed.)
256MB RAM (512MB RAM for HD encoding, [Number of CPU Cores] x 512MB RAM
for Speed Encoder feature)
800MB free hard disk space
DirectX 9.0 or later
Windows® XP Home, Windows® XP Professional + SP2
USB 1.1 port for USB Hardware Key
(also compatible with USB hubs)
12
Chapter 2
Installation
ProCoder 3
1
Installing ProCoder
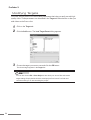
To install ProCoder:
Before installing, make sure the USB hardware key that comes with your software is
NOT plugged in.
In order to install, you must log in as a user with administrator privileges.
If QuickTime has not been installed on your system, go to My Computer, open CDROM drive, QuickTime folder, and run QuickTimeInstaller_7.1.exe to install it.
1
2
14
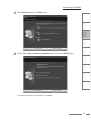
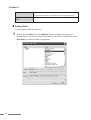
Insert the ProCoder CD-ROM in your CD drive. The CD launches automatically if
Window’s Autorun feature is enabled. If Autorun is not enabled, then go to My
Computer, double-click on the CD-ROM drive and run Setup.exe.
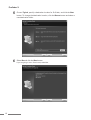
The Welcome screen appears. Click the Next button to go to the next installation
screen.
Installing ProCoder
The License Agreement appears. Select I accept the terms of the license
agreement to accept the terms of the license and click the Next button.
s
t
n
e
t
n
o
C
3
CHAPTER 1
n
o
i
t
c
u
d
o
r
t
n
I
CHAPTER 2
n
o
i
t
a
l
l
a
t
s
n
I
ProCoder 3
d
r
a
z
i
W
Using ProCoder
CHAPTER 4
Helpful Hints
CHAPTER 5
ProCoder
Reference
CHAPTER 6
Glossary
CHAPTER 7
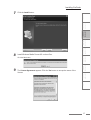
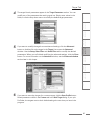
The Customer Information window appears. Enter your name and company name
and click the Next button.
CHAPTER 3
4
Index
15
ProCoder 3
5
6
16
Choose Typical, specify a destination location for ProCoder, and click the Next
button. To change the destination location, click the Browse button and select a
new destination folder.
Select No and click the Next button.
If you are going to use a Tarari board, select Yes.
Installing ProCoder
7
Click the Install button.
8
Install Windows Media Format 9.5 runtime files.
s
t
n
e
t
n
o
C
CHAPTER 1
n
o
i
t
c
u
d
o
r
t
n
I
CHAPTER 2
n
o
i
t
a
l
l
a
t
s
n
I
ProCoder 3
d
r
a
z
i
W
Using ProCoder
CHAPTER 4
Helpful Hints
CHAPTER 5
ProCoder
Reference
CHAPTER 6
Glossary
CHAPTER 7
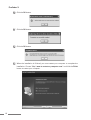
The License Agreement appears. Click the Yes button to accept the terms of the
license.
CHAPTER 3
9
Click the Yes button.
Index
17
ProCoder 3
10
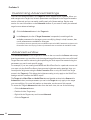
Click the OK button.
11
Click the OK button.
12
Click the OK button.
13
18
When the installation is finished, you must restart your computer to complete the
installation. Choose “Yes, I want to restart my computer now.” and click the Finish
button to restart your computer.
Installing ProCoder
CHAPTER 1
n
o
i
t
c
u
d
o
r
t
n
I
CHAPTER 2
n
o
i
t
a
l
l
a
t
s
n
I
ProCoder 3
CHAPTER 3
d
r
a
z
i
W
When the computer finishes restarting, plug-in the USB Hardware Key that comes
with your software. You can use the computer's on-board USB ports, a USB PCI
card or a USB hub connected to either of these ports. The USB Hardware Key
MUST be connected before starting ProCoder.
s
t
n
e
t
n
o
C
14
Using ProCoder
CHAPTER 4
Helpful Hints
CHAPTER 5
ProCoder
Reference
CHAPTER 6
Glossary
CHAPTER 7
Index
19
ProCoder 3
2
Uninstalling ProCoder
Before starting uninstallation, close all the other applications that may be running in the
task tray.
In order to uninstall, you must log in as a user with administrator privileges.
To uninstall ProCoder:
1
2
20
From the Start menu, select Control Panel, and choose Add or Remove Programs.
Select ProCoder 3 and click the Remove button.
Uninstalling ProCoder
3
Select Remove and click the Next button.
4
Select “Yes, I want to restart my computer now.” and click the Finish button.
s
t
n
e
t
n
o
C
CHAPTER 1
n
o
i
t
c
u
d
o
r
t
n
I
CHAPTER 2
n
o
i
t
a
l
l
a
t
s
n
I
ProCoder 3
CHAPTER 3
d
r
a
z
i
W
Using ProCoder
CHAPTER 4
Helpful Hints
CHAPTER 5
ProCoder
Reference
CHAPTER 6
Glossary
CHAPTER 7
Index
The computer will reboot. Uninstallation is completed.
21
ProCoder 3
22
Chapter 3
ProCoder 3 Wizard
ProCoder 3
1
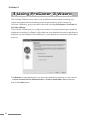
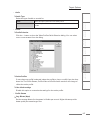
Using ProCoder 3 Wizard
The ProCoder 3 Wizard is very easy-to-use. Its Wizard interface makes converting your
videos as straightforward as answering a few simple questions. Simply launch the
ProCoder 3 Wizard by going to the Start menu and choosing All Programs > ProCoder 3 >
ProCoder 3 Wizard.
The ProCoder 3 Wizard lets you configure a conversion by simply answering the questions
displayed in the dialog. ProCoder’s online help has more detailed information regarding the
questions you will be asked. Press the F1 key on your keyboard to access the online help at
any time.
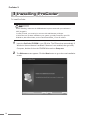
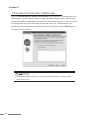
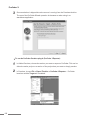
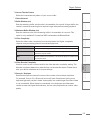
The Welcome screen appears when you launch the application and gives you two choices
– Convert a source file to a different format or Create a watch folder. Make a selection
and click the Next button.
24
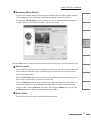
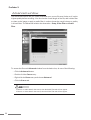
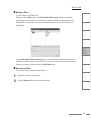
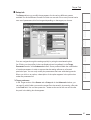
Using ProCoder 3 Wizard
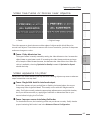
Convert a Source
s
t
n
e
t
n
o
C
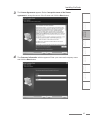
If you choose to convert a source file, the Load Source screen appears. Click the Load
button to choose the video file you want to convert.
CHAPTER 1
n
o
i
t
c
u
d
o
r
t
n
I
CHAPTER 2
n
o
i
t
a
l
l
a
t
s
n
I
ProCoder 3
d
r
a
z
i
W
CHAPTER 4
Helpful Hints
CHAPTER 5
ProCoder
Reference
CHAPTER 6
Glossary
CHAPTER 7
Index
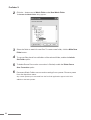
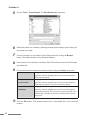
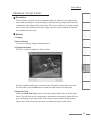
The Source Parameters section of the window shows the selected source’s file
information. You can see a preview of the video and scrub through it on the right side
of the screen.
Using ProCoder
Checking the Source
CHAPTER 3
The ProCoder 3 Wizard can load a variety of different video file formats for conversion.
If you cannot see the file you want to load but you know it exists, the file may not be a
supported source type. For example, some file types, such as RealMedia files, cannot be
loaded due to licensing restrictions.
If the ProCoder 3 Wizard has problems loading the selected file, please make sure the file
has the proper file extension for its format. For example, an MPEG-1 file that should have
the .mpg file extension may be mislabelled with the .wmv file extension. Windows Media
Player may play the file properly but also display an error message about the file extension
not matching the file type.
Changing Source Parameters
If you want to modify the In/Out points or change the cropping parameters, click the
Config Source File Settings option in the bottom left-hand corner and click the Next
button.
25
ProCoder 3
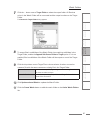
Setting In/Out points
Setting In and Out points on your video clip allows the ProCoder 3 Wizard to ignore
portions of video at the start and end. For example, you may have a few seconds of
blank video at the beginning or end that you don’t need to encode.
Click and drag the scrubber below the Preview window to choose where you want
the final encoded video to start and click the Set In Point button.
The timeline to the left of the scrubber turns gray, which means any footage that
appears before the scrubber will not be included in your final converted video. Click
and drag the scrubber to set the video’s out point and click the Set Out Point button.
The timeline to the right of the scrubber turns gray, which means any footage after
this point will not be included in your final converted video.
The Default button restores the in and out points to their original settings.
26
Using ProCoder 3 Wizard
Advanced Settings
s
t
n
e
t
n
o
C
CHAPTER 1
n
o
i
t
c
u
d
o
r
t
n
I
CHAPTER 2
n
o
i
t
a
l
l
a
t
s
n
I
ProCoder 3
CHAPTER 3
d
r
a
z
i
W
Using ProCoder
CHAPTER 4
Helpful Hints
CHAPTER 5
ProCoder
Reference
CHAPTER 6
Glossary
CHAPTER 7
Advanced Settings let you set the video cropping mode for your source video.
Choose a cropping mode and click the Next button. If you choose the Manual option,
then click the Select Cropping button to open the Crop dialog.
To modify more advanced source settings, click the Select Settings button to open
the Config dialog. The Config dialog lets you modify additional parameters that affect
your source video. This is only recommended for advanced users and should be used
with caution.
Index
27
ProCoder 3
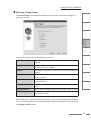
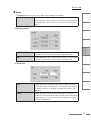
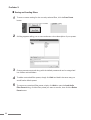
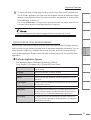
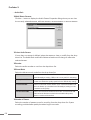
Choose Conversion Settings
Next, the Use the Wizard or Select a History Entry screen appears. This screen gives you
three options – you can use the Wizard to help you select a target; select a generic target
format and modify the parameters yourself if you are an advanced user; or you can choose
the settings from a previous encoding job from the history list. The last option is not
available if you have not performed any previous encoding jobs. Click the Next button to
proceed to the next screen.
The ProCoder 3 Wizard must be running in order for watch folder monitoring and file
conversion to occur.
28
Using ProCoder 3 Wizard
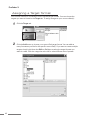
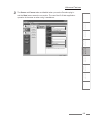
Selecting a Target format
s
t
n
e
t
n
o
C
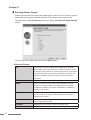
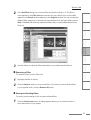
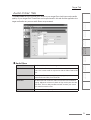
The Select Target screen appears and lets you choose the conversion settings for
your source video.
CHAPTER 1
n
o
i
t
c
u
d
o
r
t
n
I
CHAPTER 2
n
o
i
t
a
l
l
a
t
s
n
I
ProCoder 3
d
r
a
z
i
W
ProCoder
Reference
Glossary
CHAPTER 7
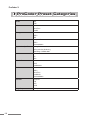
Create MPEG-1 files that are ready to be used in VideoCD authoring
CHAPTER 6
VideoCD
Helpful Hints
Create video files in AVI, MPEG-1, QuickTime or Windows Media
format for delivery on CD-ROM.
CHAPTER 5
CD-ROM Video
CHAPTER 4
Create a QuickTime, RealMedia or Windows Media for viewing on a
Web page.
Using ProCoder
Web Video
software.
Create MPEG-2 files that are ready to be used in Super VideoCD
authoring software.
DVD
Create high-quality MPEG-2 files that are ready to be used in DVD
authoring software.
HD (High Definition)
Create HD-compliant video streams that can be viewed on an
HDTV.
Email Attachment
Create a Windows Media file that is small enough to send via email.
Video Editing
Convert your source video to a format that is compatible with your
video editing software.
Index
Super VideoCD
CHAPTER 3
You can choose from any of the following formats.
After selecting your desired target format and clicking the Next button, the Wizard
begins asking you a series of questions so that it can choose the appropriate settings
for your final encoded video. Proceed through the Wizard’s questions until you get to
the Saving Your File screen.
29
ProCoder 3
Selecting Generic Targets
Advanced users that know what output settings they want to use can select a generic
target type and bypass the Wizard questions. The settings of the target can be
specified later in the Job Summary screen by clicking the Advanced Output Settings
button.
Choose one of the output types and click the Next button.
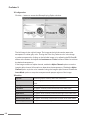
About the Formats
AVI
AVI is used for a variety of applications ranging from CD-ROM
video to video editing and archiving. It is really a file type, versus a
compression type. AVI files can contain many types of compressed
video data depending on the codecs installed on the system. Any
available DirectShow codec on the system can be used as the
compressor.
30
AVI (DV)
DV AVIs are usually used by DV video editing software.
MPEG
MPEG is commonly used as a delivery and distribution format
because it provides small files sizes. VideoCD, Super VideoCD
and DVD all use MPEG compression. Both MPEG-1 and MPEG-2
streams can be created.
QuickTime
QuickTime is also more of a file type versus a format. QuickTime
files can contain many types of data depending on the codecs
available on the system.
WindowsMedia
Windows Media files are often used for web video and more
recently, high definition video.
RealMedia
RealMedia files are normally used for streaming video.
Raw DV
Raw DV files are used by some DV video editing systems.
Using ProCoder 3 Wizard
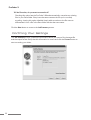
Choosing Output Location
s
t
n
e
t
n
o
C
After answering choosing your settings, the Saving Your File screen appears. On this
screen, you can choose where you want your encoded video file to be saved and how the
file should be named.
CHAPTER 1
n
o
i
t
c
u
d
o
r
t
n
I
CHAPTER 2
n
o
i
t
a
l
l
a
t
s
n
I
ProCoder 3
d
r
a
z
i
W
Helpful Hints
ProCoder
Reference
CHAPTER 6
Glossary
CHAPTER 7
Where do you want to save the file?
CHAPTER 5
If the file exists, do you want to overwrite it?
CHAPTER 4
How should the file be named?
Using ProCoder
Where do you want to save the file?
Click on the ... button to choose the folder where you want your converted files to be
saved.
Index
How should the file be named?
CHAPTER 3
There are three questions in the Saving Your File screen.
There are two options for this question. Choosing Use the Source File Name gives
the converted video the same name as the source file but with the file extension (.mov,
.m2p, .wmv) of the output type.
Choosing Specify New Name lets you give the converted video a different file name.
Simply type the new file name in the field.
31
ProCoder 3
If the file exists, do you want to overwrite it?
Checking this option lets the ProCoder 3 Wizard automatically overwrite any existing
files in your Save folder if they have the same name as the file you’re currently
encoding. Leaving this option disabled simply adds a number to the file name to
differentiate it from a file in the Save folder that has the same name.
Click the Next button to move to the Job Summary screen.
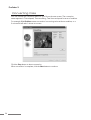
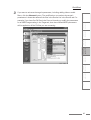
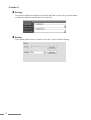
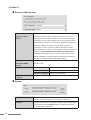
Confiming Your Settings
The Job Summary screen contains the information about your source file, the target file
and the output format. Verify that this information is correct and click the Convert button to
start converting your video.
32
Using ProCoder 3 Wizard
Advanced Output Settings
s
t
n
e
t
n
o
C
CHAPTER 1
n
o
i
t
c
u
d
o
r
t
n
I
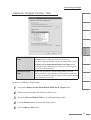
If you are an advanced user and want to make some last minute changes to your
settings, click the Advanced Output Settings button to open the Config dialog.
Clicking on any of the settings gives you a brief description at the bottom of the
dialog.
CHAPTER 2
n
o
i
t
a
l
l
a
t
s
n
I
ProCoder 3
CHAPTER 3
d
r
a
z
i
W
Using ProCoder
CHAPTER 4
Helpful Hints
CHAPTER 5
ProCoder
Reference
CHAPTER 6
Glossary
CHAPTER 7
When you are finished configuring your settings, click the Close button.
Index
33
ProCoder 3
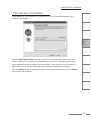
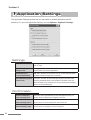
Converting Files
You can monitor the conversion status of your file on the next screen. The conversion
status appears in Time elapsed, Time remaining, Total time and speed in terms of realtime.
For example, 2.0x Realtime means conversion is occurring twice as fast as realtime, or a
2-minute file will take 1 minute to convert.
Click the Stop button to abort conversion.
When conversion is complete, click the Next button to continue.
34
Using ProCoder 3 Wizard
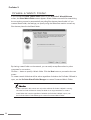
Conversion Finished
s
t
n
e
t
n
o
C
Congratulations, your conversion is complete! A list of converted files appears at the
bottom of the window.
CHAPTER 1
n
o
i
t
c
u
d
o
r
t
n
I
CHAPTER 2
n
o
i
t
a
l
l
a
t
s
n
I
ProCoder 3
CHAPTER 3
d
r
a
z
i
W
Using ProCoder
CHAPTER 4
Helpful Hints
CHAPTER 5
ProCoder
Reference
CHAPTER 6
Glossary
CHAPTER 7
Click the Open Target Folder button to access your converted videos. When the folder
opens, double-click on the file you created and it should open in the appropriate media
player. Watch the video and make sure it looks okay. If you want to try encoding the file
again, launch the ProCoder 3 Wizard and go through the Wizard interview again.
Click the Restart button to return to the start to set up another conversion or click Finish to
exit the ProCoder 3 Wizard.
Index
35
ProCoder 3
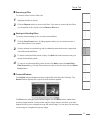
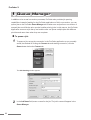
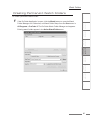
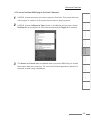
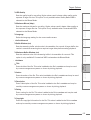
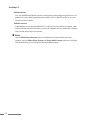
Create a Watch Folder
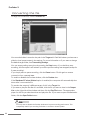
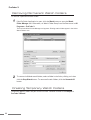
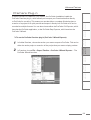
If you choose the Create a watch folder option on the ProCoder 3 Wizard Welcome
screen, the Select Watch Folder screen appears. Watch folders are useful for streamlining
the conversion process by automatically encoding files that are placed inside it. If you
create a Watch folder, the settings you specify using the Wizard are used to convert any
files that are placed in the Watch folder.
By sharing a watch folder on the network, you can easily accept files written by other
computers for conversion.
Click the … button to specify a Watch folder. Click the Next button to proceed to the next
screen.
To create a watch folder that will be active regardless of whether the ProCoder 3 Wizard is
open, use the ProCoder Watch Folder Manager to create a Permanent Watch Folder.
Folders watched in this manner are only active while the ProCoder 3 Wizard is running.
Once the ProCoder 3 Wizard is closed, the folder is no longer watched. To create a
watch folder that is active regardless of whether the ProCoder 3 Wizard is open, use
the ProCoder Watch Folder Mananger to create a Permanent Watch Folder.
36
Using ProCoder 3 Wizard
Monitoring Watch Folders
s
t
n
e
t
n
o
C
CHAPTER 1
n
o
i
t
c
u
d
o
r
t
n
I
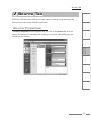
You can also monitor watch folders using the Wizard. The conversion status appears
in Time elapsed, Time remaining, Total time and speed in terms of realtime.
For example, 2.0x Realtime means conversion is occurring twice as fast as realtime.
In other words, a 2-minute file will take 1 minute to convert.
CHAPTER 2
n
o
i
t
a
l
l
a
t
s
n
I
ProCoder 3
d
r
a
z
i
W
CHAPTER 4
Helpful Hints
CHAPTER 5
ProCoder
Reference
CHAPTER 6
Glossary
CHAPTER 7
Index
A list of files remaining to convert appears in this section. Any files that have been put
into the watch folder that have not already been converted or are in the process of
conversion appear here.
Click the Clear List button to remove the remaining files from the list. Removing the
files from the list will skip conversion of those files.
Click the Unwatch button to stop monitoring the selected folder. Any files that arrive
in the watch folder will not be added to the list of files to convert until monitoring
resumes. After clicking Unwatch, the button will change to Watch and you can click
the Watch button to resume monitoring the watch folder.
Using ProCoder
Files to convert
CHAPTER 3
Click the Stop button to stop conversion of the current file and go on to the next file, if any.
Watch Folder
This section shows the path to the folder being watched.
37
ProCoder 3
Other Watch Folder Options
You can drag and drop files into the Monitoring Watch Folders window to begin encoding.
Moving or saving file shortcuts instead of the real files into the Watch folder will also start
the encoding process.
38
Chapter 4
Using ProCoder
ProCoder 3
1
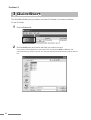
QuickStart
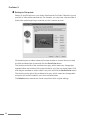
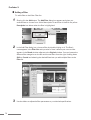
This QuickStart Guide gives you a basic overview of ProCoder’s conversion workflow.
To use ProCoder:
40
1
Click the Source tab.
2
Click the Add button and choose the file(s) you want to convert.
If you want to add multiple files to the Source List, hold down the Shift or Ctrl keys and
choose the files you want to convert. You can also drag and drop files directly onto the Source
List.
QuickStart
3
The file(s) appears in the Source List.
s
t
n
e
t
n
o
C
CHAPTER 1
n
o
i
t
c
u
d
o
r
t
n
I
Using ProCoder
CHAPTER 4
Helpful Hints
CHAPTER 5
ProCoder
Reference
CHAPTER 6
Glossary
CHAPTER 7
Clicking the Source tab.
ProCoder 3
Clicking the source’s icon in the Source List and pressing the Enter key on your keyboard.
CHAPTER 3
Right-clicking the source’s icon in the Source List and choosing Advanced in the
contextual menu that appears.
d
r
a
z
i
W
Double-clicking the source’s icon in the Source List.
n
o
i
t
a
l
l
a
t
s
n
I
If you want to trim your source video or add video and/or audio filters, click the
Advanced button. You can also access the Advanced window by:
CHAPTER 2
4
Index
For more information, see the Advanced window section later in this chapter.
41
ProCoder 3
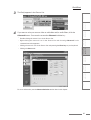
Assigning a Target format
Your source video(s) is converted to one of several target formats. You can choose the
targets you want to create in the Target tab. To assign a target to your source video(s):
1
2
42
Click the Target tab.
Click the Add button to choose your source file’s target format. You can add as
many formats as you like for the specific source file(s). If you want to create multiple
targets, simply hold down the Shift or Ctrl keys to select the target formats you
want to create. Click the categories at the left to select different sets of presets.
QuickStart
CHAPTER 1
n
o
i
t
c
u
d
o
r
t
n
I
CHAPTER 2
n
o
i
t
a
l
l
a
t
s
n
I
ProCoder 3
CHAPTER 3
d
r
a
z
i
W
If you want to enhance the target’s parameters, including adding video or audio
filters, click the Advanced button. The modifications you make to the target’s
parameters in these tabs affect all the files in the Source List in the Source tab. For
example, if you have five DV files in the Source List and you modify the parameters
for an MPEG target setting in the Target tab, then the modified MPEG parameters
will be applied to all five DV files you are converting.
s
t
n
e
t
n
o
C
3
Using ProCoder
CHAPTER 4
Helpful Hints
CHAPTER 5
ProCoder
Reference
CHAPTER 6
Glossary
CHAPTER 7
Index
43
ProCoder 3
Converting the file
To begin file conversion, click the Convert tab.
Your encoded video is saved to the path in the Target tab’s Path field unless you have set a
global or local preset output in the settings. For more information or if you want to change
the default target folder, see Transcoding Settings.
You can stop encoding at any time by pressing the Stop button. If you decide to stop
encoding, the file output is still written up until the point encoding was stopped (except for
2-pass encoding).
If you simply want to pause encoding, click the Pause button. Click it again to resume
conversion from a paused state.
To enable or disable the Preview window, click the Preview box.
If the Shutdown PC when finished option is enabled, the computer will automatically shut
down after it converts the file.
To preview the output of a different target, click it in the Target List.
If you want to play the file after it’s encoded, click the file you want to view in the Output
List on the right side of the window and then click the Play File button. The appropriate
player for the file you select launches and plays the file. If you want to open the destination
folder, click the Open Folder button.
You may want to disable the Preview windows to improve encoding performance. This
is especially useful if you are using ProCoder on an older or slower system.
44
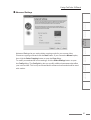
Source Tab
CHAPTER 2
ProCoder 3
CHAPTER 3
d
r
a
z
i
W
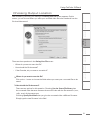
The Source Properties window appears when you click on the Source tab. All of the
resources necessary for managing and modifying your source video parameters are
available in this window.
n
o
i
t
a
l
l
a
t
s
n
I
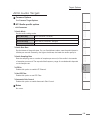
Source Properties
CHAPTER 1
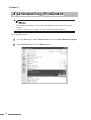
The Source Tab lets you modify source video settings, enhancing and repairing video
before it is encoded to the desired Target format.
n
o
i
t
c
u
d
o
r
t
n
I
Source Tab
s
t
n
e
t
n
o
C
2
Using ProCoder
CHAPTER 4
Helpful Hints
CHAPTER 5
ProCoder
Reference
CHAPTER 6
Glossary
CHAPTER 7
Index
45
ProCoder 3
Source List
The Source List displays all of the source files you are planning to transcode. Use the
buttons and options on the left to modify the list.
Add
Adds files to the list. You can also add files by dragging and
dropping them onto the Source List.
Remove
Click the Remove botton to remove the currenttly selected(s) ffrom
the list.
Remove All
Click the Remove All button to remove all of files from the list.
Advanced
Click the Advanced button to open the Advanced window, which
appears on top of the main ProCoder window. Double-clicking on a
item in the Source List also opens the Advanced window. To close
the Advanced window, simply click the Close button. For more
information on the Advanced Window, see the Advanced Window
section later in this chapter.
Stitch
Check this option if you want ProCoder to connect all the items in
the Source List into one big file. The arrow keys let you reorder
the Source List before the files are stitched together. Stitching is a
helpful feature if you are, for example, encoding two files, one an
ad or commercial and the other your main video clip. By enabling
the Stitching feature, you can encode both files into a single file that
contains the commercial before your main video clip. It’s also useful if you have a segmented source file that you need encoded into
a single file.
Double-clicking on an item in the Source List opens the Advanced Window. For more
information on the Advanced window, see the Advanced Window section later in this
chapter.
46
Source Tab
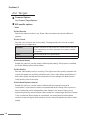
Parameters
s
t
n
e
t
n
o
C
CHAPTER 1
n
o
i
t
c
u
d
o
r
t
n
I
The Parameters section gives you a brief summary of your source file’s settings.
When you add a file to the Source List, ProCoder automatically reads the file
properties, analyzes its parameters and makes the appropriate adjustments to read
the Source correctly before it is encoded.
CHAPTER 2
n
o
i
t
a
l
l
a
t
s
n
I
ProCoder 3
CHAPTER 3
d
r
a
z
i
W
Using ProCoder
CHAPTER 4
Helpful Hints
CHAPTER 5
ProCoder
Reference
CHAPTER 6
Glossary
CHAPTER 7
Index
For example, if you add an interlaced source file to the Source List, the Parameters
section tells you if the Bottom Field or the Top Field appears first in the Interlacing
field. While ProCoder does its best to make the correct assessment, it may incorrectly
identify which field is first. If this happens, you can use the Interlacing drop-down
menu to override ProCoder and choose the correct setting. You can also override
ProCoder’s automatic deinterlacing by applying the Adaptive Deinterlace filter to your
source video and modifying its parameters in the Advanced window.
The following parameters generally apply to all file types. Depending on your source
file type, other parameters may appear in these sections. Consult the Reference
section of this manual for information on more format-specific parameters. For more
information on the Advanced window, see the Advanced window section later in this
chapter.
Source Parameters
Length
Displays the duration of the source file in hours:minutes:
seconds;frames.
Source File
Displays the source file’s current location on your computer.
47
ProCoder 3
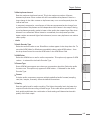
Video Parameters
Video Frame Size
Displays the current frame size of the source file in pixels.
Frame Rate
Displays the source file’s current frame rate in frames per second.
The higher the frame rate, the more frames that are stored in the
video file and the smoother playback appears. At lower frame rates,
playback will be jerkier.
Video Codec
Displays the codec used to read the source file’s video. In order to
play the video, your system needs to have the appropriate codec
module installed. If the appropriate codec is not installed, the
system will not be able to play the video, and ProCoder will not be
able to convert it to another format. However, you can usually find
the codec you’re looking for on the Internet and then download and
install it, making it available to the system and to ProCoder, as well.
Interlacing
Displays whether or not your source video is interlaced or not. If
your source file is interlaced, the drop-down menu displays which
field is stored first (lower/bottom or upper/top).
ProCoder determines how the frames of video are stored in
the source file. Non-interlaced video stores and displays entire
frames at one time. Interlaced mode splits each frame into sets of
alternating lines, called fields, and displays each field in succession.
In ProCoder, the Bottom field is the Lower field, and the Top field
is the Upper field. Specifying the incorrect field order will result in a
vertical jitter or ghosting during playback.
Aspect Ratio
Displays the source file’s width-to-height ratio and its pixels. The
video aspect ratio is the display size proportion of width to height.
ProCoder has presets for both standard (4:3) and widescreen (16:9)
video aspect ratios. An improper video aspect ratio will result in the
image looking stretched or squashed, i.e. circles will appear as ovals.
The pixel aspect ratio determines the displayed “shape” of each
pixel. For computer use, pixels are normally square (1:1 ratio).
However, for television and video use, pixels are mostly (but not
always) rectangular. ProCoder has presets for square, television
and DV standard, television and DV widescreen, and anamorphic
pixel sizes. An improper pixel aspect ratio can cause the image to
appear stretched or squashed, as well as cause filtering and other
processing to appear strange. For example, a circle wipe may
display as an oval wipe instead.
While ProCoder is fairly accurate at determining the interlacing properties of your
source video, it’s not always right. For best results, double-check this parameter and
set it to the correct setting if it’s set incorrectly.
48
Source Tab
Audio
d
r
a
z
i
W
CHAPTER 4
Helpful Hints
CHAPTER 5
ProCoder
Reference
CHAPTER 6
Glossary
CHAPTER 7
Displays the codec used to play the source file’s audio. In order to
play the audio in a file, the system needs to have the appropriate
codec module installed. If the appropriate codec is not installed, the
system will not be able to play the audio in the file. For the most
part, ProCoder should be able to read the majority of major audio
codecs. If you don’t have the appropriate codec, you can usually
find it on the Internet and then download and install it, making it
available to the system and to ProCoder, as well.
Using ProCoder
Audio Codec
ProCoder 3
Displays the size of each source file’s audio sample in bits per
sample. The more bits per sample, the more accurate the digital
recording will accurately represent the sound changes in a source.
The combination of sample rate and bits per sample determine the
source file’s overall audio quality.
Description
Index
The Description section is a yellow box in the bottom right-hand corner of the Source
or Target tab windows. It gives you a brief definition of the particular setting, button
or parameter you are currently working on. Click on one of the parameters to see its
description in this box.
CHAPTER 3
Bits / Sample
CHAPTER 2
producible frequency for a given sample rate is one-half the sample
rate. For example, a standard audio CD uses audio that is at 44.100
kHz, or 44,100 samples per second. This equates to the ability to
reproduce sounds up to frequencies of 22,050 Hz. The combination
of sample rate and bits per sample determine the overall quality of
the audio.
n
o
i
t
a
l
l
a
t
s
n
I
Displays the number of audio samples per second in the source
file’s audio. The fidelity or dynamic range of the encoded audio
depends on the sample rate. The higher the sample rate, the wider
the range of frequencies that can be reproduced. The maximum re-
n
o
i
t
c
u
d
o
r
t
n
I
Sample Rate
s
t
n
e
t
n
o
C
Displays whether the source file’s audio is single channel (mono),
stereo (left/right channel) or multi-channel (surround).
CHAPTER 1
Channels
49
ProCoder 3
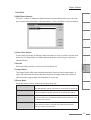
Advanced window
The Advanced window lets you modify and tweak your source file even further so it is at its
highest quality before encoding. You can trim the overall length of the file, add a video filter
to clean up the image or apply an audio filter in order to boost the overall volume or quality
in this window. The Advanced window has three tabs – Setup, Video Filter and Audio
Filter.
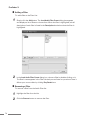
To access the Source’s Advanced window from the basic view, do one of the following:
Click the Advanced button.
Double-click the Source entry.
Right-click the Source entry and choose Advanced.
Click the Source tab.
If there is no audio data for the source, then the Audio Filter tab will not appear.
If there is no video data for the source, then the Video Filter tab will not appear.
50
Source Tab
Setup
Trimming section
CHAPTER 1
The Setup tab lets you trim your video using a variety of controls.
Use the scrubber or play controls to choose your In point and then
click the In button. Then choose your Out point and click the Out
button.
n
o
i
t
c
u
d
o
r
t
n
I
Scrubber/Play Controls
s
t
n
e
t
n
o
C
The Setup tab lets you trim your video using a variety of controls.
CHAPTER 2
n
o
i
t
a
l
l
a
t
s
n
I
ProCoder 3
d
r
a
z
i
W
Glossary
Index
Displays the frame number at which the scrubber is stopped. You
can also use the arrow buttons to find a specific frame at which you
want to set the In or Out point. You can also simply enter a frame
number in the Frame box.
CHAPTER 7
Frames
ProCoder
Reference
Displays the time for the frame at which the scrubber is stopped.
You can also use the arrow buttons to find a specific time at which
you want to set the In or Out point, or simply enter a time in the
Time field.
CHAPTER 6
Time
Helpful Hints
Clip section
CHAPTER 5
Sets the Out Point at the currently displayed frame. The Out Point’s
Time and Frame number are listed in their respective boxes.
CHAPTER 4
Out
Using ProCoder
Sets the In Point at the currently displayed frame. The In Point’s
Time and Frame number are listed in their respective boxes.
CHAPTER 3
In
51
ProCoder 3
Total
Displays the source file’s total duration after the In and Out
Points are set. This value is calculated automatically and cannot be modified by hand. It can only be modified by setting the
In and Out points. Duration time is displayed in hours:minutes:
seconds;frames.
Close button
The Close button closes the Advanced window and returns you to the Source tab.
Because MPEG is composed of a series of Groups of Pictures (GOPs), trimming MPEG
files may not occur at the frame that appears in the Preview window, but rather at
the nearest available GOP. Because of this, ProCoder can’t guarantee the trimming
positions of MPEG files.
Video Filter tab
The Video Filter tab lets you apply filters to your video to help improve image quality of
your source files before they are converted. These filters can be previewed in this tab, but
are applied when the video is being converted to its new format.
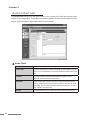
Video filters
52
601 Correction Expand Color Space
This video filter expands the RGB range of the video from 16-235 to
0-255. Use this filter to create output for a system that uses the full
0-255 range from input that uses 16-235.
601 Correction Shrink Color Space
This video filter shrinks the RGB range of the video from 0-255 to
16-235. Use this filter when create output for a system that uses the
16-235 range from input that uses the full 0-255 range.
601 to 709 Color
Correction
This video filter is used to convert video in the SD (601) colorspace
to the HD (709) colorspace. Broadcast HD video uses YCbCr colors
following Rec. ITU-R BT 709-5 where as broadcast SD video follows
ITU-R BT 601.
709 to 601 Color
Correction
This video filter is used to convert video in the HD(709) colorspace
to SD(601) colorspace.
Adaptive De-interlace
This video filter combines the fields of an interlaced video source’s
fields back into whole frames using special processing to preserve
full resolution while ensuring smooth motion.
Bitmap Keying
Superimpose a bitmap logo or graphic on the video. This is often
used to watermark video so it can be personalized.
Source Tab
Relative Crop
Remove unwanted edges on the video with this filter. This is often
used for removing any edge blanking or other unwanted video
information from the top or bottom of the video frame.
Rotate
This filter provides 90-degree rotation and axis-flipping for the
video.
Sharpen
This filter sharpens the video using the "unsharpen mask" technique.
d
r
a
z
i
W
This filter offers conversion without interpolation for progressiveto-interlaced (i.e. film-to-video) file conversion. This preserves full
spatial image quality and creates target fields that are selected from
the nearest temporal source frame. Displaying the resulting file
on a progressive display, such as a computer monitor, produces
very noticeable interlacing artifacts. However, displaying this on an
interlaced display, such as a television, produces very good image
quality. This method is generally used when cinematographic
footage is encoded to a DVD and played on a TV.
n
o
i
t
a
l
l
a
t
s
n
I
Pulldown
n
o
i
t
c
u
d
o
r
t
n
I
This filter is designed to improve picture quality by removing
single-pixel defects without affecting the sharpness.
s
t
n
e
t
n
o
C
Median
Index
This filter applies a Gaussian blur to the video.
Glossary
This filter adjusts your video’s gamma settings.
Gaussian Blur
CHAPTER 7
Gamma Correction
ProCoder
Reference
This filter applies a fade in and/or out to your video in order to
aid the encoding process. You should use this filter if your source
video has a lot of fast motion in the first few frames. The fade in
gives ProCoder a “running start” so it can encode your video more
efficiently.
CHAPTER 6
Fade In/Out
Helpful Hints
This filter allows you to adjust the brightness, contrast, hue and
saturation of your video image.
CHAPTER 5
This filter blurs the video in a circular pattern.
Color Correction
CHAPTER 4
Circular Blur
Using ProCoder
Some colors that can be displayed on a computer cannot be
displayed on television or video output. This filter restricts the
colors in the source to only colors that are safe for television and
video broadcast.
ProCoder 3
This filter blurs the video in a rectangular pattern.
Broadcast Color Safe
CHAPTER 3
Blur
CHAPTER 2
This filter lets you adjust and control the levels of black and white
pixels in your video. By adjusting the sliders, you can specify at
which point a pixel will become black and/or white. The higher the
setting, the more nearly black pixels will be converted to true black
and vice versa. This works best if you are encoding video for the
Web and need to adjust the black and/or white levels of broadcast
video so that they are truly black or white. It’s also useful for making
white titles on a black background more legible when viewing on a
computer monitor.
CHAPTER 1
Black/White Correction
53
ProCoder 3
Temporal Noise Reducer This filter removes noise by using temporal noise reduction.
Temporal noise reduction is effective for removing analog noise.
Video Inverse Telecine
Filter
Use this filter to inverse telecine 2-3 telecined videos.
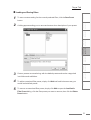
Adding a Filter
To add a filter to the Video Filter list:
1
54
Simply click the Add button. The Add Filter dialog box appears and gives you
several filters to choose from. A brief description of each filter is listed in the yellow
Description box when the filter is highlighted.
Source Tab
CHAPTER 1
n
o
i
t
c
u
d
o
r
t
n
I
In the Add Filter dialog box, choose a filter by double-clicking on it. The filter’s
name appears in the Filter List and a preview of how it affects your source video
appears in the Result window adjacent to the Original window. You can browse the
different filter categories on the left and choose filters from the right. Holding down
Shift or Control and selecting the desired filters lets you add multiple filters to the
Filter list.
s
t
n
e
t
n
o
C
2
CHAPTER 2
n
o
i
t
a
l
l
a
t
s
n
I
ProCoder 3
d
r
a
z
i
W
Using ProCoder
CHAPTER 4
Helpful Hints
CHAPTER 5
ProCoder
Reference
CHAPTER 6
Glossary
CHAPTER 7
Use the sliders to adjust the filter parameters to your desired specifications.
Removing a Filter
To remove a filter from the Filter List:
Highlight the filter in the list.
Click the Remove button to remove the filter. If you want to remove all the filters
you’ve applied so far, click the Remove All button.
Index
1
2
CHAPTER 3
3
Saving and Loading filters
To save a custom setting for the currently selected filter:
1
Click the Save Preset button. A dialog appears asking you to name and enter a
short description of your preset.
55
ProCoder 3
2
3
4
Custom presets are stored along with the default presets and can be categorized
into folders and subfolders.
To add a customized filter preset, simply click Add and load it the same way you
would load a default preset.
To remove a customized filter preset, simply click Add to open the Load Video
Filter Preset dialog, click the filter preset you want to remove, then click the Delete
Preset button.
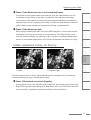
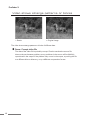
Preview Windows
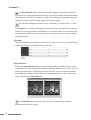
The Original window displays what the original file looks like before filtering. The
Result window displays the original file with the filters applied.
The Plus button enlarges both preview images, and the Minus button makes both
preview images smaller. If the preview image is larger than the window, scroll bars
appear allowing you to navigate through the entire image. You can also click and drag
on the image to navigate through the image.
The Fit to Window button resizes the preview images to fit inside the window’s
current size. No matter what size the window, this preview mode preserves the aspect
ratio assigned to the file. This button is useful if you enlarged or reduced the preview
image and want to view the whole image in the window again.
The 1:1 button displays the video at 1-to-1 pixel size. (1 monitor pixel = 1 video
pixel)
The Scrubber bar is used to find specific frames in the source video that you want to
use so you can see the effect of the filter(s) on the specific frame. You can either click
and drag the scrubber or use your keyboard’s arrow keys to step through the video’s
individual frames.
56
Source Tab
Settings
s
t
n
e
t
n
o
C
This section displays the settings for the particular filter you are using. Use the sliders
to adjust the degree of modifications for each filter.
CHAPTER 1
n
o
i
t
c
u
d
o
r
t
n
I
CHAPTER 2
n
o
i
t
a
l
l
a
t
s
n
I
d
r
a
z
i
W
Using ProCoder
CHAPTER 4
Helpful Hints
CHAPTER 5
ProCoder
Reference
CHAPTER 6
Glossary
CHAPTER 7
The Orientation button switches the orientation of the preview windows
between horizontal and vertical.
ProCoder 3
Clicking the Large Preview button opens a floating window that allow you to modify
the preview size. This is helpful for scrutinizing the finer details of your video. You can
use the scrubber bar to find specific points in the video. You can resize the window
as needed, and it adjusts the size of the previews proportionally. It also contains the
same controls as the Video Filter tab.
CHAPTER 3
Large Preview
Index
57
ProCoder 3
Audio Filter tab
The Audio Filter tab lets you add audio filters to your source file to help improve the audio
quality of your target files. These filters can be previewed in this tab and are applied to the
source audio before any target audio filters are processed.
Audio Filters
58
Channel Mixer
The Channel Mixer filter interchanges audio channels.
Fade In/Out
The Fade In/Out filter is used to add a fade in and/or fade out to the
audio. This is most useful in conjunction with the Video Fade In/Out
filter.
Lowpass
The Lowpass filter removes high-frequency signals, such as
electrical noise and hiss, from the audio.
Normalize
The Normalize filter raises the audio to maximize volume without
clipping. Adjust the volume of a batch of clips so they are all at the
same level. This is a dual-pass filter and will increase your source
file’s overall conversion time.
Volume
The Volume filter lets you adjust the overall volume of the audio.
Source Tab
Adding a Filter
s
t
n
e
t
n
o
C
CHAPTER 1
n
o
i
t
c
u
d
o
r
t
n
I
To add a filter to the Filter List:
Simply click the Add button. The Load Audio Filter Preset dialog box appears
and displays a list of filters to choose from. When the filter is highlighted, a brief
description of each filter is listed in the Description box below when the filter is
highlighted.
CHAPTER 2
n
o
i
t
a
l
l
a
t
s
n
I
ProCoder 3
d
r
a
z
i
W
Helpful Hints
ProCoder
Reference
CHAPTER 6
Glossary
CHAPTER 7
Highlight the filter from the list.
CHAPTER 5
1
2
CHAPTER 4
To remove a filter from the Audio Filter list:
Using ProCoder
Removing a Filter
CHAPTER 3
In the Load Audio Filter Preset dialog box, choose a filter by double-clicking on it.
The filter’s name appears in the Filter List, and you can listen to a preview of how it
affects your source video by clicking Play Result here.
Click the Remove button to remove the filter.
Index
59
ProCoder 3
Saving and Loading filters
1
2
3
4
5
60
To save a custom setting for the currently selected filter, click the Save Preset
button.
A dialog appears asking you to name and enter a short description of your preset.
Custom presets are stored along with the default presets and can be categorized
into folders and subfolders.
To add a customized filter preset, simply click Add and load it the same way you
would load a default preset.
To remove a customized filter preset, simply click Add to open the Load Audio
Filter Preset dialog, click the filter preset you want to remove, then click the Delete
Preset button.
Source Tab
Settings
s
t
n
e
t
n
o
C
This section displays the settings for the particular filter you are using. Use the sliders
to adjust the degree of modifications for each filter.
CHAPTER 1
n
o
i
t
c
u
d
o
r
t
n
I
CHAPTER 2
n
o
i
t
a
l
l
a
t
s
n
I
Preview
The Preview section lets you preview your audio – with or without filtering.
ProCoder 3
CHAPTER 3
d
r
a
z
i
W
Using ProCoder
CHAPTER 4
Helpful Hints
CHAPTER 5
ProCoder
Reference
CHAPTER 6
Glossary
CHAPTER 7
Index
61
ProCoder 3
3
Target Tab
A Target is basically the video format of your converted source file. You can assign multiple
Targets to a single source file, which lets you create different formats of the same source
file in one shot.
You can create various kinds of the following types of media with ProCoder, including:
AC3 Audio
AVI
DV
Flash
H.264
HDV
MP3 Audio
MPEG
PCM Audio
Poster Frame Exporter
Preview DVD
QuickTime
RawDV
RealMedia
Windows Media
Assigning Targets
To assign a target to your source file:
1
2
62
Click on the Target tab.
Click the Add button. The Load Target Preset dialog appears.
Target Tab
Web
contains MPEG, QuickTime, RealMedia, Windows Media and
Thumnails profiles suitable for Web delivery.
CD/DVD
contains Computer, VCD, DVD and SVCD useful for video on CD
and DVD media.
Image Sequence
exports a series of still images.
You can also create your own categories and subcategories to store and organize your own
target presets.
4
Index
The format you selected appears in the Target List. You can modify a target´s
parameters in the Target Parameters section of the Target tab. Customizable
parameters are those with a white background color. Depending on the setting,
either enter the values you wish to use or make a selection from the drop-down
menu.
d
r
a
z
i
W
contains iPod, 3GPP and RealMedia 10 for video files that are
compatible with handheld devices, such as PDAs and cell phones.
n
o
i
t
a
l
l
a
t
s
n
I
contains HD, SD and Web profiles.
Handheld
Glossary
H.264
CHAPTER 7
contains Editing Software, DVD prodution/ authoring and
MediaEdge / HDMA-4000 profiles.
ProCoder
Reference
contains Canopus HQ, MPEG and Windows Media HD settings.
Application Specific
CHAPTER 6
HD
Helpful Hints
contains AVI, MPEG, or Windows Media targets for use as
archival storage formats.
CHAPTER 5
Storage
CHAPTER 4
contains AVI, QuickTime and RawDV profiles for different DV
standards.
Using ProCoder
DV
ProCoder 3
contains PCM and MP3 settings for audio-only output formats.
These settings are good for exporting audio for use in other
applications and for conforming audio files.
CHAPTER 3
Audio
CHAPTER 2
contains base settings for all the formats ProCoder produces.
These settings are a good starting point for creating a custom
setting.
CHAPTER 1
System
n
o
i
t
c
u
d
o
r
t
n
I
Click the entry of the file type you want to create in the left column, then choose a
preset from the right column. The Description box tells you exactly which type of
target file you have selected.
s
t
n
e
t
n
o
C
3
63
ProCoder 3
Modifying Targets
ProCoder offers a plethora of customizable parameters that help you easily encode highquality video. These parameters can be edited in the Target tab either before or after you
add videos to the Source List.
1
2
3
Click on the Target tab.
Click the Add button. The Load Target Preset dialog appears.
Choose the target you want to use and click the OK button.
The chosen target appears in the Target List.
You can also choose File > Save Project to save both your source files and custom
target settings. Simply double-click the saved project file to launch ProCoder and
continue working on or start encoding the project.
64
Target Tab
The target’s basic parameters appear in the Target Parameters section. You can
modify any of the parameters that aren’t grayed out. Simply enter values in the
fields, or use the drop-down menus to modify the default target parameters.
s
t
n
e
t
n
o
C
4
CHAPTER 1
n
o
i
t
c
u
d
o
r
t
n
I
CHAPTER 2
n
o
i
t
a
l
l
a
t
s
n
I
ProCoder 3
d
r
a
z
i
W
Using ProCoder
CHAPTER 4
Helpful Hints
CHAPTER 5
ProCoder
Reference
CHAPTER 6
Glossary
CHAPTER 7
If you want to modify the target’s more advanced settings, click the Advanced
button or double-click on the target in the Target List to open the Advanced
window. Use the Setup, Video Filter and Audio Filter tabs to modify the desired
parameters. When you are finished modifying the advanced settings, click the Close
button. For more information on the Advanced window, see the Advanced window
section later in this chapter.
CHAPTER 3
5
Index
6
If you want to save the changes for a custom target, click the Save Profile button.
Saved presets are visible in the Custom tab in the Add Target dialog. If you quit
ProCoder, the targets revert to their default settings the next time you launch the
program.
65
ProCoder 3
Customizing Advanced Settings
There are two different places in the Target tab where targets can be modified. When you
add a target to the Target List, its basic parameters are displayed in the Target Parameters
section of the tab, and you can easily modify nearly all of these settings. See the next
section for more information on the Advanced window. If you want to modify the selected
target’s more advanced settings:
1
2
Click the Advanced button in the Target tab.
In the Setup tab, the list of Target Parameters is expanded, containing all the
available parameters for the target you are modifying. Keep in mind, however, that
not all parameters are available to all targets.
For example, there are generally more modifiable options for MPEG streams than there are for
DV streams due to the varying number of parameters that are available for the MPEG codec.
Advanced window
The Advanced window in the Target tab is similar to the one used in the Source tab except
that the parameters you set affect only the assigned target files and not the source file itself.
Target filters are used for enhancing and optimizing the final output files created using the
parameters you set for each specific target.
For example, if you are creating both MPEG and QuickTime files for a particular source and
you want only the QuickTime files to have an extra brightness setting attached, then you
can adjust the brightness using the Color Correction filter on only the QuickTime Target
preset in the Target tab. This allows the brightness setting to only apply to the QuickTime
settings and will not affect the MPEG output.
The Target tab’s Video Filter and Audio Filter tabs are identical to those in the Source tab’s
Advanced window, but the parameters you set in the Target tab only apply to the target
you are modifying. For more information on these tabs, see the rest of this manual.
To access the Target’s Advanced window from the basic view, do one of the following:
Click the Advanced button.
Double-click the Target entry.
Right-click the Target entry and choose Advanced.
Click the Target tab.
66
Target Tab
Setup tab
s
t
n
e
t
n
o
C
The Setup tab lets you modify the parameters for the various different presets
available for all the different formats ProCoder can encode. Since every format has its
own set of parameters, this list changes depending on the target you choose.
CHAPTER 1
n
o
i
t
c
u
d
o
r
t
n
I
CHAPTER 2
n
o
i
t
a
l
l
a
t
s
n
I
ProCoder 3
d
r
a
z
i
W
Using ProCoder
CHAPTER 4
Helpful Hints
CHAPTER 5
ProCoder
Reference
CHAPTER 6
Glossary
CHAPTER 7
Target path name
Index
In the Target section of the Source tab or Setup tab in the Advanced window, you
can specify which folder you want the target file to be saved in by entering a file path
in the Path field. You can also press the ... button at the end of the row and choose
the path in the dialog box that appears.
CHAPTER 3
You can navigate through the settings quickly by using the tree-based option
list. Clicking on the profiles in the tree displays them immediately in the Target
Parameters section of the Advanced window. Some profiles disable the modification
of certain parameters in order to ensure that the setting adheres to a format’s
particular spec. You can only modify the parameters that have white backgrounds.
When you click on an option, a description of the option appears in the yellow box
under the parameter list.
67
ProCoder 3
Video Filter tab
The Video Filter tab lets you apply filters to your video to help improve image quality of
your source files before they are converted. These filters can be previewed in this tab, but
are applied when the video is being converted to its new format.
Video filters
68
601 Correction Expand Color Space
This video filter expands the RGB range of the video from 16-235 to
0-255. Use this filter to create output for a system that uses the full
0-255 range from input that uses 16-235.
601 Correction Shrink Color Space
This video filter shrinks the RGB range of the video from 0-255 to
16-235. Use this filter when create output for a system that uses the
16-235 range from input that uses the full 0-255 range.
601 to 709 Color
Correction
This video filter is used to convert video in the SD (601) colorspace
to the HD (709) colorspace. Broadcast HD video uses YCbCr colors
following Rec. ITU-R BT 709-5 where as broadcast SD video follows
ITU-R BT 601.
709 to 601 Color
Correction
This video filter is used to convert video in the HD(709) colorspace
to SD(601) colorspace.
Adaptive De-interlace
This video filter combines the fields of an interlaced video source’s
fields back into whole frames using special processing to preserve
full resolution while ensuring smooth motion.
Bitmap Keying
Superimpose a bitmap logo or graphic on the video. This is often
used to watermark video so it can be personalized.
Black/White Correction
This filter lets you adjust and control the levels of black and white
pixels in your video. By adjusting the sliders, you can specify at
which point a pixel will become black and/or white. The higher the
setting, the more nearly black pixels will be converted to true black
and vice versa. This works best if you are encoding video for the
Web and need to adjust the black and/or white levels of broadcast
video so that they are truly black or white. It’s also useful for making
white titles on a black background more legible when viewing on a
computer monitor.
Blur
This filter blurs the video in a rectangular pattern.
Broad cast Color Safe
Some colors that can be displayed on a computer cannot be
displayed on television or video output. This filter restricts the
colors in the source to only colors that are safe for television and
video broadcast.
Circular Blur
This filter blurs the video in a circular pattern.
Color Correction
This filter allows you to adjust the brightness, contrast, hue and
saturation of your video image.
Target Tab
Video Inverse Telecine
Filter
Use this filter to inverse telecine 2-3 telecined videos.
d
r
a
z
i
W
Temporal Noise Reducer This filter removes noise by using temporal noise reduction.
Temporal noise reduction is effective for removing analog noise.
n
o
i
t
a
l
l
a
t
s
n
I
This filter sharpens the video using the "unsharpen mask" technique.
n
o
i
t
c
u
d
o
r
t
n
I
Sharpen
s
t
n
e
t
n
o
C
This filter provides 90-degree rotation and axis-flipping for the
video.
Glossary
Rotate
CHAPTER 7
Remove unwanted edges on the video with this filter. This is often
used for removing any edge blanking or other unwanted video
information from the top or bottom of the video frame.
ProCoder
Reference
Relative Crop
CHAPTER 6
This filter offers conversion without interpolation for progressiveto-interlaced (i.e. film-to-video) file conversion. This preserves full
spatial image quality and creates target fields that are selected from
the nearest temporal source frame. Displaying the resulting file
on a progressive display, such as a computer monitor, produces
very noticeable interlacing artifacts. However, displaying this on an
interlaced display, such as a television, produces very good image
quality. This method is generally used when cinematographic
footage is encoded to a DVD and played on a TV.
Helpful Hints
Pulldown
CHAPTER 5
This filter is designed to improve picture quality by removing
single-pixel defects without affecting the sharpness.
CHAPTER 4
Median
Using ProCoder
This filter applies a Gaussian blur to the video.
ProCoder 3
This filter adjusts your video’s gamma settings.
Gaussian Blur
CHAPTER 3
Gamma Correction
CHAPTER 2
This filter applies a fade in and/or out to your video in order to
aid the encoding process. You should use this filter if your source
video has a lot of fast motion in the first few frames. The fade in
gives ProCoder a “running start” so it can encode your video more
efficiently.
CHAPTER 1
Fade In/Out
Index
69
ProCoder 3
Adding a Filter
To add a filter to the Video Filter list:
1
2
3
70
Simply click the Add button. The Add Filter dialog box appears and gives you
several filters to choose from. A brief description of each filter is listed in the yellow
Description box below when the filter is highlighted.
In the Add Filter dialog box, choose a filter by double-clicking on it. The filter’s
name appears in the Filter List and a preview of how it affects your source video
appears in the Result window adjacent to the Original window. You can browse the
different filter categories on the left and choose filters from the right. Holding down
Shift or Control and selecting the desired filters lets you add multiple filters to the
Filter list.
Use the sliders to adjust the filter parameters to your desired specifications.
Target Tab
Removing a Filter
ProCoder
Reference
CHAPTER 6
Glossary
CHAPTER 7
The Original window displays what the original file looks like before filtering. The
Result window displays the original file with the filters applied.
Helpful Hints
Preview Windows
CHAPTER 5
To remove a customized filter preset, simply click Add to open the Load Video
Filter Preset dialog, click the filter preset you want to remove, then click the Delete
Preset button.
CHAPTER 4
4
To add a customized filter preset, simply click Add and load it the same way you
would load a default preset.
Using ProCoder
3
Custom presets are stored along with the default presets and can be categorized
into folders and subfolders.
ProCoder 3
2
Click the Save Preset button. A dialog appears asking you to name and enter a
short description of your preset.
CHAPTER 3
1
d
r
a
z
i
W
To save a custom setting for the currently selected filter:
CHAPTER 2
Saving and Loading filters
n
o
i
t
a
l
l
a
t
s
n
I
Click the Remove button to remove the filter. If you want to remove all the filters
you’ve applied so far, simply click the Remove All button.
n
o
i
t
c
u
d
o
r
t
n
I
Highlight the filter in the list.
CHAPTER 1
1
2
s
t
n
e
t
n
o
C
To remove a filter from the Filter List:
Index
The Plus button enlarges both preview images, and the Minus button makes both
preview images smaller. If the preview image is larger than the window, scroll bars
appear allowing you to navigate through the entire image. You can also click and drag
on the image to navigate through the image.
71
ProCoder 3
The Fit to Window button resizes the preview images to fit inside the window’s
current size. No matter what size the window, this preview mode preserves the aspect
ratio assigned to the file. This button is useful if you enlarged or reduced the preview
image and want to view the whole image in the window again.
The 1:1 button displays the video at 1-to-1 pixel size. (1 monitor pixel = 1 video
pixel)
The Scrubber bar is used to find specific frames in the source video that you want to
use so you can see the effect of the filter(s) on the specific frame. You can either click
and drag the scrubber or use your keyboard’s arrow keys to step through the video’s
individual frames.
Settings
This section displays the settings for the particular filter you are using. Use the sliders
to adjust the degree of modifications for each filter.
Large Preview
Clicking the Large Preview button opens a floating window that allow you to modify
the preview size. This is helpful for scrutinizing the finer details of your video. You can
use the scrubber bar to find specific points in the video. You can resize the window
as needed, and it adjusts the size of the previews proportionally. It also contains the
same controls as the Video Filter tab.
The Orientation button switches the orientation of the preview windows
between horizontal and vertical.
72
Target Tab
Audio Filter Tab
s
t
n
e
t
n
o
C
The Audio Filter tab lets you add audio filters to your target file to help improve the audio
quality of your target files. These filters can be previewed in this tab and are applied to the
target audio after any source audio filters are processed.
CHAPTER 1
n
o
i
t
c
u
d
o
r
t
n
I
CHAPTER 2
n
o
i
t
a
l
l
a
t
s
n
I
ProCoder 3
d
r
a
z
i
W
Index
The Volume filter lets you adjust the overall volume of the audio.
Glossary
Volume
CHAPTER 7
The Normalize filter raises the audio to maximize volume without
clipping. Adjust the volume of a batch of clips so they are all at the
same level. This is a dual-pass filter and will increase your source
file’s overall conversion time.
ProCoder
Reference
Normalize
CHAPTER 6
The Lowpass filter removes high-frequency signals, such as
electrical noise and hiss, from the audio.
Helpful Hints
Lowpass
CHAPTER 5
The Fade In/Out filter is used to add a fade in and/or fade out to the
audio. This is most useful in conjunction with the Video Fade In/Out
filter.
CHAPTER 4
The Channel Mixer filter interchanges audio channels.
Fade In/Out
Using ProCoder
Channel Mixer
CHAPTER 3
Audio Filters
73
ProCoder 3
Adding a Filter
To add a filter to the Filter List:
1
2
Simply click the Add button. The Load Audio Filter Preset dialog box appears
and displays a list of filters to choose from. When the filter is highlighted, a brief
description of each filter is listed in the Description box below when the filter is
highlighted.
In the Load Audio Filter Preset dialog box, choose a filter by double-clicking on it.
The filter’s name appears in the Filter List and you can listen to a preview of how it
affects your source video by clicking Play Result here.
Removing a Filter
To remove a filter from the Audio Filter list:
1
2
74
Highlight the filter from the list.
Click the Remove button to remove the filter.
Target Tab
Loading and Saving filters
n
o
i
t
c
u
d
o
r
t
n
I
A dialog appears asking you to name and enter a short description of your preset.
CHAPTER 1
2
To save a custom setting for the currently selected filter, click the Save Preset
button.
s
t
n
e
t
n
o
C
1
CHAPTER 2
n
o
i
t
a
l
l
a
t
s
n
I
ProCoder 3
d
r
a
z
i
W
CHAPTER 4
Helpful Hints
CHAPTER 5
ProCoder
Reference
CHAPTER 6
Glossary
CHAPTER 7
Index
5
To add a customized filter preset, simply click Add and load it the same way you
would load a default preset.
Using ProCoder
4
Custom presets are stored along with the default presets and can be categorized
into folders and subfolders.
CHAPTER 3
3
To remove a customized filter preset, simply click Add to open the Load Audio
Filter Preset dialog, click the filter preset you want to remove, then click the Delete
Preset button.
75
ProCoder 3
Settings
This section displays the settings for the particular filter you are using. Use the sliders
to adjust the degree of modifications for each filter.
Preview
The Preview section lets you preview your audio – with or without filtering.
76
Convert Tab
CHAPTER 1
The Convert tab is very straightforward. When you click it, the Convert window appears.
You can watch your files encode in the Convert window’s preview section.
n
o
i
t
c
u
d
o
r
t
n
I
Convert Tab
s
t
n
e
t
n
o
C
4
CHAPTER 2
n
o
i
t
a
l
l
a
t
s
n
I
ProCoder 3
CHAPTER 3
d
r
a
z
i
W
Using ProCoder
CHAPTER 4
Helpful Hints
CHAPTER 5
ProCoder
Reference
CHAPTER 6
Glossary
CHAPTER 7
To begin converting files, click the Convert button. The conversion process begins, and
you can keep track of how each file will look in the preview window. If you are converting
a batch of files, the Output List lets you know which files have been encoded. The file at
the bottom of the list is the file that is currently being encoded. By clicking on a file in the
Output List, you can preview each target as it’s being encoded in realtime. This is handy
for checking the picture quality of your converted files while they are being encoded. When
ProCoder finishes encoding all the files, you’ll hear ProCoder’s exuberant “Done” sound.
Don’t worry, you can’t miss it.
You can stop encoding at any time by pressing the Stop button. You can play the partially
encoded file up to the point at which encoding was stopped. If you want to re-encode the
file, press the Convert button and ProCoder will start encoding from the beginning of the
file.
Index
When encoding is either stopped or completed, there may be some delay before
ProCoder is available to the system. This is normal, so please do not terminate the
application during this time.
77
ProCoder 3
Playing converted files
If you want to play a file after it’s encoded, click the file you want to view in the Output
List on the right side of the window and then click the Play button. The appropriate player
for the file you select appears and plays the file. If you want to open the destination folder,
click the Open Folder button. You can only open files that are finished encoding, so you
should wait until ProCoder starts encoding the next file in the batch and then trying to open
the previous file.
78
Presets and Profiles
ProCoder 3
d
r
a
z
i
W
Using ProCoder
CHAPTER 4
Helpful Hints
CHAPTER 5
ProCoder
Reference
CHAPTER 6
Glossary
CHAPTER 7
To save a custom setting for the current list of Targets, click the Save Profile button. A
dialog appears asking you to name and enter a short description of your preset.
To load a custom Target setting, click the Add Target button. The Add Target dialog
appears. Click the Custom tab and select the preset you want to load.
CHAPTER 3
Loading and Saving Target profiles
CHAPTER 2
To save a custom setting for the currently selected filter, click the Save Preset button. A
dialog appears asking you to name and enter a short description of your preset.
To load a custom setting for the currently selected filter, click the Load Preset button. The
Settings dialog appears. Click the Custom tab and select the preset you want to load.
To remove a custom filter setting, simply select the filter you want to remove and click the
Remove button.
CHAPTER 1
Loading and Saving Custom Settings
n
o
i
t
a
l
l
a
t
s
n
I
Procoder makes it easy to save and manage customized presets and profiles.
n
o
i
t
c
u
d
o
r
t
n
I
Presets and Profiles
s
t
n
e
t
n
o
C
5
Index
79
ProCoder 3
6
Queue Manager
In addition to its normal conversion processes, ProCoder also provides job queuing
capabilities. Instead of waiting for the ProCoder application to finish a conversion, you can
queue jobs to the ProCoder Queue Manager which takes over and performs conversion of
queued jobs much like the print spooler handles printing jobs. In this manner, the ProCoder
application serves as a job set-up tool and the user can queue multiple jobs with different
priorities and return later when they are complete.
To queue a job:
1
To queue a job, set up the conversion in the ProCoder application as you normally
would, but instead of clicking the Convert tab and starting conversion, click the
Queue button below the Convert tab.
The Job Queueing window appears.
2
80
In the Job Name field, enter a name for the job. The job’s name will appear in the
Queue Manager.
Queue Manager
n
o
i
t
a
l
l
a
t
s
n
I
d
r
a
z
i
W
Helpful Hints
ProCoder
Reference
CHAPTER 6
Glossary
CHAPTER 7
Click the Queue button to add the job to the queue. The Launch Queue Manager
button launches the ProCoder Queue Manager so you can view the status of the
conversion queue.
CHAPTER 5
Overwrite the output file if a file of the same name already exists
CHAPTER 4
Rename the output file if a file of the same name already exists
Overwrite if exists
Using ProCoder
Rename if exists
ProCoder 3
Select the appropriate action to take an output file already exists from the Target
File Name drop-down.
Cancelling and managing jobs
Job management is handled by the ProCoder Queue Manager. There are three ways that
you can access the ProCoder Job Queue Manager:
CHAPTER 3
8
Enter a name for the target file in the Target File Name field.
CHAPTER 2
6
7
Check One Job for each Target, to add a job to the Job Manager for each target
registered.
CHAPTER 1
5
Choose a Job Priority from the drop-down box. The higher the job priority is, the
sooner the Queue Manager will start the job. Higher-priority jobs are started before
lower-priority jobs. The highest priority is 9 which means the job will be started
as soon as any currently jobs are complete, unless there are more priority 9 jobs
already waiting.
n
o
i
t
c
u
d
o
r
t
n
I
4
Enter a description of the job in the Job Description field. The job’s description will
also appear in the Queue Manager.
s
t
n
e
t
n
o
C
3
Clicking the Manage button on the left side of the ProCoder application.
Launching the Job Queue Manager separately by choosing Start Menu > All
Programs > ProCoder 3 > Job Queue Manager.
Index
Clicking the Launch Queue Manager button in the Job Queueing window.
See Managing Jobs in the next section for more information on using the Queue Manager.
81
ProCoder 3
Managing Jobs
The ProCoder Queue Manager is used to monitor the progress of conversion jobs the
system is processing.
You can launch the Job Queue Manager by clicking the Manage button in the ProCoder
application or by launching the ProCoder Job Queue Manager by choosing by choosing
Start Menu > All Programs > ProCoder 3 > Job Queue Manager.
Any jobs that are pending or in progress are displayed in the list, along with information
about the job and any sub-sections.
Viewing Jobs
The job information is listed in the Queue Manager as follows:
82
Name
The name of the job as specified by the ProCoder application
Description
The description of the job as specified by the ProCoder application
Priority
Priority of the job from 1-9, 9 being highest. Queued jobs with
higher priority values will be processed before jobs with lower
priority values.
User
The method of submission for this job. Jobs normally appear as
ProCoder 3.
Progress
The progress of the job in percent.
Progress Bar
A graphical representation of the progress of the job.
Time
The time of job submission.
Machine
The name of the machine where the job is executed.
Warning/Error
Any warnings or errors in a job appear here.
Queue Manager
Managing Jobs
n
o
i
t
a
l
l
a
t
s
n
I
d
r
a
z
i
W
You can display the details of a job.
n
o
i
t
c
u
d
o
r
t
n
I
Show Details
Glossary
You can display a preview of a job in progress by right-clicking the
job and choosing Preview.
CHAPTER 7
Previewing a job
ProCoder
Reference
To remove a job, right-click the job and choose Remove.
CHAPTER 6
Removing a job
Helpful Hints
A running job can be paused by right-clicking the job and choosing
Pause. To resume a paused job, right-click it and choose Resume.
CHAPTER 5
Pausing a job
CHAPTER 4
To stop a running job, right-click the job and choose Stop. To
restart a stopped job, right-click it and choose Restart.
Using ProCoder
Stopping a job
ProCoder 3
Queued jobs start automatically as processing resources are
available. You can also force the job that is in the QUEUED state
to start locally by right-clicking the job and choosing Start locally
now.
Clearing the Queue
There are options you can choose in the Tools menu to clear out the queue, including:
Clean List
Removes all completed jobs
Automatically Remove
on Completion
Removes a job upon successful completion of encoding.
CHAPTER 3
Starting a job
CHAPTER 2
You can change the priority of a job that has not started by rightclicking the job and choosing Change Priority to select a new
priority. Jobs with higher priorities are processed before jobs with
lower priorities.
You can also change the priority of a job so that it can be processed
next by right-clicking the job and choosing Start Next.
CHAPTER 1
Changing job priority
s
t
n
e
t
n
o
C
Jobs can be controlled by the contextual menu shown by right-clicking on them.
Index
83
ProCoder 3
7
Watch Folders
A watch folder is used to automatically convert files placed into it. ProCoder “watches” the
folder for new files and when a new file arrives, it is converted automatically according to
the settings assigned without needing user input.
In ProCoder, there are two types of watch folders:
Permanent Watch Folders are set up by ProCoder’s Watch Folder Manager tool. Files
placed into permanent watch folders are converted using the associated target profile
and are active regardless of whether the ProCoder application is open and remain
watched until removed using the Watch Folder Manager tool.
Temporary Watch Folders are set up using the ProCoder 3 Wizard. Files placed into a
temporary watch folder are only converted while the ProCoder 3 Wizard is open. Once
the ProCoder 3 Wizard is closed, the folder stops being watched and returns to being a
normal folder.
You can copy approximately 2000 files at once into the Watch folder. If you need to
copy more than 2000 files, break them up into smaller groups before copying them into
the Watch folder.
84
Watch Folders
Creating Permanent Watch Folders
n
o
i
t
c
u
d
o
r
t
n
I
CHAPTER 2
n
o
i
t
a
l
l
a
t
s
n
I
ProCoder 3
CHAPTER 3
d
r
a
z
i
W
If the ProCoder Application is open, click the Watch button to open the Watch
Folder Manager tool. Otherwise, run Watch Folder Setup from the Start menu in
All Programs > ProCoder 3. The ProCoder Watch Folder Manager tool appears.
Existing watch folders appear in the Active Watch Folders area.
CHAPTER 1
1
s
t
n
e
t
n
o
C
To create a permanent watch folder:
Using ProCoder
CHAPTER 4
Helpful Hints
CHAPTER 5
ProCoder
Reference
CHAPTER 6
Glossary
CHAPTER 7
Index
85
ProCoder 3
2
3
4
5
6
Click the ... button next to Watch Folder under New Watch Folder.
The Browse for Watch Folder dialog appears.
Select the folder to watch for new files. To create a new folder, click the Make New
Folder button.
To convert files placed into subfolders of the selected folder, enable the Include
Sub Folder option.
To delete Source file once the conversion is finished, enable the Delete Source
after Conversion option.
Permanent Watch Folders use conversion settings from a preset. Choose a preset
from the drop-down menu.
Any custom presets you have saved from the ProCoder application appear in this list in
addition to the basic presets.
86
Watch Folders
Click the ... button next to Target Folder to select the output folder. All files that
arrive in the Watch Folder will be converted and the output is written to the Target
Folder.
The Browse for Target Folder dialog appears.
s
t
n
e
t
n
o
C
7
CHAPTER 1
n
o
i
t
c
u
d
o
r
t
n
I
CHAPTER 2
n
o
i
t
a
l
l
a
t
s
n
I
ProCoder 3
d
r
a
z
i
W
Glossary
CHAPTER 7
Index
Click Update selected Watch to update the Watch Folder.
ProCoder
Reference
overwrites any existing output file in the Target Folder with the
result of the conversion.
CHAPTER 6
Overwrite if exists
Helpful Hints
renames the output file, appending a number starting from 00 to
the name to make it unique.
CHAPTER 5
Rename if exists
CHAPTER 4
10
11
Click the drop-down next to Target File to choose what to do when conversion
creates a file with the same name as an existing file in the Target Folder.
Using ProCoder
9
To output files in subfolders of the Watch Folder into matching subfolders in the
Target Folder, enable the Append Sub Source Folder to Target option. If it is not
enabled, files in subfolders of the Watch Folder will be output to root of the Target
Folder.
CHAPTER 3
8
Click the Create Watch button to add the watch folder to the Active Watch Folders
list.
87
ProCoder 3
Removing Permanent Watch Folders
To remove a permanent watch folder:
1
If the ProCoder Application is open, click the Watch button to open the Watch
Folder Manager tool. Otherwise, run Watch Folder Setup from the Start menu in All
Programs > ProCoder 3.
The ProCoder Watch Folder Manager tool appears. Existing watch folders appear in the Active
Watch Folders area.
2
To remove individual watch folders, select a folder in the list by clicking on it then
click the Stop Watch button. To remove all watch folders, click the Unwatch All
button.
Creating Temporary Watch Folders
Temporary Watch Folders are part of the ProCoder 3 Wizard covered in the Chapter 3:
ProCoder 3 Wizard.
88
Transcoding Settings
n
o
i
t
a
l
l
a
t
s
n
I
d
r
a
z
i
W
Glossary
CHAPTER 7
Index
When the source or target frame rate is below approximately 23fps,
ProCoder will pick the nearest frame instead of interpolating in
order to avoid ghosting.
ProCoder
Reference
Automatic selection
CHAPTER 6
This option creates a target frame interpolating between the
two nearest temporal source frames. This guarantees smooth
movement. However, since every target frame is an interpolation
between source frame, the spatial quality is degraded and “ghost”
images may appear.
Helpful Hints
Always interpolate
CHAPTER 5
This option creates a target frame by picking the nearest temporal
frame from the source stream. This preserves full spatial source
image quality. However, depending on the ratio between the source
and target frame rates, movement in the video may appear jerky.
CHAPTER 4
Always pick nearest
frame
Using ProCoder
If your source and your target have different frame rates, there are many different
ways to converting the source frame rate to the target frame rate.
ProCoder 3
Frame Rate Conversion
CHAPTER 3
The Processing Options tab controls both Frame Rate Conversion Chapter Points,
TimeCode, and Scaling and Letterboxing preferences.
CHAPTER 2
Processing Options tab
CHAPTER 1
The Transcoding Settings window lets you set parameters for destination disks to save
encoded files, as well as default processing options for the entire application. Setting these
parameters is useful if you are going to be dealing with lots of source files from a single or
similar sources. To open the Transcoding Settings dialog, choose Options > Transcoding
Settings.
n
o
i
t
c
u
d
o
r
t
n
I
Transcoding Settings
s
t
n
e
t
n
o
C
8
If ProCoder needs to interpolate frames for doing frame rate conversions, ghost
images might appear. Use the Automatic selection option to avoid ghosting. If
ghosting still occurs, then use the Always pick nearest frame option.
89
ProCoder 3
NTSC-PAL conversions between formats that have specific NTSC and PAL parameters
are handled by ProCoder automatically and do not use this setting.
Source Playback Speed Adjustment
ProCoder normally does not alter the playback rate of sources in order to preserve
the source’s original speed and visual intent. In other words, objects always move at
the same speed through video regardless of the target frame rate and a 10-second
source always converts to a 10-second target.
However, in some circumstances it is advantageous to slightly alter the source
playback rate by a very small amount in order to aid conversion. For example, a
29.97fps source can be sped up to 30fps playback for conversion to a 15fps output,
removing the possibility of interpolation artifacts and making the conversion faster.
It is also standard that 24fps film transfers to PAL DVD-Video are not put through
frame rate conversions. Instead, the 24fps film content is encoded and authored as if
it was 25fps content, resulting in a 4% speed-up. This eliminates any interpolation or
pulldown but makes PAL DVDs of film transfers ever-so-slightly shorter in length.
Enable Source Playback
Speed Adjustment
Check this box to allow ProCoder to alter the playback speed of
sources up to the percentage in the Max. Adjustment (%) box.
Be careful not to set the Max. Adjustment percentage too high because it can cause
undesirable results,
such as distored audio and video playback.
Chapter Points
When a DVD is created with the multiple videos stitched together, the Chapter points
can automatically be set at the source stitch points.
Set Chapter Point at
Source Stitch Points
90
Check this box to allow ProCoder to set Chapter Points at the
Source Stitch Points.
Transcoding Settings
Time Code
CHAPTER 2
n
o
i
t
a
l
l
a
t
s
n
I
Scaling and Letterboxing
n
o
i
t
c
u
d
o
r
t
n
I
Check this option to use NTSC Drop Frame Time Code.
CHAPTER 1
Use NTSC Drop Frame
Time Code
s
t
n
e
t
n
o
C
As a NTSC video is in 29.97fps, it takes more than a second to display 30 frames. To
correct this difference, drop frame Time Code drops frame numbers.
ProCoder 3
CHAPTER 3
d
r
a
z
i
W
Using ProCoder
CHAPTER 4
Helpful Hints
CHAPTER 5
ProCoder
Reference
CHAPTER 6
Glossary
CHAPTER 7
If your source and your target have different frame sizes, there are two different ways
to handle this scenario. For example, you may have a 16:9 source file that needs to
be encoded to a target file with a 4:3 aspect ratio frame size. Because of the different
frame sizes, you either have to scale and crop your Source file, or add black bars to
the video to compensate for the difference. If you want to crop your source file, you
should use the Crop video filter in the Source tab.
Index
91
ProCoder 3
Add Letterbox/
Scale & Crop slider
Adjust the slider to the desired percentages. 100% letterbox,
or sliding it to all the way to the left, leaves the source frame
completely visible, with letterbox bars added if necessary. If the
slider is at 0% letterbox, the image will fill the entire space without
letterboxing, but the sides will be chopped off. Leaving the letterbox
slider in the middle (50%) is a mixture of adding letterbox bars and
scaling the file to fit the space. If you know you can afford to cut off
a little of the video, then you should have the bar more toward the
middle. Experiment with these settings to determine which ones
are appropriate for your source files.
100% Letterbox
Scales the source image so the entire
image fits within the target frame, which
can result in unused areas which become
letterbox bars.
100% Scale & Crop
Scales the source image so the target
frame is completely filled, resulting in no
letterbox bars, but the possibility that part
of the source image that has “spilled over”
outside of the target frame has now been
removed and is no longer visible.
Allow anamorphic
scaling
This option enables anamorphic scaling.
Enable MPEG-1
compliant scaling
ProCoder normally converts full-D1 sources to MPEG1 SIF using the
Scaling and Letterboxing slider setting.
However, the MPEG specification states to convert a full-D1
(720x480/576) source to MPEG1 SIF (352x240/288), crop 8 pixels
from the left and right sides of the source to create a 704x480/576
frame then scale it to 50% for a 352x240/288 frame.
Check this box to have ProCoder comply to the MPEG specification
when converting full-D1 sources to MPEG1 SIF.
Crop when scaling D1 to Enable this option when converting a NTSC D1 720x486 source to
DV (NTSC)
NTSC DV 720x480. ProCoder will crop 4 lines from the top and 2
lines from the bottom of the source frame during conversion. This
results in faster processing and higher quality since scaling is not
performed.
92
Crop/Adjust when
converting between VBI
containing formats
This option enables to convert videos which have VBI(Vertical
Blanking Interval) where the original size information is stored.
Discard field when
scaling height by 1/2
When using full-size interlaced source files, this option discards one
of the fields if you are scaling the file to half-size. In some cases,
this eliminates the need for applying deinterlacing filters to your
source file since discarding a field effectively deinterlaces the video.
Transcoding Settings
Conversion Options tab
s
t
n
e
t
n
o
C
The Conversion Options tab controls various preview, loading and system preferences.
CHAPTER 1
n
o
i
t
c
u
d
o
r
t
n
I
CHAPTER 2
n
o
i
t
a
l
l
a
t
s
n
I
ProCoder 3
d
r
a
z
i
W
CHAPTER 4
Helpful Hints
CHAPTER 5
ProCoder
Reference
CHAPTER 6
Glossary
CHAPTER 7
Index
Preview Devices
Use Overlay on Desktop
Using ProCoder
Always Scale/Shrink To Enable this option to have ProCoder always compensate for pixel
Aspect Ratio Correct Full aspect ratio differences and provide an accurate on-screen display.
Screen Display
It is recommended to keep this option enabled.
CHAPTER 3
Preview Options
Enable this option to use video overlay for preview. Video overlay
is faster than standard video writes and therefore causes less
slowdown on conversions. You should disable this option for
remote desktop or if your preview stays blank.
93
ProCoder 3
Source Loading Options
Apply modified Source
options to similar
Sources
Enable this option to use modified source options on subsequent
source files. With this option enabled, subsequent sources of
similar types will be loaded with the same source parameters as
the previous source of the same file type. This is useful for Watch
folders because it allows source files to be adjusted automatically
without the need for the user to interact with the software.
For example, let’s say you have an AVI file that does not have
square pixels and you set it so the pixel aspect ratio isn’t square (i.e.
DV NTSC). If Apply modified Source options to similar Sources
is enabled, the next AVI source file you load will retain the same
settings used before, and will loads the file with the pixel aspect
ratio set to DV NTSC, instead of the default setting.
Force internal
DirectShow MPEG
Decoder
Enable this option to use internal DirectShow MPEG Decoder to
load source file.
MPEG Timestamp Mode Automatic
Sets timecode automatically.
Always Use Timestamp Sets timecode using timestamp.
Never Use Timestamp
Default Subtitle
Language
Does not use timestamp.
Specifies the default subtitle language.
System
94
Temp. Dir
Some conversions need to save temporary files. Click the Browse
button to choose a location for your temporary directory.
Cache Dir
ProCoder retains some information in order to speed certain types
of conversions. Click the Browse button to select the location to
use for ProCoder’s cache files.
Transcoding Settings
Default Target Folder Tab
s
t
n
e
t
n
o
C
CHAPTER 1
n
o
i
t
c
u
d
o
r
t
n
I
CHAPTER 2
n
o
i
t
a
l
l
a
t
s
n
I
ProCoder 3
d
r
a
z
i
W
ProCoder
Reference
Glossary
CHAPTER 7
Index
3
4
5
CHAPTER 6
1
2
Helpful Hints
To set the Local Default Target folder:
CHAPTER 5
Sets the output location for specific target presets. The local
defaults override the global defaults. This is helpful for separating
files that go to different projects or can be used to separate different
target formats from each other.
Folder
CHAPTER 4
Local Default Target
Using ProCoder
This option sets the output location for all formats and targets. Click
the Browse button to select the folder you want to use.
If you want the global settings to apply to all target folders, check
the Always use the Global Default Folder for all Targets option.
Checking this option disables and overrides any local settings you
may specify in the next section.
CHAPTER 3
Global Default Target
Folder
Uncheck the Always use the Global Default Folder for all Targets option.
Select the desired target from the list by clicking on it.
Check the Use Local Default Folder for the selected Target option.
Click the Browse button to choose the folder to use.
Click the Apply or OK button.
95
ProCoder 3
9
Application Settings
The Application Settings window lets you set enable or disable application-specific
behaviors. To open the Application Settings, choose Options > Application Settings.
Settings
Window animation
This toggles whether or not the windows slide into place when they
open or close.
Show “Save Project”
dialog on exit
This toggles whether or not ProCoder prompts you to save your
projects when you exit the application.
Disable Sound on
“Conversion finished”
This option disables the exuberant “Done” sound that plays when
ProCoder finishes a foreground conversion.
Show Advanced options This option includes all advanced options within the basic view.
in basic view
When the advanced options are included in the basic view, the
advanced view is only necessary for source trimming and adding
filters to sources and targets.
Confirmation
96
Disable confirmation
when removing Filter
This option lets you disable the prompt that appears when you
want to remove a filter(s) from targets or sources.
Disable confirmation
when removing Source
This option lets you disable the prompt that appears when you
want to remove a source file(s) from the Source List.
Disable confirmation
when removing Target
This option lets you disable the prompt that appears when you
want to remove a target(s) from the Target List.
Advanced Features
d
r
a
z
i
W
Helpful Hints
ProCoder
Reference
CHAPTER 6
Glossary
CHAPTER 7
When you are finished adding and adjusting the targets, click the Save Preset
button. This preserves all of your modifications and saves it to a custom preset. The
saved preset can be selected later in the Load Target Preset dialog box.
CHAPTER 5
Adjust the parameters for each target to your specifications. If necessary, click the
Advanced button of the desired target to modify its advanced settings.
CHAPTER 4
4
Click the Add button to add a target to the Target List. You can have multiple
targets encoding multiple files within your droplet.
Using ProCoder
3
Click the Target tab.
ProCoder 3
1
2
CHAPTER 3
To create a droplet,
CHAPTER 2
You can automate your encoding by creating droplets. Droplets let you save a specific
set of parameters into a mini-application that launches the ProCoder application with the
predefined settings. Simply drag one or multiple files onto the droplet to automatically
encode all the files to the selected settings. You can also double-click on a droplet, which
opens the ProCoder application with the Source List empty and the droplet’s saved targets
listed in the Target List.
n
o
i
t
a
l
l
a
t
s
n
I
Droplets
CHAPTER 1
ProCoder’s advanced features give you some options for automating the application or
integrating it into your workflow.
n
o
i
t
c
u
d
o
r
t
n
I
Advanced Features
s
t
n
e
t
n
o
C
10
Index
97
ProCoder 3
5
6
7
8
9
10
98
Choose Tools > Create Droplet. The Save Droplet dialog appears.
Select the preset you created by selecting the appropriate category and clicking on
the preset at the right.
Choose a location for the droplet in the Folder section by clicking the Browse
button. The default location is the Windows Desktop.
Enter a name for the droplet in the Name field. This will be the name of the Droplet
executable file.
Choose the action the droplet should perform by clicking the Action drop-down.
Launch ProCoder 3
Dragging files onto the droplet will launch the ProCoder
application with the dragged files as sources and the droplet’s
target settings applied.
Launch ProCoder 3 and
Start Conversion
Dragging files onto the droplet will launch the ProCoder
application with the dragged files as sources and the droplet’s
target settings applied. Conversion starts automatically.
Queue to ProCoder 3
Job Manager
Dragging files onto the droplet will launch the ProCoder
application with the dragged files as sources and the droplet’s
target settings applied. The conversion job will be queued to the
Job Manager. ProCoder shuts down immediately after queuing
the project.
Click the OK button. The droplet appears as an executable file in the specified
location.
Advanced Features
/Targetdir:<dir>
Writes target files to the specified folder.
[project file]
The complete name and path of your ProCoder project file. If the
filename contains a space, you should enclose the entire path in
double-quotes (i.e. “C:\Windows\Desktop\My project.PCP”).
[source files]
Any additional source files If the filename contains a space, you
should enclose the entire path in double-quotes (i.e. “C:\Windows\
Desktop\My project.PCP”).
d
r
a
z
i
W
Creates a log file that details the conversion and reports any errors
that may have occurred.
n
o
i
t
a
l
l
a
t
s
n
I
/Log:<logfile>
Index
Queue to job manager instead of converting within the ProCoder
application.
Glossary
/Queue
CHAPTER 7
Shuts down the PC after conversion finishes.
ProCoder
Reference
Closes ProCoder after conversion finishes.
/Shutdown
CHAPTER 6
/Closeapp
Helpful Hints
Starts conversion immediately as long as one valid source and
target is loaded.
CHAPTER 5
/Start
CHAPTER 4
ProCoder3.exe [/Start] [/Closeapp] [/Shutdown] [/Queue]
[/Log:<logfile>] [/Targetdir:<dir>] [Project file] [source files]
Using ProCoder
ProCoder Application Options
ProCoder 3
The Windows command-line interface can be used to process files with ProCoder droplets
and ProCoder projects, allowing another level of automation and batch processing. You can
either encode a single file or multiple files through Droplets, and entire projects through
the ProCoder application. Simply create a Droplet or save a project file using the ProCoder
application.
CHAPTER 3
Command-line Automation
CHAPTER 2
You can only drag files onto droplets. Dragging folders onto droplets will not work.
CHAPTER 1
You can also double-click on a droplet, which opens the ProCoder application with the Source
List empty and the droplet’s saved targets listed in the Target List.
n
o
i
t
c
u
d
o
r
t
n
I
To use the droplet, simply drag and drop one or more files onto the droplet icon.
The ProCoder application will open with the dropped sources and droplet’s target
settings. If the droplet’s action is to start conversion automatically or queue to the
Queue Manager, it will do so.
s
t
n
e
t
n
o
C
11
99
ProCoder 3
Example:
ProCoder3.exe /Start /Closeapp /Log:C:\MyJobs\Job1.log /Targetdir:D:\MyOutput C:\
MyProjects\Job1.pcp D:\Misc\AdditionalFile.avi
Will start the ProCoder application with the the project file C:\MyProjects\Job1.pcp.
Conversion will start automatically and the ProCoder application will be closed
automatically after conversion is complete.
A log will be saved to the file C:\MyJobs\Job1.log and output will be saved in D:\MyOutput.
In addition to the source files specified in C:\MyProjects\Job1.pcp,
D:\Misc\AdditionalFile.avi will also be used as a source.
ProCoder Droplet Options
<Dropletname>.exe [/Start] [/Closeapp] [/Shutdown] [/Queue] [/Log:<logfile>]
[/Targetdir:<dir>] [source files]
<Dropletname>
The name of the saved droplet executable file.
/Start
Starts conversion immediately as long as one valid source and
target is loaded.
/Closeapp
Closes ProCoder after conversion finishes.
/Shutdown
Shuts down the PC after conversion finishes.
/Queue
Queue to job manager instead of converting within the ProCoder
application.
/Log:<logfile>
Creates a log file that details the conversion and reports any errors
that may have occurred.
/Targetdir:<dir>
Writes target files to the specified folder.
[source files]
Any additional source files If the filename contains a space, you
should enclose the entire path in double-quotes
(i.e. “C:\Windows\Desktop\My project.PCP”).
Example:
VCD-NTSC.EXE /Start /Shutdown /Log:VCD-NTSCStatus.txt /Targetdir:D:\Output “D:\My
Video\Horse.avi” E:\Video\Foo.m2p E:\TempVideo\Bar.mov
Will start ProCoder with the VCD-NTSC settings (assuming a droplet called VCD-NTSC was
saved) with the source files D:\My Video\Horse.avi, E:\Video\Foo.m2p and E:\TempVideo\
Bar.mov.
Conversion will start automatically and the PC will be shut down after conversion is
complete.
A log will be saved to the file VCD-NTSCStatus.txt and output will be saved in D:\Output.
100
Advanced Features
Premiere Plug-in
s
t
n
e
t
n
o
C
n
o
i
t
c
u
d
o
r
t
n
I
n
o
i
t
a
l
l
a
t
s
n
I
d
r
a
z
i
W
Using ProCoder
CHAPTER 4
Helpful Hints
CHAPTER 5
ProCoder
Reference
CHAPTER 6
Glossary
CHAPTER 7
In Premiere, choose File > Export Timeline > ProCoder 3 Wizard Exporter... The
ProCoder Wizard launches.
ProCoder 3
2
In Adobe Premiere, choose the section you want to export to ProCoder. This can be
either the entire project or a section of the project that you want to simply preview.
CHAPTER 3
1
CHAPTER 2
To use the ProCoder Premiere plug-in (ProCoder 3 Wizard Exporter):
CHAPTER 1
If Adobe Premiere is installed on your system, the ProCoder Installation installs the
ProCoder Premiere plug-in, which allows you to export your Premiere timeline directly
to ProCoder for encoding. This means you can take either a complete finished project or
a section of a project for a quick preview and export it directly into ProCoder so it can be
encoded to multiple formats. You can also choose either the ProCoder Full Exporter, which
launches the ProCoder application, or the ProCoder Easy Exporter, which launches the
ProCoder 3 Wizard.
Index
101
ProCoder 3
3
Source selection is skipped since the source is coming from the Premiere timeline.
The rest of the ProCoder Wizard operation is the same as when using it as
standalone application.
To use the ProCoder Premiere plug-in (ProCoder 3 Exporter):
1
2
102
In Adobe Premiere, choose the section you want to export to ProCoder. This can be
either the entire project or a section of the project that you want to simply preview.
In Premiere, choose File > Export Timeline > ProCoder 3 Exporter... ProCoder
launches and the Target tab is enabled.
Advanced Features
CHAPTER 1
n
o
i
t
c
u
d
o
r
t
n
I
CHAPTER 2
n
o
i
t
a
l
l
a
t
s
n
I
ProCoder 3
CHAPTER 3
d
r
a
z
i
W
The Source and Convert tabs are disabled when you use the Premiere plug-in
and the Start button starts the conversion. The rest of the ProCoder application
operation is the same as when using it standalone.
s
t
n
e
t
n
o
C
3
Using ProCoder
CHAPTER 4
Helpful Hints
CHAPTER 5
ProCoder
Reference
CHAPTER 6
Glossary
CHAPTER 7
Index
103
ProCoder 3
EDIUS Plug-in
The ProCoder Installation installs the ProCoder EDIUS plug-in, which allows you to export
your timeline directly from EDIUS version 4 to ProCoder for encoding. This means you
can take either a complete finished project or a section of a project for a quick preview and
drop it into ProCoder so it can be encoded to multiple formats. You can also choose either
the ProCoder 3 Exporter, which launches the ProCoder application, or the ProCoder 3
Wizard Exporter, which launches the ProCoder 3 Wizard.
To use the ProCoder EDIUS plug-in (ProCoder 3 Wizard Exporter):
1
2
3
104
In EDIUS, choose the section you want to export to ProCoder. This can be either the
entire project or a section of the project that you want to simply preview.
In EDIUS, choose the Export to Tape function in the Monitor window, then choose
ProCoder 3 Wizard from the export list. The ProCoder Wizard launches.
Source selection is skipped since the source is coming from the EDIUS timeline.
The rest of the ProCoder Wizard operation is the same as when using it standalone.
Advanced Features
To use the ProCoder EDIUS plug-in (ProCoder 3 Exporter):
n
o
i
t
c
u
d
o
r
t
n
I
In EDIUS, choose the Export to Tape function in the Monitor window, then choose
ProCoder 3 from the export list. ProCoder launches and the Target tab is enabled.
CHAPTER 1
2
In EDIUS, choose the section you want to export to ProCoder. This can be either the
entire project or a section of the project that you want to simply preview.
s
t
n
e
t
n
o
C
1
CHAPTER 2
n
o
i
t
a
l
l
a
t
s
n
I
ProCoder 3
d
r
a
z
i
W
Using ProCoder
CHAPTER 4
Helpful Hints
CHAPTER 5
ProCoder
Reference
CHAPTER 6
Glossary
CHAPTER 7
The Source and Convert tabs are disabled when you use the EDIUS plug-in and the
Start button starts the conversion. The rest of the ProCoder application operation is
the same as when using it standalone.
CHAPTER 3
3
Index
105
ProCoder 3
106
Chapter 5
Helpful Hints
ProCoder 3
1
Maximizing ProCoder performance
While adding more RAM, upgrading to faster CPUs and adding additional CPUs are usually
the best ways to increase ProCoder’s performance, there are a few optimizations that you
can do to increase ProCoder’s speed without hardware upgrades.
Close other tasks
Close any other applications that are running. Any background applications will take
CPU cycles from ProCoder and slow conversion.
Optimize drive speed
Defragmenting the source and target hard drive can significantly increase read and
write speeds. Putting sources and targets on separate physical disks or writing to a
fast network drive will also improve ProCoder’s performance to a certain degree.
Disable automatic scanning applications
Anti-virus software and recycle bin “protection” software can significantly increase
disk and CPU loads. Consider temporarily disabling these types of software while
ProCoder is running.
Use separate source and target drives
Minimize the number of sources read from the same drive and minimize the number
of targets written to the same drive. This will reduce the amount of seeking the drive
needs to do, reducing the amount of delay introduced by disk access.
Disable preview
Disabling the preview can result in faster conversions. While this is usually a very
small speed increase, it can be a measurable amount, especially in longer jobs.
108
Using Filters
Glossary
CHAPTER 7
Index
Use Target filters to apply filters that are useful for certain encoding types, such as
Blur for streaming formats.
ProCoder
Reference
Enhance encoding of specific targets
CHAPTER 6
Use Source filters to apply filters that enhance or improve the source quality, such as
Color Correction.
Helpful Hints
Improve or correct sources
CHAPTER 5
Broadcast formats often have a larger frame than is normally visible. If your output
target is for computer use, it may be helpful to apply the Crop filter to remove the
portions of the frame containing garbage or static (overscan) that are not normally
visible when viewing it on a television.
CHAPTER 4
Cropping unwanted data
Using ProCoder
Why filters are necessary
ProCoder 3
If a filter should always be applied regardless of the Source, it should be applied to
the Target.
CHAPTER 3
Target filters
d
r
a
z
i
W
If a filter is applied only for a particular Source, it should be applied to the Source.
CHAPTER 2
Source filters
CHAPTER 1
ProCoder lets you apply filters on both Sources and Targets. It is important to know where
to apply a filter in order to achieve the best result and keep ProCoder running at optimal
speed.
n
o
i
t
a
l
l
a
t
s
n
I
When to apply filters
n
o
i
t
c
u
d
o
r
t
n
I
Using Filters
s
t
n
e
t
n
o
C
2
Expand/shrink 601 color range
Different video editing systems and encoders use different color ranges to represent
the minimum and maximum values. Use the 601 Correction filters to convert between
0-255 and 16-235 ranges when converting for systems that do not use the same ITU
BT.601 conversion methods.
109
ProCoder 3
3
Improving your Video
Even when using an intelligent tool like ProCoder, sometimes things just don’t seem quite
right. This section illustrates some common video encoding problems and how you can fix
or avoid them.
Video is blocky or appears to break up
> Result
> Original image
The video image appears to break up into different moving blocks. Parts of previous video
may appear in different locations. Notice in the example that elements of the correct video
seem to be mixed with the older video. After some time, the image may recompose itself,
producing a correct image.
Cause: DVD media reading problem
If you are seeing this type of problem after authoring a DVD and playing it back on a
set-top DVD player, it could simply be a difficulty reading the DVD-recordable media.
Try the same disc in a computer-based DVD player. If it plays in the computer without
problems, try a different set-top player or a different brand or type of DVD-recordable
disc. Many set-top players cannot reliably play all DVD-recordable discs.
Cause: Use of seek or trick-play in the player
If you were playing the file and playback was okay until you used the player’s fastforward, rewind or scrubber to reposition the playback location, then it’s probably not
a problem at all. Depending on the format and player, the video may take until the
next keyframe to start displaying properly. Try letting the file play through from start
to end without interrupting it to verify. If the video displays correctly in a straightthrough playback, then the output file is fine.
110
Improving your Video
Cause: Video bitrate too low or not enough keyframes
n
o
i
t
c
u
d
o
r
t
n
I
n
o
i
t
a
l
l
a
t
s
n
I
d
r
a
z
i
W
CHAPTER 4
Helpful Hints
CHAPTER 5
ProCoder
Reference
CHAPTER 6
Glossary
CHAPTER 7
The video appears fuzzy or blurry. When played zoomed, it appears blocky, almost like
viewing something through a frosted glass window.
Using ProCoder
> Original image
ProCoder 3
> Result
CHAPTER 3
Video appears fuzzy or blurry
CHAPTER 2
When using a hardware decoder, such as for MPEG playback, in some cases a video
bitrate that is too high can cause the to image break up. If the video bitrate is at or
near the maximum setting, try reducing it a bit. If it plays on a software-based player
but not on a hardware-based player, this may also be because the bitrate is too high.
s
t
n
e
t
n
o
C
Cause: Video bitrate too high
CHAPTER 1
If the break-up only appears after scene changes, then the video bitrate is too low
to handle the large change in the video. Increase the video bitrate to allow faster
recomposition. Alternatively, if the target format supports keyframing, decrease the
keyframe interval, thus increasing the number of keyframes. Keyframes provide a full
video frame so large changes can be tracked and better compensated for.
Cause: DV playback not set to full quality
Index
If the problem occurs only with Microsoft DV AVI files, the problem may be due to the
Digital Video decode setting being set to Low. When set to Low, DV files are decoded
in low resolution, regardless of what the resolution of the actual file is.
111
ProCoder 3
To fix this problem in Windows Media Player:
1
2
3
4
Open Windows Media Player, and look for the Options selection in the menu (usually
under Tools).
Look for a setting called Digital Video that has a slider with Small at one end
and Large at the other. In Windows Media Player 9, this is found by clicking the
Advanced button in the Performance tab.
Set the slider to Large.
Close all open programs including Windows Media Player, then open the file for
playback again. The file should now play in full resolution.
Cause: Video resolution too low
When stretched to the original size, a low-resolution image will appear blocky. If you
want or need to view the image at the same size as the original, you should increase
the video frame size. In order to preserve quality and avoid similar effects due to too
low a bitrate, the bitrate should be increased when increasing the video resolution.
Cause: Video bitrate too low
Depending on the encoding format, a video bitrate that is too low can also produce
blocky video as shown above. Increase the video bitrate to see if this is the case. If
increasing the bitrate does not help, the video frame size needs to be increased.
112
Improving your Video
Video has halos or blocks near objects
s
t
n
e
t
n
o
C
CHAPTER 1
n
o
i
t
c
u
d
o
r
t
n
I
CHAPTER 2
n
o
i
t
a
l
l
a
t
s
n
I
d
r
a
z
i
W
Glossary
CHAPTER 7
Index
If the video appears to have vertical jitter or flashing horizontal edges, the source
image may have single-field detail. This usually occurs with still images used for
video. ProCoder normally makes the appropriate adjustments to avoid this situation,
but if you still have trouble, try applying an antiflicker or deinterlace filter to your
source before bringing it to ProCoder.
ProCoder
Reference
Cause: Single-field detail in interlaced output
CHAPTER 6
Movement in the video seems to jitter up and down. Moving objects may seem to take two
steps forward then one step back.
Helpful Hints
Video appears to jitter
CHAPTER 5
This type of effect is usually caused by setting the video bitrate too low. Increase the
video bitrate to get a better result. If increasing the video bitrate produces too large
a file, keep the video bitrate the same, but decrease the video frame size. When the
choice is available, choosing Optimize for Quality instead of Optimize for Speed
should also help.
CHAPTER 4
Cause: Video bitrate too low
Using ProCoder
The video appears to have halos around the edges of objects and/or block-like noise
around near objects. There does not seem to be a loss of resolution, just loss of sharpness
and some changes to colors.
ProCoder 3
> Original image
CHAPTER 3
> Result
Cause: Improper source interlacing field order
For interlaced sources, the interlacing mode may not be set correctly. Verify that the
proper interlacing field order is set in the Advanced Source Configuration.
113
ProCoder 3
Cause: Improper target interlacing field order
For interlaced output, the target field order may be incorrect for the playback device.
Check the requirements of the intended playback device to determine the proper
interlacing setting.
Video movement appears jumpy
> Result
> Original image
Movement in the video does not appear smooth – it seems to jump instead of move in a
fluid fashion. Objects in motion seem to jump or “flash” to the next position like a strobe
effect.
Cause: Video frame rate too low
If the video frame rate is too low, motion in the video will not appear smooth.
Increasing the frame rate will help to improve the fluidity of motion but will also
make the file size larger. Generally speaking, a frame rate below 15fps will result in
unsatisfactory playback.
Cause: Streaming connection speed too slow
Users viewing a streaming file that was made for a faster connection speed may
see this type of “snapshots in time” effect. The user need a faster connection to the
streaming server, a progressive download file should be used instead.
Cause: Playback machine too slow
Some formats play with different frame rates depending on the speed of the viewer’s
machine. Try playback on a faster computer to see if it plays better.
114
Improving your Video
Audio and video are out of sync
n
o
i
t
c
u
d
o
r
t
n
I
n
o
i
t
a
l
l
a
t
s
n
I
d
r
a
z
i
W
Helpful Hints
ProCoder
Reference
CHAPTER 6
Glossary
CHAPTER 7
Index
If your problem exists with an authored DVD, it could be a problem with the DVD
authoring. Substandard DVD authoring can also cause audio/video sync problems.
Try reauthoring the DVD with a different DVD authoring application.
CHAPTER 5
Cause: DVD authoring error
CHAPTER 4
If you’re seeing the problem using a set-top DVD player for playback, it could be
a problem with the player itself. Some set-top DVD players have problems with
audio synchronization, especially when the audio is AC3 format. Try a commerciallyproduced DVD in the player and see if it has the same problem. Also try playing your
DVD with a software-based DVD player.
Using ProCoder
Cause: Set-top DVD audio decoder problems
ProCoder 3
If you are playing the video on one device and using a different device for audio,
synchronization is not guaranteed. For example, DV files playing audio from
the PC but using a connected DV camera or converter for video output will be
unsynchronized. This is because there is a slight delay between the DV camera or
converter gets the DV data from the PC and when it outputs the decoded analog
video. Thus, in this situation audio will appear to come slightly before the video.
CHAPTER 3
Cause: Video and audio playing from different devices
CHAPTER 2
If you were playing the file and playback was in-sync until you used the player’s fastforward, rewind or scrubber to reposition the playback location, then it’s probably not
a problem at all. Depending on the format and player, audio/video synchronization
cannot be guaranteed after repositioning the playback point. Try letting the file
play through from start to end without interrupting it to verify. If synchronization is
maintained in a “straight-through” playback, then the problem is trick-play and not the
output file.
CHAPTER 1
Cause: Use of seek or trick-play in the player
s
t
n
e
t
n
o
C
Audio and video do not play in synchronization with each other. For example, a person
talking may show their lips moving, but their speech may not be audible until a second or
two later.
115
ProCoder 3
Video shows strange patterns or blocks
> Result
> Original image
The video shows strange patterns or blocks of different data.
Cause: Corrupt video file
The data of the video file is probably corrupt. Check to see that the source file
does not show the same problem, as any problems in the source will be faithfully
reproduced in the output. If the problem only occurs in the output, try writing the file
to a different drive or directory, or try a different compression format.
116
Improving your Video
Video appears stretched or squashed
s
t
n
e
t
n
o
C
CHAPTER 1
n
o
i
t
c
u
d
o
r
t
n
I
d
r
a
z
i
W
ProCoder
Reference
CHAPTER 6
Glossary
CHAPTER 7
Index
Check the aspect ratio setting in your source file. If it is set incorrectly, ProCoder will
interpret the shape of the video image incorrectly and therefore process it incorrectly.
ProCoder never does anything to stretch or squash the image – widescreen sources
converted to standard screen size will be scaled to fit into the standard width, a
process known as letterboxing, as shown in the image below.
Helpful Hints
Cause: Incorrect source aspect ratio setting
CHAPTER 5
Some media players do not compensate for video with non-square pixels and thus do
not display video in the proper aspect ratio. This is not a problem with the encoding
or ProCoder, it is a problem with the player. Try to find a player that properly
compensates for non-square pixel playback.
CHAPTER 4
Cause: Player does not compensate for pixel and frame aspect ratio
Using ProCoder
If your output is widescreen MPEG-2, then this is not a problem. Some MPEG-2
playback software does not properly size the video playback according to the aspect
ratio set in the MPEG-2 file. Thus, widescreen MPEG-2 files play back squashed.
Authoring a widescreen DVD using this file and playing that DVD on a DVD player will
produce a correct widescreen result.
ProCoder 3
Cause: Widescreen MPEG-2 output
CHAPTER 3
The video appears to be stretched in one direction. Circles now appear as ovals and people
are taller or wider than they should be.
n
o
i
t
a
l
l
a
t
s
n
I
> Original image
CHAPTER 2
> Result
> 4:3 Letterboxed video
117
ProCoder 3
Cannot load encoded MPEG files into DVD
authoring software
Your DVD authoring software does not accept the MPEG files you made with ProCoder.
Cause: File naming problem
Some DVD authoring applications do not recognize the standard .m2p file extension
for MPEG-2 program streams. Instead, they want files named .mp2 or .mpg instead.
Try renaming the output file from .m2p to .mp2 or .mpg and try again.
Cause: Incorrect MPEG-2 file type
Not all DVD authoring applications support MPEG-2 elementary streams (.m2v files
and associated audio files) and MPEG-2 program streams (.m2p files), some will only
accept one or the other. Check your DVD authoring software’s documentation to see
which type it supports and verify that you are creating the correct type with ProCoder.
Cause: Software does not accept MPEG files
Some DVD authoring applications do not accept MPEG files as sources. If this is the
case, you will need to use ProCoder to output a different file type (usually VOB) that
the authoring application will accept or use a different authoring application. Consult
your authoring software’s documentation to find out what file types it accepts.
118
Chapter 6
ProCoder Reference
ProCoder 3
1
Source Options
Most sources contain these options, and they all have the same meanings. Some options
may not appear in certain sources.
Common Source Options
Source
Source File
Displays the name of the source file.
Length
Displays the length of the source in hours:minutes:seconds;frames for drop-frame
timecode and hours:minutes:seconds:frames for non-drop frame timecode.
Video
Select Video Stream
Specifies whether to use the Original Video of the source or not.
Original Video
Use the video in the source.
None
Do not use the video in the source and treat it as an audio-only
stream.
Video Frame Size
Displays the size of the source as width x height in pixels.
Frame Rate (fps)
Displays the number of frames per second of the source.
Video Bitrate (kbps)
For non-fixed bitrate codecs, displays the video bitrate in kilobits-per-second.
Generally, the higher the bitrate, the better the video quality is.
Video Codec
Displays the video codec used to decode the video stream.
120
Source Options
Interlacing
Frames are stored as separate fields with the upper field first.
Aspect Ratio
Audio Stream SourceIf
Alternate Audio is selected for Select Audio Stream, select the file to get audio from
by clicking the ... button. Audio can be retrieved from any supported source type.
Channels
Glossary
Do not use the audio in the source and treat it as a video-only
stream.
CHAPTER 7
None
ProCoder
Reference
Use audio from an alternate file. Select the source for the audio in
the Audio Stream Source field.
CHAPTER 6
Alternate Audio
Helpful Hints
Use the audio in the source.
CHAPTER 5
Original Audio
CHAPTER 4
Selects whether to use the audio from the source (if any), to use alternate audio from
another file or to ignore the source audio entirely.
Using ProCoder
Select Audio Stream
ProCoder 3
Audio
Displays the number of channels in the audio source.
Displays the sampling rate or number of samples per second, of the source in
thousands of samples per second. The reproducible frequency range of encoded
audio depends on the sample rate.
Index
Sample Rate (kHz)
CHAPTER 3
Displays or selects the aspect ratio of the source image, as width x height, width:
height or a width-to-height ratio for the video frame and/or the display pixels.
d
r
a
z
i
W
Upper/Top Field First
n
o
i
t
a
l
l
a
t
s
n
I
Frames are stored as separate fields with the lower field first.
n
o
i
t
c
u
d
o
r
t
n
I
Lower/Bottom Field
First
CHAPTER 2
Entire frames are stored in the stream instead of separate fields.
CHAPTER 1
Non-Interlaced
(Progressive)
s
t
n
e
t
n
o
C
Displays the interlacing mode of the video stream. This option determines how video
frames are read from the video stream. If the Interlacing mode is set improperly, the
video may not play smoothly.
Bits / Sample
Displays the audio sample size for the source in bits per sample. The more bits per
sample, the better the representation of changes in the audio level and the better
the audio quality. The combination of sample rate and bits per sample determine the
overall quality of the audio.
121
ProCoder 3
Audio Bitrate (kbps)
For non-fixed bitrate codecs, displays the audio bitrate in kilobits-per-second.
Generally, the higher the bitrate, the better the audio quality is.
Audio Codec
Displays the audio codec used to decode the source audio.
Notes
Not all sources will include all of the common parameters. Some parameters
are available only in certain cases. Most parameters are read-only and are for
informational purposes only.
AC3 Audio Source
Common Options
See Common Source Options.
AC3-specific options
Audio
Sample Precision
Displays the sample precision (bits).
AC3 Data Rate
Displays the audio bit rate (kbps)
Dynamic Range Compression
Select the Dynamic Range mode.
Dynamic Range Cpmoression is written into AC3 files as metadata, leaving the
responsibility of performing Dynamic Range Compression for the decoder.
Notes
No notes.
122
Source Options
AVI Source
d
r
a
z
i
W
ProCoder
Reference
Glossary
CHAPTER 7
Displays the DV mode.
CHAPTER 6
DV Mode
Helpful Hints
Source
CHAPTER 5
DV-specific options
CHAPTER 4
See Common Source Options.
Using ProCoder
Common Options
ProCoder 3
DV Source
DV Format
Specifies the DV format DV/DVCAM or DVCPRO. If your source does not process
correctly, try changing this setting.
CHAPTER 3
AVI files with odd (not evenly divisible by 2) width or height cannot be imported.
Please use only AVI files with even width and height. To load AVI files with odd width
or height, try using an AviSynth script to crop or matte the AVI to even width and
height, then use the AviSynth script as a source.
CHAPTER 2
Notes
n
o
i
t
a
l
l
a
t
s
n
I
No AVI-specific options exist.
CHAPTER 1
AVI-specific options
n
o
i
t
c
u
d
o
r
t
n
I
See Common Source Options.
s
t
n
e
t
n
o
C
Common Options
Video
For Panasonic 24p DV sources, specifies whether it should be decoded as 23.976fps
progressive or 29.97fps interlaced.
Index
Decoding Mode
Notes
No notes.
Preview playback will still occur at 23.97fps interlaced, even if 29.97fps is selected.
Processing, however, will be performed properly at 29.97fps if it is selected.
123
ProCoder 3
DVD (VIDEO TS.IFO) Source
Common Options
See Common Source Options.
DVD-specific options
Basic Settings
Source File
Displays the name of the source file.
Length
Displays the length of the source in hours:nimutes:seconds;frames for drop-frame
timecode and hours:nimutes:seconds;frames for non-drop-frame timecode.
Title
Displays the number of the titles, chapters and the length.
First Chapter
Specify the first chapter to use as a source.
Last Chapter
Specify the last chapter to use as a source.
Use timestamp
Enable this option to use the timestamps in the stream for setting precise in/out
points.
Video
Angle
Select the Angle ID to use if there is more than one Angle present.
Use Film Decode
Enable this option to ignore the 3-2 pulldown flag in an applicable video stream and
provide 23.976fps output.
Audio
Stream ID
Select the stream ID to use if there is more than one audio stream present.
Stream Type
Displays the stream type of the source audio stream.
Decoder
Select a decoder to use.
124
Source Options
Decoder Properties
Notes
s
t
n
e
t
n
o
C
Click the browse button to open the properties for the selected decoder.
No notes.
d
r
a
z
i
W
Glossary
CHAPTER 7
Closed Caption (line 21) preservation requires setting the Track Mode option to a
specfic video track.
ProCoder
Reference
Flash sources that have odd (not evenly divisible by 2) width or height will be cropped
to even width and height on import.
ProCoder only decodes video from Flash files. It cannot decode the audio.
CHAPTER 6
Notes
Helpful Hints
Select whether to use a particular track or all available tracks.
CHAPTER 5
Track Mode
CHAPTER 4
Video
Using ProCoder
Click the ... button to display the detected movie properties.
n
o
i
t
a
l
l
a
t
s
n
I
Movie Properties
ProCoder 3
Source
CHAPTER 3
Flash-specific options
n
o
i
t
c
u
d
o
r
t
n
I
See Common Source Options.
CHAPTER 2
Common Options
CHAPTER 1
Flash Source
Index
125
ProCoder 3
H.264 Source
Common Options
See Common Source Options.
H.264-specific options
Video
Video Size
Displays the size of the source as width x height in pixels. See Video Frame Size in
Common Source Options.
Field Order
Displays the interlacing mode of the video stream. See Interlacing in Common Source
Options.
Video Compression
Displays the video codec used to decode source video.
Profile
Displays the H.264 profile.
Level
Displays the H.264 level.
Audio
Audio Compression
Displays the audio codec used to decode the source audio.
Sample Precision
Displays the Sample Precision in bits.
Notes
No notes.
126
Source Options
HDV(m2t) Source
Basic Settings
Helpful Hints
ProCoder
Reference
CHAPTER 6
Glossary
CHAPTER 7
Displays the name of the source file.
CHAPTER 5
Source File
CHAPTER 4
Displays the length of the source in hours:nimutes:seconds;frames for drop-frame
timecode and hours:nimutes:seconds;frames for non-drop-frame timecode.
Using ProCoder
Length
ProCoder 3
No notes.
Use timestamp
Enable this option to use timestamp to specify the In/Out positions.
Transport Stream
Stream Type
Displays the type of the stream.
Program Number
Index
A transport stream can have multiple programs. Specify the program ID to decode
here.
CHAPTER 3
Notes
d
r
a
z
i
W
Set this name to affect the target name handling. This setting can be used as a source
file base name (use %s on the target side).
CHAPTER 2
Module Name
n
o
i
t
a
l
l
a
t
s
n
I
Name
CHAPTER 1
HDV(m2t)-specific options
n
o
i
t
c
u
d
o
r
t
n
I
See Common Source Options.
s
t
n
e
t
n
o
C
Common Options
Program/System
Stream Type
Displays the stream type of the multiplex source.
Flags
Displays the list of flags declared in the stream.
Video Stream
Specifies the video stream ID to decode.
127
ProCoder 3
Audio
Stream Type
Displays the stream type of the source audio stream.
Audio Stereo/Mono Mode
Displays the channel type of the audio.
Flags
Lists any flags in the audio stream.
Subpicture Stream
Specifies the subpicture stream ID to decode.
Video
Stream Type
Displays the stream type of the source video.
Video Frame Size
Displays the video frame size.
Use Film Decode
Enables this option to ignore 3-2 pulldown and output 23.976fps/progressive
sequence.
MPEG Aspect ration
Specifies the video/pixel aspect ratio declared in the MPEG stream.
Video Bitrate(kbps)
Displays the video data rate in kilobits per second.
Buffer Size(KB)
Displays the VBV Buffer Size. The playback hardware is required to have the specified
size of buffer for decoding.
Profile@Level
Displays the Profile@Level. The MPEG2 stream is guaranteed to be decoded by the
compliant decoder for the Profile@Level.
Chroma Format
Displays the Chroma Format for the stream.
Notes
No notes.
128
Source Options
MP3 Audio Source
Program/System Stream
Glossary
Enable this option to use the timestamps in the stream for setting precise in/out
points.
CHAPTER 7
Use timestamp
ProCoder
Reference
Basic Settings
CHAPTER 6
Set this name to affect the target name handling. This setting can be used as a source
file base name (use %s on the target side).
Helpful Hints
Module Name
CHAPTER 5
Name
CHAPTER 4
MPEG-specific options
Using ProCoder
See Common Source Options.
ProCoder 3
Common Options
CHAPTER 3
MPEG Source
d
r
a
z
i
W
No notes.
CHAPTER 2
Notes
n
o
i
t
a
l
l
a
t
s
n
I
No MP3-specific options.
CHAPTER 1
MP3-specific options
n
o
i
t
c
u
d
o
r
t
n
I
See Common Source Options.
s
t
n
e
t
n
o
C
Common Options
Stream Type
Flags
Index
Displays the stream type for multiplexed sources.
Lists any flags in the stream.
Video Stream
Select the stream ID to use if there is more than one video stream present.
Audio Stream
Select the stream ID to use if there is more than one audio stream present.
Subpicture Stream
Specifies the subpicture stream ID to decode.
129
ProCoder 3
Video
Stream Type
Displays the stream type of the source video stream.
Display Size
Indicates the intended display size which may be different from the size of the
encoded frame.
Use Film Decode
Enable this option to ignore the 3-2 pulldown flag in an applicable video stream and
provide 23.976fps output.
MPEG Aspect ratio
Displays the intended display aspect ratio of the source.
Video Bitrate (kbps)
Displays the video bitrate and mode of the source.
VBV Buffer Size (KB)
Displays the VBV buffer size of the source in kilobytes.
Profile@Level
Displays the Profile and Level the source is compliant to.
Chroma Format
Displays the chroma format of the source.
Audio
Stream Type
Displays the stream type of the source audio stream.
Audio Stereo/Mono Mode
Displays the channel type of the audio.
Flags
Lists any flags in the audio stream.
130
Source Options
PCM (WAVE) Audio Source
Glossary
Select whether to use a particular track or all available tracks.
CHAPTER 7
Track Mode
ProCoder
Reference
Video
CHAPTER 6
Click the ... button to display the detected movie properties.
Helpful Hints
Movie Properties
CHAPTER 5
Source
CHAPTER 4
QuickTime-specific options
Using ProCoder
See Common Source Options.
ProCoder 3
Common Options
Audio
Track Mode
Select whether to use a particular track or all available tracks.
QuickTime sources that have odd (not evenly divisible by 2) width or height will be
cropped to even width and height on import.
Index
Notes
CHAPTER 3
QuickTime Source
d
r
a
z
i
W
No notes.
CHAPTER 2
Notes
n
o
i
t
a
l
l
a
t
s
n
I
No PCM audio-specific options.
CHAPTER 1
PCM Audio-specific options
n
o
i
t
c
u
d
o
r
t
n
I
See Common Source Options.
s
t
n
e
t
n
o
C
Common Options
Closed Caption (line 21) preservation requires setting this option to a specfic video
track.
131
ProCoder 3
RawDV Source
Common Options
See Common Source Options.
RawDV-specific options
Source
DV Mode
Displays the DV mode.
DV Format
Specifies the DV format - DV/DVCAM or DVCPRO. If your source does not process
correctly, try changing this setting.
Video
Decoding Mode
For Panasonic 24p DV sources, specifies whether it should be decoded as 23.976fps
progressive or 29.97fps interlaced.
Audio
Audio Mode
Displays the audio mode.
Notes
No notes.
Still Image Source
Common Options
See Common Source Options.
Still Image-specific options
Loading Style
Source Path
Displays the place where the source file is stored in full path.
See Common Source Options.
132
Source Options
Multi-Image Files
n
o
i
t
a
l
l
a
t
s
n
I
Click the ... button to display a numbered list of files matching the Wild Card File
Name.
CHAPTER 2
File List
CHAPTER 1
Specify the file naming convention for multiple image files here. Use the standard “?”
to specify any character and “*” to specify any number of characters. For example,
Video1?.jpg will read Video1a.jpg, Video1b.jpg, but not Video10a.jpg while Video*.jpg
will read Video1a.jpg, Video1b.jpg and Video10a.jpg
n
o
i
t
c
u
d
o
r
t
n
I
Wild Card File Name
s
t
n
e
t
n
o
C
Enable this option to load a sequence of images as a video source.
ProCoder 3
d
r
a
z
i
W
ProCoder
Reference
CHAPTER 6
Glossary
CHAPTER 7
Index
FramesPerImage
Helpful Hints
Video
CHAPTER 5
Set the number for the last file to use in the image sequence using the numbering
from the File List. 1 is the first file.
CHAPTER 4
End Point
Using ProCoder
Set the number for the first file to use in the image sequence using the numbering
from the File List. 1 is the first file.
CHAPTER 3
Start Point
Sets the number of frames each image should create. For example, if there are 30
images and FramesPerImage is 4, the source output will be 120 frames.
Notes
Image files with odd (not evenly divisible by 2) width or height cannot be imported.
Please use only image files with even width and height.
Images loaded in a still image sequence must all have the same width and height.
Images that do not have the same width and height as the first image will be skipped
during multi-image import.
133
ProCoder 3
Windows Media Source
Common Options
See Common Source Options.
Windows Media-specific options
Source
Video Streams
In multistream video sources, select which track will be used as the source video for
the encoded file.
Audio
Audio Streams
In multistream audio sources, select which track will be used as the source audio for
the encoded file.
Notes
Windows Media files with odd (not evenly divisible by 2) width or height cannot be
imported. Please use only Windows Media files with even width and height.
To load Windows Media files with odd width or height, try using an AviSynth script
to crop or matte the video to even width and height, then use the AviSynth script as a
source.
If you load a Windows Media file that was encoded with interlaced video, and you
want to read the video as interlaced, you will need to manually set the Interlacing
control to the correct mode (Upper/Lower field first).
134
Target Options
Quality/Size
Index
Click the ... button to bring up the Quality/Size Configuration window. The Quality/
Size Configuration window displays the media requirements for your conversion
parameters and can set the bitrate to an appropriate value based on the number of
media you want to output.
For example, if your target media is a single CD-R (650MB) and your current setting
will output 800 MB, the Number of media will be 2. You can then adjust the Quality
slider until the Number of media reads 1. Alternatively, you can enable the Fill Media
if possible option, then set the number of media to 1. ProCoder will automatically
calculate an appropriate bitrate to fit within the media requirements, if possible.
This option is only available under the following circumstances:
Glossary
Sets the size to split output files at in megabytes. For example, if the max file size is
set to 650 MB and the total output size is 1.5 GB, there will be 3 output files.
CHAPTER 7
Max. File Size for Splitting (MB)
ProCoder
Reference
Sets the time interval to split output files at in minutes. For example, if the interval
time is set to 10 minutes, a 35-minute source will be split into 4 output files.
CHAPTER 6
Interval Time for Splitting (Minutes)
Helpful Hints
Start a new output file when the current output’s file size reaches
the specified maximum size.
CHAPTER 5
Split using max. Size
CHAPTER 4
Split using Time Interval Start a new output file when the current output’s video length
reaches the specified maximum time.
Using ProCoder
Do not automatically split output files.
ProCoder 3
No Splitting
CHAPTER 3
Selects the automatic file-splitting method. Automatic file-splitting can divide output
files into separate files for easier archiving or transport. File-splitting is not related to
multiplexing. File-splitting cannot be used with multi-pass encoding. Not all formats
support file splitting or all options available for file splitting.
d
r
a
z
i
W
Choose Splitting Method
CHAPTER 2
Target File Splitting (Advanced)
n
o
i
t
a
l
l
a
t
s
n
I
Common Target Options
CHAPTER 1
Most targets contain these options and they all have the same meanings. Some options
may not appear in certain targets, may be in different locations or may only appear under
certain circumstances. Certain settings may be disabled when using target presets.
n
o
i
t
c
u
d
o
r
t
n
I
Target Options
s
t
n
e
t
n
o
C
2
135
ProCoder 3
The target supports a user-specified bit rate for encoding.
Split using max. Size is enabled.
There is only a single source or the Stitch function is enabled.
Destination
Base Name
Sets the name of the output file. A few special substitution strings can be used in the
Base Name and ProCoder will replace them with the values during its processing.
Periods are not allowed in the base name.
%s is replaced by the name of the source file (without extension) unless the Stitch
function is used, in which case %s will be replaced by {Stitched Sources}.
%n is replaced by the file-splitting segment number of the output file. If file-splitting is
disabled, %n will be 0.
%% is replaced by a percent-sign (%).
Path
Sets the output location for the target file(s). Click the ... button to set the output
folder.
Use source filename if required
Enable this option to automatically append the source filename to the output filename
when the following is true:
There is more than one source.
The Stitch option is not enabled.
The %s substitution string is not present in the Base Name.
File Name
Displays the output file name or an example if one of the substition strings is used.
136
Target Options
Video
Don’t Use
A video track is not generated, even if the source contains video.
Width
Specifies the width of the output video frame in pixels.
Frames are stored as separate fields with the lower field first.
Upper/Top Field First
Frames are stored as separate fields with the upper field first.
Index
Lower/Bottom Field
First
Glossary
Entire frames are stored in the stream instead of separate fields.
CHAPTER 7
Non-Interlaced
(Progressive)
ProCoder
Reference
For formats the support interlaced output, this option sets the interlacing mode for
the output. This option determines how video frames are stored in the video stream.
If playback hardware or software does not use the same interlacing method, the video
may not play back smoothly.
CHAPTER 6
Interlacing
Helpful Hints
Sets the number of frames per second for the output video. The higher the frame rate,
the smoother motion will appear, but the video requires more bits. A good balance
between video frame rate and video bitrate is the key to high-quality playback.
CHAPTER 5
Frame rate
CHAPTER 4
For non-fixed bitrate codecs, sets the video bitrate in kilobits-per-second. Generally,
the higher the bitrate, the better the video quality is.
Using ProCoder
Video Bitrate (kbps)
ProCoder 3
Specifes the height of the output video frame in pixels.
CHAPTER 3
Height
d
r
a
z
i
W
If the source has video, that video will be output. If the source has
novideo, no video track is generated.
n
o
i
t
a
l
l
a
t
s
n
I
Use if Exist
CHAPTER 2
A video track is always output. If the source has no video, a black
video track is generated.
CHAPTER 1
Use always
n
o
i
t
c
u
d
o
r
t
n
I
Choose how ProCoder will output video for the target.
s
t
n
e
t
n
o
C
Use Video
Aspect Ratio
Sets the aspect ratio of the video image, as width x height, width:height or a widthto-height ratio for the video frame and/or the display pixels. If available, click the ...
button to select either a video frame aspect ratio or a pixel aspect ratio.
137
ProCoder 3
Audio
Use Audio
Selects whether the target will contain an audio track.
Use Always
The target will always contain an audio track, even if the source
does not contain audio.
Use if Exist
The target will contain an audio track if the source contains audio. If
the source does not contain audio, the target will not have an audio
track.
Don’t Use
The target will not have an audio track, even if the source contains
audio.
Channels
Sets the number of channels and if applicable, the channel type for the audio output.
Common options are:
Stereo
Two channels of audio (left/right).
Mono
One channel of audio.
Sample Rate(kHz)
Sets the sampling rate or number of samples per second, of the audio in thousands
of samples per second. The reproducible frequency range of encoded audio depends
on the sample rate.
Bits / Sample
Sets the audio sample size in bits per sample. The more bits per sample, the better
the representation of changes in the audio level and hence the better the audio
quality. The combination of sample rate and bits per sample determine the overall
quality of the audio.
Audio Bitrate (kbps)
For non-fixed bitrate codecs, sets the audio bitrate in kilobits-per-second. Generally,
the higher the bitrate, the better the audio quality is.
Audio Codec
Selects the audio codec used to decode the source audio.
Notes
Not all targets will include all of the common parameters. Some parameters are
available only in certain cases.
138
Target Options
AC3 Audio Target
Sets to dual channel (2 independent channels).
Stereo Recording
Sets to stereo (2 channels - left/right)
Multichannel Recording
Sets to multichannel.
Automatic Gain Control
Glossary
Enable this option to use LFE Filter.
CHAPTER 7
Use LFE Filter
ProCoder
Reference
Enable this option to enable LFE Channel.
CHAPTER 6
LFE On
Helpful Hints
Sets the sampling rate or number of samples per second, of the audio in thousands
of samples per second. The reproducible frequency range of encoded audio depends
on the sample rate.
CHAPTER 5
Audio Sampling Rate
CHAPTER 4
Set the bitrate of the audio data. For non-fixed bitrate codecs, sets the audio bitrate in
kilobits-per-second. Generally, the higher the bitrate, the better the audio quality is.
Using ProCoder
Audio Data Rate
ProCoder 3
Sets to monaural (1 channel).
Dual Recording
CHAPTER 3
Mono Recording
d
r
a
z
i
W
Set the audio coding mode.
CHAPTER 2
Audio Mode
n
o
i
t
a
l
l
a
t
s
n
I
Ac3 Parameters
CHAPTER 1
AC3 Audio-specific options
n
o
i
t
c
u
d
o
r
t
n
I
See Common Target Options.
s
t
n
e
t
n
o
C
Common Options
Enable this option to enable Automatic Gain Control.
Index
Notes
No notes.
139
ProCoder 3
AVI Target
Common Options
See Common Target Options.
AVI-specific options
Video
Video Encoder
Selects the video encoder to use. Some video encoders may expose additional
options.
Color Format
Sets the color format to use for encoding. The appropriate color format normally
depends on your application.
Automatic
ProCoder will select an appropriate color format based on the color
format requested by the codec. Automatic is not always available
as a selection.
RGB24
Uses the 24-bit RGB color representation.
YCbCr
Uses the YCbCr color representation.
Use Default Quality
Enable this option to use the codec’s default quality setting. If this option is enabled,
the Video Quality option will be hidden.
Video Quality
Sets the video quality level for encoding. The higher the video quality, the better the
output will appear but encoding will take longer. If the codec allows specification of
both video quality and bitrate, the combination of both settings will determine the
visual quality of the final output.
Use Default Keyframe Interval
Enable this option to use the codec’s default keyframe interval.In temporal
compression, most frames of video are represented as the change from a previous
frame. Keyframes are full independent video frames in the output. Having more
keyframes generally results in better video quality but creates larger files when bitrate
is not constrained. When bitrate is constrained, more keyframes provides better
random access and higher fault-tolerance, but too many keyframes can reduce video
quality.
140
Target Options
Max keyframe interval
s
t
n
e
t
n
o
C
n
o
i
t
c
u
d
o
r
t
n
I
n
o
i
t
a
l
l
a
t
s
n
I
d
r
a
z
i
W
CHAPTER 4
Helpful Hints
CHAPTER 5
ProCoder
Reference
CHAPTER 6
Glossary
CHAPTER 7
Select the ACM driver to use for audio compression. This option only appears if ACM
codecs... is selected for the Audio Encoder Type.
Using ProCoder
ACM Driver
ProCoder 3
Select the audio encoder to use. DirectShow codecs appear in the drop-down list. To
use older ACM (Video for Windows-compatible) codecs, select ACM codecs... from
the drop-down list and choose the ACM codec in the ACM Driver field.
Format Type
Some ACM drivers support more than one compression algorithm. Select the audio
format to use. This option only appears if ACM codecs... is selected for the Audio
Encoder Type.
Format
If the the audio compressor supports multiple predefined audio formats (sampling
rate, bits / sample, channels), select the desired format here.
Sets the quality level for audio encoding. The higher the quality level, the better the
output will sound but encoding will take longer. If the codec allows specification of
both quality and bitrate, the combination of both settings will determine the audio
quality of the final output.
Index
Quality
CHAPTER 3
Audio Encoder Type
CHAPTER 2
Audio
CHAPTER 1
Sets the maximum keyframe interval. This is the maximum number of frames
between keyframes. Some codecs will still insert additional keyframes if there is a
large change in the video content so keyframes may occur more frequently than the
interval set here.
In temporal compression, most frames of video are represented as the change from
a previous frame. Keyframes are full independent video frames in the output. Having
more keyframes generally results in better video quality but creates larger files when
bitrate is not constrained. When bitrate is constrained, more keyframes provides
better random access and higher fault-tolerance, but too many keyframes can reduce
video quality.
141
ProCoder 3
Multiplexer
A/V interleaving period
AVI files alternate video and audio in chunks. This setting determines the spacing
between the audio chunks with respect to the video. Higher interleaving periods allow
for better bitrate control, but some applications require a specific interleaving period
to maintain audio/video synchronization. In general, it is best to use the default value.
Index Format
The Index Format determines the compatibility of the output file with different AVIcompatible applications.
Non-compatible
(AVI2 only)
The output AVI will only be compatible with DirectShow-based
video applications. Applications that use the older Video for
Windows AVI access methods will not be able to open the AVI.
Compatible(AVI1/AVI2)
The output AVI will be compatible with both DirectShow-based and
Video for Windows-based video applications. However, Video for
Windows-based applications may not be able to access beyond the
first 1, 2 or 4 GB of the AVI content, depending on the application.
To avoid size restriction problems, use ProCoder’s automatic filesplitting function to generate multiple output files within the size
your application supports.
Notes
AVI file output must have even (evenly divisible by 2) width and height.
142
Target Options
DV Target
See Common Target Options.
CHAPTER 1
DV-specific options
n
o
i
t
c
u
d
o
r
t
n
I
Glossary
CHAPTER 7
Index
A/V interleaving period
ProCoder
Reference
The output DV AVI file contains DV video as a vids stream and
DV audio as an auds stream. This type of DV AVI is compatible
with both DirectShow-based and Video for Windows-based video
applications and codecs.
CHAPTER 6
DV Type 2
Helpful Hints
The output DV AVI file contains one DV data stream containing
both video and audio. This type of DV AVI is compatible with
DirectShow-based video applications and codecs only.
CHAPTER 5
DV Type 1
CHAPTER 4
The DV Type determines the structure of the data within the AVI file.
Using ProCoder
DV type
ProCoder 3
The output AVI will only be compatible with DirectShow-based
video applications. Applications that use the older Video for
Windows AVI access methods will not be able to open the AVI.
CHAPTER 3
AVI1 + AVI2 (OpenDML) The output AVI will be compatible with both DirectShow-based and
Video for Windows-based video applications. However, Video for
Windows-based applications may not be able to access beyond the
first 1, 2 or 4 GB of the AVI content, depending on the application.
To avoid size restriction problems, use ProCoder’s automatic filesplitting function to generate multiple output files within the size
your application supports.
d
r
a
z
i
W
The Index Format determines the compatibility of the output file with different AVIcompatible applications.
CHAPTER 2
AVI 1/2 Index Format
n
o
i
t
a
l
l
a
t
s
n
I
Destination
AVI2 (OpenDML)
s
t
n
e
t
n
o
C
Common Options
AVI files alternate video and audio in chunks. This setting determines the spacing
between the audio chunks with respect to the video. Higher interleaving periods allow
for better bitrate control, but some applications require a specific interleaving period
to maintain audio/video synchronization. In general, it is best to use the default value.
143
ProCoder 3
Canopus Reference DV
Enable this option to create a Canopus Reference AVI. Canopus Reference AVI files
are DV Type 2 AVIs and can surpass the AVI filesize limits by creating separate
reference data files. The AVI files points to these data files and accesses the AVI as
if it was one large AVI file. Reference AVI files cannot be moved or renamed without
using special tools such as the Canopus Ref. AVI Manager. This option is only
available when the encoder is set to Canopus DV.
DV Format
Set the DV encoding format here. DV and DVCAM use the same encoding format but
DVCPro25 uses a different method.
DV/DVCAM
Select this option if you require DV or DVCAM format output.
DVCPro25
Select this option if you require DVCPro25 format output.
Profile
Use Profile
Enable this option to use a settings profile. Profiles automatically set certain
parameters.
Select Profile
If Use Profile is selected, choose a profile from the drop-down box.
Video
Encoder
Selects the video encoder to use. Some video encoders may expose additional
options.
Video Standard
The DV format handles NTSC and PAL video differently. Select the appropriate video
standard for your output.
Use Line21
Select the action to take when Closed Caption (Line21) data is present in the source.
Not all sources support Closed Caption data.
Use if Exist
If Closed Caption data exists in the source, include it in the DV output.
Don Use
Closed Caption data is not output, even if the source contains
Closed Caption data...
Notes
The DV specification states that DV data is always Lower/Bottom Field first. However,
ProCoder allows you to change the output setting in order to work with decoders that
do not follow the specification.
144
Target Options
Flash Target
Number of passes
Helpful Hints
ProCoder
Reference
CHAPTER 6
Glossary
CHAPTER 7
Audio
CHAPTER 5
Two-pass VBR performs an analysis pass before the encoding
pass. The analysis pass determines the best bit allocation for the
encoding pass. The actual bitrate varies between the specified
minimum and maximum bitrates. The increases and decreases in
bitrate are balanced to keep the average bitrate to the specified
video bitrate.
CHAPTER 4
2 pass
Using ProCoder
Single-pass VBR encoding varies the bitrate on-the-fly, starting at
the specified bitrate, increasing toward the specified maximum in
complex segments and decreasing toward the specified minimum
in less complex segments. In general, single-pass VBR output will
be as-large or larger than CBR output at the same video bitrate.
ProCoder 3
1 pass
Audio Compression
Specifies the type of the compression used for audio.
Bits/Sample
Index
Specifies the file's audio sample size. The available bits per sample settings depend
on the audio encoder selected.
The number of bits per sample determines how well a particular level can be
represented. More bits per sample allows for better representation of audio changes
in the Source but results in a larger file size.
The combination of sample rate and bits per sample determine the overall quality of
the audio.
CHAPTER 3
For VBR encoding, select 1 pass or 2 pass encoding.
d
r
a
z
i
W
Specifies the type of a file to create.
CHAPTER 2
Multiplexer type
n
o
i
t
a
l
l
a
t
s
n
I
Video
CHAPTER 1
Flash-specific options
n
o
i
t
c
u
d
o
r
t
n
I
See Common Target Options.
s
t
n
e
t
n
o
C
Common Options
145
ProCoder 3
Sample Rate(kHz)
Specifies the number of audio sample per second (in thousands) for the Target. The
reproducible frequency range of the encoded audio depends on the sample rate.
Choosing a higher sample rate produces better sound quality but a larger file size. The
combination of sample rate and bits per sample determine the overall quality of the
audio. The available sample rates depend on the audio encoder selected. The higher
the sample rate, the wider the range of frequencies that can be reproduced. The
maximum reproducible frequency for a given sample rate is one-half the sample rate.
For example, a standard audio CD uses audio that is at 44.1kHz, or 44,100 samples
per second (Hz), which equates to the ability to reproduce sounds up to frequencies
of 22,050 Hz.
Channels
Specifies the number of channels (or channel encoding type) of audio for the Target.
Normally audio is single channel (mono) or stereo (left/right channel), but some audio
codecs allow for different encoding types such as Joint Stereo to store audio in a
more efficient manner. The options listed here depend on the audio codec used most codecs support Mono (1 channel) and Stereo (2 channels).
146
Target Options
H.264 Target
PCR_PID
Index
Video Bitrate(kbps)
Glossary
Two-pass VBR performs an analysis pass before the encoding
pass. The analysis pass determines the best bit allocation for the
encoding pass. The actual bitrate varies between the specified
minimum and maximum bitrates. The increases and decreases in
bitrate are balanced to keep the average bitrate to the specified
video bitrate.
CHAPTER 7
2 pass
ProCoder
Reference
Single-pass VBR encoding varies the bitrate on-the-fly, starting at
the specified bitrate, increasing toward the specified maximum in
complex segments and decreasing toward the specified minimum
in less complex segments. In general, single-pass VBR output will
be as-large or larger than CBR output at the same video bitrate.
CHAPTER 6
1 pass
Helpful Hints
For VBR encoding, select 1 pass or 2 pass encoding.
CHAPTER 5
Number of passes
CHAPTER 4
Choose CBR(Constant Bitrate) or VBR(Variable Bitrate).
Using ProCoder
Bitrate mode
ProCoder 3
Bitrate
CHAPTER 3
Specifies the elementary value for PCR stream. Usually, the application which uses
the transport stream defines the value.
d
r
a
z
i
W
Choose between Raw, video-only H.264 or MPEG2 Transport Stream.
CHAPTER 2
Stream Type
n
o
i
t
a
l
l
a
t
s
n
I
Stream
CHAPTER 1
H.264-specific options
n
o
i
t
c
u
d
o
r
t
n
I
See Common Target Options.
s
t
n
e
t
n
o
C
Common Options
Specifies the video data rate in kilobits per second for this Target. This value will be
the average bitrate in VBR mode.
Maximum bitrate(kbps)
Specifies the maximum bitrate for VBR Target.
H.264 Encoder Settings
Profile
Specifies the Target profile.
147
ProCoder 3
Level
Combines with the profile, the level defines the minimum and maximum values for
the frame size, frame rate, bitrate and other settings.
GOP size
Specifies the size of a Group of Pictures. Set is to 1 to only generated I-frames. The
GOP size must be a multiple of (Number of B-frames plus one).
Number of B-frames
Specifies the number of B-frames between consecutive I and P frames. B-frames are
not allowed when the Baseline profile is selected, or if GOP size is set to 1.
Audio
Audio Compression
Specifies the type of the compression used for audio.
Bits/Sample
Specifies the file's audio sample size. The available bits per sample settings depend
on the audio encoder selected.
The number of bits per sample determines how well a particular level can be
represented. More bits per sample allows for better representation of audio changes
in the Source but results in a larger file size.
The combination of sample rate and bits per sample determine the overall quality of
the audio.
Channels
Specifies the number of channels (or channel encoding type) of audio for the Target.
Normally audio is single channel (mono) or stereo (left/right channel), but some audio
codecs allow for different encoding types such as Joint Stereo to store audio in a
more efficient manner. The options listed here depend on the audio codec used most codecs support Mono (1 channel) and Stereo (2 channels).
Sample Rate(kHz)
Specifies the number of audio sample per second (in thousands) for the Target. The
reproducible frequency range of the encoded audio depends on the sample rate.
Choosing a higher sample rate produces better sound quality but a larger file size. The
combination of sample rate and bits per sample determine the overall quality of the
audio. The available sample rates depend on the audio encoder selected. The higher the
sample rate, the wider the range of frequencies that can be reproduced. The maximum
reproducible frequency for a given sample rate is one-half the sample rate. For example,
a standard audio CD uses audio that is at 44.1kHz, or 44,100 samples per second (Hz),
which equates to the ability to reproduce sounds up to frequencies of 22,050 Hz.
148
Target Options
HDV Target
HDV Format
Displays the size of the frame as width x height in pixels.
ProCoder
Reference
Glossary
CHAPTER 7
Channels
CHAPTER 6
Audio
Helpful Hints
Determines the profile andlevel compliance of the HDV output. The profile and level
impose restrictions on various parameters in order to guarantee compatibility with
MPEG hardware devices.
CHAPTER 5
Profile / Level
CHAPTER 4
Displays the frame rate used for playback time.
Using ProCoder
Playback Frame Rate
ProCoder 3
Frame Size
Displays the channel mode.
Notes
No notes.
CHAPTER 3
Specifies the detailed format for the selected mode.
d
r
a
z
i
W
Specifies the HDV mode. Mode-1 is progressive, and Mode-2 is interlace.
CHAPTER 2
HDV Mode
n
o
i
t
a
l
l
a
t
s
n
I
Video
CHAPTER 1
HDV-specific options
n
o
i
t
c
u
d
o
r
t
n
I
See Common Target Options.
s
t
n
e
t
n
o
C
Common Options
Index
149
ProCoder 3
MP3 Audio Target
Common Options
See Common Target Options.
MP3 Audio-specific options
Audio
Channels
Displays the channel mode.
Bitrate Type
Select the bitrate control type here.
CBR(Constant Bitrate)
Encodes using a constant average bitrate. Quality may vary
depending on the complexity of the source.
VBR(Variable Bitrate)
Encodes using variable bitrate. The specified audio bitrate defines
the base or average bitrate.
Audio Quality
Sets the encoding quality level here. The higher the quality, the slower the encoding
process.
Quality/Speed
The Quality/Speed setting determines the quality vs speed trade-off the encoder uses.
Highest Quality
Optimize encoding for the highest quality.
High Quality
Balance encoding speed versus quality.
High Speed
Optimize encoding for the highest speed.
Copyright
Enable this option to indicate the audio is copyrighted. The flag is informational.
Original Flag
Enable this option to indicate the audio is an original work. The flag is informational.
Notes
MP3 does not stand for MPEG-3, it stands for MPEG-1 Layer III audio. There is no
MPEG-3 format specification.
150
Target Options
MPEG Target
d
r
a
z
i
W
Glossary
Stream
CHAPTER 7
Sets the chapter interval in minutes. For example, if the chapter interval is set to 5, a
13-minute source will have 3 chapter points set at the start, 5 minutes and 10 minutes.
This option is only available when the Stream Format is set to DVD (VOB Files).
ProCoder
Reference
Chapter Interval (mins.)
CHAPTER 6
No chapter points are set.
Helpful Hints
No Chapter Point
CHAPTER 5
Sets a chapter point at the specified chapter interval.
CHAPTER 4
Periodic
Using ProCoder
Sets the chapter creation method. This option is only available when the Stream
Format is set to DVD(VOB Files).
ProCoder 3
Chapter Method
Stream Format
Video CD
Create VideoCD (VCD) compliant output.
SVCD
Create Super VideoCD (SVCD) compliant output.
DVD(MPEG Program/
Elementary Stream)
Create DVD compliant output for authoring.
DVD (VOB Files)
Create DVD VOB compliant output for burning directly to DVD.
HDV HD-1 Mode
Create HDV compliant output compatible with JVC’s GR-HD1 and
JY-HD10 HD camcorders.
Generic ISO MPEG
stream
Create a generic ISO compliant MPEG output.
Index
The Stream Format specifies the type of MPEG stream to output. Different stream
types have different constraints.
CHAPTER 3
Enable this option to use marker points as chapter points when ProCoder is launched
from an editing application. If this is option enabled, marker points from the
application providing data to ProCoder will be used for chapter point creation instead
of the specified Chapter Method. If this option is disabled, or no marker points are
received from the application providing data, chapter points will be created following
the specified Chapter Method. This option is only available when the Stream Format
is set to DVD (VOB Files).
CHAPTER 2
Use Marker Point if exist
n
o
i
t
a
l
l
a
t
s
n
I
Video-VOB Output
CHAPTER 1
MPEG-specific options
n
o
i
t
c
u
d
o
r
t
n
I
See Common Target Options.
s
t
n
e
t
n
o
C
Common Options
151
ProCoder 3
Stream Type
Select the stream type depending on your application requirements. Available stream
types depend on the selected Stream Format.
MPEG-1 System Stream
Output as a multiplexed stream with audio and video.
MPEG-2 Program
Stream
Output as a multiplexed stream with audio and video.
MPEG-1 Elementary
Stream
Output as separate audio and video elementary streams.
MPEG-2 Elementary
Stream
Output as separate audio and video elementary streams.
MPEG-2 Transport
Stream
Output as a multiplexed transport stream with audio and video.
Video
Video Standard
MPEG files for broadcast handle NTSC and PAL formats differently. Set the Video
Standard here. This option also affects which frame sizes are available.
Quality/Speed
The Quality/Speed setting determines the quality vs speed trade-off the encoder uses.
High Speed
Optimize encoding for the highest speed.
High Quality
Balance encoding speed versus quality.
Highest Quality
Optimize encoding for the highest quality.
Mastering Quality
Perform all encoding optimizations to produce the absolute
best quality at the specified bitrate setting without regard to
encoding speed. This option should not be used for performance
benchmarking as it is an exhaustive process that can take 10-20
times longer than the other modes.
Bitrate Type
Select the bit rate control type here. The available rate control types depend on the
selected Stream Format.
152
CQ (Constant Quality)
Encodes to achieve constant quality, varying bitrate up to the
specified maximum.
VBR (Variable Bitrate)
Encodes using variable bitrate. The specified video bitrate defines
the base or average bitrate.
CBR (Constant Bitrate)
Encodes using a constant average bitrate. Quality may vary
depending on the complexity of the source footage.
Target Options
Number of passes
n
o
i
t
a
l
l
a
t
s
n
I
d
r
a
z
i
W
Profile/Level
Index
Valid only in 1-pass VBR mode. The output file size is at most [average bitrate] *
[duration] + [ExpenseReservoir Buffer Size].
Glossary
Expense Buffer Size(KB)
CHAPTER 7
Valid only in 1-pass VBR mode. The output file size is at least [average bitrate] *
[duration] [Reservoir Buffer Size].
ProCoder
Reference
Reservoir Buffer Size (KB)
CHAPTER 6
The Quantization Level determines the picture quality for CQ encoding. Higher
quantization levels provide better picture quality but require more bits to encode.
Helpful Hints
Quantization Level
CHAPTER 5
Specifies the minimum bitrate in thousands of bits per second for non-CBR encoding.
The encoded bitrate will not drop below the minimum bitrate.
CHAPTER 4
Min Bitrate(kbps)
Using ProCoder
Specifies the maximum bitrate in thousands of bits per second for non-CBR encoding.
The encoded bitrate will not exceed the maximum bitrate.
n
o
i
t
c
u
d
o
r
t
n
I
Max Bitrate(kbps)
ProCoder 3
Two-pass VBR performs an analysis pass before the encoding
pass. The analysis pass determines the best bit allocation for the
encoding pass. The actual bitrate varies between the specified
minimum and maximum bitrates. The increases and decreases in
bitrate are balanced to keep the average bitrate to the specified
video bitrate.
CHAPTER 3
2 pass
CHAPTER 2
Single-pass VBR encoding varies the bitrate on-the-fly, starting at
the specified bitrate, increasing toward the specified maximum in
complex segments and decreasing toward the specified minimum
in less complex segments. In general, single-pass VBR output will
be as-large or larger than CBR output at the same video bitrate.
CHAPTER 1
1 pass
s
t
n
e
t
n
o
C
For VBR encoding, select 1 pass or 2 pass encoding.
Determines the profile and level compliance of the MPEG output. The profile and level
impose restrictions on various parameters in order to guarantee compatibility with
MPEG hardware devices.
Put Sequence Headers on each GOP
Enable this option to add sequence headers at each GOP. Some applications require
sequence headers at every GOP.
153
ProCoder 3
Aspect Ratio Code
The Aspect Ratio Code tells the decoder what the intended display frame size is.
VBV Buffer Size (KB)
Specifies the video buffer verifier size in kilobytes. This is used by the encoder to
ensure the stream can be properly decoded by hardware players.
Max GOP size
Sets the maximum GOP (Group Of Pictures) size. Larger GOPs provide better
compression while smaller GOPs provide faster access.
GOP Structure
Specifies the maximum distance between I and P frames, which determines the GOP
(Group Of Pictures) structure.
Automatic
Sets the GOP structure automatically based on the content.
I-Frame only
Creates output without P and B frames.
1 frame (IPPP ...)
Creates output with a maximum of 1 frame from I to P frames.
2 frames (IBPBPBP...)
Creates output with a maximum of 2 frames from I to P frames.
3 frames (IBBPBBP...)
Creates output with a maximum of 3 frames from I to P frames. This
is the standard for DVD-compliant MPEG streams.
Enable Scene Detection
When scene detection is enabled, the encoder distributes the available bandwidth
better by splitting GOP over scene changes. For best quality, it is recommended to
keep this option enabled.
Picture Structure
The compression process can compress interlaced fields separately or combined as a
frame to improve efficiency. This option sets the picture structure for the compression
process. This is does not affect the interlacing mode of the output.
Always Field
Always compress interlaced fields separately. This option should be
avoided except in special circumstances.
Always Frame
Always compress interlaced fields together as frames. This method
is compatible with all known DVD players.
Automatic
Selects the optimal mode for each frame. The output may not play
correctly in all players.
Use Closed GOP
Enable this option to encode closed GOPs. Closed GOPs do not allow prediction
between frames at the ends of GOPs. Some DVD-authoring software requires Closed
GOPs, as does multi-angle DVD content.
154
Target Options
Chroma Format
s
t
n
e
t
n
o
C
For profiles and levels that support multiple color sampling formats, select the desired
format here.
Intra DC Precision
n
o
i
t
a
l
l
a
t
s
n
I
d
r
a
z
i
W
Enable this option to indicate the audio is copyrighted. The flag is informational.
Index
Copyright Flag
n
o
i
t
c
u
d
o
r
t
n
I
Enable this option to add CRC error checking data into the audio stream. Some
applications require error checking data.
Glossary
Error Protection
CHAPTER 7
Select the audio stream type here. Elementary streams and VOB file output support
both MPEG audio and PCM audio.
ProCoder
Reference
Audio Stream Type
CHAPTER 6
Audio
Helpful Hints
Enable this option to put the system header on every pack.
CHAPTER 5
Put the system header on every pack
CHAPTER 4
System
Using ProCoder
Enable this option to add extra checks to ensure the stream is compatible with certain
PAL DVD players. It is recommended to leave this box checked.
ProCoder 3
Create DVD Compatible Stream
CHAPTER 3
Enable this option to use strict bitrate control in each GOP. Some applications require
that the GOP bitrate does not fall below the minimum. With this option enabled,
padding bits will be inserted into the GOPs if necessary to adhere to the minimum
rate.
CHAPTER 2
Use Strict GOP bitrate control
CHAPTER 1
The DC Precision determines how many bits are used for the coefficients of the
Discrete Cosine Transform function. If you have very complex footage, increaseing
the number of bits can help improve the video quality...
Original Flag
Enable this option to indicate the audio is an original work. The flag is informational.
155
ProCoder 3
Emphasis
Select whether the audio was recorded with emphasis. This is used by the decoder to
restore the audio to its original sound. Emphasis was frequently used for phonodisc
recordings.
None
The audio was not recorded with emphasis and no de-emphasis is
required on playback.
50/15
The audio was recorded with 50/15 emphasis and de-emphasis is
required on playback.
CCITT.J17
The audio was recorded with CCITT.J17 emphasis and de-emphasis
is required on playback.
Notes
MPEG output must have a width that is an even multiple of 16 and a height that is an
even multiple of 8.
PCM Audio Target
Common Options
See Common Target Options.
PCM Audio-specific options
Audio
Output wave files for each channel
Enable this option to get multiple wave files for each channel.
Notes
The PCM Audio exporter writes uncompressed PCM audio WAV files.
156
Target Options
Poster Frame (Still Image) Target
Numbering Schema
Set vertical video resolution.
Use Chapter Marks
Certain formats (such as DVD's/VOB's) have Chapter Marks. If the engine can extract
those, poster frames will be created at each mark.
Interval
Glossary
Video SizeY
CHAPTER 7
Set horizontal video resolution.
ProCoder
Reference
Video SizeX
CHAPTER 6
Video
Helpful Hints
Saves images as Image_hh_mm_ss_ff
CHAPTER 5
Frame Time Code
CHAPTER 4
Appends the number of the Video Frame in the source *Image_23,
Image_2890,...
Using ProCoder
Stores Image_0, Image_1,...
Frame Nr
ProCoder 3
Sequential Number
Set the intervals for Poster Frames in Seconds.
The actual Poster Frame will be extracted N frames after its occurance.
Use this to avoid black frames at chapter marks.
Index
Frame Offset
CHAPTER 3
Choose how your file names are modified to store image sequences.
d
r
a
z
i
W
Select the file type to export.
CHAPTER 2
File Type
n
o
i
t
a
l
l
a
t
s
n
I
Destination
CHAPTER 1
Poster frame-specific options
n
o
i
t
c
u
d
o
r
t
n
I
See Common Target Options.
s
t
n
e
t
n
o
C
Common Options
Notes
No notes.
157
ProCoder 3
Preview DVD Target
Common Options
See Common Target Options.
Preview DVD-specific options
Stream Settings
Format
Specifies the file format of the target DVD.
Video-Basic
Frame Size
Specifies the frame size of the target DVD.
Quality/Speed
The Quality/Speed setting determines the quality vs speed trade-off the encoder uses.
High Speed
Optimize encoding for the highest speed.
High Quality
Balance encoding speed versus quality.
Highest Quality
Optimize encoding for the highest quality.
Mastering Quality
Perform all encoding optimizations to produce the absolute
best quality at the specified bitrate setting without regard to
encoding speed. This option should not be used for performance
benchmarking as it is an exhaustive process that can take 10-20
times longer than the other modes.
Max GOP size
Sets the maximum GOP (Group Of Pictures) size. Larger GOPs provide better
compression while smaller GOPs provide faster access.
GOP Structure
Specifies the maximum distance between I and P frames, which determines the GOP
(Group Of Pictures) structure.
158
Automatic
Sets the GOP structure automatically based on the content.
I-Frame only
Creates output without P and B frames.
1 frame (IPPP ...)
Creates output with a maximum of 1 frame from I to P frames.
2 frames (IBPBPBP...)
Creates output with a maximum of 2 frames from I to P frames.
3 frames (IBBPBBP...)
Creates output with a maximum of 3 frames from I to P frames. This
is the standard for DVDcompliant MPEG streams.
Target Options
Use Closed GOP
n
o
i
t
a
l
l
a
t
s
n
I
d
r
a
z
i
W
Helpful Hints
ProCoder
Reference
CHAPTER 6
Glossary
CHAPTER 7
Specifies the audio type.
CHAPTER 5
Audio Type
CHAPTER 4
Audio-Basic
Using ProCoder
The DC Precision determines how many bits are used for the coefficients of the
Discrete Cosine Transform function. If you have very complex footage, increasing the
number of bits can help improve the video quality...
ProCoder 3
Intra DC Precision
CHAPTER 3
Enable this option to use strict bitrate control in each GOP. Some applications require
that the GOP bitrate does not fall below the minimum. With this option enabled,
padding bits will be inserted into the GOPs if necessary to adhere to the minimum
rate.
n
o
i
t
c
u
d
o
r
t
n
I
Use Strict GOP bitrate control
CHAPTER 2
When scene detection is enabled, the encoder distributes the available bandwidth
better by splitting GOP over scene changes. For best quality, it is recommended to
keep this option enabled.
CHAPTER 1
Disable Scene Detection
s
t
n
e
t
n
o
C
Enable this option to encode closed GOPs. Closed GOPs do not allow prediction
between frames at the ends of GOPs. Some DVD-authoring software requires Closed
GOPs, as does multi-angle DVD content.
Index
159
ProCoder 3
QuickTime Export Target
Common Options
See Common Target Options.
QuickTime Export-specific options
Destination
Select Exporter
Select a QuickTime Exporter from the drop-down list. Additional exporters may be
available with updates to QuickTime.
3GPP
Export a 3GPP video file.
AIFF
Export an AIFF audio file.
FLC
Export an AutoDesk Animator animation file.
QuickTime Movie
Export a QuickTime movie file.
uLaw
Export a uLaw audio file.
AVI
Export an AVI file using QuickTime codecs.
Wave
Export a WAV audio file.
DV Stream
Export a DV stream file.
Image Sequence
Export an image sequence.
MPEG-4
Export an MPEG-4 file.
Exporter Settings
Click the ... button to access the QuickTime Exporter settings. The options in the
QuickTime Exporter settings come from QuickTime itself and vary depending on the
selected exporter. Available encoders for the QuickTime exporter depend on the
installed QuickTime codecs.
Notes
ProCoder cannot verify output file names from the Image Sequence exporter. This
means the Image Sequence exporter will automatically overwrite any existing files
that have the same file name as the project being encoded. To avoid confusion, make
sure all Image Sequence outputs use different file names and remove any similarly
named files from the output location before performing conversion.
The name.img filename is used as a placeholder and is not written.
Also, the output file shown by ProCoder does not represent the actual file(s) written
when using the Image Sequence exporter. Please check the output folder to see the
files that have been written.
160
Target Options
QuickTime Target
Video
Frame Rate Type
Glossary
Click the ... button to access the Hint Exporter Settings. This option is only available if
Hinted Streaming is selected as the Streaming Mode.
CHAPTER 7
Settings
ProCoder
Reference
Sets the output for hinted streaming playback. This is the best
choice for playback from a streaming server.
CHAPTER 6
Hinted Streaming
Helpful Hints
Sets the output so playback can begin before the download is
complete. This is a good choice for files being delivered via HTTP
that do not contain hint tracks. Files of this type cannot be used by
a streaming server.
CHAPTER 5
Fast Start-Compressed
Header
CHAPTER 4
Sets the output so playback can begin before the download is
complete. This a good choice for files being delivered via HTTP.
Using ProCoder
Fast Start
ProCoder 3
The output is not intended for streaming. If requested for streaming
playback, the file will need to be downloaded before playback can
begin.
Select the type of frame rate to use for encoding.
Sets a fixed frame rate for encoding.
FrameRate Flexible
Allows variation of the frame rate to optimize encoding.
Max FrameRate
Specifies a limit to the maximum frame rate which leaves more bits
available for each frame.
Index
FrameRate Fixed
CHAPTER 3
No Internet streaming
d
r
a
z
i
W
Select a Streaming Mode from the drop-down list. The Streaming Mode determines
how the QuickTime file will be handled when it is requested for streaming playback.
CHAPTER 2
Streaming Mode
n
o
i
t
a
l
l
a
t
s
n
I
Internet-Streaming
CHAPTER 1
QuickTime-specific options
n
o
i
t
c
u
d
o
r
t
n
I
See Common Target Options.
s
t
n
e
t
n
o
C
Common Options
Encoder
Select the encoder for QuickTime to use from the drop-down list. Any additional
QuickTime codecs that are installed on the system will appear in addition to the
default codecs that are installed with QuickTime.
161
ProCoder 3
Codec Options
Click the ... button to access the codec options for the selected codec. Not all codecs
have options and some do not have modifiable parameters.
Bits / Pixel
Select the number of colors to reproduce in the output from the drop-down list. The
number of bits per pixel, also called the color depth determines the number of colors
that can be simultaneously reproduced. More bits per pixel allow for representation of
more colors. Some encoders only support certain color depths. The common options
are:
256 Colors (8 bits per
pixel)
Up to 256 colors can be represented. This color depth is useful for
animations and other content with flat colors and little gradation.
32,768 Colors (16 bits
per pixel)
Up to 32,768 colors can be represented. This is a good trade-off
between reproduction of color gradation and file size.
Millions of Colors (24
bits per pixel)
Up to 16.7 million colors can be represented. Most photographic
image formats use 24 bits per pixel. This is often refered to as True
Color.
Millions of Colors (32
bits per pixel)
Up to 16.7 million colors can be represented along with a 256-level
transparency value.
256 Grays (8 bits per
pixel)
Up to 256 shades of gray can be represented. This is fine for video
that does not require color.
Spatial Quality
Determines the spatial compression for each frame in terms of the video quality.
Least provides the highest amount of compression but poorer image quality. Spatal
compression reduces the information size of each frame by eliminating redundant
information and/or discarding information. Best provides the least amount of
compression but results in larger output size.
Temporal Quality
Determines the temporal compression for successive frames in terms of the video
quality. Temporal compression eliminates redundant information from one frame to
the next. Least provides the highest amount of temporal compression but has poorer
image quality. Best provides the least amount of compression but results in larger
output size.
User define “key frame”
Enable this option to manually set the number of frames per keyframe instead of
letting the compressor determine the optimal keyframe interval.
162
Target Options
Frames / Keyframe
s
t
n
e
t
n
o
C
n
o
i
t
c
u
d
o
r
t
n
I
n
o
i
t
a
l
l
a
t
s
n
I
d
r
a
z
i
W
Helpful Hints
CHAPTER 5
ProCoder
Reference
CHAPTER 6
Glossary
CHAPTER 7
ProCoder uses a precise NTSC frame rate (29.97002997... fps) which is based on the
industry-standard rate/scale information of 30000/1001.However, some video editing
applications such as versions of Adobe Premiere prior to 6.5 do not properly import
files with precise Rate/Scale information. Instead, these applications expect files with
an incorrect rate/scale of 2997/100.
Only disable this option if your editing requires an incorrect rate/scale or you are
using Adobe Premiere versions prior to 6.5.
CHAPTER 4
Use Precise NTSC Scale
Using ProCoder
Set the maximum data rate for the stream, in thousands of bits per second.
ProCoder 3
Max. Data Rate(kbps)
Use Line21
Select the action to take when Closed Caption (Line21) data is present in the source.
Not all sources support Closed Caption data.
If Closed Caption data exists in the source, include it in the DV
output.
Don Use
Closed Caption data is not output, even if the source contains
Closed Caption data...
Index
Use if Exist
CHAPTER 3
Enable this option to set a limit to the data rate of the output. This is useful for
applications that have fixed bandwidth, like video being read from CD.
CHAPTER 2
User define “Limit Data Rate”
CHAPTER 1
Sets the number of frames per keyframe. For example, a setting of 10 would generate
3 keyframes in a 30-frame source.
In temporal compression, most frames of video are represented as the change from
a previous frame. Keyframes are full independent video frames in the output. Having
more keyframes generally results in better video quality but creates larger files when
bitrate is not constrained. When bitrate is constrained, more keyframes provides
better random access and higher fault-tolerance, but too many keyframes can reduce
video quality.
Audio
Encoder
Select the audio encoder to use from the drop-down list.
Codec Options
Click the ... button to access the codec options for the selected codec. Not all codecs
have options and some do not have modifiable parameters.
163
ProCoder 3
Attributes
Title
Enter the title of the file. This value is added to the file’s metadata and may be used
by content management systems or shown by during playback.
Author
Enter the author of the file. This value is added to the file’s metadata and may be used
by content management systems or shown by during playback.
Copyright
Enter the copyright information for the file. This value is added to the file’s metadata
and may be used by content management systems or shown by during playback.
Keywords
Enter keywords for the file. This value is added to the file’s metadata and may be used
by content management systems or shown by during playback.
Description
Enter a description of the file. This value is added to the file’s metadata and may be
used by content management systems or shown by during playback.
Time Code
Add Time Code Track
Enable this option to add a time code track to the file.
Display Time Code Mode
If Add Time Code Track is enabled, select the time code display mode here. This
option is only available if the Frame Rate Type is set to FrameRate Fixed. QuickTime
generates the timecode display from the file information during playback.
Do not display time code Time code is not displayed on the video.
Display inside of video
frame (top)
Time code is displayed within the video frame, over the video at the
top of the frame.
Display inside of video
frame (bottom)
Time code is displayed within the video frame, over the video at the
bottom of the frame.
Display outside of video
frame (bottom)
Time code is displayed outside the video frame beneath the bottom
of the video frame.
Notes
Available encoders for the QuickTime exporter depend on the installed QuickTime
codecs.
164
Target Options
Raw DV Target
Uses 50Mbit per second data rate.
DV25
Uses 25Mbit per second data rate.
Use Line21
Select the action to take when Closed Caption (Line21) data is present in the source.
Not all sources support Closed Caption data.
If Closed Caption data exists in the source, include it in the DV
output.
Dont Use
Closed Caption data is not output, even if the source contains
Closed Caption data...
Audio
Index
Use if Exist
Glossary
The DV format handles NTSC and PAL video differently. Select the appropriate video
standard for your output.
CHAPTER 7
Video Standard
ProCoder
Reference
Video
CHAPTER 6
Select this option if you require DVCPro25 format output.
Helpful Hints
DVCPro25
CHAPTER 5
Select this option if you require DV or DVCAM format output.
CHAPTER 4
DV/DVCAM
Using ProCoder
Set the DV encoding format here. DV and DVCAM use the same encoding format but
DVCPro25 uses a different method.
ProCoder 3
DV Format
CHAPTER 3
DV50
d
r
a
z
i
W
Specify the data bitrate to use.
CHAPTER 2
DV Standard
n
o
i
t
a
l
l
a
t
s
n
I
Destination
CHAPTER 1
RawDV-specific options
n
o
i
t
c
u
d
o
r
t
n
I
See Common Target Options.
s
t
n
e
t
n
o
C
Common Options
Audio Locked Mode
When locked audio mode is enabled, the number of audio samples per video frame
follows a constant size pattern and the audio clock is precisely synchronized with
the video. Locked audio ensures proper audio/video synchronization throughout the
output since the number of audio samples per frame is always correct and there is no
possibility of too many or too few audio samples.
165
ProCoder 3
Notes
The DV specification states that DV data is always Lower/Bottom Field first. However,
ProCoder allows you to change the output setting in order to work with decoders that
do not follow the specification.
RealMedia Target
Common Options
See Common Target Options.
RealMedia-specific options
Destination
2-Pass Encoding
Enable this option to perform 2-Pass Encoding. This generates higher-quality video
performing an analysis pass to determine bit allocation before performing the
encoding. 2-Pass Encoding cannot be used in conjunction with ProCoder’s automatic
file-splitting.
File Type
Select the file type to export.
RealMedia
Exports RealMedia which contains audio and video.
RealAudio
Exports RealAudio which contains audio only.
Video
Encoder
Select the encoder to use from the drop-down list.
Video Mode
Select an option to optimize the encoding for the desired result.
166
Normal
Optimize for normal video.
Smoothest Motion
Optimize to provide the smoothest motion.
Sharpest Image
Optimize to provide the sharpest image.
Slideshow
Optimize for slideshow presentation.
Target Options
Audio
Music
Selct this option if the source contains music or other non-voice
sounds.
Profile
Click the ... button to show the Video Profiles Quick-Selection dialog. You can select
one or more streams from the dialog.
CHAPTER 2
Profile Selection
n
o
i
t
a
l
l
a
t
s
n
I
Select this option if the source is mostly voice.
CHAPTER 1
Voice
n
o
i
t
c
u
d
o
r
t
n
I
Select the type of audio to encode for.
s
t
n
e
t
n
o
C
Audio Type
ProCoder 3
d
r
a
z
i
W
Using ProCoder
CHAPTER 4
Helpful Hints
CHAPTER 5
ProCoder
Reference
CHAPTER 6
Glossary
CHAPTER 7
Index
If more than one profile is selected, select the profile to view or modify from the dropdown list. The Profile-Stream, Profile-Video and Profile-Audio sections will change to
reflect the active profile.
CHAPTER 3
Active Profiles
Use default settings
Disable this option to customize the settings for the active profile.
Profile-Stream
Avg. Bitrate (kbps)
Set the average bitrate for the stream in kilobits per second. Higher bitrates provide
better quality but create larger files.
167
ProCoder 3
Max. Bitrate (kbps)
Set the maximum bitrate for the stream in kilobits per second. Higher bitrates provide
better quality but create larger files. This option is only available if VBR encoding is
selected.
Profile-Video
Max. Frame Rate (fps)
Specify the maximum frame rate for the output. The encoder will attempt to maintain
this frame rate, but the rate may be reduced when scenes are complex.
VBR Encoding
Select the encoding type here. VBR encoding methods cannot be used if more than
one profile is enabled.
CBR
Selects constant bitrate encoding. The bitrate will correspond to the
Avg. Bitrate setting.
VBR
Average Bit Rate Selects varible bitrate encoding maintaining the
average bit rate. The video quality may vary as the encoding rate
varies, but the average bit rate will correspond to the Avg. Bitrate
setting.
VBR
Video Quality Selects variable bitrate encoding maintaining the
video quality. The average bit rate is ignored but the encoding rate
will not exceed the Max. Bitrate setting.
VBR Quality
The VBR Quality setting determines the quality of video when the VBR Encoding type
is set to VBR Video Quality mode. Higher values specify better video quality. A value
of 100 will attempt to achieve a near-perfect reproduction of the source. The specified
quality level may not be achieved depending on the specified frame size and frame
rate.
Use Loss Protection
Enable this option to use Loss Protection. Loss Protection provides better video
quality for less-reliable connections but sacrifices effective bandwidth.
Seconds / Keyframe
Specifies the keyframe interval in terms of the number of seconds per keyframe. For
example, if set to 10, a 30-second source will have 3 keyframes. More keyframes
generally results in better video quality but creates larger files.
Startup Latency (sec)
Sets the amount of time allowed before playback must start. A larger latency
increases picture quality but takes more time to start playback.
168
Target Options
Profile-Audio
Select the audio encoder to use from the drop-down list.
s
t
n
e
t
n
o
C
Encoder
d
r
a
z
i
W
Glossary
CHAPTER 7
Use the Profile Selection option to configure individual streams of a multi-stream
RealMedia target.
ProCoder
Reference
Notes
CHAPTER 6
Enter a description of the file. This value is added to the file’s metadata and may be
used by content management systems or shown by during playback.
Helpful Hints
Description
CHAPTER 5
Enter keywords for the file. This value is added to the file’s metadata and may be used
by content management systems or shown by during playback.
CHAPTER 4
Keywords
Using ProCoder
Enter the copyright information for the file. This value is added to the file’s metadata
and may be used by content management systems or shown by during playback.
ProCoder 3
Copyright
CHAPTER 3
Enter the author of the file. This value is added to the file’s metadata and may be used
by content management systems or shown by during playback.
n
o
i
t
a
l
l
a
t
s
n
I
Author
CHAPTER 2
Enter the title of the file. This value is added to the file’s metadata and may be used
by content management systems or shown by during playback.
n
o
i
t
c
u
d
o
r
t
n
I
Title
CHAPTER 1
Attributes
Index
169
ProCoder 3
Windows Media Target
Common Options
See Common Target Options.
Windows Media-specific options
Destination
Output File Type
Select the type of file to output.
WMV file (Audio/Video)
Select this option to create a Windows Media video file with only
video or both video and audio.
WMA file (audio only)
Select this option to create a Windows Media audio file with only
audio.
Total Bitrate
Displays the total data rarte in kilobits per second for this target.
Profile
Load Profile
Click the ... button to load a profile saved using the Save as Profile option.
Save as Profile
Click the ... button to save the current settings as a profile. This is a different profile
from ProCoder’s Target Profiles and can only be loaded in the Windows Media target.
System Profiles
Click the ... button to show the System Profiles dialog. You can select a Windows
Media profile from various versions of Windows Media in the dialog.
You can load Windows Media Profiles created by sources other than ProCoder.
Set Min Packet Size
Enable this option to force the writer to create packet sizes that are larger than the
default size.
170
Target Options
Video-Basic
Click the ... button to display the Video Stream Properties dialog where you can view
the currently selected streams, add new streams, rename streams or remove streams.
s
t
n
e
t
n
o
C
Multi Bitrate Streams
CHAPTER 1
n
o
i
t
c
u
d
o
r
t
n
I
CHAPTER 2
n
o
i
t
a
l
l
a
t
s
n
I
ProCoder 3
d
r
a
z
i
W
Using ProCoder
CHAPTER 4
Helpful Hints
CHAPTER 5
ProCoder
Reference
CHAPTER 6
Glossary
CHAPTER 7
If more than one stream is defined, select the stream to view or modify from the dropdown list. The Video-Basic and Video-Advanced sections will change to reflect the
selected stream.
Encoder
Select the video encoder to use from the drop-down list.
Image Quality
The Image Quality slider sets the balance between frame rate and image quality. A
value of 0 maximizes the frame rate at the expense of image quality and a value of
100 maximizes image quality at the expense of frame rate.
CHAPTER 3
Select Video Stream
Bitrate Mode
CBR
Selects constant bitrate mode. The bitrate will correspond to the
Video Bitrate(kbps) setting. CBR mode is most useful for streaming.
Quality Based VBR
Selects Quality Based variable bitrate mode. The bitrate will vary in
order to maintain the quality specified in the VBR Quality setting.
Constrained VBR
Selects Constrained variable bitrate mode. Constrained VBR mode
varies the bitrate up to the Maximum Bitrate (kbps) setting in order
to maintain video quality.
Unconstrained VBR
Selects Unconstrained variable bitrate mode. Unconstrained VBR
mode varies the bitrate to maintain the selected video quality
without a maximum bitrate limit.
Index
Select the bitrate control mode from the drop-down list.
171
ProCoder 3
Number of Passes
Select the number of passes to use for encoding from the drop-down list. 2-pass
encoding provides better quality but takes longer to encode.
VBR Quality
Sets the quality level for encoding. Higher values result in better video quality at the
expense of larger file size. This option is only available when Quality Based VBR is
selected as the Bitrate Mode.
Maximum Bitrate (kbps)
Sets the maximum bitrate for encoding. Higher values result in better video quality at
the expense of larger file size. This option is only available when Constrained VBR is
selected as the Bitrate Mode.
Target Global Settings
Enforce Fixed Frame Rate
The Windows Media Encoder will drop frames if the image quality would be very
low otherwise or insufficient bandwidth is available. This option forces the encoder
to always encode all frames, even if the image quality becomes very low because of
this.
Flexible Frame Duration
Enable this option to allow flexible frame durations in the output. Flexible frame
duration is most useful for video with freeze-frames and pauses since it allows a static
frame to span more than one frame of output.
Transcoding by WME
When enabled, the Windows Media Encoder Engine will perform all conversions such
as frame rate conversion, sample rate conversion, etc..
This will typically result in faster encoding and sometimes better quality especially for
multi-bitrate files.
This effectively disables certain built-in aspect ration corrections perfromed by the
transcodiing engine. You will have to ensure that the source and target aspect ratio
matches.
Deinterlacing/IVT by WME
Select the built-in de-interlace, de-interlace by WME or WME's inverse telecine.
172
Target Options
Inverse Telecine Pattern
Video-Advanced
s
t
n
e
t
n
o
C
Select the inverse telecine pattern of your source video.
n
o
i
t
c
u
d
o
r
t
n
I
Sets the streaming buffer window size in thousandths of a second. A larger buffer size
results in smoother streaming but a requires longer delay before starting playback.
CHAPTER 1
Buffer Window (ms)
Seconds / Keyframe
Index
Specifies the keyframe interval in terms of the number of seconds per keyframe.
For example, if set to 10, a 30-second source will have 3 keyframes. Having more
keyframes generally results in better video quality but creates larger files when bitrate
is not constrained. When bitrate is constrained, more keyframes provides better
random access and higher fault-tolerance, but too many keyframes can reduce video
quality.
d
r
a
z
i
W
Use this control to set a custom level for the video decoder complexity setting. The
decoder complexity determines what devices can decode this stream. Please check
with your device manufacturer for proper settings.
Glossary
Video Decoder Complexity
CHAPTER 7
Sets the maximum complexity. This limits the types of systems that
can play the result.
ProCoder
Reference
Max
CHAPTER 6
Sets the minimum complexity. This allows a greater number of
systems to play the result.
Helpful Hints
Selects a complexity appropriate for offline editing and playback.
Min
CHAPTER 5
Offline
CHAPTER 4
Allow automatic selection based on the complexity of the source.
Using ProCoder
Auto
ProCoder 3
Select the video codec complexity from the drop-down list. Higher complexity
requires more processing power to encode and play back.
CHAPTER 3
Video Complexity
n
o
i
t
a
l
l
a
t
s
n
I
Sets the maximum size of the streaming buffer in thousandths of a second. This
option is only available if Constrained VBR is selected as the Bitrate Mode.
CHAPTER 2
Maximum Buffer Window (ms)
173
ProCoder 3
Audio-Basic
Multi Bitrate Streams
Click the ... button to display the Audio Stream Properties dialog where you can view
the currently selected streams, add new streams, rename streams or remove streams.
Select Audio Stream
If more than one stream is defined, select the stream to view or modify from the dropdown list. The Audio-Basic and Audio-Advanced sections will change to reflect the
selected stream.
Encoder
Select the audio encoder to use from the drop-down list.
Bitrate Mode
Select the bitrate control mode from the drop-down list.
CBR
Selects constant bitrate mode. The bitrate will correspond to the
Audio Bitrate(kbps) setting. CBR mode is most useful for streaming.
Quality Based VBR
Selects Quality Based Variable Bitrate mode. The bitrate will vary
in order to maintain the quality specified in the VBR Quality setting.
Constrained VBR
Selects Constrained variable bitrate mode. Constrained VBR mode
varies the bitrate up to the Maximum Bitrate(kbps) setting in order
to maintain audio quality.
Unconstrained VBR
Selects Unconstrained variable bitrate mode. Unconstrained VBR
mode varies the bitrate to maintain the selected audio quality
without a maximum bitrate limit.
Number of Passes
Select the number of passes to use for encoding from the drop-down list. 2-pass
encoding provides better quality but takes longer to encode.
174
Target Options
VBR Quality
d
r
a
z
i
W
Helpful Hints
ProCoder
Reference
CHAPTER 6
Glossary
CHAPTER 7
Attributes
CHAPTER 5
Sets the maximum size of the streaming buffer in thousandths of a second. This
option is only available if Constrained VBR is selected as the Bitrate Mode.
CHAPTER 4
Maximum Buffer Window (ms)
Using ProCoder
Sets the streaming buffer window size in thousandths of a second. A larger buffer size
results in smoother streaming but a requires longer delay before starting playback.
ProCoder 3
Buffer Window (ms)
Title
Enter the title of the file. This value is added to the file’s metadata and may be used
by content management systems or shown by during playback.
Author
Enter the author of the file. This value is added to the file’s metadata and may be used
by content management systems or shown by during playback.
CHAPTER 3
Audio-Advanced
n
o
i
t
a
l
l
a
t
s
n
I
Select the language setting for the current audio stream.
n
o
i
t
c
u
d
o
r
t
n
I
Language
CHAPTER 2
Sets the maximum bitrate for encoding. Higher values result in better video quality at
the expense of larger file size. This option is only available when Constrained VBR is
selected as the Bitrate Mode.
CHAPTER 1
Maximum Bitrate (kbps)
s
t
n
e
t
n
o
C
Sets the quality level for encoding. Higher values result in better video quality at the
expense of larger file size. This option is only available when Quality Based VBR is
selected as the Bitrate Mode.
Description
Index
Enter a description of the file. This value is added to the file’s metadata and may be
used by content management systems or shown by during playback.
Rating
Enter a rating for the file. This value is added to the file’s metadata and may be used
by content management systems or shown by during playback.
Copyright
Enter the copyright information for the file. This value is added to the file’s metadata
and may be used by content management systems or shown by during playback.
175
ProCoder 3
Marker Points
You can add Marker/Chapter Points by either getting marker data from the source, for
example, from an editing applications' timeline or from a QuickTime file, or you can
specify periodic markers.
Marker Interval
Adds Markers to the WindowsMedia file. A value of 0 will not add any markers, other
values indicate the interval duration in seconds. Markers will be named with numbers,
with 0 at the beginning of the stream.
Notes
Use the Multi Bitrate Streams option to add/remove/rename audio and video
streams. Use the Select Video Stream and Select Audio Stream options to configure
individual streams of a multi-stream Windows Media target.
176
Video Filters
d
r
a
z
i
W
ProCoder
Reference
Glossary
CHAPTER 7
Index
Options
CHAPTER 6
The 601 Correction - Shrink Color Space Filter shrinks video RGB values from
the full 0-255 range to the ITU-R BT 601 recommended 16-235 range. This filter is
useful when transcoding files between different systems that use different YUV-RGB
conversion methods. If you your converted file looks too much enhanced in contrast
the reason might be that the codec of your source file or the target codec are not
handling the conversion between RGB and YCbCr properly. This filter can correct this.
Helpful Hints
Description
CHAPTER 5
601 Correction - Shrink Color Space Filter
CHAPTER 4
The Canopus DV and MPEG codecs use the ITU-R BT 601 recommended range of
16-235.
Using ProCoder
Notes
ProCoder 3
There are no options.
CHAPTER 3
Options
CHAPTER 2
The 601 Correction - Expand Color Space Filter expands video RGB values from
the ITU-R BT 601 recommended 16-235 range to the full 0-255 range. This filter is
useful when transcoding files between different systems that use different YUV-RGB
conversion methods. If you feel your result is missing brilliance the reason might be
that the codec of your source file or the target codec are not handling the conversion
between RGB and YCbCr properly. This filter can correct this.
CHAPTER 1
Description
n
o
i
t
a
l
l
a
t
s
n
I
601 Correction - Expand Color Space Filter
n
o
i
t
c
u
d
o
r
t
n
I
Video Filters
s
t
n
e
t
n
o
C
3
There are no options.
Notes
The Canopus DV and MPEG codecs use the ITU-R BT 601 recommended range of
16-235.
177
ProCoder 3
601 to 709 Color Correction Filter
Description
This video filter is used to convert video in the SD (601) colorspace to the HD
(709) color space. Broadcast HD video uses YCbCr colors following Rec. ITU-R BT
709-5 where as broadcast SD video is following ITU-R BT 601. Those color spaces
are fairly close to each other so you typically will not see a difference. Because
of this, ProCoder won’t automatically perform this conversion, which maximizes
performance. For the most correct handling in the broadcasting area, however, it is
advised to use this filters when converting between HD and SD video.
Options
There are no options.
Notes
No notes.
709 to 601 Color Correction Filter
Description
This video filter is used to convert video in the HD (709) color space to SD (601)
colorspace. Broadcast HD video uses YCbCr colors following Rec. ITU-R BT 709-5
where as broadcast SD video is following ITU-R BT 601. Those color spaces are
fairly close to each other so you typically will not see a difference. Because of this,
ProCoder won automatically perform this conversion, which maximizes performance.
For the most correct handling in the broadcasting area, however, it is advised to use
this filters when converting between HD and SD video.
Options
There are no options.
Notes
No notes.
178
Video Filters
Adaptive De-Interlace
Bitmap Keying Filter
Index
Description
Glossary
If this filter is not applied, ProCoder will automatically perform deinterlacing when
necessary. Adding this filter overrides the basic deinterlacing process and allows
control of the deinterlacing settings.
CHAPTER 7
Notes
ProCoder
Reference
Adjusts the motion detection error threshold for the Adaptive Detection mode. Higher
values result in less motion detection, while lower values yield greater sensitivity to
motion.
CHAPTER 6
Threshold
Helpful Hints
Retains only information from the dominant field and discards
information from the non-dominant field.
CHAPTER 5
Discard non-dominant
field
CHAPTER 4
Overwrites the non-dominant field by interpolating from the
dominant field.
Using ProCoder
Interpolate from
dominant field
ProCoder 3
Uses motion detection to determine whether to interpolate or
discard fields.
CHAPTER 3
Adaptive
d
r
a
z
i
W
Selects the deinterlacing method to use.
n
o
i
t
a
l
l
a
t
s
n
I
Detection
CHAPTER 2
Settings
n
o
i
t
c
u
d
o
r
t
n
I
Options
CHAPTER 1
The Adaptive De-Interlace Filter is used to apply custom deinterlacing settings when
converting an interlaced source to a non-interlaced target.
s
t
n
e
t
n
o
C
Description
The Bitmap Keying Filter is used to superimpose a text or graphic overlay onto the
video. This is often used for adding station logos, copyright information and other
watermarks to video. Images can be keyed by color or using an embedded alpha
channel.
Options
Settings
Filename
Click the ... button to select a graphic file to use.
179
ProCoder 3
Configuration
Click the ... button to access the Bitmap Keying Option window.
The left image is the original image. The image at the right shows the area to be
transparent in a blue-gray color. If using the Color Key, select a color in the image
to make transparent by clicking on the left side image or by adjusting the R, G and B
sliders at the bottom and adjust the Luminance and Color tolerance sliders to achieve
the desired transparency.
If the image contains an alpha channel, enable the Alpha Channel option to use the
image’s alpha channel information to determine the transparency. Disable the Alpha
Channel option to pick a color instead of using the image’s alpha channel. Enable the
Invert Mask option to swap the transparent and opaque regions of the image.
Position
180
Top Left
Places the graphic at the top left of the video frame.
Top Center
Places the graphic horizontally centered at the top of the video
frame.
Top Right
Places the graphic at the top right of the video frame.
Left Places
the graphic vertically centered at the left of the video frame.
Center
Places the graphic at the center of the video frame.
Right Places
the graphic at the vertically centered at the right of the video frame.
Bottom Left Places
the graphic at the bottom left of the video frame.
Bottom Center Places
the graphic horizontally centered at the bottom of the video frame.
Bottom Right Places
the graphic at the bottom right of the video frame.
Video Filters
Scale
Helpful Hints
CHAPTER 5
ProCoder
Reference
CHAPTER 6
Glossary
CHAPTER 7
Settings
CHAPTER 4
Options
Using ProCoder
The Black/White Correction Filter is used to adjust the black and white levels of the
video. This is useful when converting between computer video and broadcast video.
ProCoder 3
Description
White Threshold
Adjust the slider to determine the minimum value considered to be white.
White Transition Range
Adjust the slider to determine the range of values that are transitioned to white.
Values in this range are ramped from the original value toward white. Black Threshold
CHAPTER 3
Black/White Correction Filter
d
r
a
z
i
W
No notes.
n
o
i
t
a
l
l
a
t
s
n
I
Notes
CHAPTER 2
move the image further toward the center of the video frame. A value of 100 positions
the image at the center of the frame.
n
o
i
t
c
u
d
o
r
t
n
I
Adjust the Offset slider to change the position of the keyed image. Higher values
CHAPTER 1
Offset
s
t
n
e
t
n
o
C
Adjust the Scale slider to change the size of the keyed image. Image scaling always
preserves the correct aspect ratio of the image. A value of 100 scales the image so it
fits within the video frame and fills the frame horizontally and/or vertically.
Adjust the slider to determine the minimum value considered to be white. Index
Black Transition Range
Adjust the slider to determine the range of values that are transitioned to black.
Values in this range are ramped from the original value toward black. Notes
Only black and/or white levels are adjusted. This filter does not apply a global
luminance change.
181
ProCoder 3
Blur Filter
Description
The Blur Filter is used to reduce detail. This filter applies a simple blur. Blurring can
help compression by reducing video complexity.
Options
Settings
Radius
Sets the radius of the blur. Higher values result in more blurring.
Notes
No notes.
Broadcast Color Safe Filter
Description
The Color Safe Filter restricts the color range of video to broadcast-safe colors. This is
important to ensure proper playback when producing video for broadcast.
Options
Settings
Video Standard
Select the broadcast standard to restrict the color range to. NTSC and PAL standards
have different safe color ranges.
Correction Method
Select the correction method to use out-of-range colors.
182
Reduce Luminance
Reduce the luminance of out-of-range colors to make them safe.
This option is best for footage shot by a camera.
Reduce Saturation
Reduce the saturation of out-of-range colors to make them safe.
This option is best for computer-generated and animation sources.
Video Filters
Circular Blur Filter
ProCoder
Reference
Glossary
CHAPTER 7
Brightness
CHAPTER 6
Settings
Helpful Hints
Options
CHAPTER 5
The Color Correction Filter can adjust the brightness, contrast, hue and saturation of
the video.
CHAPTER 4
Description
Using ProCoder
Color Correction Filter
ProCoder 3
No notes.
Use the slider to adjust the brightness.
Contrast
Use the slider to adjust the contrast.
CHAPTER 3
Notes
d
r
a
z
i
W
Use the slider to set the radius of the blur. Higher values result in more blurring.
n
o
i
t
a
l
l
a
t
s
n
I
Radius
CHAPTER 2
Settings
n
o
i
t
c
u
d
o
r
t
n
I
Options
CHAPTER 1
The Circular Blur Filter is used to reduce detail. This filter applies a circular blur.
Blurring can help compression by reducing video complexity.
s
t
n
e
t
n
o
C
Description
Hue
Index
Use the slider to adjust the hue.
Saturation
Use the slider to adjust the saturation.
Notes
No notes.
183
ProCoder 3
Fade In/Out Filter
Description
The Fade In/Out Filter can be used to reduce visible compression artifacts at the start
or end of the video.
Options
Settings
Fade In Select
Enable this option to apply a fade in to the video.
Fade In duration (sec)
Select the number of seconds that the fade in lasts.
Fade Out Select
Enable this option to apply a fade out to the video.
Fade Out duration (sec)
Select the number of seconds that the fade out lasts.
Notes
No notes.
Gamma Correction Filter
Description
The Gamma Correction filter adjusts video for differences between computer gamma
levels.
Options
Settings
Gamma
Use the slider to select the gamma level appropriate for your content.
Notes
No notes.
184
Video Filters
Gaussian Blur Filter
Glossary
CHAPTER 7
No notes.
ProCoder
Reference
Notes
CHAPTER 6
There are no options.
Helpful Hints
Options
CHAPTER 5
The Median Filter is designed to remove single-pixel noise from video.
CHAPTER 4
Description
Using ProCoder
Median Filter
ProCoder 3
No notes.
CHAPTER 3
Notes
d
r
a
z
i
W
Sets the radius of the blur. Higher values result in more blurring.
n
o
i
t
a
l
l
a
t
s
n
I
Blur Radius
CHAPTER 2
Settings
n
o
i
t
c
u
d
o
r
t
n
I
Options
CHAPTER 1
The Gaussian Blur Filter is used to reduce detail. This filter applies a Gaussian blur.
Blurring can help compression by reducing video complexity.
s
t
n
e
t
n
o
C
Description
Index
185
ProCoder 3
Pulldown Filter
Description
The Video Pulldown Filter is used to convert non-interlaced sources to interlaced
targets without interpolation.
The most commonly used pulldown is 3:2 pulldown, used for converting film footage
for playback on NTSC devices. DVD video is for example very often making use of
this method. When your source is 23.976 frames per second progressive and your
target is 29.97 frames per second interlaced, this filter will produce footage following
the 3:2 pulldown rule. However, pulldown might be usefull for more conversions
because it entirely avoids bluring caused by interpolation it will not modify the actual
image data of your source video but rather prepare it for playback on an interlaced
device. Occasionally, depending on your source and target frame rates, stuttering can
happen in the playback. In that case it is recommended to remove this filter and use
interpolated results which is automatically created during conversion.
Options
Field Order
Output Field Order
Select the desired output field order from the drop-down list. Set it to Auto to have
ProCoder determine the best field order for each source.
Notes
No notes.
186
Video Filters
Relative Crop Filter
n
o
i
t
a
l
l
a
t
s
n
I
d
r
a
z
i
W
Helpful Hints
CHAPTER 5
ProCoder
Reference
CHAPTER 6
Glossary
CHAPTER 7
Index
Drag the handles to define the new video frame. Grayed-out areas will be removed
from the video. Click the Full button to reset the video frame to the full frame.
CHAPTER 4
Click the ... button to display the Crop window.
Using ProCoder
Cropping Rectangle
ProCoder 3
The current cropping setting is displayed here.
CHAPTER 3
Current Setting
n
o
i
t
c
u
d
o
r
t
n
I
Cropping
CHAPTER 2
Options
CHAPTER 1
The Crop Filter is used to remove unwanted sections of video from the edgse of the
frame when encoding for computer display. Captured analog footage often has noise
or distortion at the edges of the video frame. This noise or distortion is usually unseen
as it occurs in the overscan area of the image, a portion which is displayed “beyond”
the viewable television area.
s
t
n
e
t
n
o
C
Description
Scale after Crop
Enable the Scale after Crop option to scale the cropped video frame to fill the video
frame. This will remove the cropped region and stretch the remaining video to fill the
gap, maintaining proper aspect ratio. There may be areas of black remaining if the
aspect ratio of the remaining video does not match the original video frame.
187
ProCoder 3
Constrain by Aspect Ratio
Enable the Constrain by Aspect Ratio option to restrict the cropping rectangle to the
aspect ratio of the uncropped video frame. This will ensure the remaining video will
entirely fill the frame when Scale after Crop is enabled. This option only affects the
Crop window. The Horizontal Cropping and Vertical Cropping settings are not affected
by this option.
Horizontal Cropping
Left
Sets the position in pixels of the new left edge of the video. This is also the number of
pixels removed from the left edge of the video.
Right
Sets the position in pixels of the new right edge of the video.
Right (offset)
Sets the number of pixels to remove from the right edge of the video. Adjusting this
value also changes the value of the Right setting.
Vertical Cropping
Top
Sets the position in pixels of the new top edge of the video. This is also the number of
pixels removed from the top edge of the video.
Bottom
Sets the position in pixels of the new bottom edge of the video.
Bottom (offset)
Sets the number of pixels to remove from the bottom edge of the video. Adjusting
this value also changes the value of the Bottom setting.
Notes
No notes.
188
Video Filters
Rotate Filter
Glossary
CHAPTER 7
No notes.
ProCoder
Reference
Notes
CHAPTER 6
Enable this option to rotate the video counter-clockwise by 90 degrees so the upperleft becomes the lower-left.
Helpful Hints
Rotate -90 degrees
CHAPTER 5
Enable this option to rotate the video clockwise by 90 degrees so the upper-right
becomes the lower-right.
CHAPTER 4
Rotate +90 degrees
Using ProCoder
Enable this option to flip the video vertically about a horizontally centered axis so top
becomes bottom and bottom becomes top.
ProCoder 3
Flip Vertical
CHAPTER 3
Enable this option to flip the video horizontally about a vertically centered axis so left
becomes right and right becomes left.
d
r
a
z
i
W
Flip Horizontal
CHAPTER 2
Settings
n
o
i
t
a
l
l
a
t
s
n
I
Options
n
o
i
t
c
u
d
o
r
t
n
I
dislay.
CHAPTER 1
The Video Rotate Filter can rotate and flip the video. This filter is useful for preparing
rotated video for portrait-mode display and for flipping video for rear-projection
s
t
n
e
t
n
o
C
Description
Index
189
ProCoder 3
Sharpen Filter
Description
The Video Sharpen Filter enhances fine details of the video. It is essentially the
opposite of a blur and is useful for sharpening blurry video. It can also be used as
a post-processing filter for transcoding or filter operations that unintentionally blur,
such as scaling or deinterlacing, in order to obtain sharper video results.
Options
Settings
Radius of the blur
Select the radius of the filter effect using the slider. The radius controls how wide the
edge rims. Start with smaller amounts and adjust the radius value until you achieve
an acceptable result. Amount to blend
Sets the level of detail enhancement. Larger values will make details more obvious.
Threshold for smoothness detection
Sets the threshold for detecting smooth areas. Higher values prevent detail
enhancement in smooth regions of video.
Notes
No notes.
190
Video Filters
Temporal Noise Reducer
d
r
a
z
i
W
ProCoder
Reference
CHAPTER 6
Glossary
CHAPTER 7
Index
Determines the maximum number of times a pixel can be locked beyond which all
corresponding prior information is flushed. However the pixel is still filtered with
spatial techniques.
Helpful Hints
Pixel refresh rate
CHAPTER 5
Sets the threshold for chrominance locking and also helps in pixel change detection.
Larger values allow for more shifts in color to be locked. Smaller values adversely
affects the performance of noise filtering. Generally the threshold of chrominance lock
can be higher than the threshold for luminance locking.
CHAPTER 4
Threshold for chrominance locking
Using ProCoder
Sets the threshold for luminance locking and also helps in pixel change detection.
Larger values allow large change in intensity to be locked but may cause motion
blurring. Smaller values adversely affects the per formance of noise filtering. Use
smaller values for video containing more motion and vice versa.
ProCoder 3
Threshold for luminance locking
CHAPTER 3
Use the slider to determine the chrominance blur radius. Larger value will remove
larger amount of chrominance noise. Use smaller values to maintain color sharpness.
Use zero value to completely disable chrominance blur, other video noises(impulse,
scratches, lines etc) will still be removed.
n
o
i
t
a
l
l
a
t
s
n
I
Radius of chrominance blur
CHAPTER 2
Settings
n
o
i
t
c
u
d
o
r
t
n
I
Options
CHAPTER 1
The Video Temporal Noise Reducer Filter reduces noise in video by analyzing
previous frames. This filter is recommended to clean noisy video sources such as old
analog recordings.
s
t
n
e
t
n
o
C
Description
Threshold for new scene detection
Determines the percentage of pixels in the frame that must change for the frame to be
considered a new scene. Small values may cause false scene change detection and
vice versa. For new scenes, all the pixel’s prior information is flushed, however they
are still filtered with spatial techniques.
Notes
No notes.
191
ProCoder 3
Video Inverse Telecine Filter
Description
Use this filter to inverse telecine 2-3 telecined videos.
Options
Settings
Use Inverse telecine always
Enables this option to always force usage of inverse telecine.
Maximum buffer duration
Specify the maximum buffer duration.
Telecine Pattern
Select an expected telecine pattern of the source.
Telecine Start Sequence
Expected telecine start sequence of the source.
Choose 'Automatic' to analyze and detect the sequence. If a fixed value is chosen,
cadence breaks cannot be detected.
Enable Lock-In
Enable this option to allow the filter to lock-in to a last detected telecine sequence
within lock-in duraion. If enabled, cadence breaks after the lock-in duraion cannot be
detected.
Lock-In Duration
Duration in minutes after which the last detected telecine sequence is used for the
rest of the video. Cadence breaks after this duration will not be detected.
Notes
No notes.
192
Audio Filters
Settings
Input Channels
ProCoder
Reference
Glossary
CHAPTER 7
The Audio Fade In/Out Filter can be used to fade audio in and out.
CHAPTER 6
Description
Helpful Hints
Fade In/Out Filter
CHAPTER 5
No notes.
CHAPTER 4
Notes
Using ProCoder
Specifies the number of audio channels.
ProCoder 3
Interchanges audio channels.
Options
Settings
Fade In Select
CHAPTER 3
Channel Mixer
CHAPTER 2
Options
d
r
a
z
i
W
The Channel Mixer Filter interchanges audio channels.
CHAPTER 1
Description
n
o
i
t
a
l
l
a
t
s
n
I
Channel Mixer Filter
n
o
i
t
c
u
d
o
r
t
n
I
Audio Filters
s
t
n
e
t
n
o
C
4
Enable this option to apply a fade in to the audio.
Select the number of seconds that the fade in lasts.
Index
Fade In duration (sec)
Fade Out Select
Enable this option to apply a fade out to the audio.
Fade Out duration(sec)
Select the number of seconds that the fade out lasts.
Notes
No notes.
193
ProCoder 3
Lowpass Filter
Description
The Lowpass Filter can be used to remove high-frequency noise from the audio. This
is useful when humming or buzzing is present in the audio.
Options
Settings
Cut-off Frequency (kHz)
Sets the maximum audio frequency in kilohertz for audio to be preserved. Any sounds
with a frequency higher than the selected frequency will be removed from the audio.
Notes
No notes.
Normalize Filter
Description
The Normalize Filter is used to equalize the audio volume level.
Options
Normalize Method
Audio Normalize Method
Select the method of normalizing audio.
Normalize to Mean RMS Sets the average audio level to the average volume level of all
of sources
sources. This option is useful for equalizing audio levels when
multiple sources are stitched.
Normalize Peak to
specified DB level
Adjusts the audio level so the loudest sound is occurs at the
specified decibel level.
DB Level
Normalize to DB level
Sets the decibel level to normalize the maximum peak audio level to. This option is
only available when the Audio Normalize Method is set to Normalize Peak to specified
DB level.
Notes
No notes.
194
Audio Filters
Volume Filter
d
r
a
z
i
W
Using ProCoder
CHAPTER 4
Helpful Hints
CHAPTER 5
ProCoder
Reference
CHAPTER 6
Glossary
CHAPTER 7
No notes.
ProCoder 3
Notes
CHAPTER 3
Set the volume adjustment level using the slider. A value of 1.00 leaves the volume
level unchanged. Values lower than 1.00 reduce the volume level while values greater
than 1.00 increase the volume level. 2.00 is the maximum value and represents
doubling the volume.
CHAPTER 2
Volume
n
o
i
t
a
l
l
a
t
s
n
I
Settings
CHAPTER 1
Options
n
o
i
t
c
u
d
o
r
t
n
I
The Volume Filter can be used to change the audio volume level.
s
t
n
e
t
n
o
C
Description
Index
195
ProCoder 3
5
196
ProCoder Preset Categories
Audio
MP3
PCM
DV
AVI
QuickTime
RawDV
Storage
AVI
MPEG
WM
HD
Canopus HQ
MPEG
WindowsMedia
Application Specific
Editing Software
DVD production/Authoring
MediaEdge / HDMA-4000
H.264
HD
SD
Web
Handheld
iPod
3GPP
RealMedia10
Web
Thumnails
MPEG
QuickTime
ReadMedia
WindowsMedia
CD/DVD
Computer
VCD
DVD
SVCD
Image Sequence
QT Exporter
Chapter 7
Glossary
ProCoder 3
Authoring
Refers to the process of taking your converted video files and creating a DVD,
VideoCD or Super VideoCD using a authoring software package. Authoring software
lets you do things like add chapters or menus to your disc and allows it to be played
on many set-top players or computers. Examples of authoring software include
Adobe Encore DVD, Ulead DVD Workshop, Roxio Easy CD Creator and Nero Burning
ROM.
AVI
Short for Audio Video Interleave, an early video format developed by Microsoft for
playback on Windows-based computers. AVI has been officially replaced by Windows
Media Video but is still a popular format for both DV and Disk media.
Bitrate
The measurement of the number of data bits per second in a file. Eight bits form one
byte. Video files are normally measured in thousands of bits, or kilobits per second
(kbps). The higher the bitrate, the larger the resulting file for a specified amount of
time. Generally, the higher the bitrate, the better the quality of the video.
Bitrate, Constant
A video encoding mode where each frame of video is encoded with a constant
number of bits. There can be some variation in particular frames, but the overall
average bitrate remains the same over a given time period. Constant bitrate video is
generally easier to play back than variable bitrate video because it provides a constant
flow of data.
Bitrate, 2-pass Variable
A video encoding mode where two passes are performed on the video. The first pass
analyzes the complexity of the video and the second pass encodes the video using
different bitrates depending on the results of the analysis. 2-pass variable bitrate can
produce better-looking video by reserving bits from areas of low complexity for use
in areas of higher complexity.
Codec
Short for compressor/decompressor, a codec is software that compresses video for
storage purposes and then decompresses it for playback purposes. Codecs vary in
quality - some are good for Web video while others are better for broadcast-quality
video.
198
Glossary
Data Rate
n
o
i
t
c
u
d
o
r
t
n
I
n
o
i
t
a
l
l
a
t
s
n
I
d
r
a
z
i
W
ProCoder
Reference
Glossary
CHAPTER 7
Index
Refers to the pixel size of your converted video. You’ll encounter a frame size option
when you try to create CD-ROM or HD video. For CD-ROM video, 320x240 is half
the size vertically and horizontally of full-screen video (640x480). For HD video,
resolutions are much higher so your options are 1920x1080 interlaced for 1080i, and
1280x720 for 720p.
CHAPTER 6
Frame Size
Helpful Hints
The number of video frames shown per second. In general, the higher the frame rate,
the smoother the playback.
CHAPTER 5
Frame Rate
CHAPTER 4
Popular format for storing and delivery high-quality video. DVDs use MPEG-2 video
to provide broadcast-quality playback, as well as interactivity such as menus and
chapter-points. DVDs can be played on set-top DVD players, as well as computers
with a DVD-ROM drive and appropriate software.
Using ProCoder
DVD
ProCoder 3
In general use, stands for digital video, meaning any digital representation of video.
However, more recently it refers to the Consumer DV format which is a video
compression format used in miniDV camcorders. In ProCoder, DV refers to the
Consumer DV format.
CHAPTER 3
DV
CHAPTER 2
A popular video compression method used for a wide range of purposes including
Web video and High Definition video storage and playback. DivX uses MPEG-4
technology to achieve low bitrates and small file sizes.
s
t
n
e
t
n
o
C
DivX
CHAPTER 1
The amount of data that is used in the video. Data rate is usually represented in
thousands of bits per second or kilobits per second (kbps), however, it can also
be represented in other units such as megabytes per second (MB/sec). Bitrate is a
particular measurement of data rate.
MPEG
Short for Motion Picture Experts Group, the MPEG video format was created to
provide a standard for compressing large-sized digital video files into a smaller size.
MPEG-1 was intended for video delivered on CD-ROM, but can also be used for Web
delivery. MPEG-2 is a broadcast-quality video format that is used for DVDs and digital
television.
199
ProCoder 3
MPEG-1 Elementary Streams
MPEG-1 Elementary streams carry either audio or video, but not both.
The file extensions for MPEG-1 elementary streams are .mpv or .m1v for video
elementary streams and .mpa or .m1a for audio elementary streams.
MPEG-1 System Streams
MPEG-1 System streams carry both video and audio together in a multiplexed (mixed)
arrangement where audio and video data occur together.
The file extension for MPEG-1 system streams is .mpg but elementary streams are
often named .mpg as well.
MPEG-2 Elementary Streams
MPEG-2 Elementary streams carry either audio or video, but not both. Higher-end
DVD authoring software usually requires video in MPEG-2 elementary stream format.
The file extensions for MPEG-2 elementary streams are .m2v for video elementary
streams and .m2a for audio elementary streams.
MPEG-2 Program Streams
MPEG-2 Program streams carry both video and audio together in a multiplexed (mixed)
arrangement where audio and video data occur together. Some DVD authoring
applications require MPEG-2 Program streams for input.
The file extension for MPEG-2 Program streams is .m2p but some programs use .mp2
or .mpg instead.
MPEG-2 Transport Streams
MPEG-2 Transport streams carry one or more MPEG-2 Program streams. Transport
streams include extra data to provide additional robustness and are often used for
satellite transmissions and off-air HDTV broadcasts.
The file extension for MPEG-2 Transport streams is .m2t but some programs use as
.ts or .tp instead.
MPEG-4 Streams
MPEG-4 streams can carry both video and audio as well as additional data together
in a multiplexed (mixed) arrangement. MPEG-4 is often used for low-bandwidth
video playback on handheld devices and on low-bandwidth devices such as wireless
phones.
The file extension for MPEG-4 streams is usually .mp4 but MPEG-4 streams are
sometimes “wrapped” in QuickTime or AVI files.
200
Glossary
Noise
s
t
n
e
t
n
o
C
For video, typically refers to noticeable dots, lines, or patterns that should not be in
the video. Noise is generally noticeable in poor-quality source video.
n
o
i
t
c
u
d
o
r
t
n
I
n
o
i
t
a
l
l
a
t
s
n
I
d
r
a
z
i
W
Helpful Hints
ProCoder
Reference
CHAPTER 6
Glossary
CHAPTER 7
A method of viewing video where the viewer receives enough of the video file to start
playback while it continues to receive the remainder of the video during playback.
Progressive download allows the viewer to start watching the video before it has
been fully downloaded.
CHAPTER 5
Progressive Download
CHAPTER 4
Short for Phase Alternating Lines. PAL defines a particular way a video signal can be
communicated. The PAL broadcast format is used primarilly in Asia (except Japan),
Australia and Europe. PAL signals cannot be displayed by non-PAL devices, such as
NTSC format televisions. PAL signals are displayed at 25 frames per second.
Using ProCoder
PAL
ProCoder 3
Most video output devices, such as televisions, don’t show the entire video frame
that is available. A small amount of the video’s edges is hidden and not shown.
Essentially, the video image shown is slightly smaller than the actual image being
received. The unseen edges are called the overscan area.
QuickTime
Index
Apple’s popular format for audio and video playback. QuickTime supports a variety of
additional interactivity features though they are not used often. Mac OS systems use
QuickTime as the primary video format.
CHAPTER 3
Overscan Area
CHAPTER 2
Short for North American Television Standards Committee. NTSC defines a particular
way a video signal can be communicated. The NTSC broadcast format is used
primarilly in the United States, Canada and Japan. NTSC signals cannot be displayed
by non-NTSC devices, such as PAL format televisions. NTSC signals are displayed at
29.97 frames per second.
CHAPTER 1
NTSC
RealMedia
A popular streaming video format created by RealNetworks. RealMedia files provide
varying quality video depending on the capabilities of the client machine and the
encoded video.
201
ProCoder 3
Resolution
Typically refers to the frame size, but can also refer to the density of pixels. 640x480
is generally considered full-screen for computer video players.
Source video
In ProCoder, source video refers to the source video file you are going to convert.
Streaming
The process of simultaneously receiving and viewing video. Streaming video
playback displays video as it is received, with minimal, if any delay before playback
begins. For good streaming video quality, a fast connection to the streaming server is
required.
Streaming Server
A server which stores and delivers streaming content. A streaming server is usually a
special machine running streaming server software that both stores and manages its
viewers. Examples of streaming servers include QuickTime Streaming Server, Real
Server and Windows Media Server.
Super VideoCD
A CD-based video delivery format that uses MPEG-2 compression to provide betterthan-VHS quality video playback and limited interactivity, such as menus and
chapters. Super VideoCDs are popular because they use standard CD media and can
be played in both computers as well as hardware Super VideoCD players and some
DVD players. Super VideoCD is sometimes shortened to SVCD.
Synchronization
Refers to the audio matching the video being displayed. The easiest way to check
synchronization is to make sure the dialog being spoken matches the mouth
movements of the speaker.
Target video
In ProCoder, target video refers to the video file created after you convert your source
file.
VideoCD
A CD-based video delivery format that uses MPEG-1 compression to provide nearVHS quality video playback and limited interactivity, such as menus and chapters.
VideoCDs are popular because they use standard CD media and can be played in both
computers as well as hardware VideoCD players and some DVD players. VideoCD is
sometimes shortened to VCD.
202
Glossary
VOB
n
o
i
t
a
l
l
a
t
s
n
I
ProCoder 3
CHAPTER 3
d
r
a
z
i
W
A popular video format developed by Microsoft. Windows Media Video is the
successor to the AVI format and is a common format for streaming video as well as
video archiving and delivery.
CHAPTER 2
Windows Media
n
o
i
t
c
u
d
o
r
t
n
I
A folder or directory that is monitored by ProCoder so that it can encode any files that
are placed inside it.
CHAPTER 1
Watch folder
s
t
n
e
t
n
o
C
Abbreviation for Video OBject. VOB is the native file format for DVD-Video discs. VOB
files contain the audio and video data for the DVD and may also contain additional
information, such as subtitles.
Using ProCoder
CHAPTER 4
Helpful Hints
CHAPTER 5
ProCoder
Reference
CHAPTER 6
Glossary
CHAPTER 7
Index
203
ProCoder 3
204
Index
ProCoder 3
Index
Symbols
C
601 Correction - Expand Color Space
Filter
177
601 Correction - Shrink Color Space Filter 177
601 to 709 Color Correction Filter
178
709 to 601 Color Correction Filter
178
A
AC3 Audio Source
AC3 Audio Target
Adaptive De-Interlace
Advanced Features
Advanced window
Application Settings
Assigning a Target format
Assigning Targets
Audio and video are out of sync
Audio Filters
Audio Filter Tab
Authoring
AVI
AVI Source
AVI Target
122
139
179
97
50,66
96
42
62
115
193
58,73
198
198
123
140
B
Bitmap Keying Filter
Bitrate
Bitrate, 2-pass Variable
Bitrate, Constant
Black/White Correction Filter
Blur Filter
Broadcast Color Safe Filter
206
179
198
198
198
181
182
182
Cancelling and managing jobs
81
Cannot load encoded MPEG files into DVD
authoring software
118
Channel Mixer Filter
193
Chapter Points
90
Choose Conversion Settings
28
Choosing Output Location
31
Circular Blur Filter
183
Clearing the Queue
83
Codec
198
Color Correction Filter
183
Command-line Automation
99
Common Source Options
120
Confiming Your Settings
32
Confirmation
96
Conversion Finished
35
Conversion Options tab
93
Convert a Source
25
Converting Files
34
Converting the file
44
Convert Tab
77
Create a Watch Folder
36
Creating Permanent Watch Folders
85
Creating Temporary Watch Folders
88
Customizing Advanced Settings
66
D
Data Rate
Default Target Folder Tab
DivX
Droplets
DV
DVD
199
95
199
97
199
199
Index
Loading and Saving Custom Settings 79
Loading and Saving Target profiles
79
Lowpass Filter
194
Index
L
P
PAL
PCM (WAVE) Audio Source
PCM Audio Target
Playing converted files
Poster Frame (Still Image) Target
Premiere Plug-in
Presets
Preview DVD Target
Glossary
110
14
38
201
CHAPTER 7
Improving your Video
Installing ProCoder
Other Watch Folder Options
Overscan Area
ProCoder
Reference
I
O
CHAPTER 6
126
147
127
149
201
194
201
Helpful Hints
Noise
Normalize Filter
NTSC
H
H.264 Source
H.264 Target
HDV(m2t) Source
HDV Target
N
CHAPTER 5
184
185
CHAPTER 4
Gamma Correction Filter
Gaussian Blur Filter
Using ProCoder
G
ProCoder3
184,193
125
145
199
199
CHAPTER 3
Fade In/Out Filter
Flash Source
Flash Target
Frame Rate
Frame Size
CHAPTER 2
F
d
r
a
z
i
W
104
82
108
185
64
129
150
199
200
200
200
200
200
200
129
151
n
o
i
t
a
l
l
a
t
s
n
I
EDIUS Plug-in
Managing Jobs
Maximizing ProCoder performance
Median Filter
Modifying Targets
MP3 Audio Source
MP3 Audio Target
MPEG
MPEG-1 Elementary Streams
MPEG-1 System Streams
MPEG-2 Elementary Streams
MPEG-2 Program Streams
MPEG-2 Transport Streams
MPEG-4 Streams
MPEG Source
MPEG Target
CHAPTER 1
E
M
n
o
i
t
c
u
d
o
r
t
n
I
124
123
143
s
t
n
e
t
n
o
C
DVD (VIDEO TS.IFO) Source
DV Source
DV Target
201
131
156
78
157
101
79
158
207
ProCoder 3
Processing Options tab
Profiles
Progressive Download
Pulldown Filter
89
79
201
186
Q
Queue Manager
QuickStart
QuickTime
QuickTime Export Target
QuickTime Source
QuickTime Target
80
40
201
160
131
161
R
RawDV Source
Raw DV Target
RealMedia
RealMedia Target
Relative Crop Filter
Removing Permanent Watch Folders
Resolution
Rotate Filter
132
165
201
166
187
88
202
189
S
Selecting Generic Targets
Settings
Sharpen Filter
Source Options
Source Properties
Source Tab
Source video
Speed Encoder
Still Image Source
Streaming
Streaming Server
Super VideoCD
208
30
96
190
120
45
45
202
10
132
202
202
202
Synchronization
202
T
Target Options
Target Tab
Target video
Temporal Noise Reducer
Transcoding Settings
135
62
202
191
89
U
Uninstalling ProCoder
Using Filters
Using ProCoder 3 Wizard
20
109
24
V
Video appears fuzzy or blurry
111
Video appears stretched or squashed 117
Video appears to jitter
113
VideoCD
202
Video Filters
177
Video Filter tab
52,68
Video has halos or blocks near objects113
Video Inverse Telecine Filter
192
Video is blocky or appears to break up 110
Video movement appears jumpy
114
Video shows strange patterns or blocks 116
VOB
203
Volume Filter
195
W
Watch Folder
When to apply filters
Why filters are necessary
Windows Media
84,203
109
109
203
Index
s
t
n
e
t
n
o
C
CHAPTER 1
n
o
i
t
c
u
d
o
r
t
n
I
CHAPTER 2
n
o
i
t
a
l
l
a
t
s
n
I
ProCoder3
CHAPTER 3
d
r
a
z
i
W
134
170
Windows Media Source
Windows Media Target
Using ProCoder
CHAPTER 4
Helpful Hints
CHAPTER 5
ProCoder
Reference
CHAPTER 6
Glossary
CHAPTER 7
Index
209
ProCoder 3
210