1
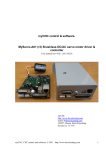
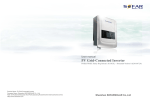
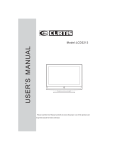
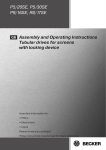
4CH Real Time DVR User Guide INFORMATION MAY CHANGE WITHOUT NOTICE. Digital Video Recorder 4CH Real Time DVR Table of Contents Caution ........................................................................................................... 4 Package Contents ......................................................................................... 4 Introduction.................................................................................................... 5 1. Product Overview........................................................................................5 2. Front Panel...................................................................................................5 3. Rear Panel....................................................................................................6 4. IR Remote Controller (Optional) ................................................................7 Installation...................................................................................................... 8 1. Install the disk drives..................................................................................8 1.1. Install the internal IDE disk drives ....................................................8 1.2. Install the internal disk drives (SATA interface)(Optional).............8 2. USB connector on rear panel.....................................................................9 3. Camera connections .................................................................................10 4. Video Format Selection ............................................................................11 5. Cablings .....................................................................................................11 6. Sensor Installation ....................................................................................12 7. Alarm Installation ......................................................................................12 Start up the DVR System ............................................................................ 13 1. Starting the System...................................................................................13 2. Main Menu..................................................................................................14 2.1. Video loss..........................................................................................15 2.2. Can Not Find HDD ............................................................................15 2.3. Split View...........................................................................................15 2.4. Mouse Operating ..............................................................................16 2.5. Log In.................................................................................................16 3. Setup ..........................................................................................................16 3.1. System...............................................................................................17 3.2. Camera ..............................................................................................20 3.3. REC Schedule ...................................................................................23 3.4. Account .............................................................................................25 3.5. Backup...............................................................................................26 3.6. Log Out..............................................................................................26 4. Search Operating ......................................................................................27 4.1. Time Search ......................................................................................27 4.2. Preview Search .................................................................................28 4.3. Event Search.....................................................................................29 Digital Video Recorder 2 4CH Real Time DVR 5. Easy Search ...............................................................................................30 6. PTZ Setup...................................................................................................31 DVR Player ................................................................................................... 32 Digital Video Recorder 3 4CH Real Time DVR Caution z z z z z z z z z For your safety, unplugging the power before moving the DVR, installing, or replacing any parts or hard drive. Make sure all the power cable and wires are properly set up before using the DVR. To avoid a short circuit, don’t leave any unnecessary parts inside the DVR. Please avoid dramatic changes of the environment, such as dust, temperature, and humidity. Keep the DVR in a temperature ranging from 5℃~40℃. Keep the DVR in a well-ventilated place and away from any heat-generating objects. Do not block the DVR’s fan and vent. Do not expose this unit to the sun directly. If you are not sure of the installation and setup, please consult the technicians. Don’t fix it yourself if there’s any damage to this unit or the power supply, Consult the technician or the distributor. Package Contents z z z z z z DVR Main unit x 1 Power Adapter x 1 AC Power Cord x 1 CD x1 (including of Manual, DVR Player / Embedded Player Software) Mouse x 1 IR Remote Controller x 1 (Optional) If there is any damage, shortage or inappropriate item in the package, please contact with your local dealer. Digital Video Recorder 4 4CH Real Time DVR Introduction 1. Product Overview ♦ 4ch real time MJPEG DVR with superior compact size. ♦ Multiple functions: display, monitor, playback, file backup and recording. ¾ Video Loss Detection, Watch Dog, Day-Saving function. ¾ Motion detection with adjustable sensitivity and area ¾ Alarm / Sensor ♦ Multiple and flexible operation control by mouse and IR remote controller(Optional) ♦ Support Video out x1, Direct VGA outputx1 and Spot Monitor x1(Optional) ♦ Password Protection ♦ P/T/Z control via RS485 ♦ Easy Backup via USB device ♦ S/W upgradeable via USB device ♦ Embedded Player for PC Data Viewer ♦ DVR Player for HDD data viewer ♦ Multi-lingual OSD supports 2. Front Panel NO Name Function 1 POWER The DVR unit is powered up and running. (Green color) 2 HDD ACTIVE LED indicator flashes at hard disk is acting (Red color) 3 4 USB IR Receiver Digital Video Recorder Connects PC for firmware upgrading/USB backup IR Control receiver (Refer to IR Remote Controller) 5 4CH Real Time DVR 3. Rear Panel No. 1 Function MOUSE (dedicated Only for Mouse Connection, must connect at the beginning of Power On) 2 AUDIO-OUT 3 AUDIO-IN 4 Spot Monitor (Optional) 5 VIDEO OUT (Monitor) 6 VIDEO IN (BNC) 7 General Purpose I/O for SENSOR/ALARM/RS485 8 VGA Display Connector (DB-9) 9 DC-IN (12V) Digital Video Recorder 6 4CH Real Time DVR 4. IR Remote Controller (Optional) No Button / Name Function 1 REC 2 z DVR N/A 3 z PTZ N/A 4 WW REW Backward search 5 STOP Stop playback 6 II PAUSE Pause playback. 7 XX FF Forward search 8 ► PLAY Enter『Time Search』for video playback 9 MENU Enter menu or exit. 10 ▲(UP)/ ▼(DOWN)/ Moves up/down/left/right through the list of menus. Start or stop recording / manual recording W (LEFT)/ ►(RIGHT) 11 (Enter/Select) Use this button to change or confirm values on main menu or sub menu setting. 12 13 4 AUTO MODE Press AUTO button to start screen auto sequence. Display screen by sequence: CH1-CH2-CH3-CH4-4 split 14 - ZOOM OUT N/A 15 + ZOOM IN N/A 16 1,2,3,4 (Channels) Channels Selector (CH1~CH4 on DVR) Digital Video Recorder 7 4CH Real Time DVR Installation Be sure there is no power connection before starting installation! 1. Install the disk drives 1.1. Install the internal IDE disk drives Step1: Unscrew three screws on DVR’s rear panel. Then slide backward the chassis’s top cover and move it upward. Step2: There is one set HDD bracket inside the chassis. Fix two screws each side of HDD into the HDD bracket. Setp3: Put the chassis’s cover back 1.2. Install the internal disk drives (SATA interface)(Optional) It needs an IDE to SATA Bridge (Optional) to transfer IDE interface into SATA before starting to install the hard disk, Step 1: Place the IDE to SATA Bridge into DVR main unit. Unscrew three screws on DVR’s rear panel. Then slide backward the chassis’s top cover and move it upward. Step 2: Place the IDE to SATA Bridge lodge in DVR main board as following: Digital Video Recorder 8 4CH Real Time DVR Step 3: Make sure the jumpers on IDE to SATA bridge (JS2): P2,4-short have been set Step 4: Install the HDD to fix two screws each side of HDD into the HDD bracket. Then, Put the chassis’s cover back. 2. USB connector on rear panel USB connector on rear panel is dedicated for USB mouse using. Do not connect to any other USB device except the mouse. Digital Video Recorder 9 4CH Real Time DVR 3. Camera connections There are four channels for cameras’ connections named CH1, CH2, CH3 and CH4. Each camera has two wirings basically: BNC and Power. Connect the BNC cable to DVR’s “VIDEO-IN” connector on rear panel for video signals and connect the power cable to the camera’s power adapter. The Dome camera has one more RS485 wiring for activity control. At first, please refer to the next section for setting JS1 selection to RS485 (default is RS232) Please refer to the following figure and connect to DVR’s “RS485 connectors” (Two pines) on rear panel for controls signal Digital Video Recorder 10 4CH Real Time DVR 4. Video Format Selection The DVR accepts two video formats: NTSC and PAL. It can be select by setting the jumper on the main control board. 5. Cablings Before starting to use, you have to connect all the peripherals like LCD display, cameras … as following figure: Digital Video Recorder 11 4CH Real Time DVR 6. Sensor Installation The DVR unit can be connected up to 4 sensor inputs as following figure. Each set of sensor has two lines: signal and ground in order to sense the sensor’s status. 7. Alarm Installation The DVR unit provides one alarm (speaker) signal. Please connect the alarm system as following figure. Digital Video Recorder 12 4CH Real Time DVR Start up the DVR System 1. Starting the System After the unit is properly installed, the DVR unit is ready to record and play. Then apply power by turn on the power switch. After the unit is powered on, the unit will check system status for several seconds including of HDD and mouse. NOTE: Connect the mouse before turn on the power switch! If there is no HDD connected, it will show error message as following. Digital Video Recorder 13 4CH Real Time DVR 2. Main Menu After completed the system checking, 4ch DVR will enter into real-time display mode shown as the following screen: 1. Setup: Setup allows users access DVR for system setup functions. 2. Search: Search allows users access to search by time or event 3. Easy Search: Easy Search allows user access to the easy (quick) search. 4. PTZ: Display PTZ camera control 5. Screen Rotation: Channel rotation.(refer to system/device setup/ sequence time) 6. Alarm Output: Operates Alarm control on/off 7. Recording Mode: Displays recording schedule mode. 8. HDD Capacity: Displays total amount of recorded video. 9. Date/Time: Displays current date and time. 10. Channel: Video channel and channel name. Digital Video Recorder 14 4CH Real Time DVR 2.1. Video loss If the display shows “VIDEO LOSS”, it means there is no video signal input at the channel. Please make sure the video cable and camera are well installed. 2.2. Can Not Find HDD If the display shows “CANNOT FIND HDD” at first beginning when start the DVR. It means there is no HDD inside the DVR and no data will be recorded whatever which record mode has been setting and shown on screen. 2.3. Split View The DVR system can display up to 4 cameras simultaneously on screen. To displays a single channel at full screen by using the mouse click at idea channel or click again to back to four channels at 4 split view. Digital Video Recorder 15 4CH Real Time DVR 2.4. Mouse Operating 2.5. Log In To Log In at first entry, default is no password at first beginning 3. Setup Set up the DVR system, camera and recording status …etc. Digital Video Recorder 16 4CH Real Time DVR 3.1. System Set up the system, such as date, time, HDD and firmware / player upgrade …etc. Press 『CLOSE』to exist the menu Press 『FACTORY DEFAYLT』to recover DVR configuration as factory defaults. After press 『FACTORY DEFAYLT』, you have to log in again for setup 3.1.1. Date/Time Setup “DATE FORMAT” –To display the date/time format on state information by DD/MM/YYYY, MM/DD/YYYY or YYYY/MM/DD. (YYYY-Year, MM-Month, DD-Day). After completed the setup, press『OK』for confirmation. Digital Video Recorder 17 4CH Real Time DVR 3.1.2. HDD Management Provide HDD information. “V” means HDD is available. “FORMAT” – Proceed HDD formatting and it will delete all data in HDD. 3.1.3. Firmware Upgrade Plug the USB disk into USB port on DVR front panel Then, Press 『UPGRADE』to update or upgrade the DVR firmware Digital Video Recorder 18 4CH Real Time DVR 3.1.4. Player Upgrade Embedded Player will help you to convert the video data which you want Backup as an executed file to play on PC without special software There is a program (Please refer to CD): Embedded Player.ply Save the program and plug the USB disk into USB port on DVR front panel to install Embedded Player into DVR. 3.1.5. Device Setup “SENSOR TYPE”:NO: Normal Open, NC: Normal Close “ALARM LINK”:ON- Alarm when the chosen Sensor been triggered OFF- No Alarm for Sensor trigger “ALARM TYPE”:NO: Normal Open, NC: Normal Close “ALARM TIME”:To set the alarm beep time period from 1~60sec “BUZZER”:ON- Enable, OFF- Disable. Buzzer acts when 『Video loss』 or 『motion』and beep as 『Key Tone』or 『Alarm』 “SCREEN”:Adjust the display screen (only for Monitor) “VGA”:Adjust the VGA display resolution “SEQUENCE TIME”:Set up the time period of screen rotation. Digital Video Recorder 19 4CH Real Time DVR 3.1.6. Log Information Display all log information 3.1.7. Language Multi-Language: English, Traditional Chinese, Simple Chinese and Korea. 3.1.8. Version It shows DVR firmware version. 3.1.9. Factory Default Set all DVR configuration as factory default. All Logs will be deleted. 3.2. Camera To set up each camera (each channel) the color adjustment, motion and PTZ … etc To select Camera (Channel) by move mouse to the idea channel (for example, choose ch2 it will turn to light-blue color as following figure) and click , it will change to CH2 Digital Video Recorder 20 4CH Real Time DVR 3.2.1. Channel Name To update/change the channel name for each channel. . 3.2.2. Color Adjust To adjust the video brightness, contrast, saturation and hue. 3.2.3. Motion Adjust To set up the motion sensitivity / sensing duration and detected cell. Digital Video Recorder 21 4CH Real Time DVR Motion cell setting To enable / disable motion cell for each channel by move mouse and click on the picture at left side of screen. “MOTION ALL”:Enable all area as motion detection “MOTION DEL”:Disable all area as motion detection Digital Video Recorder 22 4CH Real Time DVR 3.2.4. PTZ Setup To setup the PTZ camera features as following: “PROTOCAL”:Set up the protocol of PTZ camera as Pelco_D or Pelco_P “CAMERA ID”:Set up the ID of PTZ camera “BAUDRATE”:Set up the baud rate as 4800, 9600, 19200, 38400 “PAN SPEED”:Set up the Pan speed “TILT SPEED”:Set up the Tilt speed “COMMAND DELAY”:Set command delay time from 1~30se “TEST”:Test the PTZ action 3.3. REC Schedule 3.3.1. Resolution / Frame / Quality Setup To setup the resolution / recording frame (fps) / quality for each channel Resolution: 704x240 or 352x240 Frame (Frame Rate / fps): 30,15,10,7,6,5,4,3,2,1,0 Quality (Recording quality): Highest, High, Normal, Low, Lowest Digital Video Recorder 23 4CH Real Time DVR 3.3.2. Audio “ON”:Enable audio function “OFF”:Disable audio function 3.3.3. Advance Advanced setting of recording schedule “ALARM RELATION”: Setup the each channel when sensor trigger. “TIME”: Set alarm time period “PTZ PRESET”: Setup the PTZ Preset for sensor trigger “MOTION RELATION”: Setup the each channel when motion trigger. “TIME”: Set alarm time period “PTZ PRESET”: Setup the PTZ Preset for motion trigger 3.3.4. Recording schedule setting Schedule Setting: Holiday, All, Sun, Mon, Tue, Wed, Thu, Fri, Sat “ALL”: Setup all days (from Monday to Sunday) as the recording schedule. “SUN, MON, TUE, WED, THU, FRI, SAT”: Setup each day separately (from Monday to Sunday) as the recording schedule. Digital Video Recorder 24 4CH Real Time DVR “HOLIDAYS”: You can set up to 20days as holiday. Press『HOLIDAYS』to enable the holiday recording schedule. Press『ADD』or 『DEL』to add or delete the holiday date. If “Holidays” has been set, the day will record as the setting and no matter with what setting at All, Sun, Mon, Tue, Wed, Thu, Fri or Sat does. “HDD OVERWRITE”: ON–Enable HDD overwrite, OFF-Disable HDD overwrite 3.4. Account Change the password or add new user. Digital Video Recorder Default user is ADMIN and no password. 25 4CH Real Time DVR Manage the authority items for new user: 3.5. Backup To backup the data into USB by setting the time period and choose which camera (channel), it will show the choosing data capacity (as shown at right figure). Then, press “OK” to start the backup 3.6. Log Out Press “Log Out” to logout the existing user. Digital Video Recorder 26 4CH Real Time DVR 4. Search Operating The search operation provides access to time and event, preview search. 4.1. Time Search The playback timeline is used to select a day and time to begin playback. Time periods containing recorded video are represented as color-coded segments of the timeline. 1. Selected the date/time 2. Selected hour 3. Selected minute 4. Selected second 5. Search at Normal recording mode 6. Search at Motion detection recording mode 7. Search at Alarm recording mode 8. End time for recorded video 9. Start time for recorded video Digital Video Recorder 27 4CH Real Time DVR Press “OK”, then display the recorded video data as searching. 1. System setup (refer to page16) 2. Back to Live recording mode (it will exist Search mode) 3. Easy Search (refer to page 29) 4. PTZ Setup (refer to 5. Backup by USB (refer to page 29) 6. Playback buttons (refer to page 29) 7. PTZ control (refer to 4.2. Preview Search View the recorded data by time frame (setting the “DATE”, view by every hour or every minute at each channel) “No data”: There is no recorded data, for example – no motion/alarm trigger. Digital Video Recorder 28 4CH Real Time DVR 4.3. Event Search 1. Selected the Begin date/time 2. Selected the Begin date/time 3. Search at Normal recording mode for event search 4. Search at Motion detection recording mode for event search 5. Event List 6. Page UP / Page Down Digital Video Recorder 29 4CH Real Time DVR 5. Easy Search View and playback for search video recorded data “IW”: Pause backward play “W”: Move backward play, speed < 1.0, 2.0, 4.0, 8.0, 16.0, 32.0, 64.0 “”: Pause forward/backward play “X”: Move forward play, speed > 1.0, 2.0, 4.0, 8.0, 16.0, 32.0, 64.0 “XI”: Pause forward play ”: Backup by USB “ ♦ Plug the USB disk into USB port on DVR front panel ♦ Press “Pause”, Then press “ ♦ After completed the backup, it shows ♦ It will backup each channel as a jpg file under [Backup] directory, If the channel ” to start backup is no recording, it will no jpg file for backup. Digital Video Recorder 30 4CH Real Time DVR 6. PTZ Setup Operate speed done camera. 1. Start PTZ function (Speed dome control) 2. Move Video Area (W:Turn Left, S:Move Up, T:Move Down, X:Turn Right) 3. Room In (Z+) and Zoom Out(Z-) 4. Focus Adjustment 5. Preset setting Digital Video Recorder 31 4CH Real Time DVR DVR Player DVR Player will help you to play the video data on PC (Windows Environment) Please refer to the CD attached, then run “DVR Player” to playback the DVR video data. Then, click the icon “” : z Backup - to open backup file for playing z Physical – to open disk (HDD disk) which connect to PC for playing Digital Video Recorder 32