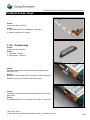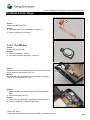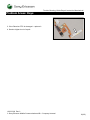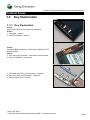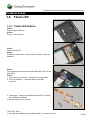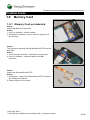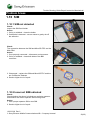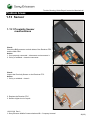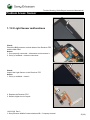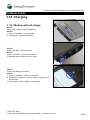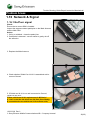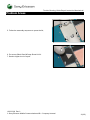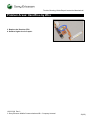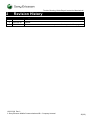
1
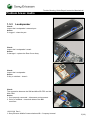
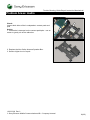
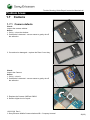
Troubleshooting Guide
- mechanical -
X10i, X10a, SO-01B
1230-2326 Rev 3
© Sony Ericsson Mobile Communications AB – Company Internal
Trouble Shooting Guide Repair Instruction Mechanical/
CONTENTS
1 Problem Areas ................................................................................ 4 1.1 Power...................................................................................................... 4 1.1.1 Will not power on or will switch off randomly ........................................... 4 1.2 Keys ........................................................................................................ 6 1.2.1 1.2.2 1.2.3 1.2.4 Menu Home Back Keys ............................................................................... 6 Camera key .................................................................................................. 7 On/Off key .................................................................................................... 8 Volume key ................................................................................................... 9 1.3 Key Illumination................................................................................... 11 1.3.1 1.3.2 Key Illumination ......................................................................................... 11 Notification ................................................................................................. 12 1.4 Display.................................................................................................. 13 1.4.1 1.4.2 Graphics & Illumination ............................................................................ 13 Touch Screen malfunction........................................................................ 13 1.5 Audio .................................................................................................... 15 1.5.1 1.5.2 1.5.3 Microphone ................................................................................................ 15 Ear Speaker ................................................................................................ 16 Loudspeaker .............................................................................................. 17 1.6 Vibrator................................................................................................. 19 1.6.1 Vibrator not generating alerts .................................................................. 19 1.7 Camera ................................................................................................. 20 1.7.1 Camera defects .......................................................................................... 20 1.8 Flash LED ............................................................................................. 21 1.8.1 Flash LED defects ..................................................................................... 21 1.9 Memory Card ....................................................................................... 22 1.9.1 Memory Card not detected ....................................................................... 22 1.10 SIM ........................................................................................................ 23 1.10.1 SIM not detected ........................................................................................ 23 1.10.2 Incorrect SIM indicated ............................................................................. 23 1.11 Bluetooth, W-LAN, GPS ...................................................................... 24 1.11.1 Bluetooth, W-LAN, GPS malfunctions ..................................................... 24 1.12 Accelerometer ..................................................................................... 25 1.12.1 Accelerometer test fails ............................................................................ 25 1.13 Sensor .................................................................................................. 26 1.13.1 Proximity Sensor maulfunctions .............................................................. 26 1.13.2 Light Sensor malfunctions ....................................................................... 27 1.14 Real Time Clock................................................................................... 28 1.14.1 Real Time Clock test fails ......................................................................... 28 1.15 Charging............................................................................................... 29 1.15.1 Battery will not charge .............................................................................. 29 1.16 Network & Signal ................................................................................. 30 1.16.1 No/Poor signal ........................................................................................... 30 1230-2326 Rev 3
© Sony Ericsson Mobile Communications AB – Company Internal
2(35)
Trouble Shooting Guide Repair Instruction Mechanical/
1.17 HandsFree by Wire .............................................................................. 32 1.17.1 Connection to Portable HandsFree fails.................................................. 32 1.18 Data Communication .......................................................................... 34 1.18.1 Data transfer via Micro USB Connector fails .......................................... 34 2 Revision History ........................................................................... 35 1230-2326 Rev 3
© Sony Ericsson Mobile Communications AB – Company Internal
3(35)
Trouble Shooting Guide Repair Instruction Mechanical/
1
Problem Areas
1.1
Power
1.1.1 Will not power on or will switch
off randomly
Check:
Check whether the phone vibrates and the Keyboard
illuminates after the power key is depressed
Action:
If activation of the Vibrator and the Main Key illuminates is
detected, refer to section 1.4 ‘Display’.
Check:
Inspect the contact pads on the Battery
Action:
1. If dirty or oxidized – clean the pads.
2. If damaged – replace the Battery.
Check:
Inspect the Battery Connector
Action:
1. If dirty or oxidized – clean the connector.
2. If adhesive is detected on the contact pins, use an eraser
to gently rub off the adhesive.
3. If damaged –send to higher level of repair.
Check:
Inspect the Key On/Off
Action:
1. If dirty or oxidized – clean it.
2. If damaged – replace it.
1230-2326 Rev 3
© Sony Ericsson Mobile Communications AB – Company Internal
4(35)
Trouble Shooting Guide Repair Instruction Mechanical/
Problem Areas: Power
Check:
Check the connection between the Key On/Off (a) and the
dome sheet on the Receiver FPC (b).
Action:
Reinstall the Key On/Off (a) to ensure the key is properly
located on the Receiver FPC (b).
Check:
1. Check the BtB connector of Receiver FPC to the Main
PBA
2. Inspect the Receiver FPC
Action:
1. If the BtB connector is not properly connected –
disconnect and reconnect it.
2. If dirty or oxidized – clean the BtB connector.
3. If the Receiver FPC is damaged – replace it.
4. Send to higher level of repair.
1230-2326 Rev 3
© Sony Ericsson Mobile Communications AB – Company Internal
5(35)
Trouble Shooting Guide Repair Instruction Mechanical/
Problem Areas
1.2
Keys
1.2.1 Menu Home Back Keys
Check:
Inspect the Key Main
Action:
1. If clogged – clean it.
2. If damaged – replace it.
Check:
Check the connection between the Key Main and the Main
Key FPC.
Action:
Reinstall the Key Main to ensure the key is properly located
on the Main Key FPC.
Check:
Check the connection between the Main Key FPC and the
Main PBA
Action:
If the BtB connector is not properly connected – reconnect it.
1230-2326 Rev 3
© Sony Ericsson Mobile Communications AB – Company Internal
6(35)
Trouble Shooting Guide Repair Instruction Mechanical/
Problem Areas: Keys
Check:
Inspect the Main Key FPC
Action:
1. If the Main Key FPC is damaged – replace it.
2. Send to higher level of repair.
1.2.2 Camera key
Check:
Inspect the Key Camera
Action:
1. If clogged – clean it.
2. If damaged – replace it.
Check:
Check the connection between the Key Camera and the
Main Key FPC.
Action:
Reconnect and reinstall the Key Camera to ensure the Key
Camera is properly located on the dome sheet.
Check:
Check the connection between the Main Key FPC and the
Main PBA
Action:
If the BtB connector is not properly connected – reconnect it.
1230-2326 Rev 3
© Sony Ericsson Mobile Communications AB – Company Internal
7(35)
Trouble Shooting Guide Repair Instruction Mechanical/
Problem Areas: Keys
Check:
Inspect the Main Key FPC
Action:
1. If the Main Key FPC is damaged – replace it.
2. Send to higher level of repair.
1.2.3 On/Off key
Check:
Inspect the Key On/Off
Action:
1. If dirty or oxidized – clean it.
2. If the Key On/Off is damaged – replace it.
Check:
Check the connection between the Key On/Off (a) and the
dome sheet on the Receiver FPC (b).
Action:
Reinstall the Key On/Off (a) to ensure the key is properly
located on the Receiver FPC (b).
Check:
1. Check the BtB connector of Receiver FPC to the Main
PBA
2. Inspect the Receiver FPC
Action:
1. If not properly connected – disconnect and reconnect it.
2. If dirty or oxidized – clean the connector.
1230-2326 Rev 3
© Sony Ericsson Mobile Communications AB – Company Internal
8(35)
Trouble Shooting Guide Repair Instruction Mechanical/
Problem Areas: Keys
3. If the Receiver FPC is damaged – replace it.
4. Send to higher level of repair.
1.2.4 Volume key
Check:
Inspect the Key Volume
Action:
If damaged – replace it.
Check:
Check the connection between the Key Volume (a) and the
Receiver FPC (b).
Action:
Reinstall the Key Volume (a) to ensure the key is properly
located on the Receiver FPC (b).
Check:
1. Check the BtB connector of Receiver FPC to the Main
PBA.
2. Inspect the Receiver FPC
Action:
1. If not properly connected – disconnect and reconnect it.
2. If dirty or oxidized – clean the connector.
1230-2326 Rev 3
© Sony Ericsson Mobile Communications AB – Company Internal
9(35)
Trouble Shooting Guide Repair Instruction Mechanical/
Problem Areas: Keys
3. If the Receiver FPC is damaged – replace it.
4. Send to higher level of repair.
1230-2326 Rev 3
© Sony Ericsson Mobile Communications AB – Company Internal
10(35)
Trouble Shooting Guide Repair Instruction Mechanical/
Problem Areas
1.3
Key Illumination
1.3.1 Key Illumination
Check:
Inspect the LED from the outside of the phone
Action:
1. If clogged – clean it.
2. If dirty or oxidized – clean it.
Check:
Check the BtB connectors on both side of Main Key FPC
and Main PBA
Action:
1. If not properly connected – disconnect and reconnect.
2. If dirty or oxidized – clean them.
3. If the Main Key FPC (a) is damaged – replace it
4. If the Key Main (b) is damaged – replace it.
5. Send to higher level of repair.
1230-2326 Rev 3
© Sony Ericsson Mobile Communications AB – Company Internal
11(35)
Trouble Shooting Guide Repair Instruction Mechanical/
Problem Areas: Key Illumination
1.3.2 Notification
Check:
Inspect the Notification LED from the outside of the phone
Action:
If dirty or oxidized – clean it.
Check:
Inspect the Notification LED on the Receiver FPC
Action:
If dirty or oxidized – clean it.
Check:
Check the BtB connector on both sides of the Receiver FPC
and the Main PBA
Action:
1. If not properly connected – disconnect and reconnect it.
2. If dirty or oxidized – clean the connectors.
2. Replace the Receiver FPC.
3. Send to higher level of repair.
1230-2326 Rev 3
© Sony Ericsson Mobile Communications AB – Company Internal
12(35)
Trouble Shooting Guide Repair Instruction Mechanical/
Problem Areas
1.4
Display
1.4.1 Graphics & Illumination
Check:
Check whether the phone vibrates and the Keyboard
illuminates after the power key is depressed
Action:
If activation of the Vibrator and the Keyboard illumination is
not detected, refer to section 1.1 ‘Power’.
Check:
The connection between Display and Main PBA
Action:
1. If not properly connected – disconnect and reconnect.
2. If dirty or oxidized – clean both sides of the BtB
connector.
3. If the Display is damaged – replace the Display and the
Adhesive Frame Sub Assembly.
4. Send to higher level of repair.
1.4.2 Touch Screen malfunction
Remove Extra Screen Protector attached on Front Cover
assy first if have before checking!
Check:
Check the BtB connectors on both sides on Front Cover
Assy and Main PBA
Action:
1. If not properly connected – disconnect and reconnect.
2. If dirty or oxidized – clean it.
1230-2326 Rev 3
© Sony Ericsson Mobile Communications AB – Company Internal
13(35)
Trouble Shooting Guide Repair Instruction Mechanical/
Problem Areas: Display
Remove Extra Screen Protector attached on Front Cover
assy first if have before checking!
Check:
Inspect the Front Cover Assy.
Action:
1. If damaged – replace it.
2. Send to higher level of repair.
1230-2326 Rev 3
© Sony Ericsson Mobile Communications AB – Company Internal
14(35)
Trouble Shooting Guide Repair Instruction Mechanical/
Problem Areas
1.5
Audio
1.5.1 Microphone
Check:
Inspect the Microphone‘s external from outside
Action:
If clogged – clean the port.
Check:
Inspect the Microphone‘s external port
Action:
If dirty or oxidized – clean it.
Check:
Inspect the Microphone‘s mash
Action:
If damaged – replace the Rear Cover Assy.
Check:
Inspect the Microphone on the Main PBA
Action:
1. If dirty or oxidized – clean it.
2. Send to higher level of repair.
1230-2326 Rev 3
© Sony Ericsson Mobile Communications AB – Company Internal
15(35)
Trouble Shooting Guide Repair Instruction Mechanical/
Problem Areas: Audio
1.5.2 Ear Speaker
Check:
Inspect the Ear Speaker‘s external port
Action:
If clogged – clean it.
Check:
Check the connection between the Receiver FPC and the
Main PBA
Action:
1. If the BtB connectors are dirty or oxidized – clean them.
2. Replace the Receiver FPC.
3. Send to higher level of repair.
1230-2326 Rev 3
© Sony Ericsson Mobile Communications AB – Company Internal
16(35)
Trouble Shooting Guide Repair Instruction Mechanical/
Problem Areas: Audio
1.5.3
Loudspeaker
Check:
Inspect the Loudspeaker’s external port
Action:
If clogged – clean the port.
Check:
Inspect the Loudspeaker’s mash
Action:
If damaged – replace the Rear Cover Assy.
Check:
Inspect the Loudspeaker
Action:
If dirty or oxidized – clean it.
Check:
The connection between the SIM and MicroSD FPC and the
Main PBA
Action:
1. If not properly connected – disconnect and reconnect.
2. If dirty or oxidized – clean both sides of the BtB
connector.
1230-2326 Rev 3
© Sony Ericsson Mobile Communications AB – Company Internal
17(35)
Trouble Shooting Guide Repair Instruction Mechanical/
Problem Areas: Audio
Check:
Inspect both sides of the Loudspeaker‘s contact pads and
pins
Action:
1. If adhesive is detected on the contact pads/pins - use an
eraser to gently rub off the adhesive.
2. Replace the Non-Celler Antenna Speaker Box.
3. Send to higher level of repair.
1230-2326 Rev 3
© Sony Ericsson Mobile Communications AB – Company Internal
18(35)
Trouble Shooting Guide Repair Instruction Mechanical/
Problem Areas
1.6
Vibrator
1.6.1 Vibrator not generating alerts
Action:
Send to higher level of repair
1230-2326 Rev 3
© Sony Ericsson Mobile Communications AB – Company Internal
19(35)
Trouble Shooting Guide Repair Instruction Mechanical/
Problem Areas
1.7
Camera
1.7.1 Camera defects
Check:
Inspect the camera window
Action:
1. If dirty – clean the window.
2. If adhesive is detected - use an eraser to gently rub off
the adhesive.
3. If scratched or damaged – replace the Rear Cover Assy.
Check:
Inspect the Camera
Action:
1. If dirty – clean it.
2. If adhesive is detected - use an eraser to gently rub off
the adhesive.
3. Replace the Camera 8 MPixel CMOS.
4. Send to higher level of repair.
1230-2326 Rev 3
© Sony Ericsson Mobile Communications AB – Company Internal
20(35)
Trouble Shooting Guide Repair Instruction Mechanical/
Problem Areas
1.8
Flash LED
1.8.1 Flash LED defects
Check:
Inspect Flash LED lens
Action:
If dirty – clean it gently.
Check:
Inspect Flash LED
Action:
If adhesive is detected - use an eraser to gently rub off the
adhesive.
Check:
The connection between the SIM and MicroSD FPC and the
Main PBA
Action:
1. If not properly connected – disconnect and reconnect.
2. If dirty or oxidized – clean both sides of the BtB
connector.
3. If damaged – replace the SIM and MicroSD FPC and the
two Conductive Gaskets.
4. Send to higher level of repair.
1230-2326 Rev 3
© Sony Ericsson Mobile Communications AB – Company Internal
21(35)
Trouble Shooting Guide Repair Instruction Mechanical/
Problem Areas
1.9
Memory Card
1.9.1 Memory Card not detected
Check:
Inspect the Memory Card holder
Action:
1. If dirty or oxidized – clean the holder
2. If adhesive is detected - use an eraser to gently rub off
the adhesive.
Check:
The connection between the SIM and MicroSD FPC and the
Main PBA
Action:
1. If not properly connected – disconnect and reconnect.
2. If dirty or oxidized – clean both sides of the BtB
connector.
Check:
Inspect the SIM and MicroSD FPC
Action:
1. If damaged – replace the SIM and MicroSD FPC and the
two Conductive Gaskets.
2. Send to higher level of repair.
1230-2326 Rev 3
© Sony Ericsson Mobile Communications AB – Company Internal
22(35)
Trouble Shooting Guide Repair Instruction Mechanical/
Problem Areas
1.10 SIM
1.10.1 SIM not detected
Check:
Inspect the SIM Card holder
Action:
1. If dirty or oxidized – clean the holder
2. If adhesive is detected - use an eraser to gently rub off
the adhesive.
Check:
The connection between the SIM and MicroSD FPC and the
Main PBA
Action:
1. If not properly connected – disconnect and reconnect.
2. If dirty or oxidized – clean both sides of the BtB
connector.
3. If damaged – replace the SIM and MicroSD FPC and the
two Conductive Gaskets.
4. Send to higher level of repair.
1.10.2 Incorrect SIM indicated
Check:
Check whether the phone is locked to a particular operator
and whether the correct operator SIM is being used
Action:
1. Use a proper operator SIM or test SIM
2. Send to higher level of repair
1230-2326 Rev 3
© Sony Ericsson Mobile Communications AB – Company Internal
23(35)
Trouble Shooting Guide Repair Instruction Mechanical/
Problem Areas
1.11 Bluetooth, W-LAN, GPS
1.11.1 Bluetooth, W-LAN, GPS
malfunctions
Action:
Send to higher level of repair
1230-2326 Rev 3
© Sony Ericsson Mobile Communications AB – Company Internal
24(35)
Trouble Shooting Guide Repair Instruction Mechanical/
Problem Areas
1.12 Accelerometer
1.12.1 Accelerometer test fails
Action:
Send to higher level of repair
1230-2326 Rev 3
© Sony Ericsson Mobile Communications AB – Company Internal
25(35)
Trouble Shooting Guide Repair Instruction Mechanical/
Problem Areas
1.13 Sensor
1.13.1 Proximity Sensor
maulfunctions
Check:
Check the BtB connector on both sides of the Receiver FPC
and the Main PBA
Action:
1. If not properly connected – disconnect and reconnect it.
2. If dirty or oxidized – clean the connector.
Check:
Inspect the Proximity Sensor on the Receiver FPC
Action:
1. If dirty or oxidized – clean it.
2. Replace the Receiver FPC.
3. Send to higher level of repair.
1230-2326 Rev 3
© Sony Ericsson Mobile Communications AB – Company Internal
26(35)
Trouble Shooting Guide Repair Instruction Mechanical/
Problem Areas: Sensor
1.13.2 Light Sensor malfunctions
Check:
Check the BtB connector on both sides of the Receiver FPC
and the Main PBA
Action:
1. If not properly connected – disconnect and reconnect it.
2. If dirty or oxidized – clean the connector.
Check:
Inspect the Light Sensor on the Receiver FPC
Action:
1. If dirty or oxidized – clean it.
2. Replace the Receiver FPC.
3. Send to higher level of repair.
1230-2326 Rev 3
© Sony Ericsson Mobile Communications AB – Company Internal
27(35)
Trouble Shooting Guide Repair Instruction Mechanical/
Problem Areas
1.14 Real Time Clock
1.14.1 Real Time Clock test fails
Action:
Send to higher level of repair
1230-2326 Rev 3
© Sony Ericsson Mobile Communications AB – Company Internal
28(35)
Trouble Shooting Guide Repair Instruction Mechanical/
Problem Areas
1.15 Charging
1.15.1 Battery will not charge
Check:
Inspect the contact pads of the Battery
Action:
1. If dirty or oxidized – clean the pad.
2. If damaged – replace the Battery.
Check:
Inspect the Micro USB connector
Action:
If dirty or oxidized – clean the connector.
If damaged-send to higher level of repair.
Check:
Inspect the Battery Connector
Action:
1. If dirty or oxidized – clean the connector.
2. If adhesive is detected - use an eraser to gently rub off
the adhesive.
3. If damaged – send to higher level of repair.
1230-2326 Rev 3
© Sony Ericsson Mobile Communications AB – Company Internal
29(35)
Trouble Shooting Guide Repair Instruction Mechanical/
Problem Areas
1.16 Network & Signal
1.16.1 No/Poor signal
Check:
Ensure that a correct SIM is installed
Inspect the antenna contact pads/pins on the Main Antenna
and the Main PBA
Action:
1. If dirty or oxidized – clean the pads/ pins.
2. If adhesive is detected - use an eraser to gently rub off
the adhesive.
3. Replace the Main Antenna.
4. Check whether Shield Can Lid A1 is assembled well to
connect Ground.
5. If Shield can lid A1 is not well connected to Ground,
replace a new one!
Follow shield can lid A1 replacement in WI firmly!
A. can’t reuse the old shield can lid after disassembly;
B .assemble the new shield can lid from Down side;
1230-2326 Rev 3
© Sony Ericsson Mobile Communications AB – Company Internal
30(35)
Trouble Shooting Guide Repair Instruction Mechanical/
Problem Areas
5. Follow the assembly sequence to press the lid;
6. Put a new Shield Can MComp Sheet Lid A1.
7. Send to higher level of repair
1230-2326 Rev 3
© Sony Ericsson Mobile Communications AB – Company Internal
31(35)
Trouble Shooting Guide Repair Instruction Mechanical/
Problem Areas
1.17 HandsFree by Wire
1.17.1 Connection to Portable
HandsFree fails
Check:
Inspect the Audio Jack Connector
Action:
If dirty or oxidized – clean the connector.
Check:
Check the contact between the Audio Jack Connector and
Receiver FPC
Action:
1. If adhesive is detected - use an eraser to gently rub off
the adhesive.
2. If the Audio Jack Connector is damaged – replace it.
Check:
Check the BtB connector on both sides of the Receiver FPC
and the Main PBA
Action:
1. If not properly connected – disconnect and reconnect it.
2. If dirty or oxidized – clean the connector.
1230-2326 Rev 3
© Sony Ericsson Mobile Communications AB – Company Internal
32(35)
Trouble Shooting Guide Repair Instruction Mechanical/
Problem Areas: HandFree by Wire
3. Replace the Receiver FPC.
4. Send to higher level of repair.
1230-2326 Rev 3
© Sony Ericsson Mobile Communications AB – Company Internal
33(35)
Trouble Shooting Guide Repair Instruction Mechanical/
Problem Areas
1.18 Data Communication
1.18.1 Data transfer via Micro USB
Connector fails
Make sure the settings parameter is correct firstly!
Drag the Status Bar menu downwards->USB connected>Mount is selected.
Check:
Inspect the Micro USB connector
Action:
1. If dirty or oxidized – clean the connector
2. If damaged—Send to higher level of repair
1230-2326 Rev 3
© Sony Ericsson Mobile Communications AB – Company Internal
34(35)
Trouble Shooting Guide Repair Instruction Mechanical/
2
Rev.
1
2
3
Revision History
Date
2010-Mar-25
2010-04-20
2010-05-31
Changes / Comments
Initial release
updated
Add some comments about extra screen protector for chapter 1.4.2 on page13.
1230-2326 Rev 3
© Sony Ericsson Mobile Communications AB – Company Internal
35(35)