1
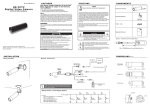
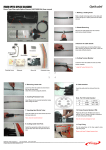
Installation Manual
Fibrain Optical Clouser
PC-ES-2024
Aplications:
PC-ES-2024 type of fiber closure is a fiber optic cable splice of multiple purposes, which can
connect and protect cables. The fiber closures are suitable for protecting fiber cable splices in
straight-through and branching applications. It can be placed in underground, aerial, wallmounting, pedestal or direct buried, hand hole-mounting and duct-mounting applications. We
always aim to the R&D of communication equipment. Our fiber closures can improve the
operation of your network communication system. Closure is suitable for the applications up to 240
single fibers, which can cover most of the applications in the long-distance transmission and local
fiber distribution networks, like Fiber To The Home / Fiber To The Curb (FTTH/FTTC). It can be applied
to areas such as underground, aerial, pedestal or direct buried.
Specifications:
Type
Size(mm)
ф×H
Quantity of the
Single Max.
Capacity (core) splice tray
The diameter of the
suitable optic cable
PC-ES-2024
260x465
240
1-10
ф 6-ф17.5(ф23)mm
Weight kg
Entrances
Airproof type
Material
Reinforced core
5.45
7
Heat Shrink
ABS, PC
Steel wire
Main technical data:
! Environment temperature: -40C +55C.
! Max. capacity: 240 cores( using single core fiber).
! Range of the suitable diameter of the cable: ф6mm - ф17.5 ф23mm.
! Airproof performance: Airing pressure inside box 100Kpa pointer immovability after 24 hours or
no air bell within 15min when parked in the common temperature water.
! Re-encapsulation performance: no change in the index of air-proof performance after three
times of repeat encapsulation.
! Insulation resistance: ≥ 2 X 10⁴MΩ
! Voltage-resistance strength under the effect of 15kvDC/1min , non-puncture, no arc-over.
1
.
Installation Manual
Fibrain Optical Clouser
PC-ES-2024
Structure and Components:
Accessories - Main components:
No.
Name
Quantity
Marks
Height × Diameter 465×ф260 (mm)
1.
Cover
1 piece
2.
Fiber splice tray
1 set
3.
Base
1 set
Fixing internal and external structures
4.
Plastic hoop
1 set
Fixing bottom and cover
5.
Seal fitting
1 piece
Waterproof and sealing
6.
Bilateral entwined tray
1 set
The fibers reserved to be entwined
7.
Earthing device
1 set
Deriving metal parts of fiber cables in closure for earthing.
Accessories and tools:
No.
Name
Quantity
Application
1.
Heat Shrinkable sleeve
1 piece
Fiber fusion and protection
2.
Nylon tie
16 piece
Fixing fiber with protective coat
3.
Pole hoop
1 set
Fixing for closure on pole
4.
Labeling paper
1 piece
Fiber labeling
5.
Insulating tape
1 piece
6.
PVC transparent hose
1 piece
(30mm)
Protect fiber
2
.
Installation Manual
Fibrain Optical Clouser
PC-ES-2024
Optional Accessories:
No.
Name
Quantity
Application
1.
Heat shrink tube
6 pieces Optic cable heat shrink and sealing
ф30×150
(mm)
2.
Dual heat shrink tube
Dual optic cable heat shrink and sealing
1 piece
ф75×150
(mm)
3.
Pressure testing valve
1 set
Testing after closure sealed
4.
Silver tape
1 set
Fiber protection
5.
Sand paper
1 set
Cleaning
6.
Branching clip
1 set
Branching optic cables
Installation flow chart:
Open the closure
Determine the length of fiber cable
to be fixed and stripped inside.
Strip off protective coats of fiber
cable and fiber.
Splice fibers.
Install heat shrinking protective
sleeve and house fibers.
Check up thoroughly.
Separate fiber cores and prepare
work before fixing fiber cable.
Assemble closures and fix closures.
Fix reinforced core and fiber cable
heat shrink/seal.
3
.
Installation Manual
Fibrain Optical Clouser
PC-ES-2024
Direction:
1. Preparation
! Please check the cable structure and the fiber type before starting installation. Different types
of fibers can’t be spliced together.
! Seal the splicing part perfectly to minimize damages to the cable caused by moisture. Don’t
apply any impact to the splicing part.
! Keep the working place free from moisture and dust. Don’t give any impact on the cables.
Don’t bend or entwine cables.
! During the sheath stripping and the closure assembling procedures, use permitted tools
according to the approved fiber optic splicing standard in your region.
2. Cable installation
! Mark the cutting point on the cable, the length of stripping being about 180cm.
! Remove the unnecessary cable sheath from the marked point with a sheath stripper.
!
Note 1. Be sure not to damage the fiber.
Note 2. Do not use any damaged cable.
Note 3. While remove the cable sheath, please do not cut, twist or damage fiber coat. Reserve
enough length to ensure repair and maintenance in case an accident happened.
Cut off the extra reinforced core about 5cm from the removing point on the sheath.
3. Installation of fiber closure
! Check the specified type and all the accessories of the fiber
closure.
! Open the fiber closure. Unlade the locked device on plastic
hoop, open plastic hoop in order to separate the cover and
bottom.
Note. Because the sealing performance is predominant,
please be careful when separating the cover and bottom
so as not to damage the case. Check the specified type
and all the accessories of the fiber closure.
! Insert cable into fiber closure.
- Select the appropriate cable inlet ports and cut less than
5mm from the applicable ports with a saw or other suitable
tools.
- Insert the removed cable into the heat shrink tube first ,
then into the inlet port
- Fix the reinforced core and fiber cable
a. Place the reinforced core plug in the device of fixing
reinforced core, then tighten the bolts using a
screwdriver or a wrench.
b. Fix the cable on the bracket with compact device
Note: Be careful not to damage the fiber
4
.
Installation Manual
Fibrain Optical Clouser
PC-ES-2024
3. Installation of fiber closure
! Insert cable into fiber closure.
- Rub and clean the inlet ports and the cable with a piece
of sandpaper to allow the sealing adhesives inside the
heat shrink tube to be attached to each side around.
- Wrap 10cm long cable with silver tape to protect cable
inlet sheath (6cm long cable was covered by heat shrink
tube).
- Heating heat shrink tube. Push the heat shrink tube up to
the cable inlet port and heat the tube but not let the fire
close to the inlet port. (When using dual type heat shrink
tube, inset the metal branching clip as the figure shown
before heating.).
Note. When heating the tube, heat the tube around the
cable equally.
- Distribution, protection and fix of the fibers. Distribute the
fiber according to require, and then let the fiber through
the PVC transparent hose and fixed at entrance of fiber
tray by nylon tie.
- Splices fibers and coil surplus fibers. Fusion and splice fibers
and coil surplus fibers on bracket using an approved
splicing method, then cover the splice tray cover after
splice fibers.
- Assembling the closure. After install of cables, put sealing
loop on case, then place the dome shaped cover onto
the bottom portion. Fasten the dome shaped cover and
the bottom portion together with a plastic hoop.
- Fiber testing and sealing test. It’s possible to test after the
closure are pressurized, and it’s possible to protect optic
cables with earthing device (Pressure testing valve is
optional).
- Fix the fiber closure
a. Fix the hanger on the concrete pole with the M10 560
screw, then tighten the nut.
b. Fix the body of the fiber closure and tighten the nut.
Note:
Using the six small cable inlet ports, the diameter of the cable
should not be more than φ17.5mm, if the big port, it should not
be. more than φ23mm.
5
.