1
DMX OPERATION
8
DMX MODES
The MX-1 has 3 DMX modes to choose from: a 1-channel mode that provides
control of the built-in stand-alone features, a 6-channel mode that provides
position control of all effects plus speed control of the mirror, and an “extended”
7-channel mode that in addition provides speed control of the effect wheel.
To select DMX mode
1 Disconnect the fixture from power. Set DIP-switch pin 10 to OFF.
2 To select 1-channel DMX mode, set DIP-switch pin 11 to ON.
3 To select 6-channel DMX mode, set DIP-switch pin 11 to OFF. Verify that the
6/7 ch. jumper is set for 6 channels. This is the factory configuration. See
“Setting the 6/7-ch. DMX jumper” on page 19.
4 To select 7-channel DMX mode, set DIP-switch pin 11 to OFF. Set the 6/7 ch.
jumper for 7 channels as described on page 19.
DMX ADDRESS
DIP-switch pins 1-9 are used to set the control address. The address, also known
as the start channel, is the first channel used to receive instructions from the
controller.
For independent control, each fixture must be assigned its own address and nonoverlapping control channels. Two MX-1s may share the same address only if
they are to respond identically: they will receive the same instructions and
individual control will not be possible.
To select DMX address
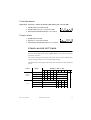
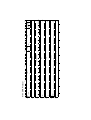
1 Select an address for the fixture on your controller. Look up the DIP-switch
setting for the address in the DIP-switch settings table below.
2 Disconnect the fixture from power.
3 Set pins 1 through 9 to the ON (1) or OFF (0) position as listed in the table.
MX-1 user manual
DMX operation
15