1
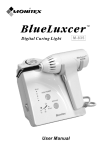
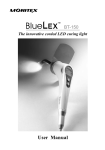
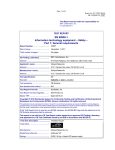
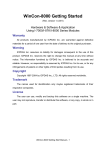
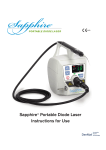
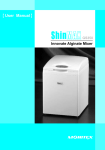
Turboson
SP-500
Ultrasonic Scaler
USER MANUAL
Contents
Preface
1
Disclaimer
2
Components and Accessories
3
Installation
5
Cleaning & Maintenance
6
Instruction for Use
7
Troubleshooting Guide
8
Technical specifications
9
Preface
Thank you for purchasing Turboson piezomatic ultrasonic scaler.
Turboson is designed for high efficiency for perio debridement with its easy charging capability, Turboson can remove the
stubborn old calculus from coronal, as well as the sulcular and
pocket epithelium in root epithelial or debris scaling with maximum
frequency.
Prior to using this equipment, please read this USER MANUAL
carefully and follow the maintenance to enable the function to be
fully implemented.
Please store this USER MANUAL in a safe place after reading.
No further advice will be issued shall any of the further modifications
be made in the future.
The Turboson is for dental use only! Turboson may only be used
by licenced doctor/Dentist with proper awareness of the standard
operating procedure in accordance to this manual.
Please Contact your local agent / distributor for furthur assist of
trouble shooting when problems occured. Any attempt of repairing
this product by unauthorized people is not allowed.
1
Disclaimer
1. We shall not assume any responsibility if any malfunction,
damage, or accident of personal body injury is caused by the
improper removal, maintenance, modification, or repair
conducted by unauthorized dealer.
2. We shall not assume any responsibility if any malfunction,
damage, or accident of personal body injury is caused by the
use of the product not provided by us.
3. We shall not assume any responsibility if any malfunction,
damage, or accident of personal body injury is caused by the
improper removal, modification, maintenance, or repair
using the parts not provided by us.
4. We shall not assume any responsibility if any malfunction,
damage, or accident of personal body injury is caused by the
improper operation incompliant with this manual.
5. We shall not assume any responsibility if any malfunction,
damage, or accident of personal injure is caused by the
surrounding environment incompliant with the installation
environment and operating conditions specified on this manual.
6. We shall not assume any responsibility if any malfunction,
damage, or accident of personal injure is caused by fire
disaster, earthquake, flood, struck by lightning or any
unpredicable natural calamity.
2
Components and Accessories
1. Control for power adjustment
2. Control for water flow adjustment
3. LEDs for operating indicator
4. On/Off power switch
3
Components and Accessories
TA1
TA2
TC
Tip
Torque Wrench
Handpiece
Tip Holder
Handpiece Cord
Water supply hose coupling
Power adapter connection
Footswitch cord connection
Footswitch
Power Adapter
4
Water Hose
T - Connecter
Installation
In order to install Turboson, the following connection is needed.
- An electrical supply of DC 24V.
- Water supply with a source pressure between 0.1 ~ 0.2 Mpa.
Connect to water supply
- Connect the water hose to a cold water supply using T shape
connector.
- Connect the coupler of the hose to the socket at the back of the unit.
Important:
If the unit is connect to the public water directly, please check
the public pressure of water supply before installation. The
internal device of this unit might be damaged if the water
pressure exceed the required specification of water supply
pressure. Please see page 9.
Connect to foot switch
- Connect the round plug of the foot switch to the socket at the
back of the unit.
Connection of the handpiece
- Screw the tip onto the handpiece.
- Tighten the tip by using the torque wrench.
- Connect the handpiece on its cord and place it on its holder.
Connection to the electricity supply
- WARRING : Always use the correct voltage of power
supply.
- A supply of DC 24V is available.
5
Cleaning & Maintenance
Handpiece Cord
The cord can be cleaned with a cloth soaked in the common
non-abrasive mild cleaning liquids containing alcohol.
Dry the handpiece connector with compressed air blow before
connecting the handpiece.
Tip & Handpiece
Tip & Handpiece can be sterilized in autoclave at 135 ℃ for 3 minutes
without protective package or for 30 minutes in a protective package.
*Caution - Tip & handpiece can be damaged by dropping on the floor.
- Do not clean the handpiece in an ultrasonic cleaner.
- Do not use chemical solvents, abrasive cleaner.
- Tips must be sterilized in autoclave before using.
Tip Holder
The torque wrench can be cleaned with a cloth soaked in any of the
common non-abrasive mild cleaning liquids containing alcohol.
Torque Wrench
The torque wrench can be cleaned with a cloth soaked in the
common non-abrasive mild cleaning liquids containing alcohol.
Transformer
The casing of transformer can be cleaned with a cloth soaked in any
of the common non-abrasive mild cleaning liquids containing alcohol.
External Casing
The casing of the Turboson can be cleaned with a cloth soaked in any
of the common non-abrasive mild cleaning liquids containing alcohol.
6
Instruction for Use
When the connections are completed as indicated in “Installation”,
you may use the device adhering to the following instruction.
1. Tip shall be sterilized before use or reuse after autoclave.
2. Use to prevent infection or injured especially transporting the tips.
3. Select the suitable tip for using
*Caution - Hand and finger can be injured by the sharp edge of
the tip.
4. By pressing the “POWER” button on the unit, it will switch the unit
ON/OFF as needed.
5. Select the level of power which is suitable to the desired treatment
by turning the “VOLUME” knob located on the unit.
6. Regulate the flow of water which is suitable to the desired
treatment by turning the “WATER” knob located on the unit with
the footswitch pressing.
*Caution - In case of using without water supply, handpiece
and tip will get overheated.
- To preventing bio-contamination, Tips & Handpiece
must be sterilized in autoclave before using.
7. The handpiece does not have heating effect. A fine spray is
sufficient to cool the point of friction between the tip and the
tooth.
7
Troubleshooting Guide
The unit does not switch ON when the “POWER” switch is pressed.
1. The power cord is not completely connected to power source or wall
electric socket, or else to the socket at the rear of the main unit.
Answer: Connect the power cord securely.
2. Apparatus is supplied with a different voltage power to the one prescribed.
Answer: Check the value of the applied voltage power supply
corresponds to that indicated on the identification label on the bottom
of the unit.
The unit is switch ON but does not work.
1. The plug of footswitch cord is not connected or not completely
connected to its socket at the rear of the unit.
Answer: Connect the footswitch cord securely.
Insufficient power/vibration.
1. Tip is not properly fastened onto handpiece.
Answer: Unscrew the tip and screw again completely.
2. Tip is distorted.
Answer: Replace with a new one.
3. Tip is worn out.
Answer: Replace with a new one.
The handpiece whistle.
1. Tip is not properly fastened onto handpiece.
Answer: Unscrew the tip and screw again completely.
Water is not coming out of the tip.
1. Water control situated in front of the unit is closed.
Answer: Turn the "WATER" knob located on the unit.
2. The water supply hose is not connected or not completely
connected to the coupling at the back of the unit.
Answer: Connect the water supply hose securely.
3. Tip has not been fastened correctly onto handpiece.
Answer: Unscrew the tip and screw again completely.
4. Tip is distorted.
Answer: Replace with a new one.
8
5. Tip is worn out.
Answer: Replace with a new one.
6. Handpiece is not connected to its cord.
Answer: Connect the handpiece to the cord securely.
7. Break in handpiece wire and current leakage through patient.
Answer: Switch OFF the power switch and disconnect
transformer from the AC power source wall outlet. Contact
the local dealer or our company for service.
8. Breakage of handpiece.
Answer: Replace with a new one.
Technical specifications
Dimension: 18 (L) x 14.5 (W) x 6.5 (H) cm
Weight: 607 g
2
Water supply pressure: 1~5 kg/cm (1~5 bar, 15~72 psi)
Frequency: 28 k Hz + 3 k Hz
SWITCHING POWER ADAPTER
Input: AC 100~240V, 50/60Hz, 0.5A
Output: DC 24V, 1A
Weight: 175g
COMPLY SAFETY STANDARDS: UL / CUL / PSE / E241618
JQE10968 / GS / EN60950
EMI / CE / FCC
Conditions for use: 10℃ ~ 40℃, 30% ~ 75% relative humidity
Storage and transport conditions: -10℃ ~ 40℃
10% ~ 95% relative humidity
500 hpa ~ 1060 hpa
9
INDUSTRIAL CO., LTD
6F, 70 GUANG-FU ROAD SEC. 1,
SAN-CHONG CITY, TAIPEI, TAIWAN
TEL : 886-2-29993869 FAX: 886-2-29993647
E-mail : [email protected]
http://www.monitex.com.tw
Copyright© 2010 MONITEX Industrial CO., LTD. All Rights Reserved. 2010.12 (Ver. 1)